In this article we going to describe “tmux” which is also known as terminal multiplexer. It allows multiple terminal sessions to be retrieved concurrently in a single window. It is useful for running more than one command-line program at the same time.
NOTE: “The main objective of publishing the series of “Linux for pentester” is to introduce the circumstances and any kind of hurdles that can be faced by any pentester while solving CTF challenges or OSCP labs which are based on Linux privilege escalations. Here we do not criticizing any kind of misconfiguration that a network or system administrator does for providing higher permissions on any programs/binaries/files & etc.”
Table of content
Introduction to tmux
· What is tmux
· How to use tmux
· tmux framework
· tmux commands
What is tmux: tmux also known as terminal multiplexer which creates a host server on your Linode and connects to it with a client window. If the client is disconnected, the server keeps running and as you reconnect to your Linode after rebooting your computer, you can reattach to the tmux session and the files you were working with will still be open.
In other word we can also say that this is a tool by the help of which we can open multiple windows and split views (called “panes” in tmux lingo) within one terminal window.
How to use tmux: Alike others tmux also supports many commands to perform its function. Now we will describe each of its major operations one by one.
It can be attained by entering a key combination called the prefix and then typing a letter. There are many letters that are assigned to tmux for performing its task.
tmux framework: The entire operations that a tmux does can be easily understand by its hierarchical structure as shown below.

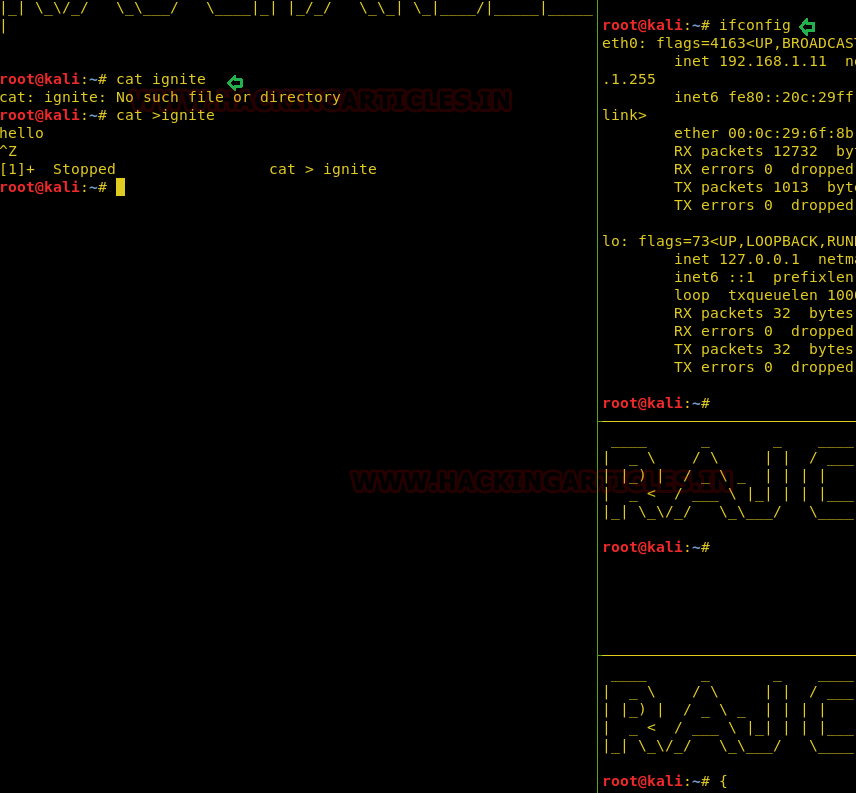
tmux commands: There are list of command that can help while working with tmux. Here in this article we are running the major operation that can be performed by the help of tmux.
Very first we will start from its help command. For this we need to write “--help” on our kali terminal as shown below.
tmux --help
The tmux operations are categorized into 3 selection which I have described above in its framework. So now we will start from first step i.e “sessions”
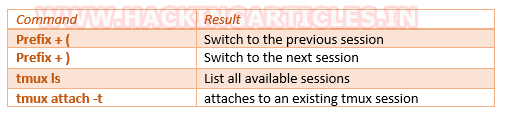
Operate tmux Sessions: Sometimes even multiple windows and panes aren’t enough and you need to separate the layouts logically by grouping them into separate sessions.
Sessions are useful for completely separating work environments.
There are many operations for the session using tmux which is shown in below image but I’m describing few of them.
· Create new session: To create new session we will frame command as shown in below image.
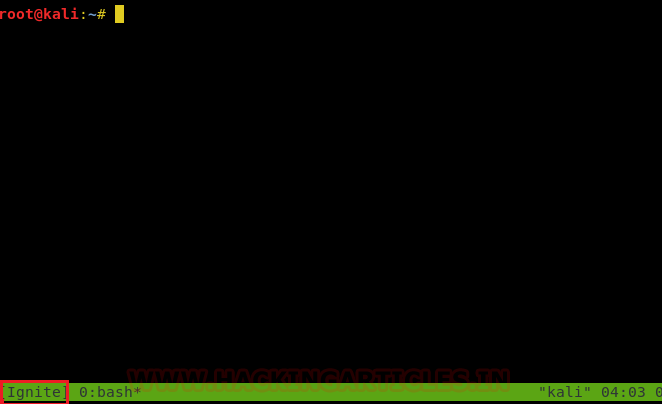
tmux new -s Ignite
In the above command “-s” is used as argument for new session and “Ignite” is the name of new session that I want to create.

On framing above command tmux will create a new session by the name of Ignite which will highlight at the bottom of terminal. Similarly, one can create multiple session by different name as per need.
· To list all created session: once we have done with creating all session as per desire then we can check it by command as:
tmux list-session
This will list all session as output that have been created. In below image tmux has listed all session which I have created by following the same procedure as above.

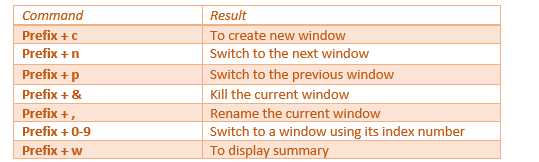
Operate tmux Window: When a tmux session starts, a single window is fashioned by default but tmux also supports a utility to attach multiple windows to the same session and we can switch between them as needed. This can be supportive when you want to run numerous jobs in parallel.
Apart from creating multiple window it also possesses many operations like rename any window, switch between window and many others.
At initial phase it shows “0:bash*” by default in which 0 represents the index value of window bash is the window name which can be rename as per need * denotes the working location and when we create new window tmux highlights all window at the bottom of terminal.
Note: We know that working of tmux is done with joining prefix with any letter as per requirement. Find the below table to understand it clearly.
In this article I have created 5 windows as shown in below image. We know that working of tmux is done with joining prefix with any letter as per requirement.
· Create new window: For creating new window we will use “-c” with prefix (ctrl-b).
Prefix (ctrl-b) +c
This will create new window. You can use same procedure for creating multiple window as below image.

· Rename window: by default, tmux mention the window name as “bash” but we can also change it as per our wish. Here I’m renaming my last window as shown below.
Prefix (ctrl-b) + ,

· To switch window: we can also switch within multiple window that helps to provide platform of working parallel. It can be done in many ways.

· To display summary: To see the entire summary for whatever we have done till now we will use tmux option as:
Prefix (ctrl-b) + w

Operate tmux Panes: By the help of tmux we can divide each window into multiple panes. This is useful when you want outputs from multiple processes visible within a single window.
In this we have many options such as divide window into vertical, horizontal, rotating panes, switching to different panes. Now we will check each of this one by one.
Note: use below table for your reference
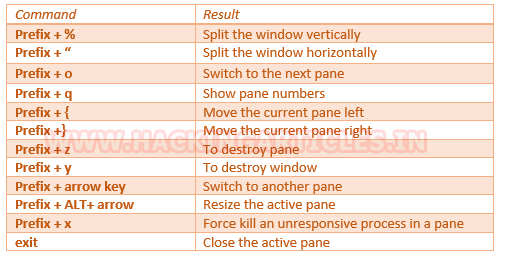
Here I have divided my window into 2 panes vertically by the command as:
Prefix (ctrl-b) + %

In below image I have further sub-divide my window horizontally.
Prefix (ctrl-b) + “
Suppose we have multiple panes containing some of information in each and we want to rotate our panes if we desire. Then will follow step as:
Prefix (ctrl-b) + {
On framing above command tmux will simply move the current pane to left.
SUID Lab setups for privilege Escalation
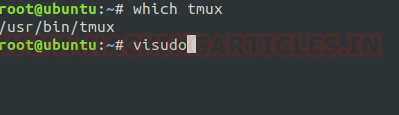
Set User ID is a type of permission that allows users to execute a file with the permissions of a specified user. Now we will start to perform privilege escalation for “tmux”. For doing so we need to set up our lab of tmux command with administrative rights. After that we will check for the “tmux command” that what effect it has after getting sudo rights.
After that we will give SUID permission on tmux, so that a local user can take privilege of tmux as root user.
Hence type following for enabling SUID:
which tmux
visudo
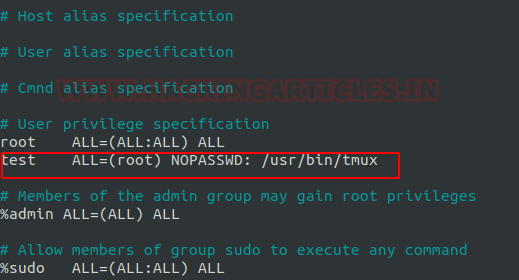
It can be clearly understood by the below image in which I have created a local user (test) who own all sudo rights as root.
To add sudo right open /sudoers file and type following as user Privilege specification.
test All=(root) NOPASSWD: /usr/bin/tmux
Exploiting Sudo rights
Now we will start exploiting tmux service by taking the privilege of sudoer’s permission. For this we need sessions of victim’s machine that will assist us to have local user access of the targeted system through which we can escalate the root user rights.
Very first we will connect to the target machine with ssh, therefore, type following command to get access through local user login.
ssh test@192.168.1.31
Then we will look for sudo right of “test” user (if given) and found that user “test” can execute the tmux command as “root” without a password.
sudo -l
Now after knowing the fact that test user attains sudo rights so, taking this benefit here we can use tmux command to escalate the privileges of test user.
sudo tmux

Conclusion: This will launch new terminal with root privilege shell.
